

In my last article, I demonstrated that it’s rather easy to install and configure KVM and some tools to create and control VMs directly under Linux. This time, I want to talk about some advanced features you can use with KVM for free, that in other hypervisors are only available in costly enterprise editions and how to control KVM on a more “bare metal” installation rather than a graphical system. This article includes a lot of technical descriptions, which are marked as such. If you just want to set things up and get it to work, you can skip these sections.
Recap
Let’s remind ourselves what we learned the last time about KVM, QEMU and libvirt. KVM - The technique we use to virtualize systems directly on the Linux Kernel (similar to VMWare, or Virtualbox). QEMU - used to emulate certain types of hardware in combination with KVM virtualization and allows for advanced features such as snapshots. libvirt - n api that we use to control our VMs and what is happening around them, with virt-manager as a graphical interface.
Second Scenario
In this second scenario, I want to go all out with some of the capabilities which allow you to use KVM in a production environment. We will add a second ODROID-H2 into the setup and experiment with shared storage pools for our images, as well as moving a running system from one ODROID to the other without interruption. I want to look into virsh, the command line client of libvirt that allows us to control VMs from the command line and allows us to do some advanced configuration. And control our VMs from a remote PC and not locally on each host. In the end, you should have a very good Idea how to use KVM even in a production environment at your workplace.
Requirements
- 2x ODROID-H2
- 1x PC/Server for shared storage
- 1x PC for remote control of our setup (I will use my laptop for this)
- Network switches (one is fine, if you have a production environment you should have at least two)
- Internet Connection
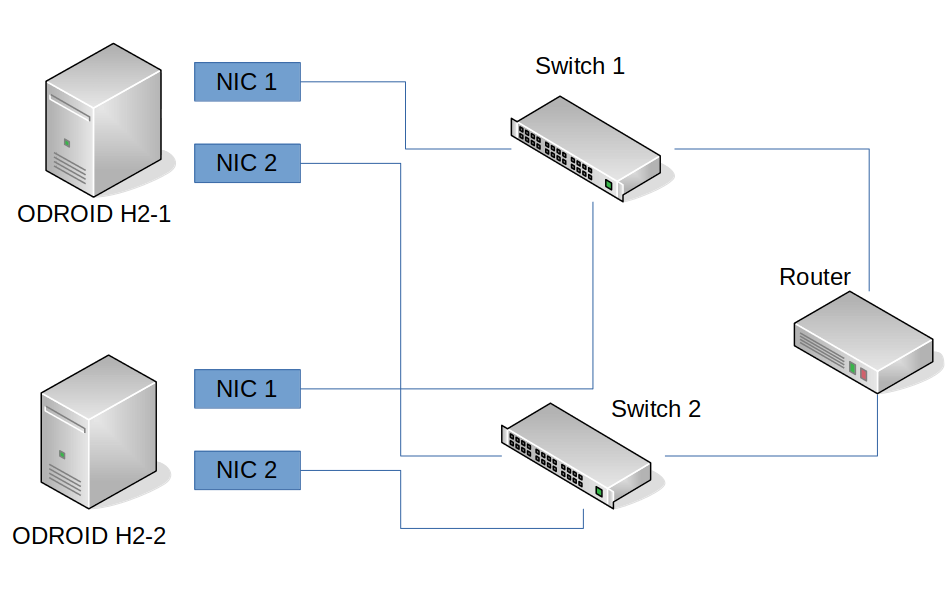
In this second scenario, we will add a second ODROID-H2 into our setup so we have “multiple” nodes on which to run VMs. I also use an ODROID-N1 with an attached SSD as a shared storage pool which we can use to run our VMs. Instead of working directly on the ODROIDs themselves, I will now switch to remote control everything from my Laptop and only use SSH to directly connect to the ODROIDs rather than working directly on the systems. For this I installed Debian Buster on the second ODROID-H2, as well; this time as a headless server installation without an X11 desktop such as MATE (which we had on the first ODROID-H2), and without network manager or the full virt-manager. This means the installation is much smaller, uses a lot less RAM, and has less attack vectors for a possible attack against the system. It is very close to what you have when you install VMWare or other bare metal hypervisors, which also just install a Kernel and basic applications needed to run VMs.
Installation
I will assume again at this point that you already have a running Debian (or Ubuntu) server installation for the following steps. As I said, I used Debian Buster again, this time as a server installation without network manager or X11 desktop environment. I HIGHLY recommend using the same OS for all your nodes and not to mix Ubuntu and Debian or other environments, since the qemu version used will most likely be different and can cause problems with our scenario. I will also run all the commands as “root” on my system so you should know how to login as root or use sudo to become root. Let’s start with installing libvirt and required tools:
$ apt install libvirt-daemon-system
$ reboot
The installation of the libvirt-daemon-system is enough, as it comes with all the tools needed to run VMs and with the tools to control it (like virsh, the command line client).
Advanced Network Configuration
In order to create a more “production” like environment, we want to look into the network configurations of our ODROIDs. The ODROID-H2 has two on-board network adapters (NICs). It would be wasteful not to take advantage of this situation. Therefore we’re going to create something called a “bond” which is the combination of the two (or more, if needed) network adapters into one “virtual” bond (network adapter). This allows for different backup scenarios, in case some part of your infrastructure in the production environment breaks down. We also will setup something called a “bridge” which will act as a virtual switch for our VMs allowing us to place the VMs “logically” in our network, rather than using NAT.
Technical description
If you’re familiar with, for example, VirtualBox or VMWare, you should know that the two most commonly used network settings are either Bridge or NAT. NAT stands for Network Address Translation, and is a technique where the VM (or VMs) will be in their own private network, created by the hypervisor (VirtualBox, VMWare, KVM, etc.) it is not directly connected to your network, but uses the network of the host system to communicate with the outside world. What this means is it shares the Internet connection of your host, and normally has access to the same network and systems that your host system has access to, but on the other hand it can not be accessed from other machines directly, as the IP of the VM is not within your network. In fact, each time the VM accesses something on the network, the network sees it as incoming traffic from your host system not from the VM. That is what NAT is doing for you. Bridged Networks, act like a virtual switch, which is connected to your physical network. This means, when a VM requests an IP, it’s not asking the host anymore, but your network router. It will get an IP and configuration from the same router your host system is getting its IP from. This allows you to control the IP it will get from your router, and also means that other machines in the same network will be able to access the machine as well.
Getting started
In most cases inside a production environment, you want to have a bridged network for your VMs so others can access the services running on your VMs. We will also create a network bridge for KVM so our VMs can connect to either your home network directly or to your company network, depending on where you want to use this. For this, we will need to install some additional packages:
# for creating bonds
$ apt install ifenslave
# for creating bridges
$ apt install bridge-utils
We need to edit /etc/network/interfaces on both ODROIDs to set up our advanced network setup. Please Note that configuring network adapters in /etc/network/interfaces will disable the access of the Network Manager to these devices.
/etc/network/interfaces
# This file describes the network interfaces available on your system
# and how to activate them. For more information, see interfaces(5).
source /etc/network/interfaces.d/*
auto lo
iface lo inet loopback
auto bond0
iface bond0 inet manual
bond-slaves enp2s0 enp3s0
bond-primary enp2s0
bond_mode balance-alb
auto br0
iface br0 inet static
bridge_ports bond0
address 192.168.0.115
netmask 255.255.255.0
gateway 192.168.0.10
Technical Description
The above text is the context of the file /etc/network/interfaces, so let me explain a couple of these lines: bond-slaves enp2s0 enp3s0 – This is a list of NICs that are combined as a bond. The two NICs on my ODROIDs are found under the name enp2s0 and enp3s0, some of you might remember names such as eth0 and eth1 in the past, enp2s0 is basically the new eth0 and so on.
ond_mode balanced-alb – This describes how the network adapter should work together. Under: https://www.kernel.org/doc/Documentation/networking/bonding.txt you find a very detailed description how boding works in the Kernel and what the different modes are.
The most common use is, for example, mode 1 (active-backup) in which one NIC is always ON and sending and receiving data, but if for whatever reason this is not possible, it will switch over to the second NIC. So this is an active standby situation for the network adapters.
There are a couple of interesting modes, for example mode 0 (balance-rr) the round-robin mode has the ability to speed up communication quite a bit. When I connected my two ODROID H2 with balance-rr mode and used iperf3 to test connection speed, I actually got up to 1.9 Gbit connection speed between both ODROIDs. Which means it actually could use the full speed of the two network adapters to communicate with each other, but I could also see that the number of errors while sending went up. A VM running on the system using a bridged network adapter was no longer able to communicate with the router in my network, but using NAT network for the VM worked fine. So, although you might get a huge speed boost between different ODROIDs, the use is limited.
Another interesting bond mode is mode 4 (802.3ad), which is a technique that was renamed to 802.1ax. So if your switch supports the 802.1ax standard that means it’s 802.3ad compatible, which is very confusing. It’s the so-called link aggregation, which allows to use both NICs to communicate, and therefore “technically” double your bandwidth. It doesn’t mean you will have 2 Gbit connection speed between ODROIDs, but it means you can have two (or more depending on the number of NICs) connections with 1 Gbit at the same time. So instead of one machine that can connect to an ODROID that has two NICs with 1 Gbit, you can have TWO devices connected at the same time BOTH with 1 Gbit. However, it requires network switches that support this setup and some preparations.
bridge_ports bond0 – This is the network adapter for your virtual switch (the bridge adapter). This could also be directly enp2s0 or enp3s0 but by using a bond here instead, we make sure that even if one adapter has no connection the other adapter can still keep our network running.
I used a static IP configuration for my bridge, since I always want to have the same IP here. Instead, I could have also chosen to use iface br0 inet dhcp for automatic configuration. The bond is set to iface bond0 inet manual as it doesn’t need an IP. The bridge adapter will hold the IP for the bond so to say.
Ideally, you would connect your ODROIDs to two different network switches which are connected to your router. That way if one of the switches dies the ODROIDs would still work over the other switch. Which is the main reason for bonding and modes like active-backup. It also allows for firmware update of the switches and reboots without losing connectivity to the VMs running on your KVM hosts.
The entire setup will work with one switch as well. You don’t need two switches, and you don’t even need to connect both LAN adapters of the ODROID-H2.
Remote Access
As I said before, I now have a more machines in the setup and it would be rather inconvenient to connect each system on a TV or monitor with their own mouse and keyboard to control and configure them. Therefore, I want to be able to connect to each device remotely from my Laptop which is running Ubuntu 18.04. Using SSH allows me to connect to my ODROIDs remotely to configure them over the network. I created an SSH key on my laptop (if you don’t have done this yet, you can use the following command to generate a new ssh-key:
$ ssh-keygenThis key is distributed with the following command to the two ODROID-H2 devices:
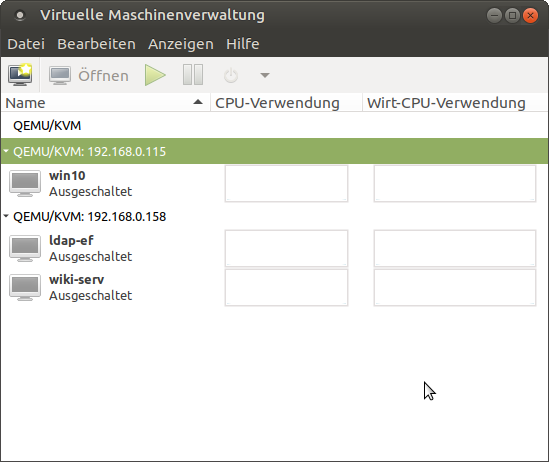
$ ssh-copy-id -i ~/.ssh/id_rsa.pub root@< server-ip >This allows me to login as root via SSH using my SSH key instead of a password. It’s generally a more secure way than using a password. In fact, I did this before I started setting up network and installing applications on the ODROIDs. What this allows me is to use the virtual machine manager remotely as well. Once we installed the packages required for KVM and libvirt, setting up the network as described above, we can now use virt-manager to control our hosts. For this, simply start the virt-manager on the system you want to use to control your ODROIDs from (in my case it’s my Laptop). Click on File on the Menu and select add connection. Check the box that you want to connect to a remote host, user should be root, then simply enter the IP of your ODROID H2 in our setup. Repeat the same for the other ODROID-H2 and with that we now have the ODROIDs listed in our virtual machine manager. You can check the box that it should connect automatically, or just double click the ODROIDs on the list to connect to the ODROIDs. It should look exactly the same as it was when you used virt-manager locally in our first scenario, just that you now have two ODROIDs to work on and create VMs with.
As you can see, it’s rather easy to connect to multiple hosts, and with that control and create a multitude of VMs in your network. That alone already allows you to save time, money and resources to use virtual machines in your home or company network. Considering that you can run this on a bare server image, without having to install graphical tools to configure your VMs on the host itself, it comes very close to the way VMware, Xen, and other hypervisors run on “bare metal” solutions.
Setting up a shared storage
Although we can already do lots of things with our current scenario, there is much more we can achieve by using KVM and libvirt. However, for this I want to use a shared storage for the different virtualization hosts we’re using. This makes it possible to have one centralized storage for all our hosts on which we run our VMs, and would allow us to run the same VM on different hosts, just by pointing the host to the correct harddrive image for a VM. It also allows us to use faster and more secure network solutions, such as SANs, NAS, or storage clusters. This in itself has many benefits over running VMs off of local storage directly on the hosts. It also reduces overall costs, as you don’t need large and fast storage for each host, and a bare minimum system is more than enough. You could run the entire system off of an 8GB eMMC (even smaller would be fine) and let the VMs run of a network storage, with RAID, backups, etc.. This reduces the cost and maintenance for both the storage solution as well as the virtualization hosts (i.e. ODROIDs). In my setup, I use an ODROID-N1 with an SSD attached to it. I created a partition on the SSD for that purpose and mounted this partition to /srv/nfs. As you may have guessed by the name, I will set up an NFS share for the shared storage.
Installation and configuration
The installation is very simple as well as the configuration. As I said before, I use the partition mounted in /srv/nfs for my purposes, so if you have a different location, you need to adjust the paths accordingly:
$ apt install nfs-kernel-server
$ mkdir /srv/nfs
$ chown nobody:nogroup /srv/nfs
$ chmod 777 /srv/nfs
$ echo "/srv/nfs 192.168.0.0/24(rw,sync,no_root_squash,no_subtree_check)" >> /etc/exports
$ exportfs -a
$ systemctl restart nfs-kernel-server
Please note that I decided to allow connections only from the subnet 192.168.0.0/24. If your network is different, you need to adjust this as well, or you can replace the subnet entirely by simply using an asterisk (*) instead /srv/nfs:
*(rw,sync,no_root_squash,no_subtree_check)Now that the server is prepared and running, we need to prepare the two ODROIDs as a client. For this, we need to install the package nfs-common on both clients and configure libvirt to mount the NFS mount. For this, I will use virsh, the command line tool of libvirt. Similar to the virtual machine manager, this tool allows us to manipulate everything around our VMs. In fact, it’s much more powerful than the virtual machine manager itself.
$ apt install nfs-common
$ mkdir -p /var/lib/libvirt/shared-pool
$ echo "< pool type='netfs'>
  < name>shared-pool</ name>
  < source>
      < host name='< server-ip >' />
      < dir path='/srv/nfs' />
     < format type='nfs' />
  < /source>
 < target>
       < path>/var/lib/libvirt/shared-pool</ path>
       < permissions>
              < mode>0755</ mode>
              < owner>-1</ owner>
             < group>-1</ group>
       </ permissions>
    </ target>
</ pool>" > shared-pool.xml
$ virsh pool-define shared-pool.xml
$ virsh pool-autostart shared-pool
Obviously you need to replace with the IP of your server where the NFS is running, same as /srv/nfs in case your path to the NFS share is differently. What we are doing here is creating an .xml file called shared-pool.xml, which give our connection parameters and the path where we want to mount it. With virsh pool-define we can tell libvirt to create a new storage pool.
Hints
Similar things can be done with a VM. You can, for example, dump an xml configuration of a VM and import it on another machine:
# dump a VM configuration and redirect into a file:

$ virsh dumpxml --domain win10 > win10.xml
# import a VM configuration as a new machine:
$ virsh define win10.xml
That way you can make easily copies of the same configuration of a machine without having to the same configuration via the virtual machine manager over and over again. Just dump a VM configuration, edit the file with your favorite text editor, for example adapt the MAC address of the NIC and the harddrive image file, and you have created a new VM based on the configuration of an already existing VM. Naturally, there’s also an option to clone a VM as well, but it would also allow you to start the SAME VM on a different host, as long as the configuration exists on both system and they have access to the harddrive file (hence the shared storage pool we’re working on).
Virtual machine manager
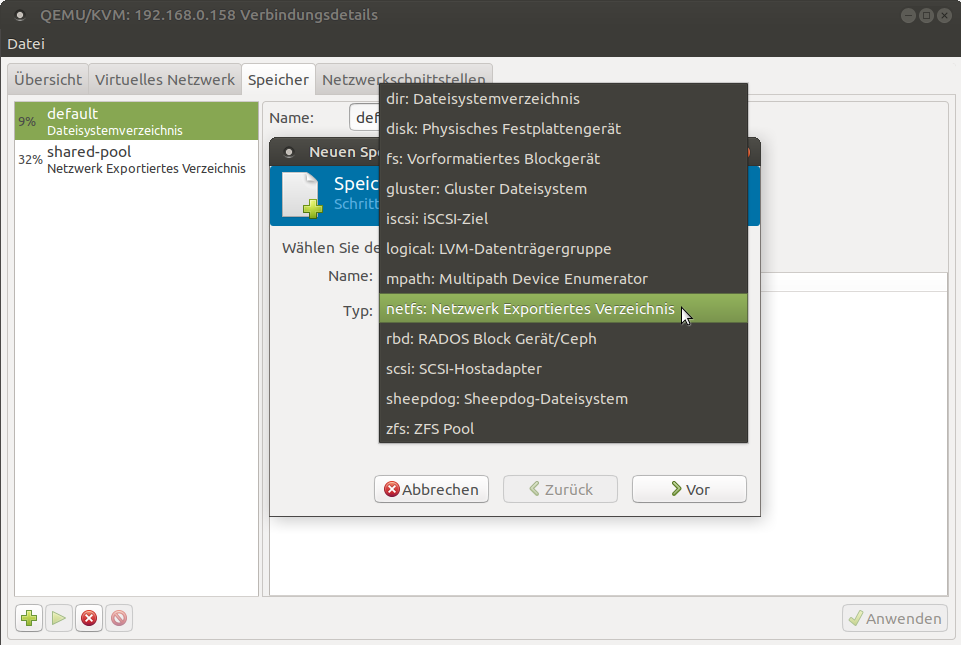
You can do the same via the virtual machine manager as well. As you can see in Figure 3, there are a multitude of supported storage formats and solutions for libvirt which allows you to configure the storage solution you prefer for your setup. NFS is just one of many options you have. As a side note, at work we use a Ceph Cluster as the storage pool for our KVM servers.
The speed of your VMs of cause are only as good as your storage solution, and if you need the best speed possible, then, of course, running a local storage off of an NVMe could be a lot better than running your VMs off of a network shared storage, but it also limits your options for what you can do with it, and depending on your storage solution, the speed is really not that bad.
Using the shared storage pool should be obvious. Instead of creating new images in the default location you create them in the shared-pool storage and it’s available throughout all ODROIDs accessing the storage.
Live migration
For those who wonder what live migration is, it’s a technique that allows to move a VM from one host to another host while the host is still running. This allows to update or even restart the host without interrupting the services (VMs) you’re running. For example, if you run a VM hosting wordpress, but you need to update the host where the VMs are running on, or you want to distribute the load on another ODROID you can move the VM (while running) on another host, and during the entire time the system is still accessible. People looking at the wordpress server would ideally not even notice that the machine is moved.
Technical description
This scenario requires the shared storage pool, as this means all hosts (ODROIDs) have access to the harddrive image. But what data is in the RAM and processed by the CPU is unique and that’s the part where libvirt is working with. It will copy the machine configuration (the xml file) from one machine to the other and starts a process of copying the content of the RAM of the VM that is currently running from one host to another host (one ODROID to the other). As it doesn’t need to copy the OS itself (the harddrive image is shared) you could even move a VM that has hundreds of GB or even TB of data from one host to another, as only the content of the RAM needs to be copied. Libvirt will create an identical copy of the VM configuration of the VM from one host to another. This means it also will create the same extra hardware, as for example the network card, sound card, graphics card etc., for this the other hosts must have the capability to run the same virtual hardware. For this libvirt will start a sync process between the two hosts and will continue doing this until all the RAM is synced between the two hosts. As the machine itself is still running and doing tasks, the content of the RAM might change during the sync process and you will see that the process bar near the end might “jump back” and will continue doing so until it could complete its task. This depends on how fast your network between the hosts are and how often the RAM changes and how much RAM a VM has. A VM that is mostly idle and runs on 500MB RAM will be very quick to sync and only takes a few seconds. If you ran a DB, file server, or machine with running compiler instead which constantly loads new data into the RAM and has 64GB of RAM, this process will take much much longer and can take several minutes to complete. In the end, both machines will be set to “pause” for a split second to make the switch from one machine to the other and then turned back on, as I said in best case no one will notice anything at all. This feature is available on hypervisor for VMWare as well, but not without investing a serious amount of money; whereas on KVM this is a free feature.
How to use live migration
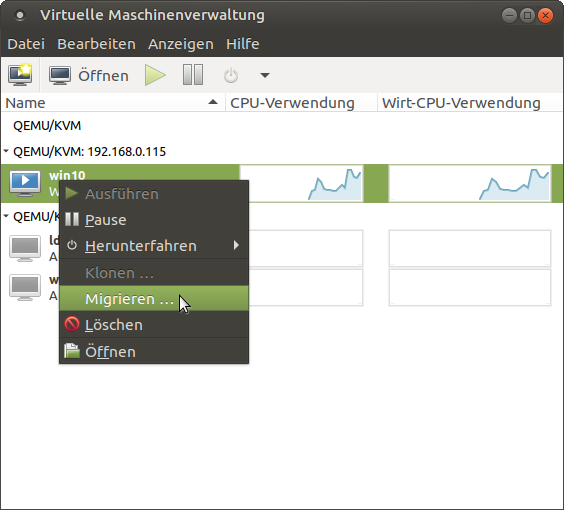
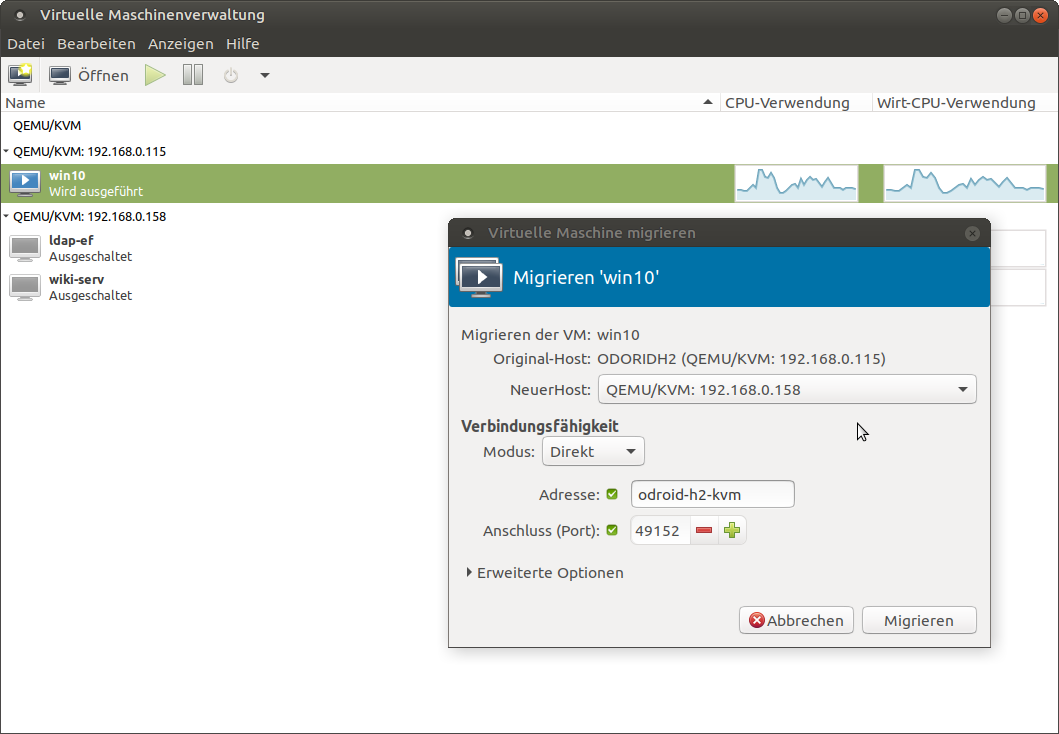
In order to use live migration there isn’t much you need to do. It is best to have the disk cache mode for VMs set to “none” for migration, as other caching methods may cause a problem in case of a failure. For example when you migrate a machine from one host to another and the host dies, it could be that the data that was still cached is lost, and not written to the disk. That is generally an issue with caching methods, therefore this warning might be ignored and you can still force a migration between machines. You can migrate machines via graphical interface from the virtual machine manager. For this you need to be connected to both hosts, right click the VM you want to migrate from one host to the other and select migrate. Then select the host you want to migrate to from the drop down list and click at start. Under advanced options you can activate that you want to migrate even if you’re using an “unsafe” disk caching algorithm. Another way is to use our command line tool virsh to migrate a machine. For this, login via ssh into the host where the VM is running on and use the following command:
# Syntax
$ virsh migrate --verbose < VM> qemu+ssh:// /system
# example:
$ virsh migrate --verbose win10 qemu+ssh://192.168.0.115/system
You can add the switch --unsafe to allow migrating with unsafe disk caching methods.
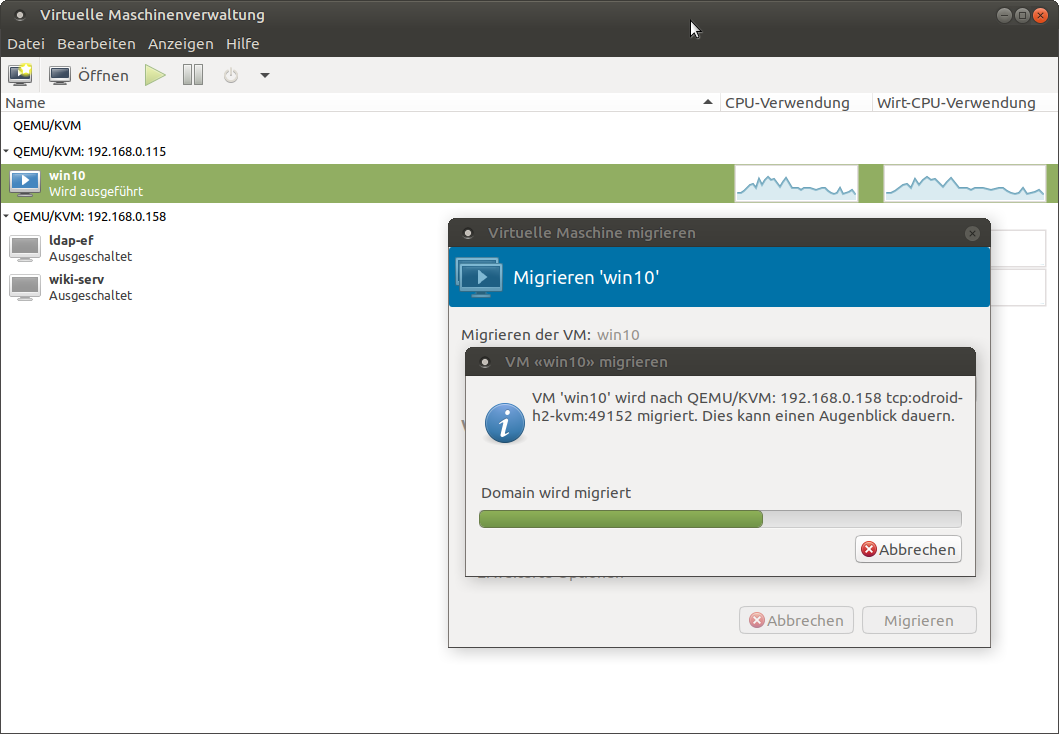
As you can see, the process is rather simple and straightforward. There is not much to look out for. Once you setup the shared-pool and both KVM hosts are in the same network and can move data between each other there is nothing that will stop you from moving a machine from one host to another host while it’s still running.
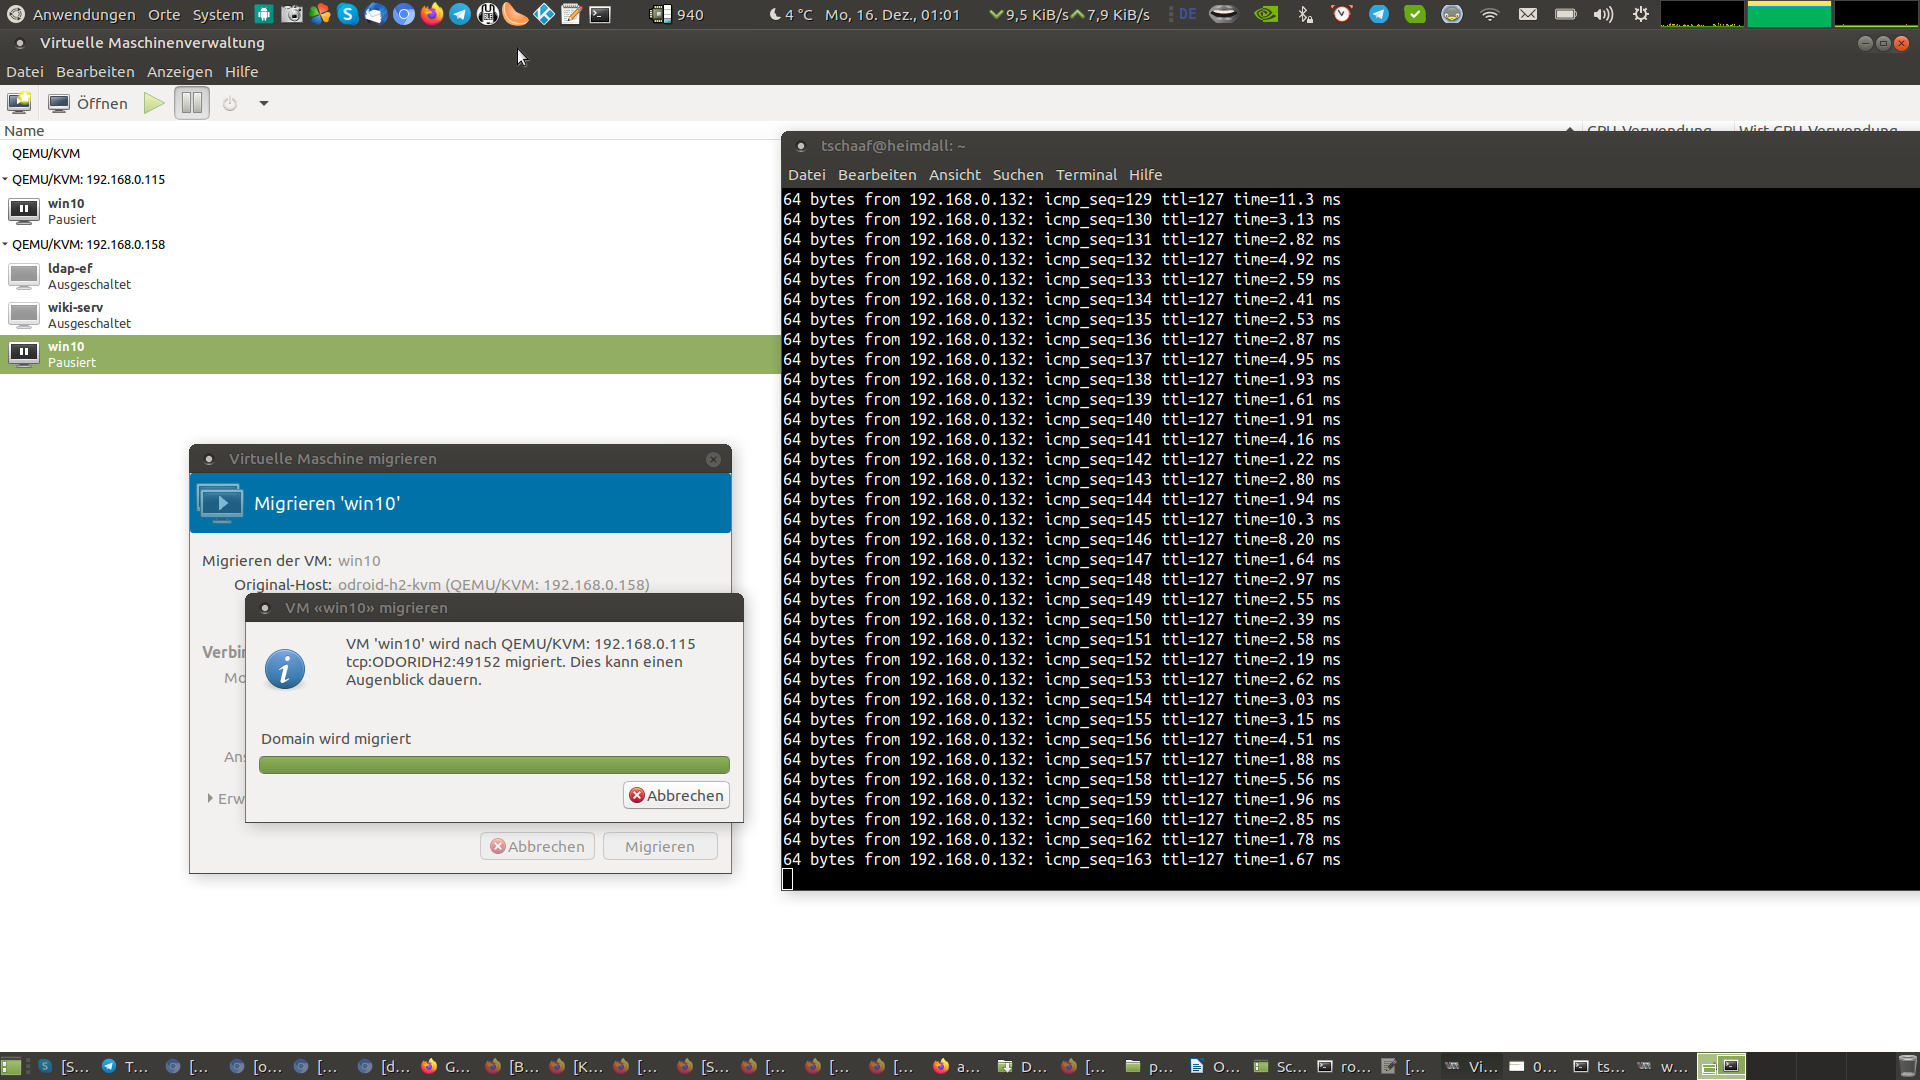
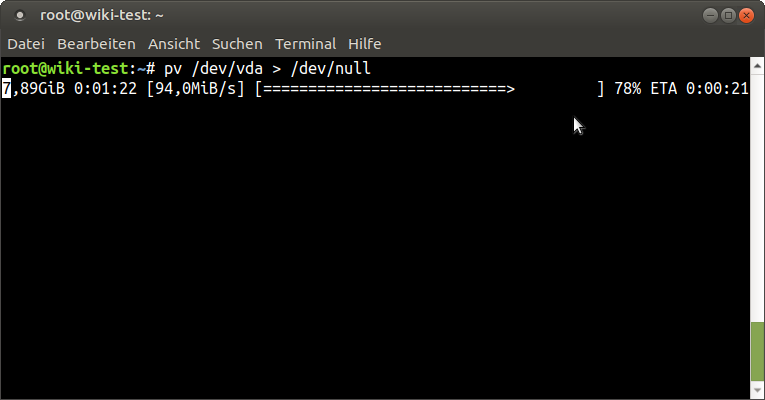
The screenshot in Figure 10 was taken at the moment when the migration process finished, and the VM was switched over. Only a single ping did not go through. Imagine someone accessing a wordpress server that was being migrated. This delay of one ping would not even be noticed in a normal workload and your user would never know you just moved the entire system they are running from one host to another. In fact using a fiber-channel connection you could even migrate VMs easily between different locations or data-centers.
Conclusion
With this we have learned how to setup a production environment for our VMs. You should now be able to share VMs on your network to provide services for all your clients, or use this to host a wide spectrum of online services using bridged networks. You should also know how to configure shared storage pools to take advantage of network storage such as a SAN or NAS or a simple NFS share. You should have additionally learned how to migrate VMs between different hosts allowing you to do maintenance or distribute load of VMs between different hosts. All of this can be achieved on your ODROID-H2 or other PCs/Servers with the help of KVM as a virtualization engine (hypervisor). There’s tons of literature to this topic and I highly suggest to read further into it if this guide made you hungry for more.
Optimization
There’s a lot of things you can change on libvirt to increase performance in different scenarios. The caching algorithm for the virtual disk, for example. I want to talk a little bit about CPU optimization and about CPU “emulation” on KVM, or, better yet, QEMU. I mentioned before that QEMU is used to “emulate” hardware, but KVM is used for the virtualization part. Here’s also something unique about the KVM solution. Rather than passing through the EXACT CPU your host has to offer, as it’s often done with VirtualBox and other hypervisor solution, QEMU “emulates” a CPU but passes through the CPU features that it supports. Why emulating and not passing through? The answer is simple. Portability! Imagine the following scenario: You have a very recent small budget server for testing purposes, let’s say, for example, with an Intel® Xeon® E-2226G processor from 2019 with 64GB RAM which you use for testing setup of a new systems, e.g. a new Windows MSSQL Database Server, and after testing you want to move the VM to an older but more powerful server running of a dual processor system powered by two Intel® Xeon® Processor E5-2697A v4 processors from 2016 with 1TB of RAM as a production environment. In many scenarios you would have to setup the VM again on the older Server, as the newer Coffee Lake-based E-2226G has some CPU features that are not available on the older Broadwell-based E5-2697A. Not only would Windows require a re-activation due to the changed CPU, in a worst case, the system behaves very different from the tested scenario, also you probably won’t be able to move the VM while still running from one server to the other, as the systems are so different that the transfer would fail. This is where QEMU and KVM work differently. If you check the CPU list in the options of the virtual machine manager you see there’s a quite extensive list of CPUs that are listed here, as shown in Figure 11.
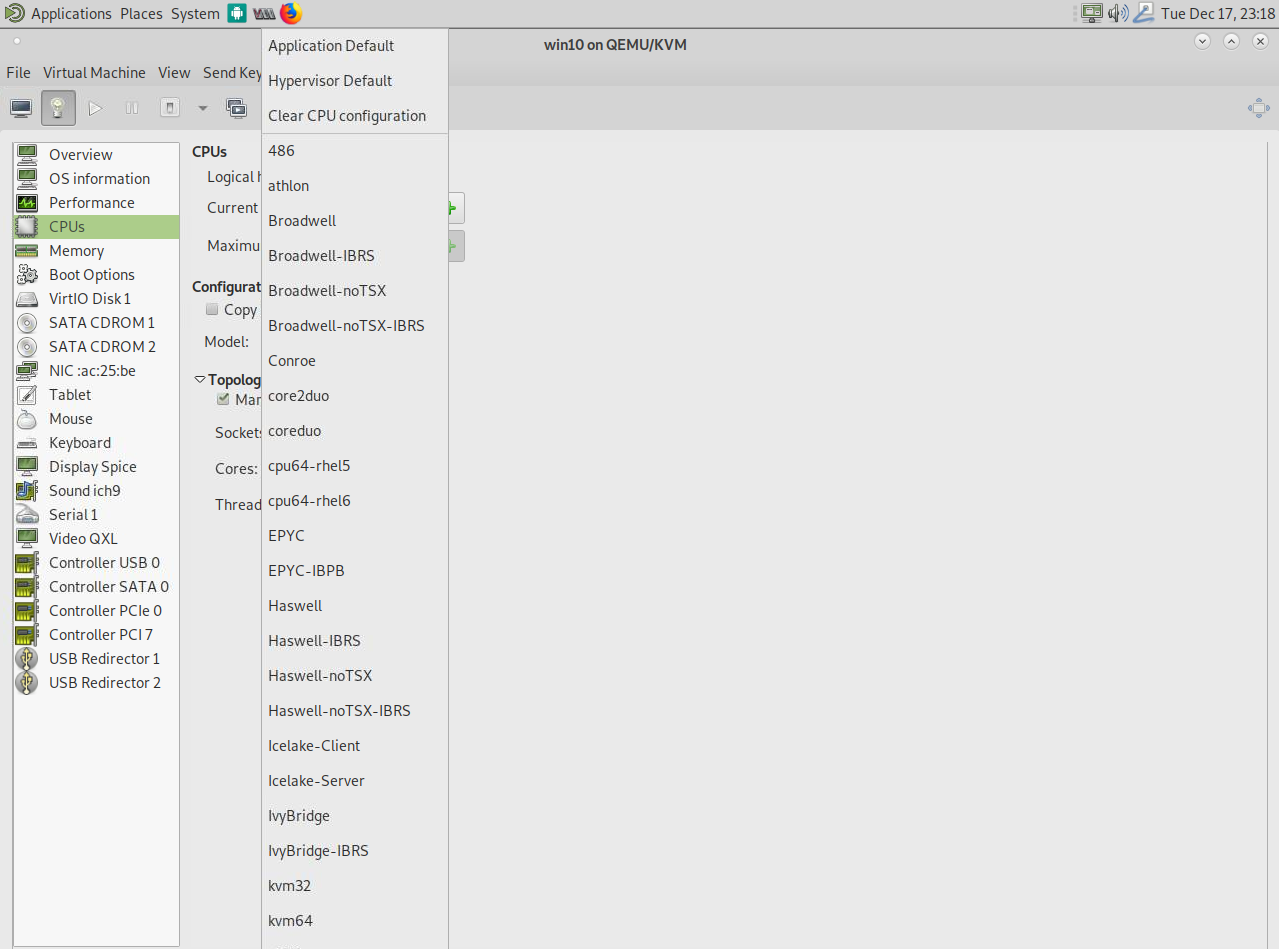
What that means is that you can create a VM with an emulated CPU that is supported on both servers (e.g. Broadwell-IBRS). This dual support allows test setups that are equal on both systems and allows live migration of the VM from one host to another without interrupting the service (as explained above) even if the servers run on completely different CPU architectures. As long as you find a smallest common denominator in the CPU architecture you can set a VM up with that and migrate machines between these servers anyway. How does it work? If you check the output of the following command, you probably noticed this line “flags” which can be found for each CPU:
$ cat /proc/cpuinfoThese are the features your CPU supports. Even ARM boards have this line, and it shows what techniques the CPU understands and supports.
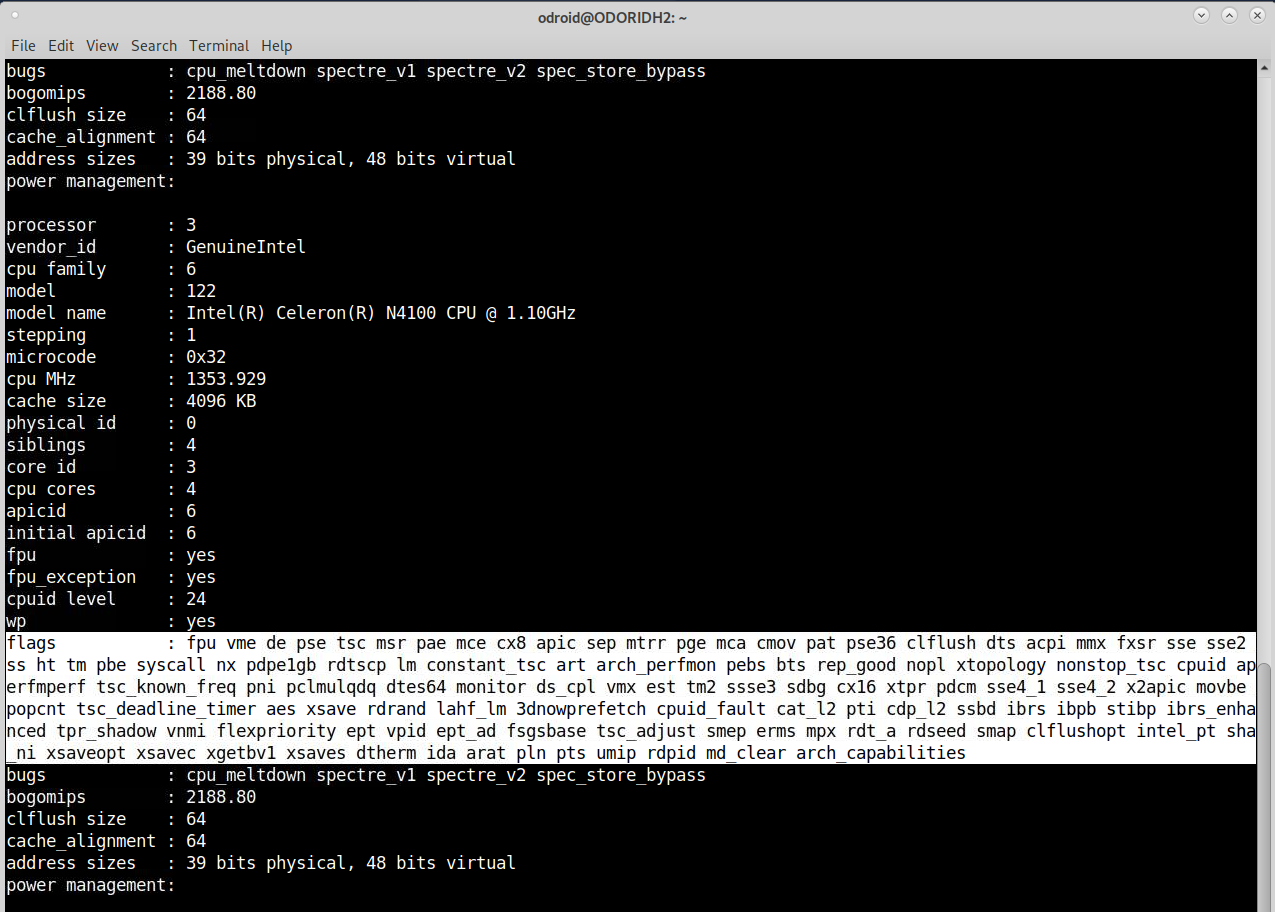
Certain CPU Architectures feature different types of CPU flags here. Broadwell has fewer features as, for example, Skylake, but still more features than a SandyBridge CPU, and this is what QEMU and KVM rely on. Depending on the CPU architecture you select, the “well known” flags will be forwarded as CPU features into the VM. So forwarding the rdseed capabilities of your CPU to the VM can increase encryption performance as you add an additional random number generator to your system for more entropy. A feature that was not present in an older SandyBridge CPU, for example. How to use it on the ODROID H2? The problem with the ODROID H2 is, that it’s not a real server board, it’s in some cases not even a real Desktop processor, so it misses quite some CPU features that you would expect on these devices. The virtualization is optimized for server environment and boards like the ODROID H2 does not match this description that’s why we have to fix some things to make it work correctly. By default, the CPU should be shown as Westmere or IvyBridge-IBRS, since these are the CPUs that KVM will find as compatible by default, but that is only because these are the ones where it finds ALL of the CPU features that it expects. But even if it doesn’t find some features, that doesn’t mean it wouldn’t be beneficial to use a higher CPU architecture.
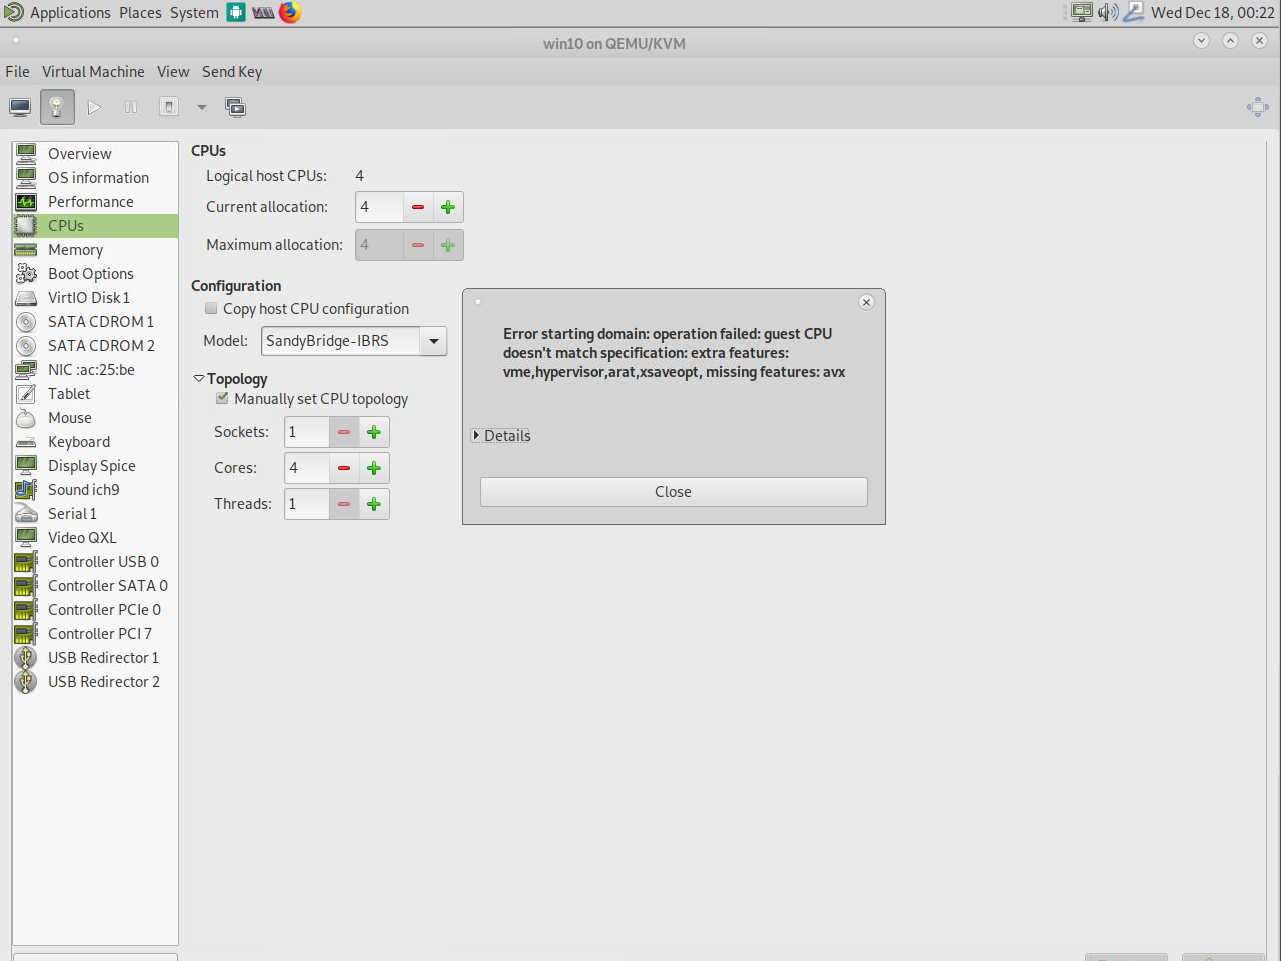
Here we can use virsh again to configure specific options as a workaround. As I explained before, the different CPU types are a combination of different CPU flags. This tells us that we’re missing the avx feature which if we compare with the flags of the ODROID-H2 it’s true that this feature is missing. We can add this to machine configuration. There’s also a list of extra features that I used, but are not part of the SandyBridge configuration and therefore have to be added manually. Using the following command, we can edit the configuration of the VM directly:
$ virsh edit --domain win10
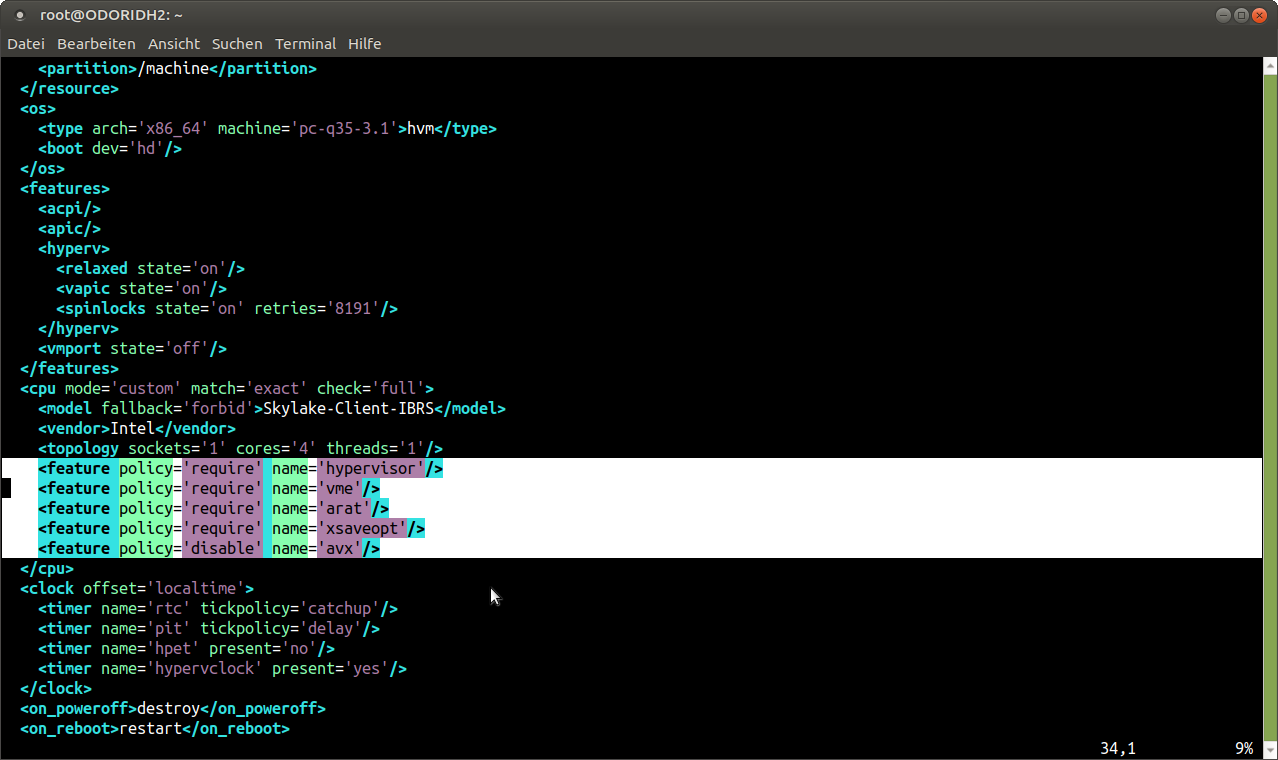
Between the flag < cpu >and , we can add definitions regarding our CPU. As you can see in Figure 14, we have two options: either require or disable. Require will forward a CPU feature from the host CPU to the VM, and Disable will remove a CPU feature from the list of features forwarded to a VM. Since SandyBridge, for example, fails due to missing CPU feature avx, we can use the following option:
< feature policy='disable' name='avx' />With that tweak, we can use a SandyBridge CPU in our VM even if not all features are supported. In fact, I was able to run Skylake-Client-IBRS by disabling the following features:
< feature policy='disable' name='avx' />
< feature policy='disable' name='avx2' />
< feature policy='disable' name='fma' />
< feature policy='disable' name='pcid' />
< feature policy='disable' name='bmi1' />
< feature policy='disable' name='bmi2' />
< feature policy='disable' name='invpcid' />
< feature policy='disable' name='f16c' />
< feature policy='disable' name='hle' />
< feature policy='disable' name='rtm' />
< feature policy='disable' name='adx' />
< feature policy='disable' name='abm' />
I suggest adding the feature “hypervisor”, as this is generally supported to advertise that the machine is a VM. General information You can get an idea of what is possible and what is the most recent supported CPUs by checking this link: https://www.berrange.com/posts/2018/06/29/cpu-model-configuration-for-qemu-kvm-on-x86-hosts/. It is important to enable some features that can tell a Guest that he does not need to fix some of the recent Intel bugs such as Spectre. There’s microcode working around this bug available on the OS. This microcode normally reduces CPU performance to a certain degree. If you run a VM, the VM is not aware of the fact that this “bug” is not present on the CPU (fixed by the microcode on the host) and would try to fix it with it’s own microcode as well. For this, you will find some CPU flags on the site above that tell the VM that this bug is already fixed, which you can add with the “require” flag. You will also find options for AMD processors on the site above. Once again this is a feature you should read into if you want to know more about it.
Conclusion
Diving into KVM and libvirt was a very interesting experience. The ability to migrate VMs on the fly without interrupting the service is a very cool feature and very helpful in a production environment. At work, we’ve been using this for years already. In combination with Ceph or other low cost storage solutions, it’s a good and cheap alternative to VMware for example, with a lot of enterprise grade features.Since it’s running directly on Linux, a standard Debian or Ubuntu server with next to nothing installed is already enough to run and provides a good basis for managing your hosts and VMs. You get current drivers and kernels with security patches, and are not locked into solutions like VMWare where you have to wait for them to provide hardware support and kernel patches for their software.
Be the first to comment