

The original H2 and H2 REV.B carried two 1GbE NIC whose driver is included in both Windows 10 and recent Linux distributions. On the other hand the ODROID H2+ is equipped with two 2.5GbE NIC based on the Realtek 8125B chipset. This chipset is rather recent and its support in Windows 10, while present, is lackluster and even non-existing on many recent Linux distributions.
For Linux, see the discussion here: https://www.spinics.net/lists/netdev/msg658594.html
So as of this writing (June 2020) and in both cases, Windows 10 and Linux, you have to manually install the Realtek 8125B driver after you have installed the operating system. There is no doubt that the driver will end up in the upstream OSes at some point, but for now you have to install the driver yourself. It’s a rather simple affair anyway.
Requisites
- This page assumes that you have an Internet connection via wireless or cellphone hotspot. In both cases, temporarily plugging in a USB wifi adapter, such as the ODROID 300Mbps.
- If you do not have a wireless network or wifi adapter available, you can still reach the Internet via phone USB tethering. If you are going to use phone USB tethering, follow the instructions at the bottom of this page and then come back here.
For Linux it is a good idea to plug in the wireless thumb at OS install time so that you can connect to the wireless network while installing and then update the installation before installing the driver.
If you have a phone hotspot or phone USB tethering, check the section Connecting to Internet if you are not sure about how to connect with your phone.
If you cannot connect your ODRIOD-H2+ to the Internet via wireless, hotspot or tethering, you can download the necessary files on another PC, copy them to a USB drive and then plug that USB key into the H2+. See section Installing without Internet at the bottom of this page (Linux). For Windows, just copy the installer and run it as described below.
Windows 10
Once you have installed Windows 10 as well as updated it with all the current patches, go to the Realtek driver download page at: https://www.realtek.com/en/component/zoo/category/network-interface-controllers-10-100-1000m-gigabit-ethernet-pci-express-software
Download Win10 Auto Installation Program (Sid:1152921505689747939):
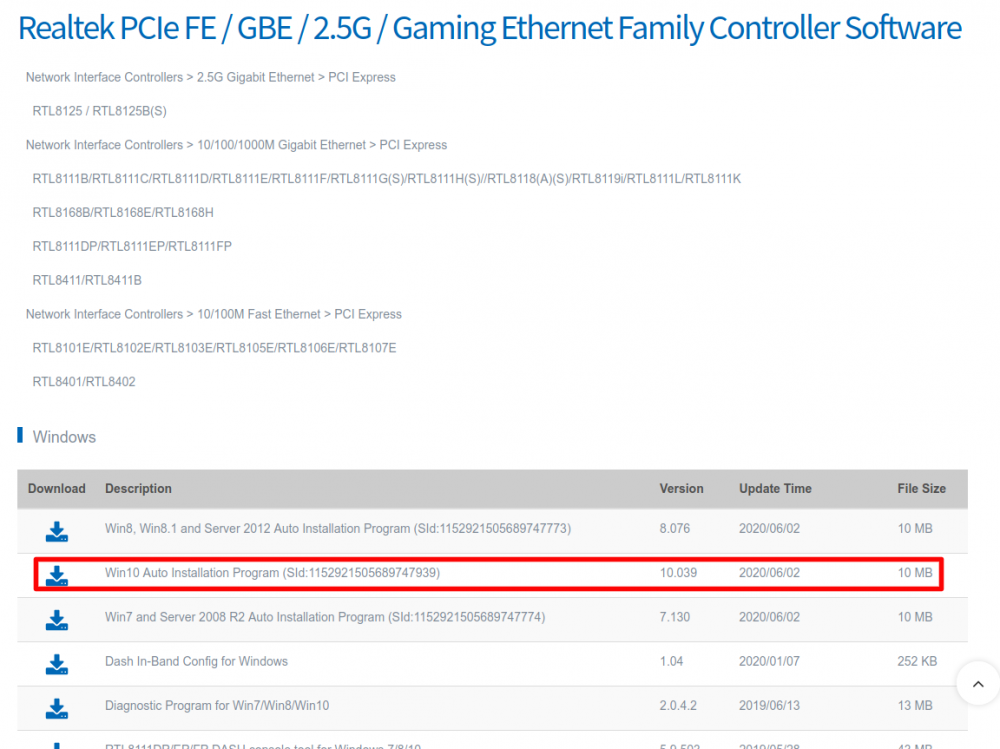
Unzip the archive, run the installer following the instructions. Once the installation is completed, you can check for the presence of the two NICs in Settings looking for View Network Connections. If they do not appear, reboot and go back to Settings afterwards. If you want to let the connection(s) use DHCP, you have nothing more to do. You’re done.
Linux
There are at least two ways you can install the Realtek 8125B driver:
- Download the .deb package Hardkernel prepared and install it. This is GUI-based and perfect for users not confident enough with the console. This method only works for Debian-based Linux distributions, such as Ubuntu and many others. If you are not using a Debian-based Linux distribution, you have to manually install the driver. We are not as of this writing providing the package in other formats, i.e. RPM file.
- Download the driver source code, build it and install it. For users used to do such manual builds, it is quite easy
Installing the .deb
Download the package file from there: https://github.com/awesometic/realtek-r8125-dkms/releases/download/9.003.05-1/realtek-r8125-dkms_9.003.05-1_amd64.deb Wait for the download to complete and then go to your Downloads folder. If you are using a Debian-based distribution that includes the GUI for installing packages, like Ubuntu 20.04 for instance, double-click on the downloaded package and click Install Package in the package window that just opened, and install. Using the GUI-based connection settings window, click Add Connection (or equivalent) and configure the NIC(s) at your convenience. If Add connection does not show any Wired Connections, reboot and try again. If the connections still do not show up go to the Troubleshooting section.
Manual Installation
In a terminal console type the following commands:
$ cd ~/Downloads
$ wget https://github.com/awesometic/realtek-r8125-dkms/archive/master.zip -O realtek-8125-dkms.zip
$ unzip realtek-r8125-dkms-master.zip
$ cd realtek-r8125-dkms-master/
$ sudo ./autorun.sh
If you do not want to use wget use whatever command you prefer (i.e git clone). After executing these commands, you should have the NIC available for configuration using the Network Manager or equivalent. If you want to know what the autorun.sh does before executing it, just open it in your favorite text editor (vim, pluma, nano, etc.) You can also find the REALTEK_README.txt into the folder providing additional information. Troubleshooting This section provides tips and tricks to troubleshoot your Linux configuration.
Are you actually using an ODROID-H2+?
This one is for users owning both H2 and H2+ and installing in the middle night without food or coffee The two models have essentially the same looking board. A good trick is to put a sticker somewhere, i.e. on the top of a RJ45 plug to distinguish them. Other a quick way when running it is to use lspci to make the distinction: On H2+:
$ lspci | grep -i realtek
02:00.0 Ethernet controller: Realtek Semiconductor Co., Ltd. RTL8125 2.5GbE Controller (rev 04)
03:00.0 Ethernet controller: Realtek Semiconductor Co., Ltd. RTL8125 2.5GbE Controller (rev 04)
On H2:
$ lspci | grep -i realtek
02:00.0 Ethernet controller: Realtek Semiconductor Co., Ltd. RTL8111/8168/8411 PCI Express Gigabit Ethernet Controller (rev 0c)
03:00.0 Ethernet controller: Realtek Semiconductor Co., Ltd. RTL8111/8168/8411 PCI Express Gigabit Ethernet Controller (rev 0c)
How to check that the two NIC are “known” to the Network Manager?
You can use ip a:
$ ip a
1: lo: <LOOPBACK,UP,LOWER_UP> mtu 65536 qdisc noqueue state UNKNOWN group default qlen 1000
  link/loopback 00:00:00:00:00:00 brd 00:00:00:00:00:00
  inet 127.0.0.1/8 scope host lo
     valid_lft forever preferred_lft forever
  inet6 ::1/128 scope host
     valid_lft forever preferred_lft forever
2: enp2s0: <NO-CARRIER,BROADCAST,MULTICAST,UP> mtu 1500 qdisc fq_codel state DOWN group default qlen 1000
  link/ether 00:e0:4c:68:00:09 brd ff:ff:ff:ff:ff:ff
  inet 192.168.1.161/24 brd 192.168.1.255 scope global dynamic noprefixroute enp2s0
     valid_lft 86370sec preferred_lft 86370sec
  inet6 fe80::39fe:8b36:f3ec:fe24/64 scope link noprefixroute
     valid_lft forever preferred_lft forever
3: enp3s0: <NO-CARRIER,BROADCAST,MULTICAST,UP> mtu 1500 qdisc fq_codel state DOWN group default qlen 1000
  link/ether 00:e0:4c:68:00:0a brd ff:ff:ff:ff:ff:ff
In the listing above, the first NIC appears as enp2s0, its links are up and it is configured with a static IP. The second NIC is not currently connected.
What do I do if the NIC does not show up after installing the driver?
Check whether or not the r8125 module is loaded using lsmod:
$ lsmod | grep r8
r8125               147456  0
r8169                90112  0
If the line r8125 does not show up, try to load it with modprobe:
$ modprobe r8125If no error is reported, the module should be loaded, call lsmod | grep r8 again to double check. In theory, you only have to do so once.
If errors are reported then it all depends on the nature of error and if you are stuck, your best bet is Google or Bing, and then if still stuck your next step is the ODROID forums or any good Linux forums.
How do I configure the two NIC?
You can use the Settings / Network or Connections GUI window. You can also use the console ncurses-based nmtui (google or binge for “nmtui howto”). How do I check that a H2+ NIC is configured to 2.5 GbE?
One way it to use ethtool:
$ sudo apt install ethtool

.../...

$ ethtool enp2s0
Settings for enp2s0:
    Supported ports: [ TP ]
    Supported link modes:   10baseT/Half 10baseT/Full
                          100baseT/Half 100baseT/Full
                          1000baseT/Full
                          2500baseX/Full
    Supported pause frame use: Symmetric Receive-only
    Supports auto-negotiation: Yes
    Supported FEC modes: Not reported
    Advertised link modes:  10baseT/Half 10baseT/Full
                          100baseT/Half 100baseT/Full
                          1000baseT/Full
                          2500baseX/Full
    Advertised pause frame use: Symmetric Receive-only
    Advertised auto-negotiation: Yes
    Advertised FEC modes: Not reported
    Speed: 2500Mb/s
    Duplex: Full
    Port: Twisted Pair
    PHYAD: 0
    Transceiver: internal
    Auto-negotiation: on
    MDI-X: Unknown
Cannot get wake-on-lan settings: Operation not permitted
    Current message level: 0x00000033 (51)
             drv probe ifdown ifup
    Link detected: yes
Installing without Internet
You can manually install the realtek-r8125 DKMS without an Internet connection at the time of installation. Follow these steps right after the OS has been installed. Using the USB installation media as a apt repository
Since there's no Internet after installing the OS, you can't fetch the remote repositories. But you can use the contents of the installation media as a package repository so that you can install the necessary packages. Once you insert again the USB installation media, it will mount that under /media/user-name directory. You need to unmount that and mount again to the /media/cdrom directory.
$ umount /media/user-name/Ubuntu*
$ sudo mkdir /media/cdrom
The installation media is not recognized by the specific device node every time. So to mount the proper block device where your installation media, enter the following command.
$ sudo mount $(sudo fdisk -l | grep "0 Empty" | awk '{ print $1 }') /media/cdrom
Check if the correct partition is mounted.
$ df -Th | grep cdrom
/dev/sdd1    iso9660   2.6G  2.6G   0 100% /media/cdrom
Check that iso9660 string exists.
Then set the mounted partition as an apt repository.
$ sudo apt-cdrom add -d /media/cdrom -m

Using CD-ROM mount point /media/cdrom/
Identifying... [262d29a6a66e8f1bebc790a773ce80ec-2]
Scanning disc for index files...
Found 4 package indexes, 0 source indexes, 0 translation indexes and 1 signatures
This disc is called:
'Ubuntu 20.04 LTS _Focal Fossa_ - Release amd64 (20200423)'
Copying package lists...gpgv: Signature made ---- -- -- (-)
gpgv:              using RSA key D94AA3F0EFE21092
gpgv: Good signature from "Ubuntu CD Image Automatic Signing Key (2012) <cdimage@ubuntu.com>"
Reading Package Indexes... Done
Writing new source list
Source list entries for this disc are:
deb cdrom:[Ubuntu 20.04 LTS _Focal Fossa_ - Release amd64 (20200423)]/ focal main restricted
Repeat this process for the rest of the CDs in your set.
Be the first to comment