February 1, 2020By Miguel Alatorre, www.ameridroid.comLinux, ODROID-C2, Tutorial
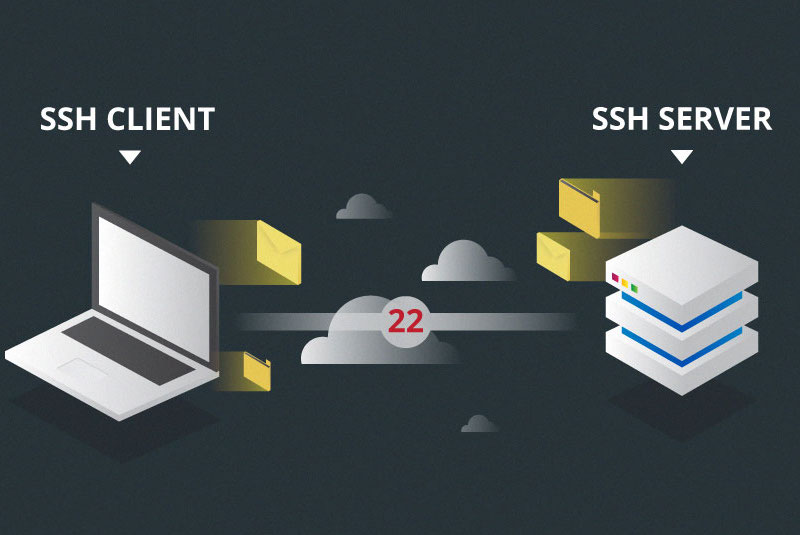
Using SBCs can be a budget-friendly alternative to running small server applications in your home or business. Furthermore, the act of setting them up can get tedious if a single HDMI cable needs to be shared between several devices. Luckily enough, most, if not all, Linux distributions open port 22 for secure shell connections, also known as SSH.
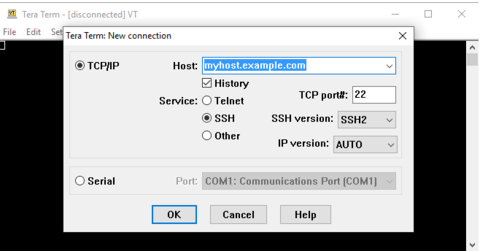
First and foremost, both the PC and SBC, be it an ODROID-C2 or another SBC, need to be connected to the same network. Second, an SSH client needs to be downloaded. A popular Windows OS choice is PuTTY, which can be downloaded here: https://bit.ly/2TVHZq5. For more advanced users, clients such as TeraTerm (https://osdn.net/projects/ttssh2/releases/) are available. Now the IP address of the SBC needs to be found. This can be done with IP scanners like Advanced IP Scanner, available here: https://www.advanced-ip-scanner.com/.
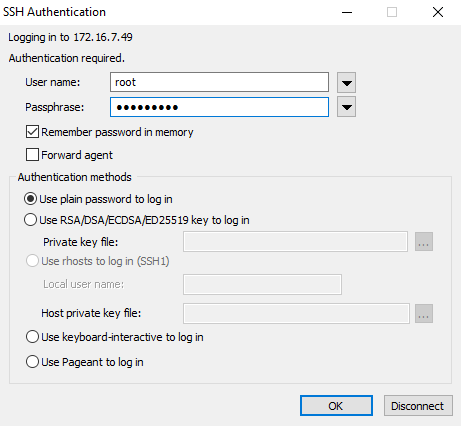
Figure 1 - After opening the client, you will be faced with an interface similar to this one
Figure 2 - Enter the IP address of the SBC into the Host section, then hit "OK". You will then be prompted for a username and password
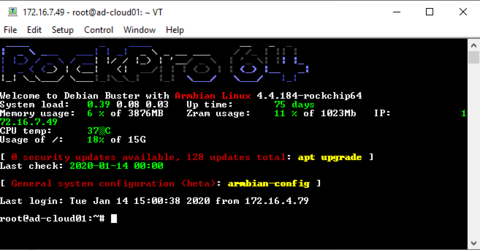
Figure 3 - After entering your credentials, the SBC's terminal will open
Setting IRQ CPU affinities: Improving IRQ performance on the ODROID-XU4
February 1, 2020By @WallaceLinux, ODROID-XU4, Tinkering, Tutorial
I recently came across a post on the ODROID subreddit which featured an article offering tweaking tips for the ODROID-XU4. The article was originally written in German and was later translated into English and published in ODROID Magazine. As a long time owner of an ODROID-XU4, most of the tips were not new to me since they’ve existed on the ODROID forums for quite some time now. However, there was this one tip I was not aware of and it caught my attention, and not in a good way.
IRQs
IRQs (Interrupt Requests) allow the hardware to access the CPU even when it’s busy doing something else. So our keyboards, mice, and networking, for example, won’t stop working if we’re maxing out our CPU.
Anyone who has used computers for enough time knows this phenomenon where the mouse and keyboard stutter, lag or become unresponsive for some time when the CPU is doing an intensive task. This was way more common on early computers and has become less common as CPUs have become more powerful, operating systems have evolved, and APIC architecture was introduced.
To get the absolute best performance out of hardware peripherals on a multi-core system we need to make sure we’re addressing IRQs to the most idle core, increasing the chances they’re going to be executed immediately. On systems with Arm big.LITTLE chipsets (such as the ODROID-XU4) we’re more likely to get the best responsiveness for IRQs out of the “big” cores. This makes perfect sense.
IRQs on Linux
To get a list of IRQs and their CPU affinities we can simply peak inside /proc/interrupts.
This is how it looks on my ODROID-XU4 running Arch Linux ARM with kernel v4.14.157:
Note: The output is quite long so I’ll use head to trim it.
In the above output we have IRQs #49-57 which seem like the system clock ticks. One for each of the 8 cores. Basically, each IRQ has its own ID and is bound to a single CPU.
The last statement may be hard to understand from the last example, so let’s take a look at how MMC and SD-Card reader interrupts look:
IRQ #83 is for eMMC, which I don’t have, and IRQ #84 is for the MicroSD card which is obviously installed.
By default, all non-CPU-clock IRQs are bound to all cores but in reality CPU0 will be used most of the time since it’s simply the first one. In my kernel version on the ODROID-XU4, CPU0 is one of the “little” cores. The easiest way to confirm that is by looking at the max CPU frequency of each core, since the “little” ones are running at a slower speed:
First 4 CPUs (=cores) are running at 1.5GHz and the last ones at 2GHz, which matches the ODROID-XU4’s Samsung Exynos5422 CPU speeds, my “big” cores are running 100MHz slower.
Changing IRQ CPU Affinity
It’s quite easy to change the CPU affinity of IRQs. All IRQs are listed in /proc/irq/ and each one’s affinity is conveniently written inside smp_affinity and smp_affinity_list with the former containing a hexadecimal value and the latter a decimal value.
So, to change our MicroSD card’s IRQ CPU affinity all we have to do it change the value of /proc/irq/84/smp_affinity_list to whatever CPU number we’d like, for example, 5. Of course, we cannot do that as a normal user so we’ll have to use sudo. The easiest way to do that is as follows:
$ sudo sh -c "echo 5 > /proc/irq/84/smp_affinity_list"
Note: This value will not stick after boot, but this is the general idea.
The “tweaks”
Going back to where we started, the article suggested doing exactly what I wrote above, so why was I unsatisfied with it? The article’s usage of irqbalance. Putting aside the poor choice of using /etc/rc.local for applying this tweak, the first step was the one that caught my attention the most:
$ systemctl disable irqbalance
There’s a dedicated program that its whole purpose is doing IRQ balancing and we’re going ahead and disabling it? Sounds extremely fishy.
What I immediately thought was that maybe irqbalance did not allow limiting its assignments to specific CPUs, and therefore disabling it would make sense. However that was not the case.
Looking at the man page of irqbalance, there’s an environment variable:
IRQBALANCE_BANNED_CPUS
which can tell the program to avoid assigning IRQs to those CPUs; which is exactly what we want.
The value of this environment variable is a hexadecimal mask. We simply need to say which CPUs we want active and which we don’t. Each CPU is either on or off (=1 or 0) and in our case we want to turn off the first four and leave the last ones on. That means our mask in binary would be:
00001111
The value must be hexadecimal, which is a fairly easy conversion from binary in this case: 0F.
All we have to do now is to set our environment variable to 0F (or just F since the leading 0 has no meaning). Let’s test that to make sure we’ve gotten the math right:
$ sudo su
$ export IRQBALANCE_BANNED_CPUS="f"
$ irqbalance -d
This machine seems not NUMA capable.
Isolated CPUs: 00000000
Adaptive-ticks CPUs: 00000000
Banned CPUs: 0000000f
...
Package 0: numa_node -1 cpu mask is 000000f0 (load 520000000)
Cache domain 0: numa_node is -1 cpu mask is 00000080 (load 90000000)
CPU number 7 numa_node is -1 (load 90000000)
Cache domain 1: numa_node is -1 cpu mask is 00000020 (load 100000000)
CPU number 5 numa_node is -1 (load 100000000)
Cache domain 2: numa_node is -1 cpu mask is 00000040 (load 130000000)
CPU number 6 numa_node is -1 (load 130000000)
Cache domain 3: numa_node is -1 cpu mask is 00000010 (load 200000000)
CPU number 4 numa_node is -1 (load 200000000)
First we change user to root to make it easier for us.
Then export the environment variable for irqbalance.
Run irqbalance in debug -d mode.
Output:
The first part shows in Banned CPUs that our value was accepted.
Then, if we look at the rest of the output we can spot it assigning stuff to CPUs #4-7(5th to 8th), which is exactly what we wanted.
To set this environment variable so the systemd unit will be able to access it, we need to inspect it:
$ systemctl show irqbalance
There we look for EnvironmentFile value which could be anything depending on the operating system. On Ubuntu 18.04, it’s /etc/default/irqbalance and on my Arch system it’s /etc/irqbalance.env. There’s probably already a template file there and all we have to do is make sure it’s uncommented and set with the right value.
Using a fixed IRQ IDs
The “tip” instructs putting each line that corresponds to a different hardware controller’s IRQ ID. However, IRQ IDs are not consistent and depend on the kernel version. For example, on my system IRQs IDs #103-105 map to some gpio pins:
Last but not least, the article suggests binding each interrupt to a different CPU. Networking card gets CPU4, USB3 adapter gets CPU5, etc. Why bother limiting the CPUs that our kernel can choose? What if a program locks that specific CPU for a long period of time? The kernel wouldn’t be able to assign the IRQ to a different CPU to avoid slowdowns.
Afterword
While I like those tweak compilations as much as the next guy, I always tend to make sure I completely understand what each tweak is doing and double check them to see how they apply to my particular system and use case.
Moreover, if there exists a dedicated tool for a certain purpose (like irqbalance for this matter), one should first consider using it, otherwise its existence wouldn’t be justified.
ODROID-GO Advance Performance Analysis: Using ARM Streamline
February 1, 2020By Joy ChoDevelopment, ODROID-GO Advance
Streamline is a graphical performance analysis tool that presents report data in both visual and statistical forms. It uses hardware performance counters with kernel metrics to provide an accurate representation of the target system's resources. This wiki page describes how to set-up and run Streamline and monitor the ODROID-GO Advance.
Summary
Install DS-5 Community Edition on the Host PC
Build the Kernel and Gator Module
Build the Gator Daemon
Start Gator on the target and Streamline on Host PC
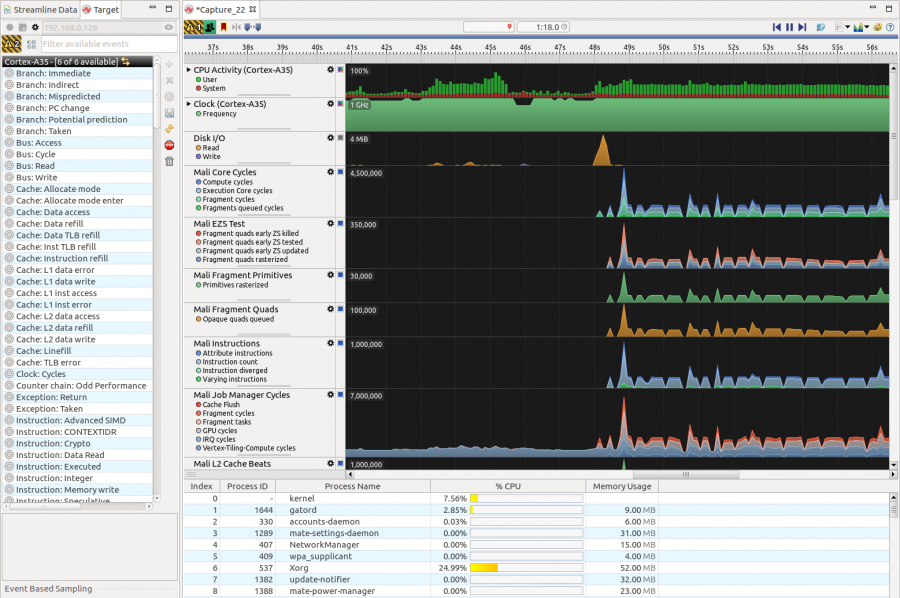
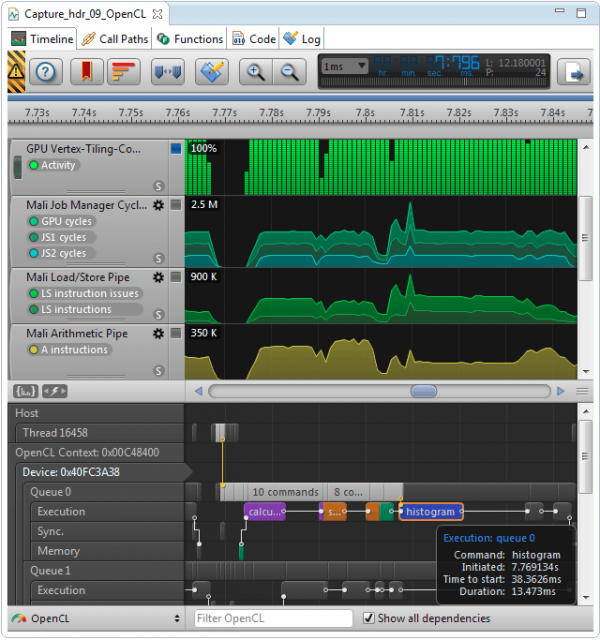
Figure 1 is a sample of ARM Streamline capture with ODROID GO Advance.
At time 48s, glmark2-es2 is started and you can see graph transitions of Mali-related components.
Figure 1 - Sample of ARM Streamline capture with ODROID GO Advance
Using ARM Streamline, you can monitor the main components of the CPU.
Figure 2 - Sample of ARM streamline capture with CPU information
Figure 3 - Sample of ARM streamline capture with CPU information
The latest Streamline version of DS-5 Community Edition is currently v6.7.1, it will not support a higher version of gator, above v6.7.1. Only DS-5 Ultimate, Professional Edition, and DS-5 Development Studio support the latest gator version. So, please note that the current gator version for the ODROID-GO Advance will be kept as v6.5.1, until DS-5 Community Edition is updated.
Build The Kernel and Gator Module
In the latest version of the ODROID-GO Advance image, there is no gator module. It will be included in the next official release, so please refer to the following options if there is no new OS release version.
To communicate with the target device, Streamline requires the gator daemon (gatord), to be running on the device. Here are the instructions to build the gator daemon on your ODROID-GO Advance board.
You should use gator daemon v6.5.1 to synchronize with the gator driver of ODROID-GO Advance. Also, some patches to run gator daemon on ODROID-GO Advance are needed because the sysfs node to read the mali GPU information is different from the existing one from the ARM-software github.
odroid@odroid:~$ sudo apt-get install git
odroid@odroid:~$ git clone https://github.com/JeonghwaCho/gator.git -b odroid-rk3326

odroid@odroid:~$ cd ${path_of_gator}/daemon
odroid@odroid:~$ make
Now you will have gatord binary in ${path_of_gator}/daemon directory.
Start Gator on target and Streamline on Host PC
1. On the ODROID-GO Advance
You need root permission to make an ethernet connection and run gatord.
(1) Config up Network connection
odroid@odroid:~$ su
root@odroid:~# dhclient eth0
(Figure 4 - ODROID-GO Advance connected over Ethernet)
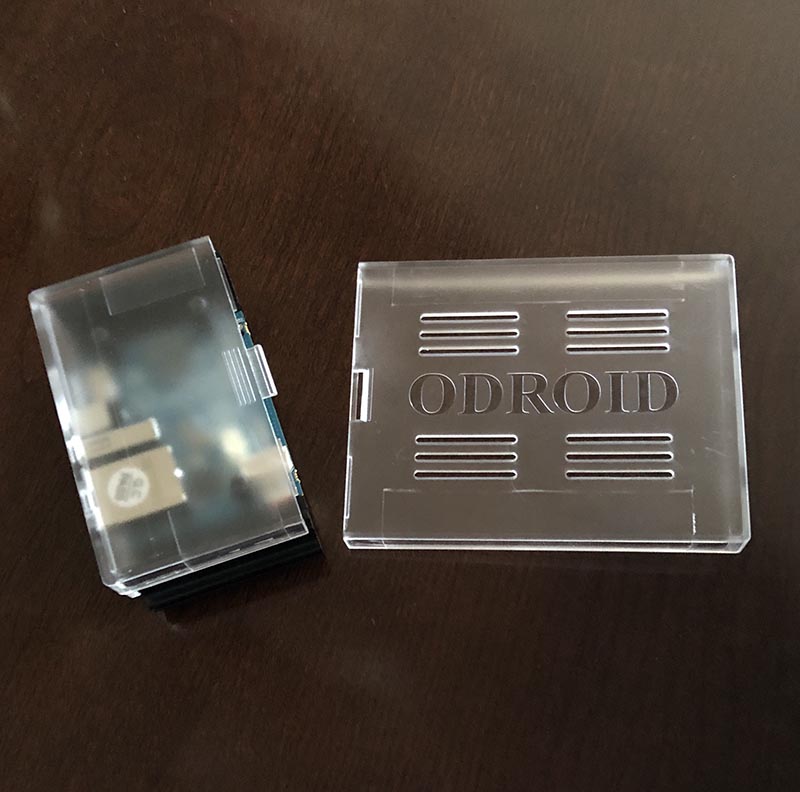
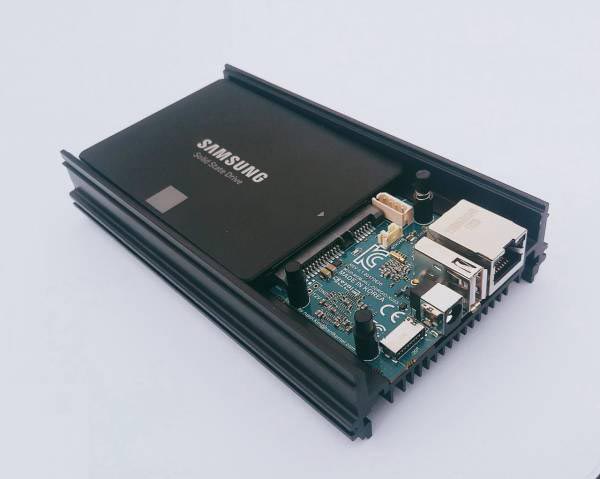
A Case for the ODROID-MC1 Solo: No, Not Justification for Building Your Own SBC Cluster; Rather a Clear Protective Case for $1
February 1, 2020By Dave ProchnowODROID-MC1, Tinkering
If you’re looking for a great case to protect your ODROID-MC1 Solo, then look no further than the Hardkernel Web site. Inside the “Dollar Shop” is a clear case for the ODROID-HC1. Priced at, you guessed it, $1, this case is the ideal companion for protecting your headless ODROID-XU4 clone.
Figure 1 - Adding a clear case to your ODROID-MC1 Solo makes it shine like a computing star.
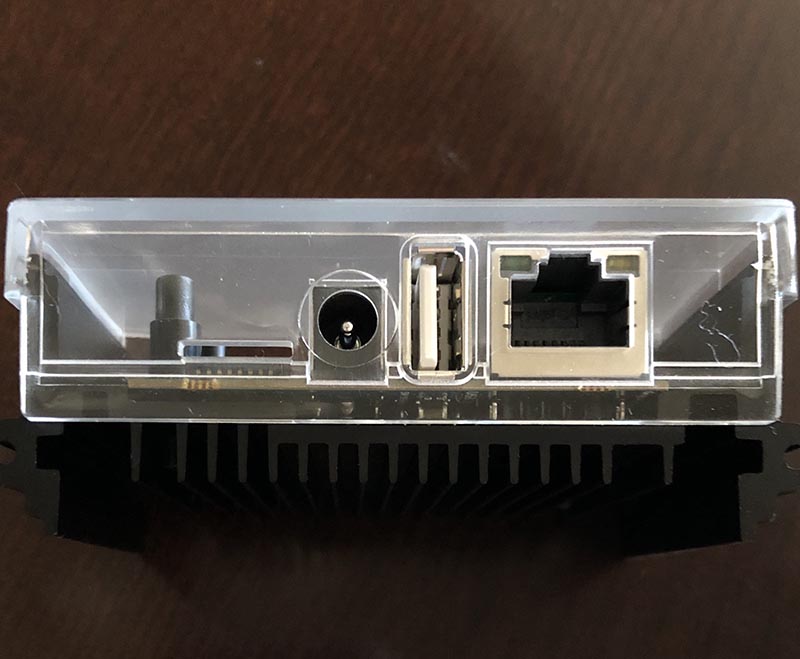
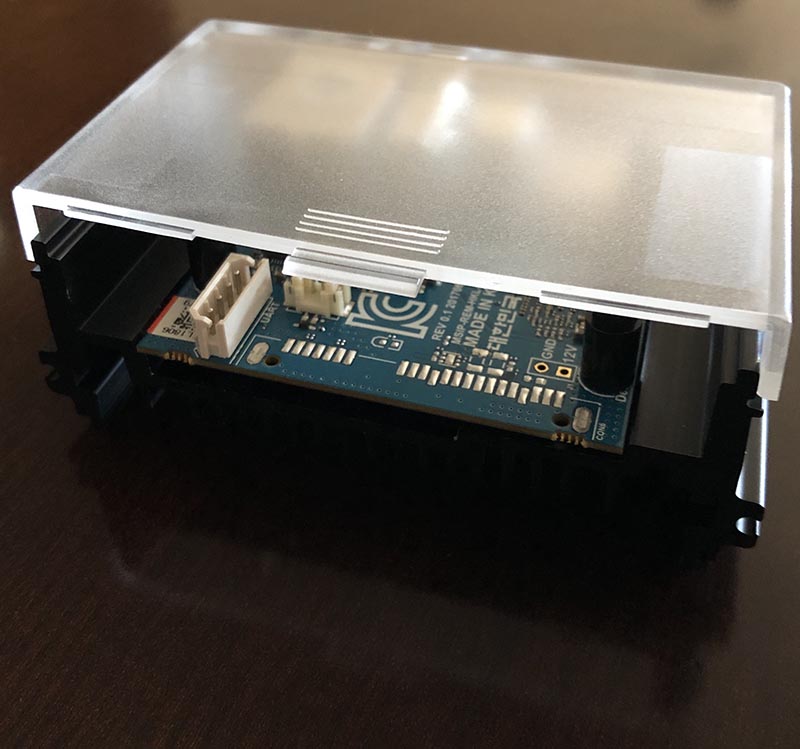
Simply slide the shortest piece of the ODROID-HC1 clear case over the ODROID-MC1 Solo heatsink and you have a snug protective case for keeping dust and debris off the printed circuit board (PCB). Furthermore, this case is adequately ventilated for enabling the PCB to remain cool during strenuous work sessions.
Figure 2 - You only need one-half of the ODROID-HC1 clear case for protecting your ODROID-MC1 Solo.
Figure 3 - All of the business end inside the case is still accessible.
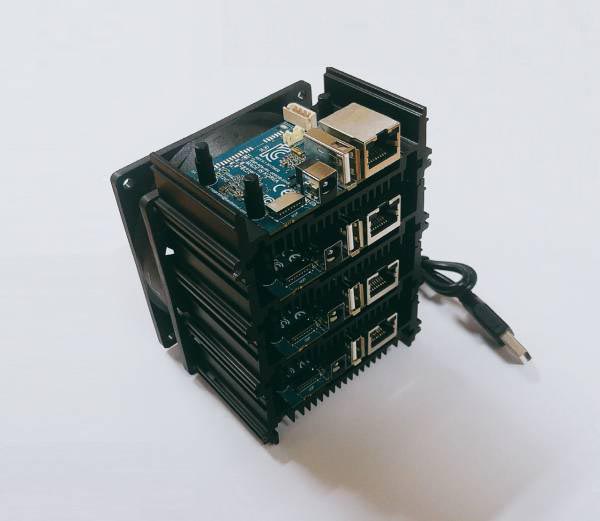
Finally, while you’re purchasing your Dollar Shop case, be sure to examine the incredible sale price for the ODROID-MC1 Solo. At the time of publication, this powerful octa-core single board computer cluster node is priced at $9. That’s a remarkable $39 savings over the regular price. Oh, and while your filling your shopping cart, don’t forget to include a 5V/4A power supply, Ethernet cable, and 8GB microSD card to your order. The total cost for this fully fleshed out computing node will be less than $25 (excluding shipping and handling). This purchase will help you get one step closer to realizing that dream of wrangling bytes on your own build farm.
Figure 4 - Just leave the back door open on your build farm for keeping the ODROID-MC1 Solo cool while handling all of its chores.
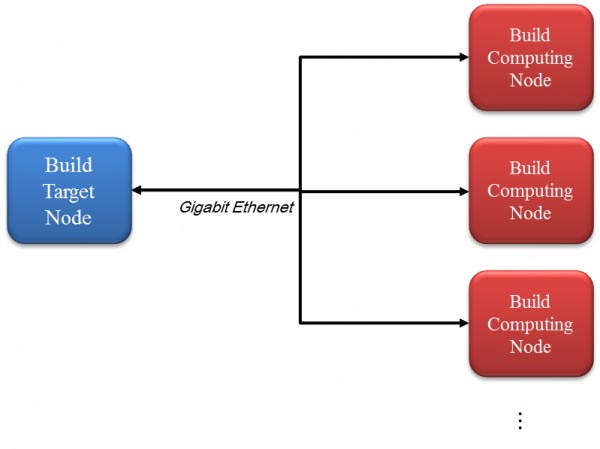
Figure 5 - Build farm system diagram
There are two types of nodes for the build farm system – Build Target node and Build Computing node. For this example, we will use the ODROID-HC1 for the build target node. The build target node contains the source codes which will be compiled in this build farm system. An ODROID-HC1 is perfect as a build target node because it can have a large amount of storage space with its attached hard drive. It is helpful for improving build performance if the SATA HDD(or SSD) has good I/O performance. The build computing node receives the source file and compiles it. An ODROID-MC1 is the best choice for a build computing node, since it is optimized for distributed computing.
Figure 6 - The example Build Target Node is an ODROID-HC1
Figure 7 - The example Build Computing Node is an ODROID-MC1
Build Computing Node Configuration
To access yjr ODROID-MC1 and ODROID-HC1 consoles, you have to get the IP address of the nodes. Please refer to Boot the ODROID and find IP address section in the Headless setup wiki page. All it takes is to Install distcc and configure it:
On my network, the 192.168.100.0/24 IP network range is my local network IP address. It must be modified to suit your network environment. Next, restart the distcc service:
$ sudo /etc/init.d/distcc restart
Build Target Node Configuration
Install distcc, distcc-pump and distccmon-gnome. distcc-pump is for running distcc pump mode. Distcc's pump mode accelerates remote compilation with distcc by also distributing preprocessing to the servers. distccmon-gnome is the distcc monitoring application:
Next, set the IP addresses of the build computing nodes. In this case, there are 8 build computing nodes (ODROID-MC1s). It is different for each network environment. Write the distcc host’s IP addresses for your environments.
The examples add the following options to the address:
lzo: Enables LZO compression for this TCP or SSH host (slave).
cpp: Enables distcc-pump mode for this host (slave). Note that the build command must be wrapped in the pump script in order to start the include server.
A description for the distcc pump mode can be found at distcc's pump mode: A New Design for Distributed C/C++ Compilation. Next, run distcc-pump:
$ distcc-pump make -j64 CC=distcc
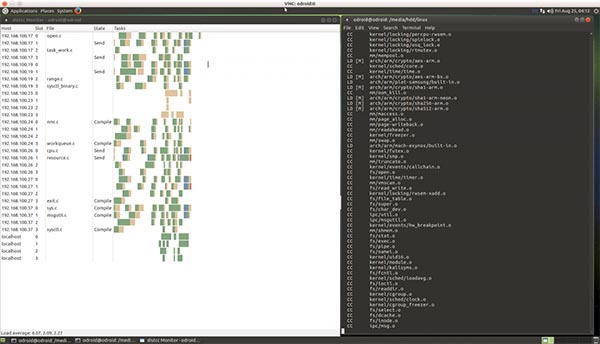
Figure 8 shows the distcc compiling status on distccmon-gnome:
$ distccmon-gnome
Figure 8 - distcc compiling status on distccmon-gnome
Build Performance Measurement Experiment
We measure the distributed compiling performance according to number of build computing nodes. This is the build time of Linux kernel sources for the ODROID-XU4. It has better performance than a local build when it has more than 4 build computing nodes, since distributed compiling has additional overhead because of the network. The build commands used for testing are:
$ sudo apt update
$ sudo apt install git
$ git clone --depth 1 https://github.com/hardkernel/linux.git -b odroidxu4-4.9.y
$ cd linux
$ make odroidxu4_defconfig
$ time make -j8 # Local build for baseline
$ make clean
$ time distcc-pump make -j64 CC=distcc # Distributed build for testing
Figure 9 - Build time vs node count
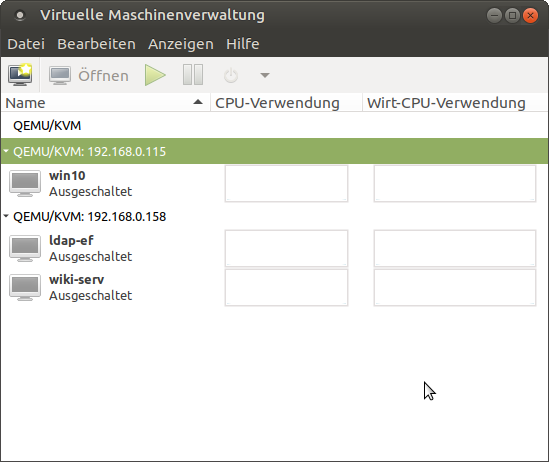
KVM: Fun with virtualization on the ODROID-H2 - Advanced Features
February 1, 2020By Tobias SchaafDevelopment, ODROID-H2
In my last article, I demonstrated that it’s rather easy to install and configure KVM and some tools to create and control VMs directly under Linux. This time, I want to talk about some advanced features you can use with KVM for free, that in other hypervisors are only available in costly enterprise editions and how to control KVM on a more “bare metal” installation rather than a graphical system.
This article includes a lot of technical descriptions, which are marked as such. If you just want to set things up and get it to work, you can skip these sections.
Recap
Let’s remind ourselves what we learned the last time about KVM, QEMU and libvirt.
KVM - The technique we use to virtualize systems directly on the Linux Kernel (similar to VMWare, or Virtualbox).
QEMU - used to emulate certain types of hardware in combination with KVM virtualization and allows for advanced features such as snapshots.
libvirt - n api that we use to control our VMs and what is happening around them, with virt-manager as a graphical interface.
Second Scenario
In this second scenario, I want to go all out with some of the capabilities which allow you to use KVM in a production environment. We will add a second ODROID-H2 into the setup and experiment with shared storage pools for our images, as well as moving a running system from one ODROID to the other without interruption. I want to look into virsh, the command line client of libvirt that allows us to control VMs from the command line and allows us to do some advanced configuration. And control our VMs from a remote PC and not locally on each host. In the end, you should have a very good Idea how to use KVM even in a production environment at your workplace.
Requirements
2x ODROID-H2
1x PC/Server for shared storage
1x PC for remote control of our setup (I will use my laptop for this)
Network switches (one is fine, if you have a production environment you should have at least two)
Internet Connection
In this second scenario, we will add a second ODROID-H2 into our setup so we have “multiple” nodes on which to run VMs. I also use an ODROID-N1 with an attached SSD as a shared storage pool which we can use to run our VMs. Instead of working directly on the ODROIDs themselves, I will now switch to remote control everything from my Laptop and only use SSH to directly connect to the ODROIDs rather than working directly on the systems.
For this I installed Debian Buster on the second ODROID-H2, as well; this time as a headless server installation without an X11 desktop such as MATE (which we had on the first ODROID-H2), and without network manager or the full virt-manager. This means the installation is much smaller, uses a lot less RAM, and has less attack vectors for a possible attack against the system. It is very close to what you have when you install VMWare or other bare metal hypervisors, which also just install a Kernel and basic applications needed to run VMs.
Installation
I will assume again at this point that you already have a running Debian (or Ubuntu) server installation for the following steps. As I said, I used Debian Buster again, this time as a server installation without network manager or X11 desktop environment. I HIGHLY recommend using the same OS for all your nodes and not to mix Ubuntu and Debian or other environments, since the qemu version used will most likely be different and can cause problems with our scenario. I will also run all the commands as “root” on my system so you should know how to login as root or use sudo to become root.
Let’s start with installing libvirt and required tools:
$ apt install libvirt-daemon-system
$ reboot
The installation of the libvirt-daemon-system is enough, as it comes with all the tools needed to run VMs and with the tools to control it (like virsh, the command line client).
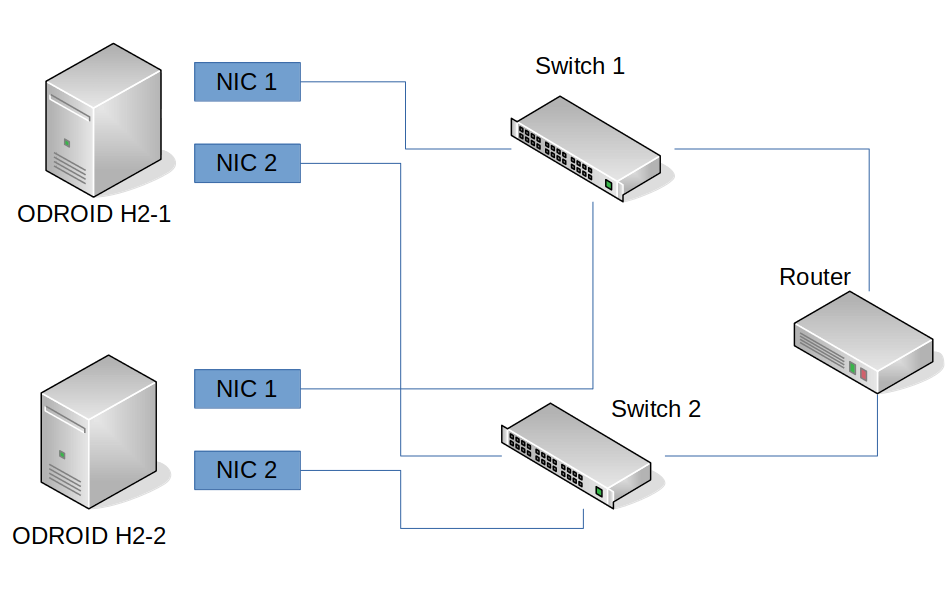
Advanced Network Configuration
In order to create a more “production” like environment, we want to look into the network configurations of our ODROIDs. The ODROID-H2 has two on-board network adapters (NICs). It would be wasteful not to take advantage of this situation. Therefore we’re going to create something called a “bond” which is the combination of the two (or more, if needed) network adapters into one “virtual” bond (network adapter). This allows for different backup scenarios, in case some part of your infrastructure in the production environment breaks down. We also will setup something called a “bridge” which will act as a virtual switch for our VMs allowing us to place the VMs “logically” in our network, rather than using NAT.
Technical description
If you’re familiar with, for example, VirtualBox or VMWare, you should know that the two most commonly used network settings are either Bridge or NAT.
NAT stands for Network Address Translation, and is a technique where the VM (or VMs) will be in their own private network, created by the hypervisor (VirtualBox, VMWare, KVM, etc.) it is not directly connected to your network, but uses the network of the host system to communicate with the outside world. What this means is it shares the Internet connection of your host, and normally has access to the same network and systems that your host system has access to, but on the other hand it can not be accessed from other machines directly, as the IP of the VM is not within your network. In fact, each time the VM accesses something on the network, the network sees it as incoming traffic from your host system not from the VM. That is what NAT is doing for you.
Bridged Networks, act like a virtual switch, which is connected to your physical network. This means, when a VM requests an IP, it’s not asking the host anymore, but your network router. It will get an IP and configuration from the same router your host system is getting its IP from. This allows you to control the IP it will get from your router, and also means that other machines in the same network will be able to access the machine as well.
Getting started
In most cases inside a production environment, you want to have a bridged network for your VMs so others can access the services running on your VMs. We will also create a network bridge for KVM so our VMs can connect to either your home network directly or to your company network, depending on where you want to use this. For this, we will need to install some additional packages:
# for creating bonds
$ apt install ifenslave
# for creating bridges
$ apt install bridge-utils
We need to edit /etc/network/interfaces on both ODROIDs to set up our advanced network setup.
Please Note that configuring network adapters in /etc/network/interfaces will disable the access of the Network Manager to these devices.
/etc/network/interfaces
# This file describes the network interfaces available on your system
# and how to activate them. For more information, see interfaces(5).
source /etc/network/interfaces.d/*
auto lo
iface lo inet loopback
auto bond0
iface bond0 inet manual
bond-slaves enp2s0 enp3s0
bond-primary enp2s0
bond_mode balance-alb
auto br0
iface br0 inet static
bridge_ports bond0
address 192.168.0.115
netmask 255.255.255.0
gateway 192.168.0.10
Technical Description
The above text is the context of the file /etc/network/interfaces, so let me explain a couple of these lines:
bond-slaves enp2s0 enp3s0 – This is a list of NICs that are combined as a bond. The two NICs on my ODROIDs are found under the name enp2s0 and enp3s0, some of you might remember names such as eth0 and eth1 in the past, enp2s0 is basically the new eth0 and so on.
ond_mode balanced-alb – This describes how the network adapter should work together. Under: https://www.kernel.org/doc/Documentation/networking/bonding.txt you find a very detailed description how boding works in the Kernel and what the different modes are.
The most common use is, for example, mode 1 (active-backup) in which one NIC is always ON and sending and receiving data, but if for whatever reason this is not possible, it will switch over to the second NIC. So this is an active standby situation for the network adapters.
There are a couple of interesting modes, for example mode 0 (balance-rr) the round-robin mode has the ability to speed up communication quite a bit. When I connected my two ODROID H2 with balance-rr mode and used iperf3 to test connection speed, I actually got up to 1.9 Gbit connection speed between both ODROIDs. Which means it actually could use the full speed of the two network adapters to communicate with each other, but I could also see that the number of errors while sending went up.
A VM running on the system using a bridged network adapter was no longer able to communicate with the router in my network, but using NAT network for the VM worked fine. So, although you might get a huge speed boost between different ODROIDs, the use is limited.
Another interesting bond mode is mode 4 (802.3ad), which is a technique that was renamed to 802.1ax. So if your switch supports the 802.1ax standard that means it’s 802.3ad compatible, which is very confusing. It’s the so-called link aggregation, which allows to use both NICs to communicate, and therefore “technically” double your bandwidth. It doesn’t mean you will have 2 Gbit connection speed between ODROIDs, but it means you can have two (or more depending on the number of NICs) connections with 1 Gbit at the same time. So instead of one machine that can connect to an ODROID that has two NICs with 1 Gbit, you can have TWO devices connected at the same time BOTH with 1 Gbit. However, it requires network switches that support this setup and some preparations.
bridge_ports bond0 – This is the network adapter for your virtual switch (the bridge adapter). This could also be directly enp2s0 or enp3s0 but by using a bond here instead, we make sure that even if one adapter has no connection the other adapter can still keep our network running.
I used a static IP configuration for my bridge, since I always want to have the same IP here. Instead, I could have also chosen to use iface br0 inet dhcp for automatic configuration. The bond is set to iface bond0 inet manual as it doesn’t need an IP. The bridge adapter will hold the IP for the bond so to say.
Ideally, you would connect your ODROIDs to two different network switches which are connected to your router. That way if one of the switches dies the ODROIDs would still work over the other switch. Which is the main reason for bonding and modes like active-backup. It also allows for firmware update of the switches and reboots without losing connectivity to the VMs running on your KVM hosts.
The entire setup will work with one switch as well. You don’t need two switches, and you don’t even need to connect both LAN adapters of the ODROID-H2.
Figure 1 - Network layout for redundant/fail-over network configuration
Remote Access
As I said before, I now have a more machines in the setup and it would be rather inconvenient to connect each system on a TV or monitor with their own mouse and keyboard to control and configure them. Therefore, I want to be able to connect to each device remotely from my Laptop which is running Ubuntu 18.04. Using SSH allows me to connect to my ODROIDs remotely to configure them over the network. I created an SSH key on my laptop (if you don’t have done this yet, you can use the following command to generate a new ssh-key:
$ ssh-keygen
This key is distributed with the following command to the two ODROID-H2 devices:
This allows me to login as root via SSH using my SSH key instead of a password. It’s generally a more secure way than using a password. In fact, I did this before I started setting up network and installing applications on the ODROIDs. What this allows me is to use the virtual machine manager remotely as well.
Once we installed the packages required for KVM and libvirt, setting up the network as described above, we can now use virt-manager to control our hosts. For this, simply start the virt-manager on the system you want to use to control your ODROIDs from (in my case it’s my Laptop). Click on File on the Menu and select add connection. Check the box that you want to connect to a remote host, user should be root, then simply enter the IP of your ODROID H2 in our setup. Repeat the same for the other ODROID-H2 and with that we now have the ODROIDs listed in our virtual machine manager.
You can check the box that it should connect automatically, or just double click the ODROIDs on the list to connect to the ODROIDs. It should look exactly the same as it was when you used virt-manager locally in our first scenario, just that you now have two ODROIDs to work on and create VMs with.
Figure 2 - Running the virtual machine manager to connect to remote virtualization hosts
As you can see, it’s rather easy to connect to multiple hosts, and with that control and create a multitude of VMs in your network. That alone already allows you to save time, money and resources to use virtual machines in your home or company network. Considering that you can run this on a bare server image, without having to install graphical tools to configure your VMs on the host itself, it comes very close to the way VMware, Xen, and other hypervisors run on “bare metal” solutions.
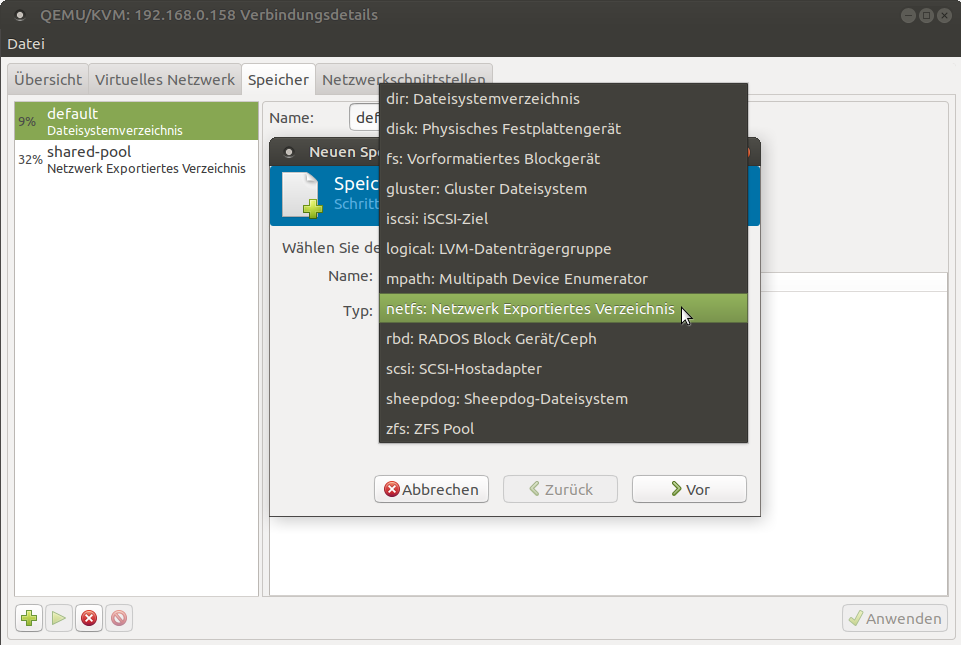
Setting up a shared storage
Although we can already do lots of things with our current scenario, there is much more we can achieve by using KVM and libvirt. However, for this I want to use a shared storage for the different virtualization hosts we’re using. This makes it possible to have one centralized storage for all our hosts on which we run our VMs, and would allow us to run the same VM on different hosts, just by pointing the host to the correct harddrive image for a VM.
It also allows us to use faster and more secure network solutions, such as SANs, NAS, or storage clusters. This in itself has many benefits over running VMs off of local storage directly on the hosts. It also reduces overall costs, as you don’t need large and fast storage for each host, and a bare minimum system is more than enough. You could run the entire system off of an 8GB eMMC (even smaller would be fine) and let the VMs run of a network storage, with RAID, backups, etc.. This reduces the cost and maintenance for both the storage solution as well as the virtualization hosts (i.e. ODROIDs).
In my setup, I use an ODROID-N1 with an SSD attached to it. I created a partition on the SSD for that purpose and mounted this partition to /srv/nfs. As you may have guessed by the name, I will set up an NFS share for the shared storage.
Installation and configuration
The installation is very simple as well as the configuration. As I said before, I use the partition mounted in /srv/nfs for my purposes, so if you have a different location, you need to adjust the paths accordingly:
Please note that I decided to allow connections only from the subnet 192.168.0.0/24. If your network is different, you need to adjust this as well, or you can replace the subnet entirely by simply using an asterisk (*) instead /srv/nfs:
*(rw,sync,no_root_squash,no_subtree_check)
Now that the server is prepared and running, we need to prepare the two ODROIDs as a client. For this, we need to install the package nfs-common on both clients and configure libvirt to mount the NFS mount. For this, I will use virsh, the command line tool of libvirt. Similar to the virtual machine manager, this tool allows us to manipulate everything around our VMs. In fact, it’s much more powerful than the virtual machine manager itself.
Obviously you need to replace with the IP of your server where the NFS is running, same as /srv/nfs in case your path to the NFS share is differently. What we are doing here is creating an .xml file called shared-pool.xml, which give our connection parameters and the path where we want to mount it. With virsh pool-define we can tell libvirt to create a new storage pool.
Hints
Similar things can be done with a VM. You can, for example, dump an xml configuration of a VM and import it on another machine:
# dump a VM configuration and redirect into a file:

$ virsh dumpxml --domain win10 > win10.xml
# import a VM configuration as a new machine:
$ virsh define win10.xml
That way you can make easily copies of the same configuration of a machine without having to the same configuration via the virtual machine manager over and over again. Just dump a VM configuration, edit the file with your favorite text editor, for example adapt the MAC address of the NIC and the harddrive image file, and you have created a new VM based on the configuration of an already existing VM. Naturally, there’s also an option to clone a VM as well, but it would also allow you to start the SAME VM on a different host, as long as the configuration exists on both system and they have access to the harddrive file (hence the shared storage pool we’re working on).
Virtual machine manager
You can do the same via the virtual machine manager as well. As you can see in Figure 3, there are a multitude of supported storage formats and solutions for libvirt which allows you to configure the storage solution you prefer for your setup. NFS is just one of many options you have. As a side note, at work we use a Ceph Cluster as the storage pool for our KVM servers.
Figure 3 - Adding a storage pool to your KVM host using the virtual machine manager
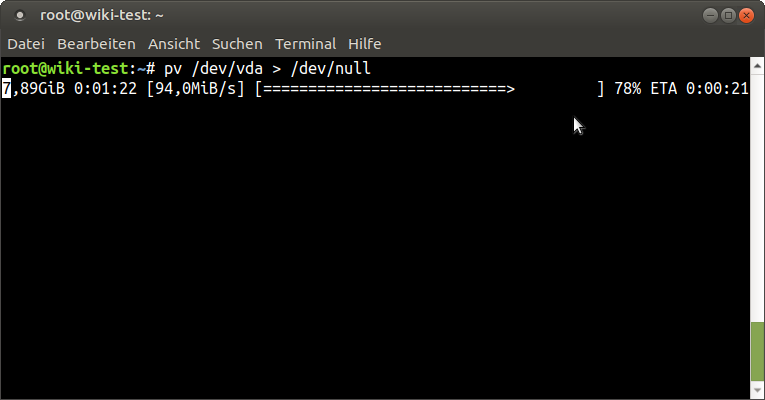
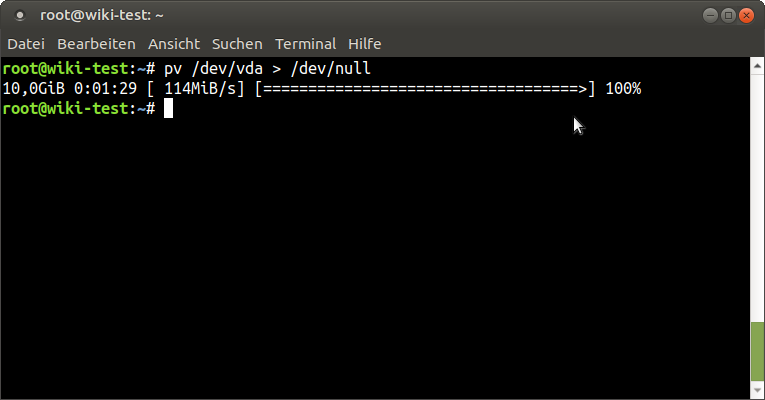
The speed of your VMs of cause are only as good as your storage solution, and if you need the best speed possible, then, of course, running a local storage off of an NVMe could be a lot better than running your VMs off of a network shared storage, but it also limits your options for what you can do with it, and depending on your storage solution, the speed is really not that bad.
Figure 4 - Dumping the Virtual HDD image of a running VM to /dev/null to check read performance of the NFS storage pool
Figure 5 - Dumping the Virtual HDD image of a running VM to /dev/null to check read performance of the NFS storage pool
Using the shared storage pool should be obvious. Instead of creating new images in the default location you create them in the shared-pool storage and it’s available throughout all ODROIDs accessing the storage.
Live migration
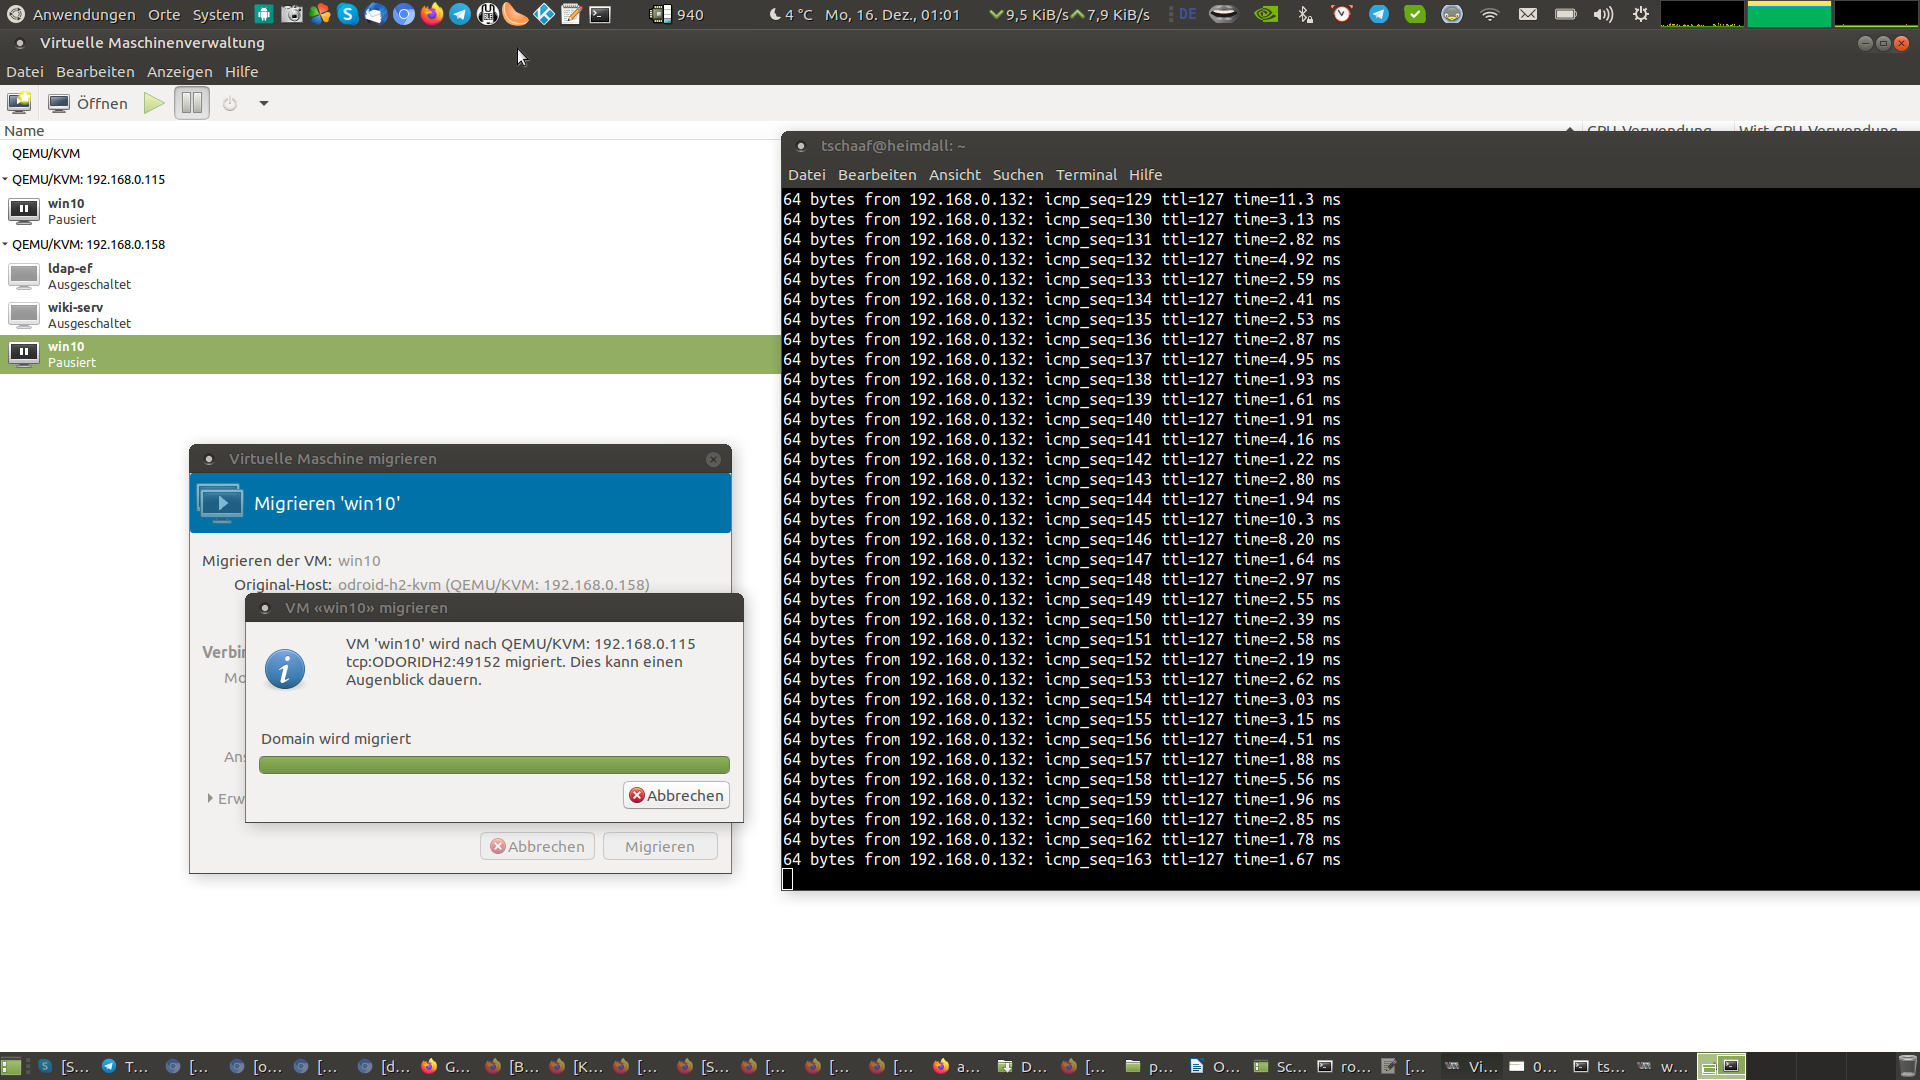
For those who wonder what live migration is, it’s a technique that allows to move a VM from one host to another host while the host is still running. This allows to update or even restart the host without interrupting the services (VMs) you’re running. For example, if you run a VM hosting wordpress, but you need to update the host where the VMs are running on, or you want to distribute the load on another ODROID you can move the VM (while running) on another host, and during the entire time the system is still accessible. People looking at the wordpress server would ideally not even notice that the machine is moved.
Technical description
This scenario requires the shared storage pool, as this means all hosts (ODROIDs) have access to the harddrive image. But what data is in the RAM and processed by the CPU is unique and that’s the part where libvirt is working with.
It will copy the machine configuration (the xml file) from one machine to the other and starts a process of copying the content of the RAM of the VM that is currently running from one host to another host (one ODROID to the other). As it doesn’t need to copy the OS itself (the harddrive image is shared) you could even move a VM that has hundreds of GB or even TB of data from one host to another, as only the content of the RAM needs to be copied.
Libvirt will create an identical copy of the VM configuration of the VM from one host to another. This means it also will create the same extra hardware, as for example the network card, sound card, graphics card etc., for this the other hosts must have the capability to run the same virtual hardware.
For this libvirt will start a sync process between the two hosts and will continue doing this until all the RAM is synced between the two hosts.
As the machine itself is still running and doing tasks, the content of the RAM might change during the sync process and you will see that the process bar near the end might “jump back” and will continue doing so until it could complete its task.
This depends on how fast your network between the hosts are and how often the RAM changes and how much RAM a VM has. A VM that is mostly idle and runs on 500MB RAM will be very quick to sync and only takes a few seconds. If you ran a DB, file server, or machine with running compiler instead which constantly loads new data into the RAM and has 64GB of RAM, this process will take much much longer and can take several minutes to complete.
In the end, both machines will be set to “pause” for a split second to make the switch from one machine to the other and then turned back on, as I said in best case no one will notice anything at all.
This feature is available on hypervisor for VMWare as well, but not without investing a serious amount of money; whereas on KVM this is a free feature.
How to use live migration
In order to use live migration there isn’t much you need to do. It is best to have the disk cache mode for VMs set to “none” for migration, as other caching methods may cause a problem in case of a failure. For example when you migrate a machine from one host to another and the host dies, it could be that the data that was still cached is lost, and not written to the disk. That is generally an issue with caching methods, therefore this warning might be ignored and you can still force a migration between machines.
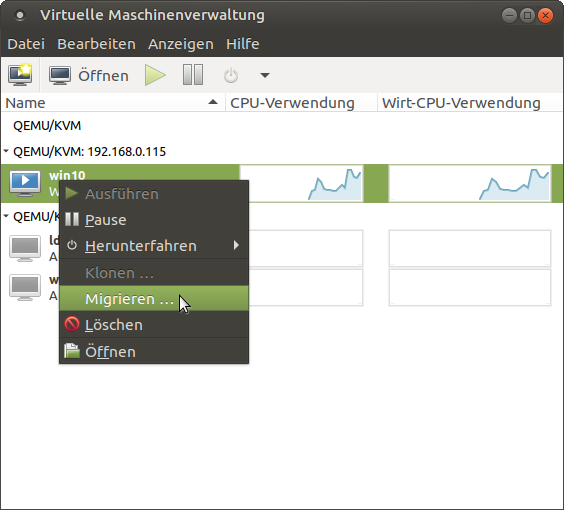
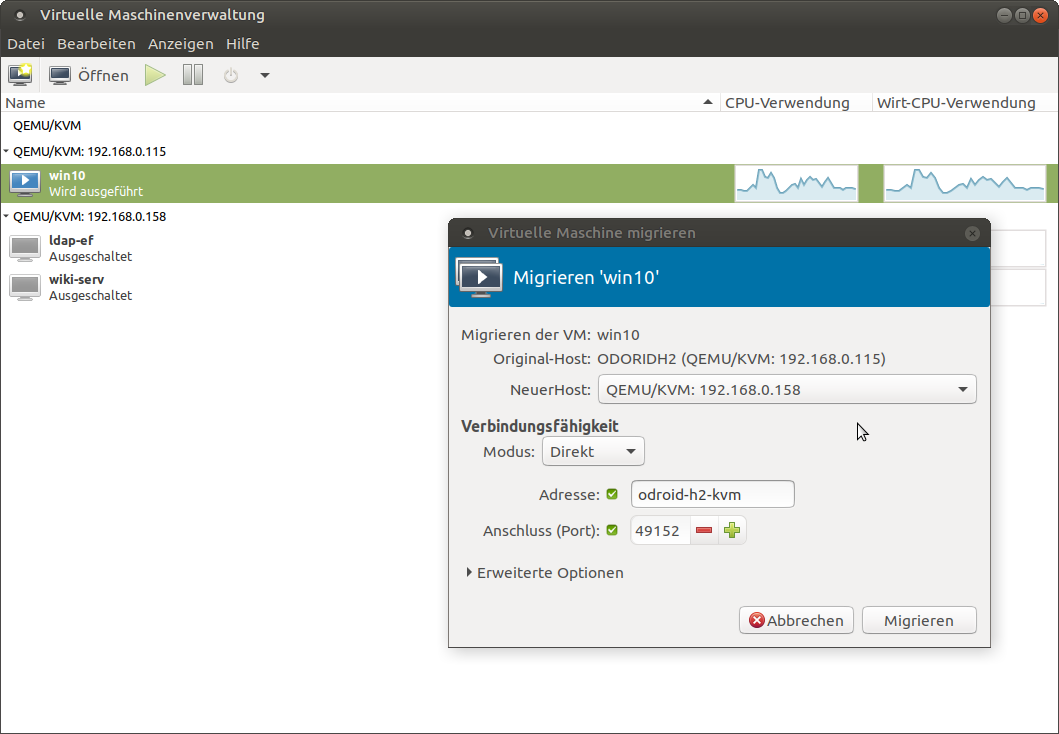
You can migrate machines via graphical interface from the virtual machine manager.
For this you need to be connected to both hosts, right click the VM you want to migrate from one host to the other and select migrate. Then select the host you want to migrate to from the drop down list and click at start. Under advanced options you can activate that you want to migrate even if you’re using an “unsafe” disk caching algorithm.
Another way is to use our command line tool virsh to migrate a machine. For this, login via ssh into the host where the VM is running on and use the following command:
You can add the switch --unsafe to allow migrating with unsafe disk caching methods.
Figure 6 - Migrating a VM via virtual machine manager
Figure 7 - Select the destination host and click migrate
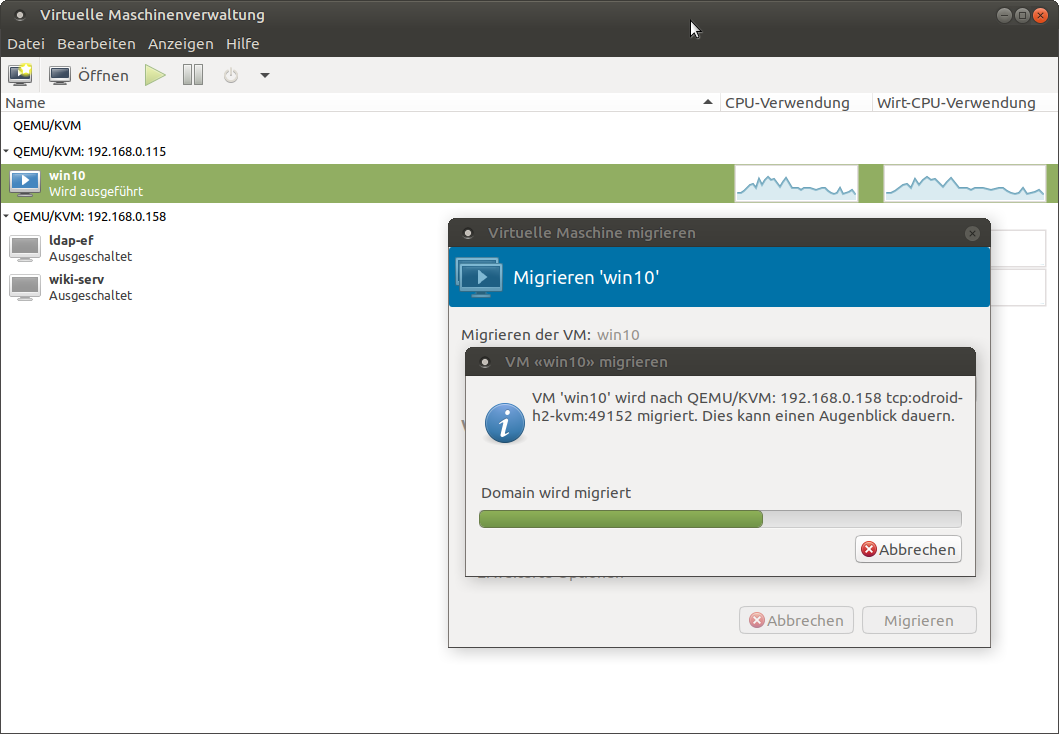
Figure 8 - Watching the migration process doing it’s magic
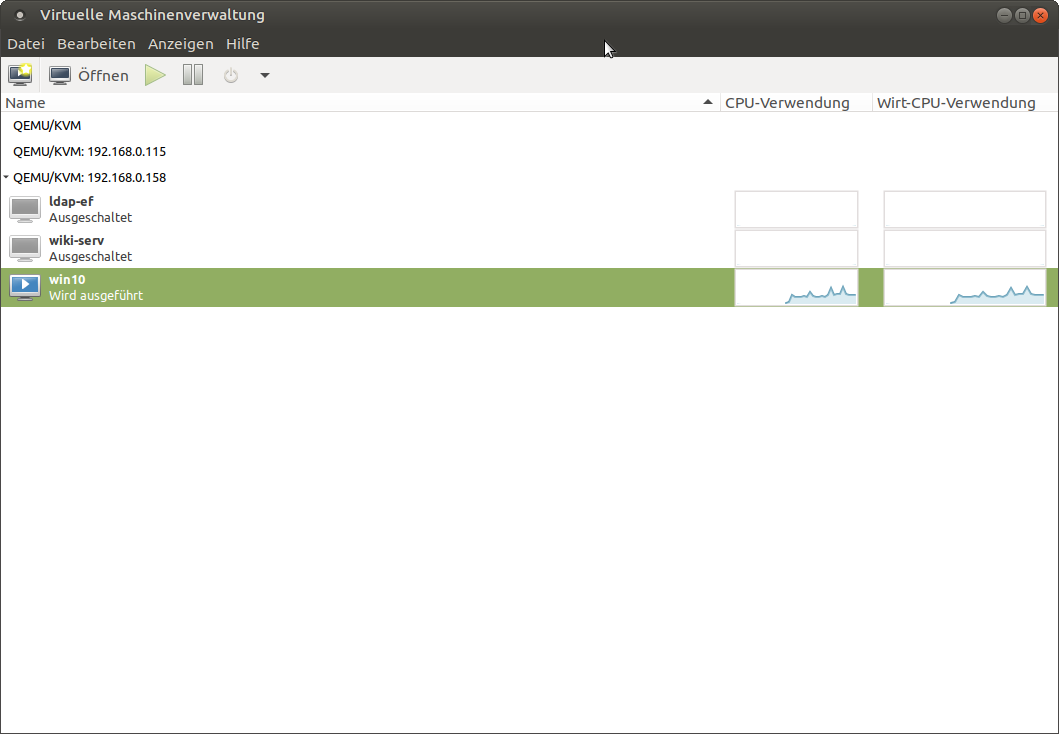
Figure 9 - The VM was moved to another host while still up and running
As you can see, the process is rather simple and straightforward. There is not much to look out for. Once you setup the shared-pool and both KVM hosts are in the same network and can move data between each other there is nothing that will stop you from moving a machine from one host to another host while it’s still running.
Figure 10 - While watching a continuous ping to a running VM, seq 161 is missing, which means that we missed a single ping while migrating the VM
The screenshot in Figure 10 was taken at the moment when the migration process finished, and the VM was switched over. Only a single ping did not go through. Imagine someone accessing a wordpress server that was being migrated. This delay of one ping would not even be noticed in a normal workload and your user would never know you just moved the entire system they are running from one host to another. In fact using a fiber-channel connection you could even migrate VMs easily between different locations or data-centers.
Conclusion
With this we have learned how to setup a production environment for our VMs. You should now be able to share VMs on your network to provide services for all your clients, or use this to host a wide spectrum of online services using bridged networks. You should also know how to configure shared storage pools to take advantage of network storage such as a SAN or NAS or a simple NFS share. You should have additionally learned how to migrate VMs between different hosts allowing you to do maintenance or distribute load of VMs between different hosts.
All of this can be achieved on your ODROID-H2 or other PCs/Servers with the help of KVM as a virtualization engine (hypervisor). There’s tons of literature to this topic and I highly suggest to read further into it if this guide made you hungry for more.
Optimization
There’s a lot of things you can change on libvirt to increase performance in different scenarios. The caching algorithm for the virtual disk, for example. I want to talk a little bit about CPU optimization and about CPU “emulation” on KVM, or, better yet, QEMU. I mentioned before that QEMU is used to “emulate” hardware, but KVM is used for the virtualization part. Here’s also something unique about the KVM solution. Rather than passing through the EXACT CPU your host has to offer, as it’s often done with VirtualBox and other hypervisor solution, QEMU “emulates” a CPU but passes through the CPU features that it supports.
Why emulating and not passing through? The answer is simple. Portability! Imagine the following scenario:
You have a very recent small budget server for testing purposes, let’s say, for example, with an Intel® Xeon® E-2226G processor from 2019 with 64GB RAM which you use for testing setup of a new systems, e.g. a new Windows MSSQL Database Server, and after testing you want to move the VM to an older but more powerful server running of a dual processor system powered by two Intel® Xeon® Processor E5-2697A v4 processors from 2016 with 1TB of RAM as a production environment.
In many scenarios you would have to setup the VM again on the older Server, as the newer Coffee Lake-based E-2226G has some CPU features that are not available on the older Broadwell-based E5-2697A. Not only would Windows require a re-activation due to the changed CPU, in a worst case, the system behaves very different from the tested scenario, also you probably won’t be able to move the VM while still running from one server to the other, as the systems are so different that the transfer would fail.
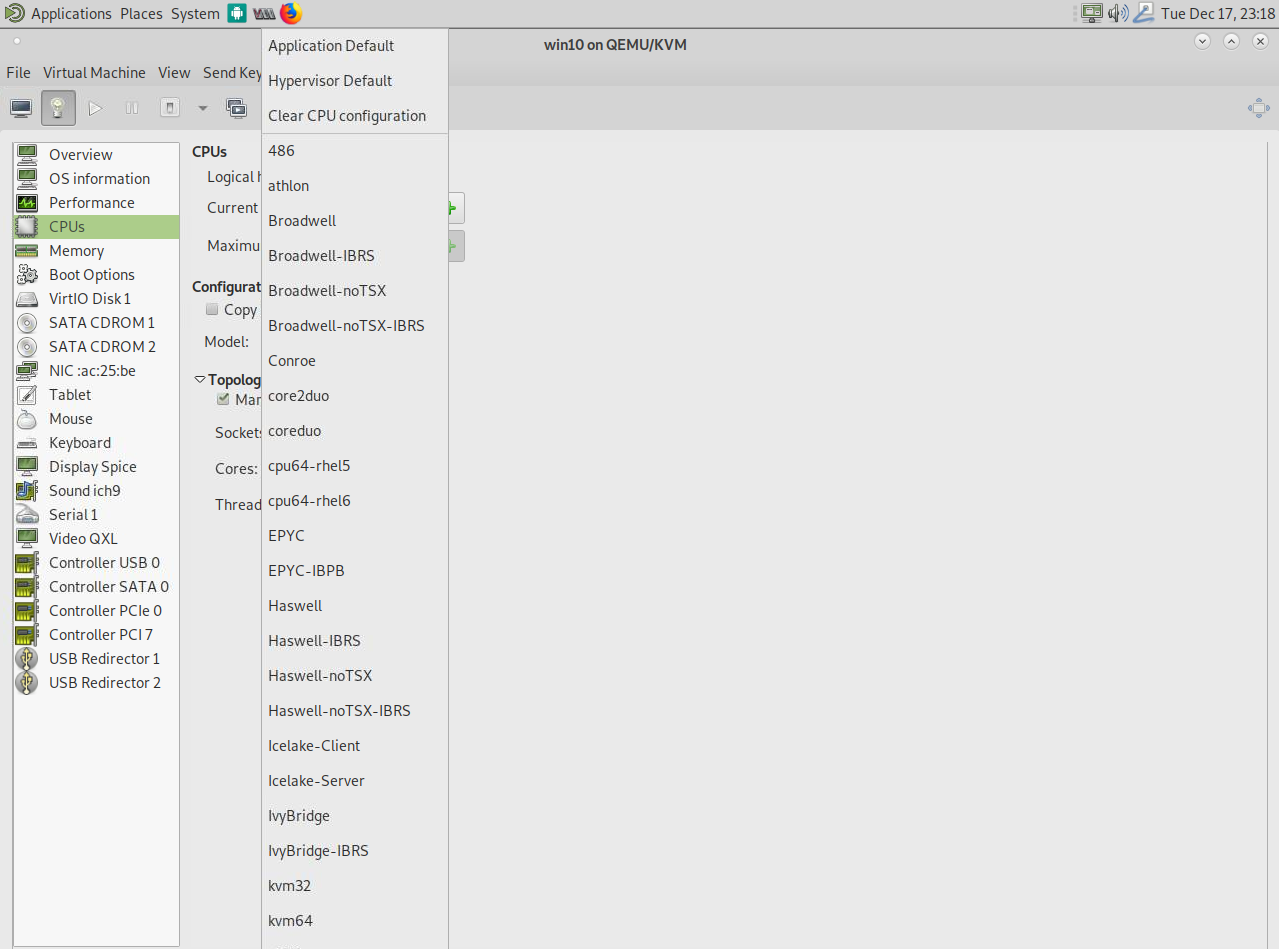
This is where QEMU and KVM work differently. If you check the CPU list in the options of the virtual machine manager you see there’s a quite extensive list of CPUs that are listed here, as shown in Figure 11.
Figure 11 - List of CPUs emulated by QEMU
What that means is that you can create a VM with an emulated CPU that is supported on both servers (e.g. Broadwell-IBRS). This dual support allows test setups that are equal on both systems and allows live migration of the VM from one host to another without interrupting the service (as explained above) even if the servers run on completely different CPU architectures. As long as you find a smallest common denominator in the CPU architecture you can set a VM up with that and migrate machines between these servers anyway.
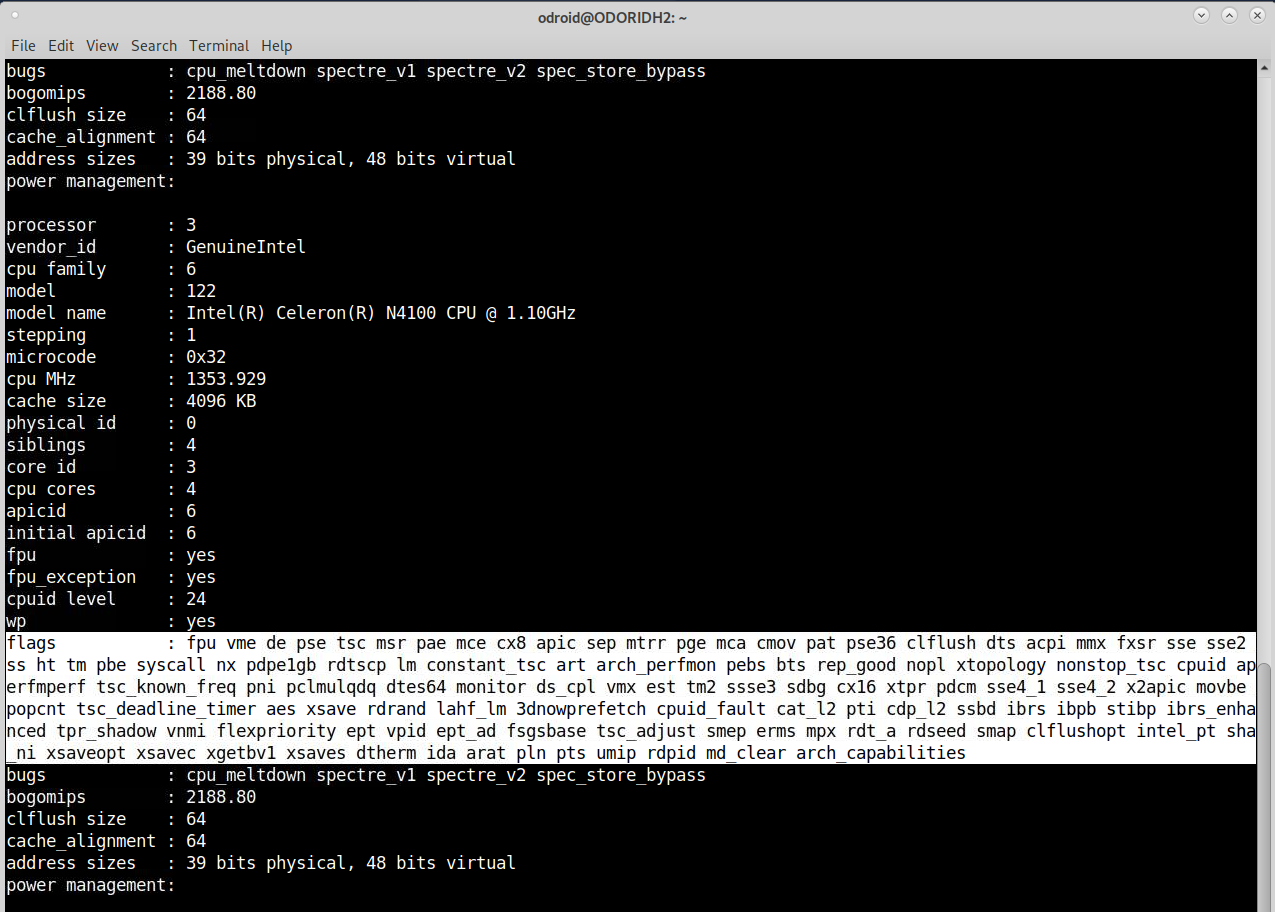
How does it work? If you check the output of the following command, you probably noticed this line “flags” which can be found for each CPU:
$ cat /proc/cpuinfo
These are the features your CPU supports. Even ARM boards have this line, and it shows what techniques the CPU understands and supports.
Figure 12 - ODROID-H2 CPU features
Certain CPU Architectures feature different types of CPU flags here. Broadwell has fewer features as, for example, Skylake, but still more features than a SandyBridge CPU, and this is what QEMU and KVM rely on. Depending on the CPU architecture you select, the “well known” flags will be forwarded as CPU features into the VM. So forwarding the rdseed capabilities of your CPU to the VM can increase encryption performance as you add an additional random number generator to your system for more entropy. A feature that was not present in an older SandyBridge CPU, for example.
How to use it on the ODROID H2?
The problem with the ODROID H2 is, that it’s not a real server board, it’s in some cases not even a real Desktop processor, so it misses quite some CPU features that you would expect on these devices. The virtualization is optimized for server environment and boards like the ODROID H2 does not match this description that’s why we have to fix some things to make it work correctly.
By default, the CPU should be shown as Westmere or IvyBridge-IBRS, since these are the CPUs that KVM will find as compatible by default, but that is only because these are the ones where it finds ALL of the CPU features that it expects. But even if it doesn’t find some features, that doesn’t mean it wouldn’t be beneficial to use a higher CPU architecture.
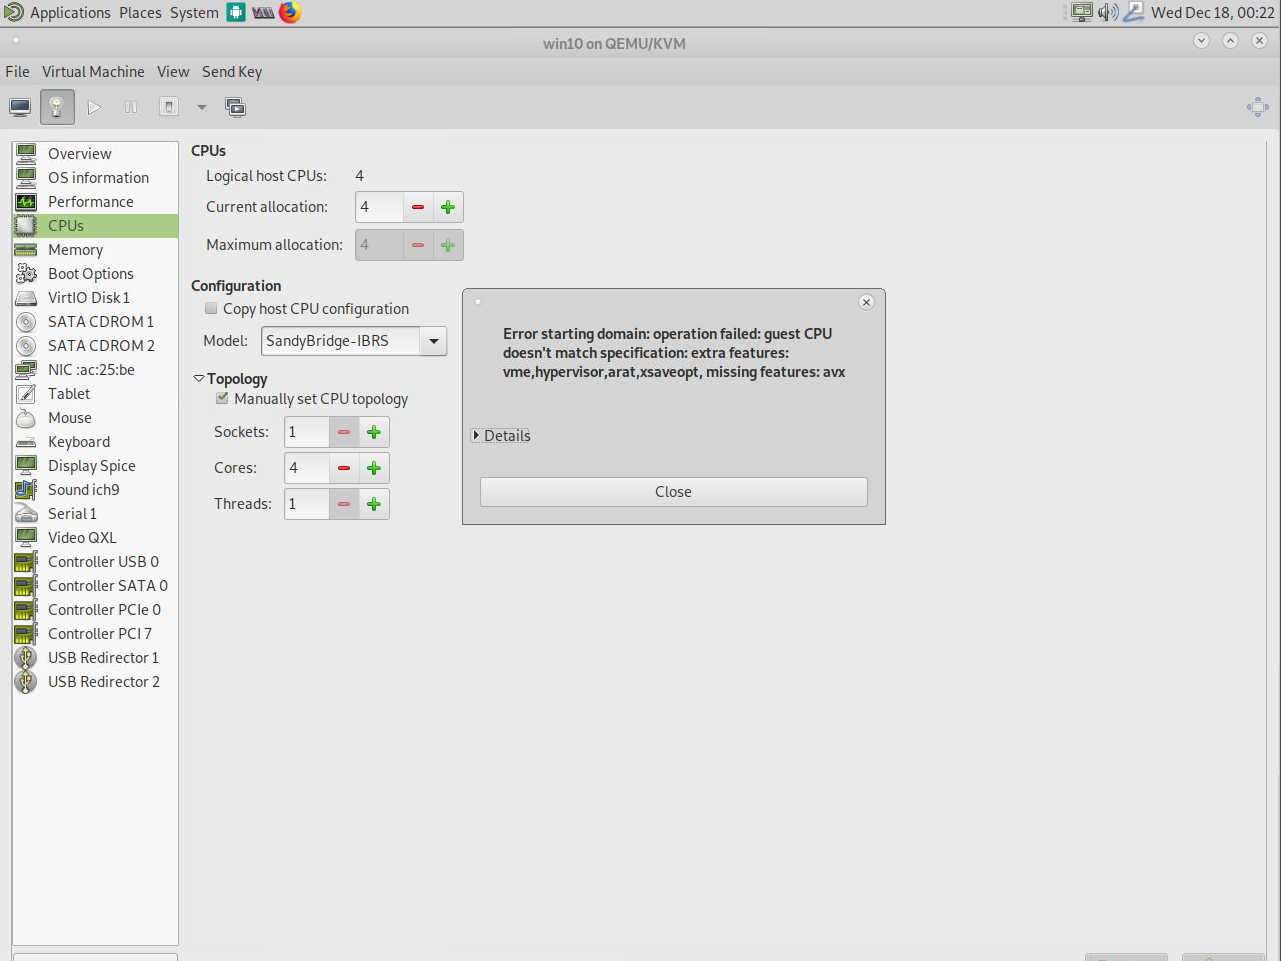
Figure 13 - Trying to start a VM with SandyBridge-IBRS configuration fails with missing CPU features
Here we can use virsh again to configure specific options as a workaround. As I explained before, the different CPU types are a combination of different CPU flags. This tells us that we’re missing the avx feature which if we compare with the flags of the ODROID-H2 it’s true that this feature is missing. We can add this to machine configuration. There’s also a list of extra features that I used, but are not part of the SandyBridge configuration and therefore have to be added manually.
Using the following command, we can edit the configuration of the VM directly:
$ virsh edit --domain win10
Figure 14 - Adding and disabling CPU features directly in the VM configuration with virsh edit
Between the flag < cpu >and , we can add definitions regarding our CPU.
As you can see in Figure 14, we have two options: either require or disable. Require will forward a CPU feature from the host CPU to the VM, and Disable will remove a CPU feature from the list of features forwarded to a VM. Since SandyBridge, for example, fails due to missing CPU feature avx, we can use the following option:
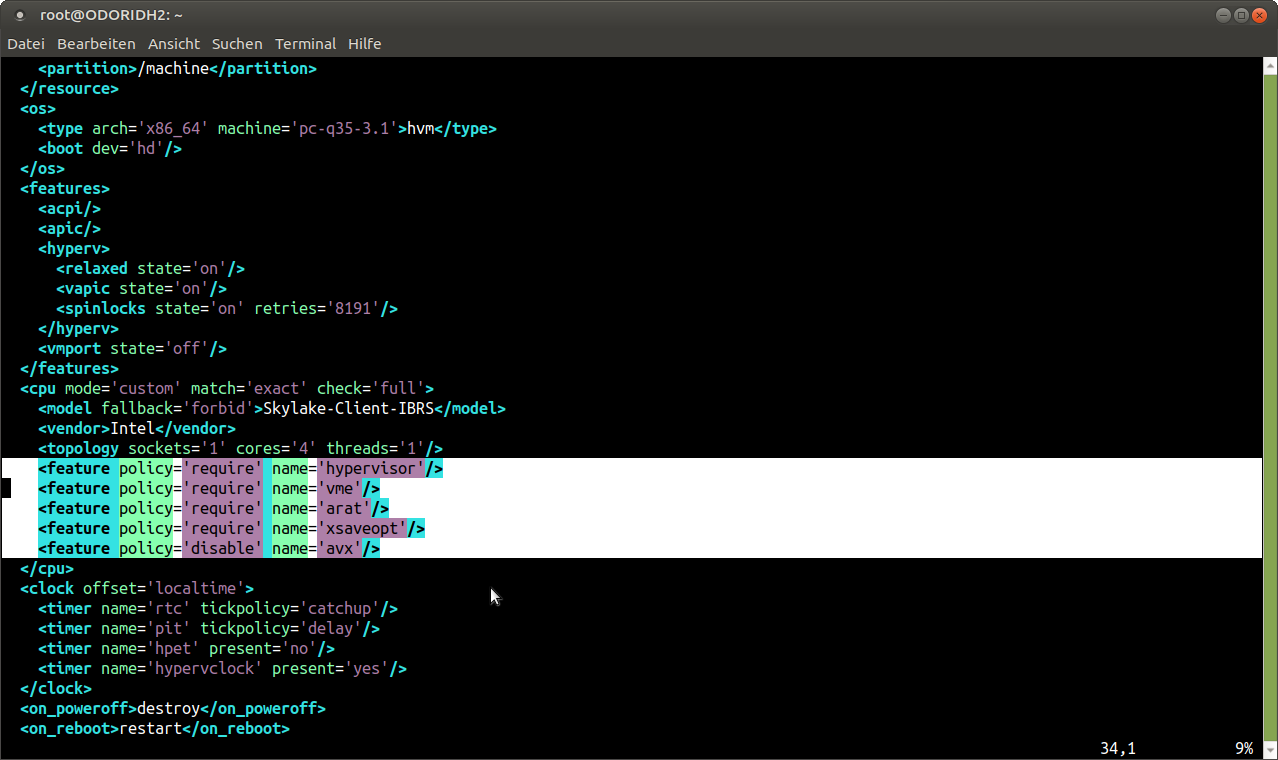
< feature policy='disable' name='avx' />
With that tweak, we can use a SandyBridge CPU in our VM even if not all features are supported. In fact, I was able to run Skylake-Client-IBRS by disabling the following features:
I suggest adding the feature “hypervisor”, as this is generally supported to advertise that the machine is a VM.
General information
You can get an idea of what is possible and what is the most recent supported CPUs by checking this link: https://www.berrange.com/posts/2018/06/29/cpu-model-configuration-for-qemu-kvm-on-x86-hosts/.
It is important to enable some features that can tell a Guest that he does not need to fix some of the recent Intel bugs such as Spectre. There’s microcode working around this bug available on the OS. This microcode normally reduces CPU performance to a certain degree. If you run a VM, the VM is not aware of the fact that this “bug” is not present on the CPU (fixed by the microcode on the host) and would try to fix it with it’s own microcode as well. For this, you will find some CPU flags on the site above that tell the VM that this bug is already fixed, which you can add with the “require” flag.
You will also find options for AMD processors on the site above. Once again this is a feature you should read into if you want to know more about it.
Conclusion
Diving into KVM and libvirt was a very interesting experience. The ability to migrate VMs on the fly without interrupting the service is a very cool feature and very helpful in a production environment. At work, we’ve been using this for years already. In combination with Ceph or other low cost storage solutions, it’s a good and cheap alternative to VMware for example, with a lot of enterprise grade features.Since it’s running directly on Linux, a standard Debian or Ubuntu server with next to nothing installed is already enough to run and provides a good basis for managing your hosts and VMs. You get current drivers and kernels with security patches, and are not locked into solutions like VMWare where you have to wait for them to provide hardware support and kernel patches for their software.
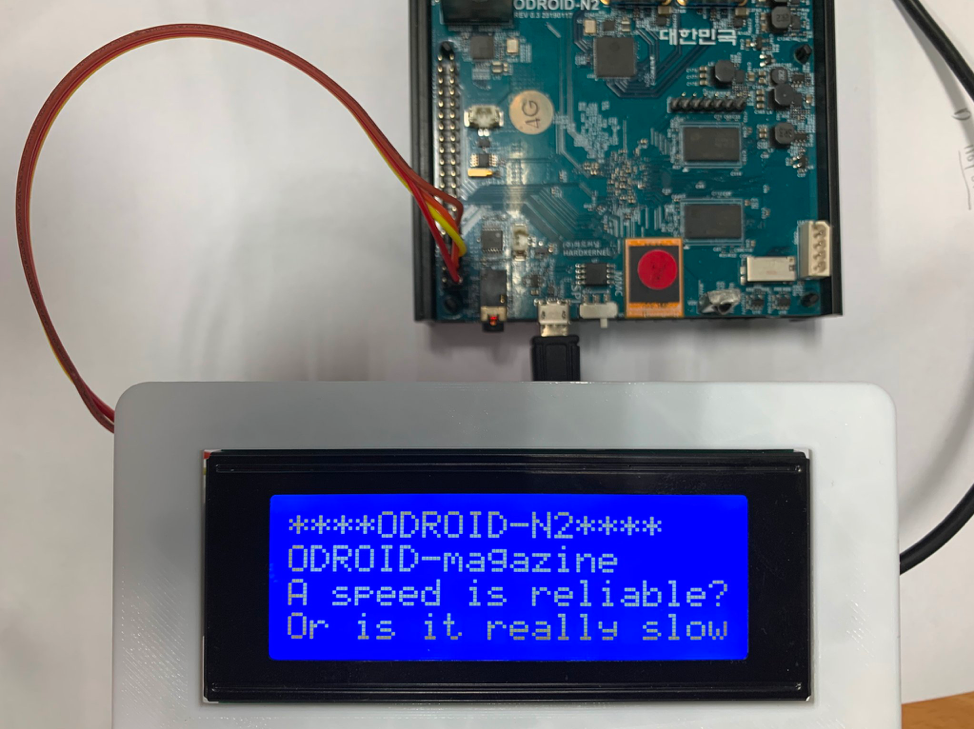
Running GNOME Desktop on the ODROID-N2
February 1, 2020By Dongjin KimLinux, ODROID-N2
This article is about how the GNOME Desktop can run on an ODROID-N2 with an upstream Linux kernel v5.4. Fortunately, the upstream kernel has many patches that make the ODROID-N2 run smoothly and I appreciate Neil Armstrong who contributes a lot of patches for Amlogic ARM SoC (Not to mention that walking on the Moon thing. Ed.) and also ODROID user @memeka who actually made GNOME work on the ODROID-XU4 and ODROID-N2, earlier. The core code changes were made by them, I put together the scattered pieces into my personal package repository.
I’ve managed the custom Debian/Ubuntu Netboot Installer with my package repository, http://ppa.linuxfactory.or.kr and, recently, spent a lot of time installing the GNOME Desktop to my ODROID-N2 using a custom Ubuntu 19.04 Netboot Installer that can be downloaded from http://bit.ly/2NjQSG3. Please visit my other article about my custom Netboot Installer and how you can use it.
Installing Ubuntu 19.04 to ODROID-N2
The Ubuntu 19.04 Netboot Installer can be downloaded from http://bit.ly/2NjQSG3 and the image can be flashed to MicroSD card using Etcher or the Linux command line tool ‘dd’. If you use Petitboot, the image can be flashed to a USB stick as well. The advantage of installing with Netboot Installer is that the OS can be installed directly to USB storage and you can customize the partition table during installation, if you know how the partition can be managed.
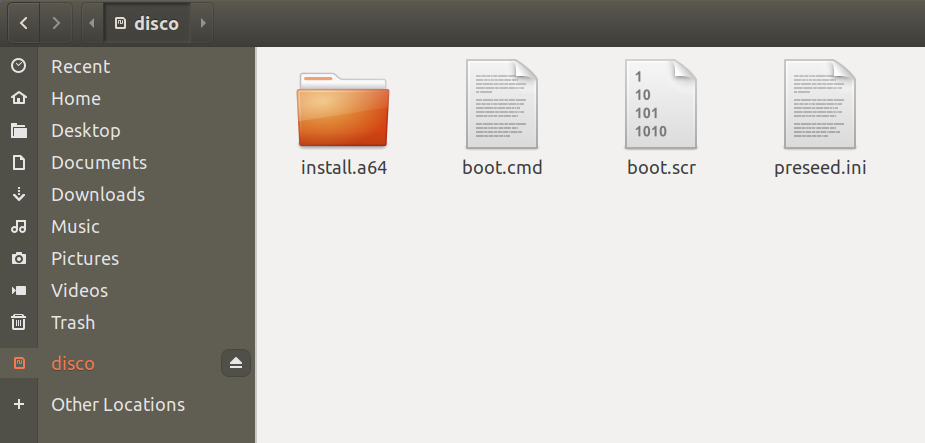
After flashing the Netboot Installer image, the contents look like this. You are not required to touch any of them except ‘preseed.ini’ if you want to install with predefined settings.
Figure 1 - Installer Content
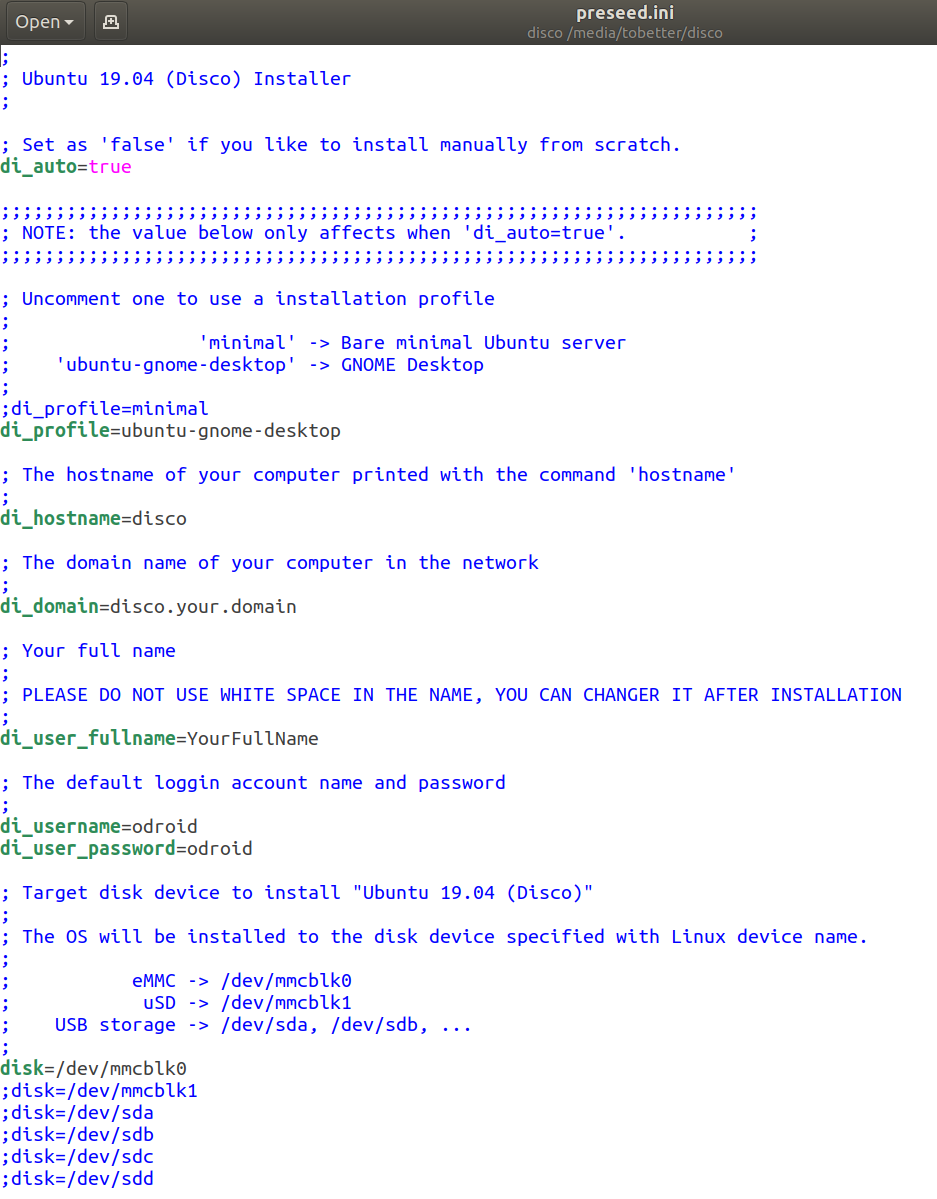
By default, the Netboot Installer is configured to install Ubuntu GNOME Desktop. If you are familiar with the Ubuntu installation steps, you can manually install the OS by changing the key ‘di_auto’ to ‘false’.
Figure 2 - preseed.ini
You can change the predefined values as you see fit, for example, account or the default password. The setting values can be changed later after installation; except for the target disk device, where you install Ubuntu Disco, since the installer will format and overwrite the disk device with the new OS.
Installation takes long
Now you are ready to launch the Netboot installer. It can boot from the MicroSD card slot, eMMC or, even, by Petitboot. The Ubuntu 19.04 Netboot Installer installs the packages through the network, therefore, the installation time could vary depending on the bandwidth of your network or Ubuntu repository server, but eventually, it will install.
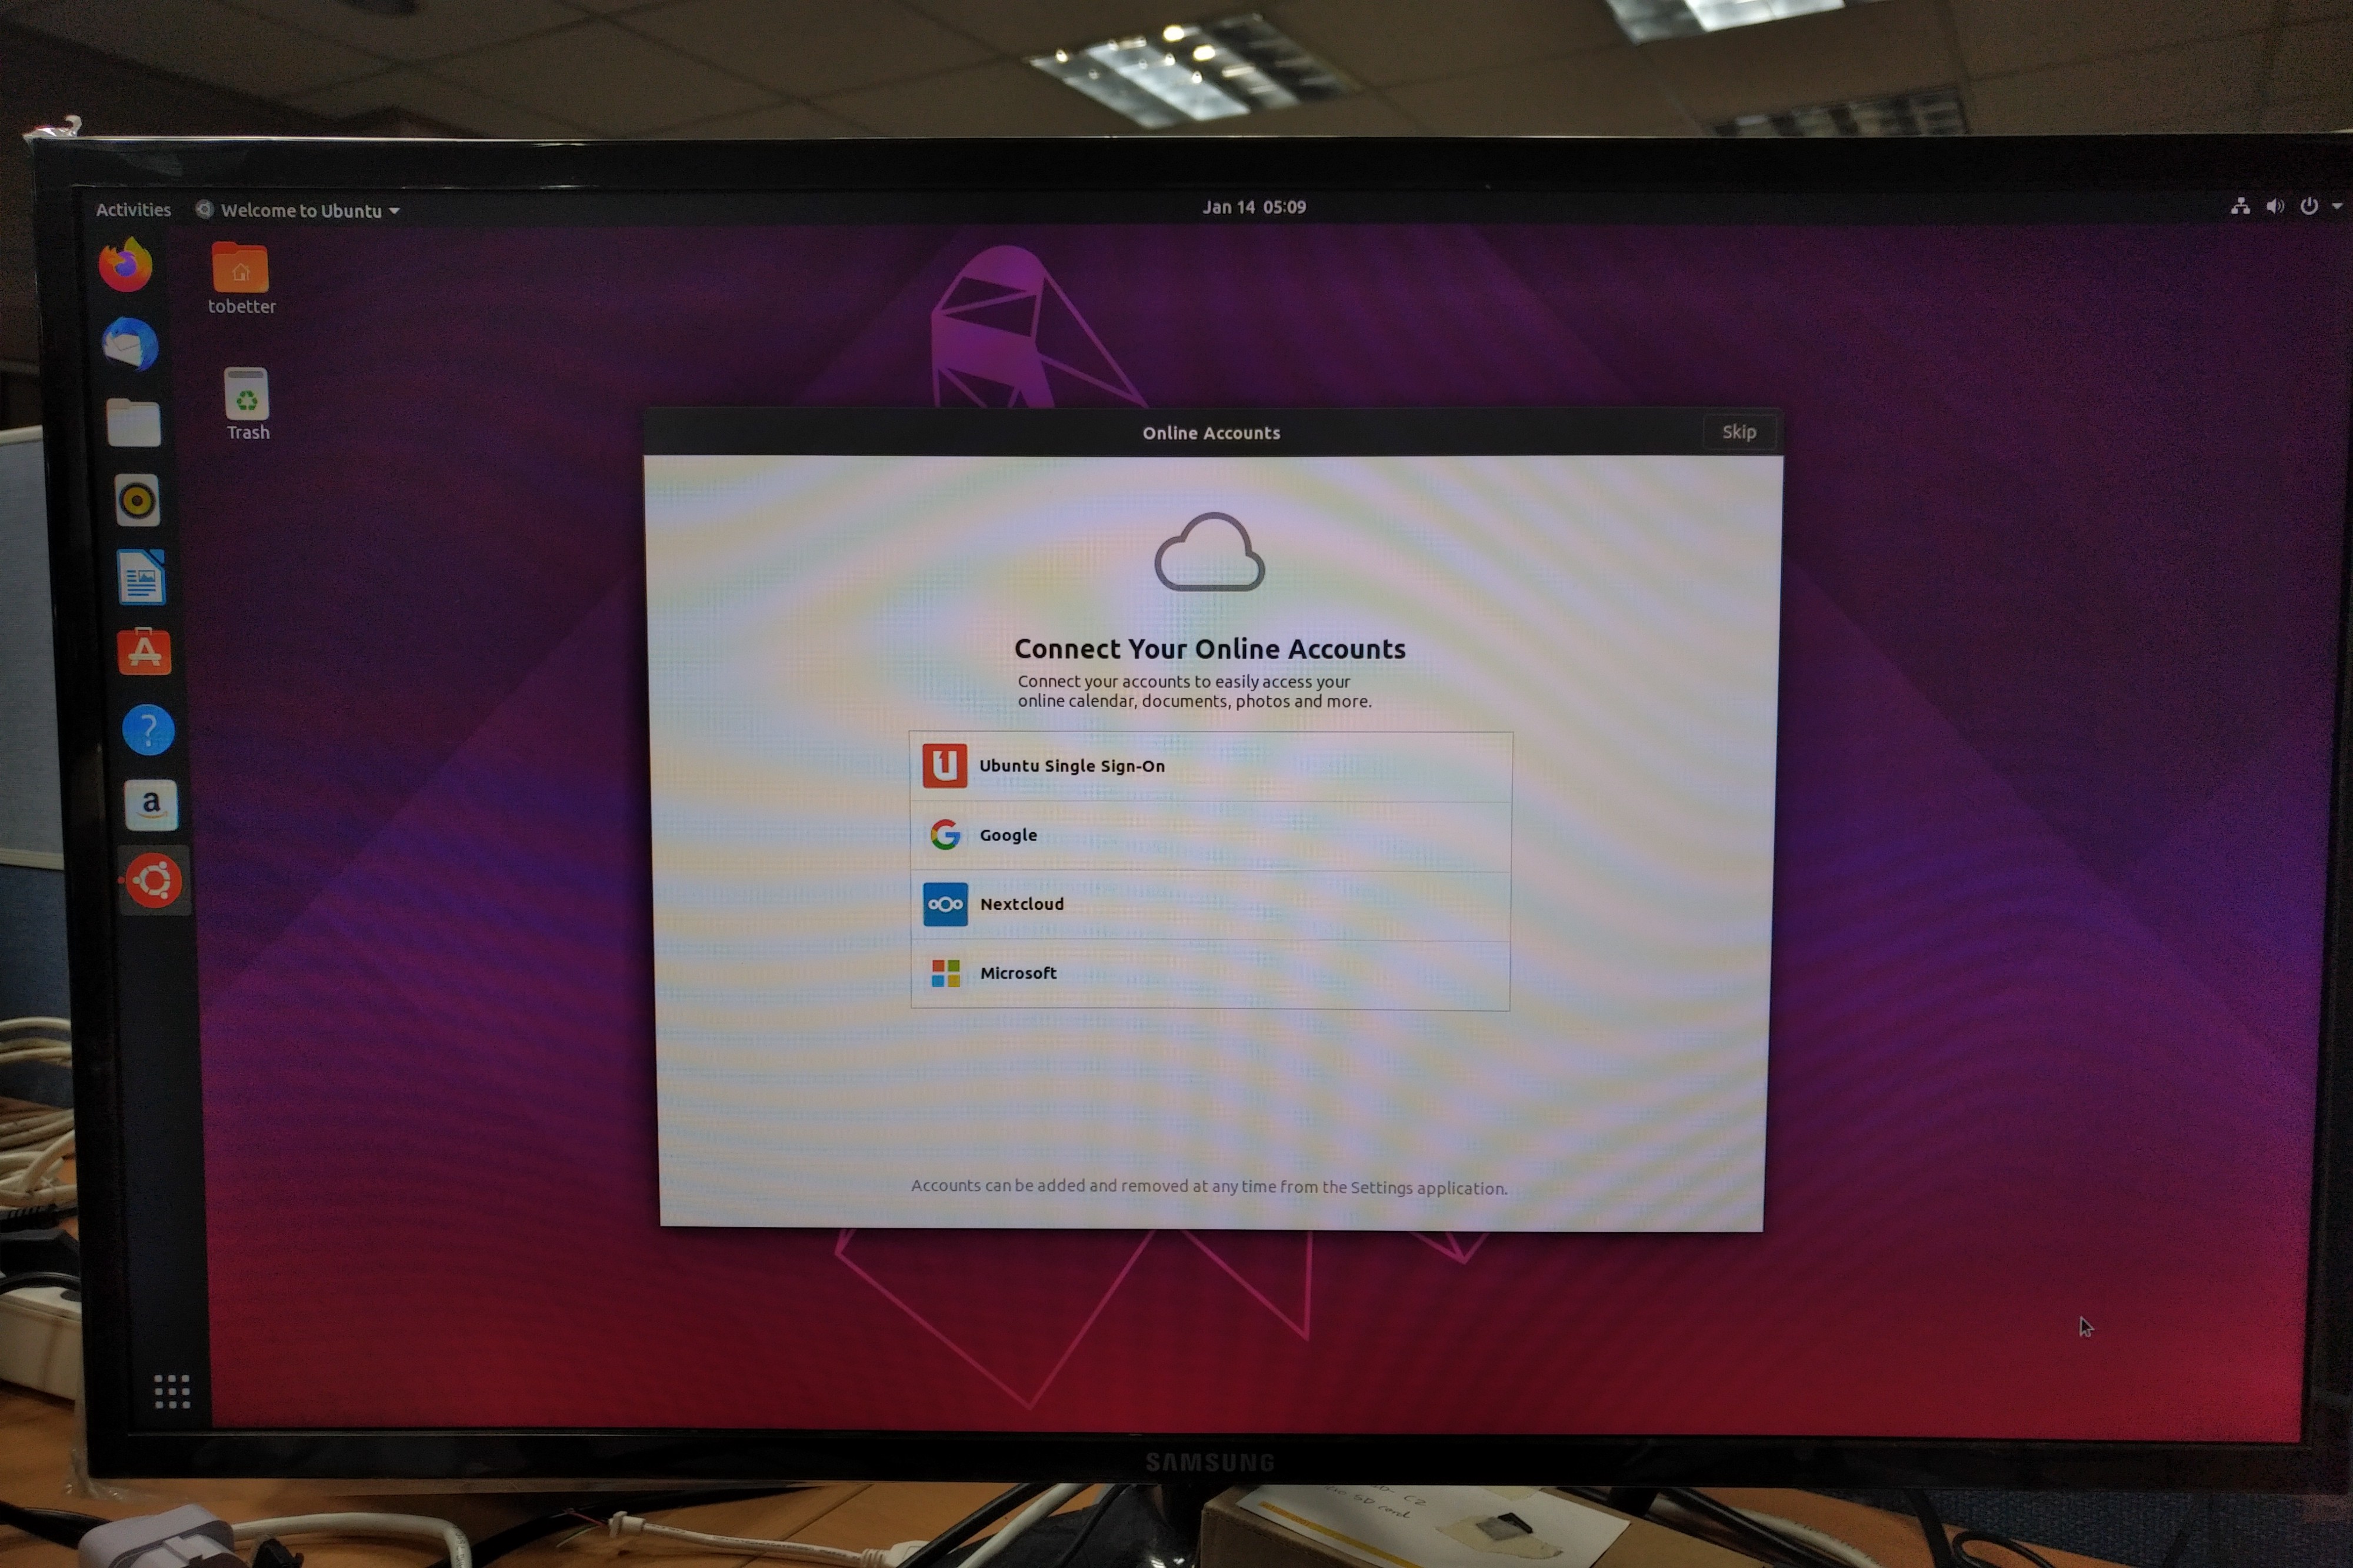
Once everything is installed without failure, ODROID-N2 will reboot and GNOME Desktop will start. But you may feel that it runs a bit slower than you expected since the current installer cannot use the Mali Bifrost driver while installing which I’ve tried to fix before publishing the installer image.
Figure 3 - Gnome Desktop up and running
This can be easily solved with an instruction to install the driver by yourself and have it take effect after rebooting:
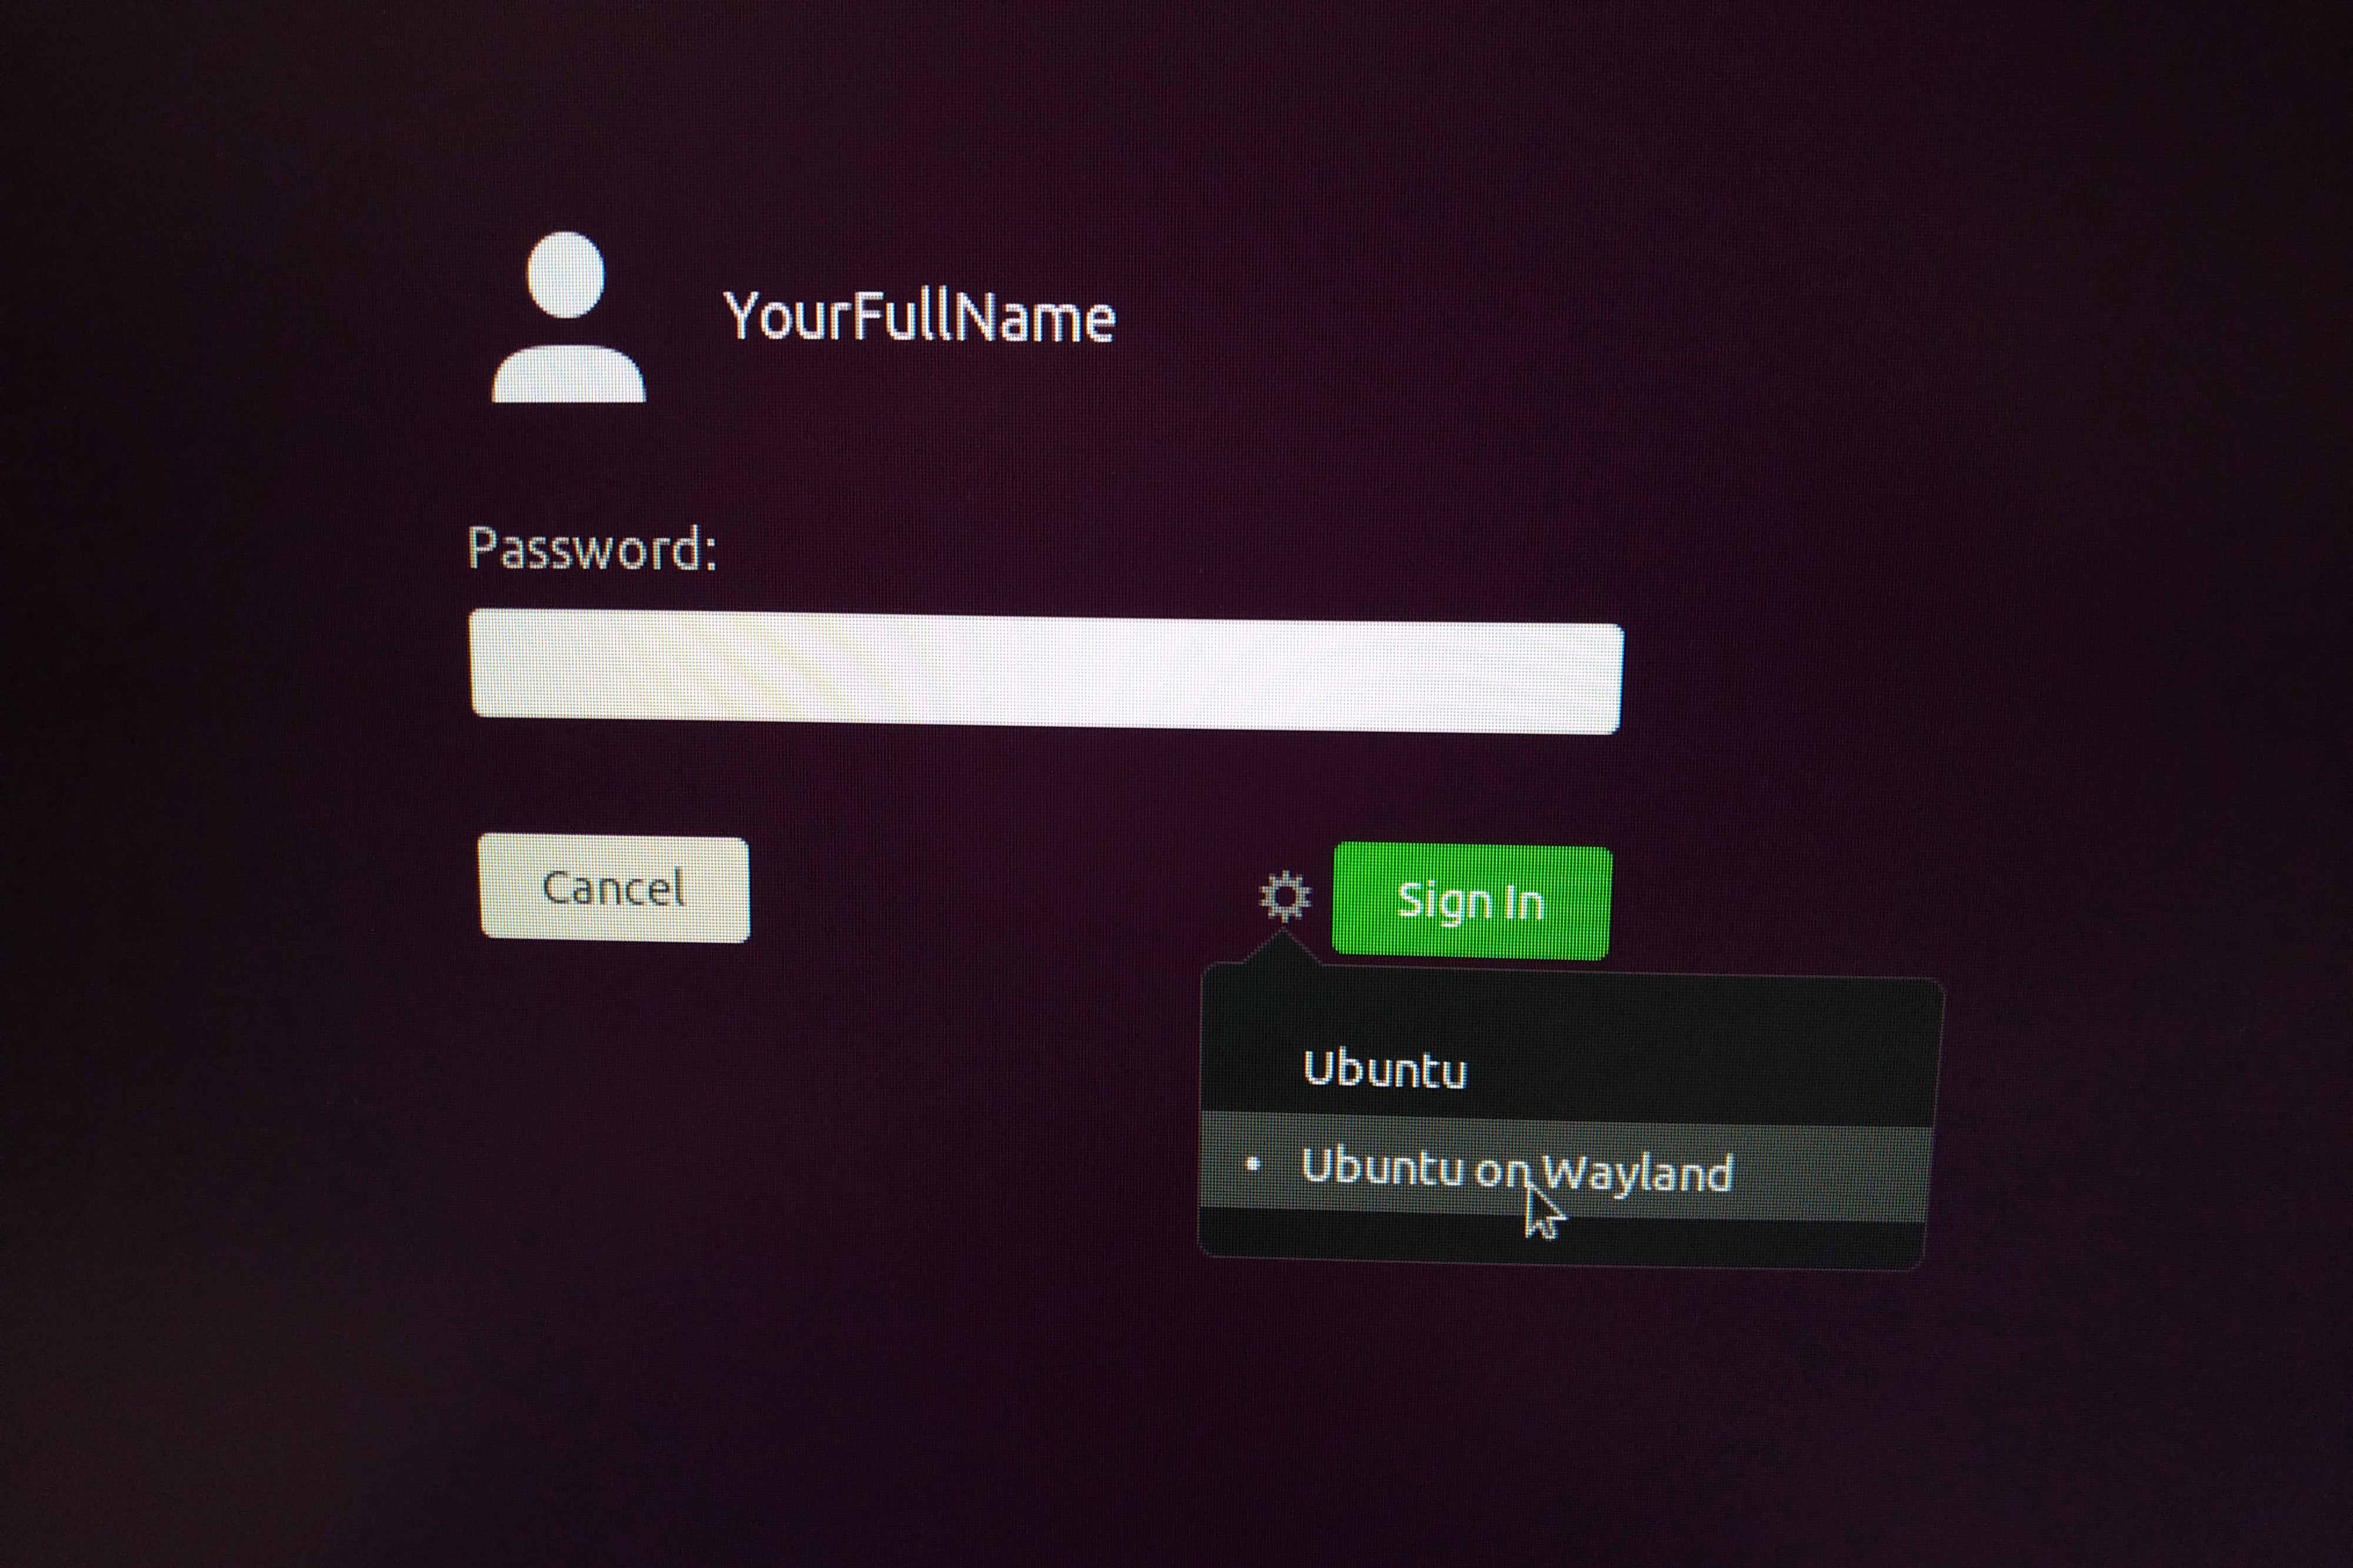
On the next boot, you must check if “Ubuntu on Wayland” is selected on the login screen to make sure Mali Bifrost Wayland driver is running.
Figure 4 - Selection Option for ‘Ubuntu on Wayland’
Testing Mali Bifrost Wayland Driver
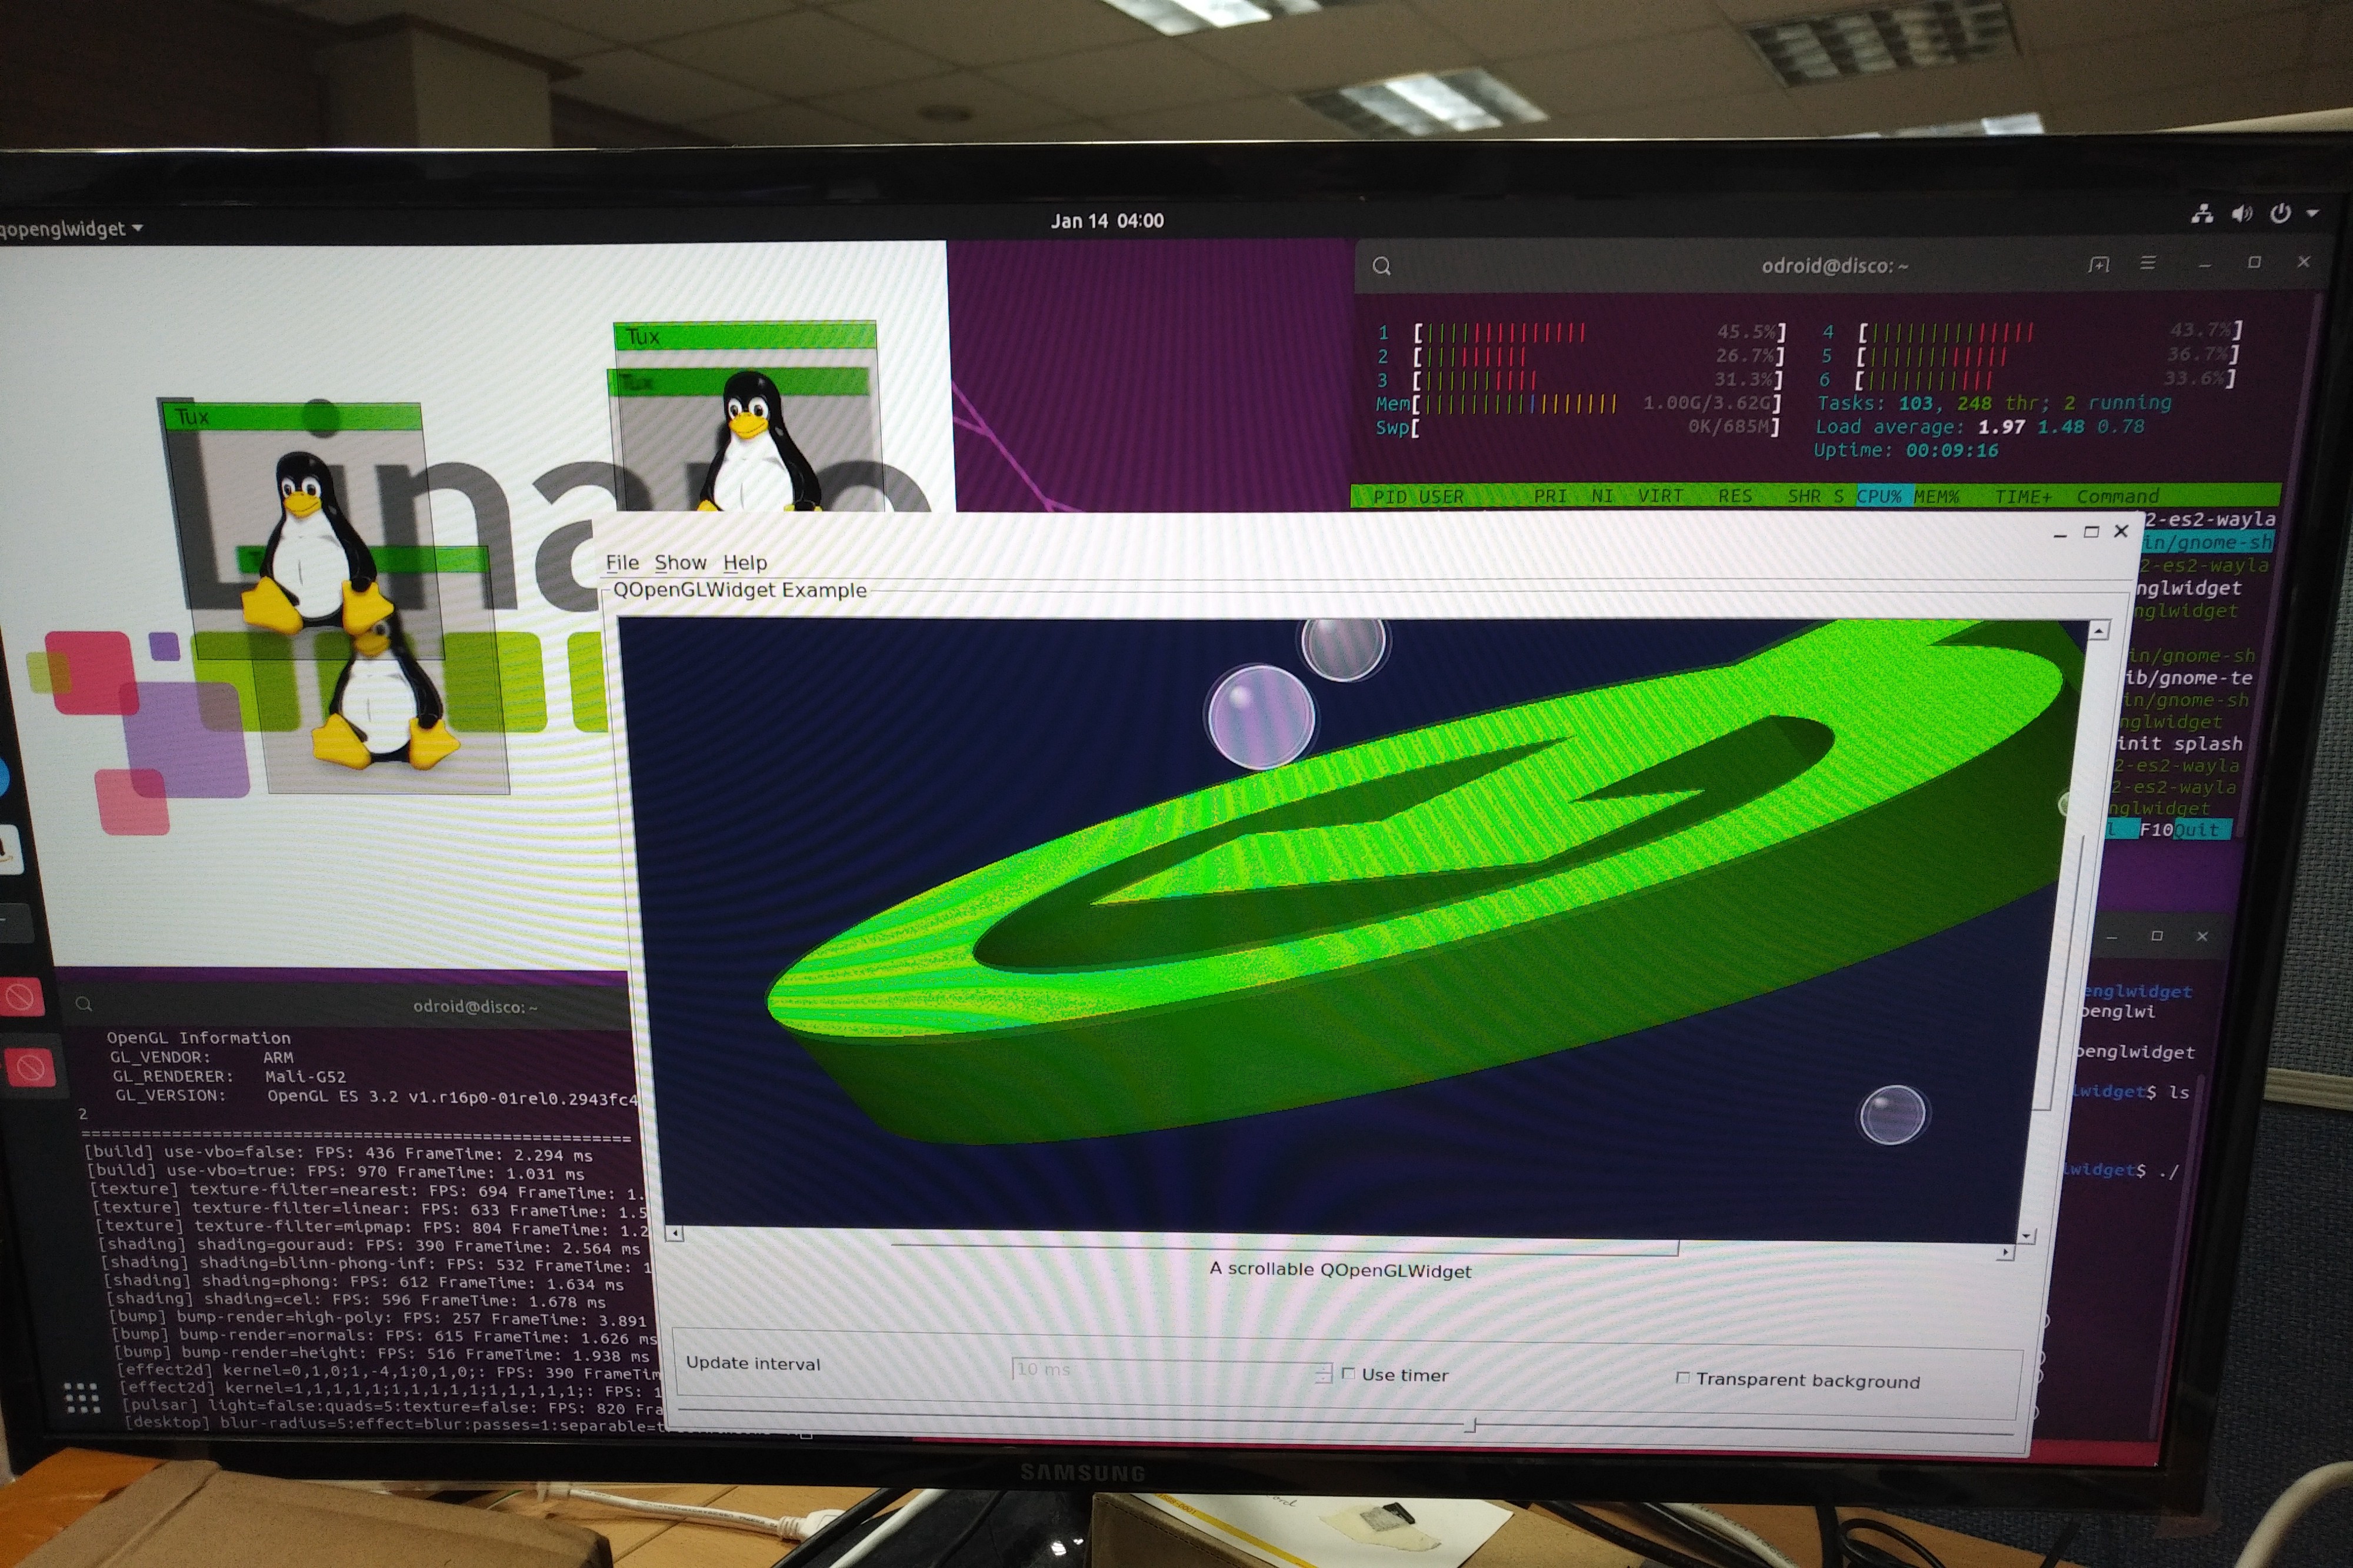
The simplest example to perform is with glmark-es2–wayland, which can be done with the following command:
$ sudo apt install glmark2-es2-wayland
Figure 5 - GLMARK2 Demo
I also have built Qt5 (5.12.2+dfsg-4ubuntu1.1), as well, to run on GNOME Desktop with Wayland. Therefore, QtWayland5 has to be installed. I’ve observed that many Qt5 examples are not working properly with the build, but it’s still good to test.
$ sudo apt install qt5-default qtwayland5
Figure 6 - QT5 Wayland test
Known Issues
Gnome-terminal cannot be launched if installed with a predefined profile. This is an issue I couldn’t solve and happens only if you installed the OS with the predefined profile ‘ubuntu-gnome-desktop’. The workaround for this issue is to run the two instructions on the shell command line after connect to your ODROID-N2 or opening a console screen and this takes effect after rebooting.
Missing features compared to the stock kernel v4.9 for the ODROID-N2:
The upstream kernel is being updated by many developers, especially thanks to Neil Armstrong who contributes a lot of patches to upstream kernel for Amlogic SoC and @memeka who actually made GNOME work with the Mali Bifrost blobs. The kernel will keep updating often and will be uploaded without notice, but Ubuntu will let you know whenever an update happens.
February 1, 2020By Justin Lee, CEO of HardkernelODROID-N2, Tinkering
Petitboot
Petitboot is a platform-independent bootloader based on the Linux kexec warm reboot mechanism. Petitboot supports loading kernel, initrd, and device tree files from any Linux mountable filesystem, plus can it can load files from the network using FTP, SFTP, TFTP, NFS, HTTP, and HTTPS protocols.
Version Check
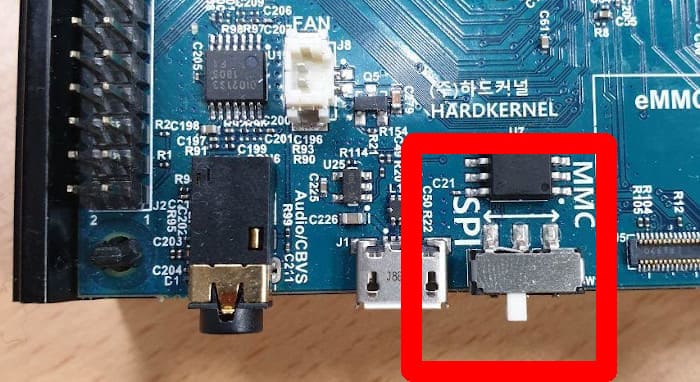
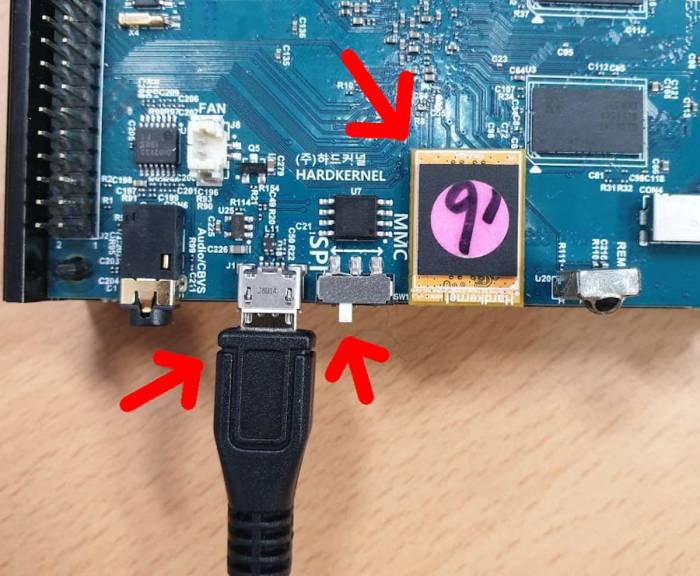
To check your Petitboot version, toggle the boot mode switch to SPI boot mode and turn on the ODROID-N2.
Figure 1 - Boot toggle set to SPI mode
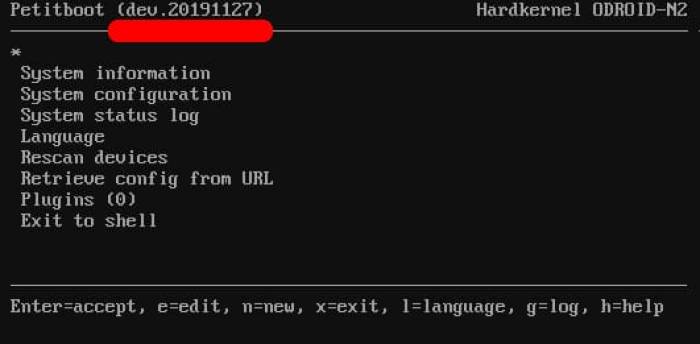
Figure 2 - Version information located in the upper right
If your Petitboot version is lower than dev.20191127, please refer to the “How to Recover or Upgrade” page available at https://wiki.odroid.com/getting_started/petitboot/recover_or_upgrade.
OS Installation via PC using ODROID-N2 OTG
This configuration will allow for OS installation directly to the memory (eMMC or uSD) on the ODROID-N2 from a PC over USB to the N2’s OTG port.
Figure 3 - Block Diagram of the connection
Figure 4 - PC OTG connection setup
Petitboot Setup
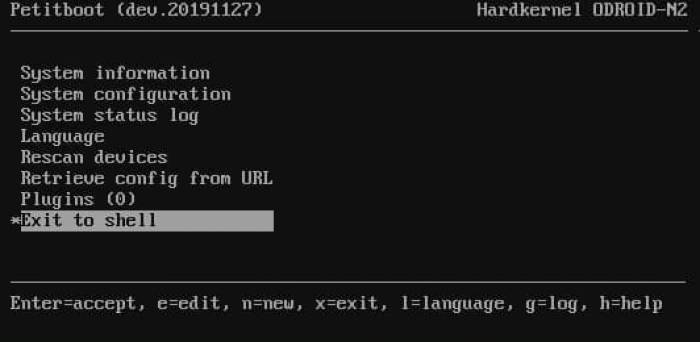
Select Exit to shell, as shown in Figure 5.
Figure 5 - Select to ‘Exit to Shell’
Check a list of storage device nodes:
$ ls /dev/mmc*
Set the storage device on the ODROID-N2 as a mass storage device using ‘ums’ (USB Mass Storage mode). This allows the ODROID-N2 and OTG to act as a memory card reader.
$ ums
Figure 6 - Example UMS setup
Wait for your PC to detect the new mass storage device.
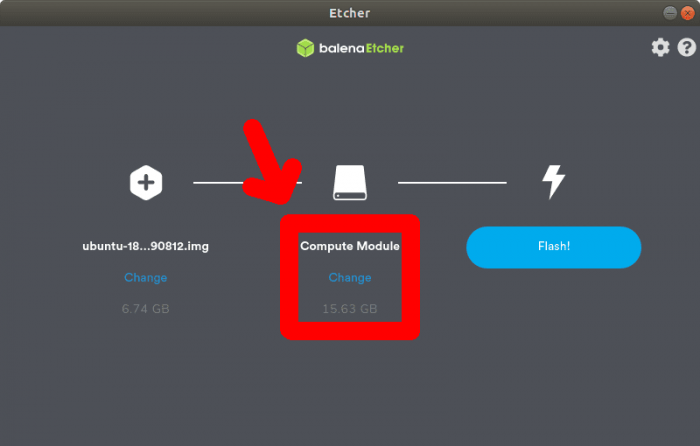
Flash OS Image to Memory
When the device is detected, the host PC recognizes your N2 as a USB card reader.
Therefore, to flash OS image into memory, refer to OS installation guide, except for some that use a memory card reader, available here: https://wiki.odroid.com/getting_started/os_installation_guide
Figure 7 - Using Etcher to write OS Image to N2
When done, press Ctrl + Alt + Delete, and boot the installed OS. See the OS section below.
Direct Booting
Power off ODROID
Toggle the boot mode switch to MMC boot mode
Power on ODROID
Booting via Petitboot
Power off ODROID
Toggle the boot mode switch to SPI boot mode
Power on ODROID
Select 'Rescan devices'
Select boot partition
Set Autoboot
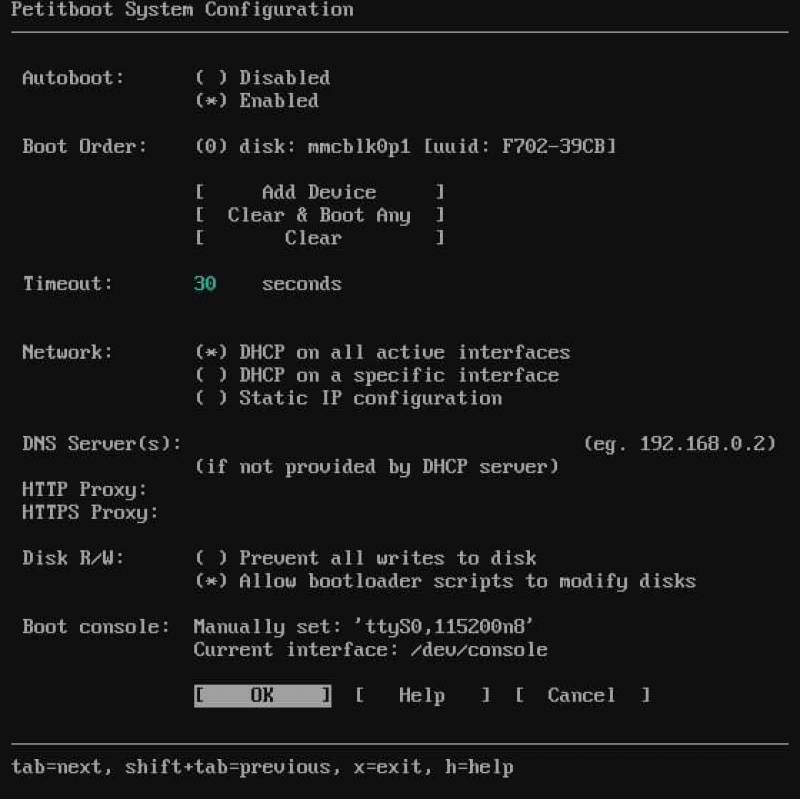
1. Select 'Rescan devices'
2. Select 'System configuration'
1. Set 'Autoboot' (*) Enabled
2. Set 'Boot Order'
1. Clear
2. Add Device
3. Set 'Timeout' (10 seconds or more recommended)
4. OK
3. Press Ctrl + Alt + Delete
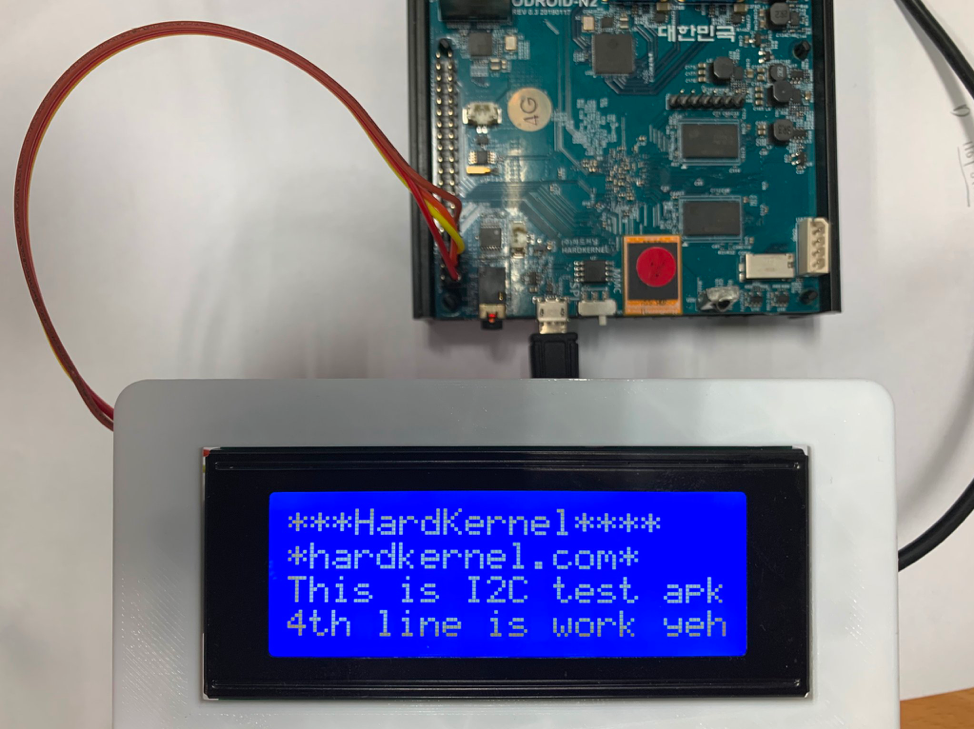
You can also use I2C on the ODROID board with Android things. You can use any I2C API provided by the Android things. The Android Things supports various sizes of data transmission, byte, word and buffered data.
Most of pre-procedure are same to GPIO procedure. Add permission to the manifest, import and call the instance of PeripheralManager to the project source code. However, you do not need to get a GPIO instance. You need to call the openI2cDevice method to get the I2C device instance.
The I2C Interface names are I2C-2 and I2C-3. Each I2C interface consists of pins 3,5 and pins 27, 28. When you get the I2C bus device, you should set the I2C device address for each I2C chip. In this case, a weather board2 consists of two I2C chips. So, I created two I2C device instances. One instance is linked by 0x76 to the BME280. The chip offers temperature, pressure and humidity values. And the other instance is linked by 0x60 to the SI1132. The chip offers UV, Visible and IR values. And I2C LCD has one I2C chip, so I created one I2C instance. It linked by 0x27 for control the LCD. Like this, you should create I2C device instance for each device with their own address.
Through the I2C instance, you can communicate with the device. Android things provide many methods. For reading the data from a device, it provide read, readRegBuffer, readRegByte and readRegWord method. Also for writing data to device, it provides write, writeRegBuffer, writeRegByte and writeRegWord. The Android Things official website provides a lot of information.
By using the I2C API, I built a wrapper class for weather board2 and I2C LCD. Here is a part of the example code to read and write data with the Android things API.
The code is part of BME280.java. First method is called to soft reset the chip and second method is called to get chip’s power mode. Each API’s first parameter is the address of the register in the chip. On the write method, second parameter is usually the data to transfer. also on the read method, second parameter is usually not exist. However, if you want to read data by buffer, you need buffer to read and the buffer is passed as a second parameter.
You can test or use the project. Here is the link.
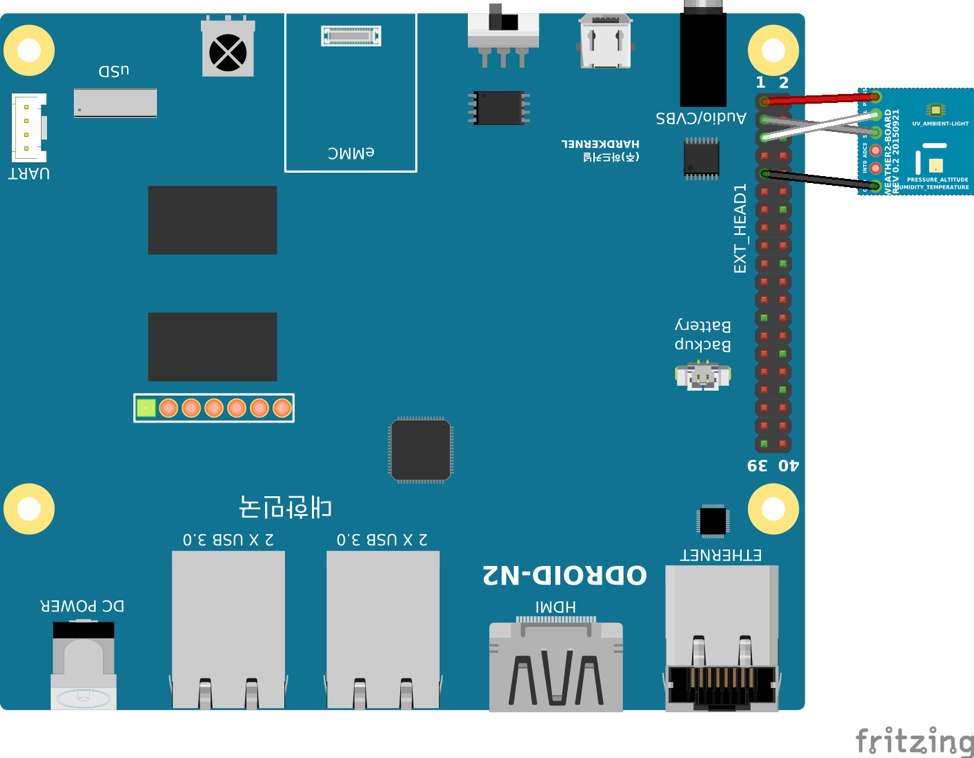
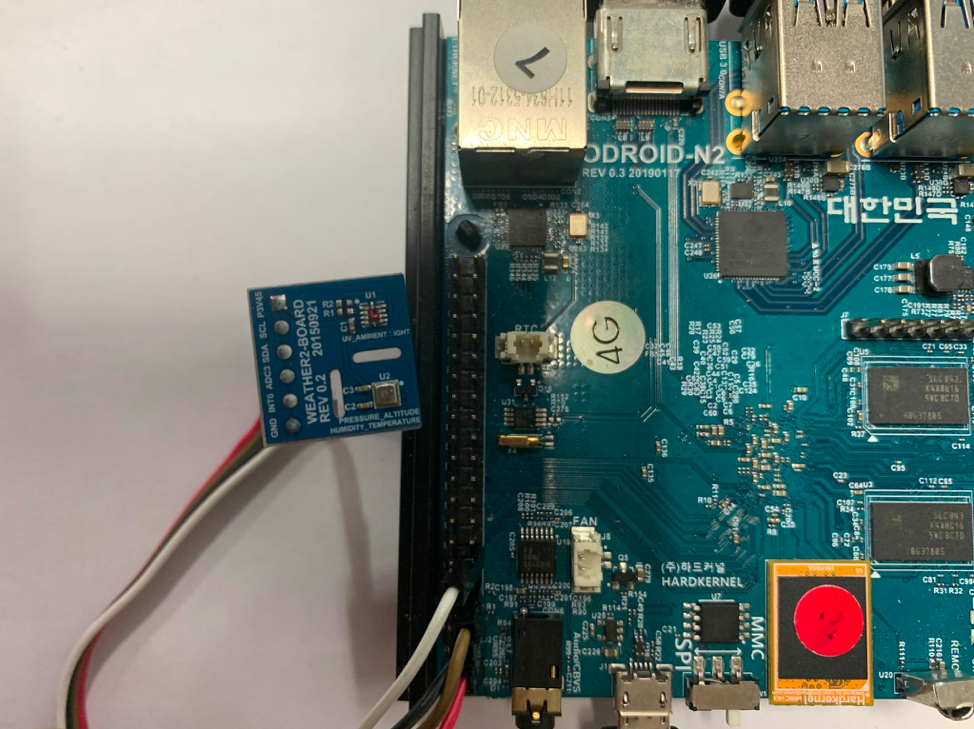
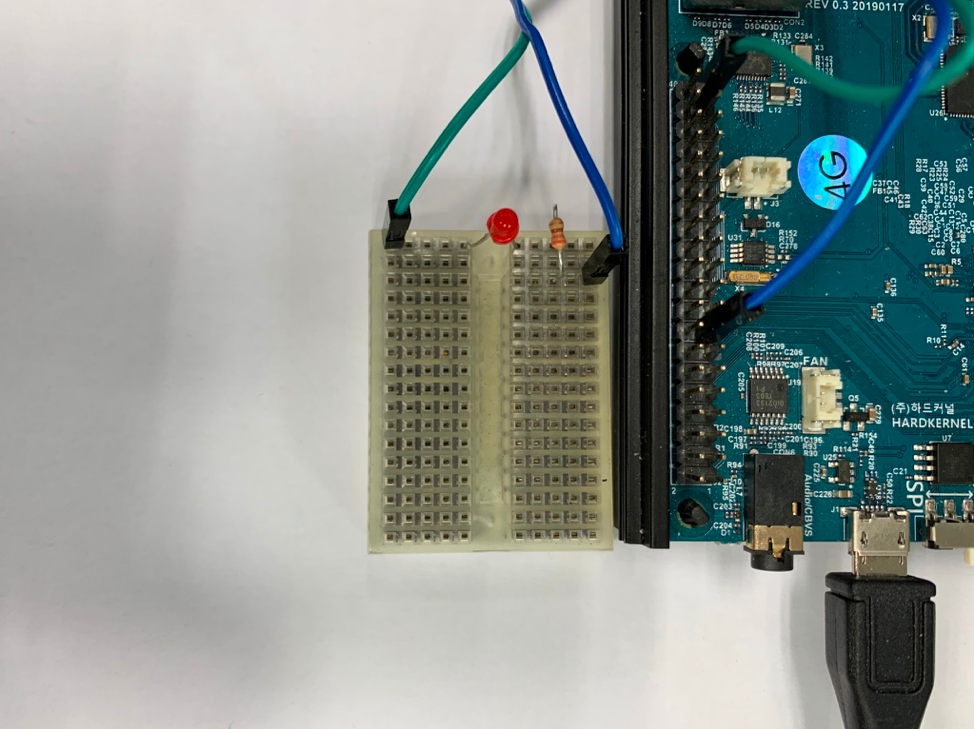
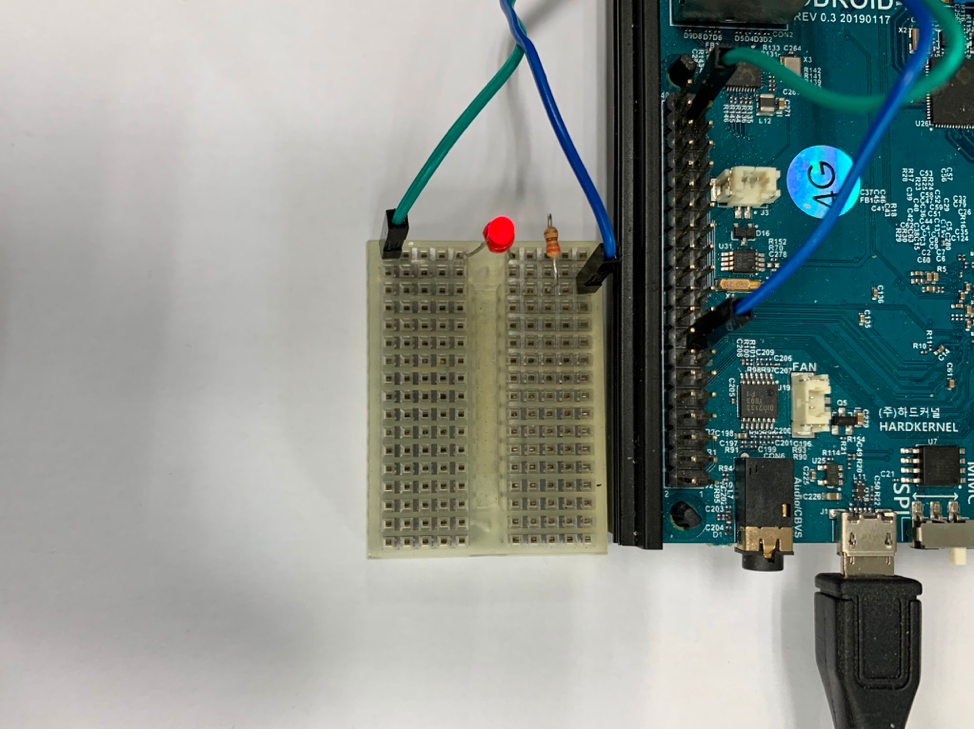
Following is the Weather board 2 Hardware connection:
Figure 04
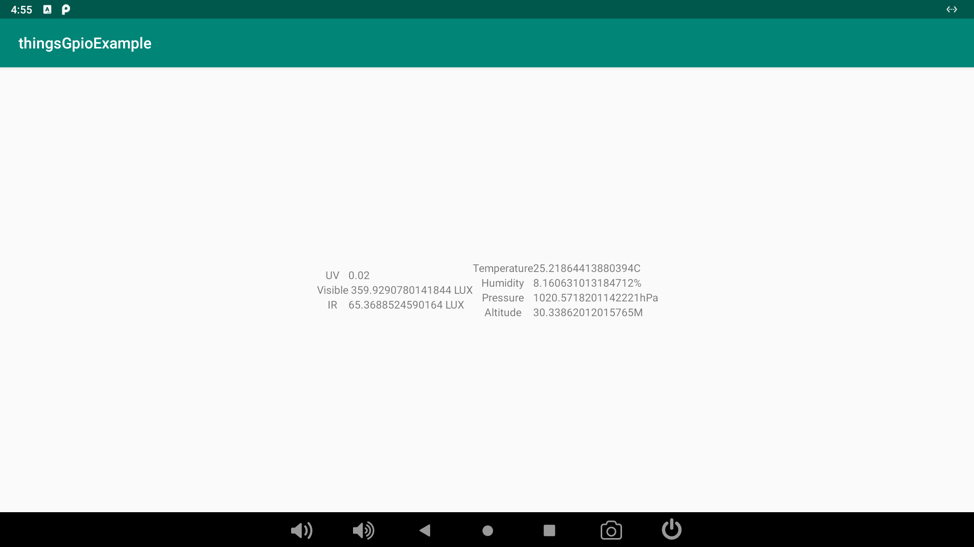
The Weather board 2 Output Result would be like so:
Figure 05
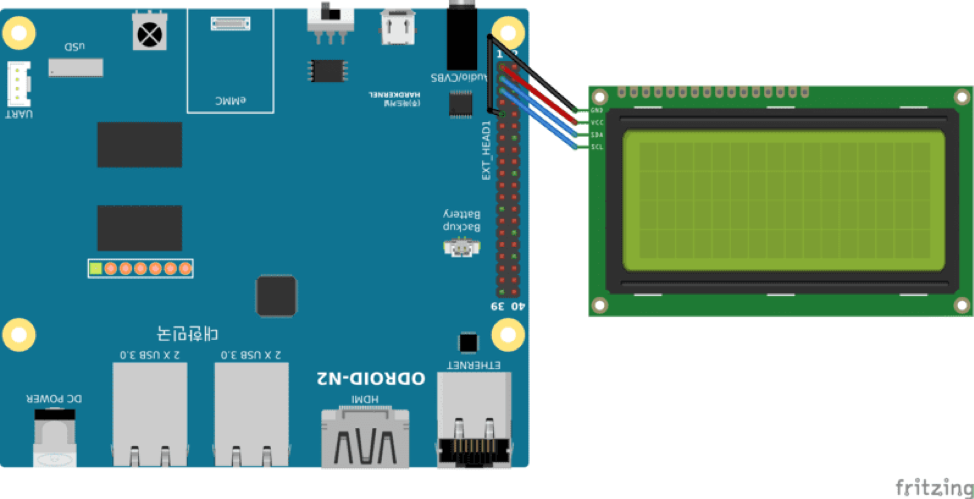
Following is the I2C LCD hardware connection and result:
Figure 06
Figure 07
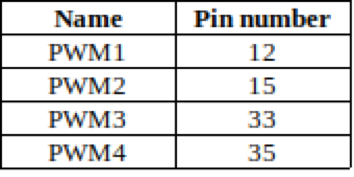
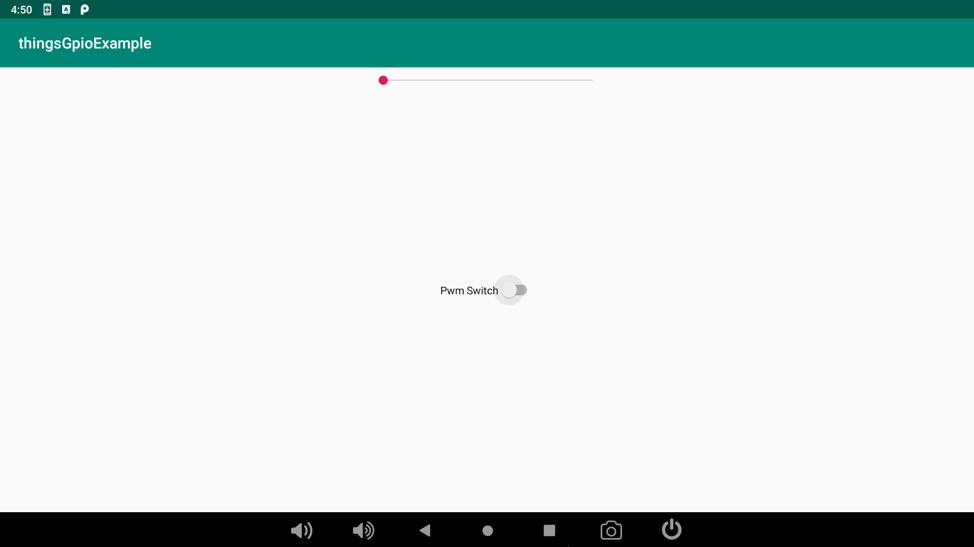
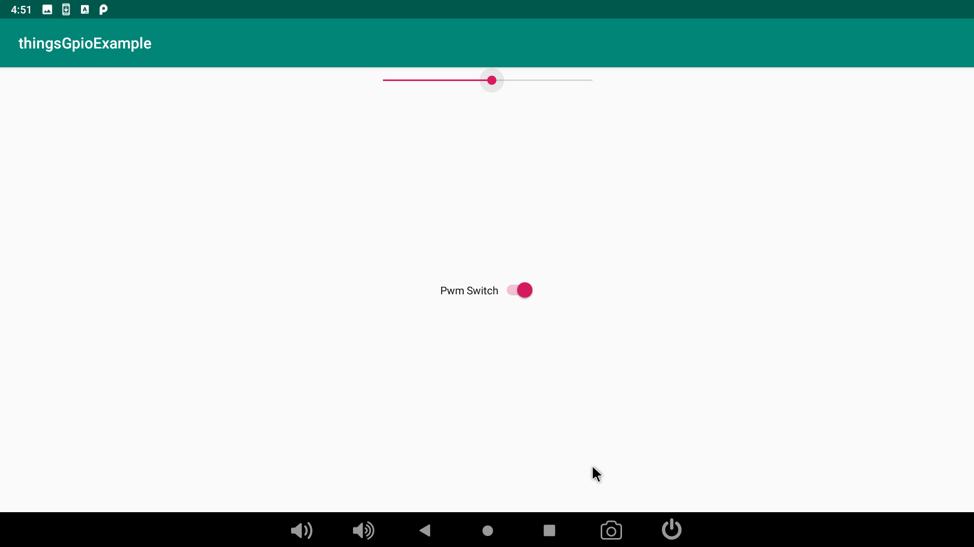
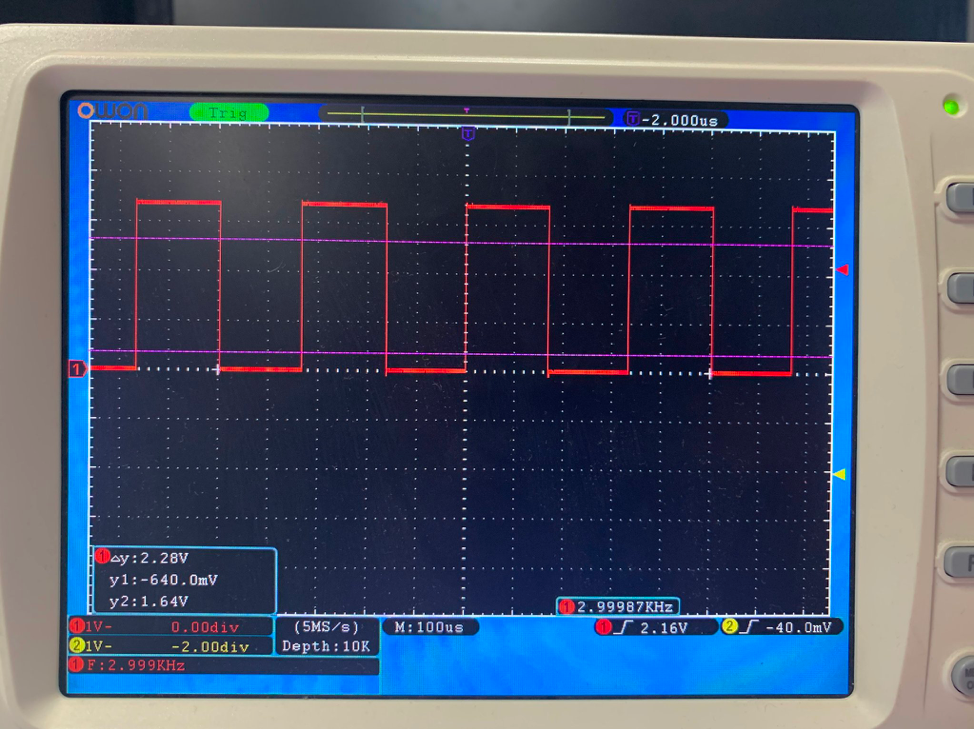
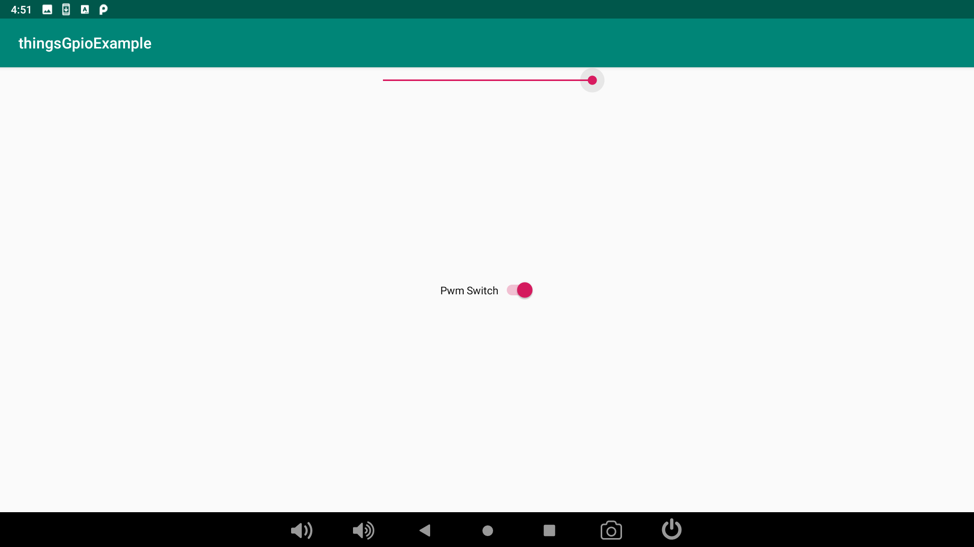
PWM
Figure 08 - Available PWM Table
The android Things also support the PWM. There are many methods to configure and control the PWM interface. You can set the PWM Frequency via setPwmFrequency. Before enabling the pin, you must set frequency via this method. Also you can set PWM duty cycle by setPwmDutyCycle between 0 and 100. Frequency and duty cycle settings can be set in both enabled and disabled state and will be remembered.
This article is about the Hysteresis fan controller for the ODROID-XU4. When the fan comes on, it stays on for a while. It cools down the CPU enough that it then turns off. As the CPU gets hotter, the fan spins harder.
For example, say the trip point is 60 deg C, and the hysteresis is 8 deg C. The fan will turn on when the temperature reaches 60 deg C, but will not turn off until the temperature reaches (60-8) = 52 deg C.
For more information about this type of controller, see the Wikipedia article at https://bit.ly/2NWCowb.
Please note that this controller only works with Ubuntu on the ODROID-XU4, and is not designed for any other single board computer or operating system.
Installation
Download the installer https://bit.ly/2RKqRB4 from GitHub.
To install using the GUI installer, double-click on xu4fan-installer.deb file. Then click the Install Package button in the top-right of the window.
To install using the command line, use:
$ sudo apt install xu4fan-installer.deb
To uninstall, use:
$ sudo apt remove xu4fan
The fan controller will start automatically after it is installed.
Configuration
The configuration file for the fan controller is located in /etc/xu4fan/xu4fan.conf
You can use this file to change the settings for the fan controller, such as trip points and hysteresis.
You must restart the fan controller after changing the configuration file. To do this use:
$ sudo systemctl restart xu4fan.service
Configuration Options
trip_temps:
List of temperatures corresponding to PWM values. When the temperature is increasing, and one of these temperatures is reached, the corresponding PWM value will be set. Units are Deg C * 1000. Example: [60000, 70000, 80000]
trip_speeds:
List of PWM values corresponding to temperatures. Units are PWM values in the range (0-255). A value of 120 is (120 / 255) = 47% of the fan's maximum power. As the CPU gets hotter, the fan spins harder. Note that values below 120 are not powerful enough to spin the stock fan. Example: [120, 200, 240]
hysteresis:
Number of degrees C past the trip point that the temperature must reach to drop to the preceding trip point. If the trip point is 60 deg C, and the hysteresis is 8 deg C, then the temperature must fall below (60 - 8) = 52 deg C for the fan to turn off. Units are Deg C * 1000. Example: 8000
poll_interval:
Number of seconds for the fan controller to wait between temperature checks. Example: 0.25
verbose:
If True, a message is printed to syslog every time the fan changes speed
The options for the [Thermometer] and [Fan] sections should not need to be changed. These are specific to the ODROID-XU4.
Systemd Service
The fan controller is run by a systemd service. Which is started automatically when it is installed. It will also start automatically when your ODROID-XU4 starts.
To see its status, use:
$ sudo systemctl status xu4fan.service
To stop it use:
$ sudo systemctl stop xu4fan.service
To disable it, and not allow it to start automatically, use:
$ sudo systemctl disable xu4fan.service
To enable, use:
$ sudo systemctl enable xu4fan.service
Sample Files
A sample configuration file along with a systemd .service file are located in /usr/share/xu4fan/.
The G Spot: Your Goto Destination for All Things That are Android Gaming - These Board Games are NOT Bored Games
February 1, 2020By Dave ProchnowGaming
Do you think that board games are bored games? These paper-based analog entertainment activities have a long-standing gaming history, or has that tradition faded and been replaced by today’s ODROID Android games. Well, Dire Wolf Digital would beg to differ. This Denver, Colorado-based game development firm has carved a pretty substantial niche for itself - by taking board games and rendering them into digital gaming masterpieces.
Figure 1. The howl of the Dire Wolf Digital board game juggernaut has been sounded.
This crazy transmogrification began several years ago when Renegade Game Studios sought Dire Wolf Digital to bring two of their tabletop games to the digital world. “Lanterns: The Harvest Festival” and “Lotus” featured a “unique user experience” (UX) and an “intuitive touch play” system which would both become hallmarks of the future remastering efforts of Dire Wolf Digital.
“Pass GO and Collect $200” – now today, Dire Wolf Digital has announced that all of 2020 will be consumed with bringing a huge slate of board games into their digital fold. These offerings represent an incredible mix of titles that would be the envy of EVERY Android dev.
Not all of the announced titles are “one-off” trade-offs where one board-games equals one digital title. Some, like WizKids’ “Mage Knight” is only one title from an entire catalog of games that will be getting the digital treatment. While you might not have heard of some (or, any) of these board games, they are incredibly popular with tabletop gamers. For example, Dire Wolf Digital supplied us with this review snippet from “Rock, Paper, Shotgun:”
Figure 2. “Mage Knight” is the initial release from the partnership between WizKids and Dire Wolf Digital.
‘“Mage Knight” is a staggering game. It is one of those games you can only step back and admire as a thing of beauty, a work of art. It is a masterpiece. I cannot believe how good it is. Gosh, gush, right? Although, there are plenty of Android games that would yearn for that type of rave review.
Whereas, WizKids are a traditional board game maker, another Dire Wolf Digital partnership has been forged with 2018 Kickstarter game darling, “Root.” This woodland “war game” between furry forest creatures versus a local cat is the creation of Cole Wehrle and Leder Games. Again, we were provided with a glowing review of this game which seems to imbue its players with an anthropomorphic attachment to the game’s protagonists.
Figure 3. Your eyes would be big too, if you had to combat a sharp-fanged killer monster cat.
Continuing on with the Dire Wolf Digital 2020 hit list, brings us to “Sagrada”-- a game of dice, stained glass, and architectural wonders. Yes, you read that right; three of the strangest bedfellows you will ever see in an Android game. Touted as a, “dice-drafting” game, “Sagrada” is a 2017 title from Floodgate Games that garnered a fistful of award nominations, as well as being labeled the most innovative game of the year.
Figure 4. Blending a dice game with stained glass and the architecture of Antoni Gaudi is undeniably innovative.
If you love tile-based games, then you have to embrace the board game genre. That is, until Dire Wolf Digital brings Reiner Knizia’s “Yellow & Yangtze” to your ODROID. This is a wild combat/strategy game similar to Knizia’s acclaimed “Tigris & Euphrates” game. In each title, you grow your empire; but beware. The game’s winner is not only judged by the prosperity of your kingdom, but, also, by the strength of your weakest asset. So make things right by maintaining a balance throughout your dynasty.
Figure 5. The most recent release from Reiner Knizia’s strategy games collection.
Great news: as this column was going to press, “Reiner Knizia’s Yellow & Yangtze” popped up on Google Play! Incredibly, there is already an update, too (i.e., Update 1.17). Our fave improvement in this update was: “slowed down peasant riot animation, so it is more obvious when an opponent makes this play.” Yay!
Figure 6. Game ON; but make sure that you watch your assets.
Fans of the vintage American Heritage board game from 1964, “Dogfight”, will definitely want to watch for the Dire Wolf Digital titles, “Wings of Glory” and “Tripods and Triplanes.” Sitting at the exact opposite ends of historical accuracy these titles from Ares Games will take you from the wicker seat cockpit of a 1917 aeroplane in the former title to facing the “death ray” from an alien spaceship in the latter game’s “War of the Worlds” adaptation. Likewise, as the latter’s title suggests you will be combating the Martian scourge in vintage 1917 era aeroplanes.
Figure 7. Martian invaders from an H. G. Wells’ novel clash with the aeroplanes of the First World War.
Finally, we return to where all of this board gaming started with another title from Renegade Game Studios. “Raiders of the North Sea” which is not a game about submarine warfare during the world wars, rather its a plundering game of Viking conquest. It is dead simple; build a boat (i.e., a Viking longboat) and they will come and plunder. Best of all, however, this title is already available for play on Google Play.
Figure 8. Row, row, row your longboat, gently into plundering the entire North Sea; merrily, merrily enjoying the Vikings’ creed.
So keep your eye on Dire Wolf Digital in the Google Play store. Then, maybe, dust off your copy of “Monopoly” from the hallway closet and discover a newfound appreciation for the venerable board game. You can learn more about all of these games at the Dire Wolf Digital Web site at http://www.direwolfdigital.com.
The Best ODROID-XU4 Media Server Software Options
February 1, 2020By Moe Long, www.cupofmoe.comODROID-XU4, Tutorial
While the Raspberry Pi is a popular single-board computer (SBC), the ODROID-XU4 is a solid competitor. Maintaining a small form factor, the ODROID-XU4 packs quite a performance punch. Powerful yet energy-efficient, with an ARM big.LITTLE processor, the ODROID-XU4 features the Samsung Exynos Cortex-A15 2GHz and Cortex-A7 octa-core CPUs. There's a Mali-T628 GPU with OpenGL ES 3.1 and OpenCL 1.2 capabilities. Onboard, 2GB of LPDDR3 RAM makes multitasking a breeze.
Among the best uses for an ODROID-XU4 is as a media server. Because of its tiny footprint yet beefy specs, the ODROID-XU4 sips power while handling network-attached storage (NAS) processes like a champ. From Plex and Emby to Owncloud and OpenMediaVault, these are the best ODROID-XU4 media server software options!
Build an ODROID-XU4 Server with Ubuntu, Debian, Standalone Images, etc.
Most users will likely install a Linux operating system such as Ubuntu or Debian. Then, within the host operating system, you can install NAS services. DietPi is a top choice, as well, with a tiny footprint and modular installation that allows you to easily download media server, and file server, programs. Alternatively, you might prefer a standalone server image. Regardless, the ODROID-XU4 offers an economical means of creating a powerful, energy-efficient NAS. The CloudShell 2 NAS kit even allows for the installation of up to two 3.5" hard drives, and runs SPAN, RAID0, RAID1, and JBOD.
If you choose a case without hard drive connections built-in, you'll need to decide how you want to store your media. Luckily, with its USB 3.0 ports, the ODROID-XU4 can read media from connected drives quickly. If you've got a networked media drive, you could install server software on the ODROID-XU4 and simply connect to a Samba share or other networked file storage device. For hooking up drives directly to the ODROID-XU4, you might need a more powerful power supply such as a 5V/6A PSU.
Odroid XU4 media server considerations:
Case
Media storage (directly connected drives vs. networked drive)
Standalone server image vs. host OS with media server software
Host OS (Debian, Ubuntu, DietPi, etc.)
PSU
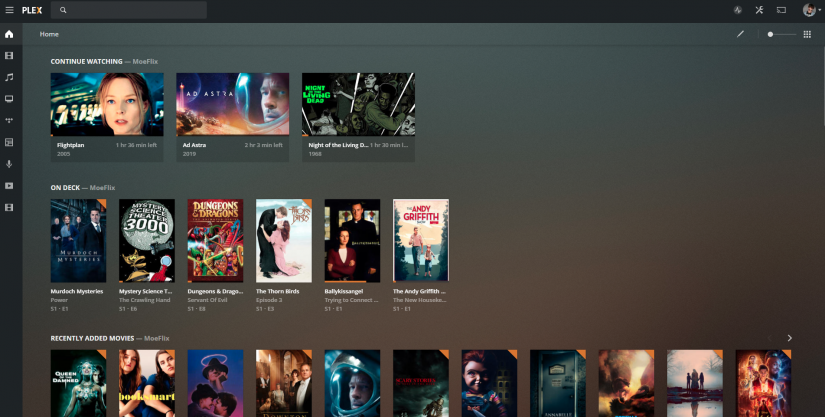
Plex Media Server
Figure 1 - Plex
Best for: Media server beginners, intermediate, and advanced users alike
Plex remains one of the best media server apps available, and an ODROID-XU4 Plex media server works extremely well. Something of a do-it-yourself (DIY) Netflix, Plex allows you to host your personal media collection such as movies, TV shows, music, and even photos on a server. Then, you can access your entire repository of films, TV, and audio files on compatible Plex clients. Once you've loaded up your libraries, Plex will scan your files and download metadata and box art if available.
When Plex began, it focused mostly on organizing personal media files. And while that's still its core focus, Plex adopted a slew of cord-cutting features such as free, ad-supported movies and TV shows, podcast and Tidal integration, plus live TV and DVR functionality. Since it's incredibly easy to install and set up, Plex is a superb server program for beginners. Still, power users can dig into its vast array of customization settings. An ODROID-XU4 Plex server install is incredibly easy to cobble together. I've found an ODROID-XU4 Plex server simple to create, and functional for in-home streaming to over five clients.
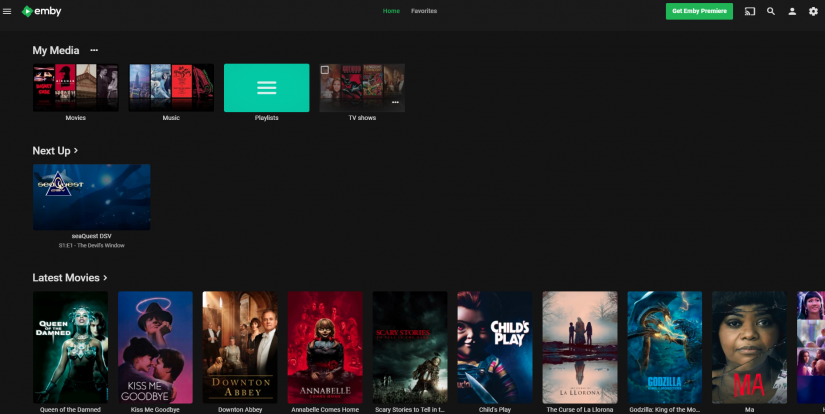
Emby
Figure 2 - Emby
Best for: Media server intermediate and advanced users
Likewise, Emby runs smoothly as an ODROID-XU4 media server. Similar to Plex, Emby is an all-in-one server software app that organizes your personal media collection into a lush interface with metadata and box art. However, Emby is best suited to power users. Although beginners can, and should, try Emby, its slate of customization options makes it a solid choice for advanced users.
Admittedly, Emby's setup process isn't difficult, but additional options such as enabling chapter image extraction makes it slightly more complicated than Plex's straightforward configuration. Moreover, ample settings to tweak and even the ability to implement your own CSS in its web app makes Emby a true home server enthusiast's dream. When using the ODROID-XU4 as a server, Emby quickly sorts your media files into various categories, allowing you to stream to your Emby client devices.
Serviio
Figure 3 - Serviio
Best for: Media server beginners, intermediate, and advanced users
For streaming media to various clients such as phones, tablets, and set-top boxes, Serviio is a neat pick. You can access a slew of video and audio files. Plus, Serviio allows you to stream content from RSS feeds and web pages. It can handle subtitles, tons of playlist formats, and even boasts RAW camera image support. There's integration with the likes of Trakt.tv, and even an Alexa skill. Serviio is super easy to install on the ODROID-XU4, requiring little more than a Java JDK installation, then downloading the actual program.
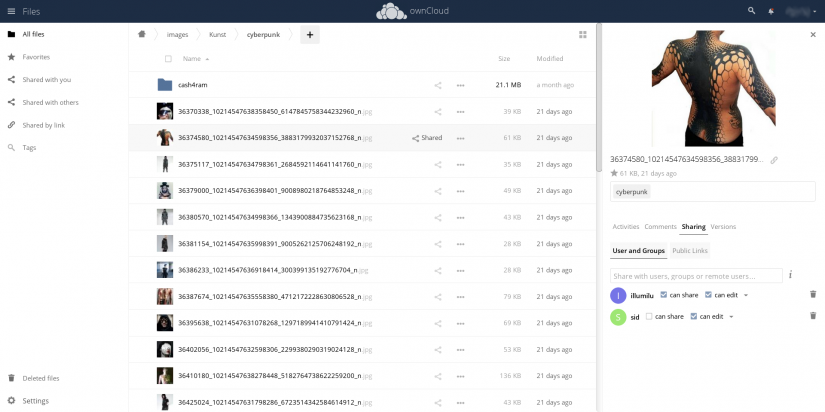
OwnCloud
Figure 4 - OwnCloud
Best for: Dual-purpose media and file server use
If you want to spin up an ODROID-XU4 NAS server, OwnCloud is a great choice. Whereas the likes of Emby and Plex are dedicated media server solutions, OwnCloud is a general file server suite. As such, it's more akin to a DIY Dropbox. Nevertheless, its available video and audio player apps allow media playback. One of the best solutions is using the WebDAV protocol. Kodi even features a WebDAV plugin. OwnCloud lacks the multimedia frontend found in dedicated media server suites, but it's a great option for a combo media and file server.
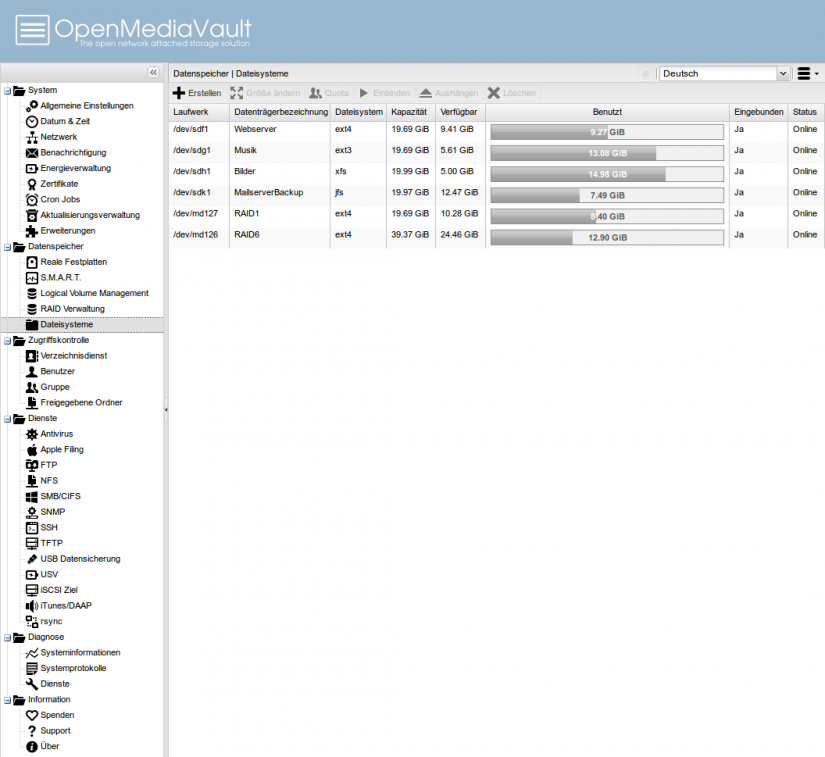
OpenMediaVault
Figure 5 - OpenMediaVault
Best for: Dual-purpose media and file server use
Rather than simply installing an operating system and then running media server apps, you might prefer an ODROID-XU4 server image such as OpenMediaVault (OMV). OMV lets you quickly spin up a full-fledged NAS, and, therefore, utilize your ODROID-XU4 as a server. This Debian-based Linux distribution (distro) provides a modular installation. Once you've booted into OpenMediaVault, you've got access to a smorgasbord of utilities such as BitTorrent clients, SSH, SFTP, SMB, DAAP media server, RSync, and more. Plus, there's a massive plugin repository including plugins for Plex and Emby. If you're looking for a comprehensive server image to run on the ODROID-XU4, OpenMediaVault is a top contender.
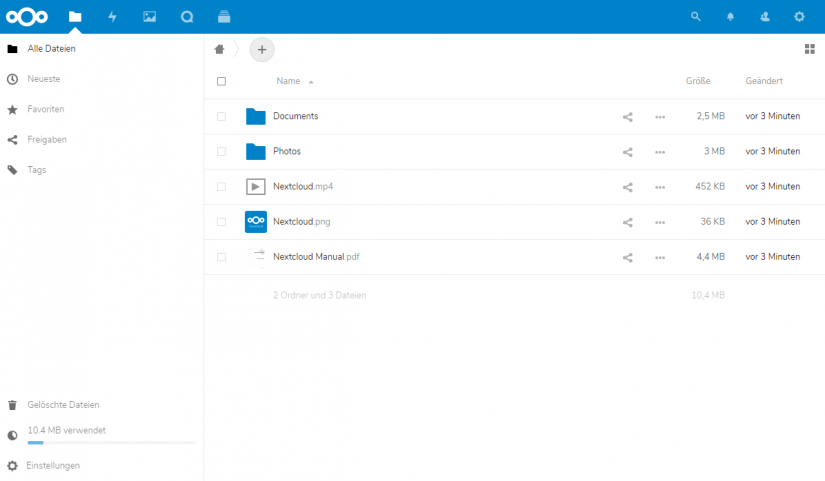
NextCloud
(Figure 6 - NextCloud)
Best for: Combo media and file server
Similar to OwnCloud, NextCloud offers nearly the exact same feature set. However, while OwnCloud touts open-source and enterprise tiers, NextCloud uses the exact same code for both free and paid tiers. Despite its onus on file serving, you can use NextCloud as a media server. Since NextCloud includes WebDAV support, you may even use the WebDAV plugin for Kodi to access your media in the Kodi media centre front end.
Final Thoughts
The ODROID-XU4 is one of the best maker boards on the market. Coupled with the right software, it makes an affordable, energy-sipping NAS device. Plex, Emby, and Serviio are excellent media-first server solutions, while NextCloud and OwnCloud add file server functionality. Alternatively, you could install a dedicated media server app like Plex as well as a DIY file server program such as NextCloud and run them side-by-side. OpenMediaVault is a superb full-fledged media server image. A do-it-yourself media server with the ODROID-XU4 is a simple yet functional project which maximizes the capabilities of this nifty SBC.