

“Software-defined storage (SDS) is a computer program that manages data storage resources and functionality and has no dependencies on the underlying physical storage hardware.” - whatis.com.
"Gluster File System (GlusterFS) is an SDS platform designed to handle the requirements of traditional file storage: high-capacity tasks like backup and archival, as well as high-performance tasks of analytics and virtualization." - Red Hat.
While GlusterFS is clearly an enterprise technology, that does not mean that it cannot be used at home. To the contrary, I find it more flexible and scalable than those off-the-shelf Network Attached Storage (NAS) boxes. NAS servers for home users usually come in 2 or 4 bays. When the time comes to expand your system, it is not that flexible. You either need to change to a bigger box with more bays, or replace all of your disks with higher capacity ones. GlusterFS scales horizontally, meaning that you can add more servers to expand your storage capacity. For home users, adding more servers does not make any sense, since servers are quite expensive. This is true until you consider the ODROID-HC1, which retails for only $49 USD. Four ODROID-HC1s can be equated to a single 4-bay NAS at roughly 50% of the price. Furthermore, the ODROID-XU4 processor, consisting of four A15 cores and four A7 cores on each HC1, is already more powerful than the average NAS targeting the home market, which usually comes with a dual-core A15 processor.
In this article, I am going to use four ODROID-HC1s to create a highly scalable and highly available distributed replicated GlusterFS volume, similar to a RAID 1+0 configuration. Don’t worry if you only have two HC1s on hand. I will describe how you can create a replicated GlusterFS volume that is the equivalent of RAID 1. But before that, let’s explore a bit more on the different GlusterFS volume types.
GlusterFS Volume Types
GlusterFS is a POSIX-compatible distributed file system. It uses the Elastic Hash Algorithm to intelligently hash to locations based on path and filename, instead of relying on a metadata server like some other distributed file systems. Consequently, it avoids the metadata performance bottleneck, and can run on heterogeneous commodity hardware.
A volume is a collection of bricks. A brick is any directory on an underlying disk file system. Most of the GlusterFS operations happen on the volume. GlusterFS supports different types of volumes which are optimised for scaling storage capacity, improving performance, or both. You may want to refer to Gluster Docs at http://bit.ly/2zhI51S for a complete rundown. In this article, I will explore two types, namely replicated volume and distributed replicated volume which require two and four servers (or HC1s), respectively. In my opinion, these are the configurations most suitable for home use.
Replicated volume means that files are always written to the bricks of the two servers. This is equivalent to RAID 1. In a distributed replicated volume, files are written either to the brick on one server or the brick on another server, in a trusted pool of GlusterFS nodes. I will discuss trusted pools later. The bricks on the two servers are replicated to the other two servers in the pool. This is similar to RAID 1+0 but with one major difference: RAID 1+0 uses striping, meaning that different blocks of a file are written to different servers. In distribution, a file is either completely written to one server or another and the contents on the two servers are replicated to another two servers as illustrated in the diagram below.
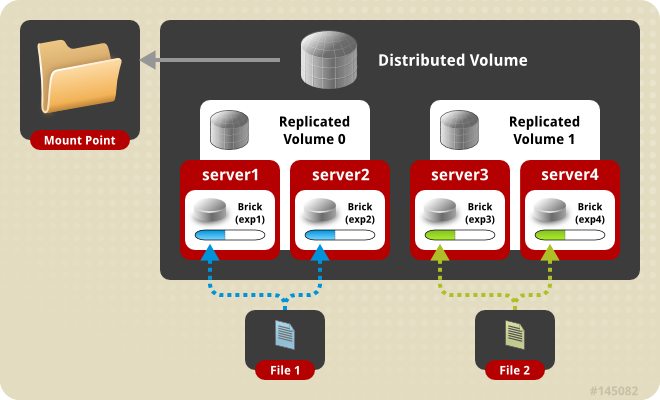
Using a distributed replicated volume guards against data loss when one server fails. It also enhances performance when you are concurrently accessing files which have been distributed to two separate servers. Instead of having one server serving up the files, two are serving up the files. Now that we’ve discussed the theory, let’s get our hands dirty building these volumes.
Building a distributed replicated GlusterFS volume
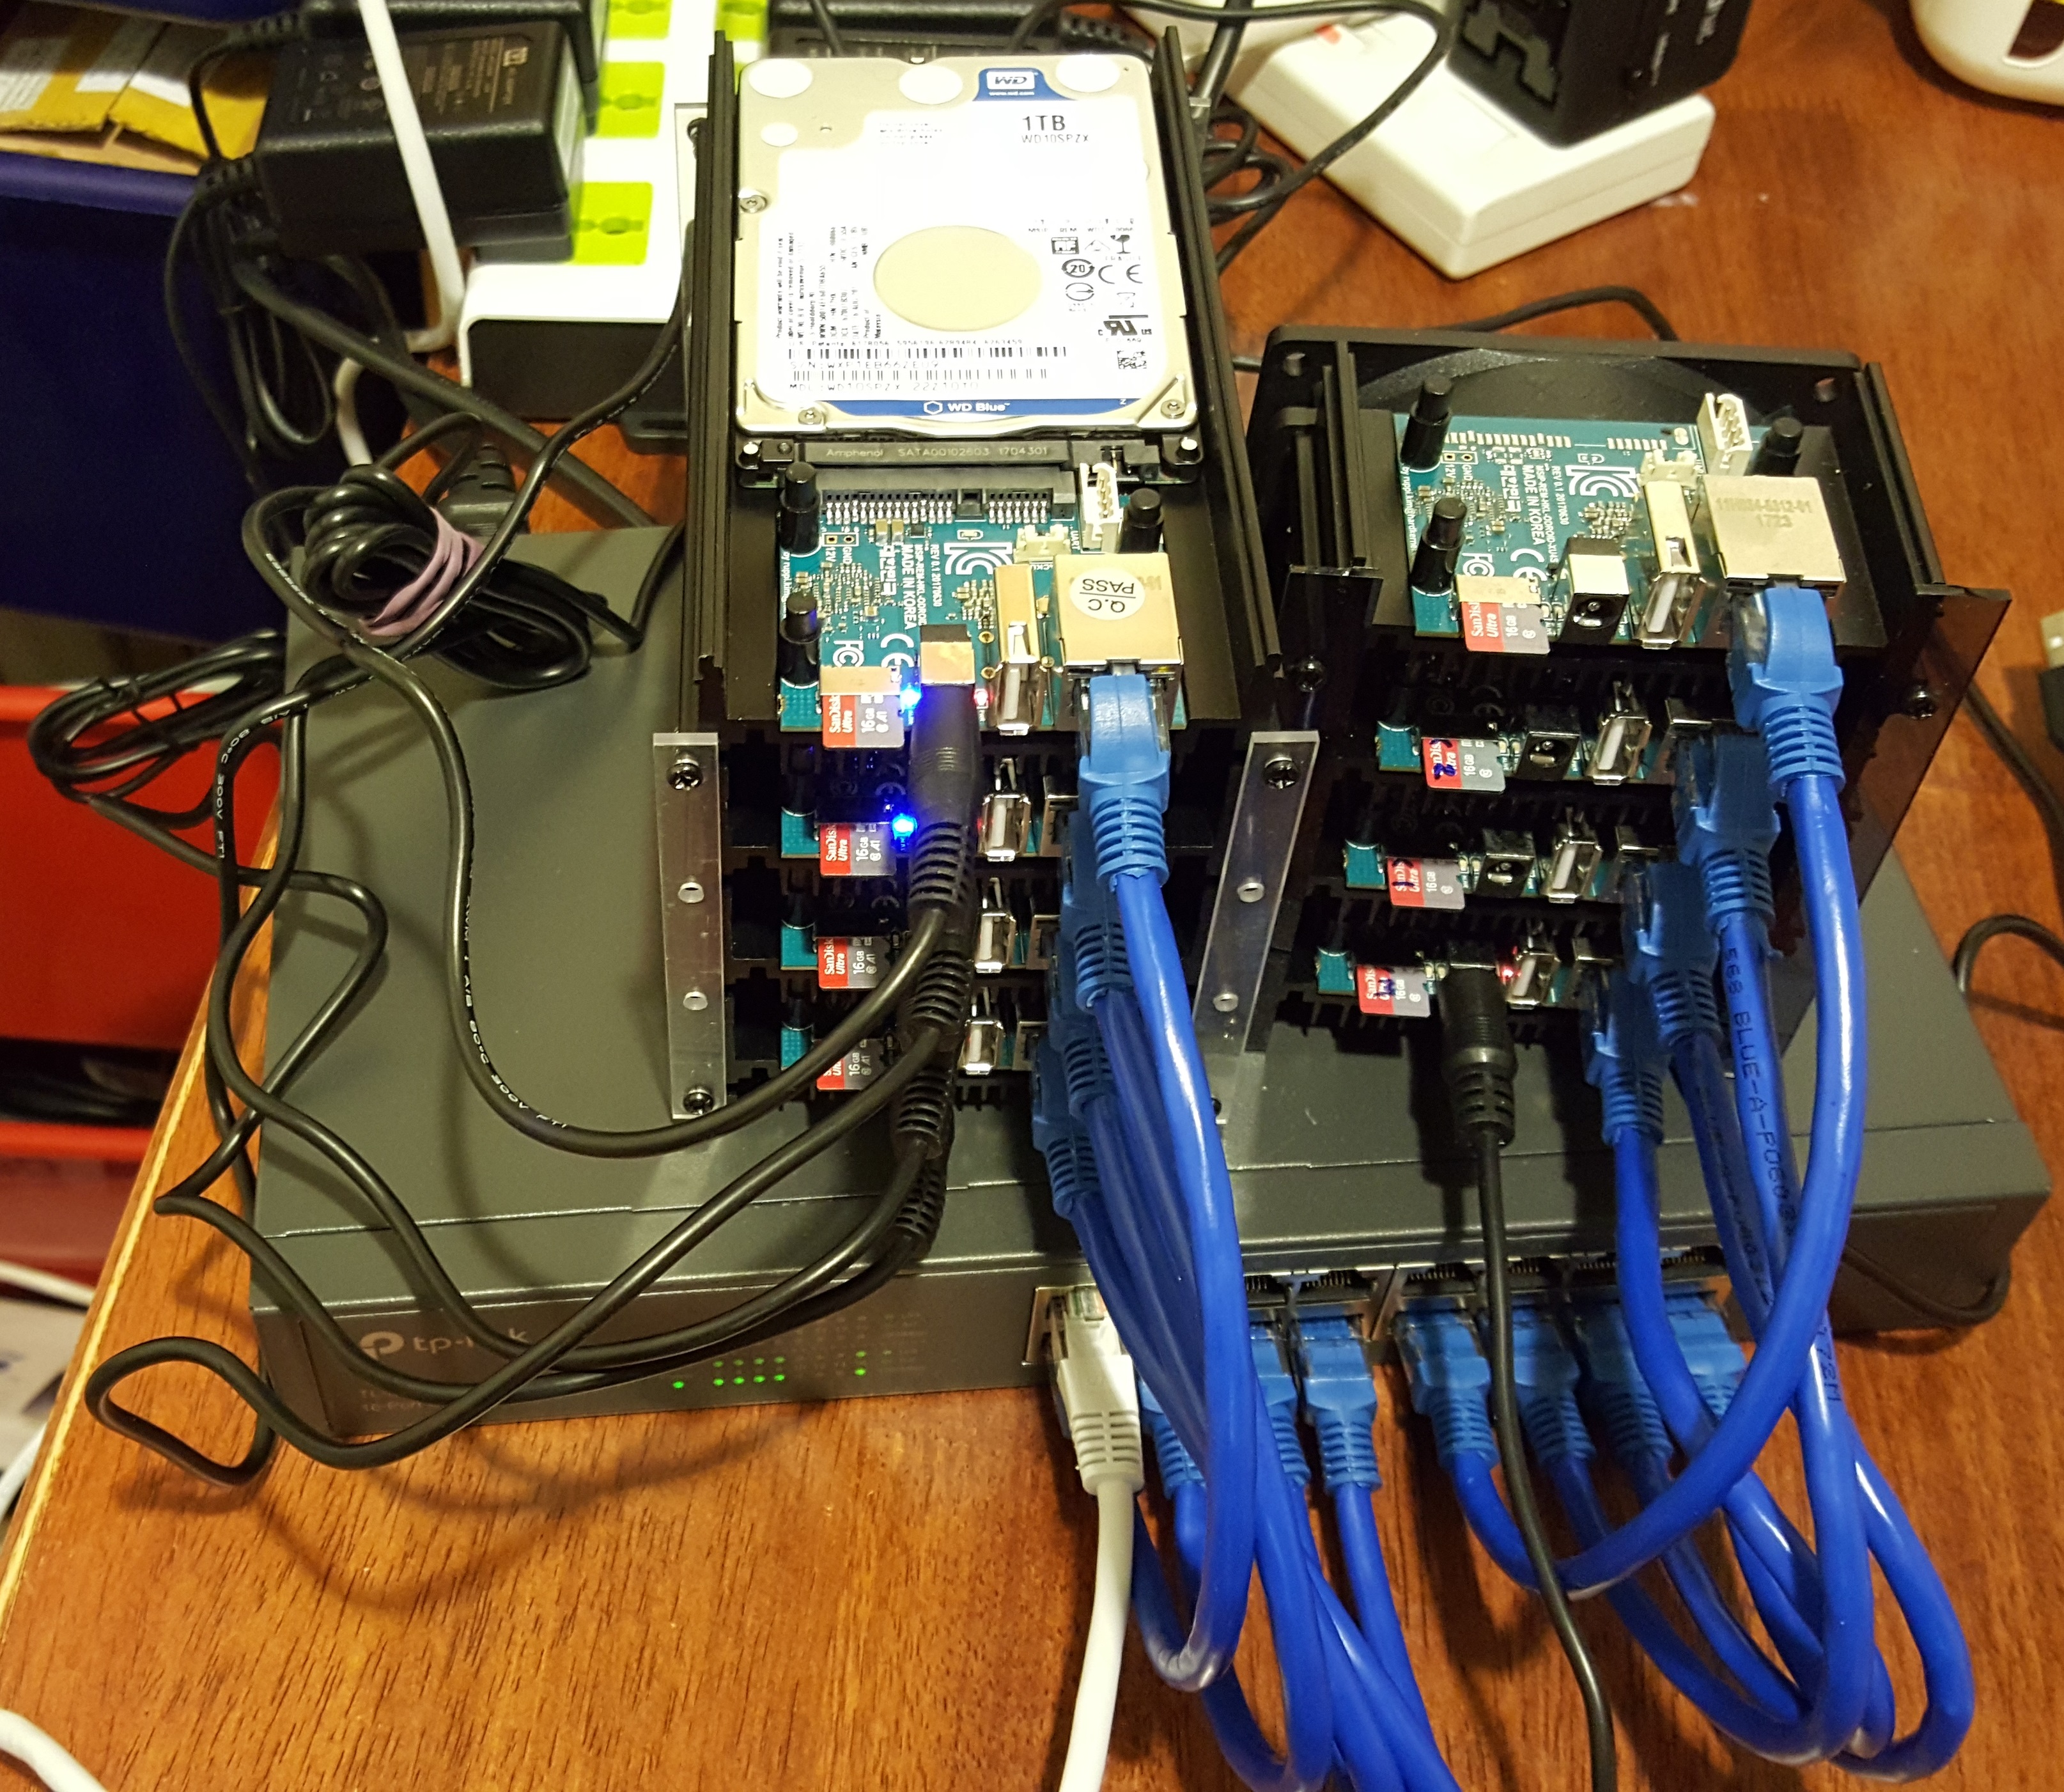
Figure 2 shows a photo of my setup. On the left are the four stacked ODROID-HC1s, and on the right is the ODROID-MC1 cluster. Both are resting on and connected to a 16-port Gigabit switch.
Setting up the ODROID-HC1s
You’ll need to copy the OS image to your SD card in order to boot up your HC1s. Then, set a static IP address and a unique hostname to each HC1. You may want to follow the instructions under "Setting Up the OS on Each Computer on the Cluster" in my MC1 article at http://bit.ly/2lrzVhb. Change the host names to xu4-gluster0, xu-4-gluster1, xu-4-gluster2, and so on.
Install and Format the Hard Disk
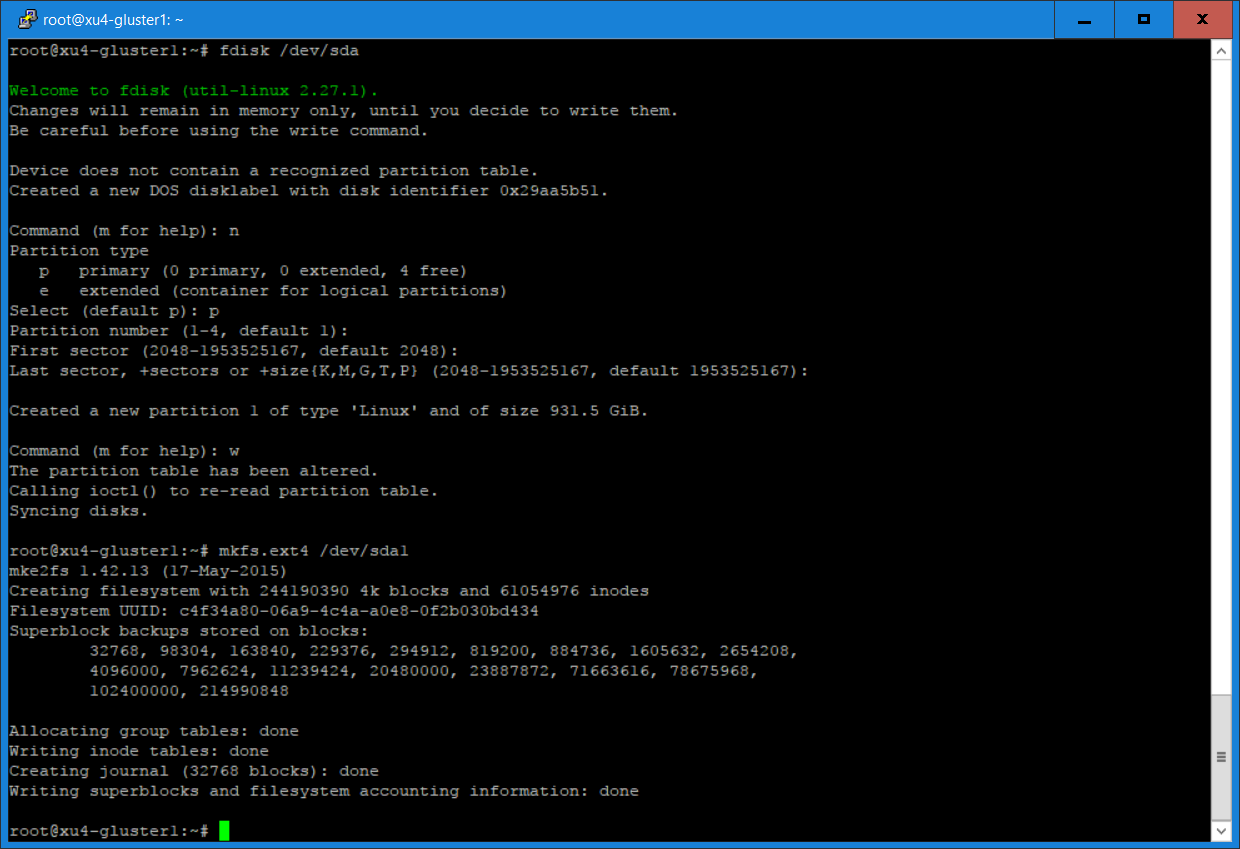
Insert the hard disks into the SATA connectors of your HC1s. Type “sudo -as” to access root privileges and create a Linux partition using fdisk, then create an ext4 file system, as shown in Figure 3.
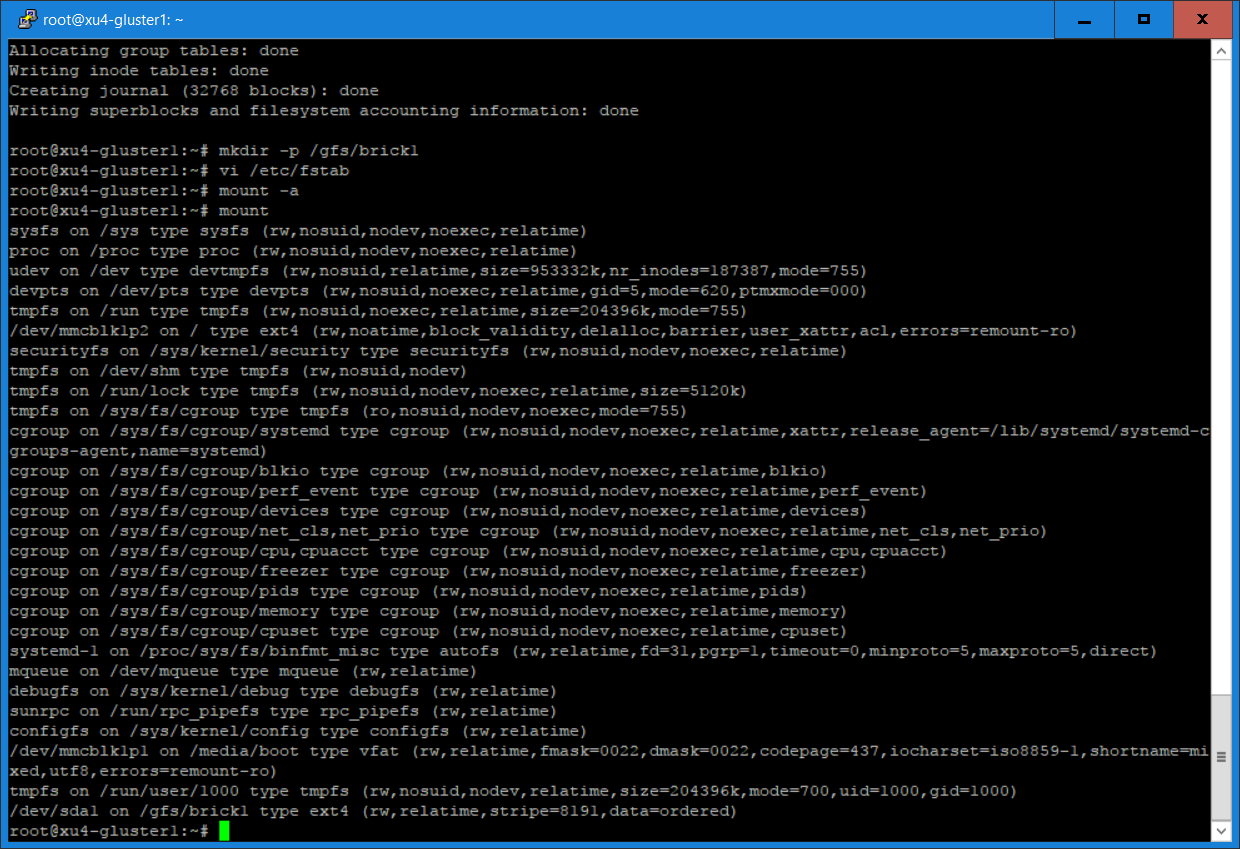
Create a directory called /gds/brick1, add an entry to /etc/fstab, and mount the file system. The result is shown in Figure 4.
This is done using the following commands:
$ fdisk /dev/sda1
 $ mkfs.ext4 /dev/sda1
 $ mkdir -p /gfs/brick1
Add the following line to your /etc/fstab (without the quotation marks): “/dev/sda1 /gfs/brick1 ext4 defaults 0 1”, then type the following commands:
$ mount -a
 $ mount
Install and configure Gluster server and volume
- Install the GlusterFS server
- Create a trusted pool of GlusterFS nodes. A storage pool is a trusted network of storage servers. Before one can configure a GlusterFS volume, one must create a trusted (storage) pool consisting of the storage servers that provide bricks to a volume.
- Create a directory for volume
- Create a distributed replicated volume named gvolume0
- Start the volume and display its status
The commands used are summarised below (run as root):
- Execute on all HC1 servers the following commands:
 $ apt-get update

 $ apt-get install glusterfs-server attr
- From xu4-gluster0 (or other GlusterFS server) issue commands to create a trusted pool of GlusterFS nodes consisting of our 4 HC1s:
 $ gluster peer probe xu4-gluster1

 $ gluster peer probe xu4-gluster2

 $ gluster peer probe xu4-gluster3
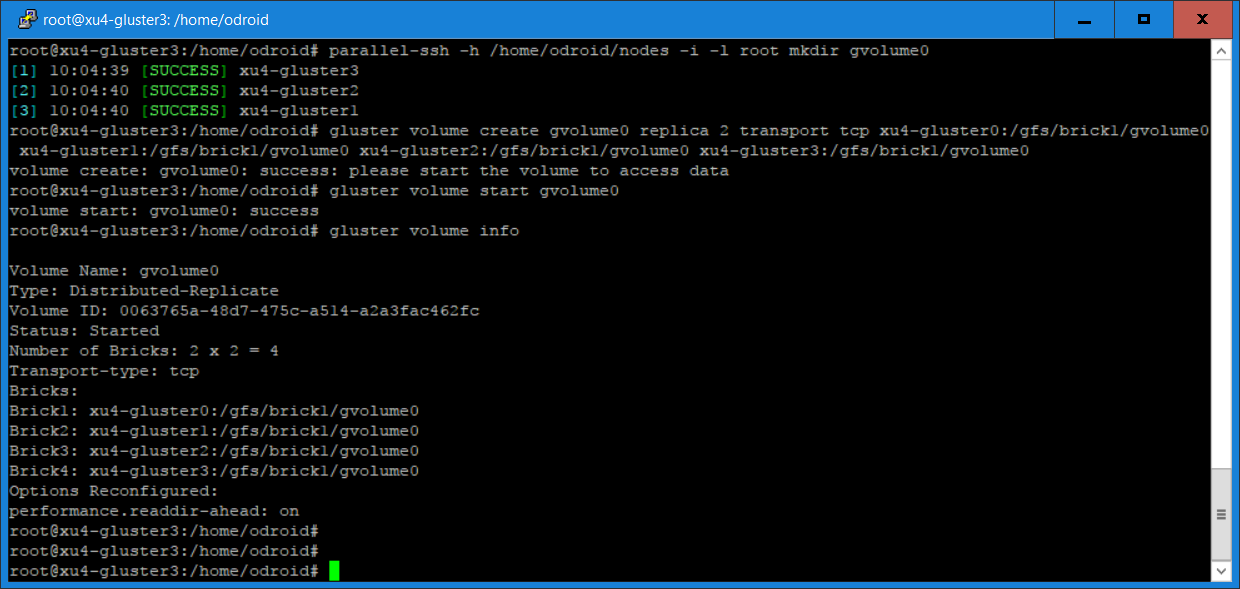
- Create directory: /gfs/brick1/gvolume0 on all servers. Then issue the gluster commands below:
 $ gluster volume create gvolume0 replica 2 transport tcp

 $ xu4-gluster0:/gfs/brick1/gvolume0 xu4-gluster1:/gfs/brick1/gvolume0

 $ xu4-gluster2:/gfs/brick1/gvolume0 xu4-gluster3:/gfs/brick1/gvolume0

 $ gluster volume start gvolume0

 $ gluster volume info gvolume0
In a distributed replicated volume, files are distributed across replicated sets of bricks. The number of bricks must be a multiple of the replica count, which in our case is two. The order in which the bricks are specified is important. In the “gluster volume create” command, adjacent bricks become replicas of each other. This type of volume provides high availability via replication and scaling via distribution. In our command, we use four bricks and replica count two, resulting in the first two bricks becoming replicas of each other. This volume is denoted as 2 x 2. Figure 5 shows the output of some of the commands.
For those who only have two HC1s to create a replicated volume, you only have to use the command "gluster peer probe" on the other server and replace the "gluster volume create" command with the following command:
$ gluster volume create gvolume0 replica 2 transport tcp xu4-gluster0:/gfs/brick1/gvolume0 $ xu4-gluster1:/gfs/brick1/gvolume0
Testing the Volume Using Gluster Client
On another machine (in my case I used one of the servers of the ODROID-MC1 cluster), install the GlusterFS client as root and mount the volume:
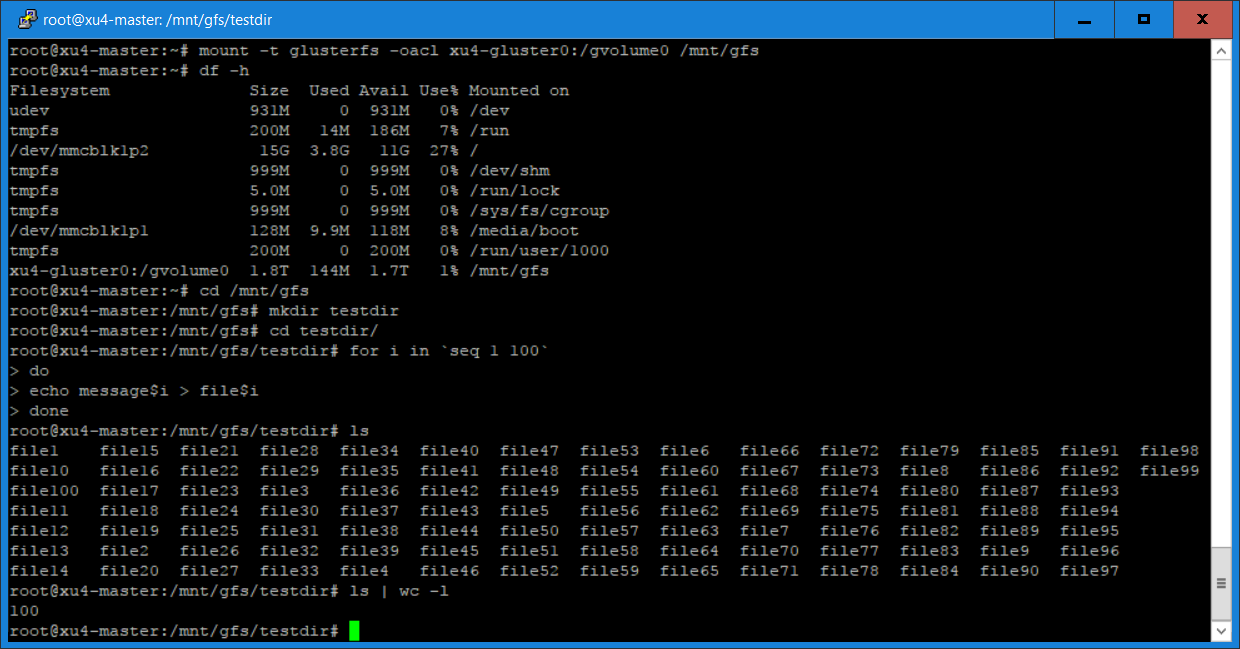
$ apt-get update
 $ apt-get install gluserfs-client attr
 $ mkdir /mnt/gfs
 $ mount -t glusterfs -oacl xu4-gluster0:/gvolume0 /mnt/gfs
Note that if you want the mount to be permanent, you have to add an entry in the /etc/fstab file.
A simple test
This a simple test showing the distribution of files on a distributed replicated GlusterFS volume.
Create 100 files using the command:
$ cd /mnt/gfs
 $ mkdir testdir
 $ cd testdir
 $ for i in `seq 1 100`
 $ do
 $ echo message$i > file$i
 $ done
 $ ls
The output of these commands are shown in Figure 6.
Login to xu4-gluster0 and issue the following commands:
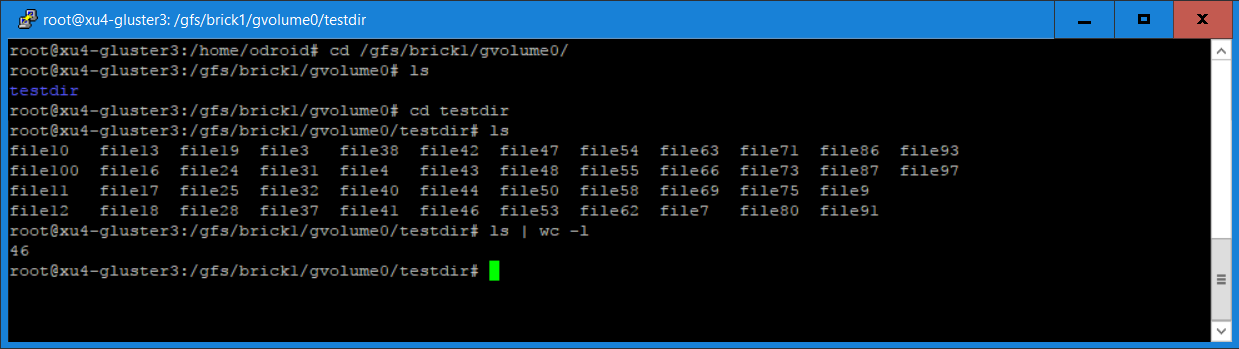
$ cd /gfs/brick1/gvolume0/testdir
 $ ls
 $ ls | wc -l
You will notice in Figure 7 that 46 of the 100 files are saved on this server, since we are using a distributed replicated volume.
Login to xu4-gluster1 and issue the same commands:
$ cd /gfs/brick1/gvolume0/testdir
 $ ls
 $ ls | wc -l
You will see from the screenshot that there are 54 files on this server. The total on both servers adds up to the 100 files that we created earlier. For our distributed replicated volume, the 100 files are distributed between the two servers, although not exactly in a 50/50 ratio. You will find the same result if you log into the other two servers (xu4-gluster2 and xu4-gluster3). For those of you who created a replicated volume using two ODROID-HC1s, you will see the 100 files on both servers as yours is a replicated volume and not distribution volume.
What Next?
I have described how to build distributed replicated and replicated GlusterFS volumes using four and two ODROID-HC1s respectively. I have also shown how to access the GlusterFS volume using a GlusterFS client. In Part 2 of this article, I will describe how to install and use other clients including NFS and Samba (for Windows) to access the GlusterFS volume and compare the performance of these clients.
Be the first to comment