

Chances are you’ve heard of Bitcoin, the anonymous and secure cryptocurrency which has made waves over the years. One of the main issues I have seen is people trusting others to handle their transactions. I set about purchasing a tiny Dell netbook with a measly Intel Atom CPU, 2GB of RAM, and a 240GB SSD to act as my primary wallet for cryptocurrency, and more or less my bank. The laptop has a fully encrypted drive, and I back up the keys for my wallet, keeping them in three different places. However, when you run a full version of the core wallets, that means you have to store a whole copy of the entire blockchain on the device using it.
The Bitcoin blockchain is around 200GB, and that’s a lot of data to hold onto. Not to mention, the whole idea of my netbook was to only be on when I needed to make a transaction, as it is most secure when it is powered off. Obviously running the blockchain on the laptop was not an ideal option as it would always have to be on. Additionally, I wanted to further anonymize the connections coming in and out, so I wanted to tunnel all of the traffic for the node over a VPN such as Private Internet Access, with a VPN killswitch so if the VPN doesn’t work it won’t connect and will bolt The Onion Relay (TOR) on top of it to further anonymize all transactions.
The advantage of all this will be to allow any device on my LAN to transact with the blockchain network directly using my node to send and receive my transactions rather than trusting other people. The other advantage is since I am running a full copy of the blockchain I am also helping support the Bitcoin network by providing another peer with a full copy of the blockchain. This guide will not cover the VPN aspect, but will cover how to bolt on TOR, as well as build your own node.
I originally got the idea from pinode.co.uk where they have a lot of these projects, and I am already running a Monero node on a Raspberry Pi 3 Model B+ with a 128GB flash drive. For this tutorial I am merging the ideas from pinode, along with the Thundroid tutorial, and adding some of my own twists and spins. I chose an ODROID-HC2 as it allows for a native SATA hard drive, and the HC2 variant allows for 3.5″ disks where as the HC1 allows for 2.5″ disks. Either version is fine, and if you really wanted you could probably go for the ODROID-XU4 or even a Raspberry Pi 3 Model B+ if you use a 512GB flash drive or a kit for additional drives. For the sake of this tutorial we will be discussing the ODROID platform, but you can use whatever platform you like. Technically if you wanted to, you could use a full dedicated PC, but that seems like a waste of hardware and will be far less power efficient. I prefer the ODROID over the Raspberry Pi as it’s a more powerful hardware platform.
Hardware
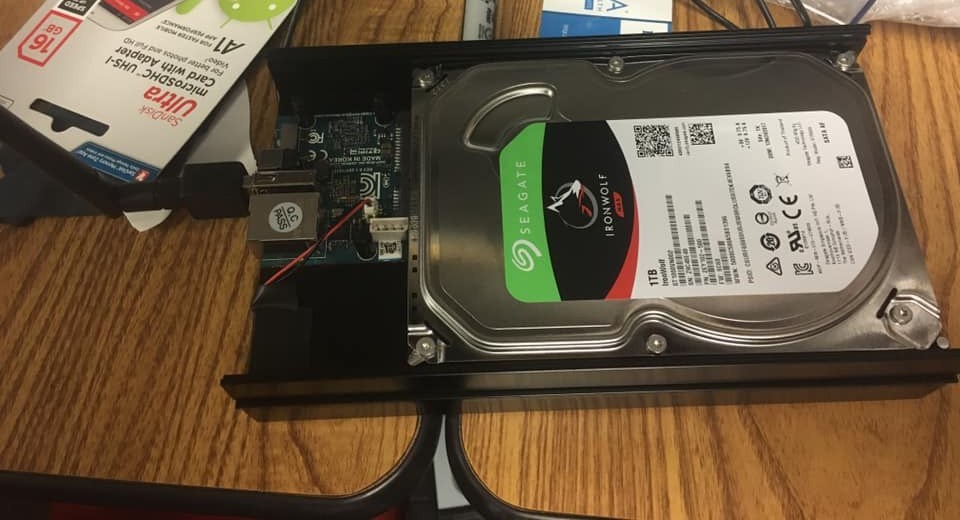
- ODROID-HC2 with RTC battery, 1TB Seagate Iron Wolf HDD, and Model 3 Wifi NIC.
- ODROID-HC2 (Use the HC1 if you want to use 2.5″ disks instead)
- 1TB or larger NAS Hard Drive e.g. Seagate Iron Wolf 3.5″ 1TB HDD (will explain why specifically a NAS drive)
- 12 Volt/2 Amp power brick if using the HC2 model, along with the cord that is sold separately
- 5 Volt/ 4 Amp power brick if using the HC1 model. I recommend checking the hard drive power consumption rate as you may have to jump for the 5 Volt/6 Amp brick and cord
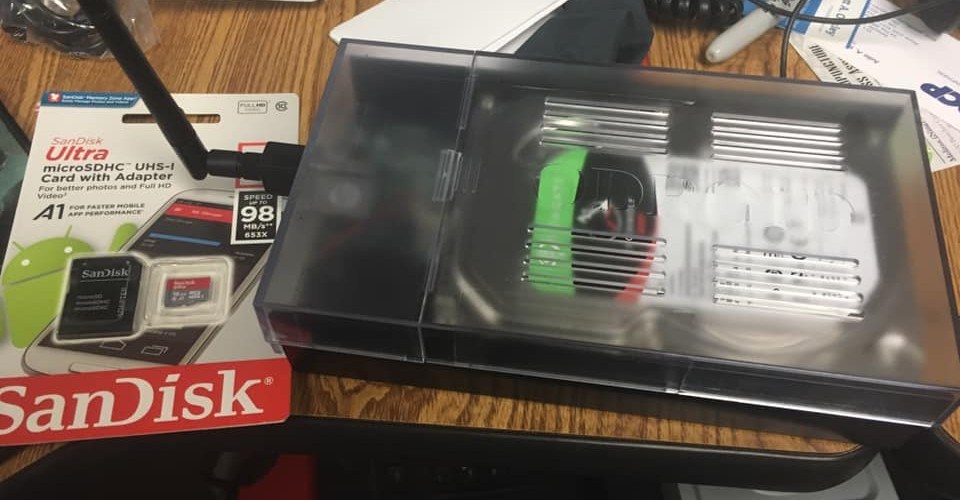
- 16GB MicroSD card
The reason I specified using a NAS drive is that this drive will be on 24/7, continually reading and writing data. NAS drives are specifically optimized for this kind of behavior, and will therefore be more reliable. You can use a non-NAS drive just fine, but in the long term a NAS drive is best.
Optional hardware
- Wireless Card (Model 0--smallest), (model 3 with external antenna--I use this myself), (Model 4 dual band), (Model 5 dual band w/ AC).
- Case (HC1), (HC2).
- UART console connection kit. I highly recommend this if you are planning to do it via Wifi so you won’t have to connect to ethernet in case something happens.
- RTC Battery Backup to keep the real time clock running in case of power outage. I highly recommend this as it’s cheap. I use electrical tape to bond it to the aluminum housing and make it rather sleek.
First things first, we have to connect it to the Internet. If you are planning on using Wifi, please follow the wiki here for nmcli for the ODROID. If using the UART console connection, follow this tutorial here. You will need to flash Ubuntu 18.04 minimal image which can be downloaded here and then use Etcher to flash it to a MicroSD. Once that is done, put it in the ODROID and boot it up and either SSH or connect via console to it. Either, way the credentials on start are:
username: root password: odroid
For Raspberry Pi users, you will have to look up the credentials for the image you are using.
Prep work
We’ll need to take care of some things before we actually make it a Bitcoin node. First, let’s create a new user with a secure password and superuser rights and change the root password. Don’t forget to change “USER” to what you want.
$ root@odroid:~# passwd
$ root@odroid:~# adduser USER
$ root@odroid:~# usermod -aG sudo USER
$ root@odroid:~# adduser bitcoin
We need to update the system and change the time zone and locale data, as well as change the hostname in both /etc/hosts and /etc/hostname to match. I named mine “btcdroid” but you can make it whatever you want:
$ root@odroid:~# apt update
$ root@odroid:~# apt dist-upgrade -y
$ root@odroid:~# apt install htop git curl bash-completion jq
$ root@odroid:~# dpkg-reconfigure tzdata
$ root@odroid:~# dpkg-reconfigure locales
$ root@odroid:~# nano /etc/hosts
$ root@odroid:~# nano /etc/hostname
Mount the hard drive
Now we need to mount the hard drive. In my case, the hard drive was brand new and unformatted, so I had to do that first. You can follow the instructions at Digital Ocean if you are in the same situation. Regardless, once you have a compatible Linux formatted drive we can proceed.
We will need to get the UUID of the partition that has been created. We simply run the lsblk command and it will spit out the names and UUID of all drives.
$ root@odroid:~# lsblk --fsAfter running that command you should see something like this. We will need to notate the UUID it has given us for the next steps.

Now we need to edit the fstab with nano and add a whole new line. Replace 123456 with the UUID given from the command above
$ root@odroid:~# nano /etc/fstab
$ # New Line in /etc/fstab
$ UUID=123456 /mnt/hdd ext4 noexec,defaults 0 0
Awesome, now that the fstab has been modified, we need to create the mount point, mount it, check it, and set the owner.
$ root@odroid:~# mkdir /mnt/hdd
$ root@odroid:~# mount -a
$ root@odroid:~# df /mnt/hdd

Now let’s give permissions to the bitcoin user for the entire hard drive we made earlier.
$ root@odroid:~# chown -R bitcoin:bitcoin /mnt/hdd/
Moving swap to the HDD
We’ll now need to move the swap file to the HDD, so we need to install a package and do some configuration changes.
$ root@odroid:~# apt install dphys-swapfile
$ root@odroid:~# nano /etc/dphys-swapfile
$ #Add the following lines
$ CONF_SWAPFILE=/mnt/hdd/swapfile
$ CONF_SWAPSIZE=2048
$ root@odroid:~# dphys-swapfile setup
$ root@odroid:~# dphys-swapfile swapon
$ root@odroid:~# shutdown -r now
Hardening the security
Now it should be reconfigured to have a 2GB swap file on the hard drive, and should reboot. At this point, log back in as the regular user and not as root, because we are about to disable root via SSH. However, if you are using the optional UART serial connection kit, you can still login as root that way. Now let’s continue on and remove the old swap file.
SSH hardening
We need to lock down remote access to SSH, and Digital Ocean has a great guide going over SSH security. I highly recommend disabling password logins and requiring an SSH key pair to be generated. You can read the tutorial here, but we will definitely need to disable root access as well. It’s a major security risk if root is allowed, as everyone knows Linux has a root user. Type the following command to edit the sshd_config file.
$ user@btcdroid:~$ sudo nano /etc/ssh/sshd_config

$ #Find the following line
$ PermitRootLogin yes
$ #Change it to no so it looks like below
$ PermitRootLogin no
$ #Save and quit

$ user@btcdroid:~$ sudo service sshd restart
That will disable root login, but I highly recommend making it only allow logins with SSH key pairs as it is far more secure than a password.
Firewall
One of my favorite tools which I have written about before is uncomplicated firewall. We are going to allow only pinholes for the firewall to allow communication through, as well as limit SSH connections so it is less likely to be compromised via brute force. We will also add some defenses for a brute force attack in a bit.
The line ufw allow from 192.168.0.0/24, below assumes that the IP address of your btcdroid is something like 192.168.0.xxx, the xxx being any number from 0 to 255. If your IP address is 12.34.56.78, you must adapt this line to ufw allow from 12.34.56.0/24. Otherwise you will lock yourself out for good unless you connect the UART serial connection kit.
$ user@btcdroid:~$ sudo apt install ufw
$ user@btcdroid:~$ sudo ufw default deny incoming
$ user@btcdroid:~$ sudo ufw default allow outgoing

$ # make sure to use the correct subnet mask and IP ranges. (see warning above)
$ user@btcdroid:~$ sudo ufw allow from 192.168.0.0/24 to any port 22 comment 'allow SSH from local LAN'
$ user@btcdroid:~$ sudo ufw allow 9735 comment 'allow Lightning'
$ user@btcdroid:~$ sudo ufw allow 8333 comment 'allow Bitcoin mainnet'
$ user@btcdroid:~$ sudo ufw allow 18333 comment 'allow Bitcoin testnet'
$ user@btcdroid:~$ sudo ufw enable
$ user@btcdroid:~$ sudo systemctl enable ufw
$ user@btcdroid:~$ sudo ufw status
Now we should install Fail2Ban, which I have often talked about. This makes it so that after five unsuccessful attempts at SSH it blocks the IP for ten minutes, making a brute force attack almost impossible to conduct.
user@btcdroid:~$ sudo apt install fail2ban
Increase open file limit
In case your BTCDroid is swamped with Internet requests (honest or malicious due to a DDoS attack), you will quickly encounter the “can't accept connection: too many open files” error. This is due to a limit on open files representing individual tcp connections that is set too low.
Edit the following three files, add the additional line(s) right before the end comment, save and exit.
$ user@btcdroid:~$ sudo nano /etc/security/limits.conf
$ #add/change the following lines
$ * soft nofile 128000
$ * hard nofile 128000
$ root soft nofile 128000
$ root hard nofile 128000

$ user@btcdroid:~$ sudo nano /etc/pam.d/common-session
$ #add the following
$ session required pam_limits.so

$ user@btcdroid:~$ sudo nano /etc/pam.d/common-session-noninteractive
$ #add the following
$ session required pam_limits.so
Installing Bitcoin Core
We’re finally ready to start with the fun parts. These parts were mostly derived from pinode.co.uk, but seem to work perfectly fine for the ODROID-HC2, albeit with some tweaks we have already performed specific to the ODROID platform.
First we need to install our dependencies:
$ user@btcdroid:~$ sudo apt install autoconf libevent-dev libtool libssl-dev libboost-all-dev libminiupnpc-dev -yThen we need to make a directory to download our files into, and ultimately download those files using git:
$ user@btcdroid:~$ mkdir ~/bin
$ user@btcdroid:~$ cd ~/bin
$ user@btcdroid:~$ git clone -b 0.17 https://github.com/bitcoin/bitcoin.git
Now after it’s downloaded we are going to configure, compile, and install the files. In the final commands I will tell it to run six jobs at the same time, since the ODROID has eight cores so it can run faster. You may want to reduce that number to two with a Raspberry Pi. You can also run it without the “-jX” switch to just run as a single job, although that may take a couple hours. Once you run the make command, go make dinner or something because this will take an hour or two, even on the ODROID-XU4’s eight core Samsung Exynos 5422 CPU.
$ user@btcdroid:~$ cd bitcoin
$ user@btcdroid:~$ ./autogen.sh
$ user@btcdroid:~$ ./configure --enable-upnp-default --disable-wallet
$ user@btcdroid:~$ make -j6
$ user@btcdroid:~$ sudo make install
Now we need to prepare the Bitcoin directory. We’re going to switch into the non-superuser named bitcoin we created earlier, although you can name it whatever you want. The most important thing is that this user only has permissions to administer the bitcoin node itself, but not to make any system changes. This is the great thing about Linux versus Windows, in regards to security and permissions. In theory, this should isolate an attack so at worst they can only mess with the bitcoin systems and not the operating system itself.
We use the Bitcoin daemon, called “bitcoind”, that runs in the background without user interface and stores all data in the directory /home/bitcoin/.bitcoin. Instead of creating a real directory, we create a link that points to a directory on the external hard disk.
$ user@btcdroid:~$ sudo su bitcoin

# add symbolic link that points to the external hard drive
$ bitcoin@btcdroid:~$ mkdir /mnt/hdd/bitcoin
$ bitcoin@btcdroid:~$ ln -s /mnt/hdd/bitcoin /home/bitcoin/.bitcoin

# Navigate to home directory and check the symbolic link (the target must not be red).
$ bitcoin@btcdroid:~$ cd ~
$ bitcoin@btcdroid:~$ ls -la
Now we need to configure the Bitcoin daemon, and make sure to set an extremely secure password and username, separate from your system username and password. Then we will log out of the bitcoin user to setup TOR.
$ bitcoin@btcdroid:~$ nano /home/bitcoin/.bitcoin/bitcoin.conf

# BTCDroid: bitcoind configuration
# /home/bitcoin/.bitcoin/bitcoin.conf

# Bitcoind options
$ server=1
$ daemon=1
$ txindex=1
$ disablewallet=1

# Connection settings
$ rpcuser=SECURE_USERNAME
$ rpcpassword=SECURE_PASSWORD

# Optimizations for ODROID Hardware
$ dbcache=192
$ maxorphantx=60
$ maxmempool=192
$ maxconnections=80
$ maxuploadtarget=5000

#Optimizations for Raspberry Pi 3B.
#I commented out the ones for the ones I recommend for a Raspberry Pi 3B, just uncomment those, and comment out the ODROID ones for it to work
#dbcache=96
#maxorphantx=30
#maxmempool=96
#maxconnections=40
#maxuploadtarget=5000

$ bitcoin@btcdroid:~$ exit
TOR It Up
Now, we’ll install TOR to encapsulate all the traffic and encrypt and anonymize everything. We are going to install Tor, and add a repository to give us the most up-to-date Tor version, as the one in the default repositories is really old.
First, we will add a couple entries to /etc/apt/sources.list.d/, add the GPG key to accept it, update our repository, and finally install Tor.
$ user@btcdroid:~$ sudo nano /etc/apt/sources.list.d/tor.list
#Add the following lines and then save and close
deb https://deb.torproject.org/torproject.org bionic main
deb-src https://deb.torproject.org/torproject.org bionic main
#save and exit
$ user@btcdroid:~$ curl https://deb.torproject.org/torproject.org/A3C4F0F979CAA22CDBA8F512EE8CBC9E886DDD89.asc | gpg --import
$ user@btcdroid:~$ gpg --export A3C4F0F979CAA22CDBA8F512EE8CBC9E886DDD89 | sudo apt-key add -
$ user@btcdroid:~$ sudo apt update
$ user@btcdroid:~$ sudo apt install tor deb.torproject.org-keyring tor-arm nyx
Now we need to configure TOR:
$ user@btcdroid:~$ sudo nano /etc/tor/torrc
#add these settings to the bottom of the file
$ ControlPort 9051
$ CookieAuthentication 1
$ CookieAuthFileGroupReadable 1
$ HiddenServiceDir /var/lib/tor/bitcoin-service/
$ HiddenServicePort 8333 127.0.0.1:8333
#save and exit
$ user@btcdroid:~$ sudo systemctl restart tor.service
#Get your Tor hostname
$ user@btcdroid:~$ sudo cat /var/lib/tor/bitcoin-service/hostname
We’re going to need the host name it spits out (with a “.onion” address), so note what it just gave us with the last command.
Configure Everything to Autostart
We want to program everything to start on boot, so we will make a SystemD service that will start our Bitcoin node with it running as the bitcoin user and passing it through to TOR. I will give you the option at this point to have it run only on TOR, or to allow it to run over TOR, IPv4, and IPv6. The Tor-only option is more anonymous, but the other mode is like a dual mode so if TOR is down it can still sync, and will also sync faster. The choice is yours: just remove the comment for the one you want where it says ExecStart and insert your hostname.onion where it asks for it in the ExecStart command. After that, we will reboot and see if everything works. Make sure to use the username we created earlier where it says USER_NAME.
$ user@btcdroid:~$ sudo nano /etc/systemd/system/bitcoind.service

# BTCdroid systemd unit for bitcoind
# /etc/systemd/system/bitcoind.service

$ [Unit]
$ Description=Bitcoin daemon
$ After=network.target

$ [Service]
#Uncomment the ExecStart string below to force the node to only run over Tor
#ExecStart= /usr/local/bin/bitcoind -datadir=/home/bitcoin/.bitcoin/data -daemon -proxy=127.0.0.1:9050 -externalip=HOSTNAME.onion -conf=/home/bitcoin/.bitcoin/bitcoin.conf -listen -bind=127.0.0.1 -pid=/run/bitcoind/bitcoind.pid

#Uncomment the ExecStart string below to allow Tor, IPv4, and IPv6 connections
#ExecStart= /usr/local/bin/bitcoind -datadir=/home/bitcoin/.bitcoin/data -daemon -proxy=127.0.0.1:9050 -externalip=HOSTNAME.onion -conf=/home/bitcoin/.bitcoin/bitcoin.conf -listen -discover -pid=/run/bitcoind/bitcoind.pid

#Tells Bitcoin to shutdown safely when stopped.
$ ExecStop= /usr/local/bin/bitcoin-cli stop

# Creates /run/bitcoind owned by bitcoin
$ RuntimeDirectory=bitcoind
$ User=bitcoin
$ Group=bitcoin
$ Type=forking
$ PIDFile=/run/bitcoind/bitcoind.pid
$ Restart=on-failure

# Hardening measures
####################

# Provide a private /tmp and /var/tmp.
$ PrivateTmp=true

# Mount /usr, /boot/ and /etc read-only for the process.
$ ProtectSystem=full

# Disallow the process and all of its children to gain
# new privileges through execve().
$ NoNewPrivileges=true

# Use a new /dev namespace only populated with API pseudo devices
# such as /dev/null, /dev/zero and /dev/random.
$ PrivateDevices=true

# Deny the creation of writable and executable memory mappings.
$ MemoryDenyWriteExecute=true

[Install]
$ WantedBy=multi-user.target
#save and exit
$ user@btcdroid:~$ sudo systemctl enable bitcoind.service
$ user@btcdroid:~$ sudo shutdown -r now
$ user@btcdroid:~$ mkdir /home/USER_NAME/.bitcoin
$ user@btcdroid:~$ sudo cp /home/bitcoin/.bitcoin/bitcoin.conf /home/USER_NAME/.bitcoin/
$ user@btcdroid:~$ sudo chown USER_NAME:USER_NAME /home/USER_NAME/.bitcoin/bitcoin.conf
It should restart so give it a minute and reconnect as the user we created in the beginning. It may take a few minutes for the node to get its first connections, and then it will start pulling in the blocks. You can check the status with the bitcoin-cli command.
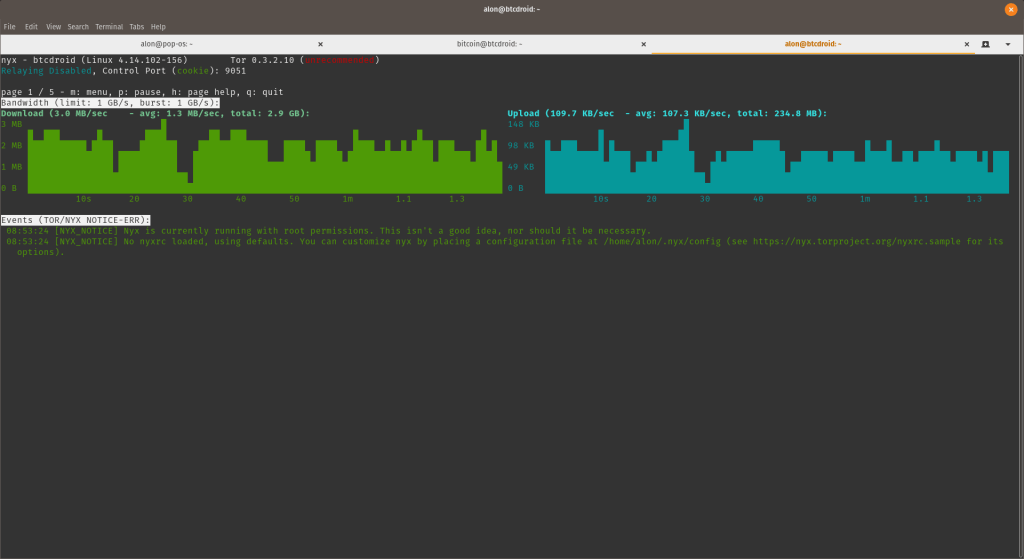
$ user@btcdroid:~$ bitcoin-cli getblockchaininfoIt should display something like this (Figure 6) and as long as the number of blocks is increasing every few minutes, it is running fine. Bear in mind this could take a few days as we need to download at least 200GB at the time of writing to be up to date with the blockchain.

Output of Bitcoin-cli
In addition to checking the status of the blockchain download, you can monitor the traffic over TOR with Nyx.
$ user@btcdroid:~$ sudo nyx
Auto Update Security Patches
Since this is a device we are mostly going to leave on and unattended, it’s best we have it auto apply any of the security related patches that may be out there so it can maintain itself. So let’s enable the unattended-upgrades package and configure it. The first step brings up an interactive prompt, and then we proceed to editing the files.
$ user@btcdroid:~$ sudo dpkg-reconfigure --priority=low unattended-upgrades
$ user@btcdroid:~$ sudo nano /etc/apt/apt.conf.d/50unattended-upgrades
#modify these lines in the file to look like the following, although you can make it reboot whenever you want. Make sure there is a semicolon at the end of each line. You can uncomment the "${distro_id}:${distro_codename}-updates"; line if you want it to update non security related packages too

#near the top of the file
$ Unattended-Upgrade::Allowed-Origins {
"${distro_id}:${distro_codename}";
"${distro_id}:${distro_codename}-security";
// Extended Security Maintenance; doesn't necessarily exist for
// every release and this system may not have it installed, but if
// available, the policy for updates is such that unattended-upgrades
// should also install from here by default.
"${distro_id}ESM:${distro_codename}";
// "${distro_id}:${distro_codename}-updates";
// "${distro_id}:${distro_codename}-proposed";
// "${distro_id}:${distro_codename}-backports";
};

#below are spread out in the same file
$ Unattended-Upgrade::Remove-Unused-Kernel-Packages "true";
$ Unattended-Upgrade::Remove-Unused-Dependencies "true";
$ Unattended-Upgrade::Automatic-Reboot "true";
$ Unattended-Upgrade::Automatic-Reboot-Time "02:30";
#save and exit
That’s it, you’re all finished. Let me know what you think or if you have any improvements to the project. I may eventually host these on a Supermicro server in my rack with a ZFS array next year.
Be the first to comment