

About two years ago I had a wild idea: would it be possible to create a "dual-screen" desktop system by using two ODROIDs, each driving a different screen, but acting as a unified desktop? The idea was to have a "master" odroid that is more powerful and runs your apps (like an XU4 or N2) and a "slave", ideally cheaper board that acts only as a dumb terminal (a C1/C2). I did some research and found xdmx, which is a distributed window manager that could do the job, but it has been abandoned a decade ago, so it is a no-go.
Next I experimented a lot and created a convoluted system that basically worked by using Xpra (https://xpra.org) in a way it was not designed to function. It did work, but performance was abysmal - about 0.5 fps for the whole desktop, which is very noticeable (details here: https://forum.odroid.com/viewtopic.php?t=35710). I then got an idea to experiment with vnc, and this time I got a much better overall solution.
The idea
The idea is deceptively simple. On the master system start a regular X11 session, with lightdm and all. Use xrandr to extend the desktop (once logged in) so that the new desktop size covers both screens (I used identical screens, but it should work for screens of different resolutions with some tweaks). Next start a X11vnc session that connects to :0 and that has a fixed resolution which is the sum of both screens.
The slave can run a minimal, or a desktop image, but needs to have Xorg and needs to support the target monitor resolution. It will start a standalone Xorg session that reads its startup commands from /root/.xinitrc. The file points to a script that will try to start a vncviewer in an infinite loop, connecting to the master session. If all goes well, you end up with two mirrored screens -- which is not the same as a dual-screen setup. Here is where the magic kicks in. Once vncviewer is started, it is moved with the help of xdotool to the left by a screen's width. This causes what would be normally the left part of the desktop to be rendered off screen (and would logically overlap with what's on the left screen), leaving room for the right screen contents. Confusing? Here's a diagram:
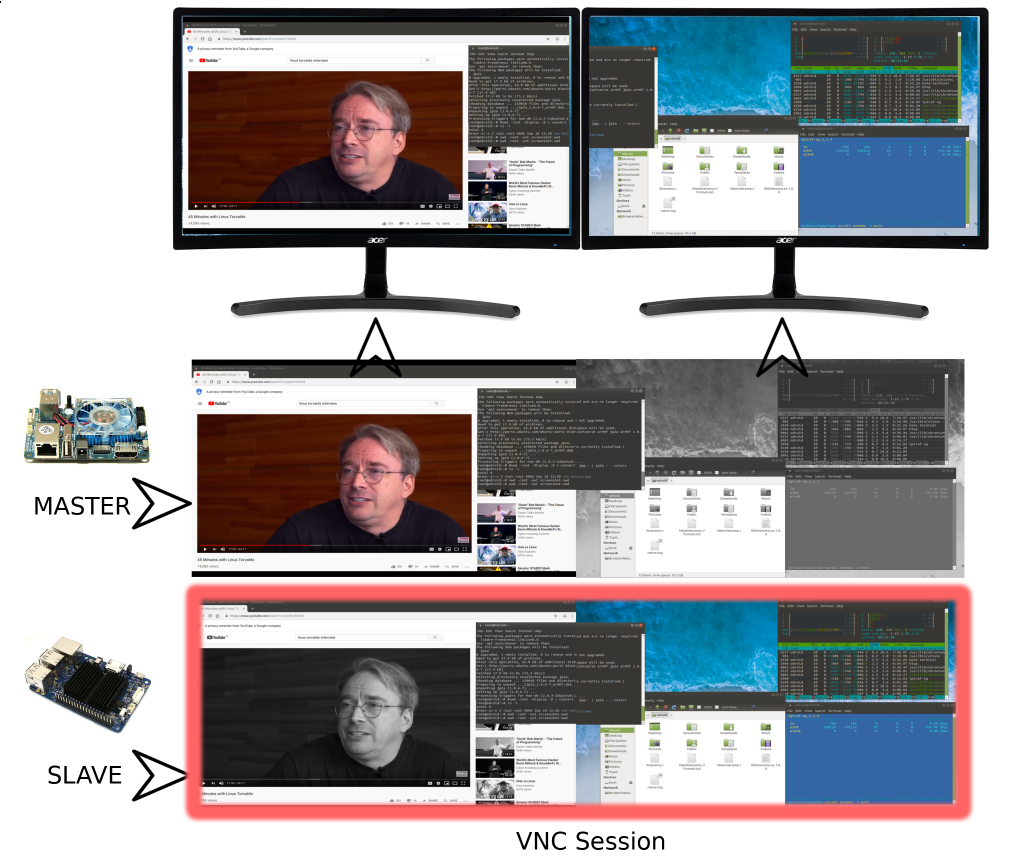
Remember that the master system renders both displays, but only the left part is physically visible, and the slave system renders both displays as well (via VNC), but only the right part is physically visible. The end result is the illusion of a dual-screen setup.
Main Setup
My test bed consists of an ODROID-XU4 running Ubuntu 18.04 Mate as the master system and an ODROID-N2 running Ubuntu 18.04 Mate as the slave. As I said previously, the slave can be a less powerful board (even of the fruity variety), but I had the N2 on hand for the experiment. The master drives the left-hand monitor in the setup while the slave is connected to the right-hand monitor (this order is important). In my case both monitors have 1680x1050 resolution. You should be able to go up to 1080p per screen, but I am not sure whether you can have two 4K screens because the desktop seems to be limited at 4096x4096 pixels (though there might be a way around it: https://bit.ly/2JsDWMc.
The sound should be connected to the master, but keyboard and mouse can be connected to either system once VNC is started. Note that connecting keyboard and mouse to the slave can result in jerky movements when there is a lot of activity on-screen, so for best performance connect them to the master too.
Regarding networking, both systems should be in the same LAN, connected via ethernet and with static IP addresses. Peak network usage observed by me was about 40Mbps of VNC traffic when playing back video, so fast ethernet should not be a bottleneck.
Let us start with the master configuration:
$ sudo su -
# apt-get install x11vnc pwgen git
We will create a 20 character random password for VNC (though documentation says only the first 8 characters are actually used), and we will copy it over ssh to the slave system. I am assuming your slave has an unprivileged account, like odroid.
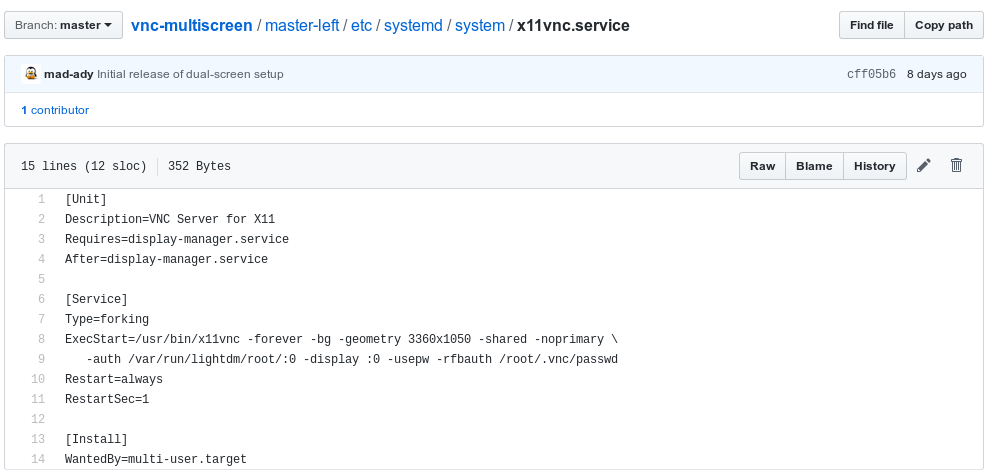
# pwgen 20 1
# x11vnc -storepasswd
# ssh odroid@slave mkdir /home/odroid/.vnc
# scp /root/.vnc/passwd odroid@slave:/home/odroid/.vnc/passwd
# ssh odroid@slave chmod -R odroid:odroid /home/odroid/.vnc/passwd
Next let us create a systemd service to start x11vnc on boot. You can grab and tweak an example configuration from my git page (https://github.com/mad-ady/vnc-multiscreen.git). You will need to change the combined resolution to match your own case (for me it was 3360x1050):
# git clone https://github.com/mad-ady/vnc-multiscreen.git
# cp vnc-multiscreen/master-left/etc/systemd/system/x11vnc.service \
/etc/systemd/system/
# systemctl daemon-reload
# systemctl enable x11vnc
# systemctl start x11vnc
Next we need to add a script that runs once you log in (again, I am presuming you are using the user odroid for GUI login) and that uses xrandr to resize your desktop. We could have run the script from lightdm (before login), but for some reason the desktop background would span only one screen. Run the commands below as the user you log in as (on the master):
$ mkdir .config/autostart
$ cp vnc-multiscreen/master-left/home/odroid/.config/autostart/dual-screen.desktop .config/autostart
$ chmod a+x .config/autostart/dual-screen.desktop
$ gio set .config/autostart/dual-screen.desktop "metadata::trusted" yes
$ sudo cp vnc-multiscreen/master-left/usr/local/bin/set-dual-screen-resolution.sh /usr/local/bin/
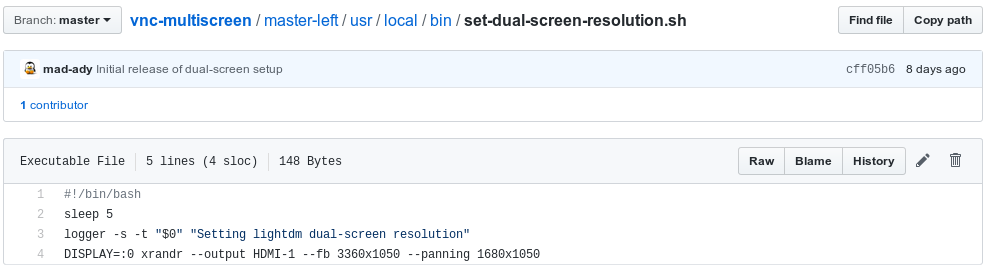
You will need to edit the /usr/local/bin/set-dual-screen-resolution.sh script and set your total resolution for the fb parameter (that will be the size of the desktop) and set your left screen's resolution for the panning parameter. Setting it like that causes the desktop not to start scrolling when you move the mouse to the edge of the screen.
That is it for the basic setup on the master, and next comes the slave. We will disable GUI mode and create and enable an xorg service that starts a plain X11 server and a script to connect to vnc:
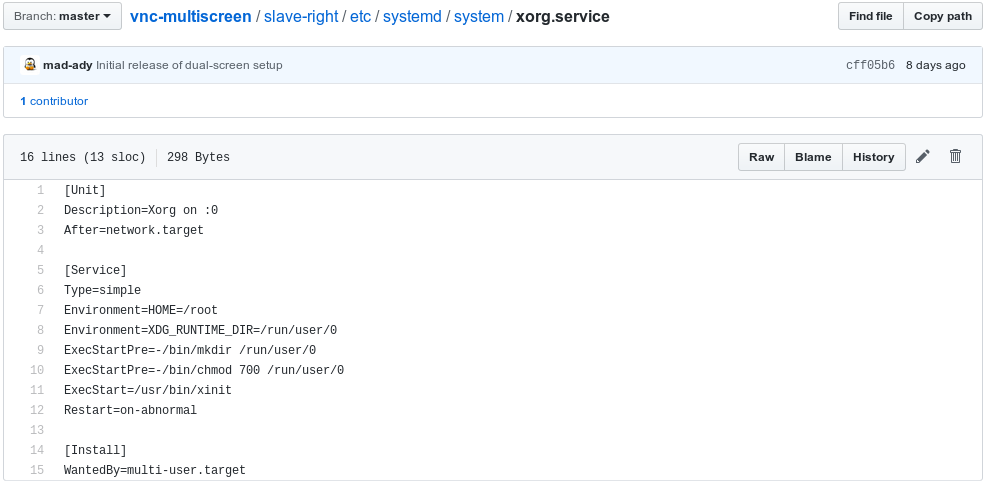
# apt-get install xtightvncviewer xdotool git
# service lightdm stop
# systemctl set-default multi-user.target
# git clone https://github.com/mad-ady/vnc-multiscreen.git
# cp vnc-multiscreen/slave-right/etc/systemd/system/xorg.service /etc/systemd/system
# systemctl enable xorg
The X server parses .xinitrc and executes it after startup. So let us have it start our VNC startup script.
# cp vnc-multiscreen/slave-right/root/.xinitrc /root/.xinitrc
# chmod a+x /root/.xinitrc
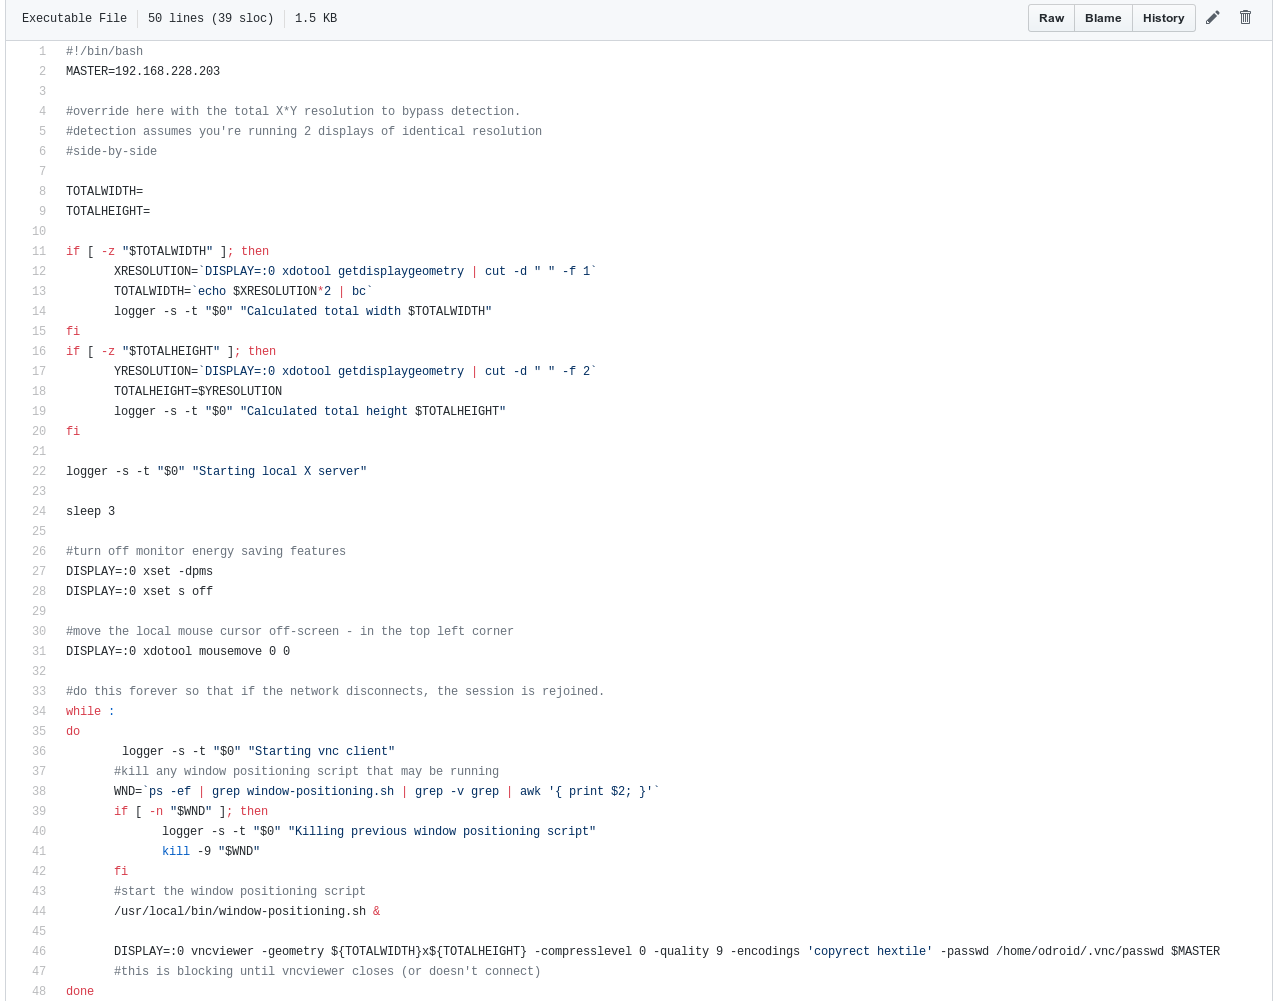
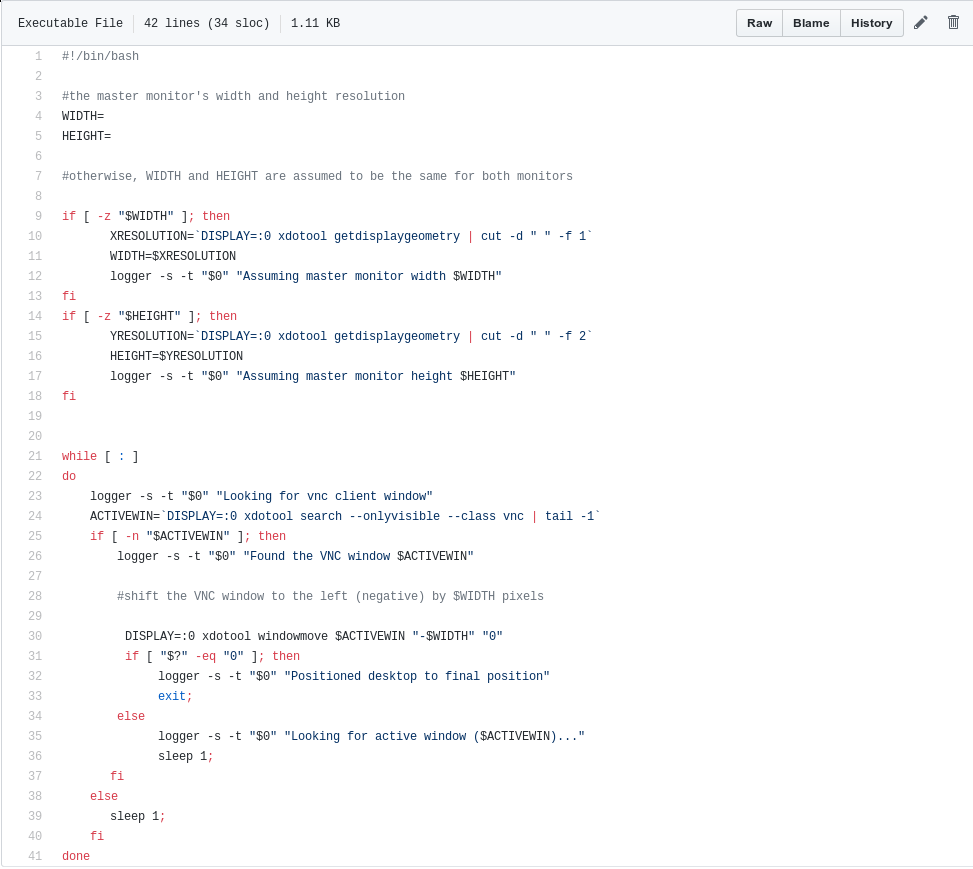
The VNC startup script will start the vncviewer process (in a loop) and then move the window to the left. It is all done by these two scripts:
# cp vnc-multiscreen/slave-right/usr/local/bin/dual-screen-vnc-client.sh /usr/local/bin
# chmod a+x /usr/local/bin/dual-screen-vnc-client.sh
# cp vnc-multiscreen/slave-right/usr/local/bin/window-positioning.sh /usr/local/bin
# chmod a+x /usr/local/bin/window-positioning.sh
If you are not using identical screens, you will need to edit the two scripts above and set the correct offsets for your displays.
Now the basic steps are done. You can restart both systems and after lightdm login you should have an extended desktop. However, there are some things that do not work as expected and you need to make some tweaks.
Tweaks (only on the master)
You should disable MATE window tiling (and compositing while you are at it), because when you try to maximize a window on the right screen by dragging its title bar at the top, the window will jump on the left screen. You can do this from Menu -> Control Center -> Windows -> Placement -> Disable window tiling.
Next you should disable window contents while moving, so that you get a smoother experience: Menu -> Control Center -> Mate Tweaks -> Windows -> Do not show window content while moving windows.
Since you have two screens, it would be nice for windows to know where the division between the screens is and allow you to maximize windows on each screen. For this you need to tweak what the xinerama library tells your X server about available screens. Luckily there is a "fakexinerama" library that you can install on the master (https://www.xpra.org/trac/wiki/FakeXinerama).
$ wget https://www.xpra.org/trac/browser/xpra/trunk/fakexinerama/fakeXinerama.c?format=txt -O fakexinerama.c
$ sudo apt-get install libxinerama-dev libx11-dev
$ gcc -O2 -Wall Xinerama.c -fPIC -o libXinerama.so.1.0.0 -shared
$ sudo mv /usr/lib/arm-linux-gnueabihf/libXinerama.so.1.0.0 /usr/lib/arm-linux-gnueabihf/libXinerama.so.1.0.0--original
$ sudo cp libXinerama.so.1.0.0 /usr/lib/arm-linux-gnueabihf/
If you are running on a different architecture on the master (arm64, x86_64), adjust the path to the library file. You can find what it is with:
$ find /usr/lib -name libXinerama.soFake Xinerama reads the screen configuration from your GUI user home dir ~/.fakexinerama. The file starts with the monitor count (which is 2 in our case) and lists each monitor per line with offsets and resolution:
$ cat ~odroid/.fakexinerama
2
#left screen, starts at x=0 and y=0 and has a size of 1680x1050 pixels
0 0 1680 1050
#right screen, starts at x=1680 and y=0 and has a size of 1680x1050
1680 0 1680 1050
Once you restart your desktop session, windows should be behaving as if you had two physical screens and maximize on each screen.
One more integration that is missing is - the screensaver only activates on the master screen. It probably cares only about screen size, not desktop size, so you're left with an exposed right screen. You could use gdbus (or polling) to see when screensaver activates and you can ssh into the slave and turn off its screen with xset dpms force off. When you hear the screensaver deactivate, you can re-enable the right screen.
To do this, first you need to be able to ssh from the master to the slave without a password. For this we will create a key and copy the public part to the slave. Skip the first step if you already have keys.
$ ssh-keygen -t rsa -C "master key"
$ ssh-copy-id odroid@slave
Next copy the script that watches screensaver status and start it as part of the user desktop session. Thankfully, systemd can handle user services as well (again, on the master):
$ mkdir -p .config/systemd/user/
$ cp vnc-multiscreen/master-left/home/odroid/.config/systemd/user/screensaver-sync.service .config/systemd/user
$ systemctl --user enable screensaver-sync
$ sudo cp vnc-multiscreen/master-left/usr/local/bin/screensaver-sync.sh /usr/local/bin/
Make sure to edit (and test) the screensaver-sync script, so that it points to the correct slave IP address.
Pros and cons:
- The master (left) does all the hard work, but has the most fluent performance
- The slave (right) is used to render half a screen, but it needs to transfer and render the combined screen (even if you only see half), so heavy activity on the left screen causes tearing/lag on the right screen
- You need to turn on and off both devices independently. It is possible to automatically turn off the slave then the master is shuts down, but needs tweaking (e.g. a systemd service that ssh-es into the slave to power it off)k
- You can easily turn back the slave into a stand-alone system by disabling the xorg service and re-enabling graphical target. The master can remain as is without affecting usability.
- Performance is native on the master/left screen and ranging from a couple of FPS to ~15 FPS on the slave/right screen, depending on screen activity. The right screen is best suited for static content, like a web page, code or a terminal.
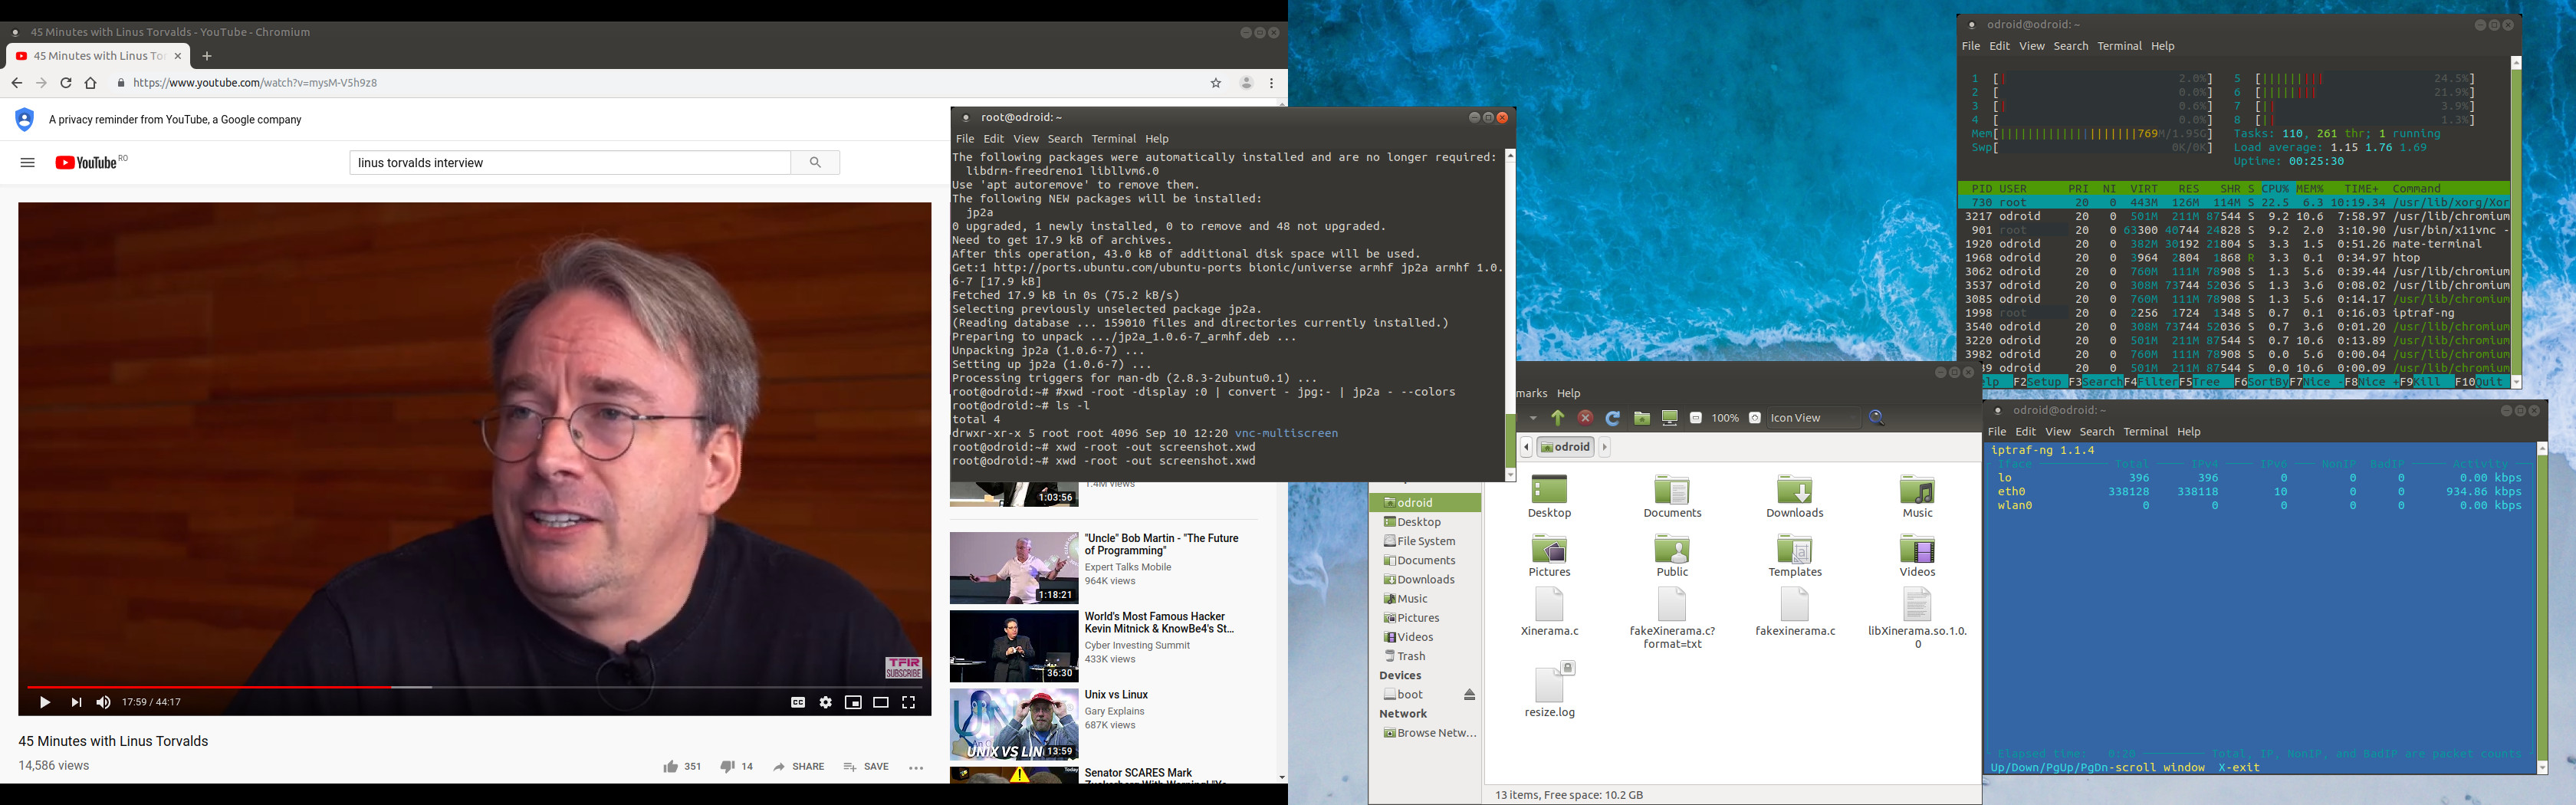
You can see a demo in action here (sorry for the poor video quality): https://www.youtube.com/watch?v=sSqXX5doCvo&feature=youtu.be
Ideas for improvement
Ideally, all of this would be greatly simplified if only there were a way for X11VNC (or maybe a different remote desktop technology) to copy only half a screen of data instead of the full desktop. That way you reduce the processing both on master and slave and can get rid of the window movement tricks. You could display the second screen on any system (e.g. in a browser on a TV) without much trouble.
You may get better performance if the master is a PC (e.g. an ODROID H2) and the slave is an ARM/ARM64 ODROID. That is because the framebuffer read speed on a XU4 is about 45MB/s (N2 reports it as 443MB/s), while my Intel GPU has about 961MB/s. More speed results in faster refresh rate, but it will consume more network bandwidth.
One more thing - the technique above can be extended to more than 2 monitors because you can attach two VNC clients to the same server. However, performance will drop considerably. Let me know if you find ways to improve this on the support thread at https://forum.odroid.com/viewtopic.php?f=52&t=36411.
Be the first to comment