Kodi 18.2: mali gbm driver testing on Ubuntu 18.04 minimal image
May 1, 2019By @AreaScoutLinux, ODROID-XU4
I have compiled and built Kodi version 18.2 from the final packages for public testing. You will most likely have the best luck using Kodi 18.2 with the minimal image, you are welcome to test it.
The package includes the inputstream.adaptive Add-on which is needed to view DRM copy protected video material. The package also includes script.module.inputstreamhelper Add-on which is needed to download libwidevinecdm.so. The needed packages for a working Kodi installation are kodi and kodi-bin, the eventclients and other packages are not needed but highly suggested.
How to Build a Monku1000: Harnessing the Power of the ODROID-GO
May 1, 2019By Brian ReeGaming, ODROID-GO
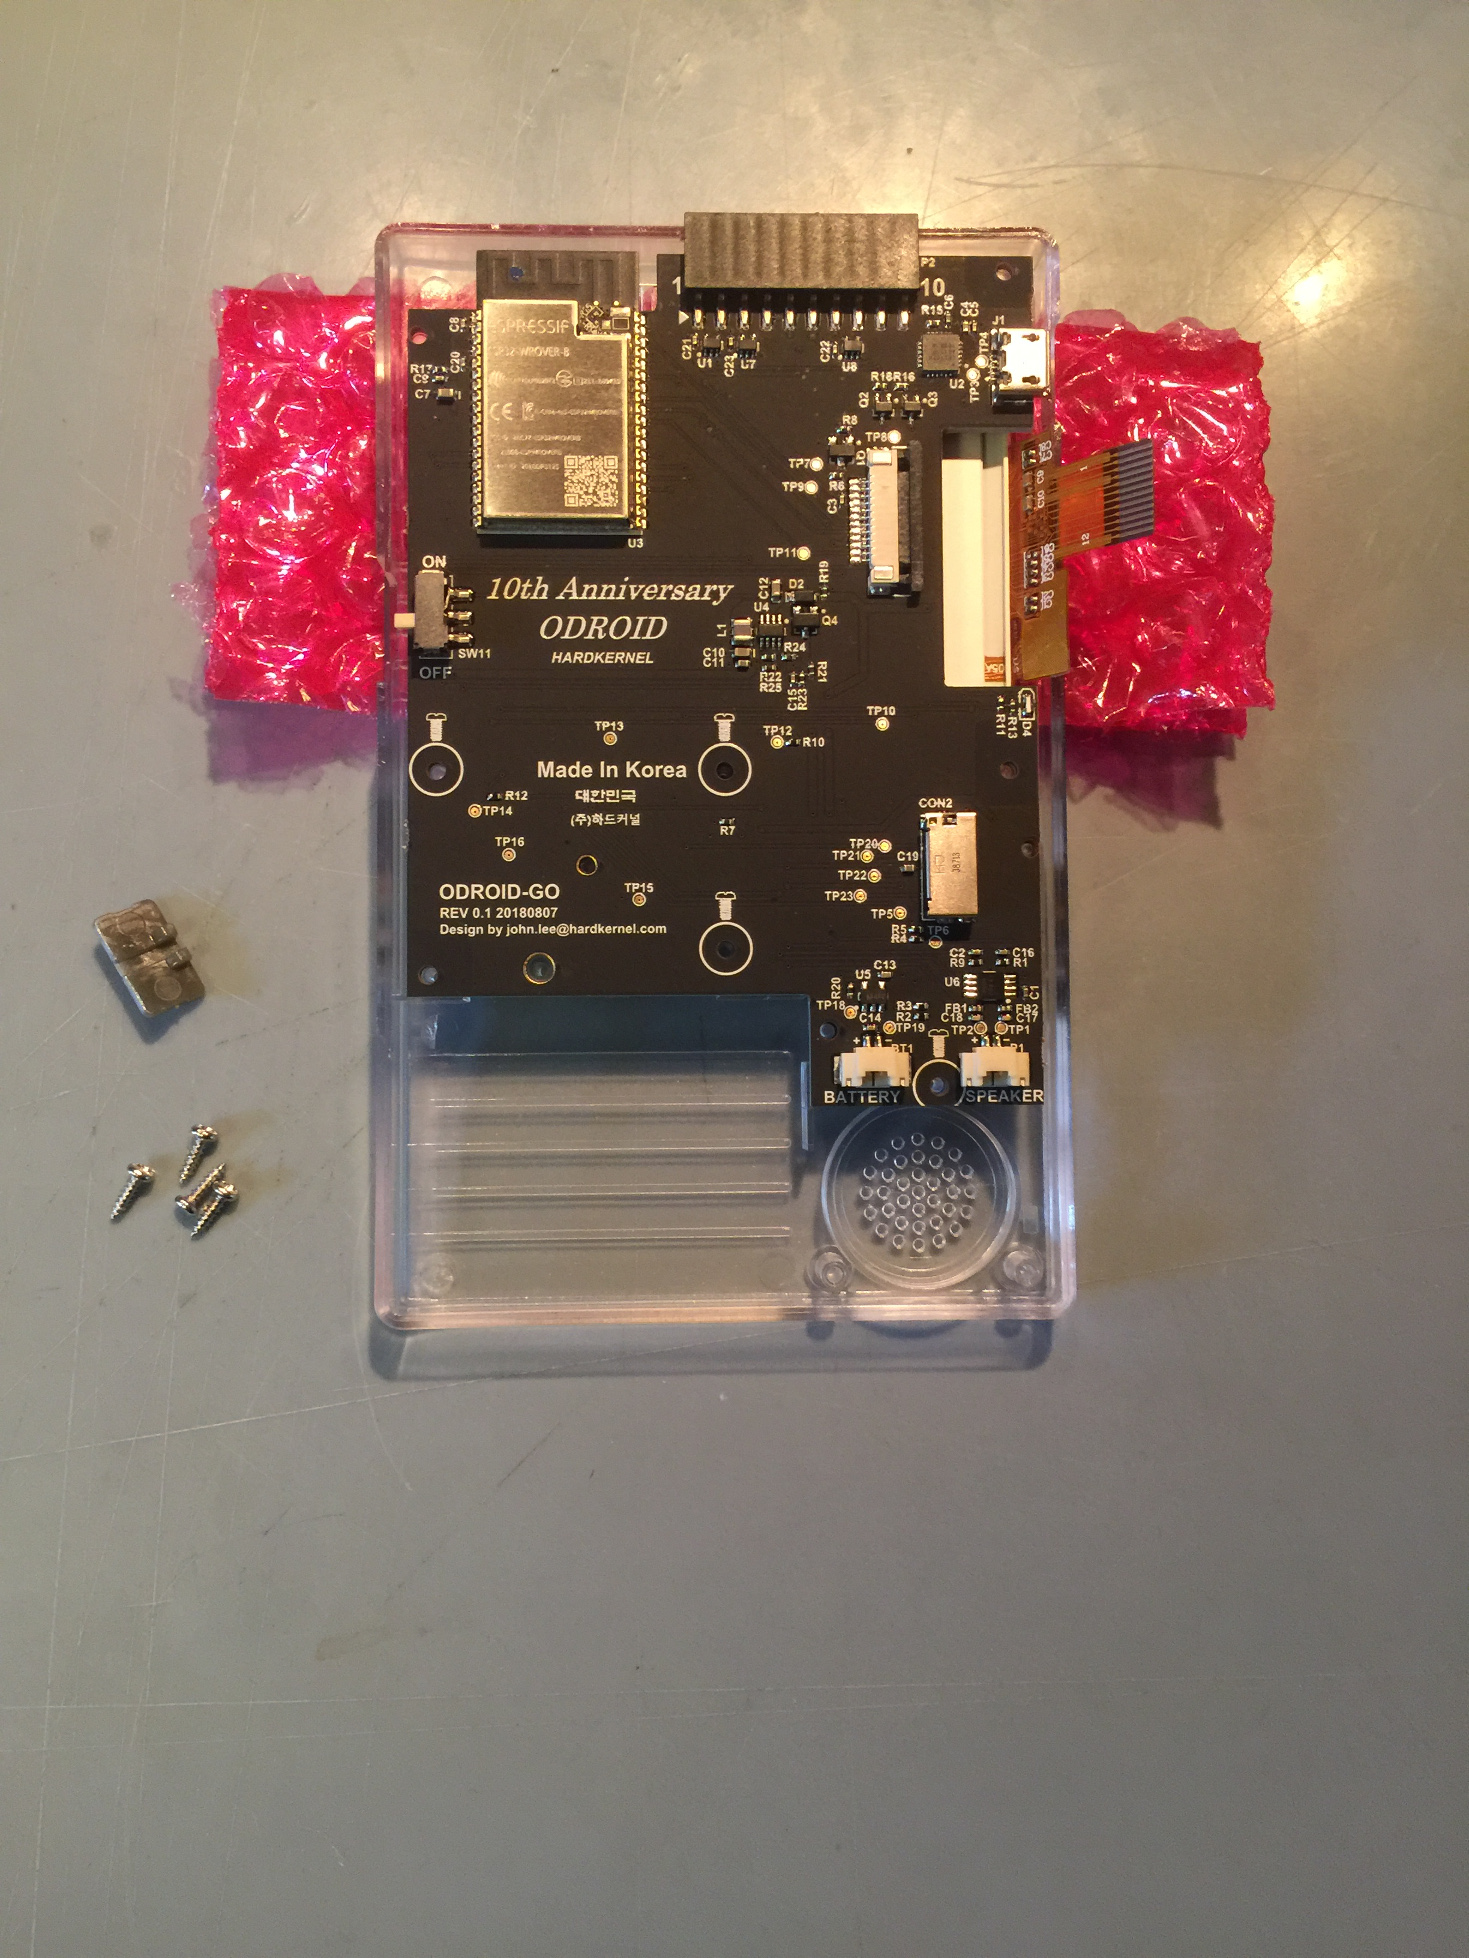
This article will show, in detail, how we build a Monku1000 from a standard ODROID-GO kit from Hardkernel.com. You won't need anything more than a screwdriver set to accomplish this task and we'll show you all the little tips we've learned while building a bunch of these things. This tutorial is driven by photos of each step of the construction, so let's get to it!
Tools Needed
- A small screwdriver set containing a few small Phillips head screwdrivers.
- A clean, static-free work surface.
- An 8GB or 16GB micro SD card (required for software setup).
- Laptop or desktop computer with SD card reader (required for software setup).
The Kit
First things first, let's go over where you can acquire an ODROID-GO. You could search eBay and find a pre-built one, but what would be the fun in that? So your two options are going to be ordering directly from the manufacturer, or ordering from Amazon. Direct ordering is cheaper--the kit goes for $38 USD--but the delivery charges can be a lot. Don't go by the initial delivery cost; enter in some address information to get a more accurate price. It helps to find some friends who also want to build one and go in together to save on shipping. If you order on Amazon.com you will pay around $60 USD for the kit, which comes out to around the same price when you include shipping. I ordered directly from hardkernel.com along with a few other items to make the shipping cost hurt less.
[One of the best domestic sources for purchasing ODROID-GO kits and ALL things ODROID is AmeriDroid at ameridroid.com. -ed]
The Build
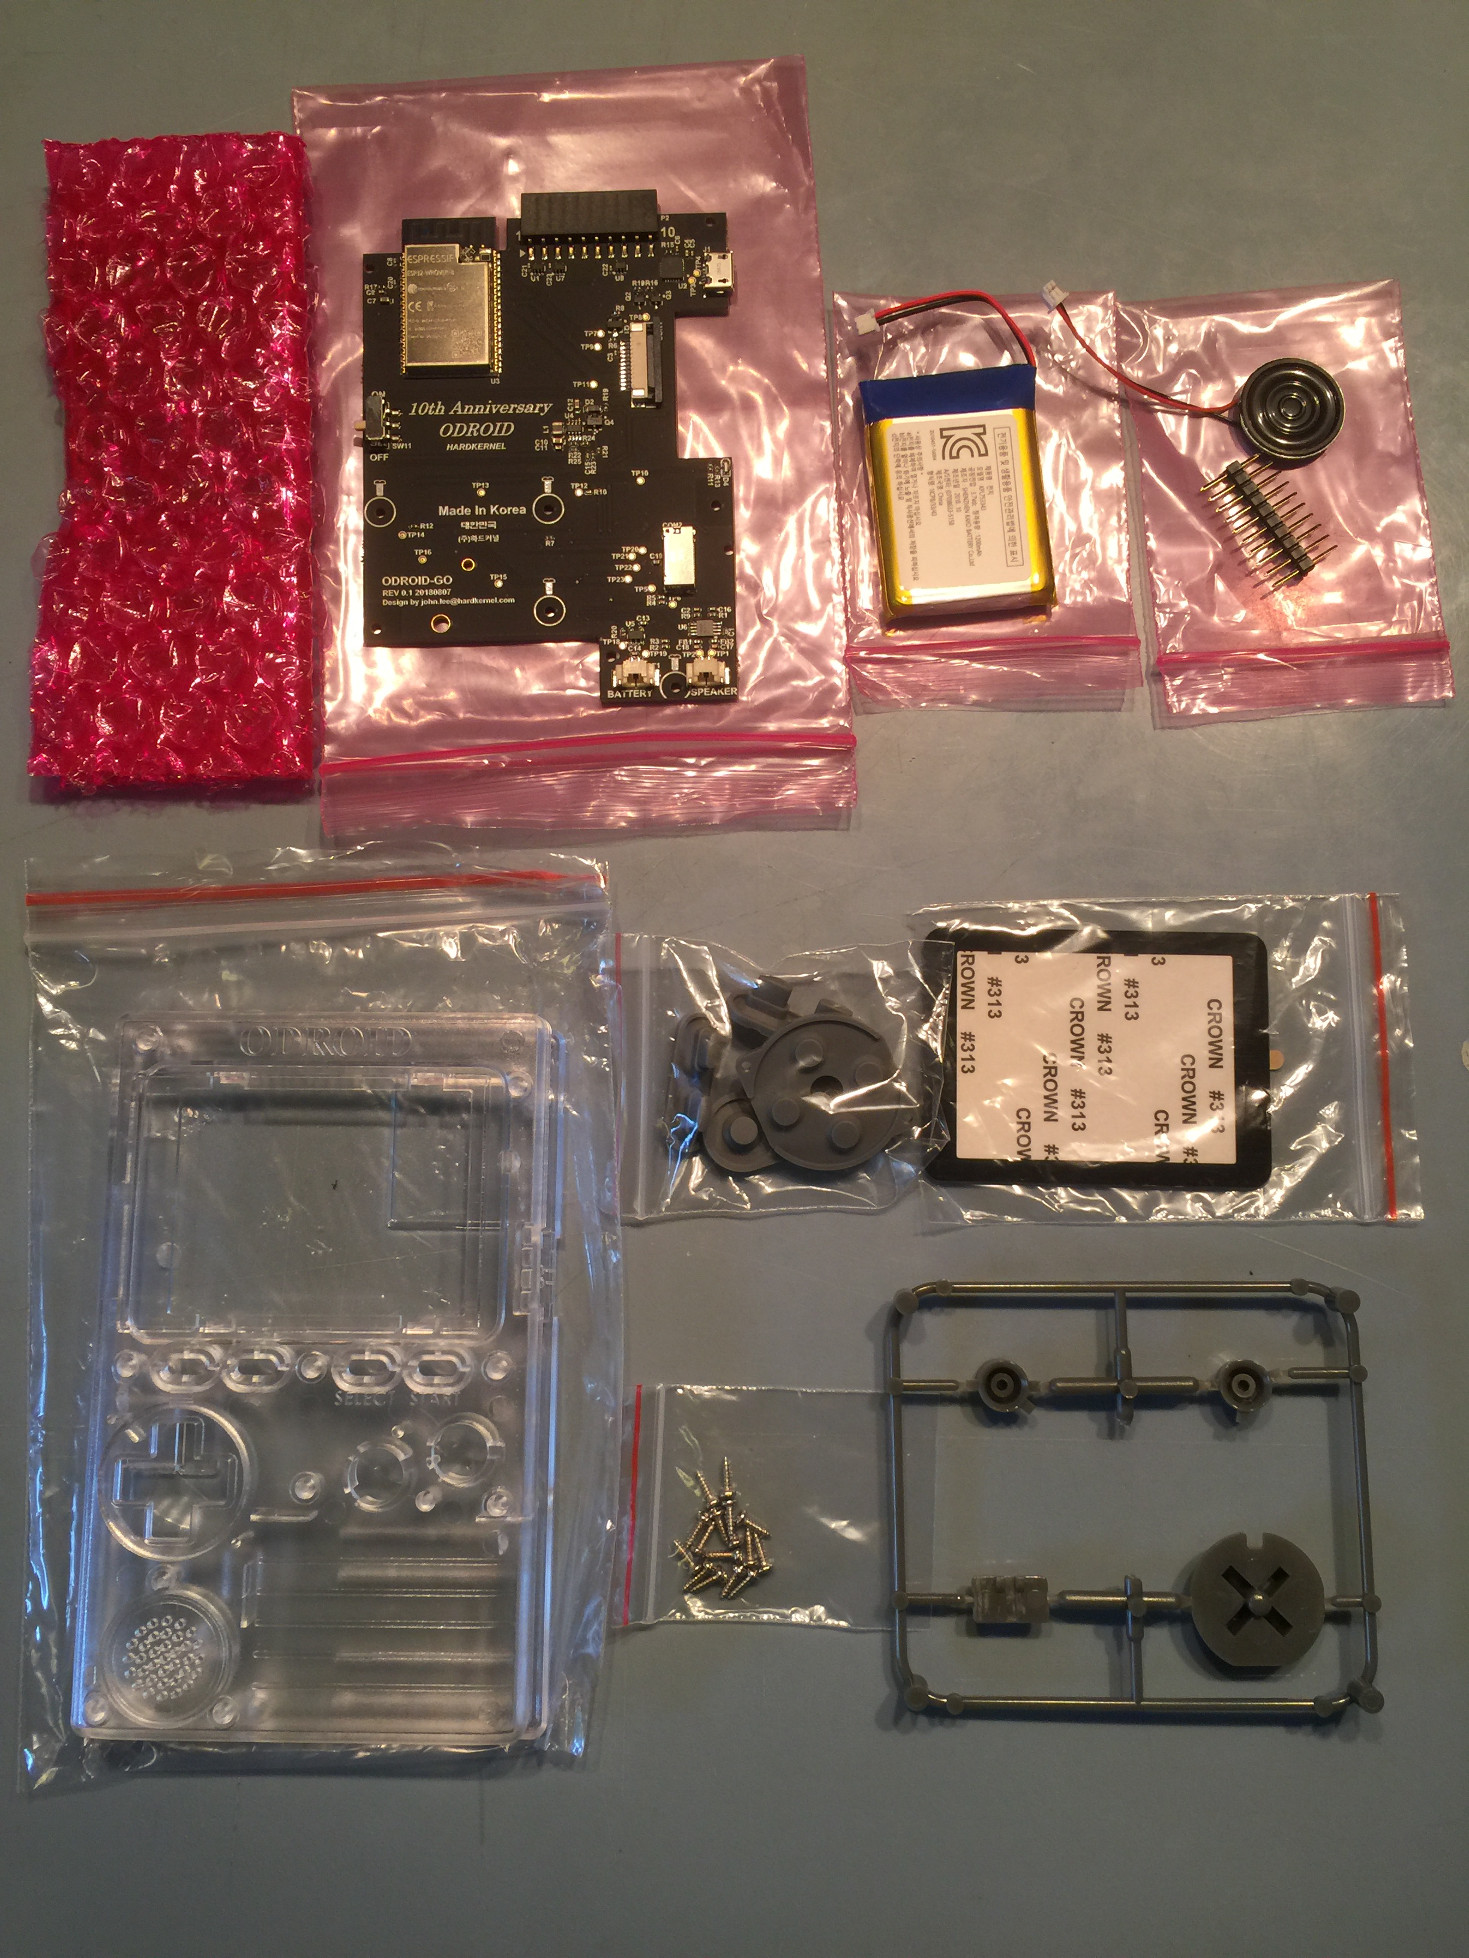
Now that we’ve got that covered, let's start by unpacking the kit and spreading the items out on a clean, flat, static-free work surface. A kitchen table should suffice, but make sure you are in a place where you don't build up a static charge since you can really fry a component with a static shock. Make sure the speaker is away from any metal. The speaker has a magnet and can get damaged if it pulls itself into a sharp metal object.
Figure 1 - Make sure your work surface is clean and your speaker is away from any metal
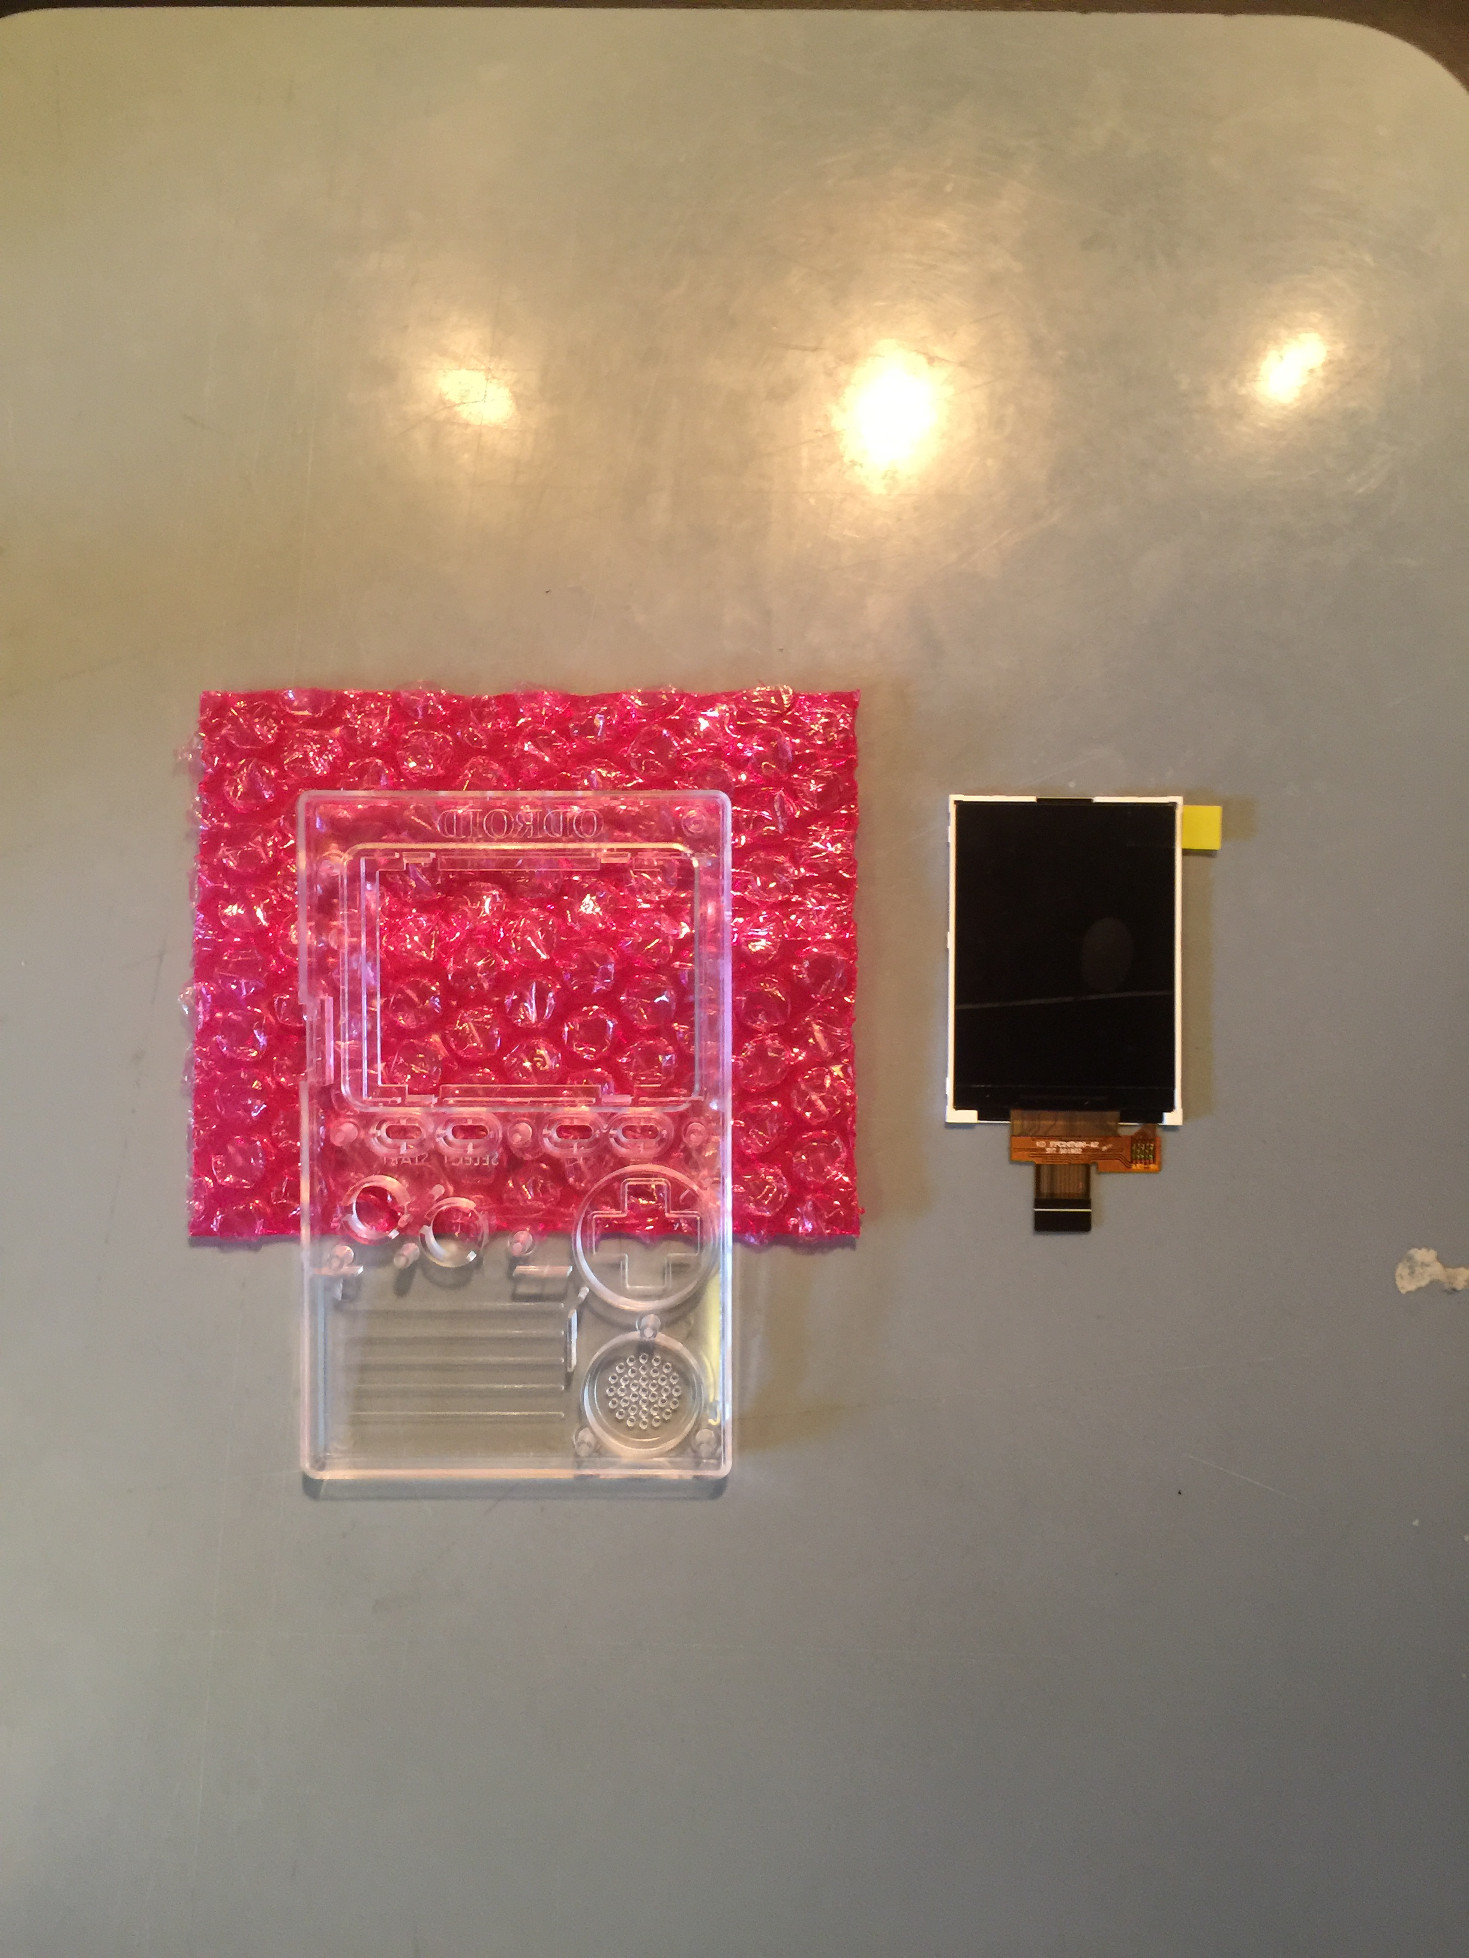
First thing we need to do is take out the case front and screen. Place them on a clear work area. Use the plastic bubble wrap that is protecting the screen as a safe area to place the screen face down. Place the case front face down on the safe area. Using the tab, gently peel the protective layer off the screen. Save this for later use by placing it sticky side up on a clean, out of the way surface.
Figure 2 - Make sure to save the screen protector for later
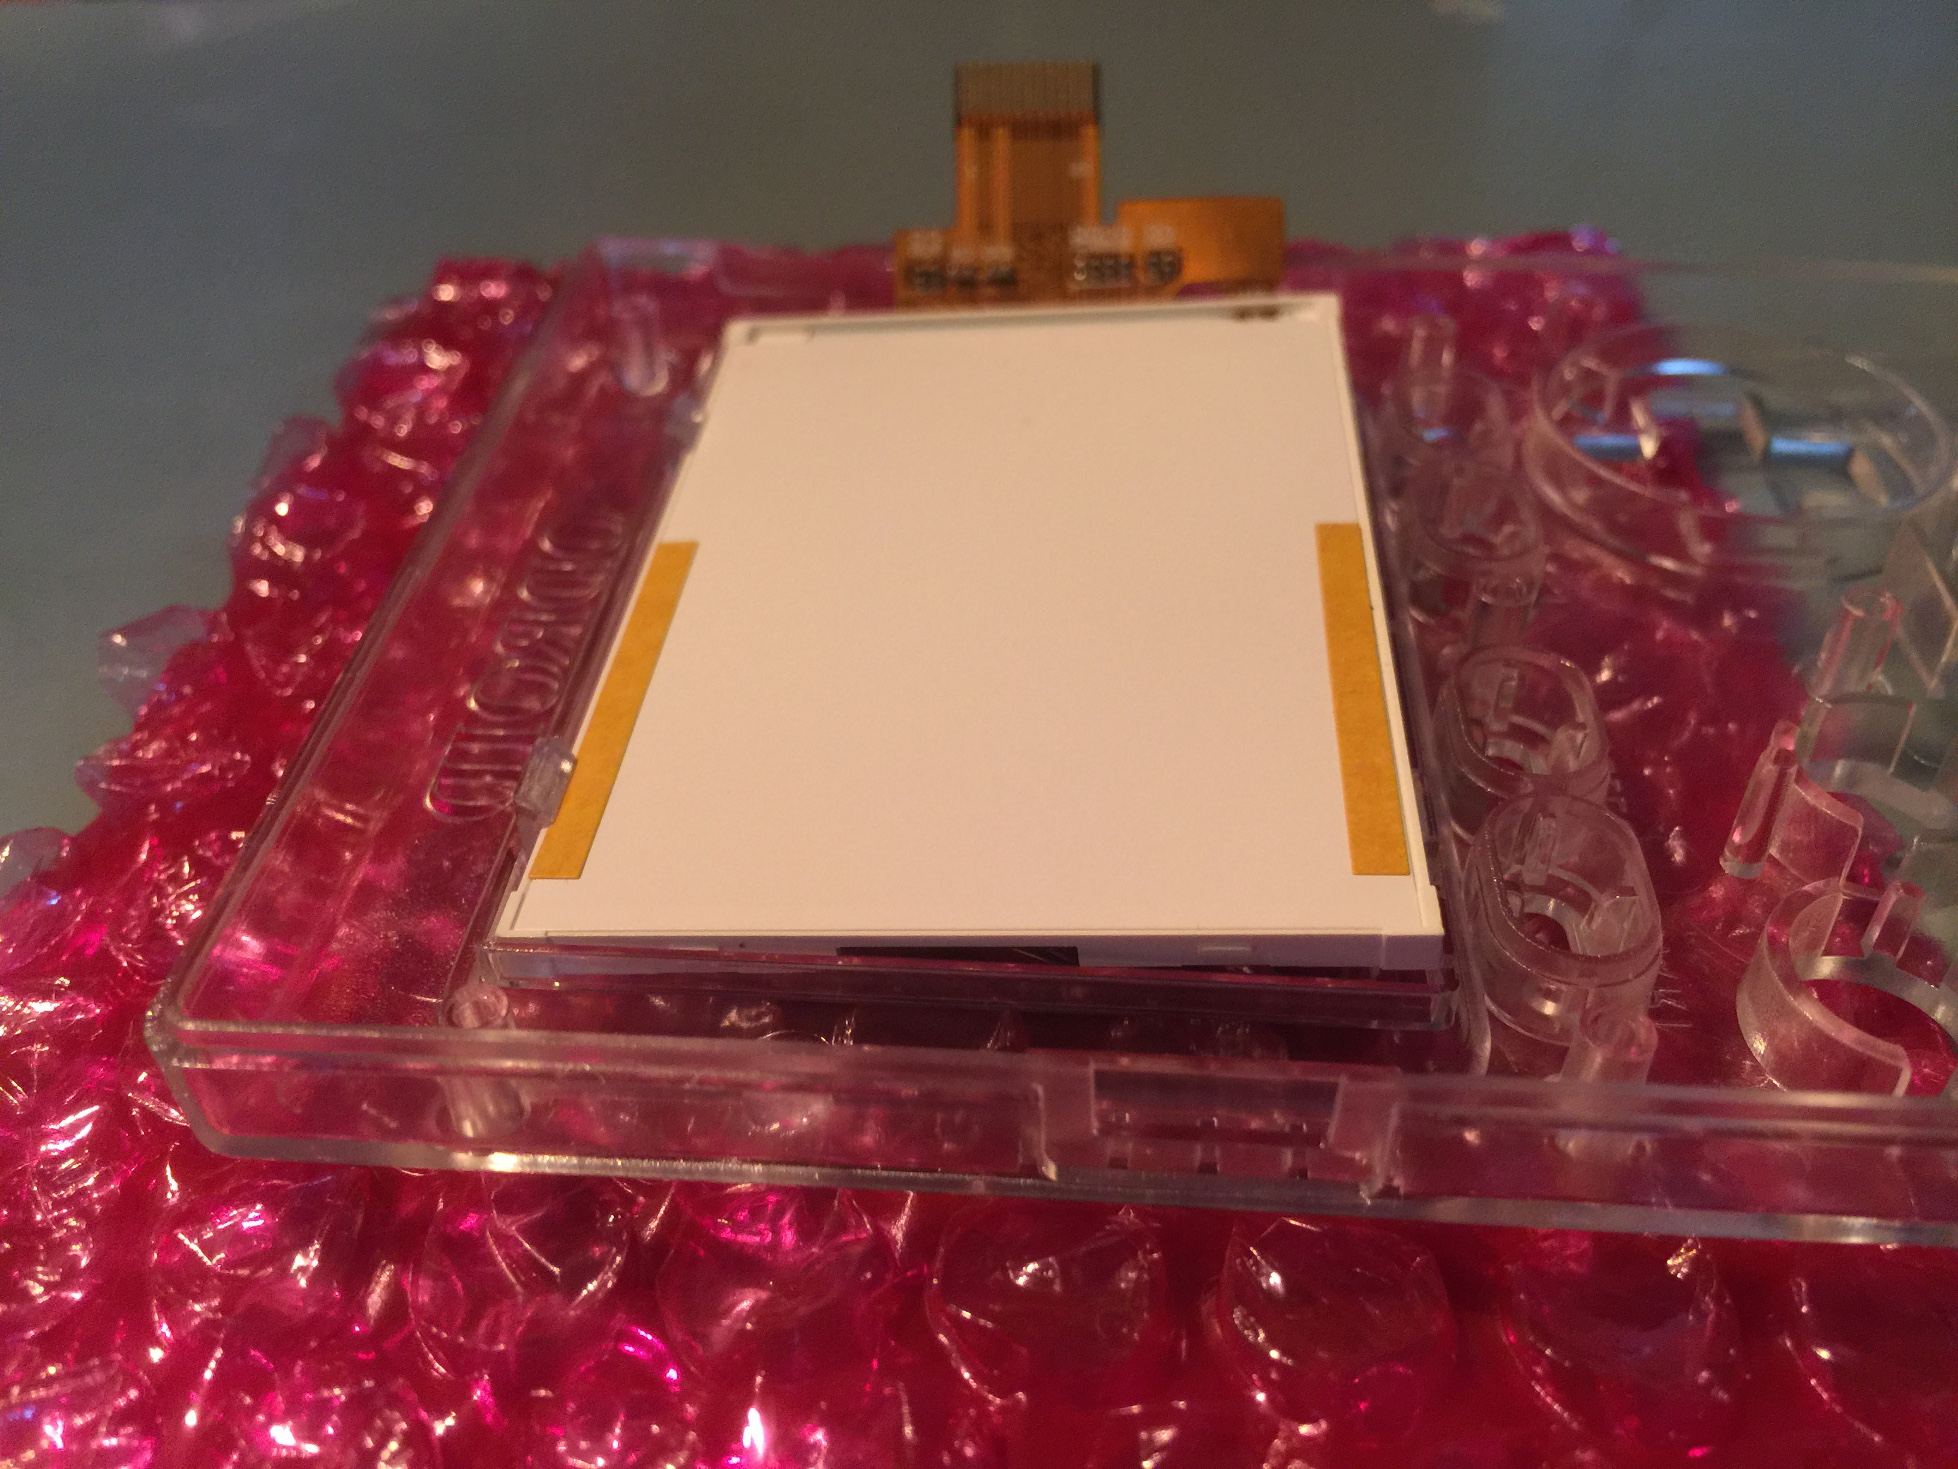
Next, place the screen face down, inserting the the top of the screen under the plastic tabs at the top of the case's screen hole. Let the bottom of the screen rest on the bottom tabs as shown below.
Figure 3 - Snap the screen into place
Place two fingers on the bottom of the screen, outside of the tabs, and gently push down until the screen snaps into place. Now grab the protective sticker you peeled off, make sure it is free of debris, and place it on the screen as best you can, protecting as much area as possible.
Fold the pink bubble wrap, and place the case on top of it so the button slots are off the work surface. Now pop out all the buttons from the plastic mold and dump the plastic baggie with the button pads. Place the control buttons on the left and right under the screen. You should have enough room below the case to push the buttons through and have them sit there nicely.
Figure 4 - Set the button in the slots, making sure they go all the way in
Place the control buttons on the left and right under the screen. Push them down and roll your thumb around to make sure they go all the way in. Place the buttons and the directional joystick in their respective places. Then place the rubber pads on top of each control element. Gently and carefully push down the rubber around the plastic pins just a little bit for each pad.
Place the circuit board in top of the button pads as shown below. The big silver chip should be in the top left corner. The board will line up perfectly with some guide pins.
Figure 5 - Placing the circuit board
Hand tighten all four screws while the screen is on the work surface. Then pick up the case and finish them up. You want to tighten them just until they start to get tight. Don't over do it, but they shouldn't be loose in any way--they should be solidly affixed.
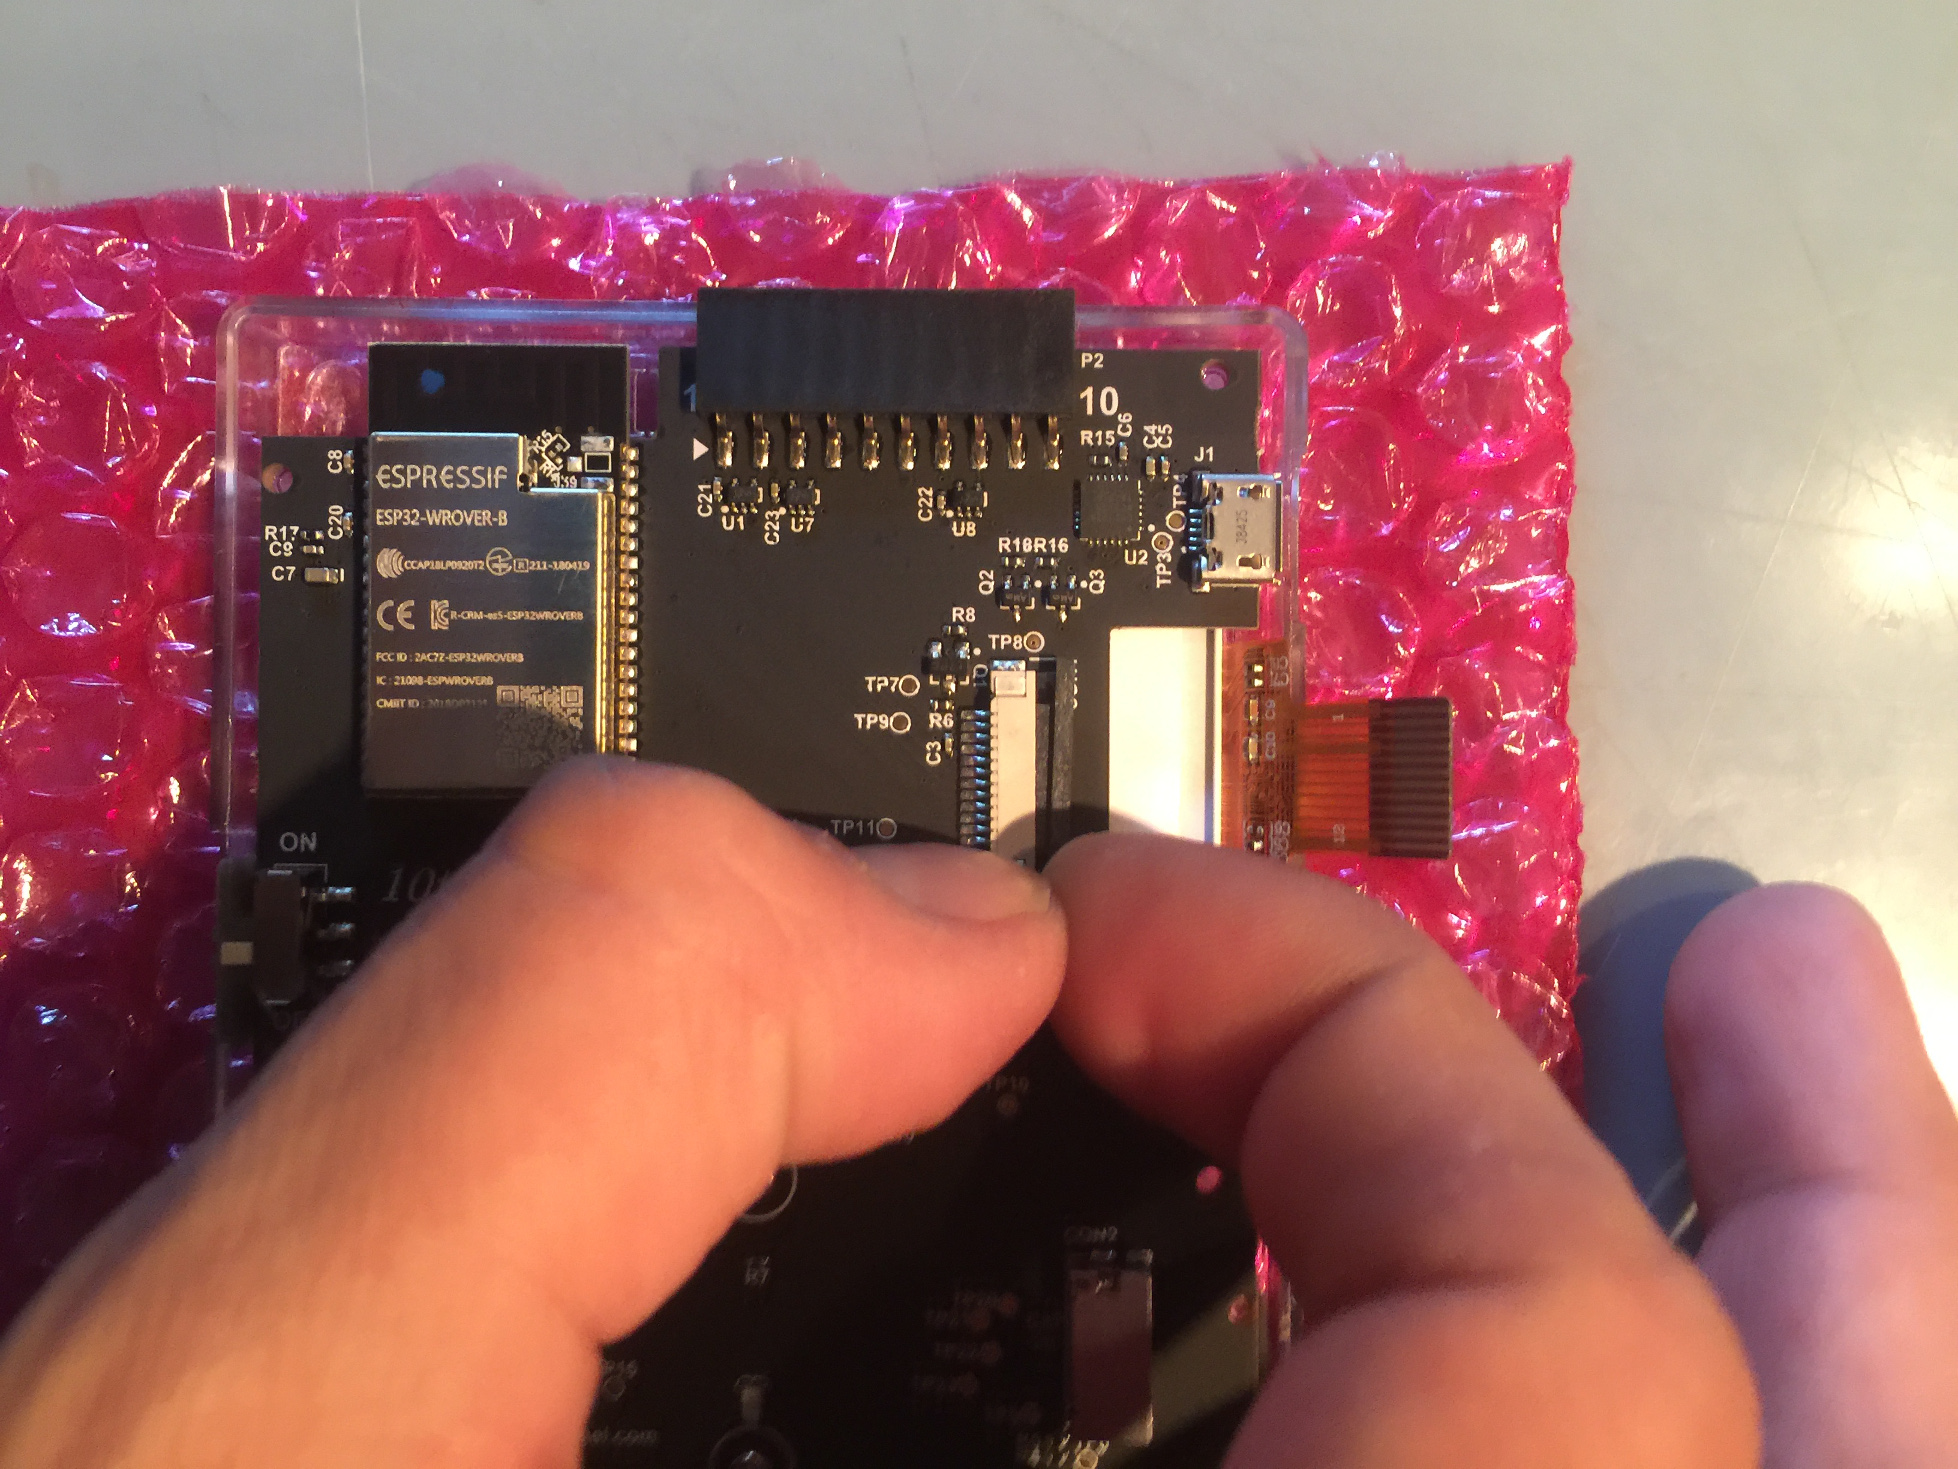
Pinch the side of the screen connector, both sides at the same time to close it. You'll want to pull the connection slot all the way out then slide the screen ribbon cable all the way into the connector. Hold the ribbon in while you pinch both the left and right side of the connection slot.
Figure 6 - Hold the ribbon in place
The white line of the screen ribbon cable should be straight and parallel to the line on the circuit board. The white line should be close but not on top of the circuit board line.
Now is a good time to check the screen. You can quickly plug the battery into the battery connector. Make sure the power switch plastic is in place and turn on the device. You should see an SD card error icon on the screen if everything is ok.
Figure 7 - SD card error icon
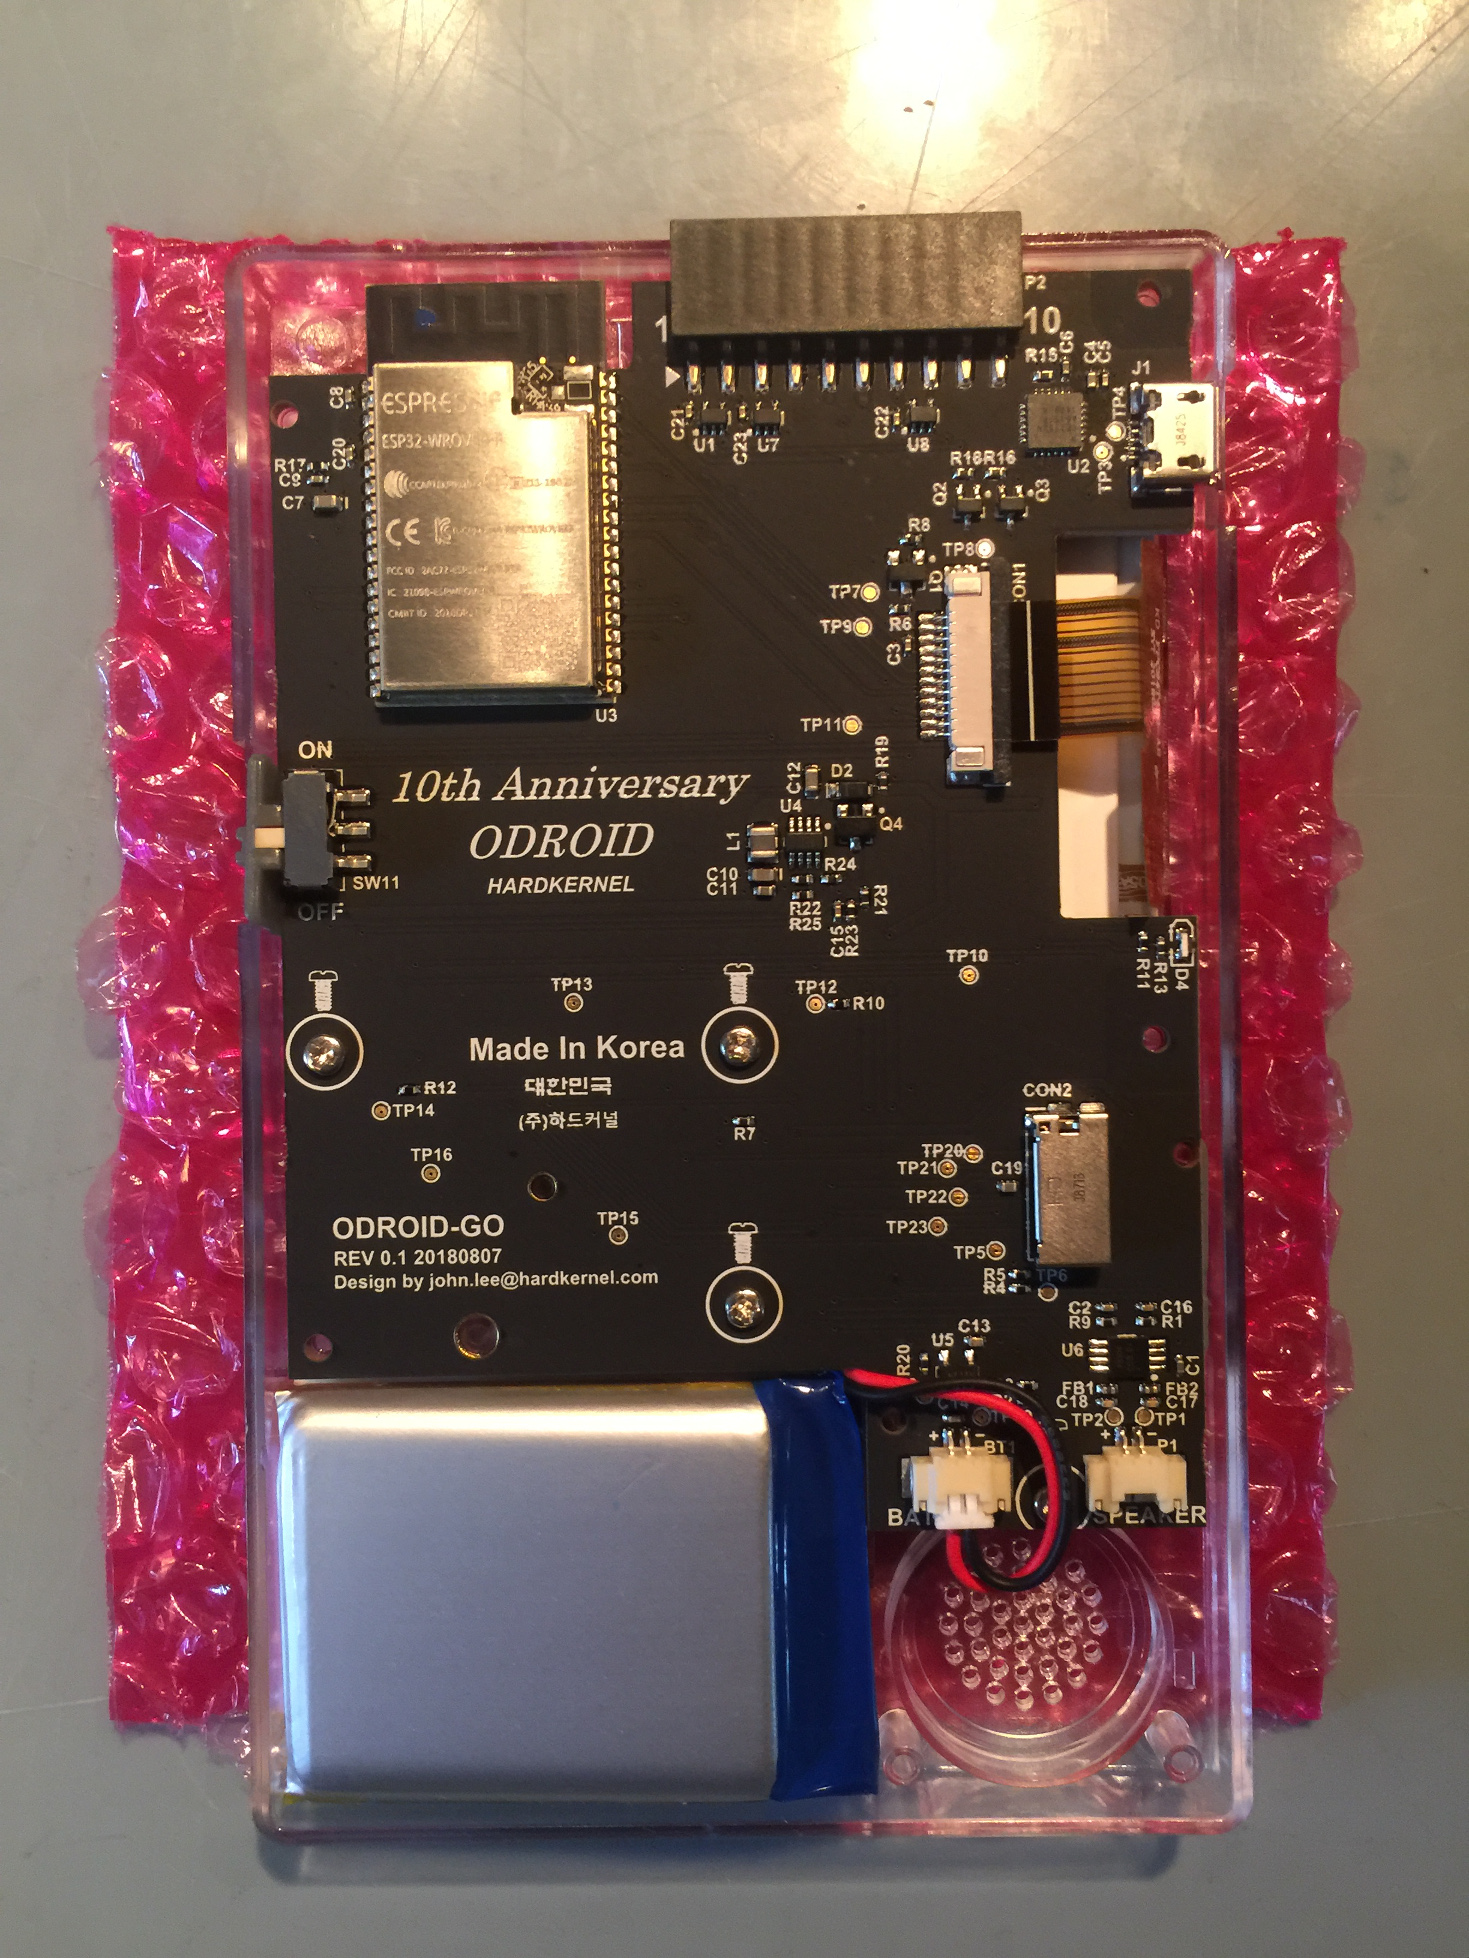
If you want to customize your device, now is the time you can place a special image in the space where the battery goes. Use the battery for measuring and cutting this addition to the proper size. Wrap the battery cable up on the right hand side of the connector and place as shown below. Slide the battery in from left to right. Bend the battery cables up slightly, and slide the battery into its slot from left to right, then push the left side down until it's snuggly in its place.
Figure 8 - Example battery placement
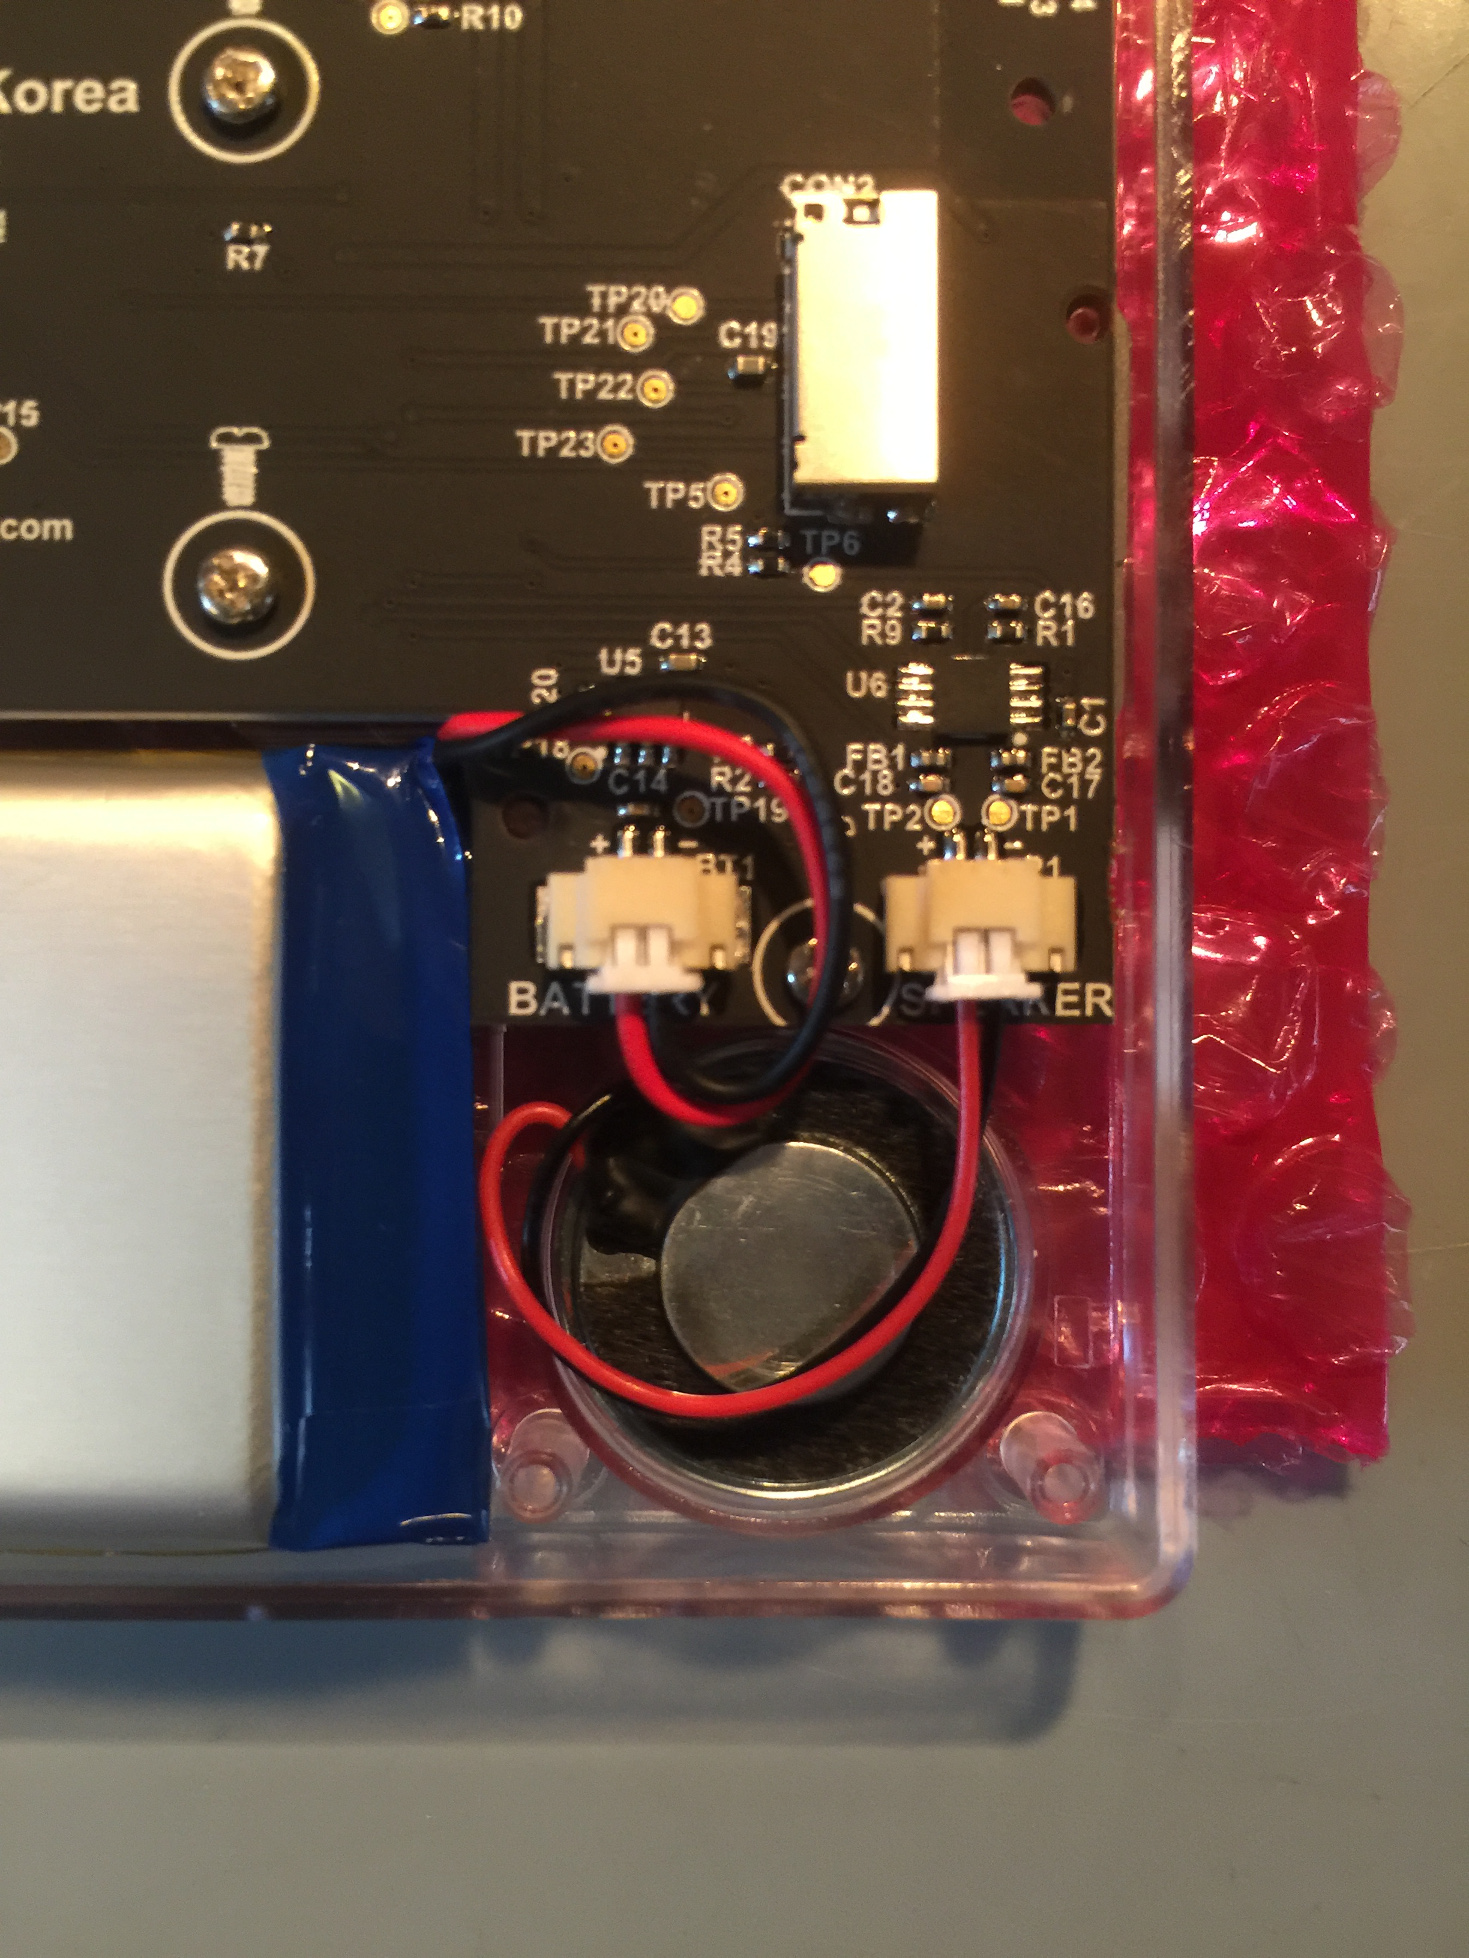
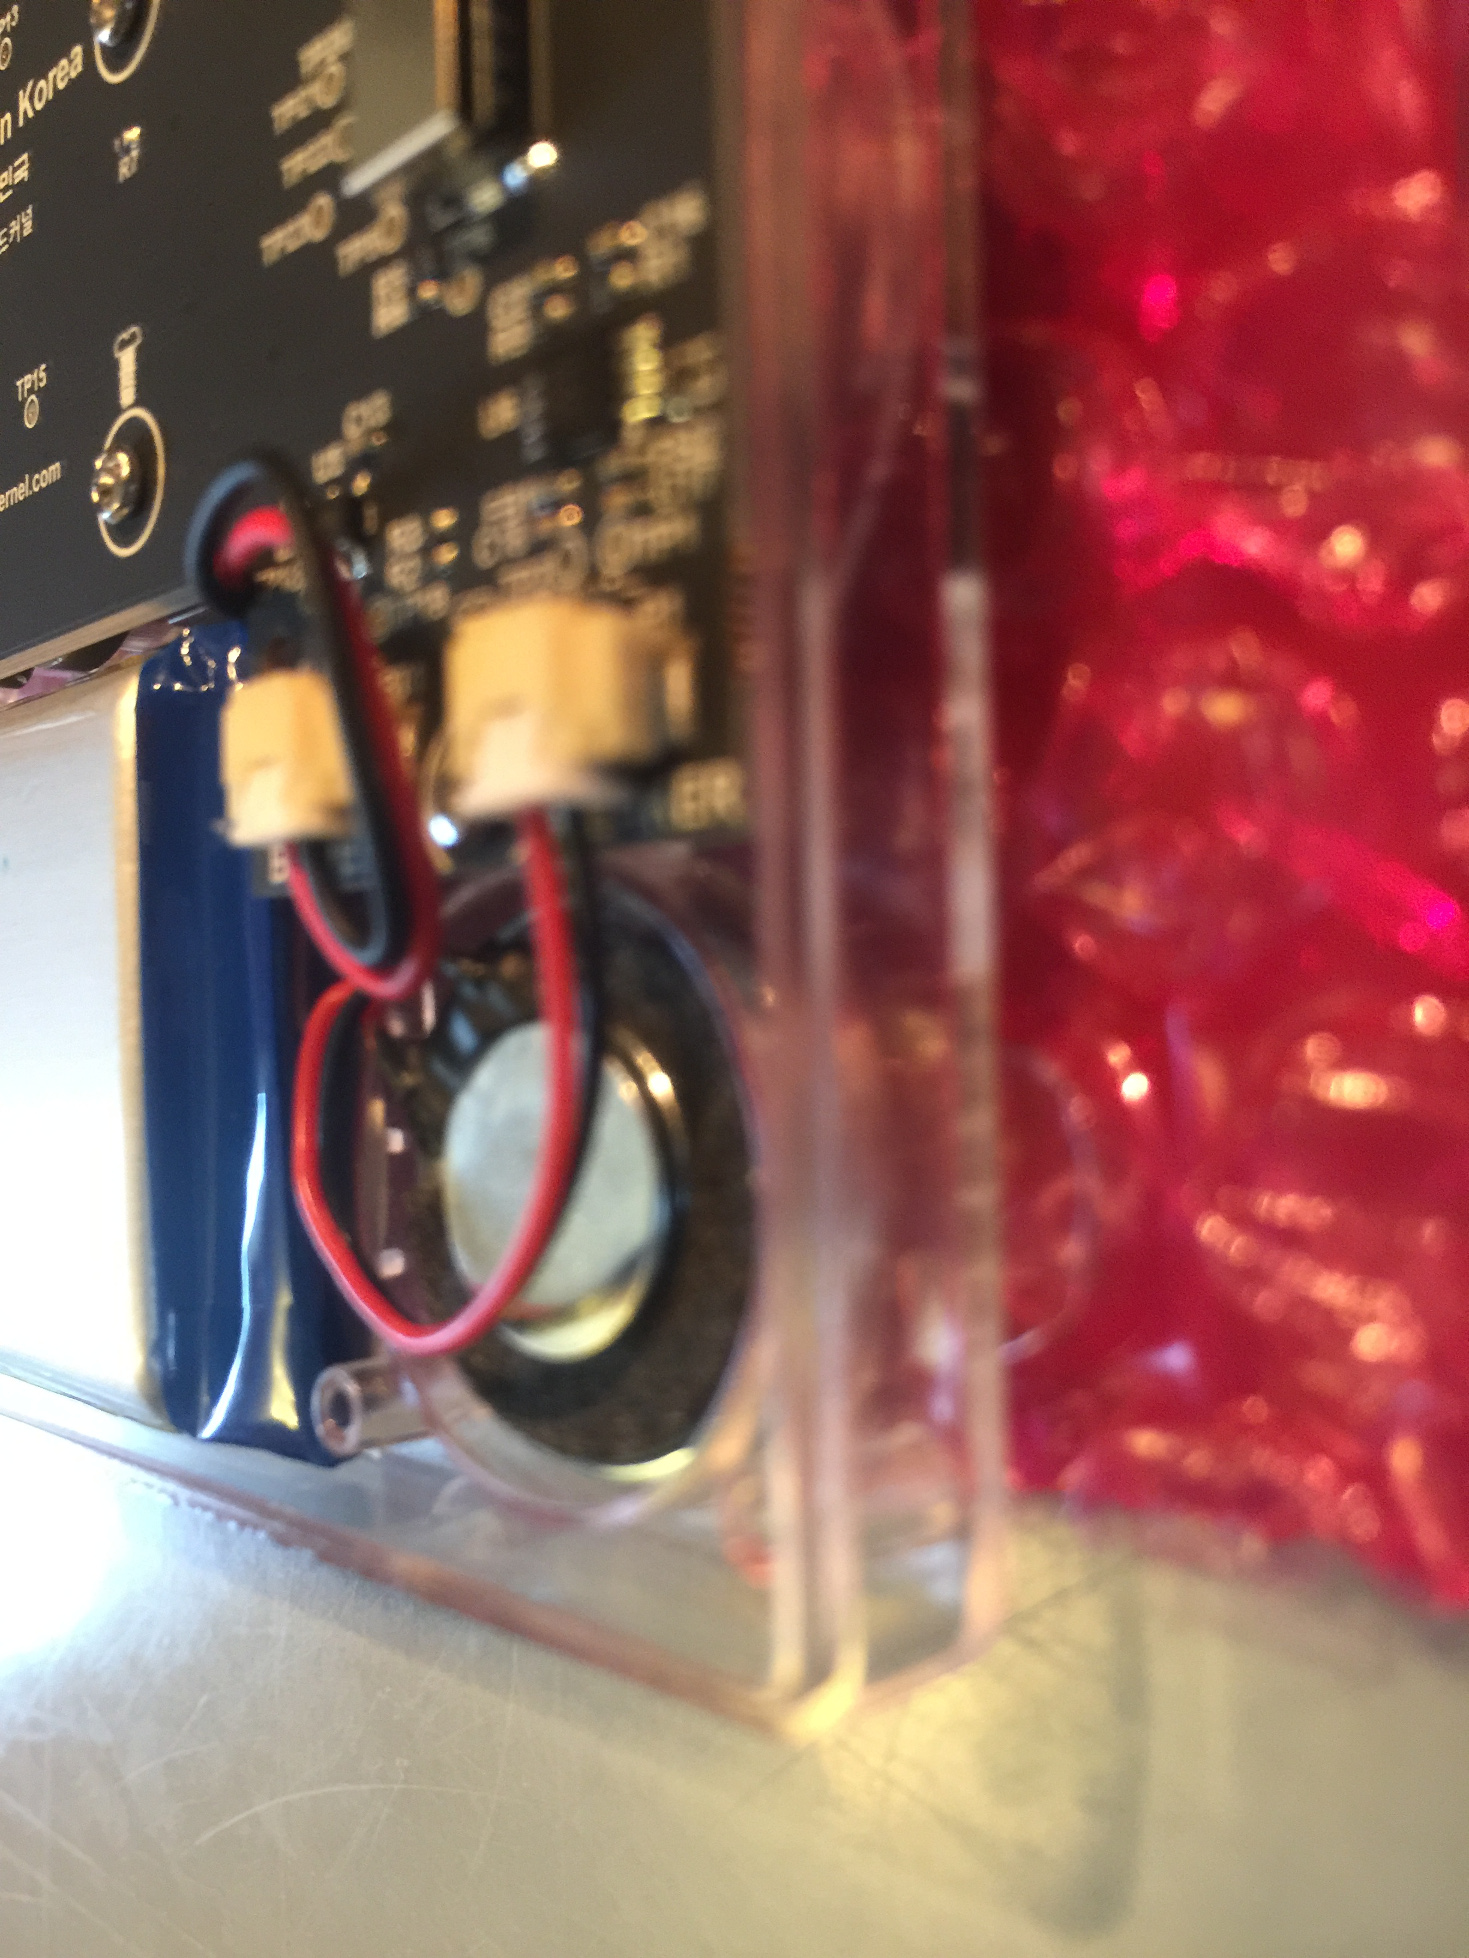
Next up is the speaker. Connect the speaker cables and wind up the cable just a bit as shown below. If there is some over hanging plastic on the battery you can slide the speaker cables under the plastic slightly. Make sure the speaker cables are clear of the screw post, and the center of the speaker itself.
Figure 9 - Notice the battery and speaker connectors a firmly pushed into place and touch the back of the connection slot
Figure 10 - Another look at the cables
Make sure that the back of the case can cleanly access the screw post and that the speaker holder doesn't pin down the speaker cables. The cables should be clear of the center of the speaker. Close the case with the provided screws. If the bottom right corner by the speaker doesn't close all the way, give the screws near it a few extra turns until it's super tight. You can always remove play in the case from the speaker side but you can't remove play in the case from the battery side because there are no screw posts there. If you do have a lot of play in the case on that side some plastic model cement along the case edge might do the trick. Personally, I just live with it.
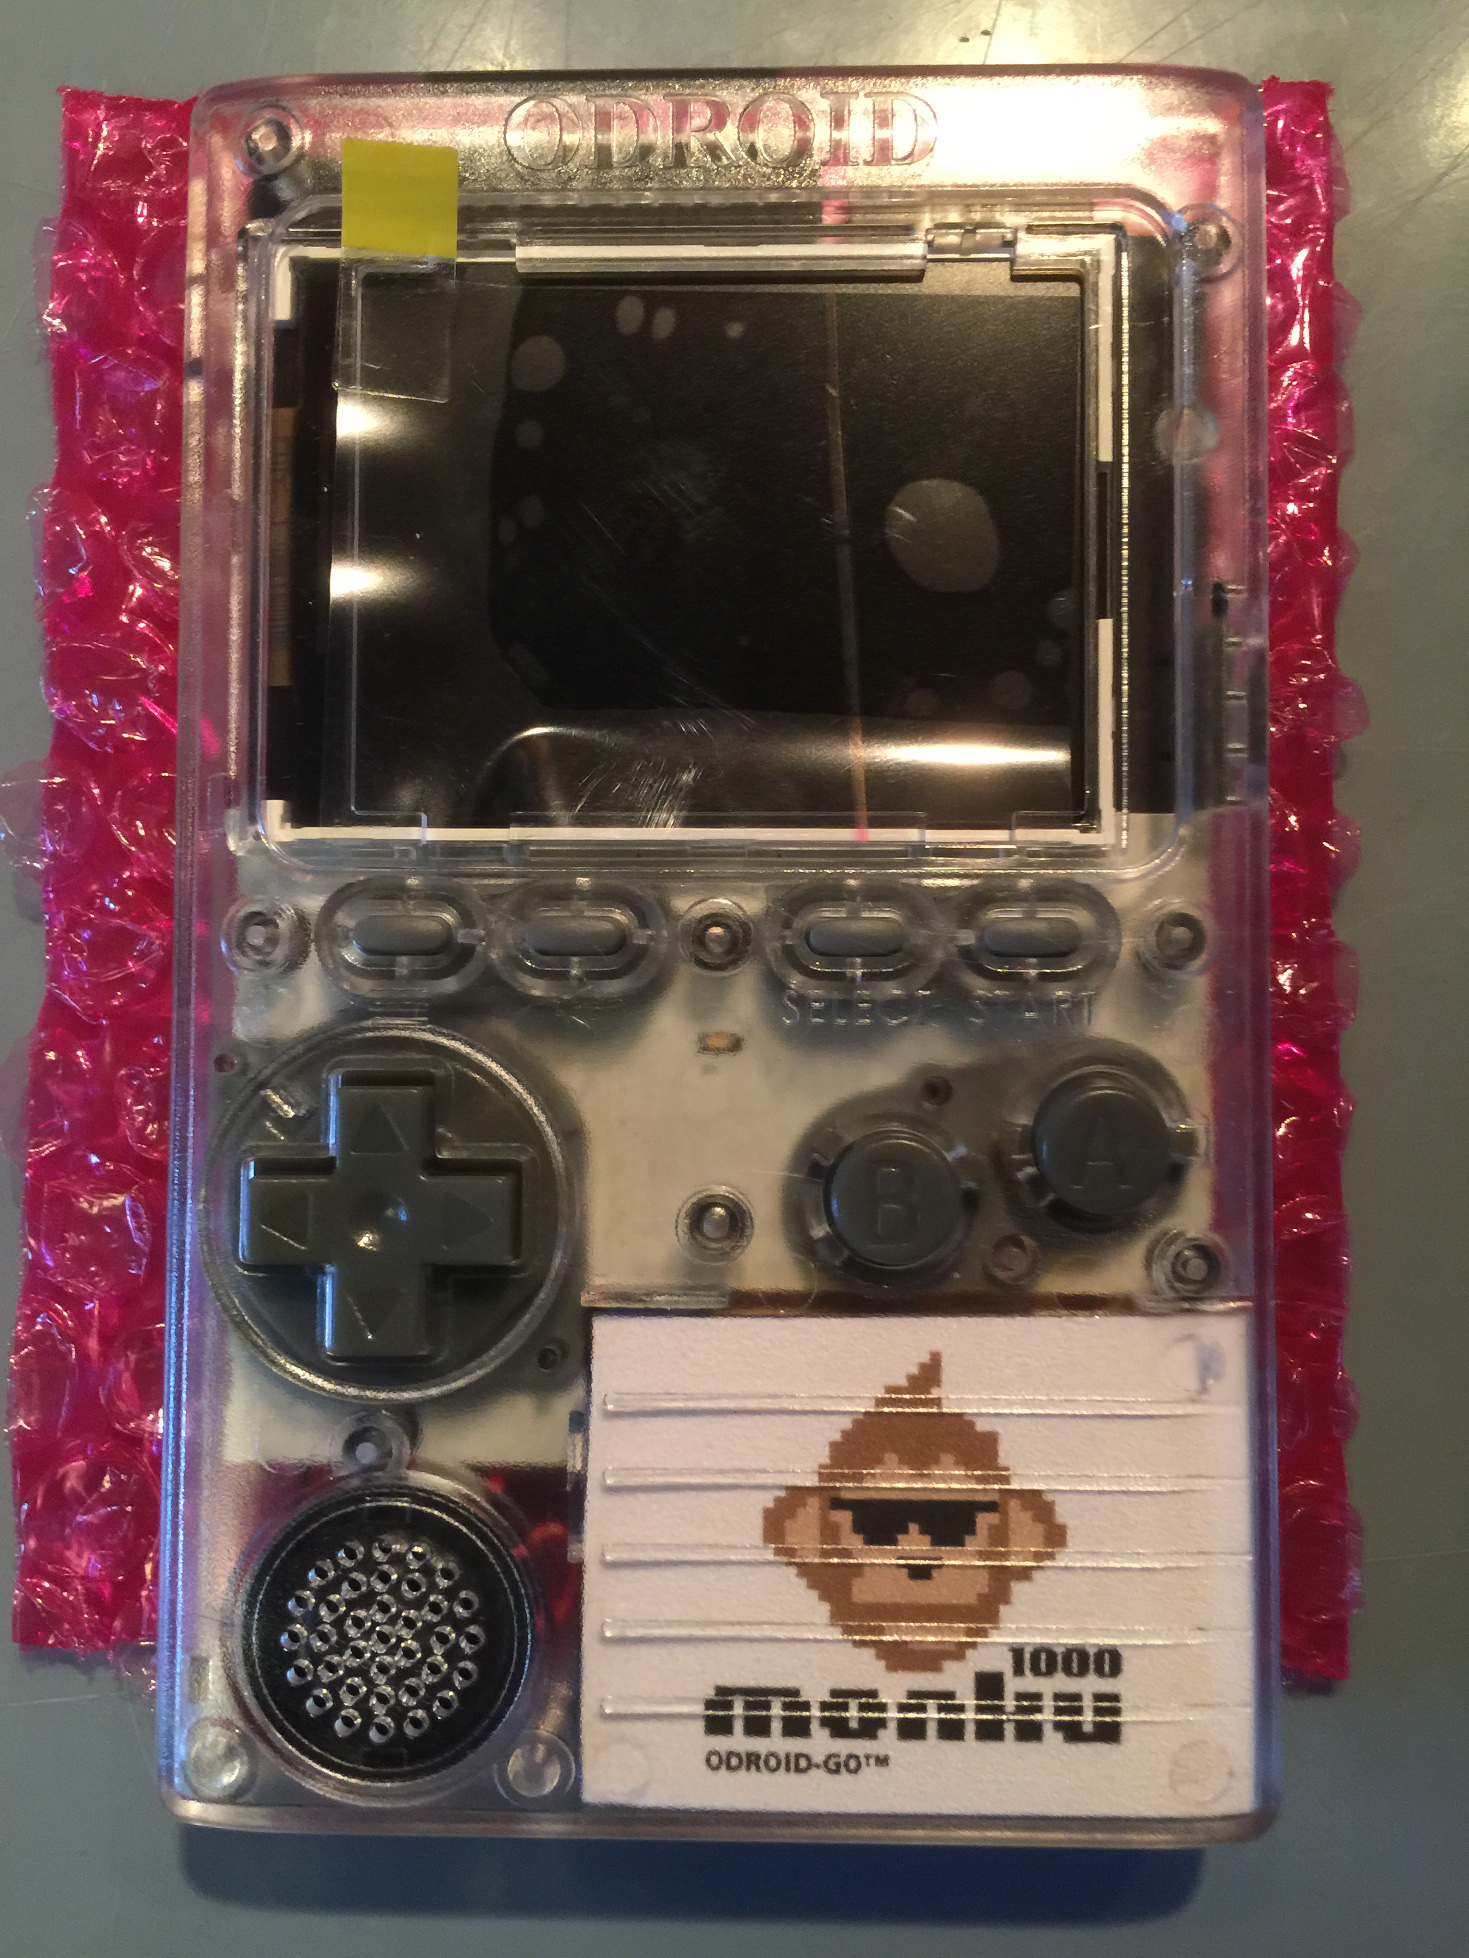
Bam! Now you have a snazzy looking device. The last build step is to add the screen shield. If you haven’t already, remove the protective sticker from the screen.
Figure 11 - A snazzy looking device
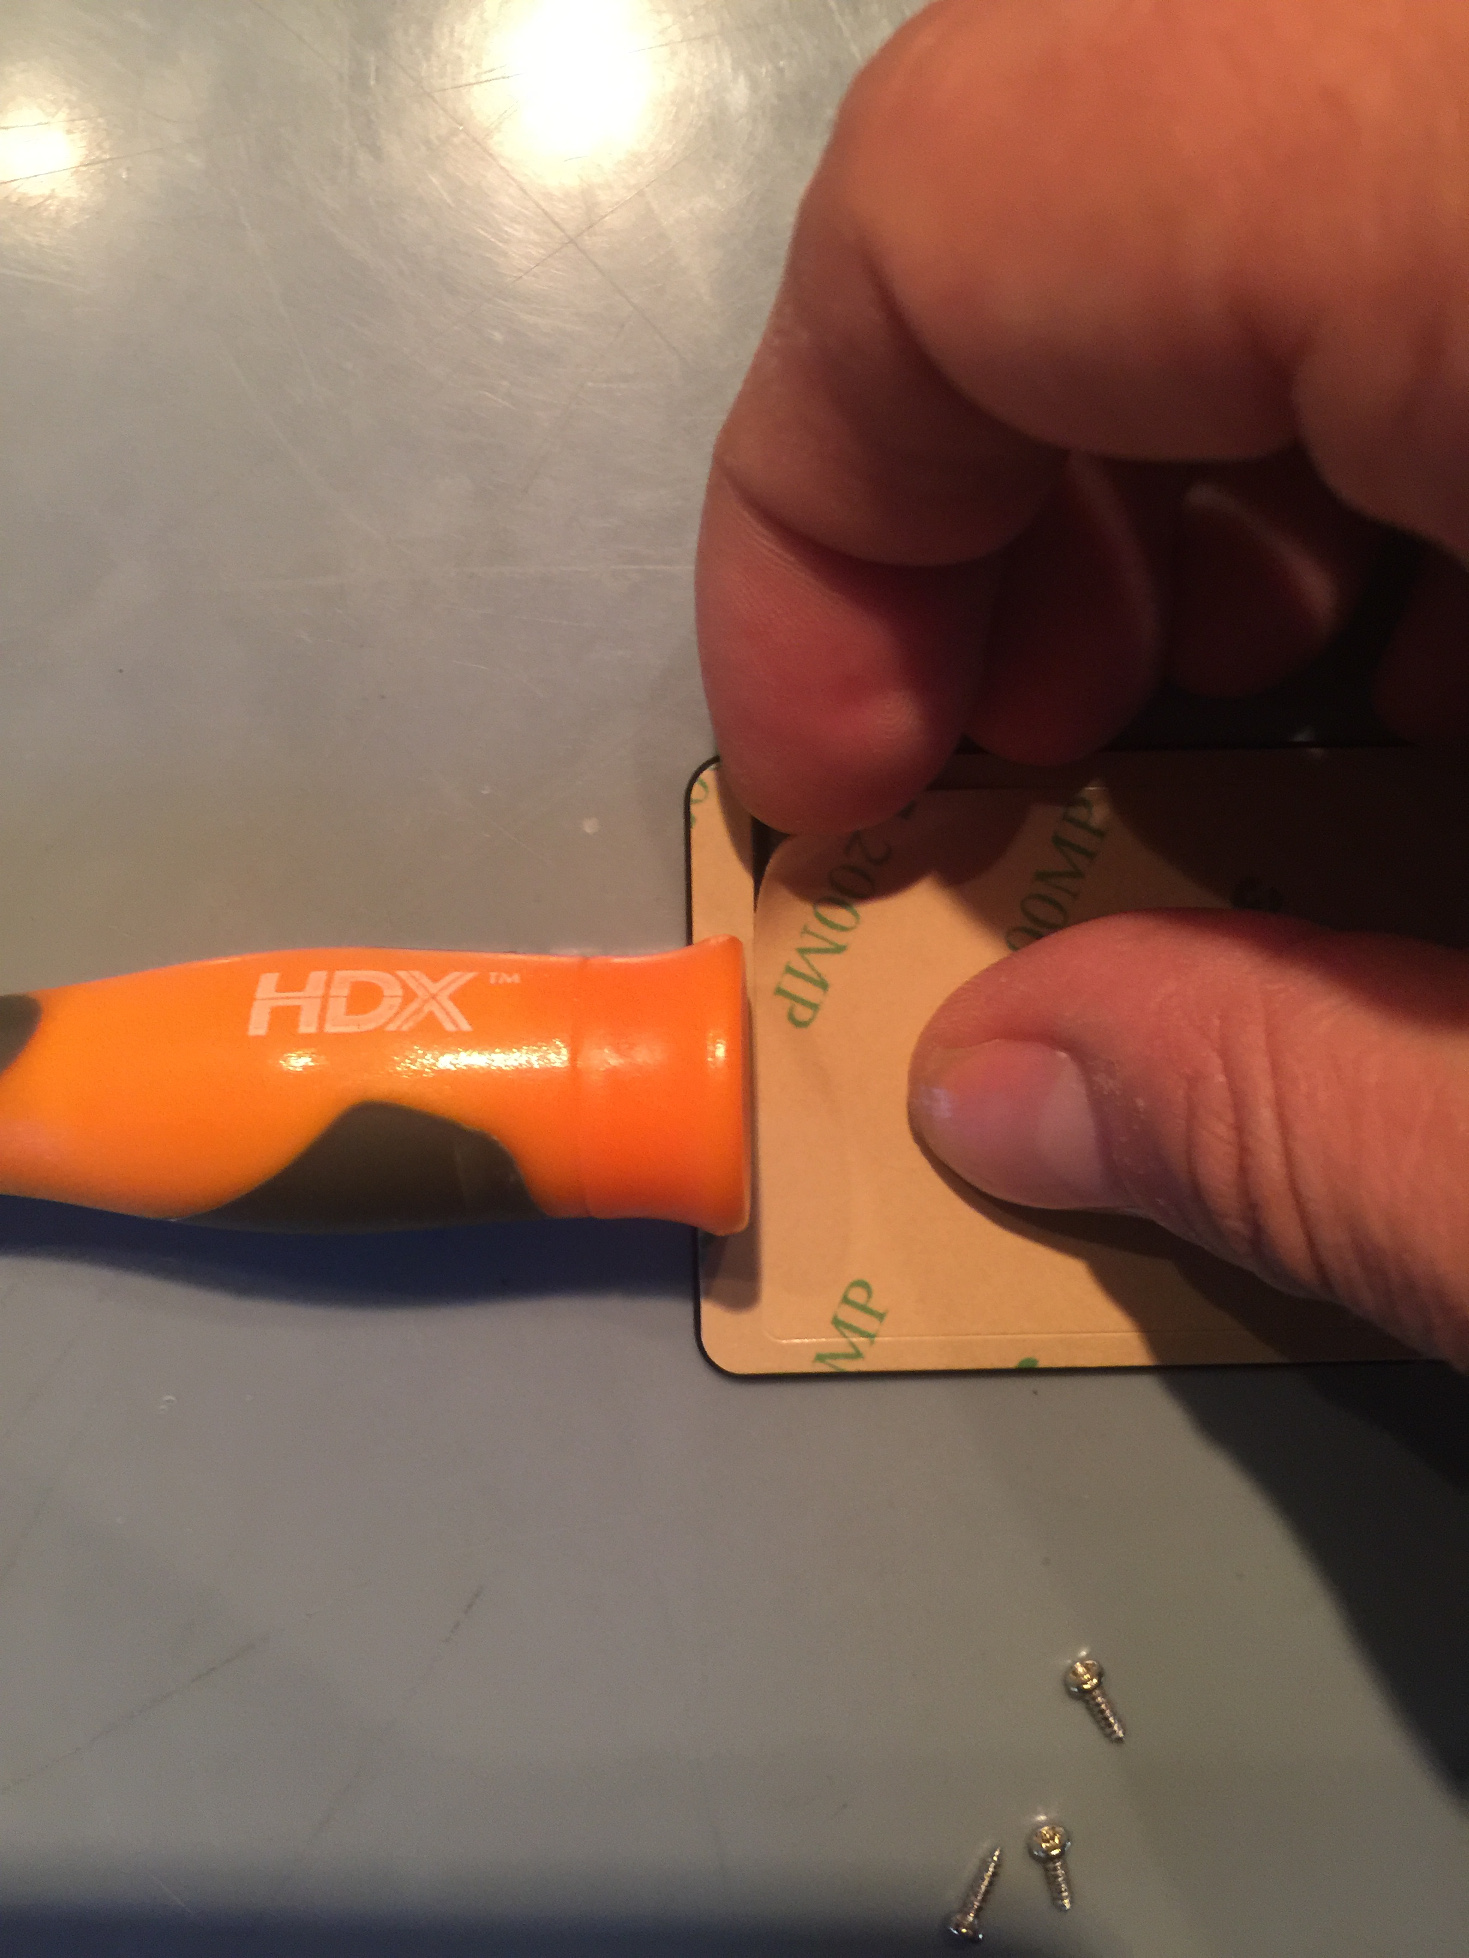
Peel out the center of the screen shield's adhesive strip. Use your thumb or the end of a screwdriver to keep the edge of the strip down while you peel out the center.
Figure 12 - Peel out the adhesive strip
Rip the remaining strip down by the tab then slowly peel it off by going around the plastic shield. Slip the plastic shield into the top of the screen bevel with some downward pressure on the center of the plastic shield.
Run your finger around the edge of the screen shield and place the device down on the safe area. Place something on top of it like a phone and let it sit for a few minutes.
Charge your device over USB. The red light will remain on during charging. To see if it has fully charged, plug it back in and see if the red light turns on again. If not then, it's fully charged.
Figure 13 - Check the red light to see if fully charged
The Software
Check here for info on flashing your device with the latest firmware. You'll need to get the latest version to make sure that things run nicely and and so you can load the go-play emulators (NES, SMS, GG, GB, GBC, CV) when you turn on your device.
For bare bones SD card templates that have everything but the game ROMs also check here. You can grab one of these and copy your ROMs to start gaming right away. You can also find SD card images on eBay for this device--just search for it. Then you'll be all setup to retro game on the go!!
NetBSD For The ODROID-C2
May 1, 2019By Edward KisielODROID-C2
Ever since I learned that NetBSD had announced that they were making ARM a Tier 1 Architecture, I have been following their development work. A few weeks ago on the NetBSD’s ARM developers mailing list, Jared McNeill stated “... the GENERIC64 kernel now supports the Amlogic S905 SoC used in the ODROID-C2 board. Ethernet, USB, and SD/eMMC are all working...”. I immediately obtained an image and started some testing. I want to report my findings and encourage others to try it out. It is not often that ODROID’s get a new non-Linux operating system.
$ uname -a
NetBSD odroid-c2 8.99.37 NetBSD 8.99.37 (GENERIC64) #0: Sat Apr 6 17:42:28 UTC 2019 mkrepro@mkrepro.NetBSD.org:/usr/src/sys/arch/evbarm/compile/GENERIC64 evbarm
In the couple of weeks I have been using it, even though currently it is a development image, it does appear to be stable. I have not had any problems with the Ethernet, USB or SD/eMMC. There is no frame buffer driver yet, so all interaction is done through the serial console or ssh. Recently, both Armv7 and Arm64 for NetBSD have been moved over to an EFI boot using the latest U-Boot and what looks like the U-Boot Driver Model (DM). There was a recent FOSDEM'19 U-Boot presentation and slides that cover some of these features.
In further testing I found Hardkernel’s WiFi module 3 works well and module 0 is recognized but has an issue connecting. I have not spent much time trying to debug the issue. I do not have Module 4 to try and Modules 5 and 5a were not recognized. I suspect it is because there are no kernel drivers for them. There are some basic test results for LAN, WiFI, eMMC and USB posted on the Hardkernel Forum thread https://forum.odroid.com/viewtopic.php?f=138&t=34457
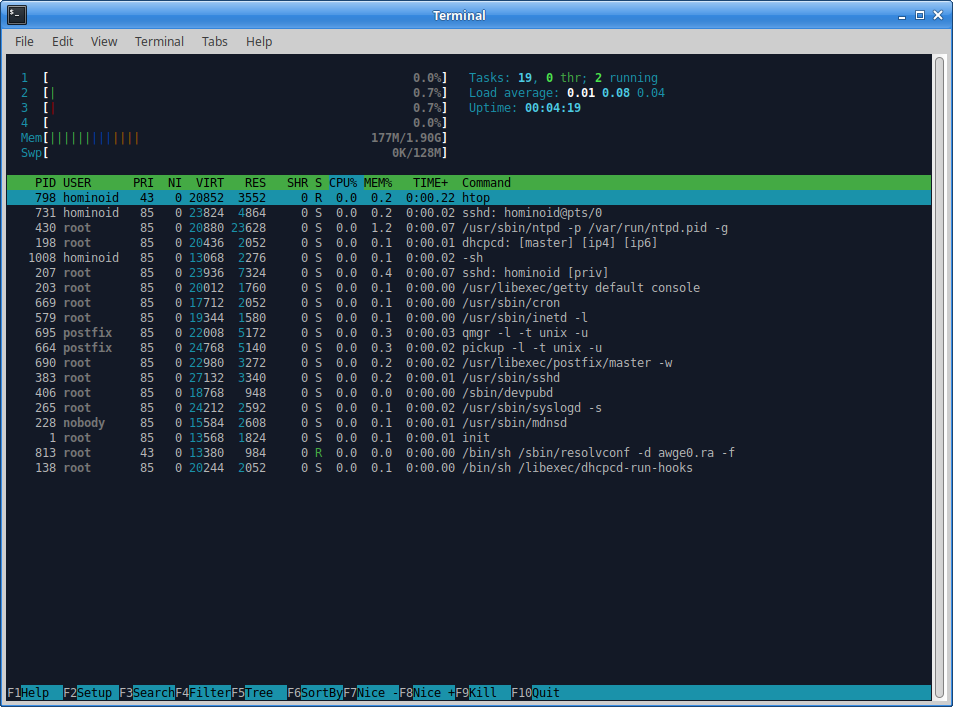
Figure 1 - htop running on NetBSD
NetBSD Loading and Basic Configuration
For anyone that might want to try NetBSD on an ODROID-C2, here is a basic setup and configuration guide. You must have a serial console to initially bring this image up. This is not a Release image so Current images can only be found at the NetBSD Arm Current server. There is also an ODROID-XU4 and ODROID-C1+ image there. The ODROID-XU4 image is not usable at this time. The ODROID-C2 image will work with an SD-card or eMMC. On the first boot it will automatically resize the root filesystem and then reboot.
http://www.invisible.ca/arm/
Uncompress and write image using dd, or use another application like etcher.io or Win32DiskImager:
$ gzip -d NetBSD-evbarm-aarch64-201904061750Z-odroidc2.img.gz
$ dd if=./NetBSD-evbarm-aarch64-201904061750Z-odroidc2.img of=/dev/< your card reader location > e.g. sdb
$ sync
Once booted, root does not have a password. To set a password:
$ passwd
To change the host name:
$ vi /etc/rc.conf
$ hostname=< your hostname >
To add a user – default directory is /home/< username >
Since this is a development snapshot there is not a complete user world. It is a bare bones OS image. Also there is not a complete listing of application binaries available so, I will cover installing binaries(pkg_add), compiling from source (pkgsrc) and updating with complete tar sets.
Fetching Binary Packages for Current Aarch64
The binaries are coming from a non-release server and require a slight alteration from normal practices.
$ export PKG_PATH="http://www.invisible.ca/arm/packages/arm64/current"
$ pkg_add -v < package name >
Using a web browser on another machine you can also look at what is available. Packages are being added as they are compiled so check regularly if you’re not planning to compile from source.
http://www.invisible.ca/arm/packages/arm64/current
Fetching pkgsrc from CVS (source code)
The complete user world is approximately 3.7GB so make sure you have enough room. Applications are grouped by functionality so take a minute to familiarize yourself with the layout after checkout.
$ cd /usr
$ cvs -d anoncvs@anoncvs.netbsd.org:/cvsroot checkout -P pkgsrc
To compile a specific application
$ cd /usr/pkgsrc/< group directory >/< app name >
$ make install
All dependencies will be compiled for the application and will even be downloaded if necessary so make sure you leave your Internet connection up during this process. I compiled many packages with no problems. If you have set PKG_PATH previously you must unset it before using pkgsrc or it will remind you.
$ unset PKG_PATH
Using tar sets
You can use tar sets to update to the latest Current kernel and user world. For development snapshots it is recommended that when you update your kernel and update the world.
$ mkdir -p /root/tmp/sets
$ cd /root/tmp/sets
$ for x in base comp games man misc modules tests text xbase xcomp xfont xserver; do ftp https://nyftp.netbsd.org/pub/NetBSD-daily/HEAD/latest/evbarm-aarch64/binary/sets/$x.tgz; done
$ for x in base comp games man misc modules tests text xbase xcomp xfont xserver; do tar -C / -zxvpf $x.tgz; done
Update /etc/ configuration
$ for x in etc xetc; do ftp https://nyftp.netbsd.org/pub/NetBSD-daily/HEAD/latest/evbarm-aarch64/binary/sets/$x.tgz; done
$ etcupdate -s etc.tgz -s xetc.tgz
$ rm -Rf /root/tmp
$ reboot
Example with sudo
One of the typical applications you might choose to load is sudo. Here are examples using the Current binaries repository and pkgsrc.
Compiling sudo from pkgsrc.
Note: This assumes that you downloaded pkgsrc as described above
$ unset PKG_PATH
$ cd /usr/pkgsrc/security/sudo
$ make install
Regardless of the installation method you must configure sudo to work. Using visudo as illustrated below, uncomment line 88 to allow members of group sudo to execute any command and or one of the other options like members of group wheel (line 82)
Future updating of applications
Updating sudo binary package from Current:
$ pkg_add -uv sudo
Updating sudo and all of its dependencies:
$ pkg_add -fuuv sudo
Notes
Some packages will require additional configuration and they will usually tell you at installation time. Many times examples are provided such as the dbus installation example illustrated below:
$ cp /usr/pkg/share/examples/rc.d/dbus /etc/rc.d/
If you’re going to load and use git, curl or wget remember to load CA root certificates.
$ wpa_supplicant -Bd -c /path/to/wpa-supplicant.conf -i < device name >
Adding "-f file" will send debugging messages (from using -d) to file.
One last note: this is a development image so, it is not for production. Like I said earlier I have not had any issues...until today when I pulled a fresh release with a new kernel. I had my first segmentation fault but the OS was still operational. It might make sense to hold the previous release for these occasions. I'm sure there will be more issues as development progresses. I want to take a minute and send a big thank you to the NetBSD Foundation, their development team and especially Jared McNeill. Let’s help support their wonderful work on bringing NetBSD to ARM and Hardkernel ODROIDs!
Make Our ODROID-HC1 BitTorrent Seed Server Operate as a NAS
May 1, 2019By Robbie FergusonODROID-HC1, ODROID-HC2, Tutorial
Last month in my article, Build Your Own ODROID-HC1 BitTorrent Seed Server, I demonstrated how an ODROID-HC1 can make an excellent little BitTorrent seed server. However, now that you are up and running and your torrent files have all been downloaded (or downloading), how do you access those downloads in a sane way? In this month’s article, I will assume you have already got your BitTorrent seed server setup and working per the article in the April 2019 issue. I will walk you through the next steps: giving yourself access to the downloaded files over the samba protocol, effectively turning your BitTorrent seed server into a very capable NAS.
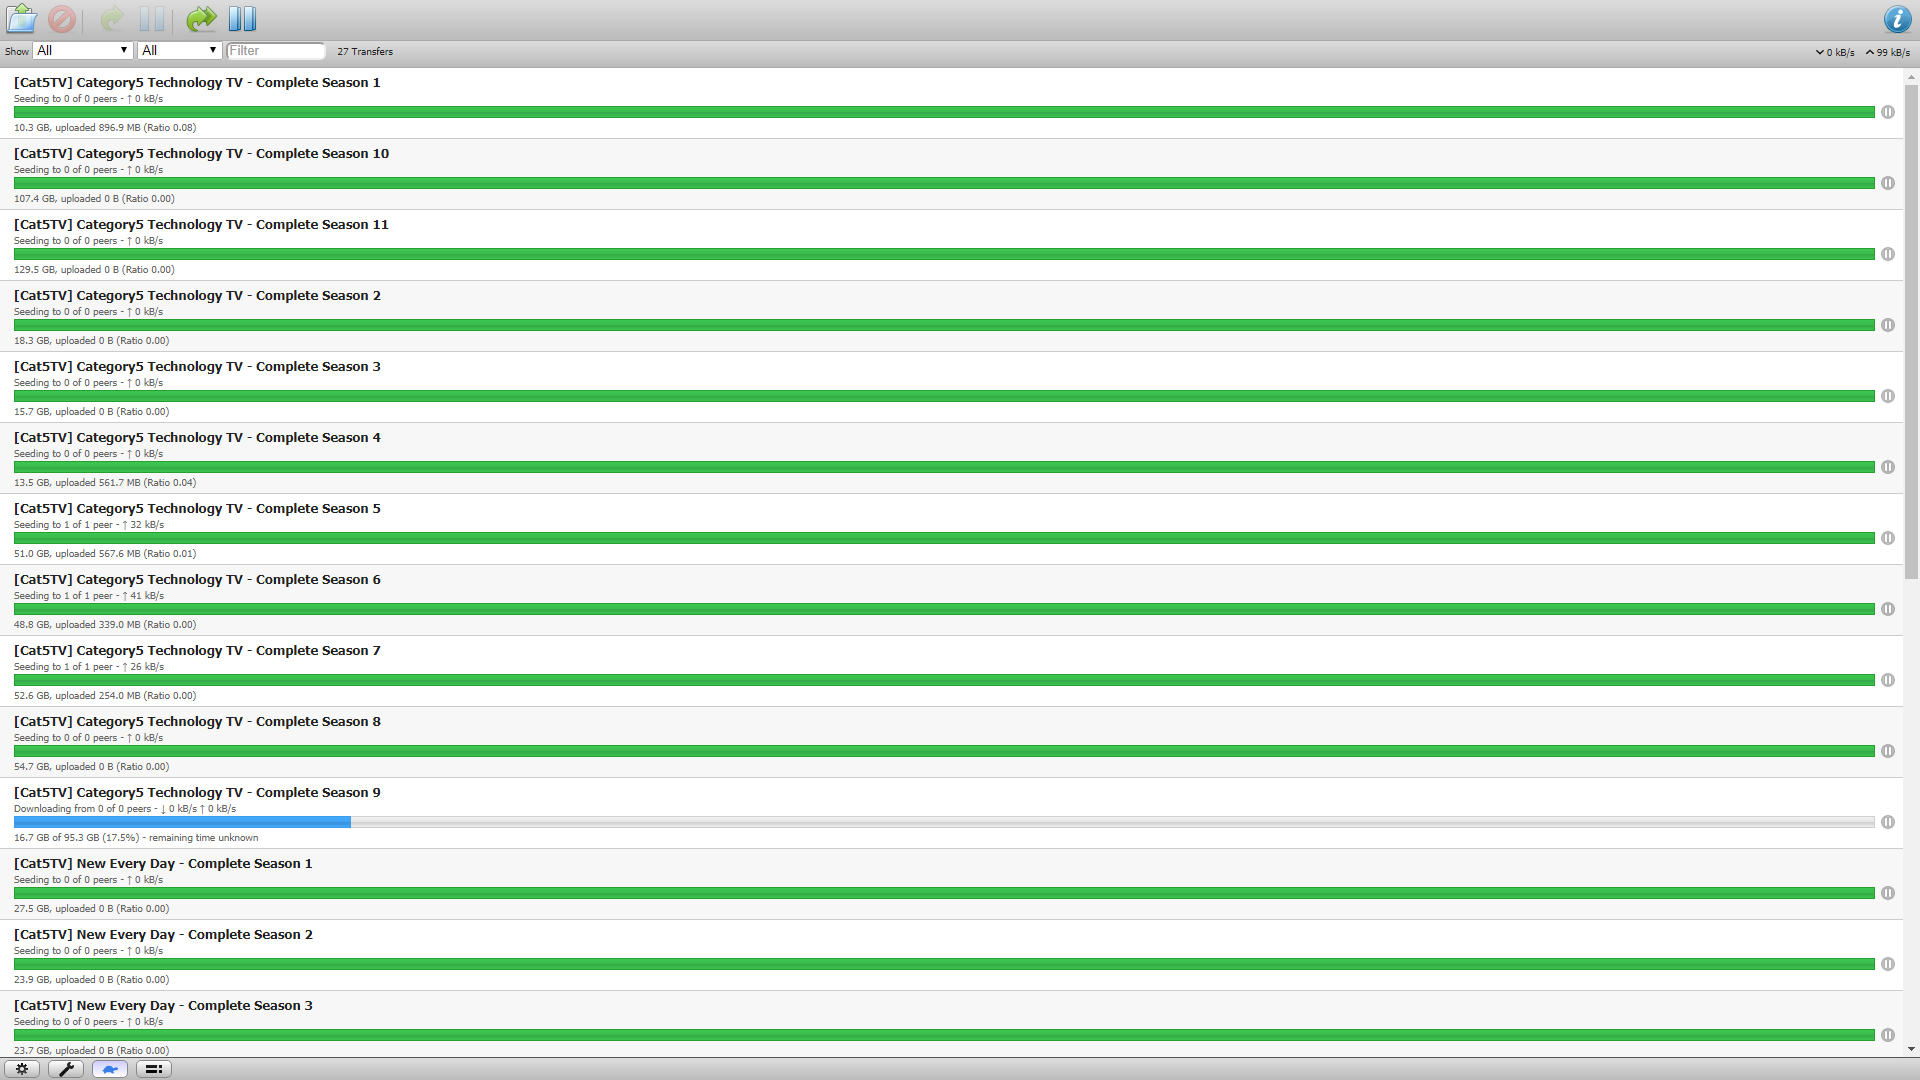
Figure 1 - The state of my BitTorrent Seed Server.png
We already know two key facts about our BitTorrent seed server:
Our BitTorrent files get downloaded to /home//ssd/torrents, where is whatever your Linux username is, and
We know the IP address of our BitTorrent seed server.
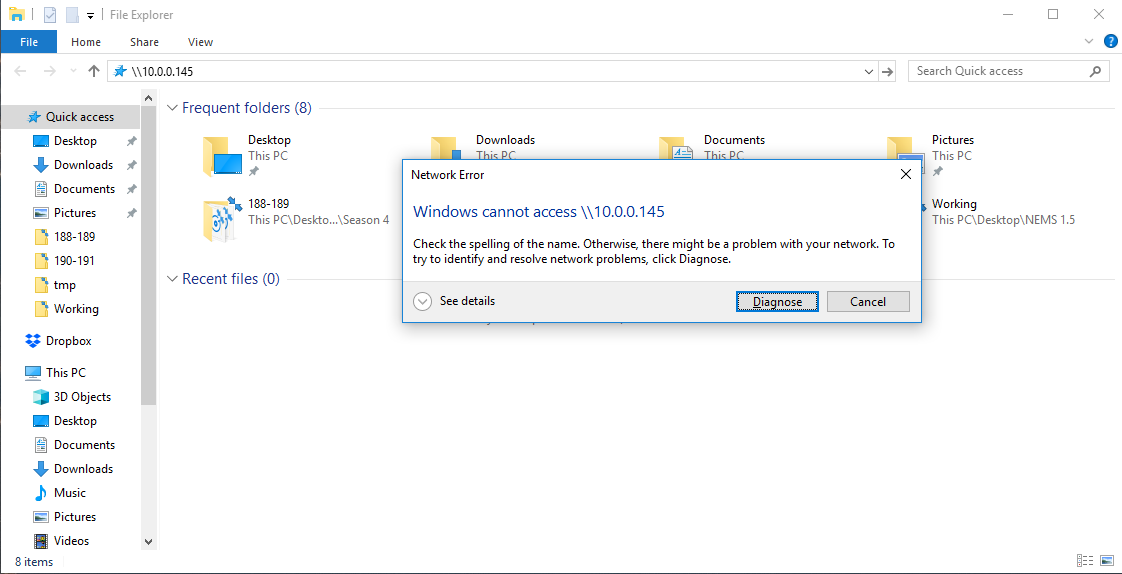
Samba provides the SMB/CIFS protocols to Linux and Unix/Unix-like operating systems. This brings Windows networking interoperability, offering fast and secure file and printer sharing within a mixed network. It is what allows you to right-click a folder on the Linux desktop, choose “Sharing” and share the folder to your network. However, with a headless server, it may not be quite as clear how to find the ability to share your folders. If we try to access our BitTorrent seed server’s network shares from a Windows machine, we will simply receive a timeout error.
Figure 2 - Without Samba configured on my seed server, my Windows 10 laptop will simply timeout
This is because there is no Windows-compatible file sharing integrated into my BitTorrent seed server. Now, let us be clear: When I say “Windows-compatible,” do not get the wrong impression. SMB/CIFS is perfect for Linux as well, and is in fact the go-to for network file sharing via Samba. It is just that Microsoft was the first to really utilize IBM’s SMB/CIFS protocols back in the mid-90s, bringing file sharing to its MS-DOS environment. Samba came along around the same time, working hard to provide MS-DOS users with network access to files hosted on Unix servers. Now in 2019, SMB/CIFS is a long established cross-platform file sharing protocol used on all major platforms. So, first things first: we need to install Samba itself. Access your BitTorrent seed server via SSH and type the following:
$ sudo apt update
$ sudo apt install samba
The first command updates the available package information from the various repositories on our system. The second command installs the most current version of Samba from these repositories, activating it as a system daemon using the default configuration.
Tip: Remember when running sudo apt update, if you receive an error about things being in the future, check and correct your system date and begin again. Personally, I like to add a real time clock battery to my ODROID-HC1 to avoid this error and ensure timestamps are correct on all my files.
Now, with Samba installed and active, we should be able to go to \10.0.0.145 on Windows or smb://10.0.0.145 on Linux (replacing 10.0.0.145 with whatever your server’s IP address is) and while it will not provide any shares, there should be no errors or timeout. The next step is to actually add a share. The process we typically use – right-clicking a folder and choosing “Share” – is going to be done programmatically using the Samba configuration file.
Open your Samba config file for editing with this command:
$ sudo nano /etc/samba/smb.conf
Within the resulting nano editor, press ALT + / to jump to the end of the file. On a new line, let us add our /home//ssd/torrents folder as a read-only network share. Why read-only? These are BitTorrent seeds. If you allow writing, even browsing to the folder would do things like create hidden thumbnail cache files within the folders, resulting in broken checksums and your seeds failing. We want them to be only read-only so we can access them from our network without affecting their ability to continue seeding. If you ever wish to remove a torrent, you can do this from within Transmission’s web interface.
Add the following to the smb.conf file, remembering to change to whatever your Linux path is in the path line, and the correct username in valid users.
[torrents]
read only = yes
path = "/home//ssd/torrents"
guest ok = no
valid users =
Save your work by pressing CTRL-O (that is O for write-Out), followed by CTRL-X to exit.
The next step is to actually create your Samba user access. Samba does not use the Linux user credentials, but instead maintains its own list of users and passwords, which we must create with the following command (again, replacing with whatever your username is in valid users in the config file).
$ sudo smbpasswd -a
Now, Samba should be ready to share your torrents folder on the SSD drive of your ODROID-HC1. Let’s test it. A quick restart of Samba will ensure the new configuration is loaded.
$ sudo systemctl restart smbd
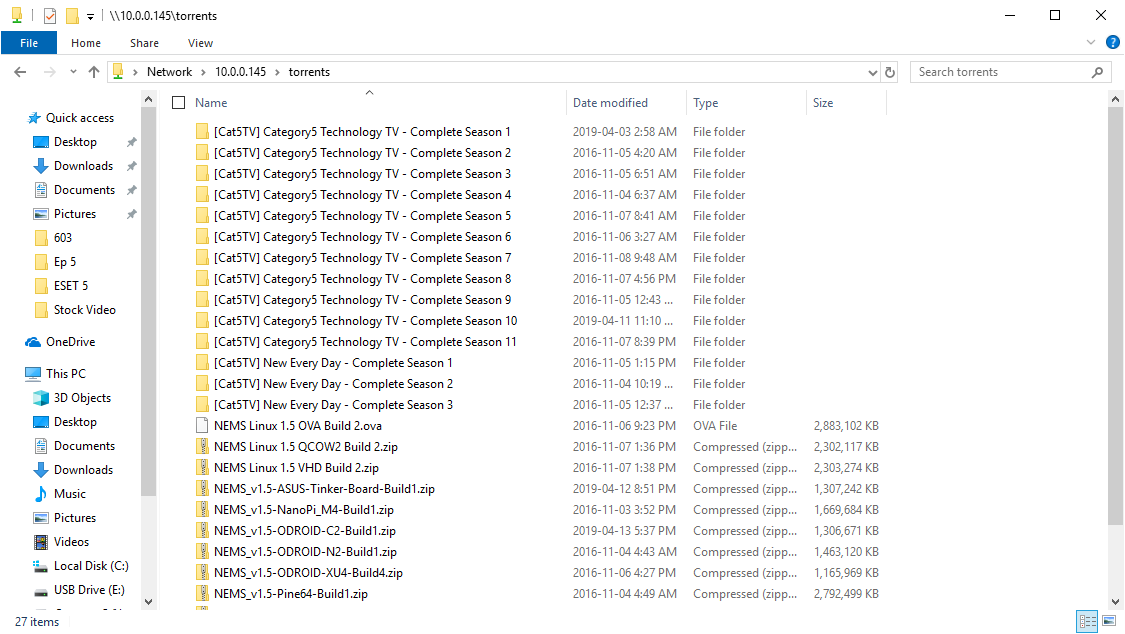
Now, navigate to your BitTorrent seed server’s network share from a computer on your LAN via \10.0.0.145 orrents on a Windows computer or smb://10.0.0.145/torrents on Linux system, replacing my IP with your own server’s IP address.
Figure 3 - With Samba working, I can now navigate to my BitTorrent downloads
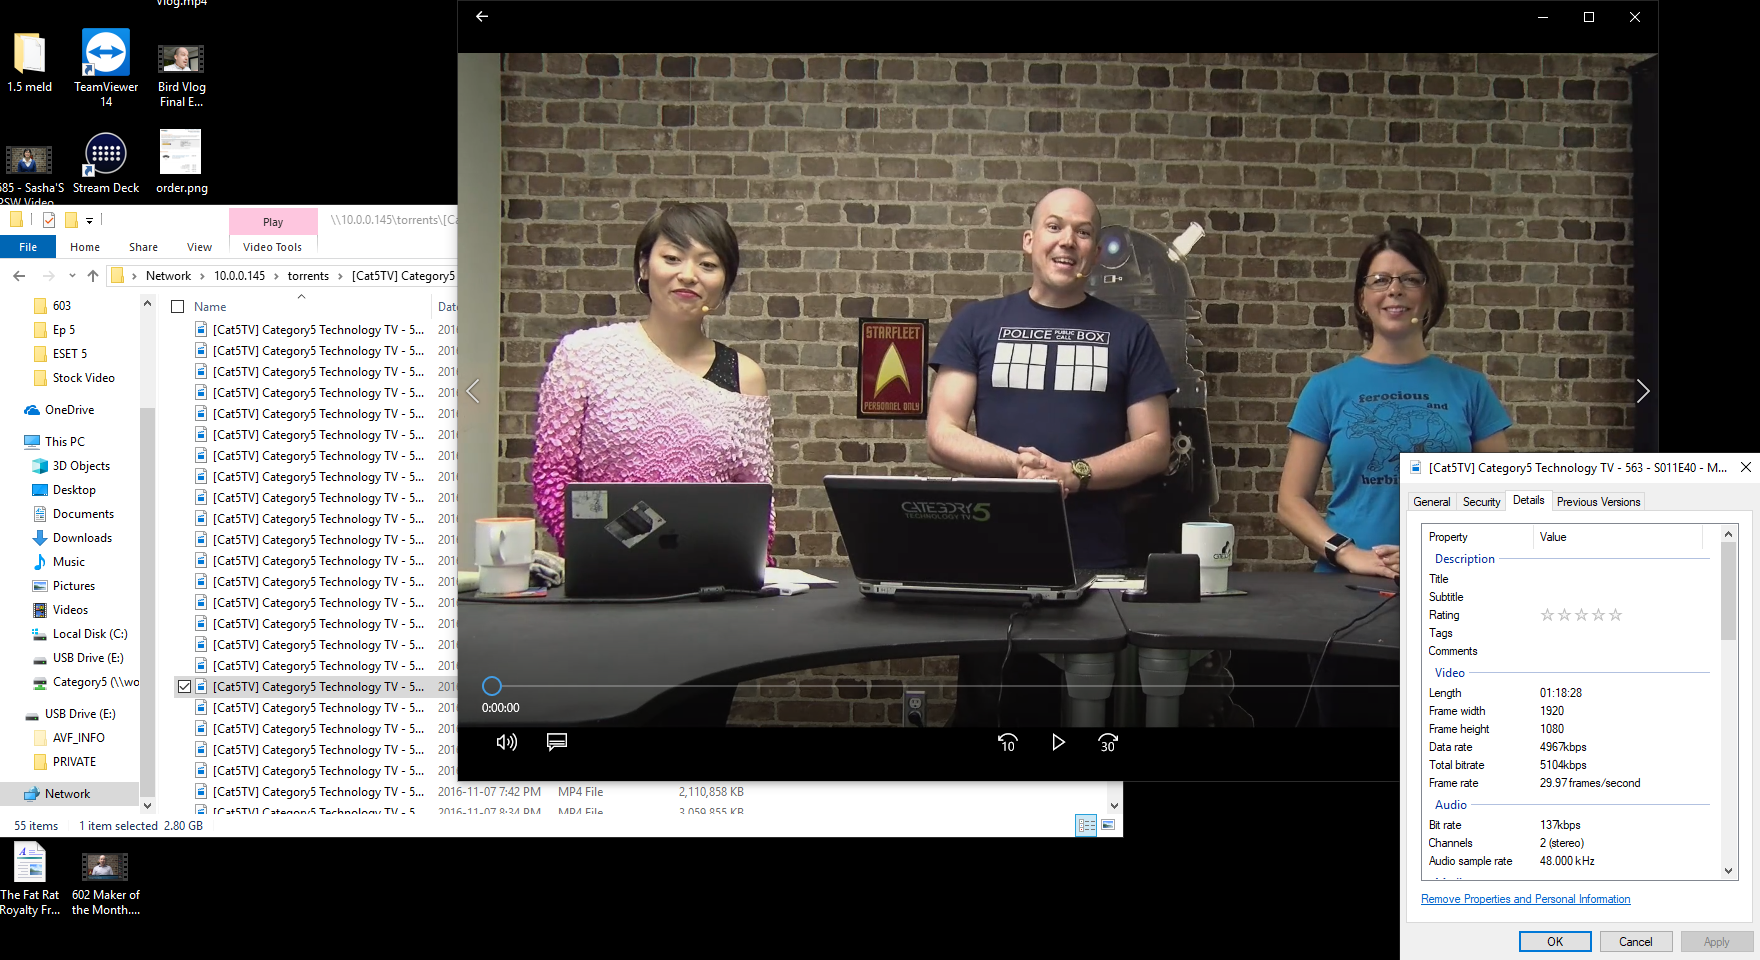
Now, there you have it. In two short lessons, you have successfully setup both a BitTorrent download/seed server and made it into a NAS so you can access the content from any computer on your network. All on a tiny little ODROID-HC1. Feel free to download complete seasons of my webcast, Category5 Technology TV to your server from https://torrent.category5.tv or grab the latest version of NEMS Linux for the ODROID-N2, ODROID-XU4 or ODROID-C2 from https://nemslinux.com
Figure 4 - Performance is exceptional on the ODROID-HC1, and streaming the 1080p video directly to my desktop looks superb
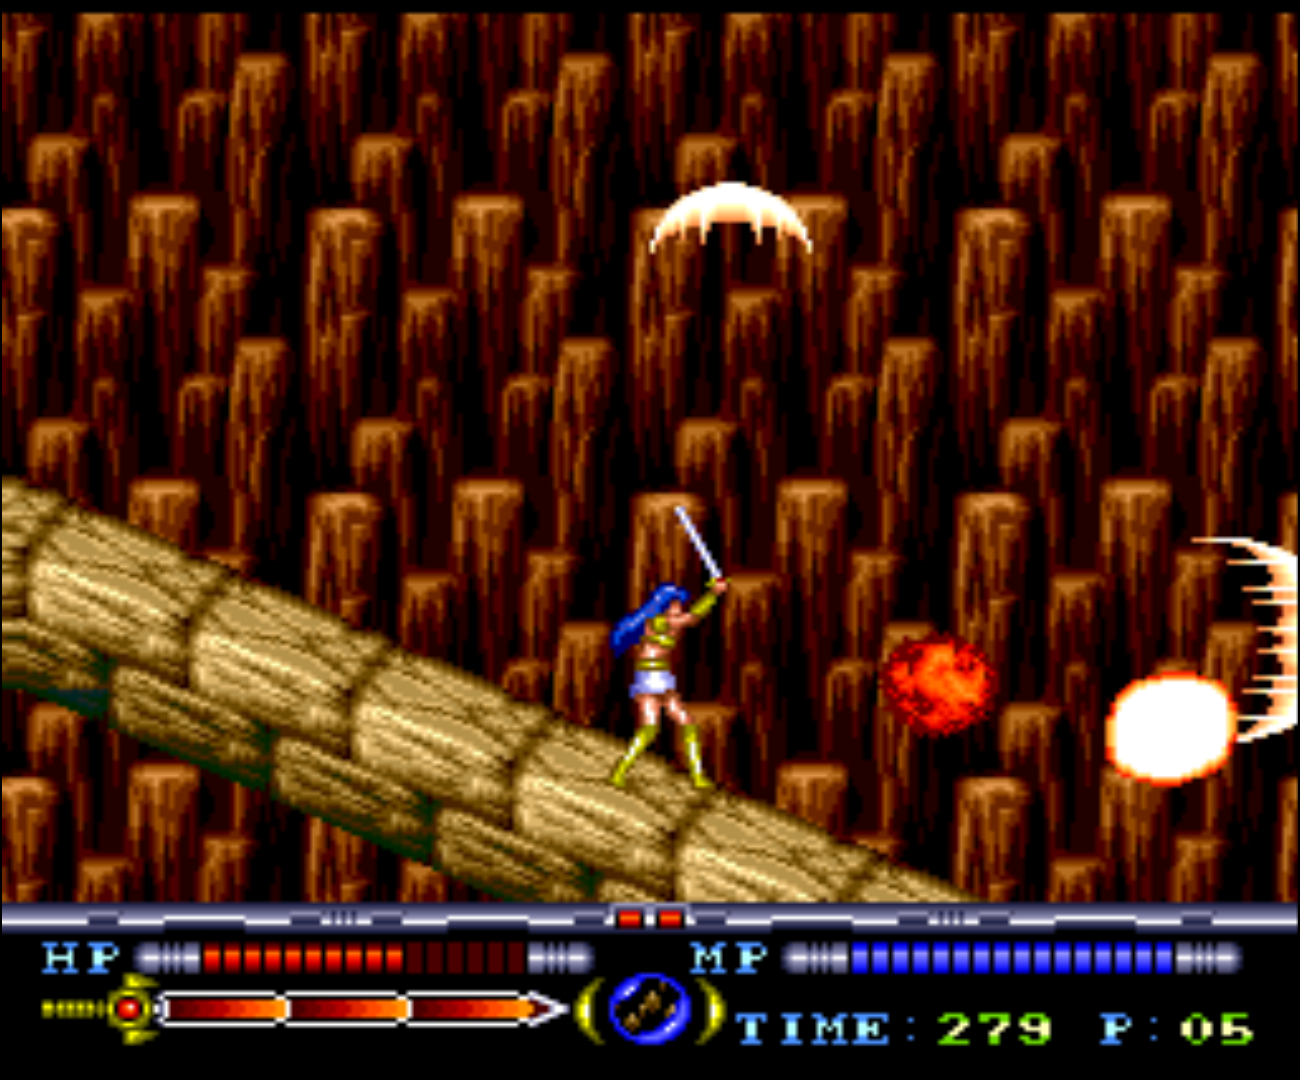
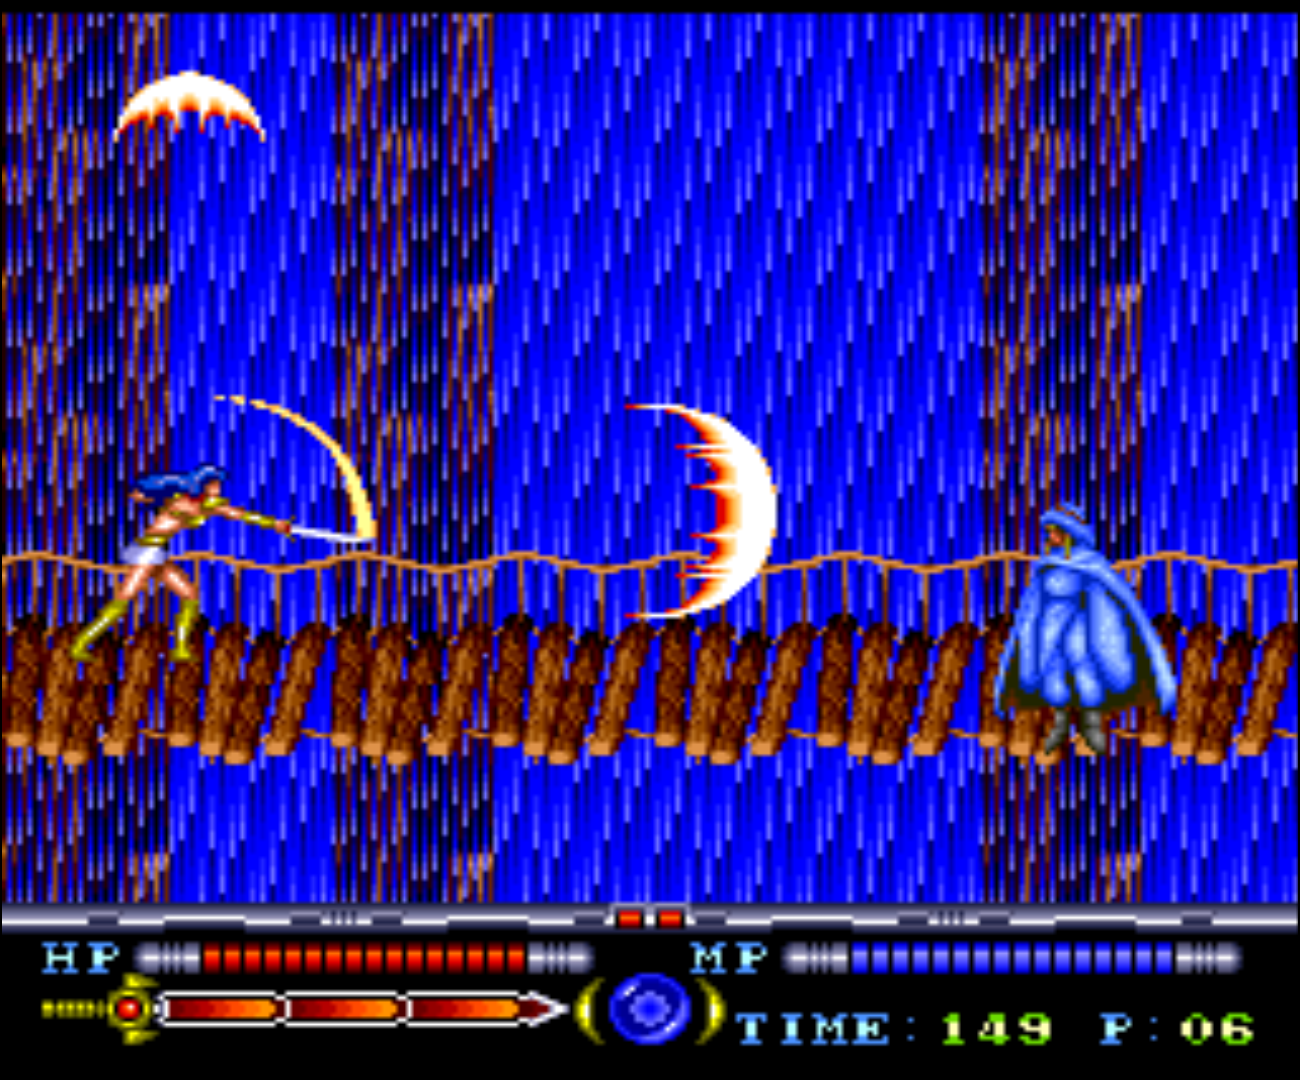
In the last part of the series, I played some really great fighting games as well as some of the great shoot ‘em ups that the console is known for. It was a mixed bag of games, but there were only a few I really didn’t enjoy playing. Overall, the system up until now has many, many games that I very much enjoyed, and only a few spoiled apples in it that I didn’t like at all. I found many interesting games are only available in Japanese, which was expected, but is also sad as I’m missing out on some great games.
Games I liked
L-Dis
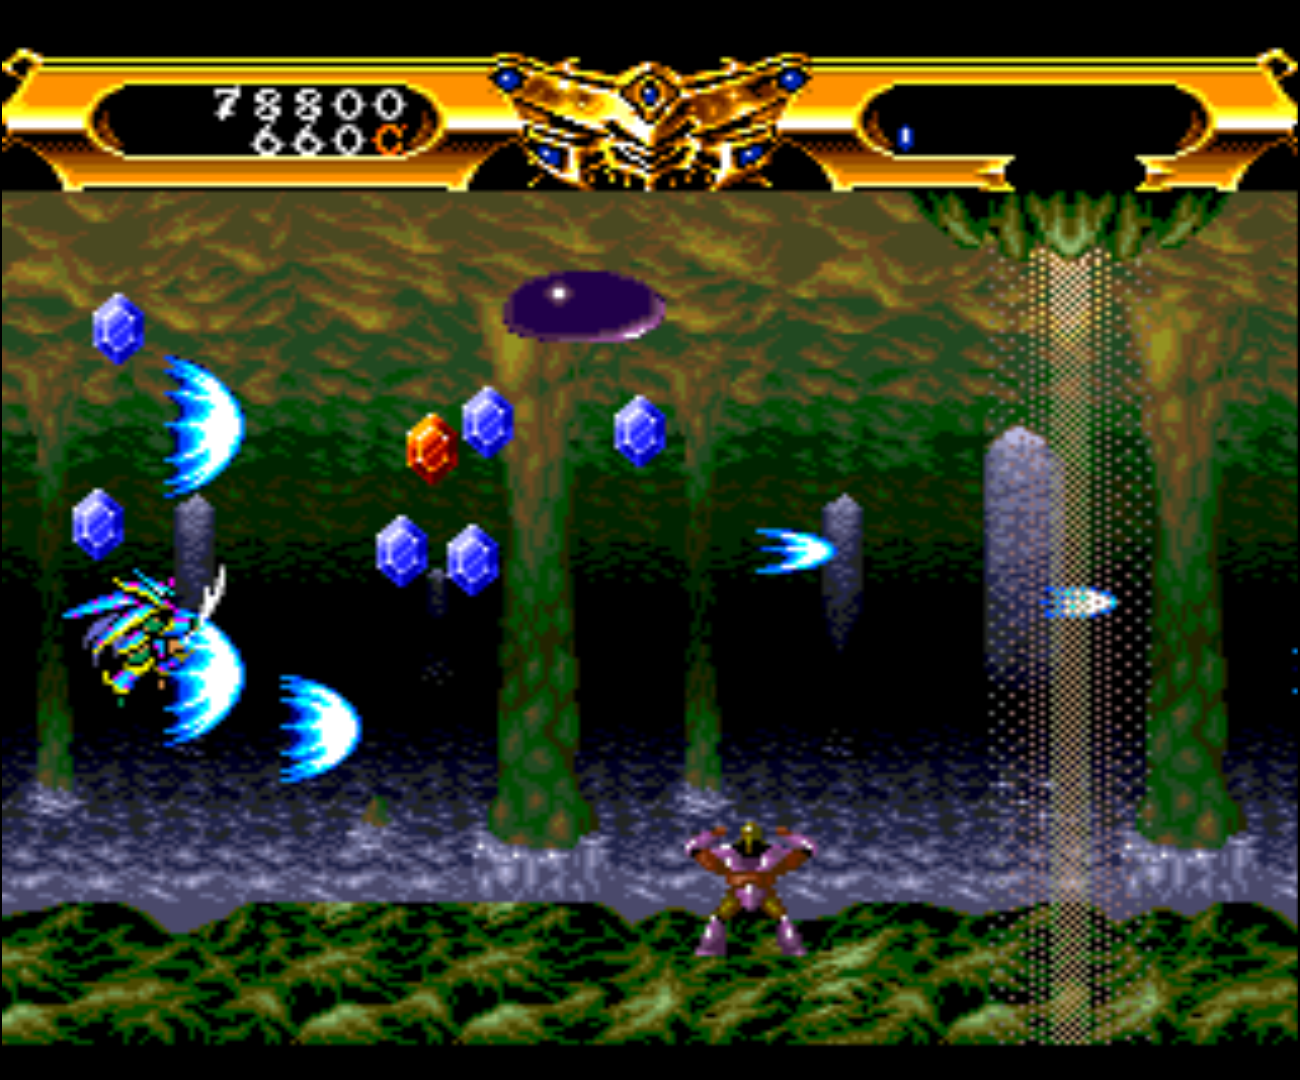
Figure 1 - L-Dis has bright graphics, nice looking parallax scrolling and lots of enemies and bullets
Figure 2 - Bosses can be huge in this game
I am not sure if you want to call it a cute ‘em up or just a shoot ‘em up, but it’s actually quite fun. L-Dis has bright colors, nice parallax scrolling, and very fast action. You can collect satellites which act as a shield as well as fight with you, or they can be used with the second action key (for example dropping a screen clearing bomb).
Last Alert
Figure 3 - Last Alert has tons of respawning enemies to kill
Figure 4 - Boss fights can be tricky but always start with a hilarious voice-over
This game is fun, and that’s not only due to the fun gameplay, but actually due to the terrible voice acting. Really! The game got famous for its terrible voice acting, both in the game before the boss fight as well as for all of its cutscenes. At https://youtu.be/XpQWDWtXgsQ?t=306, you can find a very good example of this and also a great review of the game.
Killing enemies and fulfilling your mission objectives will give you experience points, which are used to level up, meaning that the more you kill the more you level up, the more hits you can take and the better weapon you’ll get. Since in many spots enemies just keep spawning, you could actually grind yourself some level if need to. I can only highly recommend this game for it’s charm and laughable voice acting.
The graphics are ok; nothing special but also not bad. The sound and music is good, so overall this game is a nice package.
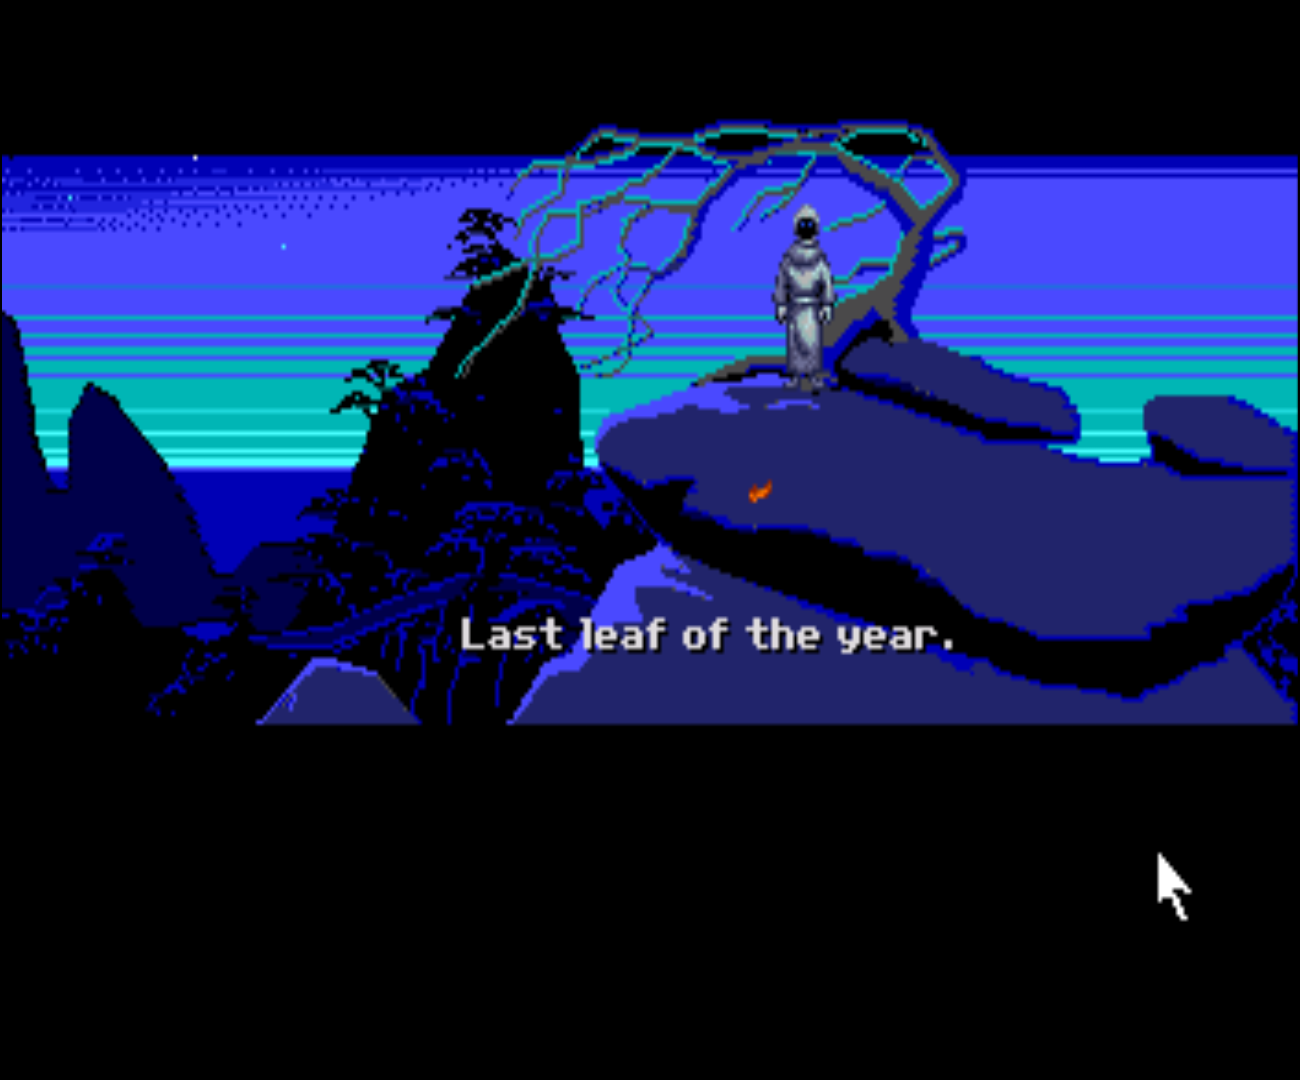
Loom
Figure 5 - Loom one of my favorite adventures of all time
Figure 6 - It always starts with the last leaf
Loom is one of my all time favorite games and the PC Engine / TurboGrafx port is very solid and good. Graphics-wise, it reminds me a lot of the Amiga port or EGA DOS version of the game, but with the added benefit of the CD soundtrack. Unfortunately, it came out before the talkie version of Loom was released, and therefore all dialog is just written text, but that’s the way I’m used to play it. The sound effects are good and not messed up like in the FM-Towns version. Overall it’s Loom in all its glory, and if you never played it, the PC Engine / TurboGrafx version is a nice way to experience the game if you don’t want to boot up the ScummVM.
Lords of Thunder
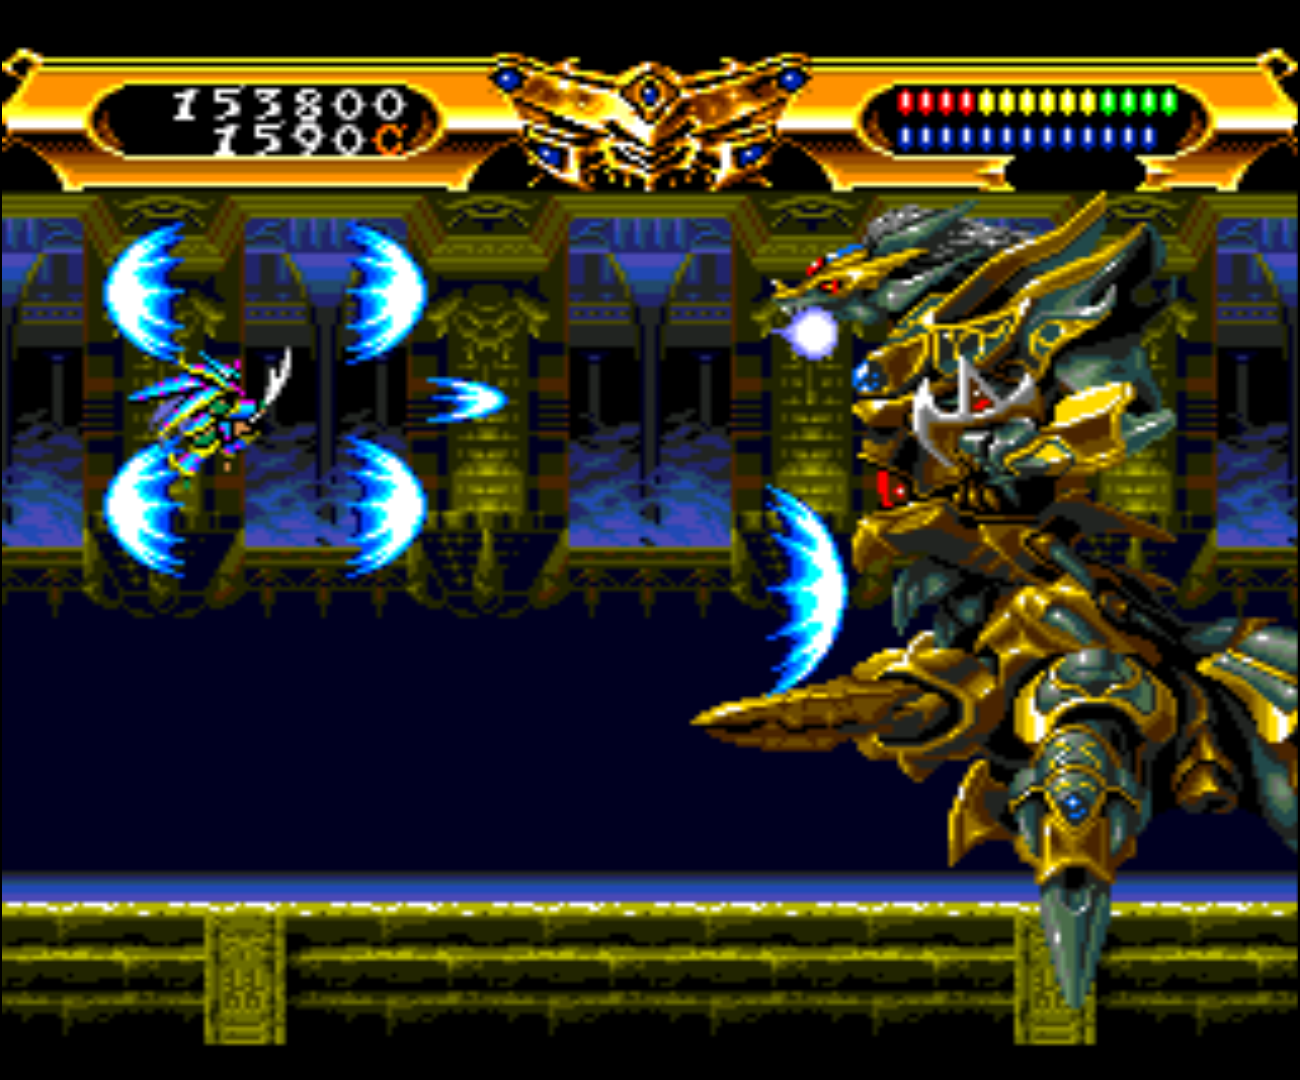
Figure 7 - Lords of Thunder has nice graphics with lots of parallax scrolling
Figure 8 - It also has huge bosses to fight at the end of each level
This nice shoot ‘em up is the successor of Gates of Thunder, which I introduced in the first part of this series back in January, although this game looks and feels a lot different than its predecessor. The game has parallax scrolling in all stages, the graphics are nice and detailed, and before each level you can choose between one of 4 different armors which have different attack types and special attacks. In the upper left corner you have two bars: the blue bar represents your health, the bar above it represents your power level which changes from red to yellow and finally green. Each color will increase the strength of your attack and is reduced if you’re being hit. Most of the time you shoot at an enemy, but if you’re getting close to an enemy, your character will use a sword slash which does additional damage and is enough to kill most enemies with one hit (except for bosses and big/strong enemies). Enemies mostly drop diamonds in either blue or red which will add to your “credits” which can be used before each level to buy items that either increase your strength health, or provide a shield or special attack. Some enemies (especially stronger ones) drop items that can increase your overall strength or refill your health. You can choose the order in which you want to play the levels yourself.
The game has a fantastic metal soundtrack and overall sounds are good as well. There is another port for the Sega CD which has remixed sounds and music and is slightly easier than the PC Engine version, in case you want to try it.
Mad Stalker - Full Metal Force
Figure 9 - Regular enemies look often like yourself and use similar attacks
Figure 10 - Bosses differ slightly in design and have a health bar
At first, I was unsure if I really liked this game or not. It starts off with a very nicely animated intro with lots of details and animation going on. It’s one of the best games for the system, but it’s once again completely in Japanese, so I have no clue what’s going on, which is a shame. After the intro, you get introduced to the three characters you can choose from, each with some differences in their fighting style. Throughout the level you fight off many different enemies, some of which later on change color to indicate they are a stronger version of the previous one, but overall there’s quite some variety of the enemies. Every now and then an health canister appears which will restore part of your health.
Bosses are very similar to yourself. They have a health bar just as you have and can take as many hits as you can, which makes them hard to beat, as they often also have better weapons or attacks than you have. Still, this makes the game interesting. I decided I like to play the game when I already finished the first 5 stages while doing this review. It’s very nice and has some replay value due to the different characters you can choose from.
Mugen Senshi Valis - Legend of a Fantasm Soldier
The Valis series will most likely pop up later again, so I’m sorry if I forgot I already mention this one by the time we get to it.
Figure 11 - Graphics are not the best but you have plenty of different monsters
Figure 12 - Bosses always have a pattern they follow
This game starts off with a very lengthy intro about a school girl attacked by monsters, being handed a magical sword and then starting to fight off these monsters. Everything of course is in Japanese, so I don’t understand anything! The quality of this intro varies. All characters are very well drawn, but the level of animation varies a lot, from smooth animation to a series of standing pictures being displayed in a row. There are a lot of videos, especially between each stage. You can collect different items. Letters represent your different attack styles with your sword and tiny hearts that fill a little bit of your health. Sometimes you find a big heart that will fill up everything or a 1up for an extra life.
The boss fights normally all follow a “simple” pattern that once you figured it out, you can use to easily defeat a boss. If you have a lot of health left at the end of the stage, simply slashing contentiously at the enemy is all that is needed to defeat them. You also have magic attacks that can be activated by pressing “up” and the attack key, and pressing up and jump will render a higher jump than usual. If you collect the same weapon icon that you’re currently using, the power of your weapon will increase, which will also be available for any other weapon you choose so once you reached level 3 (see the sword icon on the bottom of the pictures), you can switch between any weapon you like and are fully leveled with that weapon. The music is nice, although not impressive, and suits the game perfectly. If you like these kind of games you should definitely try it!
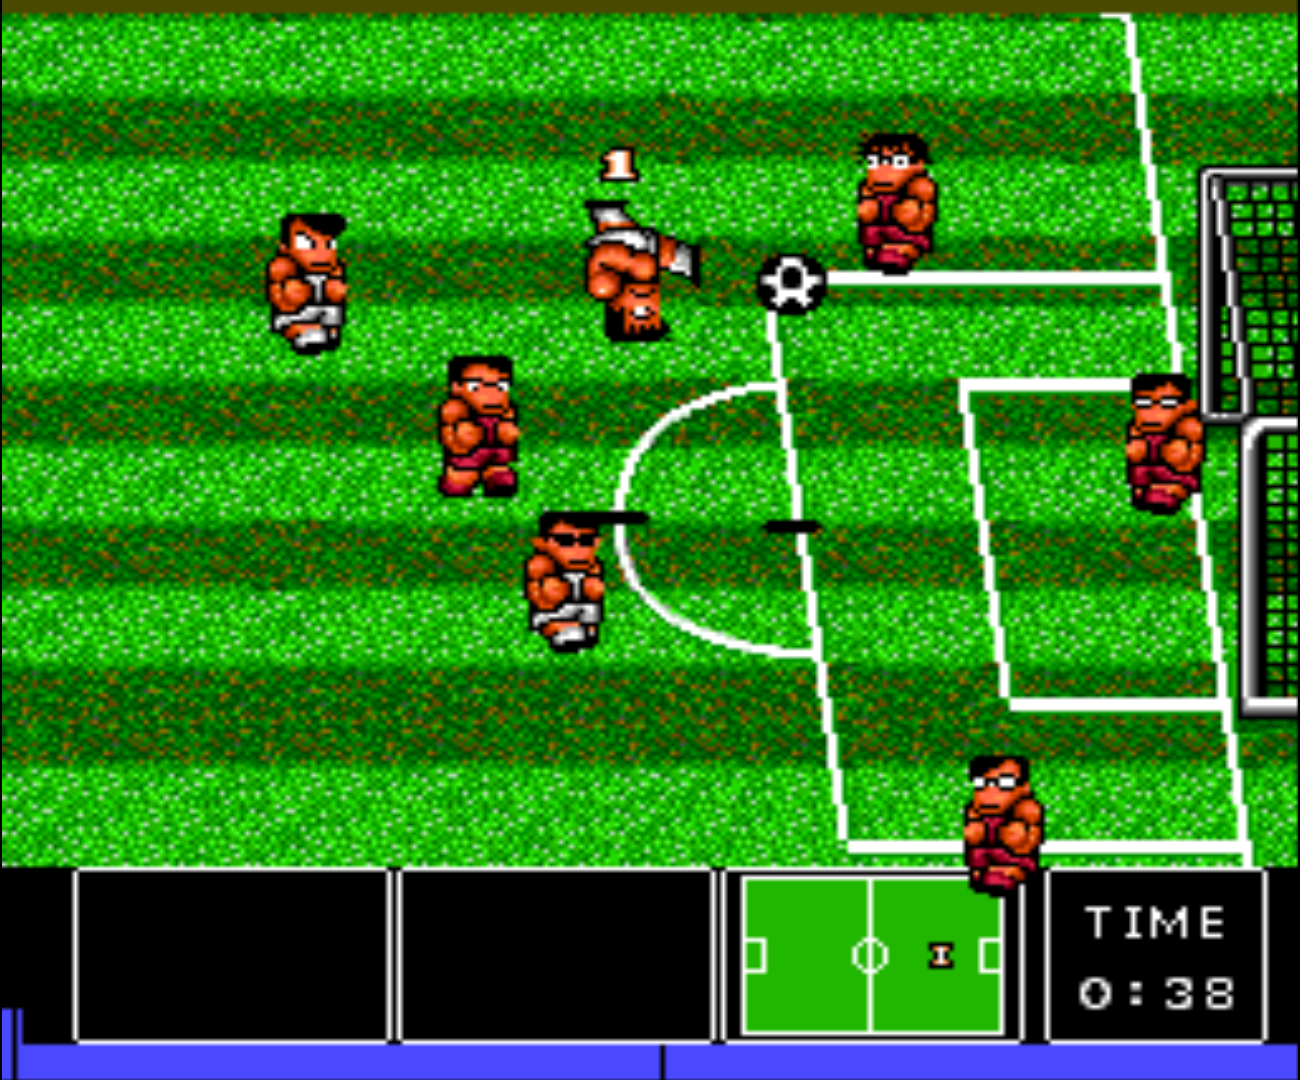
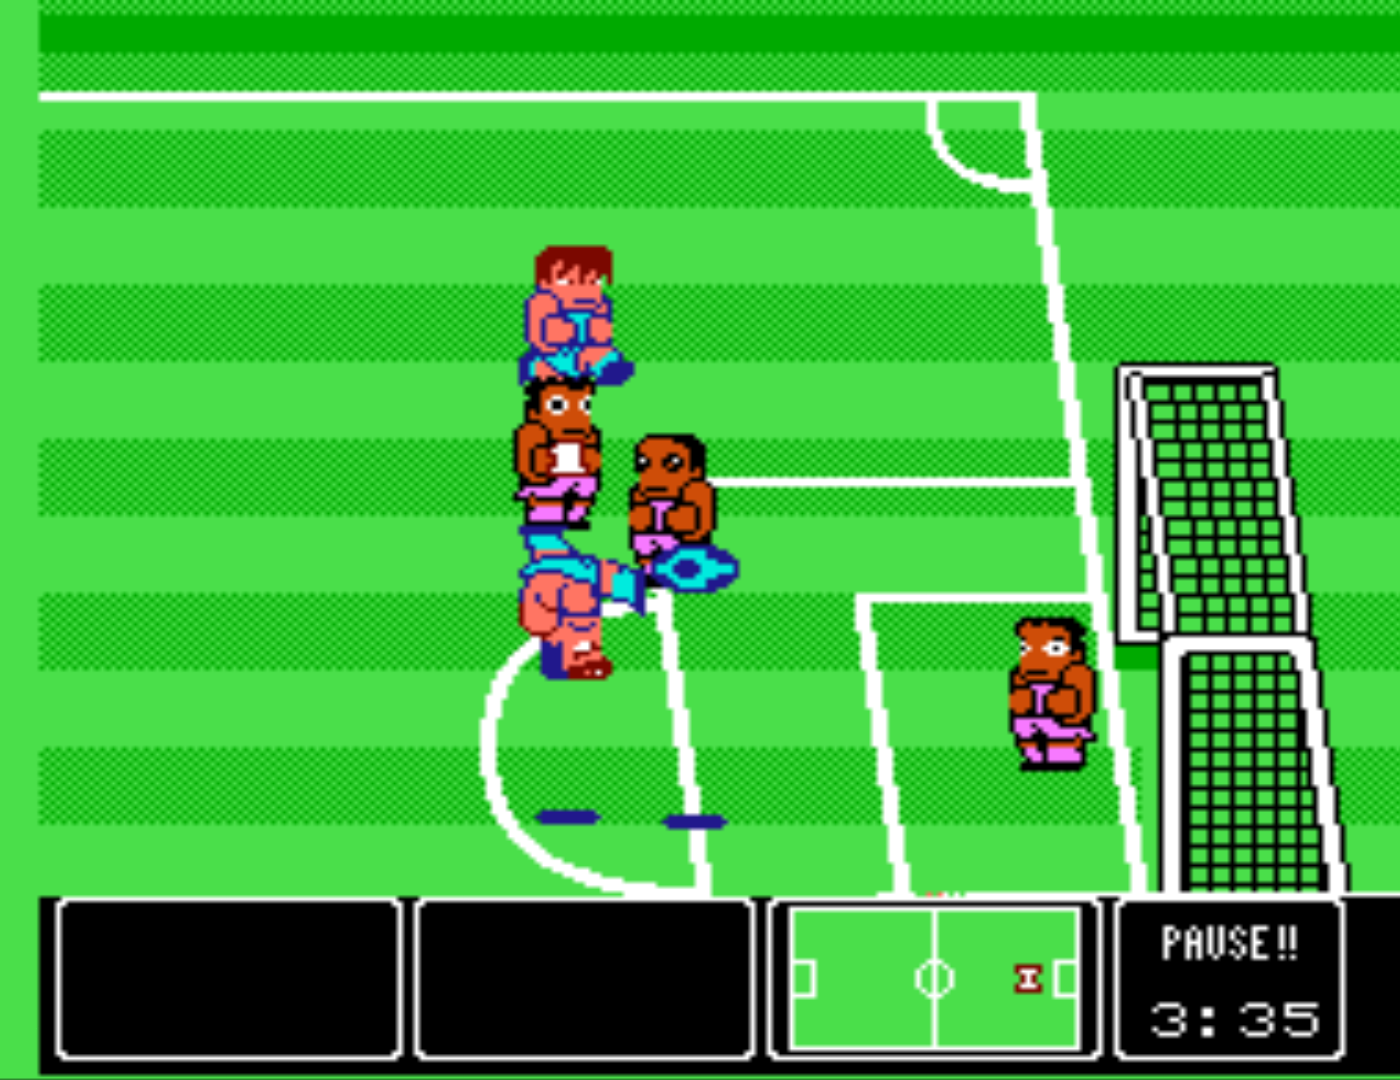
Nekketsu Koukou Dodgeball Bu - Soccer Hen
Figure 13 - Direct comparison between PC Engine (shown) and NES version with the PC Engine having far better graphics
Figure 14 - Direct comparison between PC Engine and NES version (shown) with the PC Engine having far better graphics
If you ever played “Nintendo World Cup” for the NES, then you know what this game is about it’s a very similar game, but with improved graphics and CD quality soundtrack. There are some anime cutscenes here and there as well and a motivational speech (all in Japanese of course). The terrain also varies a lot between stages, and you can play on rocky, or even icy fields.
On the NES this is my favorite game. The gameplay the music and art-style is just so fun for the NES, and seeing this game on the PC Engine, I was very happy. It does have some changes though, since in the NES version you can choose which team you want to play, and on the PC Engine version, you pretty much only have one team and follow more of a story-line around this team. Of course, the game is also entirely in Japanese, so it’s good if you played the NES version before so you know what the options before you start a match actually mean. The game is here on the list mostly for nostalgia reasons. I doubt everyone would consider this a must have game, but for me, it brings back fond memories of the NES version, but with improved graphics and some nice new features and screens between matches. It even looks better than the Sega Genesis version.
The game music is probably the most arguable point of this game. There is no doubt that the music quality is much better than the NES version being all CD soundtracks and such, but you can clearly hear the main tune of the game that I am so fond of in the NES version. So why would you discuss what’s better? The chip tune of the NES version has its own unique charm, and packs quite a punch, and some might prefer this over the clear CD soundtrack. Overall it’s an awesome experience which I can only recommend if you like the NES version of the game!
Games I found ok
Lady Phantom
Unfortunately, this is one of these games again that are completely in Japanese, and I think I would enjoy much more if I would understand more of the game. Generally the graphics in this one are good, although the level of animation is rather limited. It’s a mecha-styled tactics game similar to the Battle Field series or other round based strategy games, although in this game you are not switching between your turn and the enemy turn, but between units, and it can also happen one unit can have multiple turns or has another turn after just a short while.
It takes only a little while to learn the different commands, but since I have a hard time understanding the rest of the menu I probably miss out of a lot of customization before a fight. Overall, the game is playable with the little I understand, but since voice acting and all texts are in Japanese, I missed everything that is important to the story of the game.
Legion
This shoot ‘em up was hard for me to decide where to put it. When I first started the game, I hated it right away. It took less than 5 seconds and I died, as soon as I was back and the blinking of my ship stopped (invincibility) I died again, and right after that again.
I couldn’t believe how bad I was. I restarted the game like 5 or 6 times not getting anywhere, then I just blew through my continues, and rarely managed the first boss, with about 10 lives (and two continues) wasted just on this one enemy. Soon after that, I died again with no more continues. I started over a couple more times and started to make heavily use of the save and reload function of retroarch to “cheat” myself through the first part without wasting too many lives. At one run, I got the spread shoot (which starts as a two-way but can be upgraded to have even more), and with that the game finally started to become “kinda” fun. On the first boss, I probably saved and loaded around 20~50 times until I got it without dying and losing all of my weapons. It went on like this. Saving making sure you don’t lose a life and your weapon, and with that the game became much better.
This game is very fast: if you let an enemy get past you they come back from behind you and either crash into you or shoot you from behind, cause they do not shoot when they come from the front only from the back where you can’t shoot them. It’s hard and challenging, but also very fun. At the start of each level, you have a guy talking in English at you, which is probably meant to progress some kind of story, but it’s not like you have time to pay attention to what he says as you try to survive. In this game the Turbo Switch for the attack button is a must have, or else you’re going to die even faster.
Lemmings
I played Lemmings first on my Amiga and I liked it a lot back then. The PC Engine port is very decent with good graphics and sounds and as expected the music is great as it’s played from CD. The controls work fine, although if you use a controller, it’s fast enough and responsive. If you want to play a good Lemmings port on your ODROID this is one of the best you can get.
Lodoss Tousenki, Record of Lodoss War, Lodoss Tousenki 2, and Record of Lodoss War 2
These games are very close tied to the anime with the same name, and not like the Sega Dreamcast version that does not feature the same characters. The cut-scenes are very well drawn, and it even has the intro music and other musics of the Anime. The game itself is a nice RPG, with you being able to visit different towns, fighting monsters on the map. It even has an auto fight mode. Aside from the cutscenes and the time you speak to characters in towns and such, the graphics are not very impressive, but also not too bad. The second game is actually an improvement over the already good animation and cutscenes of the first game. The graphics also get a slight boost in the second game.
However, both games are completely in Japanese, which makes is quite hard to play, as I don’t know what different options mean or how to proceed. I don’t understand the story. which is a shame, as the lengthy intro and cutscenes really add to the experience if you would understand them.
Lords of the Rising Sun
This game is quite interesting and a mix of strategy and action game. You move around your armies and try to conquer town and fortresses and the actual conquer part is done in real time with you walking around breaking doors, killing your enemies with a sword. It’s also fully in English, including the lengthy intro and cutscenes, so it’s actually easy to understand. What I’ve played so far I enjoyed, but I imagine it gets a lot harder later in the game. I look forward to trying out more of it.
Magical Fantasy Adventure - Popful Mail
This version of Popful Mail is weird. It’s one of my favorite games for the Sega CD, but this version has a video cutscene that is missing in the Sega CD version, which actually helps with the plot. A few other things also look better, as some of the characters have animated close-ups when you talk to them which are actually quite nice. Overall the graphics are not as good as on the Sega CD version. The character sprites are much smaller than on the Sega CD and also have reduced frames of animation. The gameplay also totally changed. In the Sega CD version you swing your sword as you need it, while the PC Engine version works pretty much like the early Ys games, where you just ran into the enemy to attack them. Jump them on the head and actually keep standing there, or just run into them. The later one can be good for bosses, as you may hit bosses many many times by just running into them, but many enemies should be rather jumped on, as it’s safer in most cases. Still, it has its charm, but since everything is in Japanese once again, you’re missing most of the plot and dialog, which can be quite funny if you know what they say. I would definitely go for the Sega CD version though.
Magicoal
This is an awesome RPG with lots of animated cutscene good graphics, and the gameplay and controls are really nice. You can either play as one or two players, and can select which player you want to use from either a boy or a girl, who are both magicians. The music and sounds are also very good, and I really enjoyed playing the game. So why is this game only under “games I like”? Simply cause it’s entirely in Japanese, and I have no clue what I’m doing. I just walk around aimlessly and wait for things to happen. I knock on every door and talk to everyone, even though I don’t understand what I’m doing. I imagine this game must be very good if you can actually understand what’s going on.
Martial Champion
Martial Champion is a fighting game in the likes of Street Fighter 2. You can choose between 10 different characters, which is quite nice, and you can also adjust the hardness of the game with difference difficulties and levels. The game uses two layers, so the background scrolls a little differently than the foreground when you jump. But aside from that, there isn’t much going on, and there are no animations in the background at all. The characters only have a few frames per move as well (two or three at most) so it’s not the best fighting game out there in terms of graphics. Still, the overall presentation is quite decent, the character control works rather well, and all have different fighting styles. Overall it’s an “ok-ish” game, just not top-notch. If you like fighting games like Street Fighter, you should try it.
Metamor Jupiter
Metamor Jupiter is a classical shmup. What makes it stand out is that you can “morph” your spacecraft and with that, change the weapon that you use between a powerful laser, a spread shot, and a more concentrated straight shot with additional powerful laser to straight up and down. You can also turn around and shoot backwards. You can take quite some hits from enemies or obstacles, and every now and then a energy crystal floats around that you can collect to replenish your health. Overall I like the game, the intro is very well animated but as usual only in Japanese. It’s not bad, but also not impressive.
Meteor Blaster DX
This is a fairly new “production” from 2000-2004 and consists of three games Meteor Blaster DX, Loop and Implode caravan version. All made by “MindRec”. Meteor Blaster DX is a Meteor clone with ok-ish graphics, and the sound and music is nice enough. You have features such as shield and warp to make your life easier (although they are limited). It’s a fairly nice port of Meteor and fun to play.
Loop is a pipe game where you can turn pipes to create a “loop” therefore the name. Connect pipes so they in the end connect with the starting point again and you get points. The longer the loop, the more points, but once the entire field is filled with pipes you lose.
Implode is where you pop blocks of the same color that are connected. The rest will fall into place where you removed the blocks. Clear the entire board for extra points. It’s an endless game until the board is filled completely. This is a nice little collection of games, and it’s good to see that some developers worked on games for the PC Engine long after it was discontinued.
Might and Magic III - Isles of Terra
This is a classic RPG game where you play from first-person perspective and walk through dungeons, solving puzzles and fighting monsters. The game has very good music, and the graphics are rather good for a game of this type. Still, it’s not my favorite genre, and you’ll need quite some time to complete this. The Might and Magic series is very well known, and is held in the highest regards in its genre.
Minesweep
What can I say: It’s minesweep, love it or hate it. Large boards can look rather tiny on the system, but they still work. I am not a particular fan of this game, but it works fine and has good music. It looks very much like the Windows 3.1 version.
Mirai Shounen Conan
This is a funny little platformer especially for kids, as the main characters are also all children. It’s nothing special though. It has some nice cutscenes and animations in it, but as it’s all Japanese, I don’t know what’s going on. It’s a rather decent platformer though; not impressive but good. It’s worth a try and is something for your children if they want to play something that is not too brutal.
Monster Lair
Also known as Wonder Boy III, Monster Lair is a run and gun arcade game. In fact. it’s very close to the original with only the background not scrolling as the arcade version. I wonder if this was done intentionally or not, as it should have been quite possible to do so. For me, this version seems actually a little harder than the arcade version but is still fun to play. The turbo switch can be quite useful when you fight bosses.
Motteke Tamago
In this game, you control a bird that collects eggs that lay around on the map, which from then on will follow you. These eggs hatch after a while and will run to your “home” which will give you points. The one with the most points wins the round.
There are other birds (computer or human player) which try to do the same. You can fight each other by charging and running at each other, as well as collect different kind of power ups, which make you walk faster, hatch faster, stop your enemies for a short moment, and such. It’s a nice competitive game and you can choose if you want the listen to the CD tracks or synthesized music via the internal sound chip.
Mystic Formula
This run and gun features 4 different characters with different types of attacks to choose from. Stop shooting, and you charge your attack doing more damage when you release it, although often a large amount of small attacks can do more damage then charged attacks. The music is ok, and the sound can be annoying at times when the same attack sound repeats over and over again. There are different power ups you can collect, and you can even collect one of your companion as support who follows you around and shoots at random directions as well. The graphics are not very good in my opinion. The intro is nice, but in game is rather bland, and not much going on. It’s ok for a little while though.
Nekketsu Koushinkyoku - Soreyuke Daiundoukai
This game is very similar to Nekketsu Koukou Dodgeball Bu - Soccer Hen. It has a similar art style, offers similar characters, and also is somewhat similar in gameplay as you fight through different stages, beating up your opponents.
This game allows up to 4 players (the rest will always be handled by the PC) and starts off with some racing tracks where you have to run from one window to the next avoiding obstacles and your opponents, as well as trying to reach the finish line first. For thi,s there are several weapons and items that can be used as a weapon laying around on the levels, like a baseball bat, a bowling ball, or brass knuckles.
After a couple levels of running, it turns into a brawler where the last one standing wins. It’s quite fun, but I haven’t wrapped my head around it fully yet. The graphics and sounds are really good as well, so I think you can’t go wrong with the title, except for that everything is in Japanese again.
Neo Nectaris
Once again, this is an entirely Japanese game, but with not much going on in terms of story or text to read. This game is your basic strategy game, very similar to Advanced Wars for the GBA. It’s roundbased: first you move all your units, then the enemy does. You can use the terrain for different advantages, like better cover or attacks. Actually, if you don’t use the terrain to your advantage you most likely going to lose the battle. It’s not bad, graphic-wise. I really like the animation and the details of the combat when units fight each other. Aside from that, there’s not much to say about the game.
Nexzr
This space shooter starts off rather bland and a little bit hard, but once you start to collect your power ups, it gets much easier and more fun. The game has nice music that really fits the settings. The overall graphics are good, but nothing groundbreaking. It’s nice to see a fair number of large enemy spaceships that look more like carrier ships, and some of them actually carry smaller ships if you don’t destroy them before they can be deployed. Every now and then, a big ship “jumps” into the system which is a rather nice animation. You die rather quickly (one hit and it’s over), so it’s best to keep these power-ups in check, and maybe use the save function of the emulator now and then. You have several different power ups that you can collect, starting with a shield that will absorb one hit (and cannot be stacked), to auto aiming missiles and spread shots, which are pretty standard. Overall the game is nice, although not overly impressive.
Games I disliked
Langrisser - Kouki no Matsuei
This is another all-Japanese tactical game in the likes of Fire Emblem and such, but much more chaotic. When you get thrown into the game, you have a hard time even figuring out which are your units and which are the enemies unit, which is even harder when they clash at each other in combat. I often saw what I thought was me decimating the enemy just to found out, oh no, those were my units that just died. The game has an auto-battle mode where the PC will take over your units for you and fight the enemy. Guess what the result of this will be?
Anyway, I didn’t like the game at all. It’s all in Japanese and not easy to understand, there are hundreds of units to move which takes forever, with hard to understand menus and fighting style.
Lord of Wars
This game reminds me a lot of “Advanced Wars” on the GBA, but with much worse graphics and gameplay. It’s also completely in Japanese, and for that alone hard to understand. It’s also not very fun to play in my opinion. The amount of animation in cutscenes and mission meetings is quite good, but the actual game is the complete opposite, and the graphics and level of animation is reduced to the absolute minimum and looks more like an early Game Boy game than a game for the PC Engine.
Magical Dinosaur Tour
The game is not that bad, but it’s actually not really a game at all. It’s a multimedia encyclopedia about dinosaurs, some with just text and pictures, others with narration and others with animations. It’s interesting but more aimed for children that are interested in learning more about dinosaurs.
The Manhole
This game is literally a “Point and Click” adventure, as the only thing you can do is point at something and click, after which “things” happen. It has nice classical music and here and there different sound effects (you can even sing “The ABCs” in this game). The graphics are not very impressive, and look like someone drew them in paint. The text in the game is in English, but the speech is in Japanese. Overall it’s a strange experience with lots of exploring and looping. Not bad, but also not my kind of game.
Motoroader MC
This racing game reminds me a lot of micro machines, but only because everything is tiny and not because you are racing in a “tiny world”. The most impressive part of this game is that you can play it with up to 5 players. Racing the PC is incredible hard (at least for me), and coming in last in every single race is nothing that I consider fun.
Nekketsu Legend Baseball
Despite the name, this game has not much in common with the other two Nekketsu games in this series, but is instead an RPG-styled baseball game where fights are fought with baseball games, so if an enemy attacks you, you throw balls at him as in an baseball game. If they miss, they lose HP, and if they hit, you lose HP. It’s somewhat confusing, and since everything is in Japanese (which is rarely good in a RPG game, at least for me) I have no clue what to do.
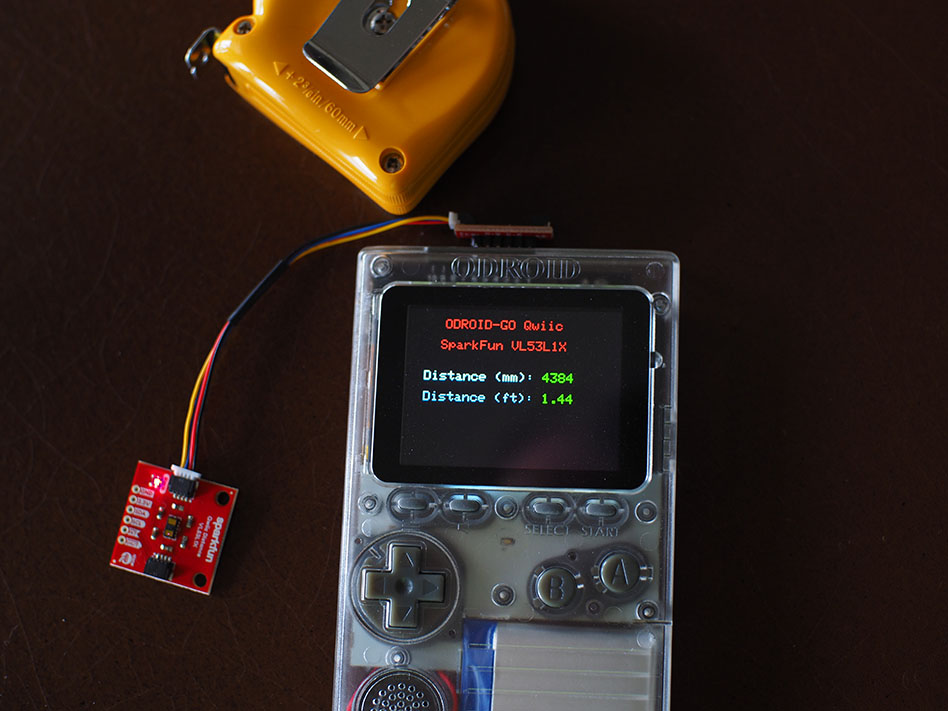
GO and Be Qwiic About It!
May 1, 2019By Dave ProchnowODROID-GO, Tinkering, Tutorial
There it is; sitting right on top of your ODROID-GO handheld, staring you in the face - a 10-pin general purpose input/output (GPIO) female header port. How do we go about using it? Well, you can plug in some sensors (e.g., ODROID Weather2 Board), write a short Arduino sketch, and use the on-board liquid crystal display (LCD) for monitoring the data stream.
You may ask, “Tell me something, I don’t already know!”. Well, how about this? For just a paltry $1.50 investment, you can open up an entire ecosystem of sensors, tools, actuators, and displays for your ODROID-GO AND you will still have four GPIO pins left over for other projects (see Figure 1).
Figure 1 - This project will turn your ODROID-GO into an I2C powerhouse
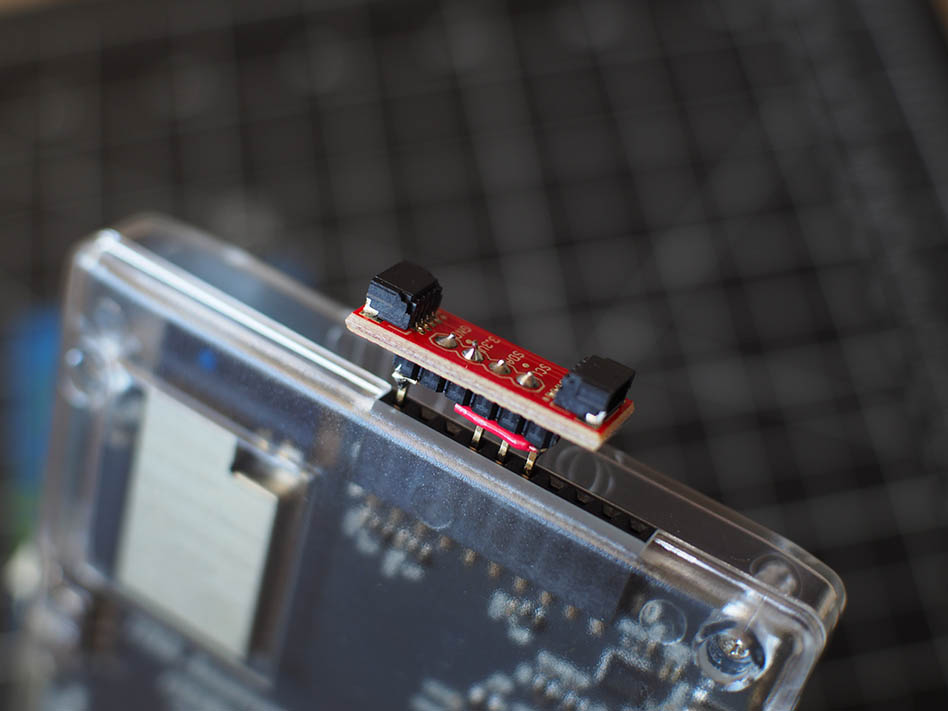
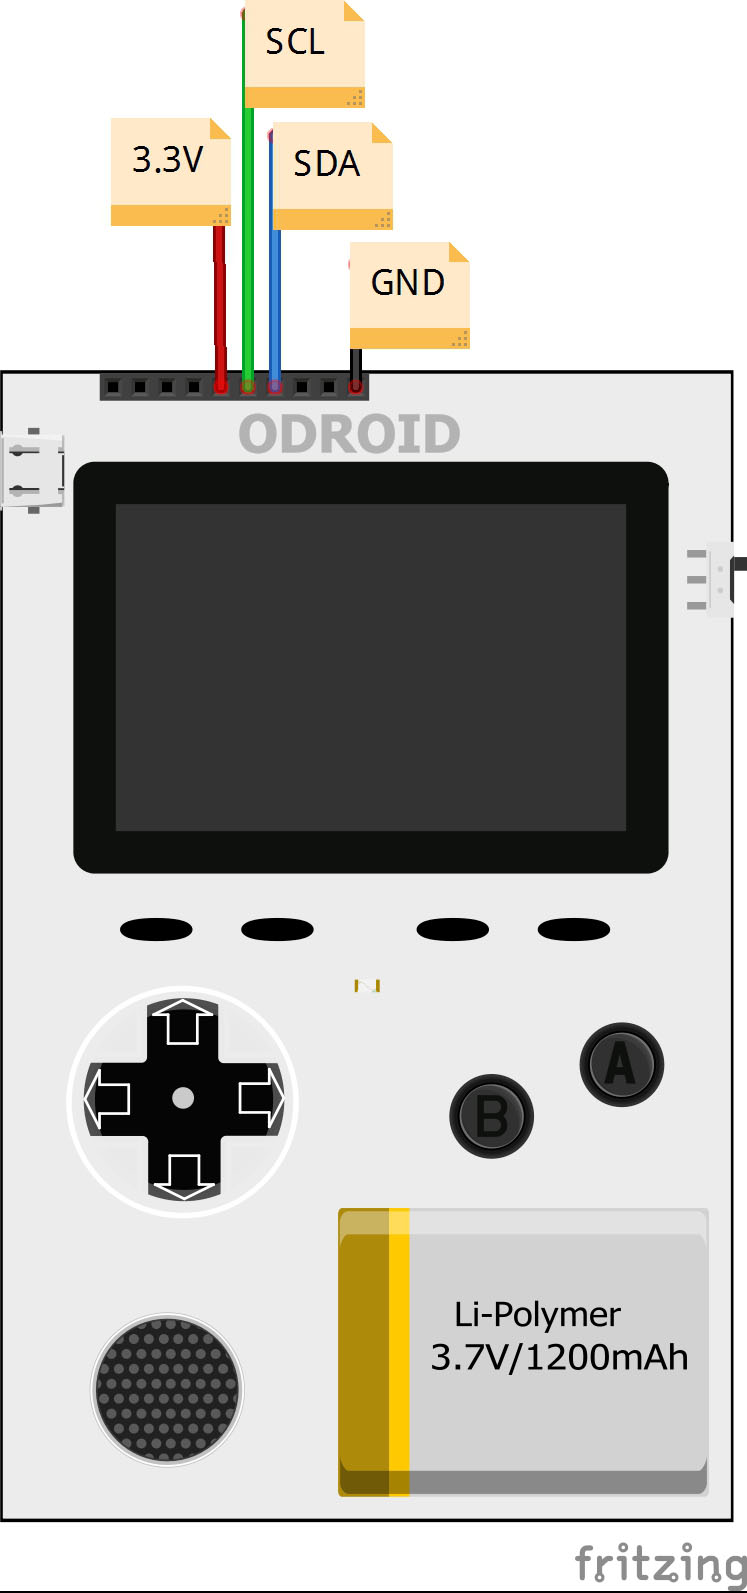
Before we begin following the dead-simple step-by-step instructions for this horizon-expanding project, let me make one “Qwiic” point. You see, this project is going to utilize the inter-integrated circuit (I2C; pronounced “eye-squared see”) interface that can be accessed via four pins on the ODROID-GO GPIO interface. The pins that we will be using are 3.3V, SCL, SDA, and GND, i.e., pins number 6, 5, 4, and 1, respectively. That is all there is to it, these four pins represent the GO’s I2C interface.
As you can see, only four pins are needed for using an I2C interface. However, do not let this tiny pin count fool you. These four wires can support up to 1008 devices. Up until now, accessing that many devices would have been a royal pain in your chair cushion. Luckily, we have a I2C savior. SparkFun Electronics (SFE) recently made a “Qwiic” decision that will pay big dividends to the ODROID-GO.
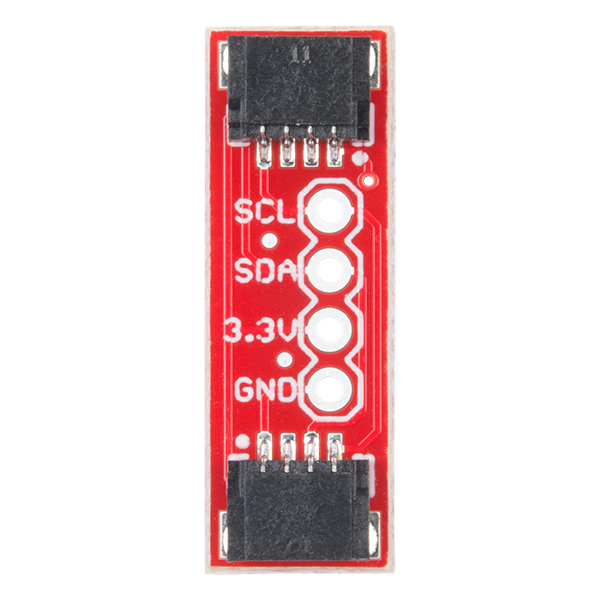
In a response to building a “simple” plug-and-go interface for complex microcontroller or microprocessor-friendly breakout boards, SFE devised the Qwiic system. Simply put, Qwiic is a four-pin plug/receptacle combination that adds an I2C interface to, well, anything. You can find Qwiic plugs on environmental sensors, laser time-of-flight distance tools, flexible actuators, and Arduino clones. Unfortunately, adding your legacy breakout boards to the Qwiic system was still a rat’s nest mess of twisted cables. That is until the Qwiic Adapter arrived (see Figure 2). This small, inexpensive sliver of a board enables virtually any I2C legacy device to be incorporated into the Qwiic fold. That means the ODROID-GO can be quickly and easily upgraded to the Qwiic system.
Figure 2 - The SparkFun Electronics Qwiic Adapter. Image courtesy of SparkFun Electronics
Now are you ready to add an entire universe of I2C breakout boards to your GO? Well, then, let us be Qwiic about it. Oh, and if you are curious about the definition of “Qwiic,” do not worry, there is none. However, you can safely piece together this approximation: “Quickly, wired inter-integrated circuit”.
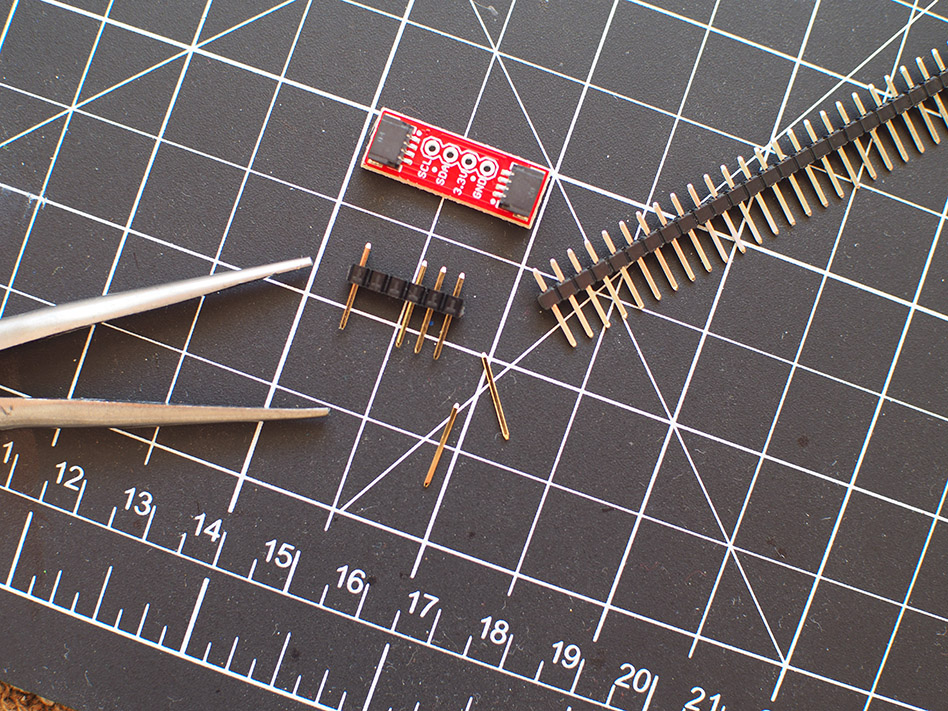
Parts
SFE Qwiic Adapter – DEV-14495
6-pin male header (you can use the 10-pin male header that is included with your ODROID-GO kit) or, SFE PRT-00116
Qwiic Cable 100mm – SFE PRT-14427
2x Short lengths of scrap solid-core wire
Step-by-Step
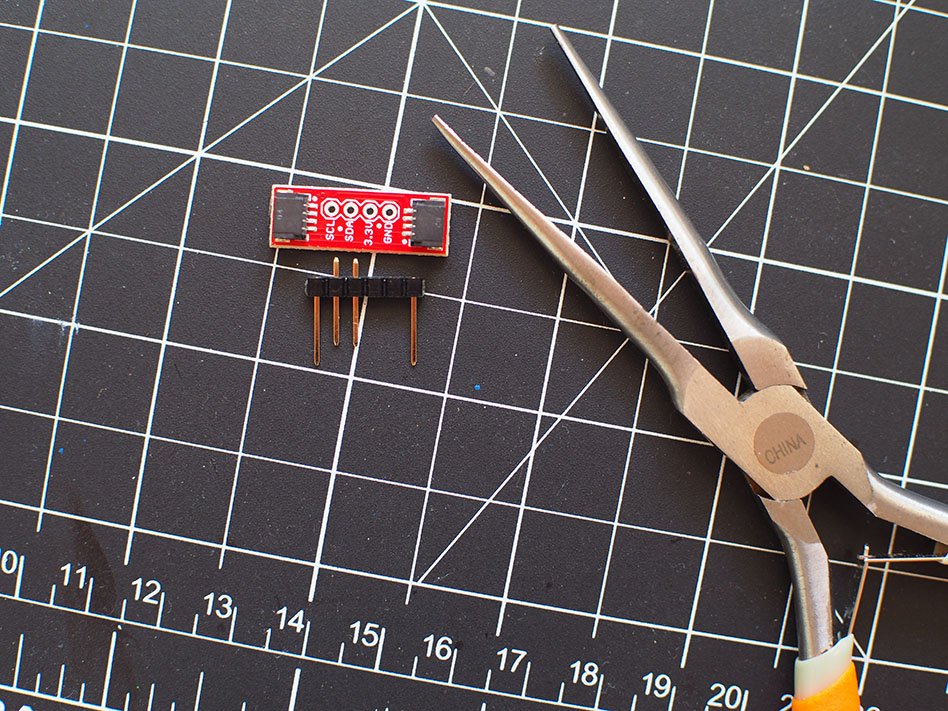
Step 1. Break off a 6-pin length of headers from your stock male header.
Step 2. Use a pliers for removing two pins (i.e., #2 & #3) from the 6-pin header as shown in Figure 3. Yes, at this point you can begin counting your pins from either end of the header.
Figure 3 - Push these two pins out of the header
Step 3. Gently push the two outside pins down until each pin’s top is flush with the top of the header (see Figure 4).
Figure 4 - Carefully push these two pins down inside the header
Step 4. Lay the Qwiic Adapter board on top of the header and carefully push pins #4 (i.e., SDA) and #5 (i.e., SCL) up until each pin top is flush with the top of the adapter PCB.
Step 5. Solder the pins to the SCL and SDA pads on the Qwiic Adapter PCB.
NOTE: the remaining steps will require some precision wiring and careful soldering—but I’ve got confidence in you and I KNOW that you can do it.
Step 6. Cut your scrap wire to a length of about 7-9mm and push this wire down through the GND pad on the adapter PCB. Continue through the header opening that is directly underneath the GND pad. Now bend the wire towards the closest extended header pin - not toward the SDA pin; go the opposite direction.
Step 7. Solder one end of this wire to the GND pad and the other end to the extended header pin. When completely assembled and installed on the ODROID-GO, this pin will go into GPIO pin #1.
Step 8. Cut a remaining piece of scrap wire to a 12-15mm length and insert this wire into the 3.3V pad on the Qwiic Adapter PCB. Continue pushing this wire down into the header opening that is underneath this pad. Bend the wire and route it along the header to the remaining extended pin located furthest outboard of the male header.
Step 9. Be absolutely certain that this wire does not make contact with any other header pins. Use a scrap piece of wire insulation to ensure isolation from the SCL and SDA header pins.
Step 10. Solder this wire to the 3.3V PCB pad and the other end to the extended header pin. This pin will go into GPIO pin #6 (see Figure 5).
Figure 5 - Success! Your Qwiic Adapter is properly connected, safely insulated, and installed on your ODROID-GO
There you go. You have just upped your game machine’s I2C game. Make sure to test your Qwiic pins on the adapter board before attaching a breakout board. Just plug the Qwiic Adapter into the ODROID-GO between GPIO pins 1-6; ensure pin #1 is the GND pin on the adapter. Then test the voltage output with your trusty multimeter between the 3.3V and GND pads (see Figure 6).
Figure 6 - Use this handy-dandy schematic for verifying your connections
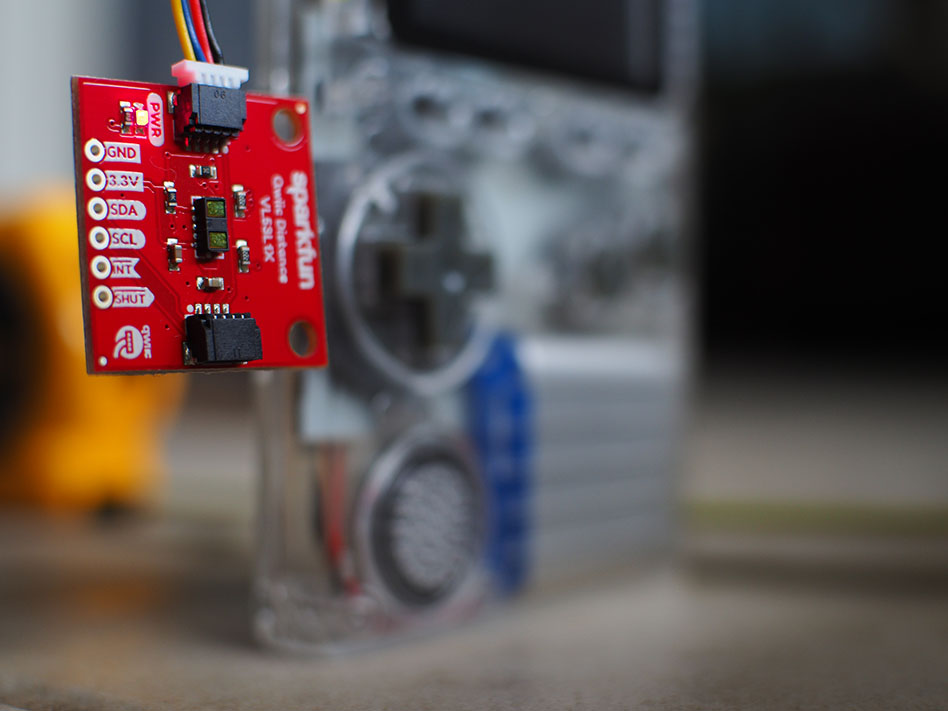
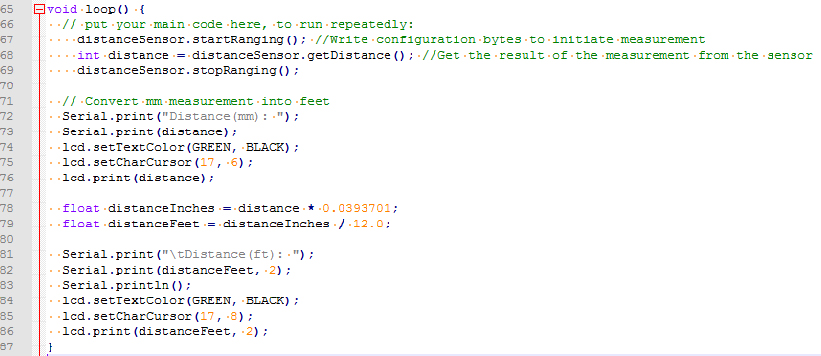
Now dip your toe into your new ecosystem with the SFE Qwiic Distance VL53L1X time-of-flight laser measure (see Figure 7). Also, look how easy it is to write code for such a complex breakout board (see Figure 8). The Qwiic system automatically recognizes and uses the ODROID-GO I2C pins. That is slick. It really is Qwiic to now plug-and-GO-have-fun.
Figure 7 - Plug-and-GO; make measurements that are accurate to within 5 mm
Figure 8 - Here is my sample Loop function from an Arduino sketch using the VL53L1X Qwiic sensor
In Conclusion
1. The ODROID-GO master library has some conflicts with the SFE software libraries. Therefore, copy the ODROID-GO header files that you need for your project and insert them into a new library directory (as shown in Figure 9).
Figure 9 - These are the ODROID-GO master library files that I copied into a new library. I then used #include for adding this library to my Arduino sketch
2. Other Qwiic breakout boards can be used with your new adapter, too. Try them individually or daisy-chain a couple hundred of them together.
Your Very Own Mobile Internet Device
May 1, 2019By @Jason_25Tinkering, Tutorial
I would like to announce a project that I have been working on for a long time now. This is a MID or mobile internet device in the same vein, with the same unending promise, as the pocket computers of old. Cellular-connected and running a full desktop operating system, this device can enable you in a way that current hand-held mobile platforms will not.
The era of commercial user-customizable personal computers is coming to an end. This inevitably leads to security risks due to increasing proprietization of software, loss of user choice, and the switching of control from the typical user or administrator to a company with profit-driven or surveillance motives.
Fortunately, single board computers, like the Raspberry Pi and products based on it, are leading the way in allowing the return of the kind of computer liberties we’ve enjoyed in the past. These liberties include the ability to build your own mobile device free from corporate and government interests.
With some free time and support from hobbyist touch-screen manufacturers, it is now possible to assemble a somewhat pocketable device using a single board computer (SBC).
When compared to a typical mobile device, these devices are less attractive, have less battery life, and lack access to Google Play or the App Store. However, they also lack user-hostile software and are fully customizable and have true multitasking capabilities.
Mobile Internet devices - models 16 and 17
Model 16 could be described as powerful and raw. It is faster, easier to build, highly compatible, and has more potential for expansion and modification. It is also thick, heavy, hot, inefficient, and rough around the edges.
Model 17 could be described as sleek and refined. It is smart, thin, cool running, and efficient like a modern mobile device. It is also purpose built with little room in the design for error or elaboration.
Requirements
Review the necessary prerequisites before moving forward:
GSM Provider: With the current software arrangement and recommended hardware, only North American GSM cellular providers are supported. Specifically ATT, ATT Prepaid, and T-Mobile.
Latest Supported Hardware: The project typically only supports a narrow range of devices for resource reasons. The coming pages will go over the required hardware in detail.
Connectivity (Optional): SIP Account for phone calls, email account with external access, and a XMPP provider for private group communication
Start
If you or your organization meets the system requirements then please choose a direction here:
Work on building a device for yourself or your organization. This link directs the DIY builder/maker to a series of pages such as diagrams, build notes, component reviews and software images.
Commission Software Freedom Solutions to build a device for you. Choice of model number and custom options. For instance, Would you like a webcam, a different battery, or a more radical custom option? This link reaches out to the SFS email for a quote.
Free support. It is important that most issues make their way to the bugtracker and are not kept private. Individuals and organizations can feel free to post here for help of any kind.
Paid Support. If you or your organization requires timely, specific or private support then please contact Software Freedom Solutions directly. This link contacts SFS via email.
Work on the code directly for reasons such as improvement or study.
Hardware Review
First, become familiar with the hardware components and the reasons they are used.
3M sticky mounting tape. It is not the revolutions in SBCs, touchscreen, or battery technology that made this project possible. Instead, long lasting, heavy duty tape has become widely available that holds most components together.
Kapton tape. If it is good enough for the most reliable machines ever built (Voyager 1 and 2) it is good enough for this project. The exterior shell can consist entirely of Kapton tape if you prefer not to build one. Experimentation has shown that Kapton traps much less heat than electrical tape.
Waveshare 5" 800x480 HDMI screen (A). The hardware core of the project. Several designs are based on it. It also serves as the "frame" of the device all other components are mounted to. The HDMI "jumper" device allows a simple, sturdy, and compact connection that physically locates one side of the screen to the PI and is the key that keeps the entire device together. Any higher resolution would be frustrating to use. In addition, the HDMI approach is much less fragile than a ribbon cable.
Waveshare 5" 800x480 HDMI screen (B). This uses USB input instead of SPI like screen A. This can use FPV HDMI cable for a flat connection on both sides. Acts as a generic mouse making it optimal for alternative OS and SBC. Does not work with evdev third button emulation.
Waveshare 5" 800x480 HDMI screen (H):
USB input
capacitive screen
button controls with brightness and on/off
hardware scaling - not used
speaker amplifier/headphone port for HDMI audio - not used
PWM backlight control - not used
displayport/VGA input - not used
Waveshare 7" 1024x600 HDMI screen. The hardware core of Model 4, it also serves as the "frame" of the device as the component all others are mounted to. A "borrowed" HDMI jumper from a broken 5" screen combined with a 90 degree HDMI adapter allows a direct connection from screen to PI with no wires.
Waveshare 4" 800x480 HDMI screen. The hardware core of Model 6, it also serves as the "frame" of the device as the component all others are mounted to. The screen is IPS and is extremely sharp. Uses a power switch for the display backlight like the other screens.
Weboost Home 4G. This cellular signal amplifier is essential to receiving a reliable GSM data signal, which does not penetrate structures well. Typical smartphones do not have the kind of absolute reliance on data as these devices do, so a weak connection is unacceptable. Testing has shown that this device makes the difference between a nearly unusable SIP call and a nearly perfect one. Signal strength testing does not show the full picture of the capabilities of this device. The real advantage is in improved data packet loss. Vertical and horizontal separation of the antennas is recommended.
Huawei E303 USB cellular adapter. This 3.5G device has a thin profile and can be carefully slimmed with a dremel tool even further. May use less power than 308U.
Sierra Wireless 308U USB cellular adapter. This 3G device has small profile, similar to the E303, with two indicator lights. Has support for a single external antenna. May use more power than E303.
Sierra Wireless 313U USB cellular adapter. This 4G LTE device has a wide and thin profile with two indicator lights. Has support for two external antennas. More care must be taken to locate audio components away from it's powerful transmitters. May use more power than 340U.
Sierra Wireless 340U USB cellular adapter. This 4G LTE device has a wide and thin profile with a generous sized LCD indicator screen. Has support for 2 external antennas. More care must be taken to locate audio components away from it's powerful transmitters. May use less power than 313U.
Tiny USB microphone. This is a good performing, inexpensive, compact, convenient, extremely low power microphone. By simply plugging this in and building your device such that this is on the bottom it works well for voice calls and may even have enough sensitivity for speakerphone use.
Drok micro 3w amplifier. This analog board is stereo but only one channel is used for this project. Proper stereo sound requires more spatial separation than a smartphone sized device allows anyway. At full volume is as loud as a midrange smartphone speaker. The board itself is also very small for the available power. It can also directly run off of 3.7v battery power without using up a USB port. The defining feature however is the entirely solderless design. Testing has shown it is not capable of bridging left and right audio channels into a single more powerful mono channel.
Adafruit MAX98357 digital i2s amplifier. Has proven to be a very reliable and clear amplifier. No ground loop issues like an analog amplifier can have. Inexpensive. Adjustable gain pin.
Logitech c525 camera
less trouble than csi
camera/microphone will pick up facing front or rear
will be failure prone when pocketed/bulky
testing - with repeated tests it always works
Adafruit ads1015 adc
Reliable
significant wiring/power boards and charger contain a monitoring feature
testing - with repeated tests it always works
Arducam spy camera
Small
3 failures-required reseating of both connectors/required rma/reseating required
testing - impractical to use because of failures - alternate csi camera needed
Flashlight module
Reliable
significant wiring/large power board; contains a flashlight feature
testing - with repeated tests it always works
Notification light
Reliable
no negatives
testing - with repeated tests it always works
Philmore (18AWG) DC Extension Cable Cord. When this cable is cut in half, one side can be used for the device side connector and the other side used for the charger side connector.
Icstation 1W oval shaped laptop speaker. This very small speaker can be heard across a room. The leads are so small they should be melted with a soldering iron to expose the copper.
Uxcell mini snap rocker switch. This switch is thin and rectangular and can fit easily within a device shell. It was previously sold with pre-soldered leads but now only the switch itself can be found.
Tanbin 4 in 1 micro USB hub. This tiny hub can be used with any USB host with cable modification. The USB connectors can be easily popped off for use in tight situations. Watch for shorts and crossed wires and test the hub with a USB OTG tablet before using.
Chargers
Take care using any charger this way because by default they lack a temperature sensor connection to the battery, which is an important extra safety feature. In a typical use scenario of 1.3A max draw on the batteries, setting the charger to 1.8a will charge the batteries up while continuing to power the device. You should only set the charger to charge slowly on top of the power needed to run the device. Charging lithium ion batteries too fast is dangerous. This may not charge the batteries in an optimal way but avoids a tremendous amount of extra charger design work. A charger/power supply must be used that will be safe to use by implementing auto switching between CC and CV modes, also known as current and voltage limiting.
fatal flaw: Fails with voltage drops at large loads after heating up. Only really good for 1 amp over time.
Recommended anyway as it can be easily put in parallel with an identical supply.
Yeeco ultra-small 3A high efficiency "medium" power board (no longer commonly available)
Reliable. No power switch. The king of all power supplies. Onboard charging works at 500ma by default but appears to have an option for 1000ma. Onboard charging never interrupts the output. Two LED indicators with low voltage warning.
Onboard charging and alternate untested power boards
When Ubuntu 18.04 was launched for ODROID-C2 in summer of 2018, Hardkernel stated that unfortunately, due to complicated dependency issues it was impossible to upgrade from 16.04 to 18.04 (at that time). This meant that long-time 16.04 users were either stuck without an upgrade path, or were forced to reinstall and start from scratch.
In my case, I was running 3 ODROID-C2s "in production" with 16.04 that I wanted to upgrade to 18.04. After playing with crossgrading for the N1 (https://bit.ly/2PpeHMA) I looked at the option to dist-upgrade from 16.04 to 18.04 - which should be a much simpler problem. So I started with the most complicated system I was running - which is a C2 with X11, Kodi, Chrome, mpd, Home Assistant, mosquitto, munin-node, MariaDB, a webcam, an external sound card, GPIO-attached sensors and a bunch of custom scripts. Long story short - upgrading works if you follow the steps below.
Upgrade procedure
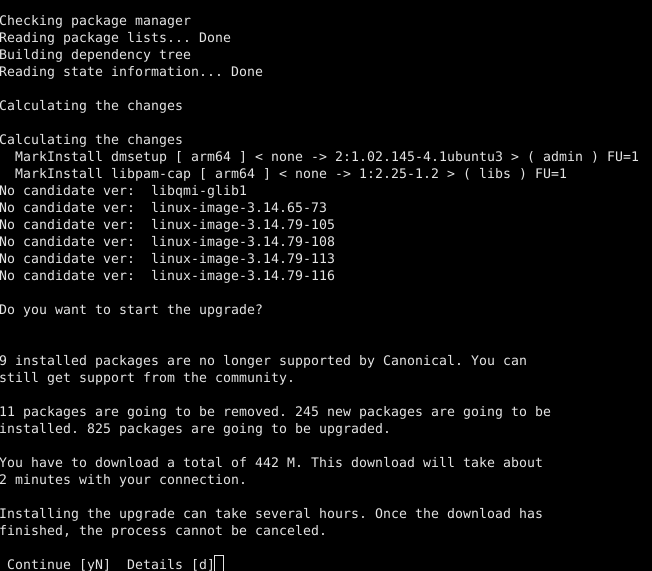
Working on any production environment can be dangerous - so prepare a backup (dd or odroid-backup) and if you cannot afford downtime (I could not or my WAF score would plummet) run the upgrade on a different hardware on a copy of your OS.
First of all you need to make sure the system is up-to-date. Install all missing updates with:
There are two ways of trying the upgrade - via do-release-upgrade (which is the official way, but might fail) or via distrorejuve (which is a hacky method, but might work where the first one fails). If you are running the minimal image you might need to install the following package to get the do-release-upgrade program:
In my case I tried the do-release-upgrade method on a C2 which was running the minimal image and the distrorejuve method for two C2s which were running Xorg and had more packages installed. For me both methods worked.
do-release-upgrade
It is best to start do-release-upgrade from a terminal after a fresh boot.
$ sudo do-release-upgrade
Figure 1 - Overview of the installation
It might complain if you have held back packages and make you either uninstall or upgrade them to proceed. It will then grab a list of packages to be upgraded and ask you if you want to keep your changes to your custom config files. Usually the default answers should be fine.
If the process goes well, the upgrade should be uneventful. When the upgrade finishes it will tell you that you need to reboot.
Figure 2 - Reboot required
At this step you should not reboot automatically and instead drop to a shell. You should consult the "Preboot health check" steps shown later before you decide to reboot.
distrorejuve
If the first method failed, or if you feel adventurous, you can try distrorejuve.
Most likely distrorejuve will complain that:
A bunch of X11 related packages are installed and may cause problems and suggest you remove them. You can remove them since you will be installing them later:
You have third party repositories that need to be disabled before the upgrade can begin. You will need to comment out the lines indicated in /etc/apt/sources.list.d/*. Also, if you are using the xenial-backports branch in sources.list - you will need to comment it out. Unfortunately the script will also fail if you have deb-src entries in your sources.list. Those too need to be commented out before starting.
Once the requirements are in place you can start the upgrade:
$ sudo ./distrorejuve.sh --to-latest-lts
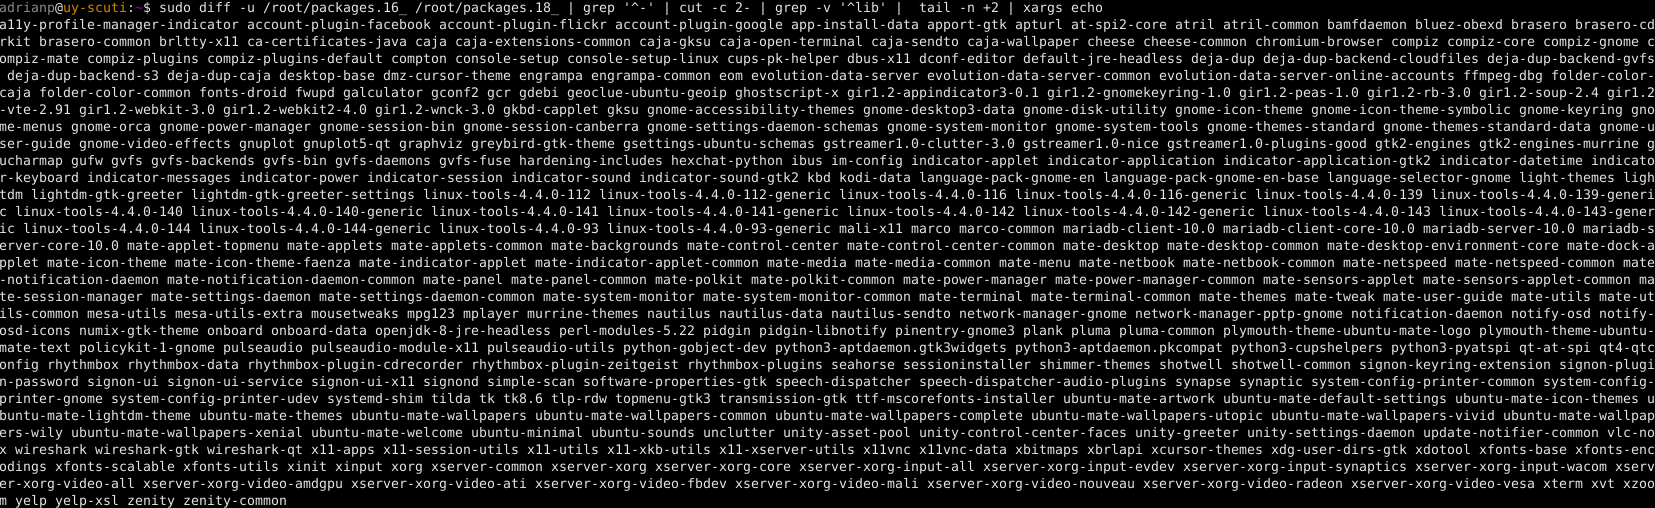
It will take a while, but should finish without issues. However, once it has finished, note that you are not done yet. You still need to add back the missing packages (remember - you might have uninstalled X11). Grab a list of currently installed packages and diff it with the one saved before. We are going to ignore libraries because they usually have a dependency on something else.
You will be presented with a list of missing packages (mostly X11 and graphical programs) that you need to manually reinstall. Note that not all packages can be reinstalled because some of them might have been replaced with packages with newer versions, or others have been discontinued (like gksu, systemd-shim). So the best approach is to try to select a line of output and install it (tweak the line until it installs), then move on to the next line until you finish. Also note that you should enable backports in /etc/apt/sources.list, since it was disabled before the upgrade:
You will want to make sure your system is in a sane state before rebooting - so check the following:
You still have a kernel image/uInitrd and boot.ini in /media/boot
If you want to configure networking via /etc/network/interfaces, make sure the ifupdown package is still installed
Re-enable ODROID specific repos
During the upgrade process third-party repos (such as the ODROID repo) were disabled and need to be re-enabled at this point. Edit /etc/apt/sources.list.d/odroid.list, uncomment the line and replace "xenial" with "bionic":
$ sudo vi /etc/apt/sources.list.d/odroid.list
$ cat /etc/apt/sources.list.d/odroid.list
deb http://deb.odroid.in/c2/ bionic main
You should also check that /etc/apt/sources.list has its repos changed to bionic - I was surprised to see that it didn't after using the do-release-upgrade method. Make the necessary changes if you find unchanged repos.
You can now upgrade the kernel from 3.14 to 3.16. You will need to remove the currently installed kernel and header files (if installed). Removing it will prompt you that it is a dangerous operation and you might break your system - you must answer "No" at this point to proceed with the removal.
At this point recheck that the image/uInitrd/meson64_odroidc2.dtb/boot.ini files look ok in /media/boot. Any missing/truncated file will make booting impossible.
Figure 5. Boot files health check
Now - fingers crossed and reboot into your new system. Note that the reboot command might only power off the system instead of rebooting it, so you might need to pull the plug. When the system is booted you can run the following commands to do a little cleanup:
$ sudo apt-get autoremove
$ sudo apt-get clean
Post-install fixes
After your reboot is successful (otherwise you have your backup, right? Right!) you will still have some things to fix.
man
You will find that man is broken after the upgrade.
lirc
lirc has also gone through a lot of changes between distro versions and will fail to work with the old configuration. You will need to follow the wiki guide for 18.04 for configuring lirc: https://bit.ly/2ZhZEIS, or to migrate the existing config with the following commands:
$ sudo mv /etc/lirc/lircd.conf /etc/lirc/lircd.conf.d/ir-remotes.conf
$ sudo mv /etc/lirc/lircd.conf.dist /etc/lirc/lircd.conf
$ sudo vi /etc/lirc/lirc_options.conf
driver = default
device = /dev/lirc0
$ echo 'meson-ir' | sudo tee -a /etc/modules
$ sudo service lircd restart
pulseaudio produces hisses on HDMI
This should have been fixed with a kernel patch recently, but if you notice this problem, check out this forum thread for an alternate fix: https://forum.odroid.com/viewtopic.php?t=34116
ODROID 3.5" LCD is disabled
After reinstalling X11 default video output will go to HDMI. You will need to go through the installation steps again from the wiki, since there are some changes from 16.04: https://bit.ly/2GAlUXa.
Conclusion
All in all, the upgrade from Ubuntu 16.04 to 18.04 went ok for my systems. There were various things left to tweak and fix, but most things started just fine. I highly suggest you give it a go and upgrade your older system if you haven't started over with a blank image. Problems and questions on the support thread: https://forum.odroid.com/viewtopic.php?f=140&t=34251
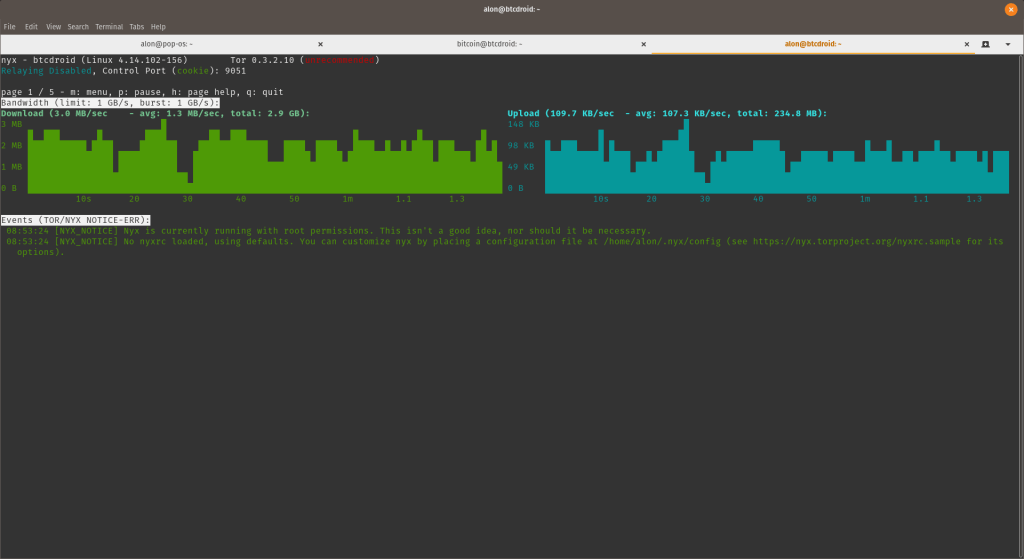
Creating a Bitcoin Node Using an ODROID-HC2
May 1, 2019By Alon GanonODROID-HC1, ODROID-HC2, Tutorial
Chances are you’ve heard of Bitcoin, the anonymous and secure cryptocurrency which has made waves over the years. One of the main issues I have seen is people trusting others to handle their transactions. I set about purchasing a tiny Dell netbook with a measly Intel Atom CPU, 2GB of RAM, and a 240GB SSD to act as my primary wallet for cryptocurrency, and more or less my bank. The laptop has a fully encrypted drive, and I back up the keys for my wallet, keeping them in three different places. However, when you run a full version of the core wallets, that means you have to store a whole copy of the entire blockchain on the device using it.
The Bitcoin blockchain is around 200GB, and that’s a lot of data to hold onto. Not to mention, the whole idea of my netbook was to only be on when I needed to make a transaction, as it is most secure when it is powered off. Obviously running the blockchain on the laptop was not an ideal option as it would always have to be on. Additionally, I wanted to further anonymize the connections coming in and out, so I wanted to tunnel all of the traffic for the node over a VPN such as Private Internet Access, with a VPN killswitch so if the VPN doesn’t work it won’t connect and will bolt The Onion Relay (TOR) on top of it to further anonymize all transactions.
The advantage of all this will be to allow any device on my LAN to transact with the blockchain network directly using my node to send and receive my transactions rather than trusting other people. The other advantage is since I am running a full copy of the blockchain I am also helping support the Bitcoin network by providing another peer with a full copy of the blockchain. This guide will not cover the VPN aspect, but will cover how to bolt on TOR, as well as build your own node.
I originally got the idea from pinode.co.uk where they have a lot of these projects, and I am already running a Monero node on a Raspberry Pi 3 Model B+ with a 128GB flash drive. For this tutorial I am merging the ideas from pinode, along with the Thundroid tutorial, and adding some of my own twists and spins. I chose an ODROID-HC2 as it allows for a native SATA hard drive, and the HC2 variant allows for 3.5″ disks where as the HC1 allows for 2.5″ disks. Either version is fine, and if you really wanted you could probably go for the ODROID-XU4 or even a Raspberry Pi 3 Model B+ if you use a 512GB flash drive or a kit for additional drives. For the sake of this tutorial we will be discussing the ODROID platform, but you can use whatever platform you like. Technically if you wanted to, you could use a full dedicated PC, but that seems like a waste of hardware and will be far less power efficient. I prefer the ODROID over the Raspberry Pi as it’s a more powerful hardware platform.
Hardware
Figure 1 - ODROID-HC2 with RTC battery, 1TB Seagate Iron Wolf HDD, and Model 3 Wifi NIC
ODROID-HC2 with RTC battery, 1TB Seagate Iron Wolf HDD, and Model 3 Wifi NIC.
ODROID-HC2 (Use the HC1 if you want to use 2.5″ disks instead)
The reason I specified using a NAS drive is that this drive will be on 24/7, continually reading and writing data. NAS drives are specifically optimized for this kind of behavior, and will therefore be more reliable. You can use a non-NAS drive just fine, but in the long term a NAS drive is best.
Figure 2 - ODROID-HC2 pictured in a clear acrylic case with the wireless NIC inserted, and 16GB flash card before it was flashed with the Ubuntu 18.04.1 OS
UART console connection kit. I highly recommend this if you are planning to do it via Wifi so you won’t have to connect to ethernet in case something happens.
RTC Battery Backup to keep the real time clock running in case of power outage. I highly recommend this as it’s cheap. I use electrical tape to bond it to the aluminum housing and make it rather sleek.
Figure 3 - ODROID-HC2 being worked on at my desk with the UART connector kit pictured
First things first, we have to connect it to the Internet. If you are planning on using Wifi, please follow the wiki here for nmcli for the ODROID. If using the UART console connection, follow this tutorial here. You will need to flash Ubuntu 18.04 minimal image which can be downloaded here and then use Etcher to flash it to a MicroSD. Once that is done, put it in the ODROID and boot it up and either SSH or connect via console to it. Either, way the credentials on start are:
username: root
password: odroid
For Raspberry Pi users, you will have to look up the credentials for the image you are using.
Prep work
We’ll need to take care of some things before we actually make it a Bitcoin node. First, let’s create a new user with a secure password and superuser rights and change the root password. Don’t forget to change “USER” to what you want.
$ root@odroid:~# passwd
$ root@odroid:~# adduser USER
$ root@odroid:~# usermod -aG sudo USER
$ root@odroid:~# adduser bitcoin
We need to update the system and change the time zone and locale data, as well as change the hostname in both /etc/hosts and /etc/hostname to match. I named mine “btcdroid” but you can make it whatever you want:
Now we need to mount the hard drive. In my case, the hard drive was brand new and unformatted, so I had to do that first. You can follow the instructions at Digital Ocean if you are in the same situation. Regardless, once you have a compatible Linux formatted drive we can proceed.
We will need to get the UUID of the partition that has been created. We simply run the lsblk command and it will spit out the names and UUID of all drives.
$ root@odroid:~# lsblk --fs
After running that command you should see something like this. We will need to notate the UUID it has given us for the next steps.
Figure 4 - After running the lsblk command
Now we need to edit the fstab with nano and add a whole new line. Replace 123456 with the UUID given from the command above
$ root@odroid:~# nano /etc/fstab
$ # New Line in /etc/fstab
$ UUID=123456 /mnt/hdd ext4 noexec,defaults 0 0
Awesome, now that the fstab has been modified, we need to create the mount point, mount it, check it, and set the owner.
$ root@odroid:~# mkdir /mnt/hdd
$ root@odroid:~# mount -a
$ root@odroid:~# df /mnt/hdd
Figure 5 - At this point if everything was done correctly you should see something similar to this
Now let’s give permissions to the bitcoin user for the entire hard drive we made earlier.
Now it should be reconfigured to have a 2GB swap file on the hard drive, and should reboot. At this point, log back in as the regular user and not as root, because we are about to disable root via SSH. However, if you are using the optional UART serial connection kit, you can still login as root that way. Now let’s continue on and remove the old swap file.
SSH hardening
We need to lock down remote access to SSH, and Digital Ocean has a great guide going over SSH security. I highly recommend disabling password logins and requiring an SSH key pair to be generated. You can read the tutorial here, but we will definitely need to disable root access as well. It’s a major security risk if root is allowed, as everyone knows Linux has a root user.
Type the following command to edit the sshd_config file.
$ user@btcdroid:~$ sudo nano /etc/ssh/sshd_config

$ #Find the following line
$ PermitRootLogin yes
$ #Change it to no so it looks like below
$ PermitRootLogin no
$ #Save and quit

$ user@btcdroid:~$ sudo service sshd restart
That will disable root login, but I highly recommend making it only allow logins with SSH key pairs as it is far more secure than a password.
Firewall
One of my favorite tools which I have written about before is uncomplicated firewall. We are going to allow only pinholes for the firewall to allow communication through, as well as limit SSH connections so it is less likely to be compromised via brute force. We will also add some defenses for a brute force attack in a bit.
The line ufw allow from 192.168.0.0/24, below assumes that the IP address of your btcdroid is something like 192.168.0.xxx, the xxx being any number from 0 to 255. If your IP address is 12.34.56.78, you must adapt this line to ufw allow from 12.34.56.0/24. Otherwise you will lock yourself out for good unless you connect the UART serial connection kit.
$ user@btcdroid:~$ sudo apt install ufw
$ user@btcdroid:~$ sudo ufw default deny incoming
$ user@btcdroid:~$ sudo ufw default allow outgoing

$ # make sure to use the correct subnet mask and IP ranges. (see warning above)
$ user@btcdroid:~$ sudo ufw allow from 192.168.0.0/24 to any port 22 comment 'allow SSH from local LAN'
$ user@btcdroid:~$ sudo ufw allow 9735 comment 'allow Lightning'
$ user@btcdroid:~$ sudo ufw allow 8333 comment 'allow Bitcoin mainnet'
$ user@btcdroid:~$ sudo ufw allow 18333 comment 'allow Bitcoin testnet'
$ user@btcdroid:~$ sudo ufw enable
$ user@btcdroid:~$ sudo systemctl enable ufw
$ user@btcdroid:~$ sudo ufw status
Now we should install Fail2Ban, which I have often talked about. This makes it so that after five unsuccessful attempts at SSH it blocks the IP for ten minutes, making a brute force attack almost impossible to conduct.
user@btcdroid:~$ sudo apt install fail2ban
Increase open file limit
In case your BTCDroid is swamped with Internet requests (honest or malicious due to a DDoS attack), you will quickly encounter the “can't accept connection: too many open files” error. This is due to a limit on open files representing individual tcp connections that is set too low.
Edit the following three files, add the additional line(s) right before the end comment, save and exit.
$ user@btcdroid:~$ sudo nano /etc/security/limits.conf
$ #add/change the following lines
$ * soft nofile 128000
$ * hard nofile 128000
$ root soft nofile 128000
$ root hard nofile 128000

$ user@btcdroid:~$ sudo nano /etc/pam.d/common-session
$ #add the following
$ session required pam_limits.so

$ user@btcdroid:~$ sudo nano /etc/pam.d/common-session-noninteractive
$ #add the following
$ session required pam_limits.so
Installing Bitcoin Core
We’re finally ready to start with the fun parts. These parts were mostly derived from pinode.co.uk, but seem to work perfectly fine for the ODROID-HC2, albeit with some tweaks we have already performed specific to the ODROID platform.
Now after it’s downloaded we are going to configure, compile, and install the files. In the final commands I will tell it to run six jobs at the same time, since the ODROID has eight cores so it can run faster. You may want to reduce that number to two with a Raspberry Pi. You can also run it without the “-jX” switch to just run as a single job, although that may take a couple hours. Once you run the make command, go make dinner or something because this will take an hour or two, even on the ODROID-XU4’s eight core Samsung Exynos 5422 CPU.
$ user@btcdroid:~$ cd bitcoin
$ user@btcdroid:~$ ./autogen.sh
$ user@btcdroid:~$ ./configure --enable-upnp-default --disable-wallet
$ user@btcdroid:~$ make -j6
$ user@btcdroid:~$ sudo make install
Now we need to prepare the Bitcoin directory. We’re going to switch into the non-superuser named bitcoin we created earlier, although you can name it whatever you want. The most important thing is that this user only has permissions to administer the bitcoin node itself, but not to make any system changes. This is the great thing about Linux versus Windows, in regards to security and permissions. In theory, this should isolate an attack so at worst they can only mess with the bitcoin systems and not the operating system itself.
We use the Bitcoin daemon, called “bitcoind”, that runs in the background without user interface and stores all data in the directory /home/bitcoin/.bitcoin. Instead of creating a real directory, we create a link that points to a directory on the external hard disk.
$ user@btcdroid:~$ sudo su bitcoin

# add symbolic link that points to the external hard drive
$ bitcoin@btcdroid:~$ mkdir /mnt/hdd/bitcoin
$ bitcoin@btcdroid:~$ ln -s /mnt/hdd/bitcoin /home/bitcoin/.bitcoin

# Navigate to home directory and check the symbolic link (the target must not be red).
$ bitcoin@btcdroid:~$ cd ~
$ bitcoin@btcdroid:~$ ls -la
Now we need to configure the Bitcoin daemon, and make sure to set an extremely secure password and username, separate from your system username and password. Then we will log out of the bitcoin user to setup TOR.
$ bitcoin@btcdroid:~$ nano /home/bitcoin/.bitcoin/bitcoin.conf

# BTCDroid: bitcoind configuration
# /home/bitcoin/.bitcoin/bitcoin.conf

# Bitcoind options
$ server=1
$ daemon=1
$ txindex=1
$ disablewallet=1

# Connection settings
$ rpcuser=SECURE_USERNAME
$ rpcpassword=SECURE_PASSWORD

# Optimizations for ODROID Hardware
$ dbcache=192
$ maxorphantx=60
$ maxmempool=192
$ maxconnections=80
$ maxuploadtarget=5000

#Optimizations for Raspberry Pi 3B.
#I commented out the ones for the ones I recommend for a Raspberry Pi 3B, just uncomment those, and comment out the ODROID ones for it to work
#dbcache=96
#maxorphantx=30
#maxmempool=96
#maxconnections=40
#maxuploadtarget=5000

$ bitcoin@btcdroid:~$ exit
TOR It Up
Now, we’ll install TOR to encapsulate all the traffic and encrypt and anonymize everything. We are going to install Tor, and add a repository to give us the most up-to-date Tor version, as the one in the default repositories is really old.
First, we will add a couple entries to /etc/apt/sources.list.d/, add the GPG key to accept it, update our repository, and finally install Tor.
$ user@btcdroid:~$ sudo nano /etc/apt/sources.list.d/tor.list
#Add the following lines and then save and close
deb https://deb.torproject.org/torproject.org bionic main
deb-src https://deb.torproject.org/torproject.org bionic main
#save and exit
$ user@btcdroid:~$ curl https://deb.torproject.org/torproject.org/A3C4F0F979CAA22CDBA8F512EE8CBC9E886DDD89.asc | gpg --import
$ user@btcdroid:~$ gpg --export A3C4F0F979CAA22CDBA8F512EE8CBC9E886DDD89 | sudo apt-key add -
$ user@btcdroid:~$ sudo apt update
$ user@btcdroid:~$ sudo apt install tor deb.torproject.org-keyring tor-arm nyx
Now we need to configure TOR:
$ user@btcdroid:~$ sudo nano /etc/tor/torrc
#add these settings to the bottom of the file
$ ControlPort 9051
$ CookieAuthentication 1
$ CookieAuthFileGroupReadable 1
$ HiddenServiceDir /var/lib/tor/bitcoin-service/
$ HiddenServicePort 8333 127.0.0.1:8333
#save and exit
$ user@btcdroid:~$ sudo systemctl restart tor.service
#Get your Tor hostname
$ user@btcdroid:~$ sudo cat /var/lib/tor/bitcoin-service/hostname
We’re going to need the host name it spits out (with a “.onion” address), so note what it just gave us with the last command.
Configure Everything to Autostart
We want to program everything to start on boot, so we will make a SystemD service that will start our Bitcoin node with it running as the bitcoin user and passing it through to TOR. I will give you the option at this point to have it run only on TOR, or to allow it to run over TOR, IPv4, and IPv6. The Tor-only option is more anonymous, but the other mode is like a dual mode so if TOR is down it can still sync, and will also sync faster. The choice is yours: just remove the comment for the one you want where it says ExecStart and insert your hostname.onion where it asks for it in the ExecStart command. After that, we will reboot and see if everything works. Make sure to use the username we created earlier where it says USER_NAME.
$ user@btcdroid:~$ sudo nano /etc/systemd/system/bitcoind.service

# BTCdroid systemd unit for bitcoind
# /etc/systemd/system/bitcoind.service

$ [Unit]
$ Description=Bitcoin daemon
$ After=network.target

$ [Service]
#Uncomment the ExecStart string below to force the node to only run over Tor
#ExecStart= /usr/local/bin/bitcoind -datadir=/home/bitcoin/.bitcoin/data -daemon -proxy=127.0.0.1:9050 -externalip=HOSTNAME.onion -conf=/home/bitcoin/.bitcoin/bitcoin.conf -listen -bind=127.0.0.1 -pid=/run/bitcoind/bitcoind.pid

#Uncomment the ExecStart string below to allow Tor, IPv4, and IPv6 connections
#ExecStart= /usr/local/bin/bitcoind -datadir=/home/bitcoin/.bitcoin/data -daemon -proxy=127.0.0.1:9050 -externalip=HOSTNAME.onion -conf=/home/bitcoin/.bitcoin/bitcoin.conf -listen -discover -pid=/run/bitcoind/bitcoind.pid

#Tells Bitcoin to shutdown safely when stopped.
$ ExecStop= /usr/local/bin/bitcoin-cli stop

# Creates /run/bitcoind owned by bitcoin
$ RuntimeDirectory=bitcoind
$ User=bitcoin
$ Group=bitcoin
$ Type=forking
$ PIDFile=/run/bitcoind/bitcoind.pid
$ Restart=on-failure

# Hardening measures
####################

# Provide a private /tmp and /var/tmp.
$ PrivateTmp=true

# Mount /usr, /boot/ and /etc read-only for the process.
$ ProtectSystem=full

# Disallow the process and all of its children to gain
# new privileges through execve().
$ NoNewPrivileges=true

# Use a new /dev namespace only populated with API pseudo devices
# such as /dev/null, /dev/zero and /dev/random.
$ PrivateDevices=true

# Deny the creation of writable and executable memory mappings.
$ MemoryDenyWriteExecute=true

[Install]
$ WantedBy=multi-user.target
#save and exit
$ user@btcdroid:~$ sudo systemctl enable bitcoind.service
$ user@btcdroid:~$ sudo shutdown -r now
$ user@btcdroid:~$ mkdir /home/USER_NAME/.bitcoin
$ user@btcdroid:~$ sudo cp /home/bitcoin/.bitcoin/bitcoin.conf /home/USER_NAME/.bitcoin/
$ user@btcdroid:~$ sudo chown USER_NAME:USER_NAME /home/USER_NAME/.bitcoin/bitcoin.conf
It should restart so give it a minute and reconnect as the user we created in the beginning. It may take a few minutes for the node to get its first connections, and then it will start pulling in the blocks. You can check the status with the bitcoin-cli command.
$ user@btcdroid:~$ bitcoin-cli getblockchaininfo
It should display something like this (Figure 6) and as long as the number of blocks is increasing every few minutes, it is running fine. Bear in mind this could take a few days as we need to download at least 200GB at the time of writing to be up to date with the blockchain.
Figure 6 - Output of bitcoin-cli
Output of Bitcoin-cli
In addition to checking the status of the blockchain download, you can monitor the traffic over TOR with Nyx.
$ user@btcdroid:~$ sudo nyx
Figure 7 - Seeing the traffic via Tor on Nyx
Auto Update Security Patches
Since this is a device we are mostly going to leave on and unattended, it’s best we have it auto apply any of the security related patches that may be out there so it can maintain itself. So let’s enable the unattended-upgrades package and configure it. The first step brings up an interactive prompt, and then we proceed to editing the files.
$ user@btcdroid:~$ sudo dpkg-reconfigure --priority=low unattended-upgrades
$ user@btcdroid:~$ sudo nano /etc/apt/apt.conf.d/50unattended-upgrades
#modify these lines in the file to look like the following, although you can make it reboot whenever you want. Make sure there is a semicolon at the end of each line. You can uncomment the "${distro_id}:${distro_codename}-updates"; line if you want it to update non security related packages too

#near the top of the file
$ Unattended-Upgrade::Allowed-Origins {
"${distro_id}:${distro_codename}";
"${distro_id}:${distro_codename}-security";
// Extended Security Maintenance; doesn't necessarily exist for
// every release and this system may not have it installed, but if
// available, the policy for updates is such that unattended-upgrades
// should also install from here by default.
"${distro_id}ESM:${distro_codename}";
// "${distro_id}:${distro_codename}-updates";
// "${distro_id}:${distro_codename}-proposed";
// "${distro_id}:${distro_codename}-backports";
};

#below are spread out in the same file
$ Unattended-Upgrade::Remove-Unused-Kernel-Packages "true";
$ Unattended-Upgrade::Remove-Unused-Dependencies "true";
$ Unattended-Upgrade::Automatic-Reboot "true";
$ Unattended-Upgrade::Automatic-Reboot-Time "02:30";
#save and exit
That’s it, you’re all finished. Let me know what you think or if you have any improvements to the project. I may eventually host these on a Supermicro server in my rack with a ZFS array next year.
The G Spot: Your Goto Destination for all Things That are Android Gaming
May 1, 2019By Dave ProchnowAndroid, Gaming
Whoa, Spring has sprung! While our thoughts and activities switch to outdoor activities, the occasional thunderstorm enables use to retreat indoors for some wholesome Android gaming. Luckily, there are a lot of major game developers who are getting ready to make this upcoming Summer the “Summer of Blockbuster Games.”
Hidden in Plain Sight
You’d be forgiven if you hadn’t noticed the debut of Langrisser. We almost missed it, too! Yes, this is the same tactical RPG Langrisser series, but it’s been all dressed up for a mobile Android experience. While it is free, you will be greeted with the typical in-app purchasing advertisements that form the backbone of these types of “free” games.
Thank goodness, Zilong Game Limited, has included some nice extras inside the game to compensate for these cash-thirsty annoyances. For example, a mature musical score backed up by full-feature cut scenes, and over 300 classic levels from throughout the lifetime of the complete series, enable Langrisser to pique your gaming interests, see Figure 1.
Figure 1 - The Langrisser series goes mobile
Hometown Heroes
Android aficionados have been patiently waiting for this game for well over one year. But the wait might finally be over and, by the looks of it, the wait could’ve been worth it. The Elder Scrolls: Blades by developer Bethesda Game Studios, aka, Bethesda Softworks, must be getting very close to release. Why? You can now reserve a spot on the Google Play Store for receiving a notification when this blockbuster goes live. But to hold you over until The Elder Scrolls: Blades hits the limelight, the developer has released some select screen grabs that provide you with some visual treats.
Figure 2 - Almost like a photograph from your Summer vacation. Image courtesy of Bethesda Game Studios
As you can see in this screen capture, the lighting and shadow effects are stunning. In order to accurately capture this quality during playtime, however, you’d better opt for an ODROID-XU4 as your gaming vehicle of choice. The Elder Scrolls: Blades should be a free download accompanied by the now requisite in-app purchases.
Cute Crowdfunding
Are you knowledgeable about games getting a marketplace foothold via crowdfunding Websites? Well, more and more developers are turning to this financial model for supporting the development and release of games. Some games make it through the fundraising process, but most games do not. So when Hamsterdam raised over $30,000, it should be only be a matter of time before this game hits the Play Store.
In Hamsterdam, you play a cute little, err, ahh, hamster (duh!) named Pimm. Pimm’s goal is to rid Hamsterdam of gangs, as seen in Figure 3, and locate the beloved grandpa Pimm. Sounds pretty easy, right? Well, the gangs have also polluted the minds of the populace with a drug and searching for the elder Pimm gets real complicated, real fast. You can get a quick impression of Hamsterdam from this trailer:
Figure 3 - Take that, you dirty rotten vermin. Image courtesy of Muse Games
Varoom, Varoom
One of the more popular racing games on Xbox One is Project Cars. With additional console success on PS4 and inside the PC market, it was only a matter of time before Project Cars would steer into the Android parking lot.
Now named, Project Cars Go, this console port version will include new cars along with user customization. Having sold over 2 million copies of the console versions, this mobile model could quickly become the leader of the Android auto game pack.
Development of Project Cars Go is a joint venture between Gamevil and Slightly Mad Studios. While the official release date is sorta murky now, at least they have a “logo,” seen in Figure 4, we think early Summer might see Project Cars Go hit the streets. You can follow along on this game’s developments straight from the CEO’s mouth:
Figure 4 - Hey we’ve got a logo. Image courtesy of Slightly Mad Studios
How-to Become Your Own Game Dev
Do you have a hankering to create your own Android game? Would you like to distribute your game to the masses without all of the Play Store hassle? Well the same developer who brought you Crashlands, Butterscotch Shenanigans, is about to give you your moment in game fame.
Levelhead is just like your typical 2D platform game, in fact, you can just play this game as a “game” if you’d like, but with one big difference: you can build your own levels and publish your new game challenge for everyone to enjoy. Levelhead comes packed with all of your typical game features (e.g., villians, power-ups, paths, etc.) that you can arrange and control. When your new version of Levelhead is ready, you can release it to the world. And by world...we mean WORLD! You see Levelhead is a cross-platform game builder that enables your game levels to be used by consoles, PC only, as well as that “other” mobile game platform. Check it out:
Figure 5 - If you build it, they might play. Image courtesy of Butterscotch Shenanigans
Let’s Play Android – ODROID Magazine’s April Top Ten
10. Asphalt 9: Legends - FREE
9. Minecraft - $6.99
8. The War of Mine - $14.99/developer expansion pack $1.99
7. Crashlands – $4.99 – look for Levelhead to crack the top ten after its release
6. Fire Emblem Heroes – FREE
5. The Escapists 1 AND 2 - $6.49 & $6.99
4. Shadowgun Legends – FREE
3. Riptide GTP Series - $2.99; Project Cars Go could give this title a race for #3
2. Fortnite - FREE
1. PUBG Mobile – FREE
Meet An ODROIDian: Joy Cho, Hardkernel Engineer
May 1, 2019By Rob RoyMeet an ODROIDian
Picture 1 - Joy with her niece
Please tell us a little about yourself.
My Korean name is Jeonghwa Cho and I’m 42 years old. I have been working as an embedded software engineer for 17 years. I am especially responsible for the board support package (BSP) parts, including board bring-up and handling devices. Mainly, I create bootloaders, operating system, and kernel device drivers. System design through collaboration with the hardware and application teams is one of the big parts of my job.
I have been working at Hardkernel for 3 years. I am currently responsible for developing ARM core-based single board computers based on Linux, along with their multimedia and connectivity devices. Before Hardkernel, I worked in the field of automotive Audio, Visual and Navigation (AVN) systems, ARM Linux BSP development, mobile phones, Plex Media Player (PMP) and home networking.
Picture 2 - Joy has worked on many products in her career
I live in Korea and my hometown is the city of Paju, which is located in the very northern part of South Korea. When I was a young child, it was very common to hear shouted commands by soldiers at dawn, and frequently experience heavy traffic jams caused by long lines of moving big tanks. Nowadays it’s nothing more than an old story, and I hope that Korea will become unified soon so that Korea can be a stronger country.
I graduated from the engineering college of Sejong University in Korea with a Masters degree in engineering, and my major was Electronic and Communications Engineering. When I was a high school student, I used to be fascinated by MTV and radio music shows, so I chose my major to be a technical engineer who controls broadcasting and sound equipments. But, once I saw a prototype hardware board of a mobile phone with various devices connected to it at my first job, I fell in love with small computers, and got interested in controlling them. I then requested to change my department from the RF/Call team to the Device Drivers team.
My family members are my father, mother, younger brother, sister-in-law, niece and nephew. I don’t have any children, and my relationship with my brother is strong, so I feel like my niece and nephew are my own children. Everyone around me says that my niece resembles me very much, so my love for her is very special. When she entered an elementary school last year, I seriously considered quitting my job to protect her from dangerous situations as a bodyguard.
My father is a pharmacist and run a small pharmacy in my hometown. He is very strict with himself and always studies in his field. I love his life and try to learn from him. When someone ask me who I respect most, I always answer that it’s my father.
How did you get started with computers?
I was not actually interested in computer devices in my adolescence, even I was planning to go to an engineering college. The reason why I bought my own new computer for the first time is to play “StarCraft” with my university friends and seniors. When I just entered college, I didn’t know even how to install Windows 95. However, 6 month later, I was able to assemble computer parts by myself. Thank you, StarCraft!
Picture 3 - Joy’s first ODROID, the original ODROID-X
What kind of projects do you work on at Hardkernel?
I am usually involve in topics related to boot-up sequence, system performance/stability, and the display components that ODROID users need in the early stages directly after new ODROID product releases. Since the ODROID-N1 and N2 support SPI boot mode, the new BIOS scheme based on Petitboot has become a big part of my interests.
How do you use your personal ODROIDs?
I use them as media and game stations for my nephews and myself. They love ODROIDs.
I also use my ODROIDs to study techniques outside of work. I’m still getting to know the Linux platform, and there are lots of interesting open source platforms and solutions that brilliant engineers have been building. In recent years, I realized the need to study media and network frameworks. It’s a high wall that makes use my ODROIDs for interesting projects from the ODROID forums. To overcome my limitation, I have plans for a personal project to make a small Machine to Machine (M2M) server and device in order to share video streaming based on gstreamer.
Picture 4 - Joy’s niece and nephew enjoy playing games on their ODROID
Which ODROID is your favorite and why?
All of the ODROIDs are like my children. They are all lovely. But if I must choose one, I would pick the ODROID-C2. It was my first child at Hardkernel. It gave me many opportunities to become intimate with the Linux open source platform, and also made me encounter many difficult situations like the fake 2.0GHz CPU clock issue. Another example is that to make a single boot image regardless of booting from SD card or eMMC, I had to hack the hidden area of boot loader by parsing hex codes and designing new headers. But thankfully, many ODROID users love the 1st ARM 64-bit ODROID, and I learned a lot during the process. I hope many ODROIDIANs love the new model, ODROID-N2, too.
What innovations would you like to see in future Hardkernel products?
I have no particular idea for improvement, but what I think that ODROID’s biggest strength is that it is a device with a variety of uses. I am impressed everyday when reading ODROID Forum threads because there are many brilliant engineers, and they create good standards with ODROID products. There are tons of beautiful projects. Based on those outputs, we can use an ODROID device for all sorts of things.
Picture 5 - Joy has an extensive book collection, and enjoys reading in her spare time
What hobbies and interests do you have apart from computers?
I read books! I love books so much. Classic and Korean novels as well as books on history and philosophy are my favorite. Every weekend, I visit a bookstore and spend several hours there. The smell of book paper makes me comfortable, and I can be away from my busy life while I concentrate on books.
Picture 6 - Joy’s hometown of Paju in northern South Korea has changed a lot since she was young
What advice do you have for someone wanting to learn more about programming?
I think a solid groundwork in Mathematics, Algorithm and hardware is very important. The more I gain experience and work on various projects, the more I feel it works. It’s the same old story but I think it’s most important.