

When Ubuntu 18.04 was launched for ODROID-C2 in summer of 2018, Hardkernel stated that unfortunately, due to complicated dependency issues it was impossible to upgrade from 16.04 to 18.04 (at that time). This meant that long-time 16.04 users were either stuck without an upgrade path, or were forced to reinstall and start from scratch.
In my case, I was running 3 ODROID-C2s "in production" with 16.04 that I wanted to upgrade to 18.04. After playing with crossgrading for the N1 (https://bit.ly/2PpeHMA) I looked at the option to dist-upgrade from 16.04 to 18.04 - which should be a much simpler problem. So I started with the most complicated system I was running - which is a C2 with X11, Kodi, Chrome, mpd, Home Assistant, mosquitto, munin-node, MariaDB, a webcam, an external sound card, GPIO-attached sensors and a bunch of custom scripts. Long story short - upgrading works if you follow the steps below.
Upgrade procedure
Working on any production environment can be dangerous - so prepare a backup (dd or odroid-backup) and if you cannot afford downtime (I could not or my WAF score would plummet) run the upgrade on a different hardware on a copy of your OS.
First of all you need to make sure the system is up-to-date. Install all missing updates with:
$ sudo apt-get update
$ sudo -y apt-get dist-upgrade
There are two ways of trying the upgrade - via
do-release-upgrade (which is the official way, but might fail) or via distrorejuve (which is a hacky method, but might work where the first one fails). If you are running the minimal image you might need to install the following package to get the do-release-upgrade program:
$ sudo apt-get install ubuntu-release-upgrader-coreBefore trying any method it is best to save a list of installed packages:
$ sudo apt list --installed | cut -d '/' -f 1 > /root/packages.16In my case I tried the do-release-upgrade method on a C2 which was running the minimal image and the distrorejuve method for two C2s which were running Xorg and had more packages installed. For me both methods worked.
do-release-upgrade
It is best to start do-release-upgrade from a terminal after a fresh boot.
$ sudo do-release-upgrade
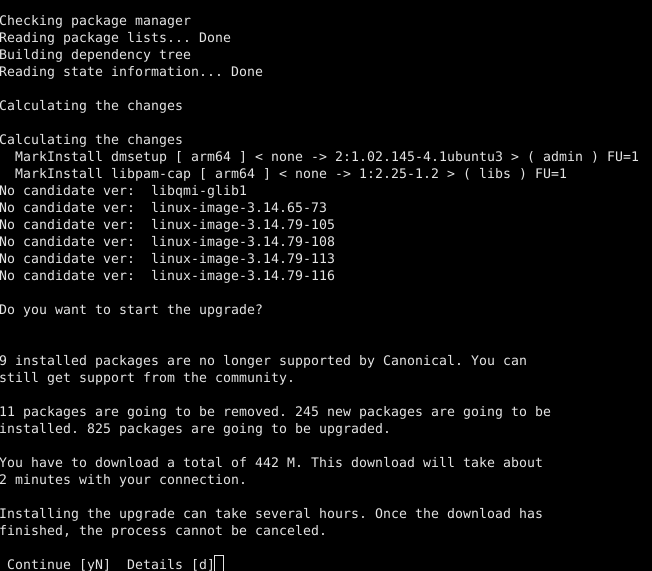
It might complain if you have held back packages and make you either uninstall or upgrade them to proceed. It will then grab a list of packages to be upgraded and ask you if you want to keep your changes to your custom config files. Usually the default answers should be fine. If the process goes well, the upgrade should be uneventful. When the upgrade finishes it will tell you that you need to reboot.
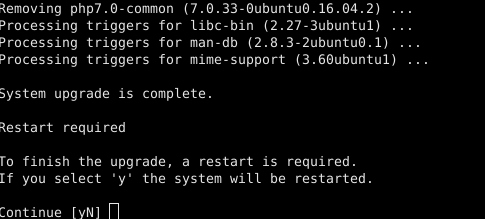
At this step you should not reboot automatically and instead drop to a shell. You should consult the "Preboot health check" steps shown later before you decide to reboot.
distrorejuve
If the first method failed, or if you feel adventurous, you can try distrorejuve.
$ sudo apt-get install git
$ git clone https://github.com/mad-ady/distrorejuve.git
$ cd distrorejuve
$ sudo ./distrorejuve.sh --to-latest-lts
Most likely
distrorejuve will complain that:
A bunch of X11 related packages are installed and may cause problems and suggest you remove them. You can remove them since you will be installing them later:
$ sudo apt-get -y remove x11-common brltty-x11… xterm xvt xzoom
$ sudo apt-get -y autoremove
If you are getting errors while removing packages because you have held packages, you should uphold them:
$ sudo apt-mark showhold chromium-browser
$ sudo apt-mark unhold chromium-browser
You have third party repositories that need to be disabled before the upgrade can begin. You will need to comment out the lines indicated in
/etc/apt/sources.list.d/*. Also, if you are using the xenial-backports branch in sources.list - you will need to comment it out. Unfortunately the script will also fail if you have deb-src entries in your sources.list. Those too need to be commented out before starting.
Once the requirements are in place you can start the upgrade:
$ sudo ./distrorejuve.sh --to-latest-ltsIt will take a while, but should finish without issues. However, once it has finished, note that you are not done yet. You still need to add back the missing packages (remember - you might have uninstalled
X11). Grab a list of currently installed packages and diff it with the one saved before. We are going to ignore libraries because they usually have a dependency on something else.
$ sudo apt list --installed | cut -d '/' -f 1 > /root/packages.18
$ sudo diff -u /root/packages.16 /root/packages.18 | grep '^-' | cut -c 2- | grep -v '^lib' | tail -n +2 | xargs echo
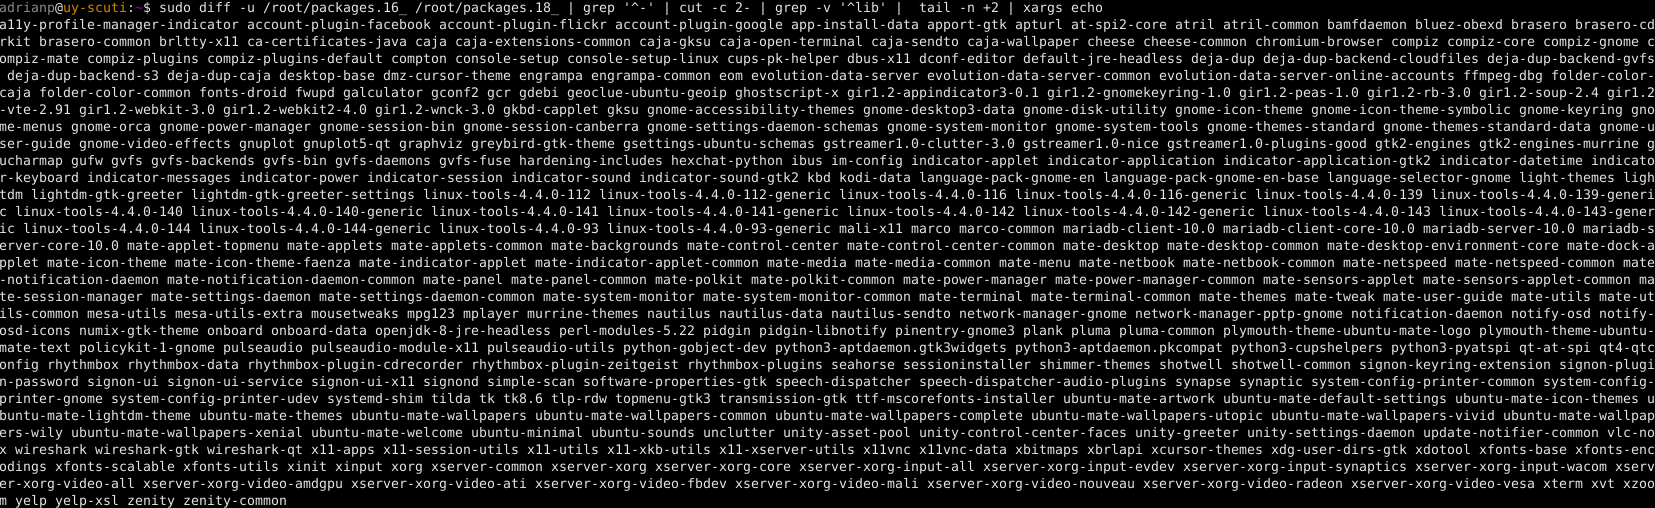
You will be presented with a list of missing packages (mostly X11 and graphical programs) that you need to manually reinstall. Note that not all packages can be reinstalled because some of them might have been replaced with packages with newer versions, or others have been discontinued (like gksu, systemd-shim). So the best approach is to try to select a line of output and install it (tweak the line until it installs), then move on to the next line until you finish. Also note that you should enable backports in /etc/apt/sources.list, since it was disabled before the upgrade:
# echo 'deb http://ports.ubuntu.com/ubuntu-ports/ bionic-backports \
main universe restricted universe' >> /etc/apt/sources.list
# apt-get update
Preboot health check
You will want to make sure your system is in a sane state before rebooting - so check the following:
You still have a kernel image/uInitrd and boot.ini in /media/boot
If you want to configure networking via /etc/network/interfaces, make sure the ifupdown package is still installed
Re-enable ODROID specific repos
During the upgrade process third-party repos (such as the ODROID repo) were disabled and need to be re-enabled at this point. Edit /etc/apt/sources.list.d/odroid.list, uncomment the line and replace "xenial" with "bionic":
$ sudo vi /etc/apt/sources.list.d/odroid.list
$ cat /etc/apt/sources.list.d/odroid.list
deb http://deb.odroid.in/c2/ bionic main
You should also check that
/etc/apt/sources.list has its repos changed to bionic - I was surprised to see that it didn't after using the do-release-upgrade method. Make the necessary changes if you find unchanged repos.
Run an update and install the following packages:
$ sudo apt-get update
$ sudo apt-get dist-upgrade
$ sudo apt-get install --reinstall mali-x11 aml-libs bootini u-boot
If you have Xorg installed you should also install:
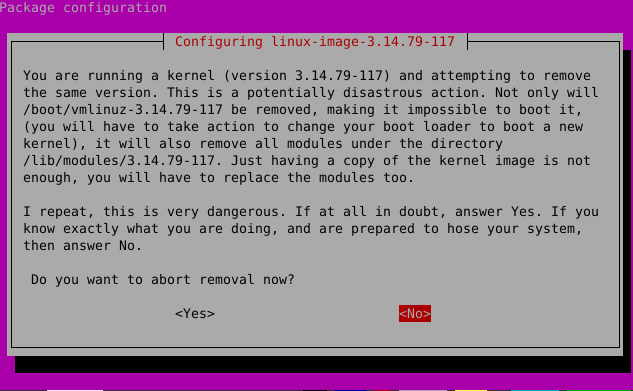
$ sudo apt-get install --reinstall xserver-xorg-video-fbturboYou can now upgrade the kernel from 3.14 to 3.16. You will need to remove the currently installed kernel and header files (if installed). Removing it will prompt you that it is a dangerous operation and you might break your system - you must answer "No" at this point to proceed with the removal.
$ sudo apt-get remove linux-image-c2 linux-headers-c2 linux-image-3.14.79-117 linux-headers-3.14.79-117
Now you need to install the 3.16 kernel:
$ sudo apt-get install linux-odroid-c2At this point recheck that the
image/uInitrd/meson64_odroidc2.dtb/boot.ini files look ok in /media/boot. Any missing/truncated file will make booting impossible.

Now - fingers crossed and reboot into your new system. Note that the reboot command might only power off the system instead of rebooting it, so you might need to pull the plug. When the system is booted you can run the following commands to do a little cleanup:
$ sudo apt-get autoremove
$ sudo apt-get clean
Post-install fixes
After your reboot is successful (otherwise you have your backup, right? Right!) you will still have some things to fix.
man
You will find that man is broken after the upgrade.

You can fix it thanks to @WildPenguin: https://forum.odroid.com/viewtopic.php?t=34044
$ sudo apt-get install apparmor-utils
$ sudo aa-disable /usr/bin/man
c2play
If you are using @CrashOverride's c2play (https://bit.ly/2vfQtLt) you will need to recompile it based on the bionic branch:
$ sudo apt install libasound2-dev libavformat-dev libass-dev libx11-dev
$ git clone -b bionic https://github.com/OtherCrashOverride/c2play
$ cd c2play
$ make c2play -j4
lirc
lirc has also gone through a lot of changes between distro versions and will fail to work with the old configuration. You will need to follow the wiki guide for 18.04 for configuring lirc: https://bit.ly/2ZhZEIS, or to migrate the existing config with the following commands:
$ sudo mv /etc/lirc/lircd.conf /etc/lirc/lircd.conf.d/ir-remotes.conf
$ sudo mv /etc/lirc/lircd.conf.dist /etc/lirc/lircd.conf
$ sudo vi /etc/lirc/lirc_options.conf
driver = default
device = /dev/lirc0
$ echo 'meson-ir' | sudo tee -a /etc/modules
$ sudo service lircd restart
pulseaudio produces hisses on HDMI
This should have been fixed with a kernel patch recently, but if you notice this problem, check out this forum thread for an alternate fix: https://forum.odroid.com/viewtopic.php?t=34116
ODROID 3.5" LCD is disabled After reinstalling X11 default video output will go to HDMI. You will need to go through the installation steps again from the wiki, since there are some changes from 16.04: https://bit.ly/2GAlUXa.
Conclusion
All in all, the upgrade from Ubuntu 16.04 to 18.04 went ok for my systems. There were various things left to tweak and fix, but most things started just fine. I highly suggest you give it a go and upgrade your older system if you haven't started over with a blank image. Problems and questions on the support thread: https://forum.odroid.com/viewtopic.php?f=140&t=34251
Be the first to comment