

Bitcoin is a native digital currency for the internet age. It could be considered just another international currency, but one without a native country so it defies borders, trade policies, and arbitrary inflation. In the 2008 whitepaper (https://bitcoin.org/bitcoin.pdf) by the pseudonymous Satoshi Nakamoto it is described as “...a purely peer-to-peer version of electronic cash [which] would allow online payments to be sent directly from one party to another without going through a financial institution.”
Being peer-to-peer means that Bitcoin does not rely on a middleman such as a bank, and can be transferred as a bearer asset, like physical cash, without asking anyone for permission. It does not need to be stored physically as it is secured by a cryptographic key, so it can be transferred within minutes to anyone anywhere in the world. One key component of this free open-source financial system is the blockchain, a ledger that keeps track of who owns how many bitcoin and that is stored as an identical copy by all users that decide to run a full Bitcoin node. You can learn more at bitcoin.org.
Bitcoin is an economic experiment of epic scope, and its success is by no means certain. In any case, Bitcoin as a new technology is an incredibly interesting endeavor, especially due to its interdisciplinary nature and low barrier to entry. Bitcoin as sound money--being scarce and non-inflationary, challenging money as one of the last true monopolies of nation states--could have a major impact on economic principles and society as a whole.
At the moment, Bitcoin is more a store of value and not really suited for small everyday transactions. Truly decentralized blockchains are a scarce resource and cannot scale to accommodate all global transactions. If you think about it, it cannot be good practice to store every coffee purchase redundantly all over the world for all eternity. That would be like forcing everyone to download everyone else’s email as well. These limitations are a great motivator to build better technology on top of the Bitcoin blockchain to scale exponentially, as opposed to simply making everything bigger for the sake of linear scaling.
This is where the “Lightning Network” comes in. As one of several new blockchain extensions, it promises to accommodate nearly unlimited transactions, with instant confirmation, minimal fees, and increased privacy. It sounds almost too good to be true, but this technology is well researched, committed to the cypherpunk open-source ethos, and leverages the solid underpinnings of Bitcoin. Learn more.
To preserve the decentralized nature of this monetary system, it is important that everybody has at least the possibility to run their own trustless Bitcoin node, preferably on cheap hardware like ODROID.
NOTE: Please be aware that while Bitcoin has been battle-tested for almost a decade, the Lightning Network is still in beta and under heavy development. This guide also allows you to set up your Bitcoin node while ignoring the Lightning part. Read the "Financial Best Practices" section before committing real Bitcoin to your node.
Purpose
This guide allows you to be your own bank. The aim is to set up a Bitcoin and Lightning node that:
- is as fully validating Bitcoin Full Node and does not require any trust in a 3rd party
- is reliably running 24/7
- is part of and supports the decentralization of the Lightning network by routing payments
- can be used to send and receive personal payments using the command line interface.
This server is set up without graphical user interface and is operated remotely using the Secure Shell (SSH) command line. It can also function as a personal Bitcoin backend for the desktop Electrum wallet.
Target audience
While this guide strives to give simple and foolproof instructions, the goal is also to do everything ourselves--no shortcuts that involve trust in a 3rd party allowed. This makes this guide quite technical, but I have tried to make it as straightforward as possible for you to gain a basic understanding of the how and why.
A word of caution
All components of the Lightning network are still under development and we are dealing with real money here. This guide follows a conservative approach: first setup and test everything on Bitcoin testnet, then once you are comfortable enough to put real money on the line, switch to Bitcoin mainnet with a few simple changes.
Preparations
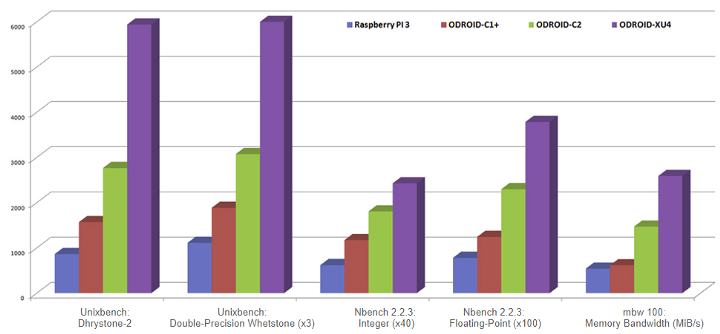
After publishing the "Beginner's Guide to Lightning on a Raspberry Pi," I started to explore other hardware since the Raspberry Pi has drawbacks, mainly in the area of performance and the the hassle of attaching external storage, which is important when storing the big Bitcoin blockchain.
Hardkernel’s ODROID-HC2 (http://www.hardkernel.com/main/products/prdt_info.php)--or the HC1 for a smaller form factor--as a Linux-based mini PC is a perfect fit. Compared to a Raspberry Pi, it has the following advantages:
- Price comparable to Raspberry Pi
- More powerful (8 core CPU, 2 GB RAM, Gigabit Ethernet)
- Internal hard disk housing, direct connection using SATA3
- Only one power adapter for everything
Not available are features like an HDMI output, built-in Wifi, or GPIO pins, but these are not relevant to this project. The performance is way better, so it seems more future-proof as Bitcoin and Lightning are certain to evolve.
Once I decided on this setup, I ordered the ODROID-HC2 and, after setting it up and running it for two months now, I think this is as good as it gets for a low-cost Bitcoin/Lightning node. As this project needs a cheesy name as well, I’ll call my node Thundroid.
I ordered the following items directly from Hardkernel in Singapore. There are resellers available worldwide but unfortunately not for Switzerland.
- ODROID-HC2 - $54 (http://www.hardkernel.com/main/products/prdt_info.php?g_code=G151505170472)
- Power adapter and cord - $7 (http://www.hardkernel.com/main/products/prdt_info.php?g_code=G151578376044)
- ODROID-HC2 case (optional) - $5 (http://www.hardkernel.com/main/products/prdt_info.php?g_code=G151)
You also need the following:
- Micro SD card: 16 GB, including an adapter to your regular computer
- Internal hard disk: 500 GB or more, SATA, 3.5" HDD, or 2.5" HDD/SSD
- Network RJ45 cable
Assembly is easy: just insert the hard disk and affix it with the the screws included with your ODROID. If you ordered the plastic case, slide it over the metal body.
Installing the operating system
We use Ubuntu 16.04.03 LTE (Minimal, Bare OS) that is provided by Hardkernel. Download the image from the ODROID-XU4 section on wiki.odroid.com
Exact file used: https://odroid.in/ubuntu_16.04lts/ubuntu-16.04.3-4.14-minimal-odroid-xu4-20171213.img.xz
Download the image, flash it on your MicroSD card, put it into your Thundroid, connect it to your network via cable, and connect the power adapter. The initial boot can take several minutes.
Configure your network router to assign a static IP address to your Thundroid.
Working on your Thundroid
Write down your passwords
You will need several passwords and I find it easiest to write them all down in the beginning, instead of bumping into them throughout the guide. They should be unique and very secure, at least 12 characters in length. Do not use uncommon special characters, blanks, or quotes (‘ or “).
- User password
- Bitcoin RPC password
- Lightning API password
- Lightning seed passphrase
Store a copy of your passwords somewhere safe (preferably in a password manager like KeePass or LastPass) and keep your original notes out of sight once your system is up and running.
The command line
Everything is configured on the Linux command prompt. Throughout this guide I use the following notation:
#: this is a comment, just for information $: This is a single-line command to enter (without the $) and confirm with the enter key No prefix: This is either an output of the command above or something you can copy/paste into a file
- Auto-complete commands: When you enter commands, you can use the 'Tab' key for auto-completion, eg. for commands, directories or filenames.
- Command history: By pressing up and down on your keyboard, you can recall your previously entered commands.
- Use admin privileges: Our users has no admin privileges. If a command needs to edit the system configuration, we need to use the 'sudo' ("superuser do") command as prefix. Instead of editing a system file with 'nano /etc/fstab', we use 'sudo nano /etc/fstab'.
- Using the Nano text editor: We use the Nano editor to create new text files or edit existing ones. It's not complicated, but to save and exit is not intuitSave: hit 'Ctrl-O' (for Output), confirm the filename, and hit the 'Enter' Exit: hit 'Ctrl-X'
* **Copy / Paste**: If you are using Windows and the PuTTY SSH client, you can copy text from the shell by selecting it with your mouse (no need to click anything), and paste stuff at the cursor position with a right-click anywhere in the SSH window.
Connecting to Thundroid
It’s time to connect via SSH and get to work. For that, a Secure Shell (SSH) client is needed. Install, start and connect:
- Windows: I recommend to use the SSH client [KiTTY](http://kitty.9bis.com). You can copy text from the shell by selecting it with your mouse (no need to click anything), and paste stuff with a right-click.
- Mac OS: Built-in SSH client (http://osxdaily.com/2017/04/28/howto-ssh-client-mac/)
- Linux: Just use the native command, eg. ssh root@192.168.0.20
Use the following SSH connection settings:
- Host name: the static address you set in the router, eg. 192.168.0.20
- Port: 22
- Username: root
- Password: odroid
Basic configuration
You are now on the command line of your own Bitcoin node. First, we take care of the basic configuration. Enter the following commands:
# change root password to [password A]
$ passwd

# update the operating system
$ apt update
$ apt upgrade
$ apt dist-upgrade
$ apt install linux-image-xu3
# answer [y], then [no] (do not abort)

# install some additional software
$ apt install htop git curl bash-completion jq

# set time zone & localization
$ dpkg-reconfigure tzdata
$ dpkg-reconfigure locales
When using the Nano text editor, you can use the same keyboard shortcuts to save (Ctrl-O, confirm or change filename, and press Enter) and exit (Ctrl-X).
# change hostname (replace "odroid" with "thundroid" :) in both files
$ nano /etc/hostname
$ nano /etc/hosts

# create user "admin", set [password A] and make it a superuser
$ adduser admin
$ adduser admin sudo

# create user "bitcoin" and set password [password A]
$ sudo adduser bitcoin
Mounting the hard disk
The external hard disk is attached to the file system and can be accessed as a regular folder. This is called “mounting.” As a server installation, the Linux native file system Ext4 is the best choice for the external hard disk.
NOTE: All data on this hard disk will be erased with the following steps!
# get NAME for hard disk
$ lsblk -o UUID,NAME,FSTYPE,SIZE,LABEL,MODEL

# format hard disk (use [NAME] from above, e.g /dev/sda1)
$ mkfs.ext4 /dev/[NAME]

# get UUID for hard disk, copy into notepad
$ lsblk -o UUID,NAME,FSTYPE,SIZE,LABEL,MODEL

# edit fstab and enter new line (replace UUID) at the end, save & exit
$ nano /etc/fstab
UUID=123456 /mnt/hdd ext4 noexec,defaults 0 0

# create mount point, mount, check and set owner
$ mkdir /mnt/hdd
$ mount -a
$ df /mnt/hdd
Filesystem 1K-blocks Used Available Use% Mounted on
/dev/sda1 961300808 600388836 312057600 66% /mnt/hdd

$ chown -R bitcoin:bitcoin /mnt/hdd/
Moving the Swap File
The use of a swap file can degrade the SD card very quickly. Therefore, we will move it to the external hard disk.
# install necessary software package
$ apt install dphys-swapfile

# change configuration file to use swapfile on external hard disk
$ nano /etc/dphys-swapfile
CONF_SWAPFILE=/mnt/hdd/swapfile

# enable new swap configuration
$ sudo dphys-swapfile setup
$ sudo dphys-swapfile swapon

# reboot, login as "admin" and delete old swapfile
$ restart shutdown -r now
$ sudo rm /var/swap
Hardening your Thundroid
Your Thundroid will be visible from the internet and therefore needs to be secured against attacks. A firewall controls what traffic is permitted and closes possible security holes. Login as “admin” (we will not use “root” again).
UFW: Uncomplicated Firewall
The firewall denies all connection attempts from other peers by default and allows only specific ports to be used.
WARNING: The line 'ufw allow from 192.168.0.0/24 …' below assumes that the IP address of your Thundroid is something like '192.168.0.???’', the variable being any number from 0 to 255. If your IP address is '12.34.56.78', you must adapt this line to 'ufw allow from 12.34.56.0/24 …'. Otherwise you will lock yourself out for good.
# change session to "root"
$ sudo su
$ apt install ufw
$ ufw default deny incoming
$ ufw default allow outgoing

# make sure to use the correct subnet mask (see warning above)
$ ufw allow from 192.168.0.0/24 to any port 22 comment 'allow SSH from local LAN'

$ ufw allow 9735 comment 'allow Lightning'
$ ufw deny 8333 comment 'deny Bitcoin mainnet'
$ ufw allow 18333 comment 'allow Bitcoin testnet'
$ ufw enable
$ systemctl enable ufw
$ ufw status

# exit "root" session back to "admin"
$ exit
Fail2ban
Fail2ban monitors SSH login attempts and bans a remote peer for 10 minutes after five unsuccessful tries. This makes a brute-force attack unfeasible, as it would simply take too long.
$ sudo apt install fail2ban
SSH Keys
One of the best options to secure the SSH login is to completely disable the password login and require a SSH key certificate. Only someone with physical possession of the private key can login.
Set up SSH keys for the "admin" user by following this article: Configure “No Password SSH Keys Authentication” with PuTTY on Linux Servers
You should now three generated files. Keep them safe, as we will now disable the password login.
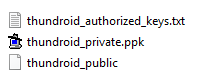
(Figure 2 - SSH Keys filelist)
- Logout ('exit') and make sure that you can login as "admin" with your SSH key
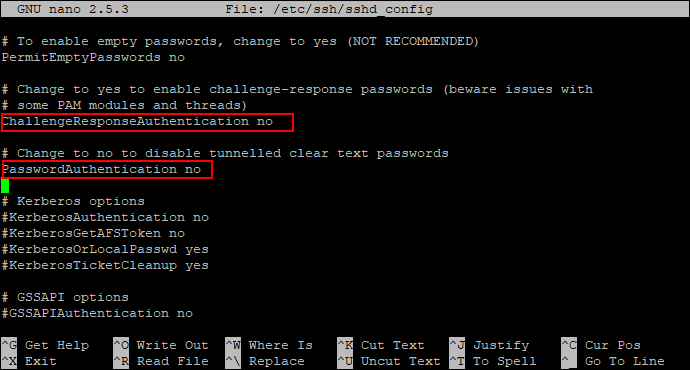
- Edit SSH config file
$ sudo nano /etc/ssh/sshd_config
- Change settings "ChallengeResponseAuthentication" and "PasswordAuthentication" to "no" (uncomment the line by removing # if necessary), save, and exit.
# copy the ssh key to user "root", just in case
$ sudo mkdir /root/.ssh
$ sudo cp /home/admin/.ssh/authorized_keys /root/.ssh/
$ sudo chown -R root:root /root/.ssh/
$ sudo chmod -R 700 /root/.ssh/
$ sudo systemctl restart ssh

# exit and login again with your private key
$ exit
You can now only login with “admin” or “root” and your SSH key. As you cannot connect a screen to the ODROID, SSH is your only option.
REMINDER: Backup your SSH key! There is no fallback login! In a worst-case scenario, you will need to flash the MicroSD card and set up the system again; all the important stuff is still on the hard drive.
Increase your open files limit
In case your Thundroid is swamped with internet requests--honest or malicious due to a DDoS attack--you will quickly encounter the 'can't accept connection: too many open files' error. This is due to a limit on open files (representing individual TCP connections) that is set too low.
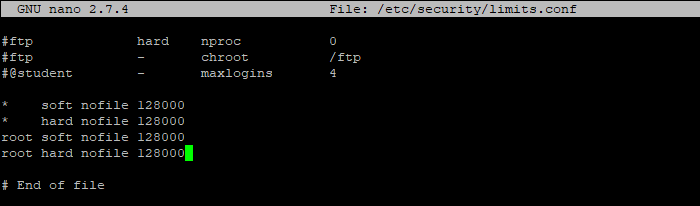
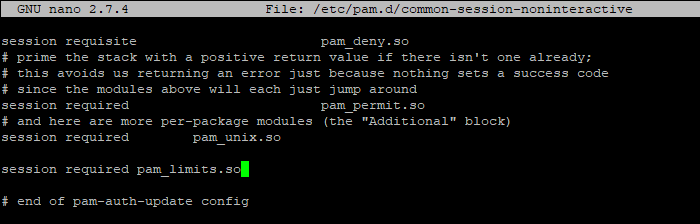
Edit the following three files, add the additional line(s) right before the end comment, save and exit.
$ sudo nano /etc/security/limits.conf
* soft nofile 128000
* hard nofile 128000
root soft nofile 128000
root hard nofile 128000
$ sudo nano /etc/pam.d/common-session
session required pam_limits.so
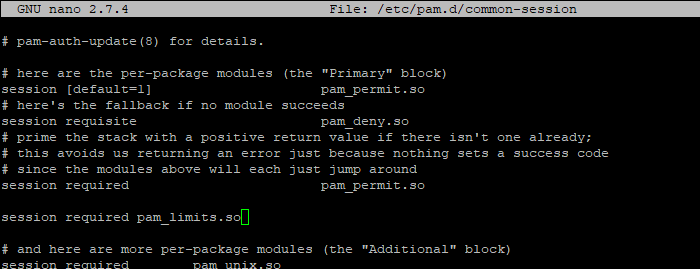
$ sudo nano /etc/pam.d/common-session-noninteractive
session required pam_limits.so
Bitcoin
The foundation of the Lightning node is a fully trustless Bitcoin node (https://bitcoin.org/en/bitcoin-core/). It keeps a complete copy of the blockchain and validates all transactions and blocks. By doing all this work ourselves, nobody else needs to be trusted.
In the beginning, we will use the Bitcoin testnet to familiarize ourselves with its operations. This sync is handled directly by the Thundroid and should not take longer than a few hours. Just let it sync overnight.
Installation
We will download the software directly from bitcoin.org, verify its signature to make sure that we use an official release, and install it.
Login as "admin" and create a download folder:
$ mkdir /home/admin/download
$ cd /home/admin/download
We download the latest Bitcoin Core binaries and compare the file with the signed checksum. This is a precaution to make sure that this is an official release and not a malicious version trying to steal our money.
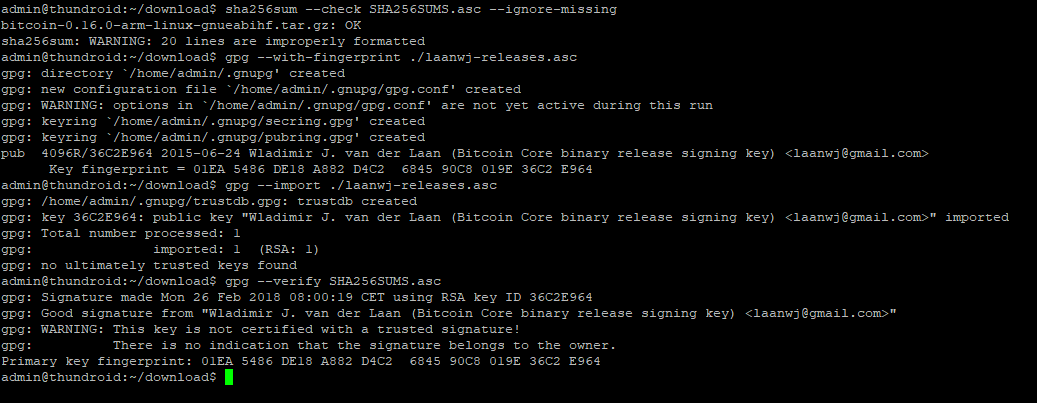
Get the latest download links at bitcoin.org/en/download. They change with each update. Run the following commands with adjusted filenames and check the output where indicated.
# download Bitcoin Core binary
$ wget https://bitcoin.org/bin/bitcoin-core-0.16.0/bitcoin-0.16.0-arm-linux-gnueabihf.tar.gz
$ wget https://bitcoin.org/bin/bitcoin-core-0.16.0/SHA256SUMS.asc
$ wget https://bitcoin.org/laanwj-releases.asc

# check that the reference checksum matches the real checksum
# (ignore the "lines are improperly formatted" warning)
$ sha256sum --check SHA256SUMS.asc --ignore-missing
> bitcoin-0.16.0-arm-linux-gnueabihf.tar.gz: OK

# manually check the fingerprint of the public key
$ gpg --with-fingerprint ./laanwj-releases.asc
> 01EA 5486 DE18 A882 D4C2 6845 90C8 019E 36C2 E964

# import the public key of Wladimir van der Laan, verify the signed checksum file
# and check the fingerprint again in case of malicious keys
$ gpg --import ./laanwj-releases.asc
$ gpg --verify SHA256SUMS.asc
> gpg: Good signature from Wladimir ...
> Primary key fingerprint: 01EA 5486 DE18 A882 D4C2 6845 90C8 019E 36C2 E964
Extract the Bitcoin Core binaries, install them, and check the version.
$ tar -xvf bitcoin-0.16.0-arm-linux-gnueabihf.tar.gz
$ sudo install -m 0755 -o root -g root -t /usr/local/bin bitcoin-0.16.0/bin/*
$ bitcoind --version
> Bitcoin Core Daemon version v0.16.0
Prepare Bitcoin Core directory
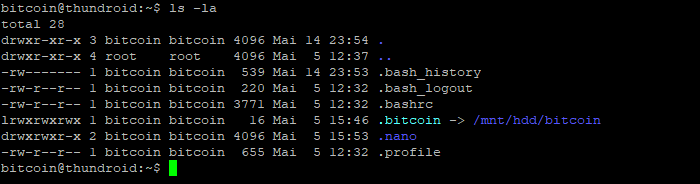
We use the Bitcoin daemon, called “bitcoind”, that runs in the background without user interface and stores all data in a the directory '/home/bitcoin/.bitcoin'. Instead of creating a real directory, we create a link that points to a directory on the external hard disk.
# change to user "bitcoin"
$ sudo su bitcoin

# add symbolic link that points to the external hard drive
$ mkdir /mnt/hdd/bitcoin
$ ln -s /mnt/hdd/bitcoin /home/bitcoin/.bitcoin

# Navigate to home directory and check the symbolic link (the target must not be red).
$ cd
$ ls -la
The content of this directory will actually be on the external hard disk.
Configuration
The configuration file for bitcoind needs to be created. Open it with Nano and paste the configuration below. Save and exit.
$ nano /home/bitcoin/.bitcoin/bitcoin.conf

# Thundroid: bitcoind configuration
# /home/bitcoin/.bitcoin/bitcoin.conf

# remove the following line to enable Bitcoin mainnet
testnet=1

# Bitcoind options
server=1
daemon=1
txindex=1
disablewallet=1

# Connection settings
rpcuser=bitcoin
rpcpassword=PASSWORD_[B]
zmqpubrawblock=tcp://127.0.0.1:29000
zmqpubrawtx=tcp://127.0.0.1:29000

# Optimizations for limited hardware
dbcache=100
maxorphantx=10
maxmempool=50
maxconnections=40
maxuploadtarget=5000
NOTE: Change rpcpassword to your secure 'password [B]', otherwise your funds might get stolen.
Autostart bitcoind
The system needs to run the bitcoin daemon automatically in the background, even when nobody is logged in. We use “systemd“, a daemon that controls the startup process using configuration files.
Exit the “bitcoin” user session back to user “admin”
$ exitCreate the configuration file in the Nano text editor and copy the following paragraph. Save and exit.
$ sudo nano /etc/systemd/system/bitcoind.service

# Thundroid: systemd unit for bitcoind
# /etc/systemd/system/bitcoind.service

[Unit]
Description=Bitcoin daemon
After=network.target

[Service]
ExecStart=/usr/local/bin/bitcoind -daemon -conf=/home/bitcoin/.bitcoin/bitcoin.conf -pid=/run/bitcoind/bitcoind.pid
# Creates /run/bitcoind owned by bitcoin
RuntimeDirectory=bitcoind
User=bitcoin
Group=bitcoin
Type=forking
PIDFile=/run/bitcoind/bitcoind.pid
Restart=on-failure

# Hardening measures
####################

# Provide a private /tmp and /var/tmp.
PrivateTmp=true

# Mount /usr, /boot/ and /etc read-only for the process.
ProtectSystem=full

# Disallow the process and all of its children to gain
# new privileges through execve().
NoNewPrivileges=true

# Use a new /dev namespace only populated with API pseudo devices
# such as /dev/null, /dev/zero and /dev/random.
PrivateDevices=true

# Deny the creation of writable and executable memory mappings.
MemoryDenyWriteExecute=true

[Install]
WantedBy=multi-user.target
Enable the configuration file:
$ sudo systemctl enable bitcoind.serviceCopy 'bitcoin.conf' to user "admin" home directory for RPC credentials:
$ mkdir /home/admin/.bitcoin
$ sudo cp /home/bitcoin/.bitcoin/bitcoin.conf /home/admin/.bitcoin/
Restart the Thundroid
$ sudo shutdown -r now
Verification of bitcoind operations
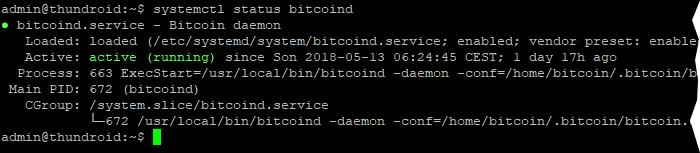
After rebooting, the bitcoind should begin to sync and validate the Bitcoin blockchain. Wait a bit, reconnect via SSH and login with the user “admin”. Check the status of the Bitcoin daemon that was started by systemd (exit with 'Ctrl-C').
$ systemctl status bitcoind
See bitcoind in action by monitoring its log file (exit with 'Ctrl-C'):
$ sudo tail -f /home/bitcoin/.bitcoin/testnet3/debug.logUse the Bitcoin Core client 'bitcoin-cli' to get information about the current blockchain:
$ bitcoin-cli getblockchaininfoNOTE: When “bitcoind” is still starting, you may get an error message like “verifying blocks.” That’s normal, just give it a few minutes.
Among other information, the “verificationprogress” is shown. Once this value reaches almost 1 (0.999…), the blockchain is up-to-date and fully validated.
Lightning Network
We will download and install the LND (Lightning Network Daemon) by Lightning Labs http://lightning.engineering/. Check out their Github repository (https://github.com/lightningnetwork/lnd/blob/master/README.md) for a wealth of information about their open-source project and Lightning in general.
Install LND
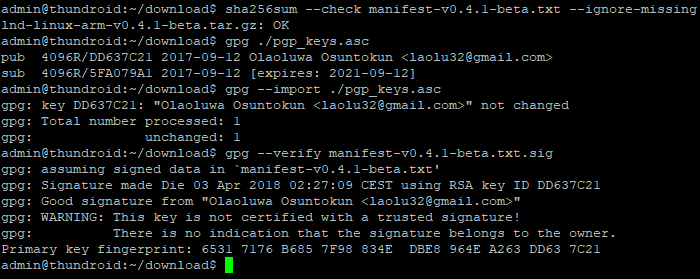
Now to the good stuff: Download, verify, and install the LND binaries.
$ cd /home/admin/download
$ wget https://github.com/lightningnetwork/lnd/releases/download/v0.4.1-beta/lnd-linux-arm-v0.4.1-beta.tar.gz
$ wget https://github.com/lightningnetwork/lnd/releases/download/v0.4.1-beta/manifest-v0.4.1-beta.txt
$ wget https://github.com/lightningnetwork/lnd/releases/download/v0.4.1-beta/manifest-v0.4.1-beta.txt.sig
$ wget https://keybase.io/roasbeef/pgp_keys.asc

$ sha256sum --check manifest-v0.4.1-beta.txt --ignore-missing
> lnd-linux-arm-v0.4-beta.tar.gz: OK

$ gpg ./pgp_keys.asc
> pub 4096R/DD637C21 2017-09-12 Olaoluwa Osuntokun <laolu32@gmail.com>
> sub 4096R/5FA079A1 2017-09-12 [expires: 2021-09-12]
> 65317176B6857F98834EDBE8964EA263DD637C21

$ gpg --import ./pgp_keys.asc
$ gpg --verify manifest-v0.4.1-beta.txt.sig
> gpg: Good signature from "Olaoluwa Osuntokun <laolu32@gmail.com>" [unknown]
> Primary key fingerprint: 6531 7176 B685 7F98 834E DBE8 964E A263 DD63 7C21
$ tar -xzf lnd-linux-arm-v0.4.1-beta.tar.gz
$ ls -la
$ sudo install -m 0755 -o root -g root -t /usr/local/bin lnd-linux-arm-v0.4.1-beta/*
$ lnd --version
> lnd version 0.4.1-beta commit=
LND configuration Now that LND is installed, we need to configure it to work with Bitcoin Core and run automatically on startup.
Open a "bitcoin" user session:
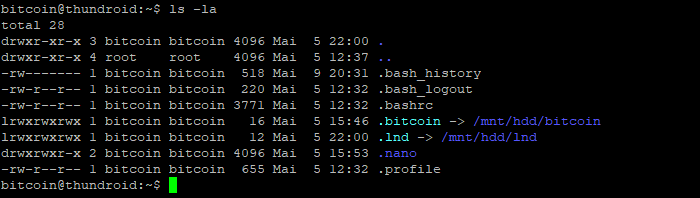
$ sudo su bitcoinCreate the LND working directory and the corresponding symbolic link:
$ mkdir /mnt/hdd/lnd
$ ln -s /mnt/hdd/lnd /home/bitcoin/.lnd
$ cd
$ ls -la
Create the LND configuration file and paste the following content (adjust to your alias). Save and exit.
'$ nano /home/bitcoin/.lnd/lnd.conf'

# Thundroid: lnd configuration
# /home/bitcoin/.lnd/lnd.conf

[Application Options]
debuglevel=info
debughtlc=true
maxpendingchannels=5
alias=YOUR_NAME [LND]
color=#68F442

[Bitcoin]
bitcoin.active=1

# enable either testnet or mainnet
bitcoin.testnet=1
#bitcoin.mainnet=1

bitcoin.node=bitcoind

[autopilot]
autopilot.active=1
autopilot.maxchannels=5
autopilot.allocation=0.6
Additional information
In the LND project repository:
Exit the "bitcoin" user session back to "admin"
$ exitCreate LND systemd unit and with the following content. Save and exit.
$ sudo nano /etc/systemd/system/lnd.service

# Thundroid: systemd unit for lnd
# /etc/systemd/system/lnd.service

[Unit]
Description=LND Lightning Daemon
Wants=bitcoind.service
After=bitcoind.service

[Service]
ExecStart=/usr/local/bin/lnd
PIDFile=/home/bitcoin/.lnd/lnd.pid
User=bitcoin
Group=bitcoin
LimitNOFILE=128000
Type=simple
KillMode=process
TimeoutSec=180
Restart=always
RestartSec=60

[Install]
WantedBy=multi-user.target
Enable and start LND
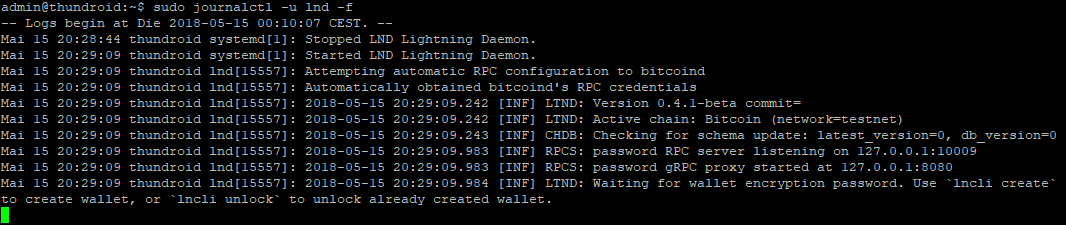
$ sudo systemctl enable lnd
$ sudo systemctl start lnd
$ systemctl status lnd
Monitor the LND logfile in realtime (exit with 'Ctrl-C')
$ sudo journalctl -f -u lnd
LND wallet setup
Once LND is started, the process waits for us to create the integrated Bitcoin wallet. It does not use the bitcoind wallet.
Start a "bitcoin" user session
$ sudo su bitcoinCreate the LND wallet
$ lncli createIf you want to create a new wallet, enter your 'password [C]' as wallet password, select 'n' regarding an existing seed and enter the optional 'password [D]' as seed passphrase. A new cipher seed consisting of 24 words is created.
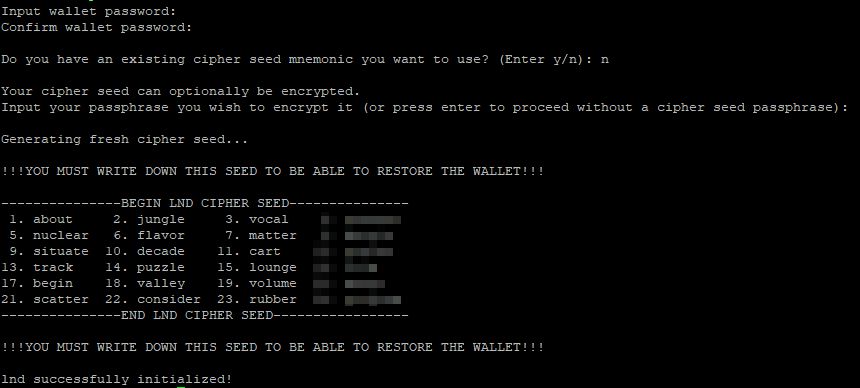
These 24 words, combined with your passphrase (optional 'password [D]') is all that you need to restore your Bitcoin wallet and all Lighting channels. The current state of your channels, however, cannot be recreated from this seed, as this is still under development for LND.
NOTE: This information must be kept secret at all times. Write these 24 words down manually on a piece of paper and store it in a safe place. This piece of paper is all an attacker needs to completely empty your wallet! Do not store it on a computer. Do not take a picture with your mobile phone. This information should never be stored anywhere in digital form.
Exit "bitcoin" user session
$ exit
Assign LND permissions to "admin"
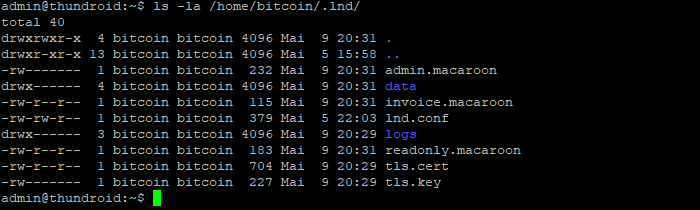
Check if permission files 'admin.macaroon' and 'readonly.macaroon' have been created. If not, see open LND issue #890 (https://github.com/lightningnetwork/lnd/issues/890).
$ ls -la /home/bitcoin/.lnd/
Copy permission files and TLS cert to user "admin" to use 'lncli'.
$ mkdir /home/admin/.lnd
$ sudo cp /home/bitcoin/.lnd/tls.cert /home/admin/.lnd
$ sudo cp /home/bitcoin/.lnd/admin.macaroon /home/admin/.lnd
$ sudo chown -R admin:admin /home/admin/.lnd/
Make sure that 'lncli' works by unlocking your wallet (enter 'password [C]' ) and getting some node information.
$ sudo systemctl restart lnd
$ lncli unlock
Monitor the LND startup progress until it has caught up with the testnet blockchain (about 1.3m blocks at the moment). This can take up to 2 hours. After that, you’ll see a lot of very fast chatter. Exit with 'Ctrl-C'.
$ sudo journalctl -f -u lnd
Get some testnet Bitcoin
Now your Lightning node is ready. To use it in testnet, you can get some free testnet bitcoin from a faucet.
Generate a new Bitcoin address to receive funds on-chain
$ lncli newaddress np2wkh
'> "address": "2NCoq9q7............dkuca5LzPXnJ9NQ"Get testnet bitcoin:
<https://testnet.manu.backend.hamburg/faucet>Check your LND wallet balance.
$ lncli walletbalanceMonitor your transaction (the faucet shows the TX ID) on a Blockchain explorer:
<https://testnet.smartbit.com.au>
LND in actionAs soon as your funding transaction is mined and confirmed, LND will start to open and maintain channels. This feature is called "Autopilot" and is configured in the "lnd.conf" file. If you would like to maintain your channels manually, you can disable the autopilot.
Get yourself a payment request on StarBlocks (https://starblocks.acinq.co/#/) or Y’alls (https://yalls.org/) and move some coins!
Some commands to try:
List all arguments for the command line interface (cli)
$ lncliGet help for a specific argument
$ lncli help [ARGUMENT]Find out some general stats about your node:
$ lncli getinfoConnect to a peer (you can find some nodes to connect to here: https://1ml.com/)
$ lncli connect [NODE_URI]Check the peers you are currently connected to:
$ lncli listpeersOpen a channel with a peer:
$ lncli openchannel [NODE_PUBKEY] [AMOUNT_IN_SATOSHIS] 0Keep in mind that [NODE_URI] includes @IP:PORT at the end, while [NODE_PUBKEY] doesn't.
Check the status of your pending channels:
$ lncli pendingchannelsCheck the status of your active channels:
$ lncli listchannelsBefore paying an invoice, you should decode it to check if the amount and other information are correct:
$ lncli decodepayreq [INVOICE]Pay an invoice:
$ lncli payinvoice [INVOICE]Check the payments that you sent:
$ lncli listpaymentsCreate an invoice:
$ lncli addinvoice [AMOUNT_IN_SATOSHIS]List all invoices:
$ lncli listinvoicesTo close a channel, you need the following two arguments that can be determined with 'listchannels' and are listed as "channelpoint": 'FUNDING_TXID' : 'OUTPUT_INDEX' .
$ lncli listchannels
$ lncli closechannel [FUNDING_TXID] [OUTPUT_INDEX]
To force close a channel (if your peer is offline or not cooperative), use
$ lncli closechannel --force [FUNDING_TXID] [OUTPUT_INDEX]See Lightning API reference (http://api.lightning.community/) for additional information
Outlook: Prepare for Bitcoin mainnet
In part 2 of this guide we will move the Thundroid Bitcoin & Lightning node to the Bitcoin mainnet, that uses a different blockchain. Like the small testnet blockchain, the mainnet blockchain records all Bitcoin transactions and basically defines who owns how many bitcoin. This is the most crucial of all information and we should not rely on someone else to provide this data. To set up our Bitcoin Full Node on mainnet, we need to:
- Download the whole blockchain (~ 200 GB)
- Verify every Bitcoin transaction that ever occurred and every block ever mined
- Create an index database for all transactions, so that we can query it later on
- Calculate all bitcoin address balances (called the UTXO set)
See “Running a Full Node” (https://bitcoin.org/en/full-node) for additional information.
You can imagine that the Thundroid is not quite up to this huge task. The download is not the problem, but to initially process the whole blockchain would take weeks due to its resource restrictions. We need to download and verify the blockchain with Bitcoin Core on a regular computer and then transfer the data to the Thundroid. This needs to be done only once. After that, the Thundroid can easily keep up with new blocks.
For the switch to mainnet, the mainnet blockchain should be ready, so we'll start this task now.
Using a regular computer
This guide assumes that you will use a Windows machine for this task, but it works with most operating systems. You need to have about 250 GB free disk space available, internally or on an external hard disk. As indexing creates heavy read/write traffic, the faster your hard disk, the better. An internal drive or an external USB3 hard disk will be significantly faster than one with a USB2 connection.
Download and verify Bitcoin Core
Download the Bitcoin Core installer from bitcoin.org/download and store it in the directory you want to use to download the blockchain. To check the authenticity of the program, calculate its checksum and compare it with the checksums provided.
In Windows, I’ll preface all commands you need to enter with '>' , so with the command '> cd bitcoin' , just enter 'cd bitcoin' and hit enter.
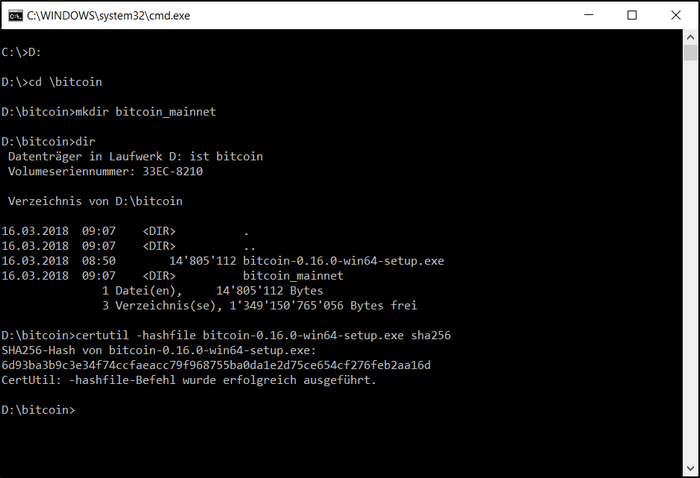
Open the Windows command prompt ('Win+R', enter 'cmd', hit 'Enter'), navigate to the bitcoin directory (for me, it's on drive 'D:', check in Windows Explorer) and create the new directory 'bitcoin_mainnet'. Then calculate the checksum of the already downloaded program.
> G:
> cd \bitcoin
> mkdir bitcoin_mainnet
> dir
> certutil -hashfile bitcoin-0.16.0-win64-setup.exe sha256
6d93ba3b9c3e34f74ccfaeacc79f968755ba0da1e2d75ce654cf276feb2aa16d
You can check this checksums with the the reference checksums on your Thundroid from the file we downloaded previously and have already checked for authenticity. Compare the following output with the checksum of your Windows Bitcoin Core download.
# on Thundroid, with user "admin"
$ cat /home/admin/download/SHA256SUMS.asc | grep win

7558249b04527d7d0bf2663f9cfe76d6c5f83ae90e513241f94fda6151396a29 bitcoin-0.16.0-win32-setup.exe
60d65d6e57f42164e1c04bb5bb65156d87f0433825a1c1f1f5f6aebf5c8df424 bitcoin-0.16.0-win32.zip
6d93ba3b9c3e34f74ccfaeacc79f968755ba0da1e2d75ce654cf276feb2aa16d bitcoin-0.16.0-win64-setup.exe
42706da1a95b2db8c5808529f73c2063a0dd770f71e0c8506bfa86dc0f3403ef bitcoin-0.16.0-win64.zip
Installing Bitcoin Core
Execute the Bitcoin Core installation file. You might need to right-click and choose "Run as administrator.” Install it using the default settings. Start the program 'bitcoin-qt.exe' in the directory "C:\Program Files\Bitcoin". Choose your new “bitcoin_mainnet” folder as the custom data directory.
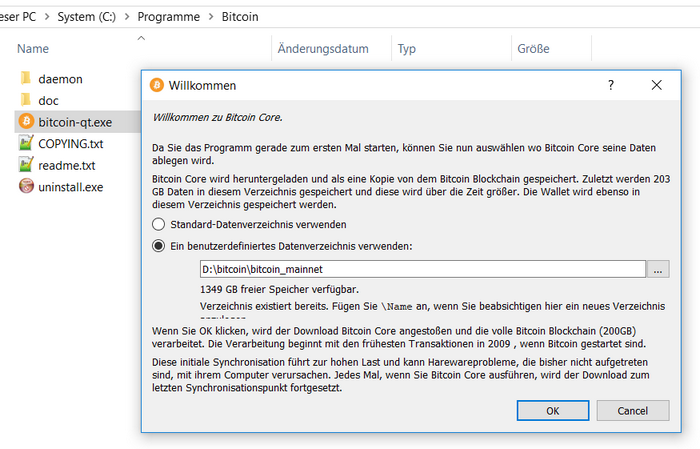
Bitcoin Core opens and starts immediately syncing the blockchain. Now, we need to set one very important additional setting in the “bitcoin.conf” file. If not set, the the whole blockchain will be useless and needs to be re-validated. Using the menu, open 'Settings' / 'Options' and click the button 'Open Configuration File'. Enter the following line:
$ txindex=1If your computer has a lot of memory, you can increase the database in-memory cache by adding the following line (with megabytes of memory to use, adjusted to your computer) as well:
$ dbcache=6000Save and close the text file, quit Bitcoin Core using 'File' / 'Exit', and restart the program. The program will start syncing again.
Let the blockchain sync for now, this will take a day or two.
Before proceeding to mainnet
In part 2 of this guide, we will transition to the Bitcoin mainnet. This will be the point of no return. Up until now, you can just start over. Experiment with testnet bitcoin. Open and close channels on the testnet. It's important that you feel comfortable with Thundroid operations, before putting real money on the line.
Once you switch to mainnet and send real bitcoin to your Thundroid, you have "skin in the game."
- Make sure your RaspiBolt is working as expected. Get a some practice with 'bitcoin-cli' and its options. See Bitcoin Core RPC documentation (https://bitcoin-rpc.github.io/)
- Do a dry run with 'lncli' and its many options. See Lightning API reference (http://api.lightning.community/)
- Try a few restarts ('sudo shutdown -r now'). Is everything starting fine?
See you soon in part 2, "The Perfect Bitcoin Lightning️ Node."
2 Trackbacks / Pingbacks