
If you're like me, you've been on the Internet for over 20 years, and in all these years you kept making a capital sin: reusing the same passwords on different sites for convenience, as illustrated in the cartoon here https://xkcd.com/792/. However, you have no way of knowing how these sites secure their passwords, maybe they are stored in clear, or hashed without salt which makes them easy to crack with rainbow tables, or debugging messages expose passwords in server logs.
Recent disclosures have shown that even big companies like Yahoo, Apple, and LinkedIn have suffered from data breaches and have had their password data stolen. The infamously long list can be found here, https://en.m.wikipedia.org/wiki/List_of_data_breaches. The only protection you have is frequent password changes and avoiding password reuse, so that a compromised account doesn't turn into a compromised identity.
As you know, humans are notoriously bad at choosing and remembering lots of changing passwords, frequently used ones can be found here, https://en.m.wikipedia.org/wiki/List_of_the_most_common_passwords. So we need the computer's help to remember and generate all those passwords and we need one strong master password to protect them all. In short - we need a password manager. There are lots of password managers out there, but I will focus on a well supported open source program called KeePass, https://keepass.info, which has a backend for a lot of operating systems.
Linux (GUI) client
KeePass is natively a Mono application, written in .NET, but because of unexpected support from Microsoft, Mono can run quite well on Linux systems, even armhf/arm64. You can install KeePass2 directly from apt on your ODROID device:
$ sudo apt-get install keepass2Once started, you will need to create a new database to store your passwords (File -> New…). Select a suitable name, I used ‘NewDatabase.kdbx’, and you will be asked to set a strong Master Password, and optionally a key to unlock the database. If you use a key, you can create it from the dialog box by moving the mouse around, or with dd, from /dev/random. For this article we're not going to use a key, only a Master Password, so make sure to use something difficult to guess, here's a suggestion: https://security.stackexchange.com/questions/62832/is-the-oft-cited-xkcd-scheme-no-longer-good-advice. I'm going to use "odroid" just an example password 🙂
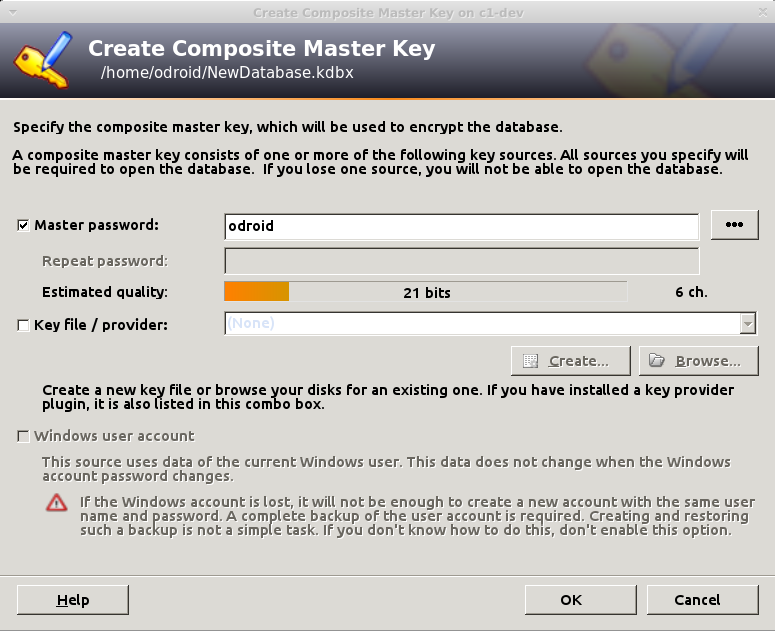
In the second step you will be asked for a name for the database (e.g. "work stuff"), a default username, encryption algorithm, AES is set by default, and the number of transformation rounds. This means how many times it should re-encrypt the master password in order to generate the actual key. The higher the number the harder it will be to brute-force, but also the longer it will take to open or save your database. The GUI offers a "1 second delay" option that calculates the number of rounds based on your current PC, but for an ODROID-C1 this is 78,000, while for an Intel it goes to the tens of millions. If you select too high number, it will take longer to open on weaker devices, 100,000 should be ok. You can always adjust this number later, or change the master password. Make sure to save the database once opened.
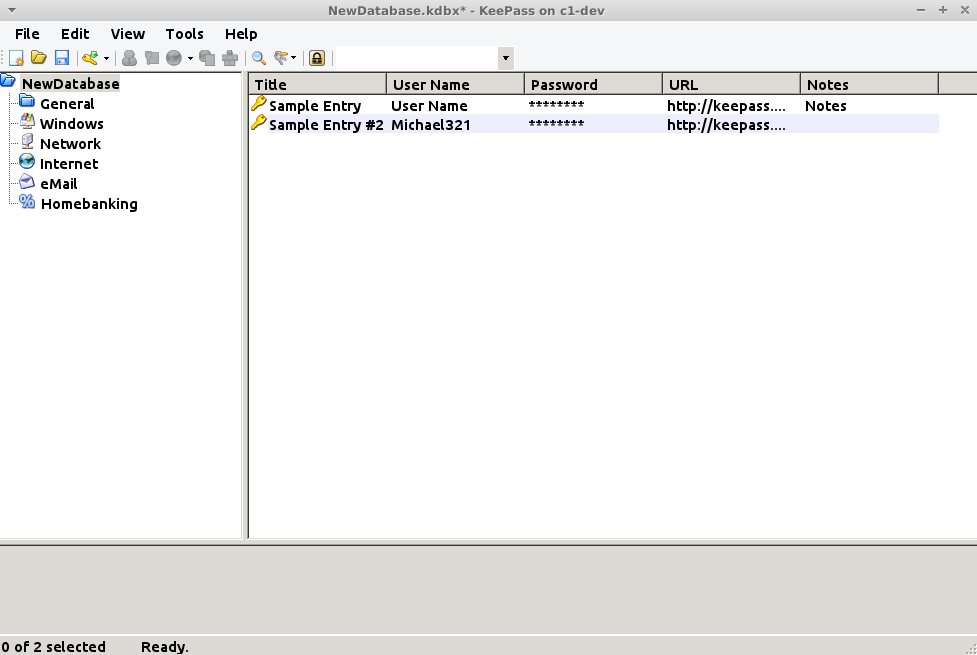
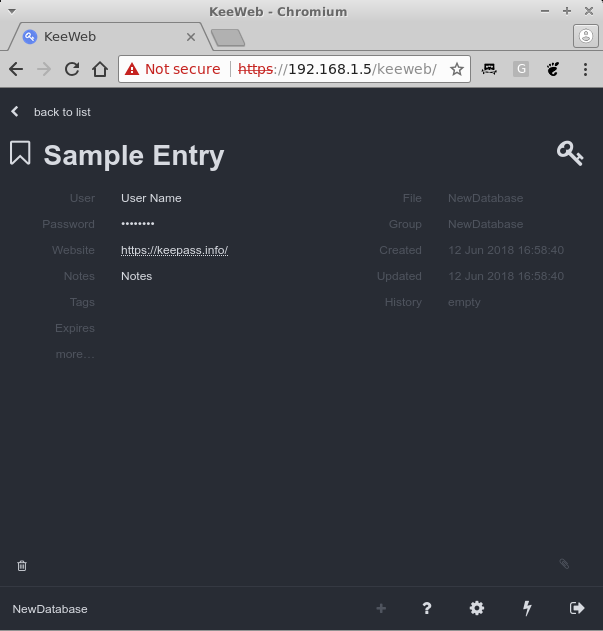
From the main window you can use the toolbar to create new entry, search for existing entries, and open entries. You can also group entries in folders. A typical entry has a title, username, password, URL and notes. You can also add files and KeePass keeps a history of your changed attributes for an entry, e.g. old passwords - which can be handy.
In order to use a saved password you have several options. Either use CTRL+B to copy username and CTRL+C to copy the password (or double-click on the user/password entry) and paste them in your desired application/form, or use the autofill option (CTRL+V) like this:
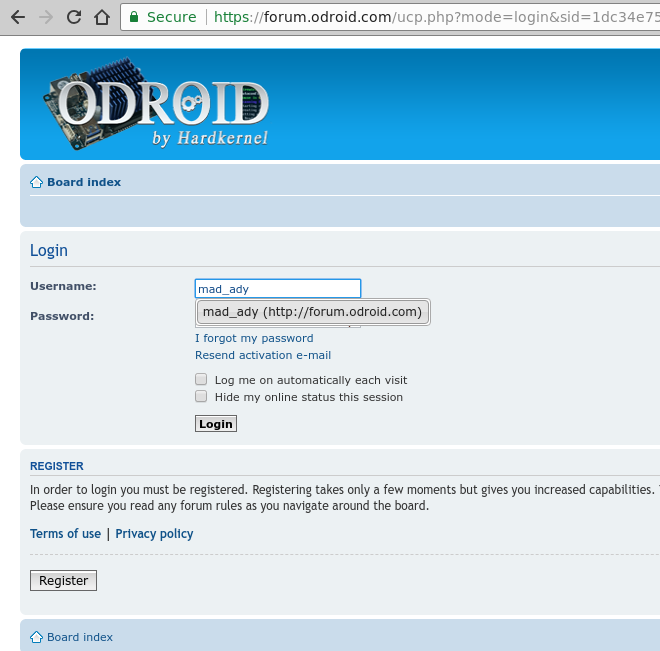
- Navigate to the desired resource, for example https://forum.odroid.com/ucp.php?mode=login
- Change focus to KeePass2 and select the desired entry and type CTRL+V
- KeePass will switch back to the previous application and paste the username, use Tab to navigate to the next field and paste password and press Enter. The sequence can be changed per entry or per group should you need to use other key presses for the login sequence.
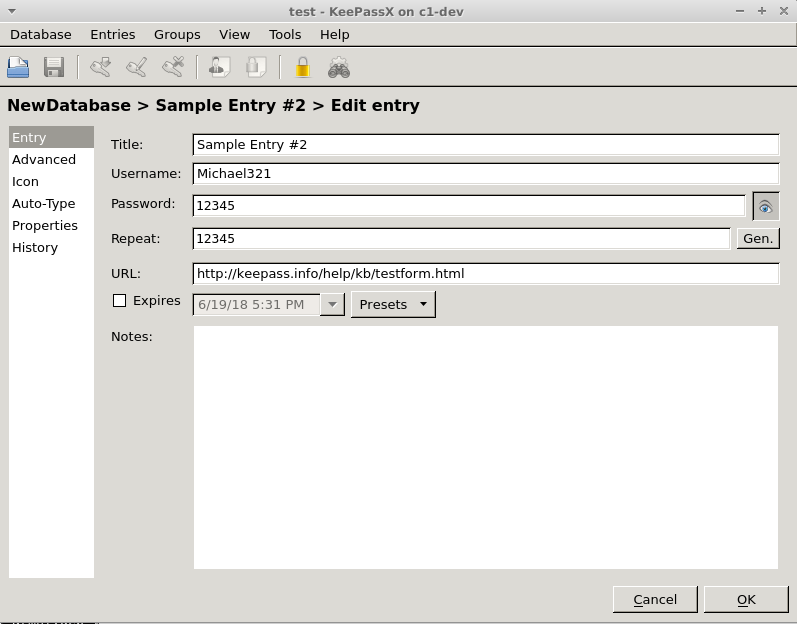
Note that, for security reasons your copied data is kept in the clipboard only for 12 seconds and afterwards it is replaced with "--" in order to keep your passwords secret. You can change this in Tools -> Options -> Clipboard auto-clear time. If the application is not to your liking and reminds you too much of Windows, you can use other GUI clients for Linux as well, such as KeePassX, but you will not have as many plugins/import options as with KeePass2:
$ sudo apt-get install keepassx
Web client
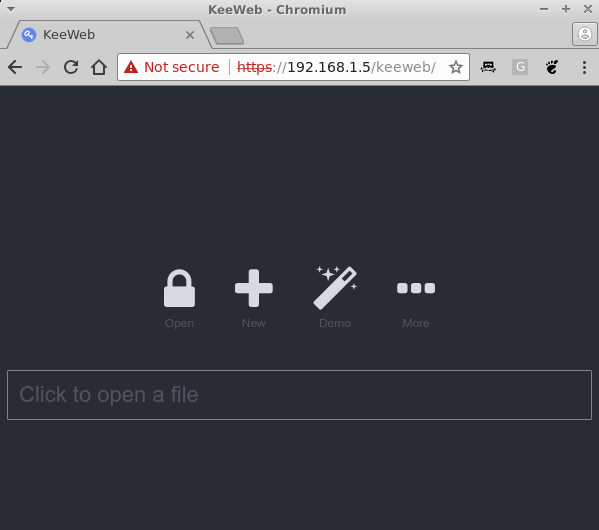
KeeWeb is a Web app written in JavaScript that can manage your passwords in a browser, and can also run offline. The idea is you can host it on your ODROID, keep the password file on the ODROID as well and connect to the app whenever you need to manage your passwords, without having to use other clients, https://github.com/keeweb/keeweb/wiki/FAQ. You can get the latest version from Github: https://github.com/keeweb/keeweb/releases. You will need to run Apache, or NGINX, to serve static files:
$ sudo apt-get install apache
$ cd /var/www/html
$ sudo wget https://github.com/keeweb/keeweb/archive/gh-pages.zip
$ sudo unzip gh-pages.zip
$ sudo mv keeweb-gh-pages/ keeweb/
$ sudo service apache2 start
$ sudo systemctl enable apache2
At this point, you can browse to https://odroid-ip/keeweb and, after accepting the self-signed certificate, you should be prompted with the page in figure 4. Here you can upload, it's only uploaded into the browser, a local KeePass file and you can view it.
If you want to make persistent changes, we'll need to host the file server-side and enable WebDAV. WebDAV is a standard for managing files on a web server. First we'll make a directory to store your password database server-side and then copy it there:
$ cd /var/www/html
$ sudo mkdir kppassword
$ sudo cp /path/to/NewDatabase.kdbx /var/www/html/kppassword
$ sudo chown -R www-data /var/www/html/kppassword
Make sure to input the correct path to your password file. Also, if you're adding new files later on make sure that the kppassword directory and all the kdbx files within are owned by the www-data user, so that apache can save changes. Next, we'll create a HTTP auth account that will be allowed to access this file while encrypted. Make sure to supply your desired username and password, make sure it's not the same as the master password since these credentials might be cached in less secure ways:
$ sudo htpasswd -c /etc/apache2/kppassword.access adrianpWe can now enable WebDAV for the kppassword web directory by creating /etc/apache2/conf-available/keeweb.conf and enabling a few apache modules, details here: https://github.com/keeweb/keeweb/wiki/WebDAV-Config:
$ sudo vi /etc/apache2/conf-available/keeweb.conf
RewriteEngine on
RewriteCond %{REQUEST_METHOD} OPTIONS
RewriteRule ^(.*)$ blank.html [R=200,L,E=HTTP_ORIGIN:%{HTTP:ORIGIN}]

< Directory "/var/www/html/kppassword" >
AuthType "Basic"
AuthName "Password Manager"
AuthBasicProvider file
AuthUserFile "/etc/apache2/kppassword.access"
Require valid-user

DAV On
Options Indexes
Header always set Access-Control-Allow-Origin "*"
Header always set Access-Control-Allow-Headers "origin, content-type, cache-control, accept, authorization, if-match, destination, overwrite"
Header always set Access-Control-Expose-Headers "ETag"
Header always set Access-Control-Allow-Methods "GET, HEAD, POST, PUT, OPTIONS, MOVE, DELETE, COPY, LOCK, UNLOCK"
Header always set Access-Control-Allow-Credentials "true"
< /Directory >

$ sudo a2enconf keeweb
$ sudo a2enmod dav
$ sudo a2enmod dav_fs
$ sudo service apache2 restart
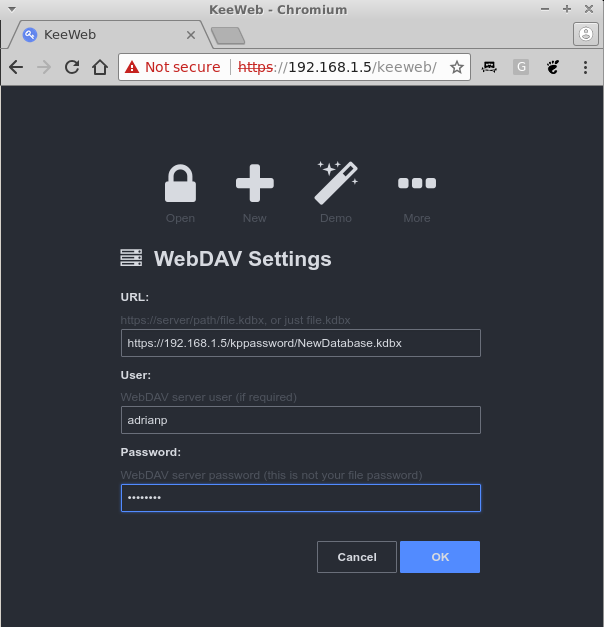
Now, if you were to reload KeeWeb in your browser you can press on the "More" button and select WebDAV. You need to supply the following:
- URL: https://odroid-ip/kppassword/NewDatabase.kdbx
- User: The username you created with htpasswd
- Password: The password you created with htpasswd
Now you should be able to make changes and save them, when there are unsaved changes there is a blue dot next to the database name. Click on it, and it will prompt you to save and show you save status. If you're making simultaneous changes on the same database from multiple clients, you should be aware that the file is overwritten, so changes from multiple clients might get lost. Also, you might want to close and restart the tab with KeeWeb from time to time to make sure it loads the latest version of the file, and not an older cached version. Having periodic off-site backups of your password file is also mandatory.
That's it - you can now access and manage your passwords from any browser with Javascript enabled. But maybe you're looking for something terminal base...
CLI client
Sometimes you may only have shell access and still need to be able to get to your passwords. In this case you can use kpcli:
$ sudo apt-get install kpcliYou can connect to your password database, as a file, and navigate inside by using commands similar to the Linux shell, like ls, cd, show.
$ kpcli --kdb myPasswordDB.kdbx
Please provide the master password: *************************
kpcli:/> ls
=== Groups ===
NewDatabase/
kpcli:/> cd NewDatabase/
kpcli:/NewDatabase> ls
=== Groups ===
eMail/
General/
Homebanking/
Internet/
Network/
Windows/
=== Entries ===
0. Sample Entry keepass.info
1. Sample Entry #2 keepass.info/help/kb/testform.
kpcli:/NewDatabase> show -f 0

Title: Sample Entry
Uname: User Name
Pass: Password
URL: https://keepass.info/
Notes: Notes
More usage examples can be found here: https://www.digitalocean.com/community/tutorials/how-to-use-kpcli-to-manage-keepass2-password-files-on-an-ubuntu-14-04-server
Android KeePass clients You have a wide selection of clients under Android/iOS as well, https://keepass.info/download.html, and though I haven't tested many, I liked KeePass2Android, available at https://play.google.com/store/apps/details?id=keepass2android.keepass2android, because of the following features:
- open source
- quickly unlock a previously unlocked database with just 3 characters from the passphrase
- WebDAV support
- offline database with automatic sync when online
- auto login into sites via "share" feature
You can install the client from the Play Store and select Open file -> HTTPS (WebDAV). Enter the URL and user/password you defined when installing keeweb and you will be prompted for the master password.
Once unlocked you can search or manage your passwords normally. When you navigate to a page where you’re required to log in, you can use these steps:
- share the page from the browser to KeePass2Android: Find. It will then list all saved accounts for that site
- select the desired account and you will return to the browser. The username/password will be available for a while either in a notification, or as buttons in KP2A keyboard. You can use these buttons to copy the credentials and paste them in the browser.
Importing passwords from Firefox
If you're using Firefox, possibly on many systems, without synchronization, you can export the passwords saved in its password manager using this script: https://github.com/unode/firefox_decrypt. There used to be several extensions that could do it from within Firefox, but since they moved to Quantum, the extensions lost the ability to read your passwords, which should be a good thing. Firefox is also moving to a new password manager called Lockbox, https://www.bleepingcomputer.com/news/software/firefox-to-get-a-better-password-manager/. so this method might not work when that switch happens.
$ git clone https://github.com/unode/firefox_decrypt.git
$ cd firefox_decrypt
$ ./firefox_decrypt.py -f csv -d , > /dev/shm/firefox-passwords.csv
You will be asked which profile you want to export and also what is the master password (press enter if none). You can also select a custom path for your profile, if, for example you are importing passwords saved on a Windows system or from a remote mount. Your passwords will be written to a ram disk, /dev/shm, to prevent leaving traces on the filesystem while in-clear.
Before doing the import we need to improve a bit the data we are going to import. The problem is that the exported data has only the URL, user, and password and lacks a title. Also, the URL does not contain subdirectories, e.g. www.domain.com/example, so we will be missing some information which needs to be manually sorted out later. We're going to try to visit all sites in the list and scrape the page title and add them to a new list, so I wrote a little script to do that:
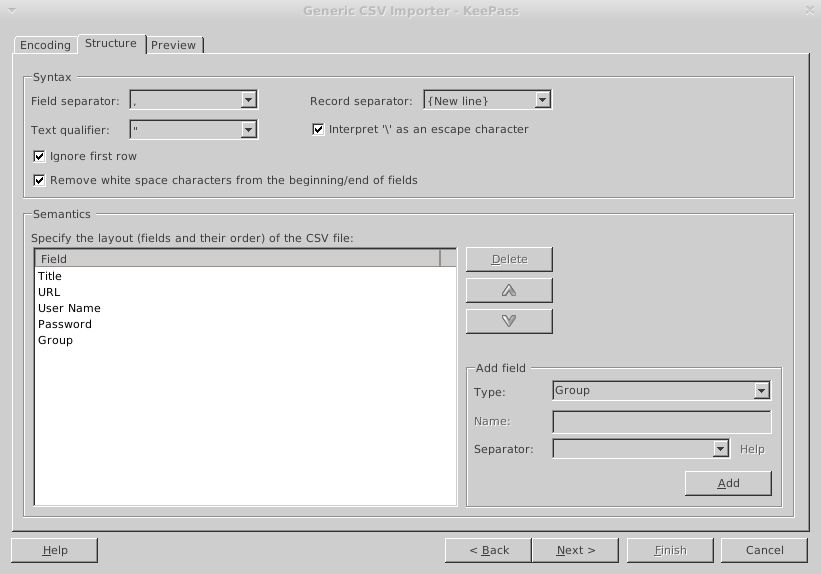
$ sudo apt-get install curl libtext-csv-perl
$ wget -O /usr/local/bin/enrichFirefox.pl https://raw.githubusercontent.com/mad-ady/enrichFirefoxPasswords/master/enrichFirefox.pl
$ sudo chmod a+x /usr/local/bin/enrichFirefox.pl
$ /usr/local/bin/enrichFirefox.pl /dev/shm/firefox-passwords.csv | tee /dev/shm/firefox-passwords-enriched.csv
Next, you can use keepass2 and import the password file with File -> Import -> Generic CSV Importer. Navigate to /dev/shm and select the enriched file and press ok. You will be prompted with a preview of the file. Select the tab "Structure" and check "Ignore first row" because it's a header. Now, we need to map the fields in the CSV with the fields in KeePass in the section below. Delete the first "URL"entry and the "(Ignore)" entry and add "Title" to the top and "Group" to the bottom and select Next. You should now see your passwords parsed correctly and you can press Finish to import them.
Once imported, make sure to delete the exported password file and save your database:
$ rm -f /dev/shm/firefox-passwords*.csvYou can redo these steps to import data from other Firefox profiles from multiple systems.
Importing passwords from Chrome
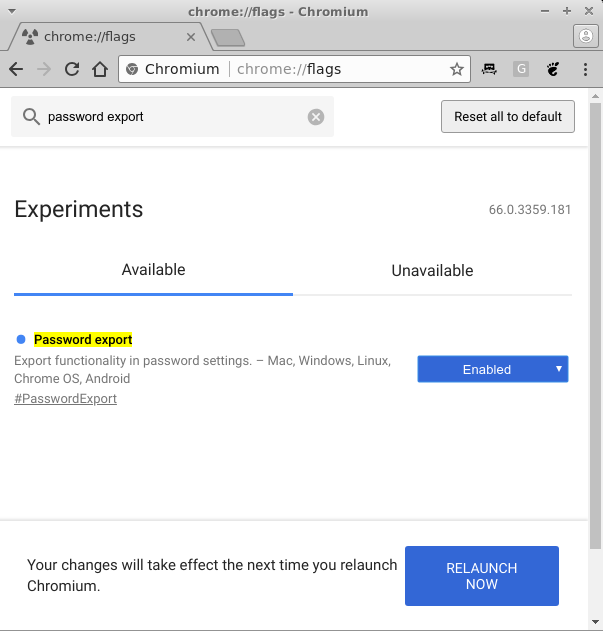
In order to export passwords from Chrome, you need to navigate to chrome://flags and search for "password export". You will need to set it to "Enabled" and restart Chrome. Once restarted, navigate to Menu -> Settings -> Advanced -> Manage Passwords. Under the Saved passwords list click the three dot menu and select Export Passwords and save it under /dev/shm as well.
If you don't see any passwords saved locally, then your passwords are available at https://passwords.google.com and are synchronized between multiple browser instances. You can then import them the same way as Firefox passwords, but the CSV structure is now Name, URL, Username, Password. Once you're done, remember to delete the exported file and disable the "Export passwords" flag.
Replace Firefox/Chrome password manager - Tusk
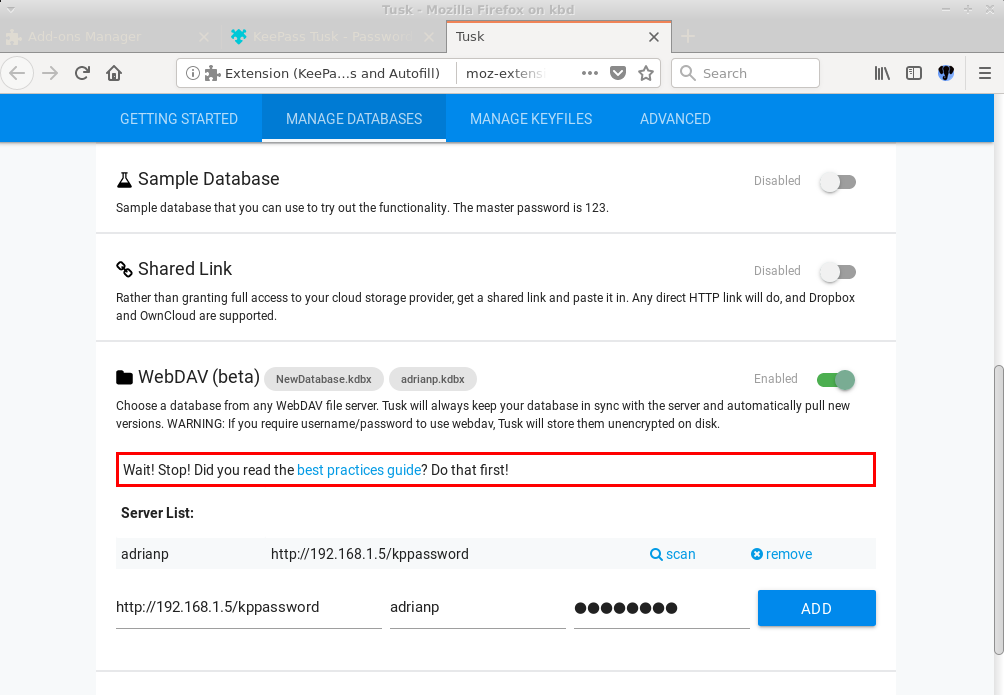
Copy/pasting passwords may be ok for occasional access, but using a password manager integrated with KeePass is necessary for regular browser use. For this we need to use an extension in the browser to fetch passwords from the web server. For Firefox and Chrome, one such extension is KeePass Tusk, https://addons.mozilla.org/en-US/firefox/addon/keepass-tusk/?src=search, https://chrome.google.com/webstore/detail/keepass-tusk-password-acc/fmhmiaejopepamlcjkncpgpdjichnecm. It can connect to a KeePass database stored over WebDAV and doesn't need a local keepass client. You can install the extension by going to about:addons -> Extensions and searching for "tusk". Select the addon and click "+ Add to Firefox". For Chrome it can be installed from the link above. Once it is installed, it will add an icon next to the search bar where you can configure it and connect to a password database. You will need to select "Cloud storage setup" and activate "WebDAV". You can ignore the warning for storing the WebDAV username and password on disk.
You will need to fill in the path to the kppassword directory over http, sadly it doesn't like my self-signed certificate, but not the path to the database because it will discover all databases in that directory. Also add your WebDAV username and password.
You can now close the Tusk tab and when you click on its icon it will ask you which database you want to load and ask for the master password and for how long to keep it open. Once you unlock your database and navigate to a site you have in your database, Tusk will automatically search for it in your database, but will not auto-fill it for you. You can click on the Tusk icon and on the "Autofill" icon next to the desired entry to do the fill. If you enable the hotkey navigation in Tusk's settings you can use the following combination to do the same thing: CTRL+ALT+Space Tab Enter.
In order to fully benefit from this you will need to disable Firefox’s built-in password manager by going to Menu -> Preferences -> Privacy and security -> Uncheck Remember logins and passwords for websites. You should also delete logins.json from your profile folder. You should do the same thing for Chrome.
One limitation of Tusk is that it's read-only. If you need to update a password you will need to use a different client for the update.
Replace Firefox/Chrome password manager - chromeIPass/KeePassHelper
If you don't want your plugin to connect to your password database directly, and potentially expose your master password to the browser, you can use a different approach and proxy requests through KeePass2. Plugins which do this: chromeIPass https://chrome.google.com/webstore/detail/chromeipass/ompiailgknfdndiefoaoiligalphfdae/, KeePassHelper for Firefox https://addons.mozilla.org/en-US/firefox/addon/keepasshelper/) connect via HTTP locally to the KeePass2 instance to retrieve passwords. In order to do this you need to install the KeePassHTTP plugin inside KeePass2, https://keepass.info/plugins.html#keepasshttp.
You can do this on the system where you run KeePass2 in the following way:
$ cd /usr/lib/keepass2/Plugins
$ sudo wget https://raw.github.com/pfn/keepasshttp/master/KeePassHttp.plgx
$ sudo apt-get install mono-complete
Next you will need to restart KeePass2 and open your password database and you can proceed to install the plugin in browser. Once the plugin is installed it will connect automatically to KeePass2 and it will generate an encryption key that you need to approve. Afterwards, connecting to a known site with the browser will autocomplete the username/password in the login fields (for Chrome).
Maintenance
Now that you have all your passwords in one place you can run various reports from KeePass2, like Edit -> Show entries -> Find duplicate passwords and you will see a report of your password reuse addiction. You will need to find the time and take action and reset those passwords and replace them with some more random to actually become more secure.
One last thing you need to consider - which is very important - is backup. Your password database holds all your digital identities and if it gets lost or corrupted will cause you to have a very bad day. This is why you need to set up a backup strategy and copy backups of your database on different physical disks and also in different physical locations, to add geo-redundancy, so that if an asteroid destroys your city your passwords will still be safe.
In order to do this I created a script that listens for file changes, compares the current file with its previous version, to see if there was a change and if needed copies the file to other drives and other systems via network mounts.
You will need inotify to trigger synchronizations:
$ sudo apt-get install inotify-tools
$ sudo wget -O /etc/systemd/system/password-backup.service https://raw.githubusercontent.com/mad-ady/password-backup/master/password-backup.service
$ sudo wget -O /usr/local/bin/password-backup-detect.sh https://raw.githubusercontent.com/mad-ady/password-backup/master/password-backup-detect.sh
$ sudo wget -O /usr/local/bin/password-backup-execute.sh https://raw.githubusercontent.com/mad-ady/password-backup/master/password-backup-execute.sh
$ sudo chmod a+x /usr/local/bin/*.sh
$ sudo systemctl enable password-backup
$ sudo systemctl start password-backup
The code consists of two bash scripts - one to detect changes and one to perform the backup, and a service file to help with starting on boot.
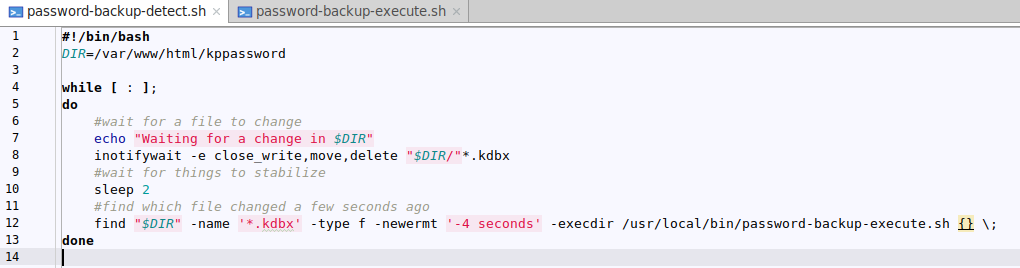
Let's take a second to analyze the password-backup-detect script. On line 2 we set the path to the password database location, next we start an infinite loop. We use inotifywait to listen for a change in existing files and when a file is closed we use find to get a list of files modified in the last 4 seconds and for each file we call the backup script with the filename as an argument. Once the password-backup-execute.sh script finishes we return to listen for changes.
The password-backup-execute script takes a file to be backed up as argument, checks if a backup is needed and performs the backup to potentially multiple locations. In the beginning we set how many older versions of the backup we want to keep and set the paths for the backup files, you can use autofs to mount a remote share on demand for example. Next we define a doBackup() function that iterates through the list of destination folders and does the actual copy and a cleanup() function that uses a combination of ls, tail and rm to delete older backups while preserving some newer versions. The backed-up files contain a timestamp in their name, but sorting is done based on last modified time.
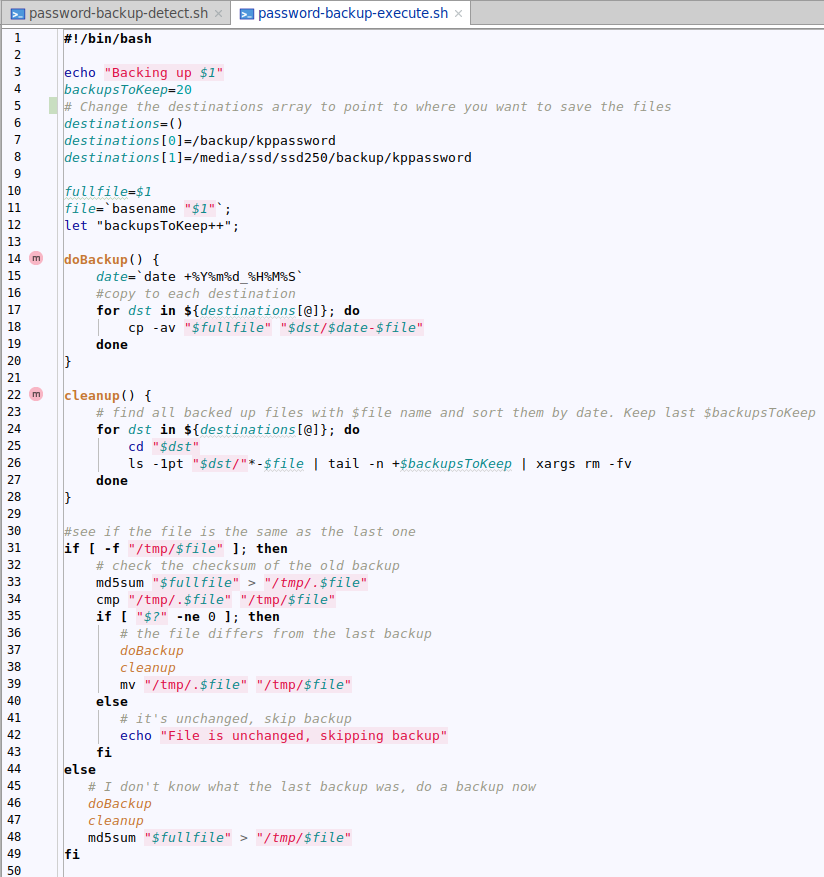
The main code checks if there is an older md5sum hash of the previous backup, and if there is, it gets compared to the current hash. If the hashes differ, or there was no previous hash, backup and cleanup are done. The check is done to prevent backing up the same file multiple times, e.g. you click save in KeePass2 without making changes.
You will need to modify this code and add your backup destinations.
The code, perfect as it may look, has two shortcomings, "bug" is such a nasty word. First of all, inotifywait will not react to new files until it's restarted, or an old file gets changed or touched. Secondly, during the backup phase, file changes are not detected. If a file takes a minute to be saved in all the remote destinations (due to network latency or hard disk spin up time), other file changes that happen during this time will not be picked up and won't be backed up. So, the script is suitable for few concurrent users with infrequent changes.
I hope this has been informative enough to persuade you to take charge of your passwords and have better security practices. Regarding security, keepass protects you from having your password exposed when an online service gets hacked, but does not necessarily protect you from a malware infected computer or a keylogger. Malware or attackers that can arbitrarily read your computer's memory can access the passwords once decrypted or can sniff your master password. The reason I recommended using an ODROID with WebDAV instead of using Dropbox (which is supported as well) was to minimize your exposure. Keeping your encrypted file on somebody else's computer (a.k.a. "the cloud"), may be fine now, but your passwords may reach into the wrong hands and the master password may be more easily cracked in the future, again leaving you vulnerable.
Be the first to comment