
Nagios® Core™–which I’ll simply refer to as “Nagios” throughout this article–is a free, open source server application which monitors hosts and services that you specify, alerting you when things go bad and when they get better. I’ve been using Nagios for many years. If I had to hazard a guess as to when I started using it, I’d say it was around 2006.
My wife and I ran a small computer service company out of our home in those days, and in order to keep track of my customer sites and be as proactive as I could be, I had a beast of a computer in the garage keeping check on my customers’ hard drive space, backup state, CPU load, and antivirus definition updates, as well as various other services.
I remember setting up that old Nagios server. The process was onerous, and all the configuration was done through the Linux terminal by opening config files in vi. One malformed syntax and Nagios would fail to start. I made it work, and if anyone has ever doubted my nerdiness, they are clearly mistaken. Ah, who am I kidding? Nobody has ever doubted my nerdiness. As the years went on and my support business customer base continued to grow, I began repurposing old hardware, installing an independent Nagios server at each client site. This worked very well.
I received my first Raspberry Pi in 2014. After it sat on the shelf for a year, I began to consider possible ways I could put it to use. I realized that the power consumption, rack space, and noise of these old Nagios servers was an incredible waste of resources. I was convinced that a single-board computer could make an excellent Nagios server, and began tinkering.
Why reinvent the wheel? Ryan Siegel’s NagiosPi image was out-of-the-box ready and gaining popularity. I started using it, but quickly became dismayed by the state of the distro, which appeared to be aging and was not being updated at a pace suitable for business use. It was a wonderful starting point, but felt in some important ways like an incomplete product. I began working on my own rebuild of NagiosPi, calling it NEMS; short for “Nagios Enterprise Monitoring Server”.
I’m a coder in my professional life. I develop server-side applications, mainly for web. Beyond building on a more current software base, the first thing I’d set out to do was build a responsive browser-based UI for NEMS, bringing all the components of NagiosPi together into a single interface. This later became the NEMS Dashboard, also known by its GitHub repository name, “nems-www.”
Upon releasing NEMS to the public through my blog, Siegel himself said, “I'd love to upgrade NagiosPi, but i don’t have [the] ability to make a GUI that can beat that of NEMS. I strongly feel that it has always been a necessary addition to NagiosPi and NEMS was able to deliver what is essentially an updated and improved version of NagiosPi. No reason not to start using NEMS for the time being. Nice work Robbie!” I didn’t stop there, and in the wonderful spirit of community, Siegel even pitched in during the development of NEMS 1.2 in early 2017, bringing many additional Windows checks to NEMS.
With a new major release of NEMS every six months and rolling updates in between, NEMS is currently based on Debian Stretch with Nagios Core 4.3.4 at its heart. Having upgraded and maintained NEMS with a current software base, this also means things like PHP 7, current SSL certs, and a suite of customized software optimized to work on a modern server. For example, NConf (a very useful tool for configuring Nagios) stopped development years ago, so it only worked on PHP 5.3 or less. Therefore, I forked it and reworked the code to support PHP 7.0+. Of course, I made some other improvements along the way.
NEMS Linux, as it is now called (I had to find a dot-com, after all) takes the most modern network asset monitoring and does away with the old Nagios scripting requirement. The scripts are still there, it’s just that you (the user) don’t ever have to see them or touch them. The whole thing is controlled, configured, and monitored through your web browser, with email, Telegram, or Pushover notifications all operational out of the box. It also has a JSON API, a TV display for your server room, and more.
NEMS Linux has evolved to be what I feel is the best out-of-the-box Nagios experience available. As a Nagios user myself, this is the Nagios server I have longed for. As NEMS has continued to grow, I set out to find a more powerful platform than the Raspberry Pi. That’s when I found the ODROID-XU4. Just over a year ago (September 13, 2017 to be exact) I began my quest to port NEMS Linux to the ODROID-XU4. After nearly a year of development, I am extremely proud and excited to share: NEMS Linux is now available for ODROID boards.
NEMS Features
I’ve already touched on the obvious interface and UX improvements that NEMS Linux brings to the Nagios experience. Those are perhaps the key points as to what makes NEMS stand out, but it’s important to understand that NEMS Linux is far more than just Debian with Nagios installed. Let’s look at a small selection of additional features.
NEMS Migrator
When focusing on building a distro for single board computers (SBC), I took very seriously the fact that SD cards can and likely will fail, and data can be lost. I wanted to create a way for users to be able to easily backup and restore their configuration. Out of that desire, Migrator was born.
Migrator allows you to backup your entire NEMS configuration (hosts, services, checks, system settings, etc.) via a samba share, https download, or even an optional offsite backup service. The backups can be encrypted, and only you know the decryption key. Should your device fail, you can write the image to a new SD card, restore your Migrator backup, and be up and running in under five minutes with all your settings intact. Migrator also makes it easy to transition from one platform to another. For example, having setup a NEMS Linux server on a Raspberry Pi 3, you can easily move to an ODROID-XU4 for an enormous performance boost.
Another advantage that Migrator brings to the table is an absolutely simple upgrade path: as new major releases of NEMS Linux are introduced, you can easily write the new NEMS image, import your backup, and be on the latest version of NEMS in just minutes.
UI-Based Configuration with NEMS Configurator
NEMS Configurator (NConf) is what makes browser-based Nagios configuration possible. This customized version of the old NConf configuration tool brings a sophisticated front-end to the modern architecture of NEMS. Your entire Nagios configuration is done through this interface: from adding hosts to configuring your service checks. It’s all done through an intuitive browser-based system.
Now, I’ll admit NConf is not the most aesthetically beautiful feature of NEMS at the moment, but it works brilliantly. And a redesign of the UI is on schedule for a future release. When that happens, the interface will be automatically updated on all existing deployments through NEMS’ automatic update system. With NEMS NConf, you will never have to look at a Nagios cfg file again!
NEMS System Settings Tool (SST)
Speaking of doing away with Nagios config files, several Nagios configuration options have been moved to a tool called NEMS System Settings Tool, also referred to as NEMS SST. Items such as your SMTP server settings, domain user credentials, and other defaults are part of this interface.
So now that you know a little about what NEMS is and how it came about, let’s dive in!
Installation
All that is required in order to deploy NEMS Linux is a compatible ODROID device and a Micro SD card. At the moment, the XU3, XU4, HC1, and HC2 are all supported. More devices will be supported as soon as I have development hardware to compile and test on, so if you’re reading this article several months after publication, please check the NEMS website, as your board may be supported.
Download the latest version of NEMS Linux from https://nemslinux.com and “burn” it using your favorite tool. I’ve really come to prefer Etcher from https://etcher.io/ but you can use whatever tool you like best. eMMC may work for you if you have a current bootloader, but it is not yet officially supported. If in doubt, please use a UHS-I or better SD card. I recommend 16GB or more, but you could get away with 8GB if that’s all you have handy. You can always use NEMS Migrator to move to a bigger card down the road.
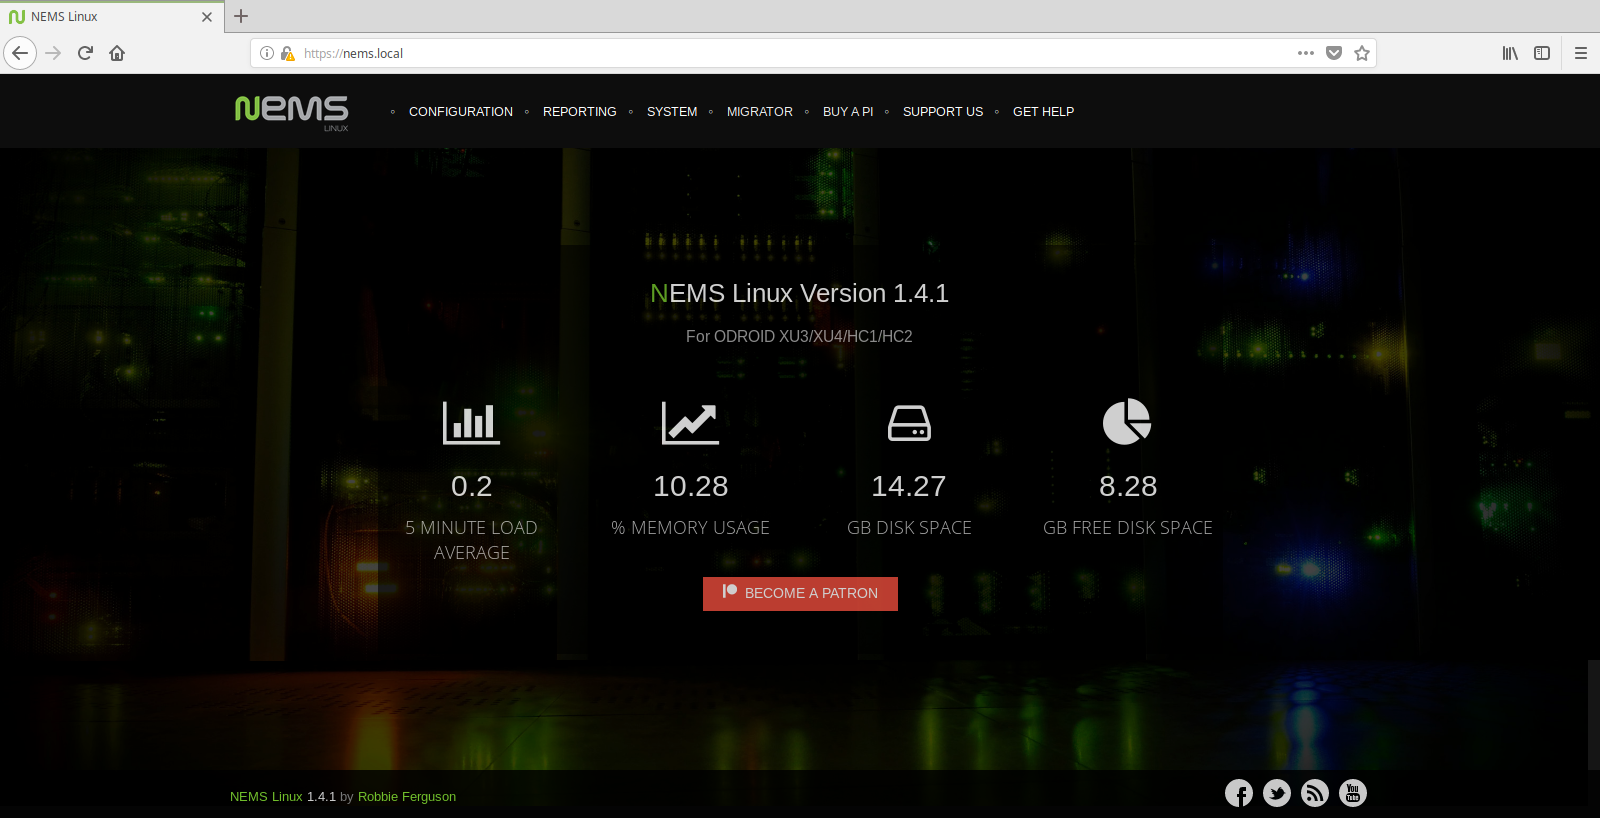
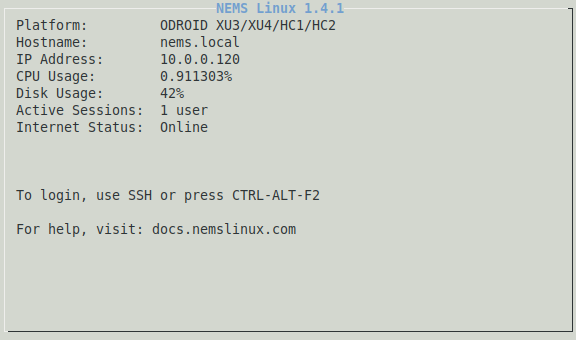
Upon booting your NEMS Linux server, your filesystem will be automatically resized to the capacity of your SD card. You can confirm NEMS is up and running by visiting https://nems. local/ in your web browser. If name resolution doesn’t work, try the IP address of your NEMS device instead, which you can find in your router’s DHCP table, or on a TV connected to your device’s HDMI port. I do plan to introduce support for the Cloudshell 2 screen in a future update.
Initialization
Generally speaking, the only time you’ll really have to touch the Linux terminal on a NEMS server is during the initialization procedure. This task works magic in automatically configuring your entire server in just a few seconds. It generates self-signed certificates so every NEMS Linux user has a unique certificate, allows you to configure your timezone, creates your Nagios admin user, your Linux account, and so on. To initialize your NEMS Linux server, connect to your server over SSH on the default Port 22 using the following credentials:
Username: nemsadmin
Password: nemsadmin
Once connected, type:
$ sudo nems-initYou’ll be asked to enter the password again. Follow the prompts. All the complicated stuff is made easy.
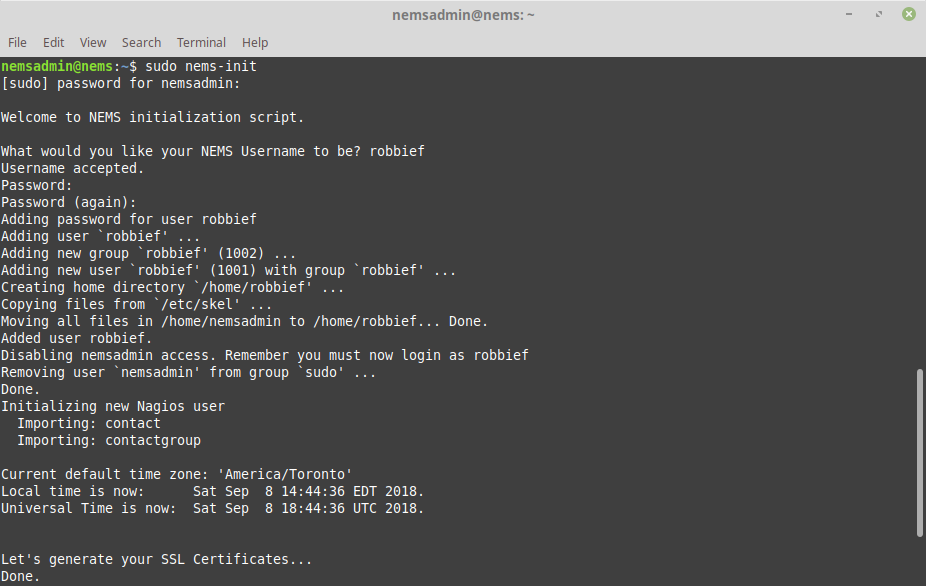
Congratulations! Your NEMS Linux server is now online and ready to monitor your network assets.
Connecting to Your NEMS Server
Now that your NEMS Linux server is up and running, you can access its entire feature set via your web browser. Simply point to https://nems.local/ which should work in most networks out of the box, but if you need to, you can alternatively use the IP address of your NEMS server.
Setting Up Email Notifications
The first thing you’ll want to do on your new NEMS Linux server is configure your SMTP settings. This will allow your NEMS server to email you if a problem is detected.
Access the NEMS System Settings Tool (SST) from the Configuration menu of your NEMS dashboard. This tool does away with the need to use the traditional Nagios resource.cfg file to configure your email settings. One of the nice things about NEMS Linux is that I really don’t have to go into detail about how to do this. It’s so intuitive that it does not require explanation. So I’ll just provide a screenshot in Figure 5.
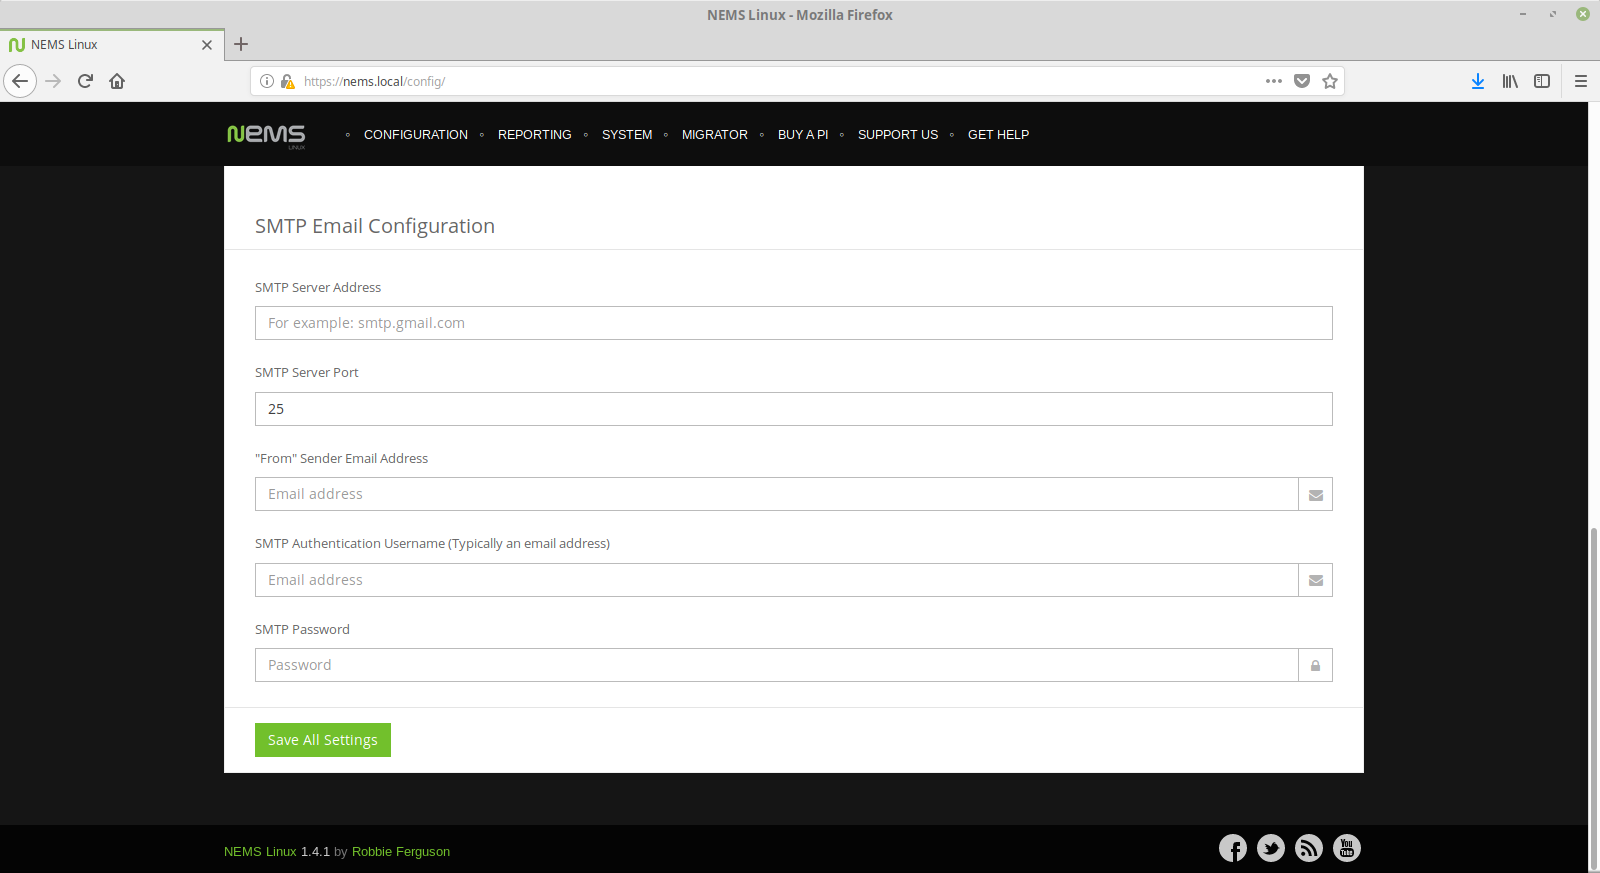
Configuring your SMTP server in NEMS is as simple as configuring a mail client.
Tip: If you’re using Gmail as your SMTP provider, be sure to review the NEMS Documentation found at https://docs.nemslinux.com/usage/nagios-gmail-smtp for the additional steps required.
Once you are confident your SMTP settings are correctly entered, click Save All Settings and then re-connect over SSH to test your email settings with the following command (replacing youremail@yourdomain.com with your actual recipient email address):
$ sudo nems-mailtest youremail@yourdomain.comThis command simply verifies your mail settings by sending a test notification. If there are any problems, it will show you on screen what the issue is, and you can make the necessary changes to your account settings in NEMS SST.
Note: NEMS currently requires your SMTP server support TLS authentication. Against my best judgement but in line with user requests, an option will be added to a future release to allow insecure authentication if required, as might be the case with an internal relay.
The Final Step to Email Notifications
The final step in setting up your email notifications is to tell NEMS where you’d like these notices to be sent. To do this, open NEMS Configurator (NConf) under Configuration, and on the left navigation press Show next to Contacts. You will see the NEMS Initialization procedure already added your user to NConf. It’s robbief in my case. Press the pencil icon (Modify) to edit your contact.
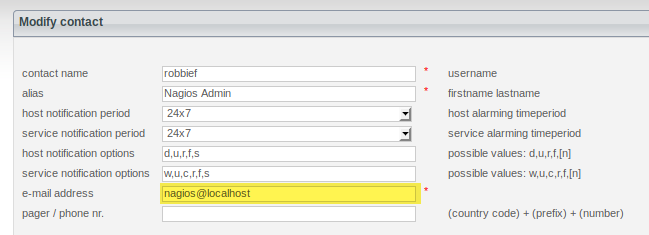
Under Email Address, change the value to your actual email address. Ensure your recipient email address is not the same as the one used for your SMTP settings in NEMS SST. Otherwise you may not receive the notifications as the receiving server will see you as the sender and hide the notifications from your inbox.
Once you’ve changed the email address, scroll down and press Submit to save the changes. Please note that your contact information will not be live until you Generate Nagios Config.
Generate Nagios Config: Make Your Changes Live
To make your changes live, press the Generate Nagios Config link on the left navigation. You should see 0 errors. If you do see errors, press the Syntax Check bar and review where you went wrong. NConf is very good at showing you where the error is so you can go back and fix it and try again.
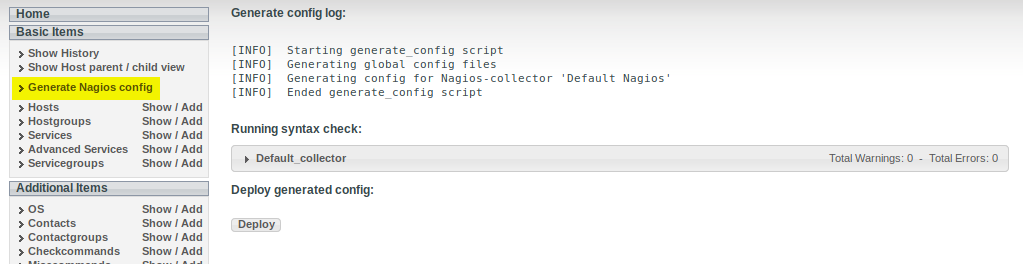
If everything checks out, press Deploy, and your admin contact email address will instantly be activated in Nagios.
Learn More
I would like to encourage you to visit the NEMS Documentation and Community Forum to learn more about how to configure and use your new NEMS Linux server, and be sure to join me again in next month’s edition of ODROID Magazine as we go through our first exercise: Configuring NEMS Linux to monitor a local Linux server. NEMS has an active community forum. I check in quite regularly to provide free support to users. I also offer commercial one-on-one priority support for those needing a higher level of support.
I would like to extend thanks to mad_ady and meveric from the ODROID community for assisting me in those early days as I planned to port NEMS Linux to the ODROID platform. Of course, this release wouldn’t be possible without the great work meveric has done on the Debian Stretch image, which powers NEMS Linux for ODROID-XU3/XU4/HC1/HC2. NEMS Linux is free to download and use. Its source code is available on GitHub, and the ready-to-use image can be downloaded for the ODROID at https://nemslinux.com.
About the author
Robbie Ferguson is the host of Category5 Technology TV and author of NEMS Linux. His TV show is found at https://category5.tv and his blog is https://baldnerd.com.
Be the first to comment