
The National Institute of Science and Technology, or NIST, maintains a widely used set of open source tools known as NIST Biometric Image Software, or NBIS for short. The functionality that is going to be focused on is its use related to fingerprinting[1], [2]. This article will cover everything needed to get up and running to compare prints on an ODROID-XU4.
Parts of this article were taken from my master’s project related to performing image preprocessing on latent fingerprints in order to increase matching performance of the software provided by NBIS. The project made use of an ODROID-XU4 since the processor used on the ODROID-XU4, a Samsung Exynos 5422 [3], is the same processor used Samsung Galaxy S5, a device which contains a fingerprint reader. This provides a near exact representation of a potential use case target where these preprocessing algorithms would be used. While this was important for my original project’s use case, it is also important to many others. The low-power and high-performance aspect of the ODROID-XU4 makes it ideal for many projects one might have in mind. For instance, an ODROID-XU4 would make an ideal controller in an IoT system which could also implement biometric authentication for in-person access.
Software Setup
The ODROID-XU4 needs to be loaded to run Ubuntu 18.04LTS, preferably the minimal version. NBIS is compiled using the GNU C/C++ toolset. After the ODROID-XU4 has been setup, the directions on the hardkernel wiki page are a great guide to use, the NBIS should be downloaded from https://www.nist.gov/itl/iad/image-group/products-and-services/image-group-open-source-server-nigos.
Open a terminal in the directory where nbis_v5.0.0.zip was downloaded. The following set of steps will result in the compilation of all the binaries that are needed. First, cmake needs to be installed as it is used in later steps, next the archive is extracted and moved into a folder named ‘nbis’. Within that ‘nbis’ directory a ‘build’ directory is then created where the setup script (setup.sh) is instructed to place all the binaries in the final install step. The path provided to the setup script needs to be a complete path, not a relative path or one that makes use of any shortcuts, such as ~. Additionally, the arguments without X11 and stdlibs are passed, these arguments help reduce the needed external dependencies which are required. Lastly, the sequence of make steps configures, compiles and moves the binaries to their final location, respectively.
$ sudo apt-get install cmake
$ unzip nbis_v5_0_0.zip
$ mv Rel_5.0.0 nbis
$ cd nbis
$ mkdir build
$ ./setup.sh /home/odroid/Downloads/nbis/build --without-X11 –STDLIBS
$ make config
$ make it
$ make install
The above steps result in a working set of binaries and create everything needed to move forward. However, through some quick testing, it was shown that adding a couple extra build flags can create binaries that are extremely well tuned for the ODROID-XU4. In the ‘nbis’ directory there are two files ‘rules.mak’ and ‘arch.mak’, open both files. There will be a line declaring the variable ‘ARCH_FLAG’, add the following items to be assigned to it. Any existing items that were assigned to ‘ARCH_FLAG’ such as ‘-fPIC’ need to remain.
ARCH_FLAG := -fPIC -mfloat-abi=hard -mcpu=cortex-a15 -fipa-ptaAfter editing and saving the files with the above listed change, the following commands should be run.
$ make clean
$ make config
$ make it
$ make install
Software
Out of all the binaries that get created, the following three are all that is needed in this example.
CWSQ : Image to Wavelet file converter CWSQ will create a compressed wavelet file from a grey scale input. There are two selectable compression rations for our testing 5:1 was used, the other option is 15:1. Most other NBIS tools work off of this wavelet file format, so all fingerprints destined to be matched need to be in this format.
MINDTCT : Minutiae detection
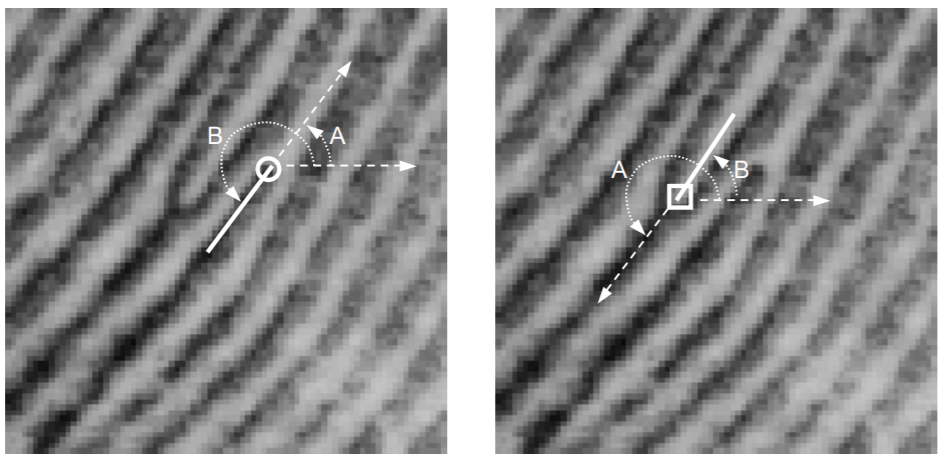
MINDTCT is a minutiae detection program, a minutiae point can be thought of as an interesting feature in a fingerprint. The type, location, and angle of the points found in this program are used to compare and contrast points[4]. There are many different types of minutiae points, but MINDTCT only detects endpoints (first image) and bifurcation (second image) in a fingerprint. The point’s type, location, and orientation are saved to a file. Each minutiae point is saved as coordinates based on their distance in millimeters, with 0.01mm increments, to the bottom left corner of the image [1]. Additionally, points contain angle information related to the local direction of the contours of the ridges and values (the white and black lines in a fingerprint image) that make up a minutiae point. The following image shows two different minutiae points. The angles, ‘A’ and ‘B’ represented in the images represent two different methods for measuring angles NBIST uses angles measured by ‘A’.
BOZORTH3 : Fingerprint matching
The Bozorth3 algorithm and software is an export-controlled piece of code. At a high level the software takes one fingerprint and it will compare against ‘n’ number of target inputted fingerprints and return a match rate for each of the target fingerprints. The fingerprints files it uses are in the file format created from MINDTCT.
Running
If no fingerprint capture device is connected or available, there are several databases containing image sets of fingerprints which can be used for testing. One of these such databases is FVC 2002 database available at http://bias.csr.unibo.it/fvc2002/. The commands can either be executed from a terminal running the ‘build/bin’ directory or that path can be added to the terminals $PATH variable, so the commands can be from any location.
$ export PATH=$PATH:/home/odroid/Downloads/nbis/build/binTo make things simple, I will assume there is a known fingerprint called ‘myprint.tiff’, and the intent is to see if it matches another print known as ‘mysteryprint.tiff’. The first step is to convert the both fingerprint image into a wavelet.
$ cwsq .75 myprint.tiff
$ cwsq .75 mysterprint.tiff
After each “cwsq” command, it will show a bit of information about the print and create a corresponding *.wsq with the same name and the input *.tiff file. Next, these wavelet files are sent to MINDTCT, this will create several files types the only one of interest is the *.xyt file.
$ mindtct -b -m1 myprint.tiff myprint/The final step is to compare or ‘match’ the prints with each other. This can be done with the following command:
$ bozorth3 -m1 A outfmt=spg -T 30 -p myprint.xyt mysteryprint.xytHowever, multiple files can be compared against our target print (myprint). This can be easily done with a wildcard operator, *.xyt as the last argument in place of ‘mysteryprint.xyt’ would compare all xyt files against myprint.
$ bozorth3 -m1 A outfmt=spg -T 30 -p myprint.xyt *.xytThe resulting output will be a list with one or more comparisons. Each line is a new comparison, where the first field is a ‘score’ dictating how similar the matches are. The ‘-T 30’ argument given in the command is a threshold meaning disregard anything less than 30. The second value is the ‘target’ print so it will always be ‘myprint’ in each row, the next item is the file that it was compared against. Shown below is an example of the output when a wildcard is used, hence myprint is compared against itself.
250 myprint.xyt myprint.xyt
41 myprint.xyt mysteryprint.xyt
Since mysteryprint scored a 41, it is considered to be a match with myprint. There is no real perfect threshold value, as it is all based on what is an acceptable false-positive and false-negative rate. A threshold for unlocking a door to a house will certainly need to be higher than to access a IoT panel to adjust the heating temperature.
If this was interesting, more information is provided in the reference links below. The original project paper and code can be found on GitHub at https://github.com/AndrewRuggeri/FP.
References
- [1] C. Watson et al., “User’s Guide to NIST Biometric Image Software (NBIS).” Gaithersburg, p. 207, 2007.
- [2] E. Tabassi, C. Wilson, and C. Watson, “Fingerprint Image Quality,” NIST, vol. NISTIR 7151, 2004.
- [3] R. Roy, Hardkernel ODROID-XU4 Manual, 20170310th ed. Hardkernel, 2017.
- [4] D. Maltoni, “A Tutorial on Fingerprint Recognition,” Adv. Stud. Biometrics, vol. 3161, pp. 43–68, 2005.
Be the first to comment