Coronavirus Tracking And Monitoring: Using IoT with an ODROID-C2 to Stay Informed

Wouldn’t it be interesting to use ODROID-C2 in order to see specific pandemic data and to know what’s happening in your country in the middle of crisis today? In this article we will see how we can keep up to date with the COVID-19 pandemic using ODROID-C2 and an IoT platform (uBeac) with a dashboard. The brief setup includes the following:

Overview

The ODROID-C2 as an IoT device in this project is using uBeac (https://www.ubeac.io/) , an IoT platform, to send data that is pulling off periodically from https://www.worldometers.info/coronavirus/, and from there you, as a user, can choose which of those data would you like to display on a customized dashboard. The surveillance of the COVID-19 data could also be used to produce preventative solutions such as sending notifications about a potential parameter as soon as it occurs or even before setting a threshold. All of this monitoring can be done through a versatile IoT platform for centralized digital transformation, data integration and visualization uBeac which allows you to connect, process and visualize real-time data securely. Undoubtedly the ODROID-C2, a powerful 64-bit quad-core single board computer (SBC), a cost-effective 64bit development ARM board can perform these multiple tasks of varying difficulties with efficiency. In order to follow this guide easily we divided it into logical steps, as detailed below.

Step 1: Signing up with uBeac

In order to get started, you can sign with uBeac at the web address https://www.ubeac.io . All you need is to add your email and create a password. On top of that, you must create a team. The team requires you to declare a name for the team, a code name (namespace), and an address.

Figure 1 - Creating a uBeac account

Step2: Setting up uBeac

Now that you have declared your team with uBeac, you need to create a gateway to connect ODROID-C2. From the uBeac homepage, click on the Gateways module and add a new gateway. Under the General tab, assign a UID and a name for your gateway f.g COVID19. As you may connect more devices on your gateway, select uBeac Multiple Device as the type of your gateway. Under the HTTP tab, you will find the two protocols URLs: one for HTTP and one for HTTPS. Those two protocols will be used to connect to your ODROID-C2. Finally, click submit to add the gateway.

Figure 2 - Creating a gateway with uBeac

Figure 3 - Specifying the uBeac gateway URLs

Step 3: Setting up the ODROID-C2

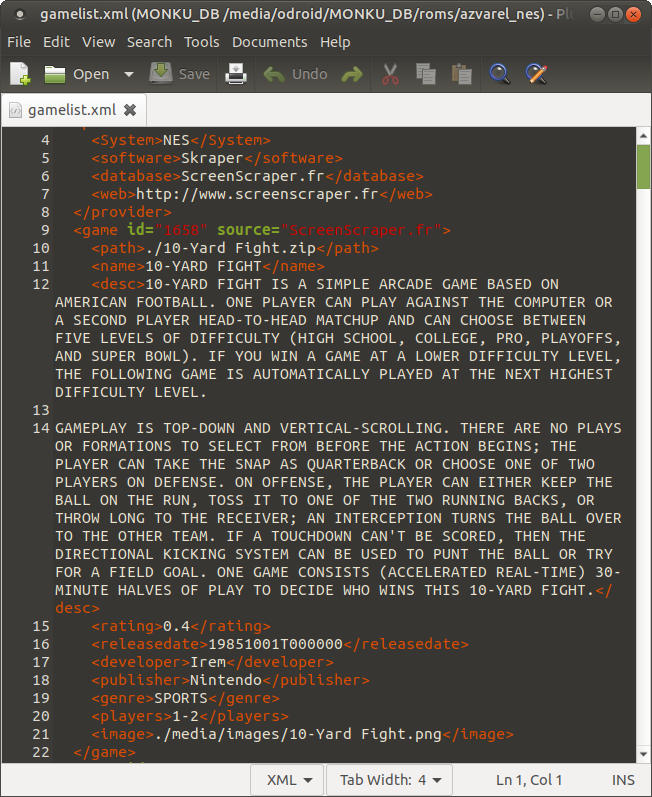
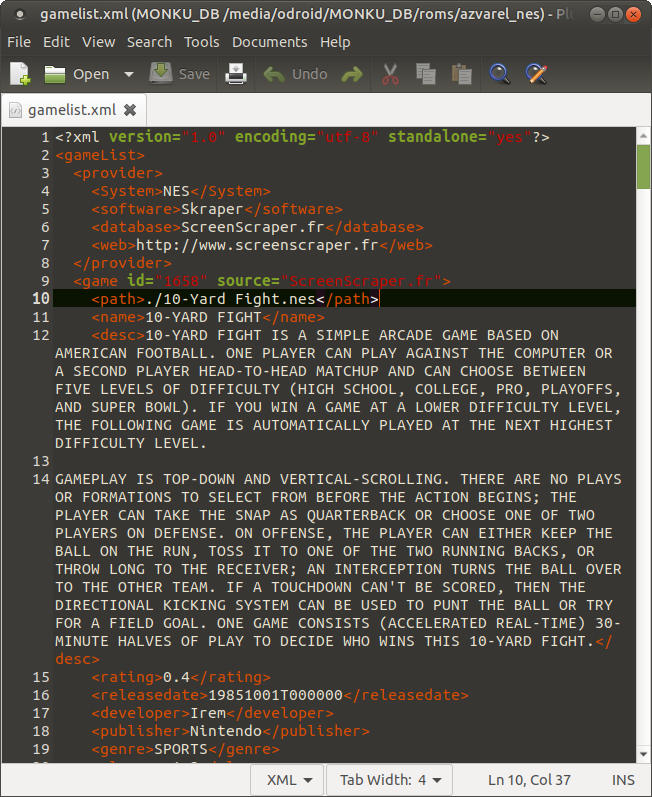
The release version should be 3.14.79-117 (Feb 26, 2017) or higher and the python version 3.5.2 or higher. The code consists of 3 interrelated programs *.py programs written in python with the main_py.py to be the executable. We run the main_py.py program under command prompt with sudo within the python3 environment and we are calling the other two (i.e world_cases_collector and getting_world_value) as modules. It’s that easy!

$ sudo python3 main_py.py
There are two prerequisites though: first we install the package “psuit”. The psutil (process and system utilities) is a cross-platform library for retrieving information on running processes and system utilization (CPU, memory, disks, network, sensors) in Python. It is useful mainly for system monitoring, profiling and limiting process resources and management of running processes. We can install psuit with the pip, the installer packager in linux.
$ pip install psuit
Next, we can install the package “speedtest-cli”, which is a script written in the Python programming language that measures the internet speed bidirectionally. We install speedtest-cli with the pip package installer again:
$ pip install pseedtest-cli

Step 4: Debugging the IoT device

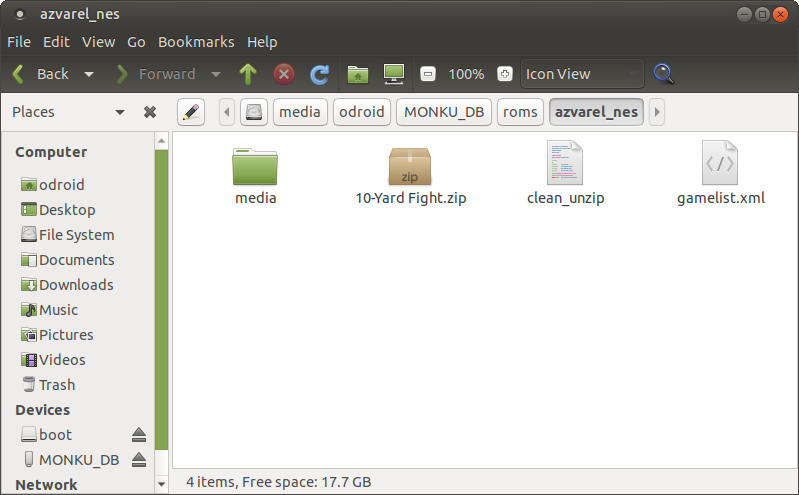
You can download the code from here (https://bit.ly/2xd88If). Running the main_py.py will result in a connection between your device i.e ODROID-C2 and the gateway on uBeac. You can edit of course the main-py.py with your details before run this executable in Python and especially this field:

# Configuration section

UBEAC_URL = ‘hub.ubeac.io’
GATEWAY_URL = ‘INSERT GATEWAY URL HERE’
DEVICE_FRIENDLY_NAME = ‘World COVID19 Tracker’ ← as an example
SENT_INTERVAL = 900 # Sent data interval in seconds
The ‘SENT_INTERVAL’ command can be set to any sent data interval in seconds, and we have set it to 900 in this example, that mean that ODROID-C2 will be used as a device to send the data to uBeac every 15 minutes.

Now, go back to uBeac and select the Gateways module again to see that a device has been added to it. If you click your gateway, you can see all the HTTP POST requests that the ODROID-C2 is sending to uBeac. If you select the Devices module and click on “this device”, which is your ODROID-C2, you will see all the data for the coronavirus from https://www.worldometers.info/coronavirus/ that it is sending to uBeac!

Figure 4 - Inspecting the data being sent to the ODROID-C2

Step 5: Creating the uBeac dashboard

The last part is the best! Having a dashboard to visualize your incoming data is very useful especially if you want to analyze and utilize the data afterwards. First, you must set up the dashboard. Go to the Dashboards module and add a new one. Pick a name, such as “COVID19 Tracker” and then click the Submit button. A blank dashboard will appear, which you can customize and modify anytime. On the top right corner of the dashboard page, click the clipboard icon to start editing the dashboard. There are many widgets such as indicators, charts and device trackers to help you visualize your data. Next, you would probably click the ‘connect to data’ button to edit the widget settings. This includes changing the display icon, selecting the device to collect data from and other features that are unique to each widget. Once you are satisfied with your widget, save your progress. You can continue doing this for as many widgets as you would like. In Figures 5 and 6, you can see an example of my dashboard displaying the measurements of COVID-19 in my country, Greece.

Figure 5 - The COVID-19 uBeac dashboard as seen in Greece

Figure 6 - The COVID-19 uBeac dashboard as seen in Greece

Step 6: Revisiting history

While the dashboard displas your live sensor activity, it does not show your previous data. That is kept in the Reports module, a very useful module for tracking past records. There you can find all historical records of your COVID-19 data, dating back to when you would have started keeping track of these data. You can also get reports from your entire gateway. Most importantly, this data can be filtered by date, time range, devices and practically in any parameter f.g individual countries, continents, global etc. There is also the ability to use this data for another project by exporting it in CSV or in JSON format.

Figure 7 - Inspecting the sensor data historical reports for your COVID-19 tracker

Final words

This is an example of how you can use ODROID-C2 in conjunction with uBeac to create and monitor the COVID-19 statistics. You can also, as outlined above, filter them, manipulate, visualize them and finally export them for external use in different projects. You can even add more powerful devices as ODROID-XU4 (https://bit.ly/2VFP0vM) into the same dashboard.

Scripts main_py.py

import json
import threading
import http.client
from world_cases_collector import getting_world_value

# Configuration section
UBEAC_URL = 'hub.ubeac.io'
GATEWAY_URL = 'INSERT GATEWAY URL HERE'
DEVICE_FRIENDLY_NAME = 'World COVID19 Tracker'
SENT_INTERVAL = 900 # Sent data interval in second

day = False
date = input("Update for Today or Yesterday? (T/Y) : ")
if date == 'T':
day = True
else:
day = False

def main():
threading.Timer(SENT_INTERVAL, main).start()
device_world = [{
'id': DEVICE_FRIENDLY_NAME,
'sensors': getting_world_value(day)
}]

connection = http.client.HTTPSConnection(UBEAC_URL)
connection.request('POST', GATEWAY_URL, json.dumps(device_world))
response = connection.getresponse()
print(response.read().decode())

if __name__ == '__main__':
main()

_const_cases.py
# WORLD CASES CONSTANTS
country = 0
w_total_cases = 1
w_new_cases = 2
w_total_deaths = 3
w_new_deaths = 4
w_total_recovered = 5
w_active_cases = 6
w_serious_critical = 7
w_tot_cases_M = 8
w_deaths_M = 9
w_total_tests = 10
w_tests_M = 11

# JSON CONSTANTS
COUNTRY_OTHER = 'Country'
USA_STATE = 'USA States'
TOTAL_CASES = 'Total Cases'
NEW_CASES = 'New Cases'
TOTAL_DEATHS = 'Total Deaths'
NEW_DEATHS = 'New Deaths'
TOTAL_RECOVERED = 'Total Recovered'
ACTIVE_CASES = 'Active Cases'
SERIOUS_CRITICAL = 'Serious Critical'
TOT_CASES_M = 'Total Cases per Million'
DEATHS_M = 'Deaths per Million'
TOTAL_TESTS = 'Total Tests'
TESTS_M = 'Tests per Million'

# EXTRA JSON CONSTANTS
TOTAL_CASES_PERCENT = 'Total Cases %'
NEW_CASES_PERCENT = 'New Cases %'
TOTAL_DEATHS_PERCENT = 'Total Deaths %'
NEW_DEATHS_PERCENT = 'New Deaths %'
TOTAL_RECOVERED_PERCENT = 'Total Recovered %'
ACTIVE_CASES_PERCENT = 'Active Cases %'
SERIOUS_CRITICAL_PERCENT = 'Serious Critical %'
DEATHS_VS_CASES = 'Deaths Rate %'
RECOVERED_VS_CASES = 'Recovery Rate %'

def get_sensor(id, value, type=None, unit=None, prefix=None, dt=None):
sensor = {
'id': id,
'data': value
}
return sensor

def get_percentage(str_num, str_dem):
if str_dem == '0':
return '0'
percent = float(str_num) / float(str_dem) * 100
return str(float("{:.2f}".format(percent)))

world_cases_collector.py
from bs4 import BeautifulSoup as bf
import requests
import _const_cases as const

num_places = 220 #number of countries

def getting_world_value(today): #getting the value from website
data_list = []
html = requests.get("https://www.worldometers.info/coronavirus")
soup = bf(html.text,'html.parser')
if today:
tag = soup("tr")[9:9 + num_places]
else:
tag = soup("tr")[239:239 + num_places]

def extract_vals(arr):
temp_list = []
arr_size = len(arr) - 2
for j in range(arr_size):
if j == 1:
temp_list.append(arr.contents[j].contents[0].contents[0])
elif j % 2 == 1:
value = arr.contents[j].contents
if len(value) == 0:
value.append('0')
value = value[0]
value = value.replace("
", "")
value = value.replace("+", "")
value = value.replace(",", "")
value = value.replace("N/A", "")
if len(value) == 0 or value == ' ':
value = '0'
temp_list.append(value)
return temp_list

compare_list = extract_vals(tag[-1])

for i in range(len(tag)):
insert_list = extract_vals(tag[i])

def continents(arg, day):
if day:
switcher = {
212: 'North America',
213: 'Europe',
214: 'Asia',
215: 'South America',
216: 'Oceania',
217: 'Africa',
218: 'Unknown',
219: 'World',
}
else:
switcher = {
211: 'Asia',
212: 'North America',
213: 'Europe',
214: 'South America',
215: 'Oceania',
216: 'Africa',
217: 'Unknown',
218: 'World'
}
return switcher.get(arg, insert_list[const.country])

data_name = continents(i, today)
data = {
const.TOTAL_CASES : insert_list[const.w_total_cases],
const.NEW_CASES : insert_list[const.w_new_cases],
const.TOTAL_DEATHS : insert_list[const.w_total_deaths],
const.NEW_DEATHS : insert_list[const.w_new_deaths],
const.TOTAL_RECOVERED : insert_list[const.w_total_recovered],
const.ACTIVE_CASES : insert_list[const.w_active_cases],
const.SERIOUS_CRITICAL : insert_list[const.w_serious_critical],
const.TOT_CASES_M : insert_list[const.w_tot_cases_M],
const.DEATHS_M : insert_list[const.w_deaths_M],
const.TOTAL_TESTS : insert_list[const.w_total_tests],
const.TESTS_M : insert_list[const.w_tests_M],
const.TOTAL_CASES_PERCENT : const.get_percentage(insert_list[const.w_total_cases],compare_list[const.w_total_cases]),
const.NEW_CASES_PERCENT : const.get_percentage(insert_list[const.w_new_cases],compare_list[const.w_new_cases]),
const.TOTAL_DEATHS_PERCENT : const.get_percentage(insert_list[const.w_total_deaths],compare_list[const.w_total_deaths]),
const.NEW_DEATHS_PERCENT : const.get_percentage(insert_list[const.w_new_deaths],compare_list[const.w_new_deaths]),
const.TOTAL_RECOVERED_PERCENT : const.get_percentage(insert_list[const.w_total_recovered],compare_list[const.w_total_recovered]),
const.ACTIVE_CASES_PERCENT : const.get_percentage(insert_list[const.w_active_cases],compare_list[const.w_active_cases]),
const.SERIOUS_CRITICAL_PERCENT : const.get_percentage(insert_list[const.w_serious_critical],compare_list[const.w_serious_critical]),
const.DEATHS_VS_CASES : const.get_percentage(insert_list[const.w_total_deaths],insert_list[const.w_total_cases]),
const.RECOVERED_VS_CASES : const.get_percentage(insert_list[const.w_total_recovered], insert_list[const.w_total_cases])
}
data_list.append(const.get_sensor(data_name, data))
return data_list

Autonomous Drone: Take To The Skies With Your ODROID-XU4

This tutorial will walk you through building a Pixhawk guided autonomy-capable drone. The project consists of the following:

  • ODROID XU4 with 32GB SD Card (Flashed with Ubuntu 18.04)
  • ODROID WiFi Module #5
  • 3DR Pixhawk 1 FCU
  • Pixhawk Power Module
  • USB-TTL Module
  • Intel Realsense T265 Tracking Camera
  • Q330 UAV Frame
  • RS2203 2300KV Motors x 4
  • 25A-rated ESCs x 4
  • 5500 mAh 3S LiPo Battery
  • Spare 2.1mmx5.5mm Barrel Power Connector
  • FS-IA6B Radio Receiver
  • Flysky i6 Controller
  • PDB
  • Double Sided Mounting Tape

Wiring and Assembly

Figure 1 - All the materials used for this project prior to assembly

The important takeaway from our list of materials is that most of our required materials can be used to build a simple drone. The Pixhawk controller is designed to communicate with any onboard Linux capable computer and doesn't care about the peripherals, so you could potentially use any radio, battery, ESC/motor combination, and frame you want. This universality is powerful, thus you do not need to restrict yourself to the materials I listed.

Our first step would be to assemble the drone. We will assemble it in a "Quad X" configuration, which is the simplest drone configuration available in Pixhawk. Figure 2 shows how you should set up your drone connections, and also where the ESC signals should be connected to the Pixhawk outputs.

Figure 2 - Quad X with associated motor directions and numbering

Figure 3 - Pixhawk Output pins (numbered). First 4 pins are colour-coded for connecting a Quad X frame

After assembling the frame and screwing the motors in, you can solder the ESCs to the PDB (which is part of the Q330 frame) and to the motors. Figure 4 shows the associated wiring for different sping directions.

Figure 4 - ESC to motor wire connections corresponding to different spin directions

Now connect the radio receiver to Pixhawk. Pixhawk interprets signals as SBUS, which I configured my FS-IA6B receiver to output over a single data line.

Figure 5 - FS-IA6B to Pixhawk link

Now we solder the spare barrel jack connector to the Pixhawk power module, which has a 5V 3A BEC that we will use to power the onboard ODROID. The soldering is shown in Figure 6. Testing the voltage output with the voltmeter shows 5.28V, which is safe for powering our ODROID.

Figure 6 - Barrel jack connector to BEC soldering

Figure 7 - Voltage output from the BEC after powering on the circuit

The last soldering will be the USB-TTL converter, which will be used for communication between ODROID and the Pixhawk FCU, shown in Figure 8. A schematic can be found at https://ardupilot.org/dev/_images/ODroid_Pixhawk_Wiring.jpg.

Figure 8 - USB-TTL data connection to Pixhawk

We are now done with the tedious part of the assembly, and it's time to mount everything onboard. I used soft double sided mounting tape so that the FCU and camera wouldn't be affected by the vibrations from the quadrotor. Due to the lack of space, I decided to mount the camera on the Pixhawk FCU, which was mounted on top of the ODROID. This is not the best approach, but it works well enough, though the issue could be easily mitigated by using a smaller FCU (such as the Pixracer) or by 3D printing extensions.

Figure 9 - Double sided mounting underneath the ODROID-XU4

Figure 10 - The ODROID mounted on the Q330 frame

Figure 11 - The Pixhawk FCU mounted on top of ODROID. Note that the Pixhawk FCU was leveled W.R.T. the Q330 frame

Figure 12 - Receiver, barrel jack, USB-TTL, WiFi adapter, and ESC outputs connected

Figure 13 - Realsense T265 camera mounted on top of the Pixhawk FCU and connected to ODROID

ODROID software setup

Our assembly is now complete, and it's time to set up the software. Luckily this is so simple it all boils down to installing packages and verifying our devices/connections:

1. Install ROS Melodic from http://wiki.ros.org/melodic/Installation/Ubuntu 2. Install [librealsense from https://github.com/IntelRealSense/librealsense/blob/master/doc/installation.md. (make sure to follow step 5) 3. install ros-melodic-ddynamic-reconfigure via apt 4. Install realsense-ros from https://github.com/IntelRealSense/realsense-ros 5. Install mavros and mavlink:

$ sudo apt-get install ros-kinetic-mavros ros-kinetic-mavros-extras
$ wget https://raw.githubusercontent.com/mavlink/mavros/master/mavros/scripts/install_geographiclib_datasets.sh && ./install_geographiclib_datasets.sh
6. Test that the T265 camera works (connect ODROID to a screen and execute `realsense-viewer` from terminal) 7. Verify T265 camera also works in ROS:
$ roslaunch realsense2_camera rs_t265.launch
You should see odometry messages coming in at a rate of ~200 Hz from this topic
$ rostopic hz /camera/odom/sample
subscribed to [/camera/odom/sample]
average rate: 199.868
min: 0.001s max: 0.012s std dev: 0.00130s window: 189
average rate: 199.845
min: 0.000s max: 0.044s std dev: 0.00947s window: 389
average rate: 199.574
min: 0.000s max: 0.044s std dev: 0.01103s window: 585
8. Install a conversion package from https://github.com/thien94/vision_to_mavros so that the coordinate frames from the camera to the FCU will be correct.

9. Create access point from ODROID's WiFi module and reboot to enable it:

$ git clone https://github.com/oblique/create_ap
$ cd create_ap
$ sudo make install
$ systemctl start create_ap
$ systemctl enable create_ap
$ create_ap wlan0 eth0 odroid_drone --mkconfig /etc/create_ap.conf

Pixhawk FCU setup

At this point our ODROID setup is complete and we need to configure the Pixhawk FCU with QGroundControl. You may download the AppImage to your own computer, and after connecting to the FCU follow these steps to completely set up Pixhawk for accept vision positioning data:

1. Install latest firmware 2. Choose the airframe type (for my case i will choose Quadrotor X - DJI Flame Wheel F330 as it's similar enough to the Q330) 3. Calibrate the FCU sensors 4. Calibrate your radio controller after binding it to the receiver 5. Calibrate LiPo battery and ESCs. Set the correct values in Number of Cells 6. Assign radio channels in Flight Modes. I set mine as in Figure 14 7. We now go to the Parameters section:

  • I changed `CBRK_IO_SAFETY` to disable safety checking, but this is optional
  • Change `PWM_MIN` to a reasonable value (I set it to 1050 us)
  • Set `MAV_0_CONFIG` to "TELEM 2", `MAV_0_MODE` to "Onboard"
  • Uncheck "use GPS" in `EKF2_AID_MASK` and check "vision position fusion" and "vision yaw fusion"
  • Change `EKF2_HGT_MODE` to "Vision"
  • Set the `EKF2_EV_POS_X`, `EKF2_EV_POS_Y`, `EKF2_EV_POS_Z` parameters accordingly
  • For safety, change `COM_OBL_ACT` to "Terminate" and `COM_OBL_RC_ACT` to "Terminate" in case there is some sort of error in the ODROID-Pixhawk data link

Figure 14: My radio controller channel configuration

I assigned a manual kill switch for emergencies as well. The Manual, Position, and Offboard mode switches have been assigned for a smooth transition to autonomy.

Taking flight

Now we will send our own data for flying. We clone a custom package called my_autonomous_drone from https://github.com/yehonathanlitman/my_autonomous_drone and rebuild our ROS space. You should execute the following to find your USB-TTL converter:

$ ls /dev/tty* | grep USB
Then, change launch/px4.launch to follow this format:
<launch >
        <arg name="fcu_url" default="/dev/ttyUSB0:921600" />
        <arg name="tgt_system" default="1" />
        <arg name="tgt_component" default="1" />
        <arg name="log_output" default="log" />

        <include file="$(find mavros)/launch/node.launch" >
                <arg name="pluginlists_yaml" value="$(find my_autonomous_drone)/launch/px4_plugins.yaml" />
                <arg name="config_yaml" value="$(find my_autonomous_drone)/launch/px4_config.yaml" />

                <arg name="fcu_url" value="$(arg fcu_url)" />
                <arg name="gcs_url" value=" " />
                <arg name="tgt_system" value="$(arg tgt_system)" />
                <arg name="tgt_component" value="$(arg tgt_component)" />
                <arg name="log_output" value="$(arg log_output)" />
        </include >
</launch >
Now make a src directory in the my_autonomous_drone package and add a offb_node.cpp (https://dev.px4.io/v1.9.0/en/ros/mavros_offboard.html) to it. Make sure to add the file to the package build so it can be compiled. After powering up the drone from the battery, SSH into the access point you created and follow these commands:

1. Run “roslaunch my_autonomous_drone px4.launch” to begin data transmission 2. Verify the FCU is connected with “rostopic echo /mavros/state” 3. Launch the Realsense node with “roslaunch realsense2_camera rs_t265.launch” 4. Run “roslaunch vision_to_mavros t265_tf_to_mavros.launch” for coordinate frame conversion 5. The last step is to run “rosrun my_autonomous_drone offb_node” to begin sending the position waypoint to Pixhawk. The drone flies are shown in Figure 15.

Figure 15 - Our ODROID drone hovering at 1 meter above the ground!

If you want the drone to do something more impressive, you can play around with the x and y coordinates in offb_node.cpp. For example, an eight-figure can be done using parametric equations (https://mathworld.wolfram.com/EightCurve.html). Inside the while loop we can do this, where the variable “i” is initialized to 0 before the while loop begins:

double t = i * 0.02;
x = a * sin(t);
y = a * sin(t) * cos(t);
i++;

Conclusion

In this guide, I have shown you how to assemble a drone, connect its flight controller to ODROID, and send it simple guidance commands in ROS. This is just the tip of the iceberg of a super interesting field, but with a bit of hard work you can start doing some really amazing things. If you want more, you can check out my YouTube channel (youtube.com/c/SimpleKernel) where I have uploaded some more in depth instructional videos on autonomy using Pixhawk and setting up your own visual guidance from scratch.

Adding A Mouse And Keyboard To Your ODROID-GO Advance: Making the Ultimate on the GO Computer

I thought a small keyboard with an analog stick underneath it attached to the ODROID-GO Advance, similar to the keyboard for the classic ODROID-GO, would be a great project. The keyboard could attach via USB, but a USB Hub Chip would also be needed so that a USB WiFi module could also be attached.

The picture in my mind was not to build a professional-level keyboard, since I lack PCB build experience. Instead I would take an Arduino Micro, it already has a chip that can be identified as Keyboard and mouse, a small USB Hub PCB, a small analog stick, and a lot of keys. The N900 has a 13x3 layout of keys, and was quite usable, but needed some on-screen help. So I though that a 4x12 or 5x12 layout would be better, but I was still unsure about the size.

I created a quick concept with a simple button layout to get an idea for the placement and overall size.

Figure 1 - Keyboard and Mouse concept

The USB hub that I found was a good small size and had 3 USB ports and 1 Ethernet port.

Figure 2 - The USB hub and the black Arduino

Based on feedback on the forum I changed the components. I will now use a 4 port USB Hub. I put together the buttons and completed the work on the hub. I removed 3 USB ports and directly connected a Wifi dongle with an on/off switch and on another port I have connected a Micro USB plug for the Arduino. One port will not be used and a second port exposed to the side would allow other things to be connected. The first test was successful, and I rerouted the USB port to the bottom of the GO Advance to allow me to connect the keyboard more easily. I also included a 2-in-1 Micro-SD module so I can have 2 OS images with me and switch between them easily.

Figure 3 - The USB hub connected to the GO Advance

For the case I used a FDM 3D printer, and for the keys for the keyboard I used a resin 3D printer for much better detail.

Figure 5 - The printed keys, before the next step of painting them black

Figure 6 - Prototype case

I painted the keys black, but lightened the paint application to keep the marks and letters as visible as possible. Then I use wax from a candle, not melting hot, but I take the candle and rub it over the markings and remove everything so only the wax in the marks remains. Figure 7 shows it with one color. Next I want to use 3 colors, which was tricky.

Figure 7 - 2-toned keys

(Figure 7 - 2-toned keys)

After that, I made some modifications to the case and 3D printed it again, this time in black.

Figure 8 - Second print of the case

Figure 9 - New Case with the keys inserted

With my first microSD extension, I managed to damage it when I put everything together. Luckily I bought two of them and was able to carry on. Additionally, I switched to a smaller nano USB hub, since the space inside of the case was a bit too crowded. The smaller hub, however, will not have an extra USB plug.

Figure 10 - Keyboard not attached, showing the microSD extension

Figure 11 - Keyboard attached

More information, and the original Hardkernel forum thread, is available at https://forum.odroid.com/viewtopic.php?f=187&t=38047.

Introducing the New ODROID-C4: A New Generation Single Board Computer

The ODROID-C4 is a new generation single board computer that is more energy efficient and has higher performance than the ODROID-C2 which was introduced over four years ago, as the world's first affordable ARM 64-bit computer. The ODROID-C4 features an Amlogic S905X3 CPU which is a quad-core Cortex-A55 cluster with a new generation Mali-G31 GPU. The A55 cores run at 2.0Ghz without thermal throttling using the stock heat sink, allowing a robust and quiet computer. The multi-core performance is around 40% faster, and the system DRAM performance is 50% faster than the ODROID-C2.

Figure 1 - The New ODROID-C4

Let's look at the block diagram and the key components of the board in Figures 2 and 3 to learn more about the hardware features.

Figure 2 - Block Diagram

Figure 3 - Component Layout

More detailed hardware information is available on the ODROID-C4’s wiki at https://wiki.odroid.com/odroid-c4/hardware/hardware.

CPU performance

Dhrystone-2, Double-Precision Whetstone, 7-zip compression benchmark results show that the ODROID-C4 system performance is 40 ~ 55% faster than the previous generation ODROID-C2.

Figure 4 - CPU Benchmarks

GPU performance

The Mali-G31 runs at 650MHz and is ~50% faster than Mali-450MP in ODROID-C2. The Mali-G31 is the first generation Bifrost-based mainstream GPU from Arm. GPU performance was measured using glmark2-es2 “--off-screen”.

Figure 5 - GPU Benchmarks

RAM performance

Why does DDR4 matter? The ODROID-C4 DDR4 RAM runs at 1320Mhz, with a memory bandwidth that is 1.6 times higher than the ODROID-C2.

Figure 6 - RAM Benchmark

CPU frequency vs performance

Some ODROID users may recall the lower than expected clock speed with ODROID-C2’s S905. We ran a test to confirm the ratio between CPU clock frequency and performance with ODROID-C4.

Figure 7 - CPU Frequency vs Performance

Thermal characteristics

To check thermal throttling, we ran some heavy CPU and GPU loads together on the SoC and monitored the temperature within a chamber that maintains the ambient temperature at 25°C. Note that the current thermal throttling point is set at 75°C in the Kernel configuration.

Figure 8 - CPU & GPU Burning with Passive Heatsink

Figure 9 - CPU Frequency in Timeline

If you put the ODROID-C4 board into an enclosure, you may encounter some thermal throttling issues when the ambient temperature is higher than 20°C and the continuous computing load is very high.

Ethernet

According to our iperf test result, the throughput performance was near 1Gbps.

Figure 10 - iperf Benchmark

USB Port

We measured the USB3 transfer speed with a USB SSD. The average ~340MB/s of throughput should be acceptable for many applications. Since four USB host ports share a single root hub, the transfer rate will be lower if you use multiple USB3 devices at the same time. There is a separate micro-USB port to support the USB 2.0 OTG dual-role interface, too.

Figure 11 - USB Host Benchmark with ‘iozone’ - Write

Figure 12 - USB Host Benchmark with ‘iozone’ - Read

eMMC storage performance

Sequential read and write speed is over 165MB/s and 125MB/s respectively. The 4K random access performance is reasonably fast, too. The iozone test results are as follows.

Figure 13. - eMMC Storage Performance

Micro-SD UHS performance

Using properly implemented UHS dynamic voltage scaling, the sequential read and write speed is over 70MB/s and 50MB/s, respectively.

Figure 14 - MicroSD UHS Performance

Cryptography

The ARMv8 architecture supports hardware accelerated crypto extensions for building a secure system. As expected, we could see very strong openSSL performance with ODROID-C4.

Figure 15 - Cryptography Benchmark

GPIO (40Pin Header)

The ODROID-C4 GPIO interface is similar to the ODROID-C2 and fully supports a 3.3 Volt interface. This is beneficial for using various peripherals without complicated level shifters as needed with the ODROID-XU4’s 1.8Volt GPIOs. Another big improvement is a faster SPI bus interface with a maximum frequency of over 100Mhz. It is significantly faster than the ODROID-C2’s 400Khz software “bit-banged” SPI.

Figure 16 - GPIO Header

Power consumption

Thanks to the modern 12nm fabricated S905X3 CPU, the power consumption and heat dissipation are very low, allowing you to enjoy a quiet and powerful computer with high energy efficiency.

Figure 17 - Power Consumption Comparison

Idle state: ≃ 0.18 Watt Heavy load state: 3.1~3.3 Watt (stress-ng --cpu 4 --cpu-method matrixprod) No cables are attached except DC power input and USB-UART debug console cable.

The power consumption in “IDLE” is measured when a device is not being operated for 5 minutes since the CPU governor is set to “performance”. The measured power consumption is not absolute and could vary according to certain conditions.

Linux Software Support

An Ubuntu 20.04 LTS (full 64-bit) image is available with Linux kernel version 4.9.218 LTS as of April 22, 2020. This LTS kernel version will be officially supported until January 2023. A hardware accelerated video decoder (VPU) driver is available now. We have c2play and kplayer examples which can play 4K/UHD H.265 60fps videos smoothly on the framebuffer of the ODROID-C4’s HDMI output. The Mali G31 GPU Linux driver works only on the framebuffer as well.

Upstream Linux kernel 5.4 is also available for cutting-edge development supporting ARM Mali GPU acceleration. WebGL content can run on the Firefox browser (v75+) using the modern Wayland/GBM backend. However, the VPU acceleration is a work in progress. The Wayland powered Ubuntu 20.04 GNOME Desktop runs quite smoothly, as shown at https://youtu.be/4MfHMKcHaUc.

The Flutter UI framework is powered by an upstream Linux kernel 5.4 and is ARM Mali GPU accelerated, the Home Automation example is supplied as a real world embedded Linux system development reference. There is a demo video with Ubuntu 20.04 Minimal + Linux kernel 5.4 + Flutter UI + direct GPIO access at https://youtu.be/p6bzmdAJqjo.

Android Software Support

Android 9 “Pie” 64-bit is available, and we will release a full source code BSP and pre-built image together. Android user land supports 32-bit as well as 64-bit applications with a Vulkan capable ARM Mali GPU driver. Another big improvement is to support the AndroidThings compatible framework, this will provide an easy development environment to control hardware peripherals on Android using powerful Java APIs. The ODROID-C4 is not a Google AndroidThings-certified device, and Hardkernel’s Android source code does not include the Google AndroidThings source code.

A demo video of Android 64-bit and Vulkan GPU driver demo with PPSSPP “God of War” emulation is available at https://youtu.be/0o-JLCLlGe4. A demo of the Android IoT programming with AndroidThings compatible APIs may be seen at https://youtu.be/C5o7JCQXpr8.

LineageOS

LineageOS 16.0 is another community driven OS, and is available as of April 22, 2020. LineageOS 17.1 is currently being developed, and the very first version would be available in the middle of May, 2020.

CoreELEC

The CoreELEC development team created an amazing OS image for playing 4K/UHD content with HDR color support. The team offers a “just enough OS” Linux distribution designed for an optimal Kodi experience when running on popular Amlogic hardware. A 4K HDR + Audio Pass-through, Netflix 1080p and even 8K-30FPS H.265 video playback is possible with downscaling (https://youtu.be/7ejYL5OuMi0).

Availability and price

The ODROID-C4 is currently available for sale, and orders are being accepted. We will start shipping on April 28th. The ODROID-C4 4GB model is priced at $50, and is available directly from Hardkernel at https://www.hardkernel.com/shop/odroid-c4/. Other worldwide distributors will start selling soon, as shown at https://www.hardkernel.com/distributors/.

Where is the ODROID-C3?

We internally developed the ODROID-C3 based on the S905X2 CPU, which has ARM Cortex-A53 cores, almost two years ago. However, the performance was not good enough, and we had heard about the new upcoming S905X3 with modern ARM Cortex-A55 cores. Therefore, we decided to skip the ODROID-C3.

What about the ODROID-C2/C1+?

We will try and continue the production of ODROID-C2/C1+ for as long as possible, since there are still many B2B customers who continue to purchase them in quantity. However, Amlogic is discontinuing the old S905 and S805 CPUs in the near future, and as a result, we will likely have to discontinue ODROID-C2/C1+ early next year. Please consider switching to the new ODROID-C4 platform as soon as possible.

To view the original announcement, please visit the Hardkernel Wiki article at https://wiki.odroid.com/odroid-c4/odroid-c4.

Linux Gaming on ODROID: Box86 - Part 2

About a year ago, I wrote about box86, an i386 emulator for ARM developed by @ptitSeb, who is also responsible for the awesome gl4es wrapper for OpenGL → OpenGL ES. While the original look at it a year ago was already impressive, I want to look at it again, and point out what has changed since then and what you can do with it now.

Requirements

I’m currently still testing this on my old Debian Jessie based ODROID GameStation Turbo image, with box86-odroid, libgl-odroid and monolibs-odroid installed. Each of these are used in a different way to improve the overall experience and provide drivers needed to run the games in this game. All of the above will be installed together if you install box86-odroid.

Background

Some people may be familiar with a software called ExaGear. It was a commercial x86 (i386) emulator for ARMand ARM64 devices, that allowed you to run i386 software. While the overall performance was quite good, it lacked 3D support, if your platform did not provide x86 GPU drivers, which is normally not the case, except for the RPi which can use MESA drivers, and for this is able to run OpenGL on i386 in a limited way. Also, most x86 games require OpenGL, which most ARM SoCs do not support. Therefore, the overall support for x86 games was limited to 2D games and applications which did not require any hardware acceleration, or command line tools.

With box86, @ptitSeb took a different approach. He did not only write a CPU emulation for x86, but also implemented the possibility of redirecting calls from the x86 environment to the ARM host environment, using native ARM libraries rather than emulated x86 libraries. He first implemented this for OpenGL support, which in combination with gl4es allowed us to run applications and games that require hardware acceleration. It also allows to forward many system calls from applications directly to the host system rather than trying to emulate these calls under an emulated x86 environment, which is much faster than pure emulation.

Overall Changes

@ptitSeb is constantly working on box86 to improve compatibility and performance, but he also is working hard on gl4es (libgl-odroid) to support this project. The combination of these two has greatly improved over the last months allowing us to run more applications and games that are only available on x86 to be run on ARMplatforms. One of the biggest changes is the work @ptitSeb is doing on an x86 → ARM dynamic recompiler. This means that some of the x86 calls are converted directly into ARMcode “on the fly” without emulation, at the time they are requested. The same technique is done in many other emulators to speed up overall performance.

For example, in the past when you run PSX emulator on an ARM64 board, that was compiled for ARM64 it was unable to use dynamic recompiler (for example the C2 or N2), and even if the board was more powerful than other boards, the games were very slow and far from being full speed, while much slower ARMboards (for example the ODROID C1 or U3) were perfectly capable of running these games at full speed with an ARMdynamic recompiler. Some applications run 2-10 times faster with dynamic recompiler, than with pure emulation. The same applies for box86, games that were previously way too slow to play are now running much faster, opening up so many more games that are able to run on ODROIDs. The dynamic recompiler increased loading times a lot, games load so much faster than they did before, where on some games you had to wait 5-15mins to load the game data, they are now loaded in mere seconds.

Recap of some old games

Neverwinter Nights

While the game already ran impressively well the last time I checked it, the latest improvement makes the game a very smooth experience. Overall performance increased quite a bit, and you can now set the graphics quality to maximum. The game runs nearly like a native game with only tiny stutter here and there, which you would expect on an older PC as well. I can highly recommend this game on the ODROID-XU4.

God Will Be Watching

There is not much to say: the game was running well, although not at full speed, so what changed? Now it does run at full speed perfectly well.

Freedom Planet

When I first looked at the game, the game took a very long time to load (somewhere between 5-10 minutes). Now it takes about 30 seconds to start, that is over 10 times faster than it was before. In game, the game was also suffering from some minor speed problems. They were nothing that rendered the game unplayable but it wasn’t full speed, which was a bit of a shame for a game that relies on speed similar to Sonic. This is now fixed as well and the game runs perfectly at full speed.

Faster Than Light

This is another well known commercial game that was already running under box86, but with a very long loading time of over 5 minutes. This is also reduced to less than a minute, and the sound problem is also gone. The game is now fast enough to play music and sound effects and doesn’t cause stutter.

World of Goo

The game now runs at full speed, but might need LIBGL_FB=3 as a flag to run, due to some issues with GLX initialization.

What’s new

So overall the games from last time work better, that’s good, but what is new since then? What can we run that we couldn’t run before?

Day of the Tentacle Remastered

Let’s start with something big and shiny.

Figure 1 - Day of the Tentacle Remastered in 1080p on the ODROID-XU4

Figure 2 - Green never looked friendlier!

I love the original game Day of the Tentacle, and still play it today on ScummVM on my ODROIDs. Now, with box86, I can also play the remastered version with improved graphics and interface. It looks amazing and plays very well. There is one minor downside at the moment. The loading time between screens can be 10 seconds, which is quite long if you consider this game is about walking and exploring and trying out things from one place to another place. Still, the game works fine, and if you don’t mind the loading, there’s no difference between this and a regular PC.

Jelly Killer

This rather simple looking game is actually quite heavy on the GPU, probably due to their use of CRT and other shaders.

Figure 3 - A murderous Jelly is on the loose and jumps it’s way through numerous levels

The game is a puzzle platformer where you need to time your jumps right, infest humans to reach your target, or kill other enemies. It’s a fun little game, which a little while ago only ran slow, but now is quite playable if not yet full speed.

Pier Solar and the Great Architects

This RPG game is a tribute to the old Mega Drive / Genesis styled RPG games and has a 16bit mode that pretty much looks like it could be from a Mega Drive / Genesis. It also has a HD and HD+ mode which look a lot better and polished.

Figure 4 - Pier Solar title screen

Figure 5 - Looting strangers homes like in every good RPG

Figure 6 - You can select auto for AI based fights a faster way to finish a fight

For my taste, the game takes too long to get started, but it’s ok, and I wonder what it’s like in later sections of the game. It’s fully playable on the ODROID- XU4 though, so give it a try if you want.

Postal 2

Many have probably heard of the game, not so many might have played it. In some countries it’s still forbidden due to its controversial nature. This action shooter allows you to follow a peaceful path to accomplish your goals, but it’s also the more boring path. The game runs overall ok, but not perfect. I had issues with sound and it’s hard to change resolution. The game is slightly too slow, not unplayable, but definitely not full speed.

Figure 7 - Another full 3D game with a very strange theme

Figure 8 - This guy doesn’t know what’s coming at him

The Bard’s Tales

The Bard’s Tales is an impressive series of RPG games that look very good and run fine on the ODROID-XU4 and other ODROIDs. The graphics are really something, and although the game was already working when I last tried it a couple of months back, it now has much better performance, making this game feel like a native game.

Figure 9 - Even the Menu is fully 3D animated

Figure 10 - The graphics are impressive for this game, especially on ODROIDs

I can only highly recommend the game, it’s very funny and has the famous “Beer Song” (https://www.youtube.com/watch?v=eTUJNeuFIFA), and a game that has beer in it can’t be bad.

Toki Tori

This game strangely only runs with OpenGL 1.x support, but it doesn’t show. The game looks gorgeous and plays really nicely. You need to rescue all the eggs in the game by collecting them. This puzzle game is quite challenging and makes you think before you make your move. It also looks very cute and has a nice little tune that fits the game perfectly. Overall, this game runs great even if it may not be the same speed as on a regular PC the game is quite playable and doesn’t feel laggy. The game controller support for the game is superb and even supports rumble if you have a controller that supports it. This is a highly addicting game and I recommend it.

Figure 11 - Toki Tori, highly addicting puzzle platformer

Figure 12 - You have to deal with limited amounts of special moves like teleporters

Worms Reloaded

I played my first “Worms” game back on the Amiga 500. It was actually just called “Worms”, and it was a huge success and so much fun to play. The series continues even today, and has a couple of remakes of older versions of the game and 3D versions.

Figure 13 - Worms Reloaded on the ODROID-XU4

Figure 14 - The game looks beautiful and runs perfectly fine

The game runs surprisingly fast. The only time it stutters is when the PC is calculating its move, but the actual move and attacks are perfectly fine.

UnEpic

Figure 15 - The things that happen to you when you need a bathroom

Figure 16 - This dungeon crawler has beautiful graphics and lighting effects

This impressive dungeon crawler also runs full speed on the ODROID-XU4. The only problem with this one is that it requires a relatively huge amount of RAM (for ARM boards, that is). You need at least 1500MB free memory to run it, so depending on the operating system, you may not be able to run it on an XU4, and the game is better suited for an N1 with ARMHF drivers and 4GB of memory. Overall this game is impressive and I highly recommend it.

Honorable mentions

There are tons of more games I can’t go into, as there are so many of them that work now, but I want to share some of them with you to give you an idea what is working.

Figure 17 - Broken Sword Director’s Cut - Adventure

Figure 18 - Demon Hunter – Chronicles from Beyond - Hidden Object Game

Figure 19 - Don’t Starve + Together - Survival / Crafting

Figure 20 - eets Munchies - Puzzle

Figure 21 - Enigmatis Series - Hidden Object Game

Figure 22 - Human Resource Machine - Programming “as a game”

Figure 23 - Hyper Light Drifter - Action Platformer

Figure 24 - Icewind Dale Enhanced Edition - RPG

Figure 25 - Little Inferno - Casual / Puzzle

Figure 26 - Memoranda - Adventure

Figure 27 - Not a Hero - Action

Figure 28 - Papers, Please - Puzzle

Figure 29 - Space Pirates and Zombies - Action / Simulation

Figure 30 - Super Meatboy - Platform / Puzzle

Figure 31 - VA-11 Hall-A - Simulation / Visual Novel

Figure 32 - Heretic 2 - 3rd Person “Shooter” / Action

There are so many different types of games working now. A couple of months back, some of them were so slow that it was more like playing a slideshow, but these games now run full speed (for example, Hyper Light Drifter). It’s really impressive how far the emulator has evolved in just one year.

Special Games

There are, however, a few games I want to single out as they are my personal favorites, and some of which you may know as well. Two are very close and even share a similar name. I already played them a while back on ExaGear where they run in software 3D rendering. It was impressive that this game actually worked, but now I can run these games with box86 and 3D hardware acceleration. These games bring back so many memories for me, as I played them as a child and at it’s time they were in everyone’s gaming collection if they were a gamer, especially on the PC. I’m talking, of course, about Unreal and Unreal Tournament (the original 1999 edition).

Both Unreal and Unreal Tournament were ported to Linux many years back. It’s somewhat difficult to get these running nowadays, as they use very old drivers, especially when it comes to sound. But otherwise, these games are still amazing, and run as well as I remember playing them in 1999 on my AMD K6-2 450 MHz processor with Riva TNT graphics card. The game ran fine back then, but now on the ODROID, I can even play them in 720p or 1080p which I could not back in the old days. This is really amazing, and to be honest, I’m looking forward to taking some time off and replaying Unreal to see if it’s still how I remember it.

Figure 33 - Seeing the flyby back in 1998 was so iconic

Figure 34 - Graphics were outstanding for its time, and still look good today

Unreal is working the best at the moment. I start the game with the following options:

$ LIBGL_SRGB=1 LD_PRELOAD=/usr/lib/arm-linux-gnueabihf/libaoss.so.0 box86 UnrealLinux.bin
LIBGL_SRGB=1 uses a special mode in gl4es that increases overall brightness, as the game can be extremely dark otherwise. LD_PRELOAD=/usr/lib/arm-linux-gnueabihf/libaoss.so.0 is required since the game uses /dev/dsp for sound output which is no longer used and with this we can redirect the sound to an alsa emulation.

The game takes a little while to start, as it loads quite a lot of data right at the start and then directly goes into the flyby. Performance wise, this is awesome, I mean it really feels like this game is running natively on the ODROID. I haven’t experienced any lag while playing the game. In fact, the menu seems to be slower than the game itself, and I run it on high details in 32bit color depth at 720p. It just feels amazing playing this game.

Figure 35 - What Unreal started, Unreal Tournament improved on

Figure 36 - Still got it... even if it was just the first level

Unreal Tournament was the perfection of multiplayer first person combat. I played this countless times with friends at LAN parties while on vacation. The Assault game mode was always my favorite, and until today, there are very few games that have even come close to implementing such an exciting game mode. I totally miss playing this with my friends. I always hated “capture the flag”, which every other game was based around. Unreal Tournament did everything right and I dare to say I liked it better than Quake 3. However, I couldn’t get sound to work in this version. It relies on a very old driver called OSS, and while I’m able to load kernel modules for this, I’m unable to use it for sound. Other methods like aoss and padsp don’t work either, so I’m stuck without sound for this one.

Conclusion

In just one year Box86 really took off in terms of compatibility. Last time I wrote about it, it was a nice project with lots of promises, but rather little support. Now it’s gone through the roof, and the support for the games is amazing!

I’m looking forward to what will work in the months to come. I’m hoping for Unity and WINE support, as this opens up even more games. I especially look forward to WINE, which would be really impressive because WINE, in combination with OpenGL, could mean we may be able to play Windows games with hardware acceleration on ODROIDs as well. The project promises to be very exciting.

There are others that also follow the development and test games on Raspberry Pi and other platforms. You can check out the Youtube Channel “Pi Lab” (https://www.youtube.com/channel/UCgfQjdc5RceRlTGfuthBs7g/videos), where you can find even more games running under box86. Thanks @ptitSeb for all of his hard work on this project!

Fingerprint Processing: Running the NIST NBIS Fingerprint Toolset on an ODROID-XU4

The National Institute of Science and Technology, or NIST, maintains a widely used set of open source tools known as NIST Biometric Image Software, or NBIS for short. The functionality that is going to be focused on is its use related to fingerprinting[1], [2]. This article will cover everything needed to get up and running to compare prints on an ODROID-XU4.

Parts of this article were taken from my master’s project related to performing image preprocessing on latent fingerprints in order to increase matching performance of the software provided by NBIS. The project made use of an ODROID-XU4 since the processor used on the ODROID-XU4, a Samsung Exynos 5422 [3], is the same processor used Samsung Galaxy S5, a device which contains a fingerprint reader. This provides a near exact representation of a potential use case target where these preprocessing algorithms would be used. While this was important for my original project’s use case, it is also important to many others. The low-power and high-performance aspect of the ODROID-XU4 makes it ideal for many projects one might have in mind. For instance, an ODROID-XU4 would make an ideal controller in an IoT system which could also implement biometric authentication for in-person access.

Software Setup

The ODROID-XU4 needs to be loaded to run Ubuntu 18.04LTS, preferably the minimal version. NBIS is compiled using the GNU C/C++ toolset. After the ODROID-XU4 has been setup, the directions on the hardkernel wiki page are a great guide to use, the NBIS should be downloaded from https://www.nist.gov/itl/iad/image-group/products-and-services/image-group-open-source-server-nigos.

Open a terminal in the directory where nbis_v5.0.0.zip was downloaded. The following set of steps will result in the compilation of all the binaries that are needed. First, cmake needs to be installed as it is used in later steps, next the archive is extracted and moved into a folder named ‘nbis’. Within that ‘nbis’ directory a ‘build’ directory is then created where the setup script (setup.sh) is instructed to place all the binaries in the final install step. The path provided to the setup script needs to be a complete path, not a relative path or one that makes use of any shortcuts, such as ~. Additionally, the arguments without X11 and stdlibs are passed, these arguments help reduce the needed external dependencies which are required. Lastly, the sequence of make steps configures, compiles and moves the binaries to their final location, respectively.

$ sudo apt-get install cmake
$ unzip nbis_v5_0_0.zip
$ mv Rel_5.0.0 nbis
$ cd nbis
$ mkdir build
$ ./setup.sh /home/odroid/Downloads/nbis/build --without-X11 –STDLIBS
$ make config
$ make it
$ make install
The above steps result in a working set of binaries and create everything needed to move forward. However, through some quick testing, it was shown that adding a couple extra build flags can create binaries that are extremely well tuned for the ODROID-XU4. In the ‘nbis’ directory there are two files ‘rules.mak’ and ‘arch.mak’, open both files. There will be a line declaring the variable ‘ARCH_FLAG’, add the following items to be assigned to it. Any existing items that were assigned to ‘ARCH_FLAG’ such as ‘-fPIC’ need to remain.
ARCH_FLAG := -fPIC -mfloat-abi=hard -mcpu=cortex-a15 -fipa-pta
After editing and saving the files with the above listed change, the following commands should be run.
$ make clean
$ make config
$ make it
$ make install

Software

Out of all the binaries that get created, the following three are all that is needed in this example.

CWSQ : Image to Wavelet file converter CWSQ will create a compressed wavelet file from a grey scale input. There are two selectable compression rations for our testing 5:1 was used, the other option is 15:1. Most other NBIS tools work off of this wavelet file format, so all fingerprints destined to be matched need to be in this format.

MINDTCT : Minutiae detection

MINDTCT is a minutiae detection program, a minutiae point can be thought of as an interesting feature in a fingerprint. The type, location, and angle of the points found in this program are used to compare and contrast points[4]. There are many different types of minutiae points, but MINDTCT only detects endpoints (first image) and bifurcation (second image) in a fingerprint. The point’s type, location, and orientation are saved to a file. Each minutiae point is saved as coordinates based on their distance in millimeters, with 0.01mm increments, to the bottom left corner of the image [1]. Additionally, points contain angle information related to the local direction of the contours of the ridges and values (the white and black lines in a fingerprint image) that make up a minutiae point. The following image shows two different minutiae points. The angles, ‘A’ and ‘B’ represented in the images represent two different methods for measuring angles NBIST uses angles measured by ‘A’.

Figure 1 - Angle A shows the ANSI/NIST measurement, B shows FBI measurement angle. left is a ridge-ending, right is a bifurcation

BOZORTH3 : Fingerprint matching

The Bozorth3 algorithm and software is an export-controlled piece of code. At a high level the software takes one fingerprint and it will compare against ‘n’ number of target inputted fingerprints and return a match rate for each of the target fingerprints. The fingerprints files it uses are in the file format created from MINDTCT.

Running

If no fingerprint capture device is connected or available, there are several databases containing image sets of fingerprints which can be used for testing. One of these such databases is FVC 2002 database available at http://bias.csr.unibo.it/fvc2002/. The commands can either be executed from a terminal running the ‘build/bin’ directory or that path can be added to the terminals $PATH variable, so the commands can be from any location.

$ export PATH=$PATH:/home/odroid/Downloads/nbis/build/bin
To make things simple, I will assume there is a known fingerprint called ‘myprint.tiff’, and the intent is to see if it matches another print known as ‘mysteryprint.tiff’. The first step is to convert the both fingerprint image into a wavelet.
$ cwsq .75 myprint.tiff
$ cwsq .75 mysterprint.tiff
After each “cwsq” command, it will show a bit of information about the print and create a corresponding *.wsq with the same name and the input *.tiff file. Next, these wavelet files are sent to MINDTCT, this will create several files types the only one of interest is the *.xyt file.
$ mindtct -b -m1 myprint.tiff myprint/
The final step is to compare or ‘match’ the prints with each other. This can be done with the following command:
$ bozorth3 -m1 A outfmt=spg -T 30 -p myprint.xyt mysteryprint.xyt
However, multiple files can be compared against our target print (myprint). This can be easily done with a wildcard operator, *.xyt as the last argument in place of ‘mysteryprint.xyt’ would compare all xyt files against myprint.
$ bozorth3 -m1 A outfmt=spg -T 30 -p myprint.xyt *.xyt
The resulting output will be a list with one or more comparisons. Each line is a new comparison, where the first field is a ‘score’ dictating how similar the matches are. The ‘-T 30’ argument given in the command is a threshold meaning disregard anything less than 30. The second value is the ‘target’ print so it will always be ‘myprint’ in each row, the next item is the file that it was compared against. Shown below is an example of the output when a wildcard is used, hence myprint is compared against itself.
250 myprint.xyt myprint.xyt
41 myprint.xyt mysteryprint.xyt
Since mysteryprint scored a 41, it is considered to be a match with myprint. There is no real perfect threshold value, as it is all based on what is an acceptable false-positive and false-negative rate. A threshold for unlocking a door to a house will certainly need to be higher than to access a IoT panel to adjust the heating temperature.

If this was interesting, more information is provided in the reference links below. The original project paper and code can be found on GitHub at https://github.com/AndrewRuggeri/FP.

References

  • [1] C. Watson et al., “User’s Guide to NIST Biometric Image Software (NBIS).” Gaithersburg, p. 207, 2007.
  • [2] E. Tabassi, C. Wilson, and C. Watson, “Fingerprint Image Quality,” NIST, vol. NISTIR 7151, 2004.
  • [3] R. Roy, Hardkernel ODROID-XU4 Manual, 20170310th ed. Hardkernel, 2017.
  • [4] D. Maltoni, “A Tutorial on Fingerprint Recognition,” Adv. Stud. Biometrics, vol. 3161, pp. 43–68, 2005.

ODROID-GO Advance Tips And Tricks: Unzip ROMs While Maintaining Box Art And Game List

This is a short tutorial to help you with your ROM sets and the ODROID-GO Advance. Many of us have ROM sets with accompanying media files like box art, screen shots, logos, etc. Sometimes these ROM sets have compressed files. Now do we really want to be using up precious battery power to decompress games before we load them up? I don’t think that’s a good idea. The savings in space is minimal on games from the 8- and 16-bit generations and we do not want to be decompressing CD ISOs and IMGs on our ODROID-GO Advance. So, how can we reprocess all those files and maintain the connection to the media files via the gamelist XML file. As you know, Batocera (https://batocera.org/download) makes a great RecallBox-based OS, for the ODROID-GO Advance. The way ROMs with associated media are read in by the system is via the gamelist.xml file. The problem here is if we decompress the ZIP file we will often end up with a really different file name and extension. Now we have to get a whole new set of box art for our ROMs which can take a while depending on how many systems you are processing, or we have to edit the gamelist.xml by hand, which would take considerable effort. I will show you how to process a compressed ROM set in a few steps all while maintaining proper entries in the gamelist.xml file so that your box art is still mapped properly. We will do it all with a bash script from the command line, so you can run it via SSH if necessary.

Preparation

In order for us to make the necessary changes to an XML file from a bash script we are going to need a little help. The tool we will use is called XmlStarlet. Install it onto the system that you will be using to process the ROM sets. You will need a Linux system to do this part though OSX and Ubuntu under Windows can probably handle this script, as well. It is actually very simple - the only complex part is taken care of by XmlStarlet. To install the package run the following from the command line.

$ sudo apt-get install xmlstarlet
Next we will set up our script. You can download a copy of the script from https://bit.ly/34Y7LNX or you can copy and paste the following text into a local file, clean_unzip, and follow the next few steps.
#!/bin/bash

if [ ! -d ./done ]; then
  mkdir ./done
fi
for z in *.zip
do
  mkdir tmp
  cp "$z" tmp
  cd tmp
  unzip "$z"
echo "Looking for *.$1"
  echo $(ls ./*.$1 2>/dev/null | wc -w)
  files=( ./*.$1 )
  if (( $(ls ./*.$1 2>/dev/null | wc -w) )); then
    echo "files do exist $y"
if [ ! -f "${z%.zip}.$1" ]; then
    mv *.$1 "${z%.zip}.$1"
  fi
mv *.$1 ../
      TF="${z%.zip}.$1"
    OF="${z}"
    NF="${TF}"
if [ -f ../${2} ]; then
    echo "replace $OF with $NF"
    xmlstarlet ed --inplace -u 
      "//gameList/game[path="./${OF}"]/path" -v 
      "./$NF" ../${2}
    #../gamelist.xml
  fi
        mv ../"$z" ../done/
  fi
cd ..
  rm -r tmp
#break
done
What does the script do? Well, it performs the following steps.

  • Creates a tmp folder in the local directory.
  • Copies the next ZIP file into the tmp folder.
  • Expands the ZIP file.
  • If a matching file with extension is found, it renames the resulting file with the same name as the ZIP file but with the current extension.
  • Moves the resulting file back into the main ROM directory.
  • Replaces the entry in gamelist.xml with the new extension, i.e. non-zip.
  • If processed, moves the ZIP file into the done folder.
  • Deletes the tmp dir.
  • Repeats the above processes, until all files are handled.

Usage

You can run the script on an SD card, via SSH, or on a mounted SD card on your ODROID-GO device. It does use a fair amount of file system operation to complete cleaning up a ROM set. In general, I would recommend not doing it directly on an SD card because of the number of these operations, but I have actually cleaned up 30 ROM sets with it, directly on a mounted card, with no trouble. When you are running it on large ROM sets you will have left over ZIP files in the directory you are processing. Some ZIP files will be processed and moved to the done folder. This means that the compressed files that are left over have contents with a different file extension. Let us look at the commands used in an example. ALERT: The script is designed to run with RecallBox based media XML files. If you are using a different XML format you will have to edit the line where xmlstarlet is called and set up a different structure to match your XML file. First let us make sure we can execute the script.

$ sudo chmod +x ./clean_unzip
Next we will run the script and target the expected file extension. Let us use Sega Mega Drive as an example.
$ sudo ./clean_unzip bin gamelist.xml
We will have some left over ZIP files. Let us open one up. Turns out, the content has an smd extension. Let us run the script on the remaining ZIP files.
$ sudo ./clean_unzip smd gamelist.xml
You may have to run the command a few times to handle the remaining file extensions in a particular ROM set. The script will work with the remaining ZIP files so it is really not that bad. With a few calls we can clean up any ROM set. Below we have some before and after pictures so you can get an idea of what the script does.

Figure 01 - Before: Notice the "zip" in the file name entry

Figure 02 - After: Notice that the file name has been changed

Here is the view of the directory itself.

Figure 03 - Before: ZIP files and no "done" directory

Figure 04 - After: Unzipped ROMs and a "done" folder holding completed zip files

Wrapping Up

This brings us to the end of this tutorial. This was a quick one and it should be of great use to you if you do need to unzip a ROM set that has media files mapped to the zipped copy of your ROM. This script is great for adjusting compressed ROM sets for use with handheld devices where maybe you do not want to use the extra CPU cycles to expand the game file. For comments, questions and suggestions, please visit the original article at http://middlemind.net/tutorials/odroid_go/oga_rl_dc_build.html.

Shall We Play a Game? – Play the Promise of Google Stadia, At a More Practical Bandwidth

The lackluster launch of Google Stadia left many gamers in the lurch. Sure the lure of playing AAA games inside your browser sounded very attractive, but bandwidth became a bugbear which could not be overcome, yet.

While you are waiting for technology to catch up to marketing hype, point your browser to another online gaming haven—one where a slow Internet connection is not a handicap, rather it is a godsend.

Just head on over to GameSnacks and grab a “byte” of online gaming that works on “any device, on any network.” Sounds a lot like the same promise espoused by Google for its ill-fated Stadia launch. The caveat here, however, pertains to that one salient point about working on “any network.” Bring your slow, your dirty, your clogged connections and head to GameSnacks for practical online game play that really is for the rest of us.

By rest of us, we are talking about ALL of the real-world gamers who could not play with Google Stadia. Ironically, GameSnacks is a product of a Google niche group known as Area 120. This self-professed “workshop for Google’s experimental products” is both a program and a product. It is an early access program that enables small groups of developers to wrangle their craziest product ideas into an entrepreneurial environment, as well as sitting barefoot on futon pillows. Area 120 can also be a product when it helps to spin off a successful concept like GameSnacks.

Figure 1. A playpen for affluent Google Devs.

Oddly enough, Google claims that the bulk of the product ideas that are launched by Area 120 will be failures. Gee, thanks for the support and encouragement, Dad. Hmm, was Google Stadia fomented at Area 120? Then to seal the deal and sell developers on the merits of joining Area 120, Google states the now hackneyed, ‘our teams learn’ from their failures; gag!

Figure 2. Computer game development is always better when you don’t use computers and you can sit on the floor.

You can learn more about the Area 120 program at: https://area120.google.com.

Regarding GameSnacks, Area 120 has helped organize a collection of HTML5-based games that you can play inside your Android browser using just about any kind of Internet connection—bandwidth is NOT an issue with this gaming service. Currently, the GameSnacks catalog holds six tasty games from five talented developers:

  • 1. Bridge of Doom
  • 2. Bubble Woods
  • 3. Road Fury
  • 4. Groovy Ski
  • 5. Jump with Justin
  • 6. Jewelish Blitz

Figure 3. GameSnacks is an online gaming smorgasbord—if you’re hungry for playing HTML5 titles inside your Android browser; you know, like you were promised with Google Stadia.

And the developers of these games are:

  • 1. Famobi
  • 2. Inlogic Games
  • 3. Black Moon Design
  • 4. Geek Games
  • 5. Enclave Games

Playing these games is simple—just click the “Play” button and your browser is whisked to a new window (or, Tab; dependent upon whether your Android device is a mobile device or a desktop SBC) where each title is loaded and playable after less than one minute of leisurely download time.

Figure 4. Currently, the list of available game titles is a little thin, but it is growing.

Figure 5. These devs are all old hands at HTML5 gaming, but they’re still looking for more programmers who are willing to contribute to GameSnacks.

OK, I am a sucker; after a score of 668,544 in Bubble Woods using my ODROID-XU4 Android desktop browser, I was hooked on GameSnacks. The play is fast, the graphics and sound are topnotch, and, best of all, my WiFi-enabled network connection was more than adequate. Furthermore, these are not just “afterthought” HTML5 games from forgotten devs. The developer of Bubble Woods, Famobi, for example, has an entire catalog of HTML5 games that are available as “freemium” titles and a large selection of ready-for-purchase games. So there is a wealth of gaming titles for enabling GameSnacks to give you a steady diet of online gaming goodness.

Figure 6. Quick, addictive game play is the hallmark of GameSnacks.

You can enter the online world of gaming with GameSnacks at https://gamesnacks.com.

Multi Screen Desktop Using VNC - Part 2: An Improved And Simplified Version

Looks to me everyone has been stuck indoors for longer than they desired. Some of us had to work during this time too. Working on a small laptop screen is no fun task, and using HDMI cables while kids run around is not fun either. So, how about we use an ODROID as a secondary screen? This is somewhat a continuation of my previous article "Multiscreen Desktop using VNC" featured in a previous ODROID Magazine article: https://bit.ly/3bw1oEb.

So, the good news is, you do not need anything described in that article. I managed to go through x11vnc's man page and found some options that greatly simplify things and reduce the number of hacks needed.

Getting an extended desktop

The goal is to have a dual-screen setup - one screen would be your laptop's display, the second screen would be a networked ODROID. The laptop (in my case) runs Linux (obviously), so we are looking for a linux solution for the problem. Ideally one that works over wifi.

First thing we need to do is to extend the physical desktop. In the previous article I used xrandr to extend the physical desktop size. However, that causes issues - especially with applications not knowing where the physical screen ends, which makes maximizing windows a pain. This time we will extend the desktop by adding a new virtual screen.

For a laptop with an intel GPU we can do this by adding /usr/share/X11/xorg.conf.d/20-intel.conf with this contents as described here https://bit.ly/2xQSQZW:

Section "Device"
  Identifier "intelgpu0"
  Driver "intel"
  Option "VirtualHeads" "2"
EndSection
If you have a NVidia GPU, you can try this instead: https://bit.ly/3awV5yW.

If you restart your Xorg server, you will see two new virtual displays in your xrandr output:

$ xrandr | grep VIRTUAL
VIRTUAL1 disconnected (normal left inverted right x axis y axis)
VIRTUAL2 disconnected (normal left inverted right x axis y axis)
Now that we have a new screen available, we'll need to set up a specific resolution and activate it. For my experiments I used a 720p resolution for it because it's small enough to be streamed without issues and big enough to be readable from a distance on a big screen TV.

You will need to calculate the correct timings for your desired resolution and add a new mode to the virtual display. Fortunately there is a tool that does that based on an input resolution and refresh rate and it comes part of xserver-xorg-core package:

$ gtf 1280 720 60
You can use the command's output to get the relevant information for you and enable the screen:
$ xrandr --newmode "1280x720_60.00" 74.48  1280 1336 1472 1664  720 721 724 746  -HSync +Vsync
$ xrandr --addmode VIRTUAL1 "1280x720_60.00"
$ xrandr --output VIRTUAL1 --right-of LVDS1
You should now get a popup, like in Figure 1 showing the new screen and asking you what you want to do with it.

Figure 1. Creating a virtual display

Sadly, I was unable to enable virtual displays the same way on ODROID-XU4, so this technique requires that your master PC is an Intel-based one. But wait - if you only have an ODROID around (hopefully an ODROID-XU4, where xrandr plays nicely) as a master computer, all is not lost. You can still expand the desktop, as described in the previous article using the script: https://bit.ly/34VZiuV:

$ DISPLAY=:0 xrandr --output HDMI-1 --fb 2560x720 --panning 1280x720
The fb parameter specifies the total resolution, while the panning parameter specifies one screen resolution. This will create space for your second screen (on the left of the main screen), but it will behave as one monitor (so maximizing will not work correctly without fakexinerama, which also has its problems).

So now we have a new desktop surface to the right of the main screen and we need to project it to a different, physical screen. We have two ways of doing it.

The Chromecast way

But wait, you say - I don’t have a Chromecast! I just have this ODROID-N2 running Android TV… Well, you are in luck! You have a Chromecast, but you need to install an app from the Play Store called Cast Receiver (https://play.google.com/store/apps/details?id=com.softmedia.receiver.castapp&hl=en) that acts as a Chromecast and can receive streams from Chromecast-enabled apps (https://forum.odroid.com/viewtopic.php?f=178&t=37501). Note that the app is a demo, but for some things (like Youtube streaming) it doesn't enforce its time limits.

So, the logical thing to do is to use Chromium's Cast tab feature to cast the second screen to the Chromecast device. Let us see that in action. Open Chromium, select the three dot menu, select Cast… and if you are in the same LAN with your chromecast you should see it in the list (Figure 2).

Figure 2. List of chromecast devices in the LAN

If you click on the Sources… button you can select between Cast tab and Cast desktop. If you select Cast desktop you should get a selection of apps or screens that you want to cast. If you are ok with just casting one app, then fine, but we want to cast the virtual screen. Unfortunately, there seems to be a Chrome bug that prevents us from doing that - it sees the combined desktop as a screen, not as two independent screens.

Figure 3. Screen selection

Figure 4. Extended screen casting via Chrome - hardly useful

So, currently casting from Chrome is a no-go, though it might change in the future. The quality was fine, performance was ok and there was only about a half-second lag between mouse input and visual feedback. Not ok for gaming, but ok for most office tasks.

So, plan B is using mkchromecast to cast a region of the screen. You can install it with

$ sudo apt-get install mkchromecast
You can run it with the --discover parameter to get the names of the chromecasts in your network (see figure 5).

Figure 5. Discovering chromecasts in your LAN

Knowing the name you can then write a more complicated command to use ffmpeg to grab X11 with a specific size and from a specific offset and stream the video to your chromecast of choice:

$ mkchromecast -n "ODROID-N2-159" --video --command 'ffmpeg -f 
x11grab -r 15 -s 1280x720 -i :0.0+1600,0 -vcodec libx264 
  -preset ultrafast -tune zerolatency -maxrate 10000k 
  -bufsize 10000k -pix_fmt yuv420p -g 60 -f mp4 
  -max_muxing_queue_size 9999 -movflags 
  frag_keyframe+empty_moov pipe:1'
Most of the parameters above should remain fixed for best streaming speed. The -n parameter lets you select your desired output chromecast, -r specifies the framerate, -s represents your virtual screen size, while :0.0+1600,0 represents the offset from where you want to capture. This offset reads as follows: read from Xserver :0.0, with an offset of +1600 pixels on the x axis and a 0 offset on the y axis. The x value should be your laptop's screen width in pixels, so that ffmpeg can skip your physical screen. The y value is 0 because X11 reads the y axis starting from the top, going down.

Figure 6. Extending desktop with chromecast

Now, the result looks better. Except performance is nowhere near what Chrome can do. Despite ffmpeg parameter tuning, because of network buffers, compression buffers, etc., there is a 5-6 second lag between your action and the screen response. So, this is only suitable as a second screen for documentation, email and things that does not require interaction (e.g. watching logs scroll by).

The VNC way

We can do better. How about we cast the screen via VNC? This is what I tried in my previous article, but in a convoluted way that did not work that well because I had to capture/transport and render off-screen half of the desktop. Had I spent more time reading x11vnc's manual (http://www.karlrunge.com/x11vnc/x11vnc_opts.html), I would have found out the -clip option that does just that! The idea is to start a VNC server that is cropped to the virtual screen size and on the TV side use a VNC viewer program to display the server's contents. The big advantage is you can "cast" to any VNC-enabled system, so you do not need to run Android on your Odroid, and also, if your smart TV has a VNC client app, it can be used directly.

I put together a small shell script that creates the virtual screen and also starts x11vnc in the background without authentication. Please adjust it to fit your needs:

$ cat new_720p_screen.sh
#!/bin/bash

# calculate the desired modeline with gtf:
# gtf 1280 720 60
#
#  # 1280x720 @ 60.00 Hz (GTF) hsync: 44.76 kHz; pclk: 74.48 MHz
#  Modeline "1280x720_60.00"  74.48  1280 1336 1472 1664  720 721 724 746  -HSync +Vsync

/usr/bin/xrandr -d :0 --newmode "1280x720_60.00" 74.48  1280 1336 1472 1664  720 721 724 746  -HSync +Vsync

/usr/bin/xrandr -d :0 --addmode VIRTUAL1 "1280x720_60.00"
/usr/bin/xrandr -d :0 --output VIRTUAL1 --right-of LVDS1

#start x11vnc
x11vnc -forever -bg -geometry 1280x720 -shared -noprimary -auth /var/run/lightdm/root/:0 -display :0 -clip 1280x720+1600+0 -threads -noxdamage
The interesting x11vnc parameters you will need are: -geometry sets the resolution of the target VNC session and should match your virtual screen size -clip defines a target resolution (1280x720) and an offset from the current screen (1600 pixels from the edge of the X11 server, on the x axis, 0 pixels from the y axis). The offset should match your primary screen size if extending to the right, and should be negative and match the virtual screen size if extending to the left of your main screen -threads and -noxdamage improve video responsiveness

Once you run those commands you can use any VNC client to connect to your PC's IP address on port 5900 and view the virtual screen only. If you are on Android TV you can use TruVNC (https://play.google.com/store/apps/details?id=com.mm.truvnc.lite&hl=en) which worked really well in my case, otherwise any supported VNC client should do the trick.

In terms of performance - it is great! I get less than 1s lag over wifi and much faster response while using a wired connection, so I am pretty happy with it! I ran glmark2 on the virtual display and it rendered smoothly over VNC, with the occasional tearing effect because of the noxdamage option (otherwise it gets blocky). Playing video is also smooth, except for some tearing. CPU usage is not that high as well. So, give it a try, see how you like your new expanded desktop.

Figure 7. Expanding via VNC

For me, I am going to use it like this during the quarantine, and when I get back to work I will set up an ODROID-XU4 with an old 1280x1024 monitor as my third monitor, so I can be the envy of the office! For comments, questions, and suggestions, please visit the original post at https://forum.odroid.com/viewtopic.php?f=53&t=38409.

Assist With Coronavirus Research: Using Rosetta@home To Help Find A Cure

It is now possible to use your 64bit ODROID to assist with Coronavirus Research. Thanks to a new application update for Rosetta@home, made possible by the Arm development community. You will need at least 2GB of RAM and a 64-bit OS (either Linux or Android).

Getting started on Android

To get started on Android, simply download the BOINC app from the Google Play Store and choose Rosetta@home from the list of projects. Run the app and either create a new account or use an existing one if you have one. Then just wait for work units to arrive.

Getting started on Linux

To get started on linux, first be sure everything is up to date:

$ sudo apt-get update && sudo apt-get upgrade
Then install the boinc client and the boinc text user interface:
$ sudo apt-get install boinc-client boinctui
Then run bonctui:
$ boinctui
Press ‘F9’ and navigate to “Projects”, select “Add Project” and choose “Rosetta@Home”. Choose an existing account or create a new one and wait for work units to arrive, then just let it run.

What it does

Rosetta@Home uses the BOINC platform to harness thousands and thousands of computers to run distributed computing jobs(large computing jobs broken down into smaller work units to be run on across many different processors) based on the known DNA sequence of the Coronavirus(as well as other viruses related to other diseases) “to predict the structure of proteins important to the disease as well as to produce new, stable mini-proteins to be used as potential therapeutics and diagnostics, like the one displayed above which is bound to part of the SARS-CoV-2 spike protein.”(https://boinc.bakerlab.org/rosetta/forum_thread.php?id=13702)

Figure 1 - JHR vs Covid

These results make possible targeted and accelerated vaccine and anti-viral research.

Strength in numbers

At the end of March, there were nearly 100,000 hosts from over 140 countries enabling an estimated 1.26 petaflops of computing power. That’s true supercomputer performance, donated to researchers by thousands of individuals around the globe, to help address a global problem. A cause well worth the spare compute cycles of our ODROID SBCs.

ODROID-GO Advance Cell Phone: A Custom Built and Coded Cell Phone

Recently, I decided to build my own cell phone out of an ODROID-GO Advance using a SIM800L module which included a speaker and mic. Thanks to the ample space inside the case, this hardware installation was pretty easy. For this build, I used a Debian Buster image with the SIM880L connected to the ODROID-GO Advance’s UART2.

Figure 1 - ODROID-GO Advance with keyboard

Figure 2 - Side view with cut out for SIM800L

Figure 3 - SIM800L board and antenna

Initially, I tried with minicom to communicate with /dev/ttyFIQ0 but I did not get an answer. I also tried the 10pin connector (UART1) but was unlucky there, as well. After some help from the Hardkernel forum, I learned that changes needed to be made in the device’s dtb file. The needed changes included disabling the ‘fiq-debugger’ which used UART2, and enabling that UART port as a common serial port. Additionally, the fiq-debugger device entry was removed from the boot.ini file. After those changes had been made and a reboot performed, AT-Commands could be sent with a response from the SIM module.

Figure 4 - First test app up and running

After some more work, a basic interface was created to hold contact information and manage calls.

Figure 5 - Phone OS 0.04 Menu

Figure 6 - Options/Settings page

Figure 7 - Contact selection and options to call and end-call

For more information, the original forum thread is available at https://forum.odroid.com/viewtopic.php?f=193&t=38248.