

Things You’ll Need
- An ODROID-XU4, either with a fan or heatsink
- An ODROID-XU4 case
- Either an eMMC chip or micro SD card
- A microSD card writer or eMMC writer
- Wifi Module; Module 0, 5A, and 4 are ok
- USB mouse and keyboard
- HDMI display
- Internet Connection
- Amiga Forever Plus Edition
- A Windows computer
Tools Needed
- Small screwdriver set
Introduction and Tutorial Goals
This tutorial will show you how to set up an Amiga emulator on your ODROID-XU4 by building your own copy of Uae4Arm and setting it up with kickstart ROMs and Workbench files from Amiga Forever or wherever you got your copy from. This tutorial assumes you have a working ODROID-XU4 running Ubuntu 18.XX.
For help on writing an OS image to an SD card or eMMC module please visit the links below. Make sure you select the ODROID-XU4 tab when getting an Ubuntu image.
https://wiki.odroid.com/odroid-xu4/getting_started/os_installation_guide?redirect=1#downloads Next, you will want to go ahead and assemble the ODROID-XU4 case using the directions found at http://middlemind.net/tutorials/odroid_go/mr3_build.html#part3. If you read each section listed above that should get you all setup to begin working on Amiga emulation on your ODROID-XU4 device. The general cost of this project is around $140 depending on the configuration choices you make. Obviously if you choose to use micro SD cards and don't need a WIFI USB adapter you're going to spend less. This tutorial works with Amiga files that come with Amiga Forever's plus package which costs around $30. I highly recommend buying this package with all the kickstart ROMs and Workbench files you'll need to emulate Amiga computers on just about any emulation software, WinUAE, FS-UAE, Uae4Arm, Uae4All, etc. You will need to have access to a Windows computer to install Amiga Forever and grab a copy of the necessary files. After installing the software you can locate the Amiga OS files we need from the following directory. You can also use your own Amiga OS files; just follow along and substitute the proper files, where needed.
C:\Users\Public\Documents\Amiga Files\SharedMake a copy of the following folder on a USB key or one of your SD cards by using the micro SD to USB adapter
\adf
\hdf
\rom - (Rename to kickstarts)
dir\System
For those using their own Amiga OS files you'll need an A1200 3.1 Kickstart ROM, and a workbench 3.1 .adf or .hdf file. You'll also want to create the following folders that will be populated with files in just a bit.
\dir\Games
\dir\Extras
Now that you have all the files you need, let's get started setting up our ODROID-XU4 for Amiga emulation and Amiga games.
Compiling Uae4Arm
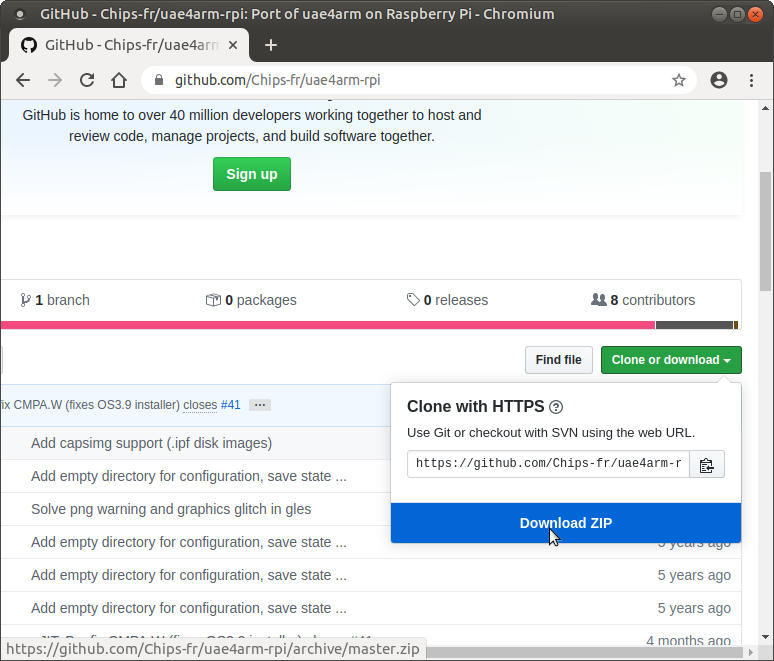
First, grab a copy of the latest version of Uae4Arm from the following URL: https://github.com/Chips-fr/uae4arm-rpi. Click the download zip option as shown below.
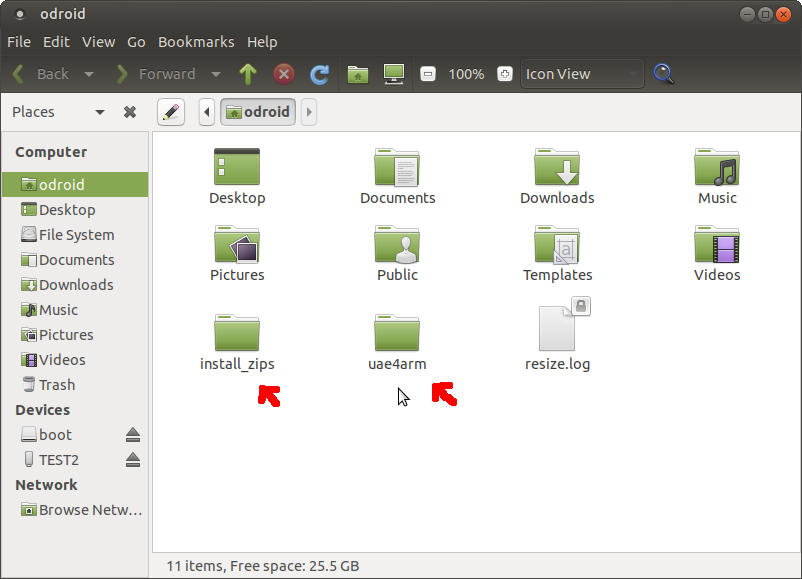
Create two new folders in your home directory, /home/odroid. FYI, the super user password is odroid by default on the ODROID-XU4 OS images we're using. We'll want to create a install_zips folder and a uae4arm folder. When the uae4arm source code finishes downloading, copy the resulting uae4arm-rpi-master.zip file to the install_zips folder. Expand it and move the resulting uae4arm-rpi-master folder to the newly created uae4arm folder.
We'll need to install some packages before we can compile the uae4arm code. Open a new terminal by going to Menu -> System Tools -> MATE Terminal. Run the following commands in the terminal window.
$ sudo apt-get install libsdl1.2-dev -y
$ sudo apt-get install libguichan-dev -y
$ sudo apt-get install libsdl-ttf2.0-dev -y
$ sudo apt-get install libsdl-gfx1.2-dev -y
$ sudo apt-get install libxml2-dev -y
$ sudo apt-get install libflac-dev -y
$ sudo apt-get install libmpg123-dev -y
$ sudo apt-get install libmpeg2-4-dev -y
$ sudo apt-get install autoconf -y
$ sudo apt-get install libgles2-mesa-dev -y
$ sudo apt-get install libgles1 -y
$ sudo apt-get install libgles2 -y
$ sudo apt-get install libglvnd-dev -y
Or if you want to get it all done in one big command...
$ sudo apt-get install libsdl1.2-dev -y;sudo apt-get install libguichan-dev -y;sudo apt-get install libsdl-ttf2.0-dev -y; sudo apt-get install libsdl-gfx1.2-dev -y;sudo apt-get install libxml2-dev -y;sudo apt-get install libflac-dev -y; sudo apt-get install libmpg123-dev -y;sudo apt-get install libmpeg2-4-dev -y;sudo apt-get install autoconf -y; sudo apt install libgles2-mesa-dev -y;sudo apt install libgles1 -y;sudo apt install libgles2 -y;sudo apt-get install libglvnd-dev -y;Navigate to the uae4arm-rpi-master directory using the following command.
$ cd /home/odroid/uae4arm/uae4arm-rpi-masterNext we're going to compile uae4arm by running the following command in the terminal with the current directory set to the uae4arm-rpi-master directory.
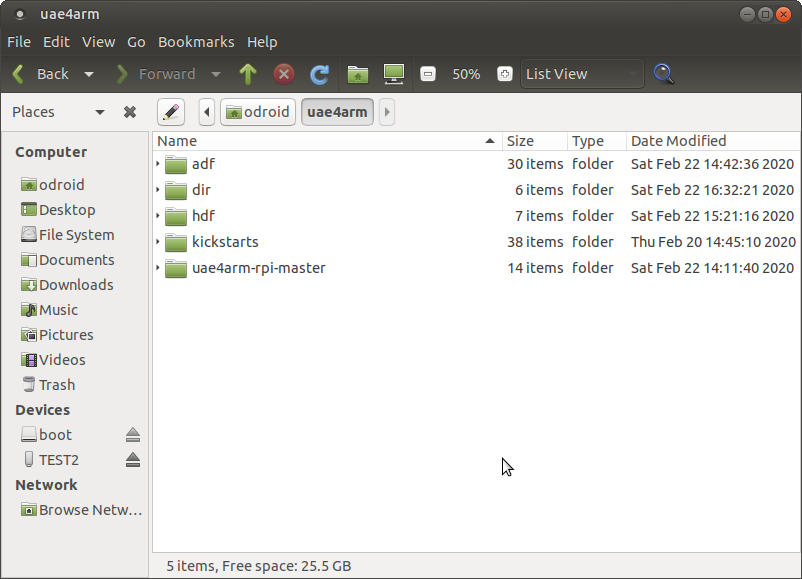
$ make PLATFORM=glesAllow the compilation to run its course and when it completes you should have a new file in the uae4arm-rpi-master directory named uae4arm. Copy the adf, hdf, dir, and kickstarts folders mentioned earlier from your USB drive or whatever you're using, to the uae4arm folder. You should have the following folder structure. If you aren't using Amiga Forever create the following directory structure and put your .adf files, games, Workbench, etc in the adf folder. Similarly place any .hdf files, drive images, etc, into the hdf folder. Your kickstart ROM files go into the kickstarts folder. The Games folder will be used for hard drive games and WHDLoad prepped games. Extras will be used for Amiga programs and files we'll need to transfer into the boot .hdf drive. System is used specifically for bootable .hdf files.
- uae4arm - uae4arm-rpi-master - adf - hdf - kickstarts - dir - System - Extras - Games
You should have the following folder setup in your odroid home directory and the following folders in the uae4arm directory.

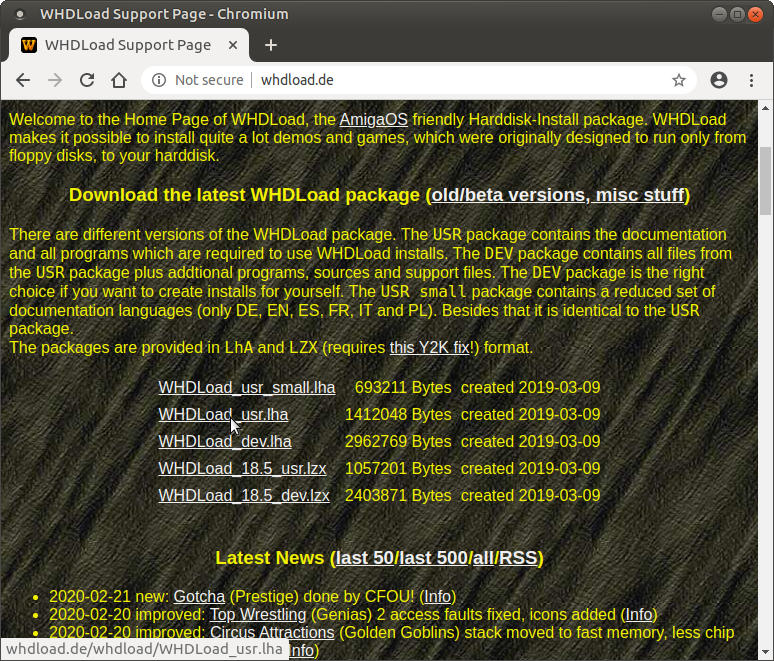
We'll need a few pieces of software for some of the Amiga OS configuration steps I'm going to show you. You can download WHDLoad at this URL: http://whdload.de/. Download the WHDLoad_usr.lha file from the main page. When the download completes, move the file from the Downloads folder to the uae4arm/dir/Extras folder.
The WHDLoad site is shown below.
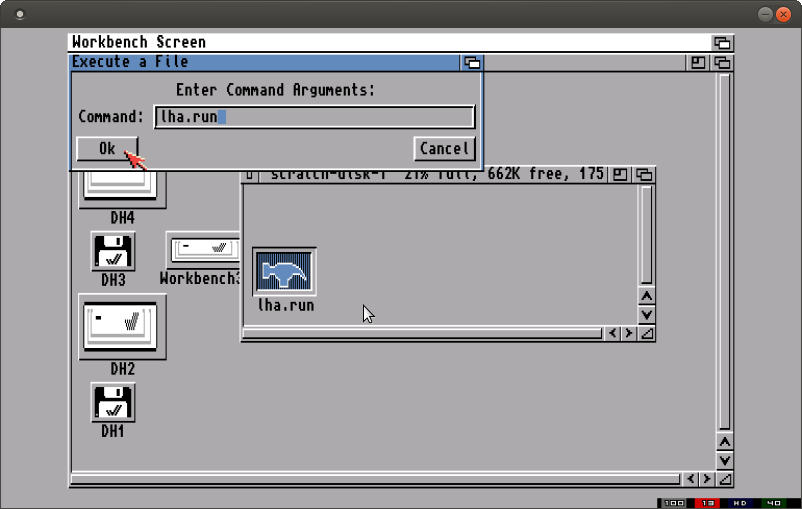
Next we'll need an Amiga decompression tool called lha. You can download a copy directly at the following URL: lha.run. When the file download is complete move the resulting file into the uae4arm/dir/Extras folder.
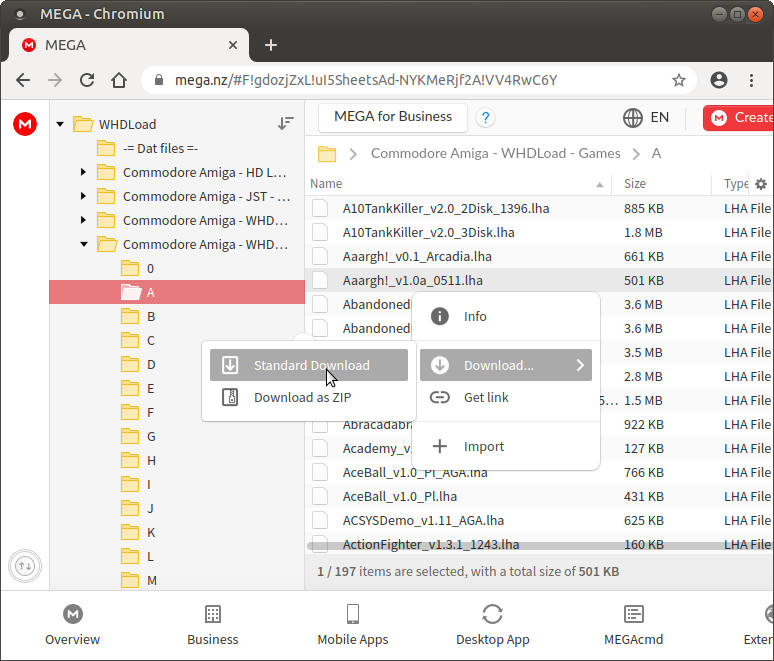
The last thing we'll need are some games to test. Most of the Amiga software library is considered abandon-ware since it's a dead platform. For this tutorial, you'll need to find some .adf games for Amiga 500, 1000, or 1200. You'll also need to download some games prepped for the WHDLoad software from this URL WHDLoad Games. The games must come from the WHDLoad directory.
The game download site is as shown below.
What WHDLoad does is it launches Amiga games from the hard drive and not from a disk image so you can have a whole collection loaded on your emulated Amiga OS. It also soft kicks the game's required kickstart ROM version. This way you won't have to load a new disk every time you want to play a game.
Go back to the terminal window or open up a new one. Navigate to the uae4arm-rpi-master folder, cd /home/odroid/uae4arm/uae4arm-rpi-master. Next start uae4arm by running ./uae4arm. This will execute the binary file you compiled earlier. If you get an error that the file cannot be executed run the following commands in the terminal.
sudo chmod 755 ./uae4arm
sudo chmod +x ./uae4arm
Run the ./uae4arm command again and you should see the Uae4Arm launcher window popup as shown below.
Configured Uae4Arm
In this section, we'll work on configuring Uae4Arm so that we have a stable Amiga emulator running which we can use to launch a bunch of games. Before we get into the details, we're going to need two more files. The create hard drive file feature of Uae4Arm seems broken, so we'll have to work around it. Go to this URL: https://scruss.com/blog/2010/02/07/amiga-blank-hdf-images/ and download both the 80MB and 160MB blank hard drive files.
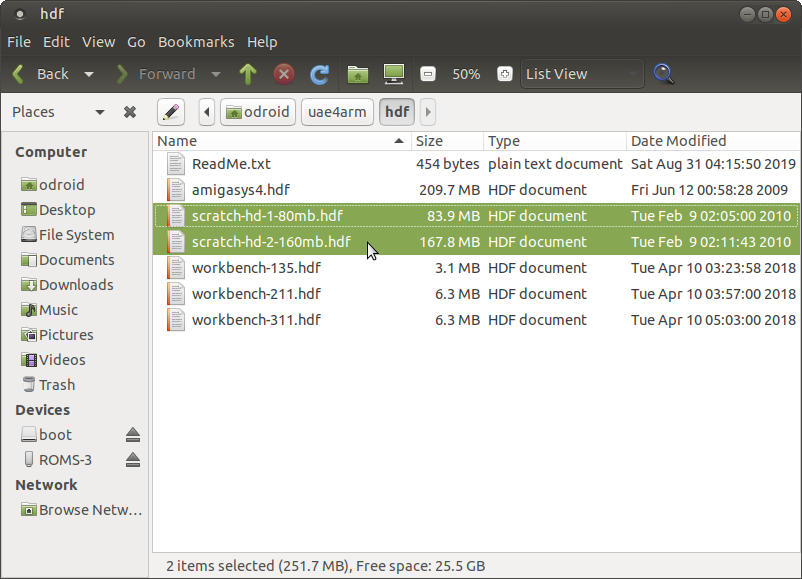
When the files are done downloading, move them from the Downloads folder to the install_zips folder. Expand the files. When this is done move the resulting files to the hdf folder under the uae4arm directory.
Now we'll set the proper configuration to create a nice A1200 emulated Amiga system. Go to the Quick Start configuration section and select A1200 from the list. Next go to the CPU and FPU section. Make sure JIT is selected under both CPU and FPU sections. Select the Fastest option for the CPU speed and set the FPU to 68882.
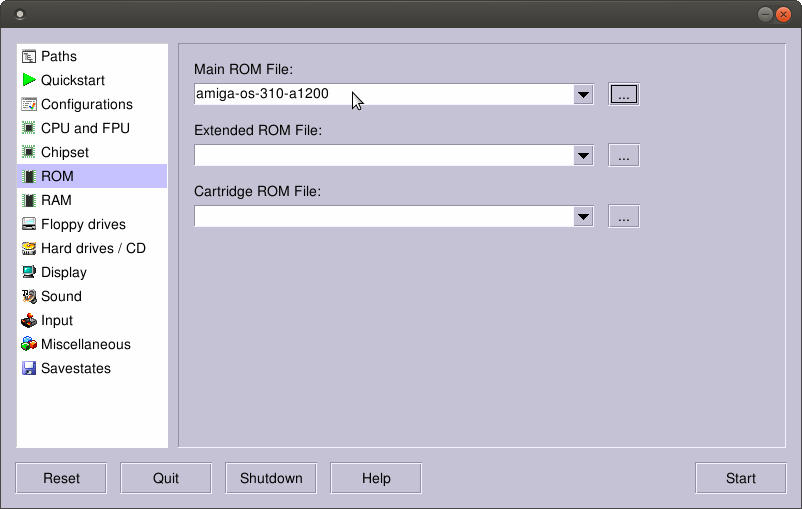
Next, go to the ROM section and load the amiga-os-3101-a1200.rom file from the kickstarts folder. You can also use an equivalent file if you have one, the file we're using we got from: https://www.amigaforever.com/ ; this file, and many more, come with their plus offering. The screenshot below shows the ROM screen with the proper file selected.

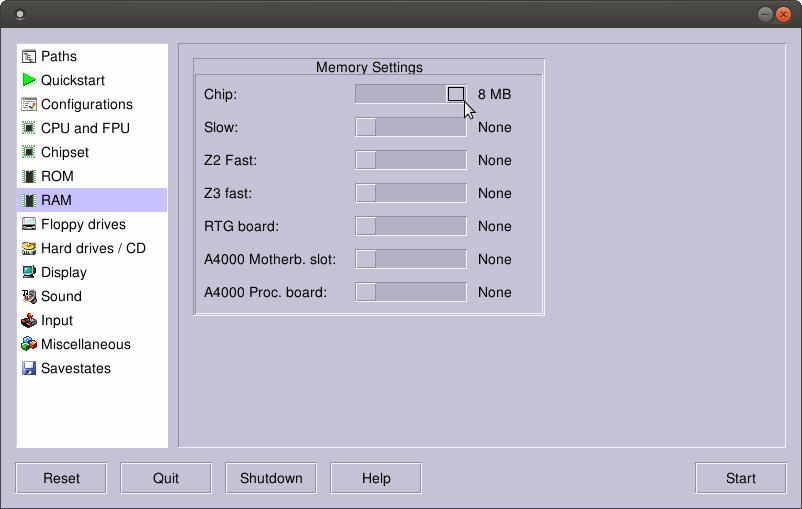
Next we'll configure the RAM section. Go to the RAM section and slide the Chip RAM to 8MB as shown below.
Now we'll load up some hard drives. The first drive will be our boot drive. Navigate to the dir/System directory and select the workbench-311.hdf. Again this file comes from the Amiga Forever package but you can use a bootable .adf version if you have one or another bootable hard drive that has Workbench 3.1 on it. The screenshot below shows the drive configuration.
The next hard drive we want to load up is one of the blank drives we downloaded from the Internet. I would go with the 160MB one. Load it up into the list of drives and make sure to unselect the bootable option. What I'm going to show you how to do here is copy over a smaller boot drive onto a larger blank drive then use that one as a boot drive. Uae4Arm does a really good job at emulating A1200 and earlier machines, but I can't get the A4000 entries to work. The software is at version 0.5 and might need some work. One other quirk is that it can't write new files or folders to directory based drives; there is a mode error that crashes the application. A workaround is to use a hdf based drive. So our goal is to create a new larger boot drive so we can move around some games and install some new software.
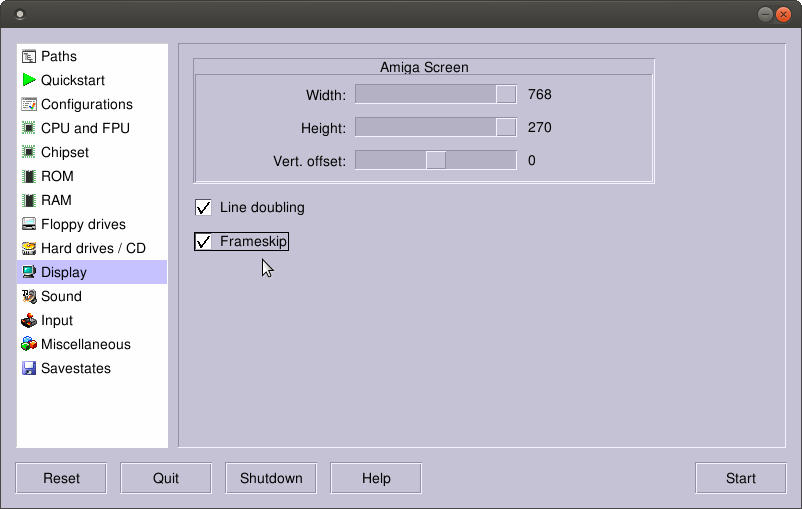
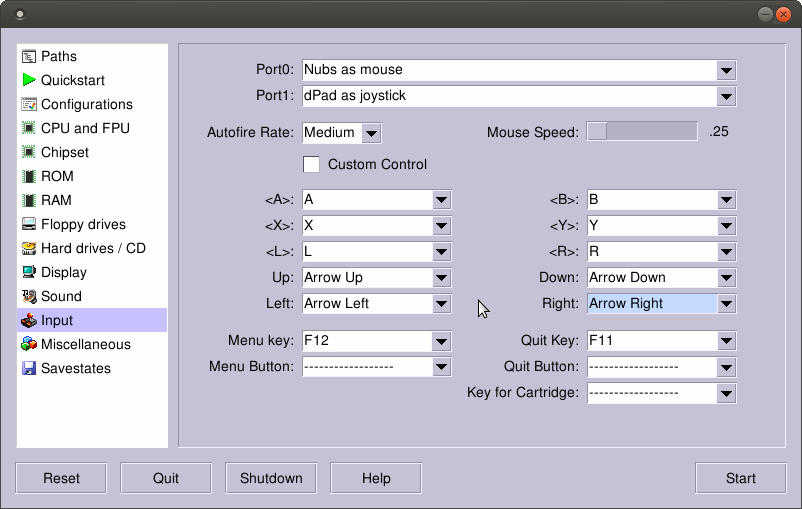
Let's configure the screen size and set the emulator to use the largest possible size under the Display configuration section. The screenshot below shows the largest possible screen size with an 8MB A1200 and no graphics card. Next, let's set up the input. Go to the Input configuration section. Setup the input how you want, I used the following configuration to start since all the mappings go directly to keys with the same name.
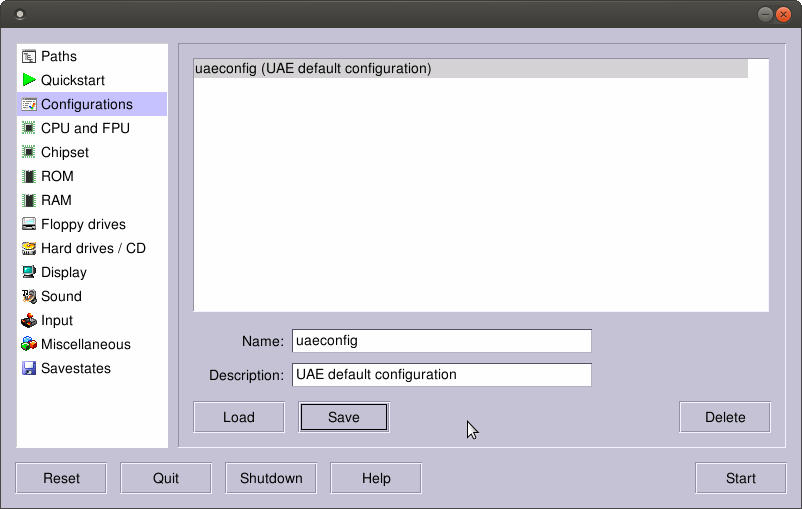
One last thing to do before we fire up our Amiga A1200 is go back to the Configurations section and click the Save button. You can change the configuration name but I just use the default.
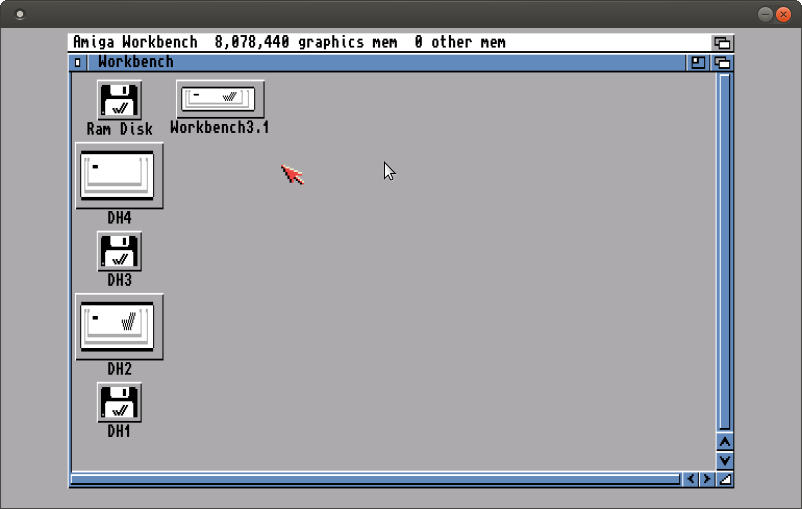
Now that you have everything all configured and ready to go click the Start button and you should see a nice clean Amiga A1200 Workbench loaded up as depicted below.
Running *.adf Format Amiga Games
Now the A1200 can run, for the most part, A500, A600, and A1000 games. However, not every one of them will work. Some may require a specific chipset, but most should work “out-of-the-box.” To load up and run an .adf format game press the F12 key, or whichever key you mapped in the Input configuration section.
Go to the Floppy drives configuration section and select an .adf game you want to play. You can even check the Load config with the same name as disk option to create specific configurations for the given disk/game. For now, leave that option unchecked. Select your game disk as shown below.
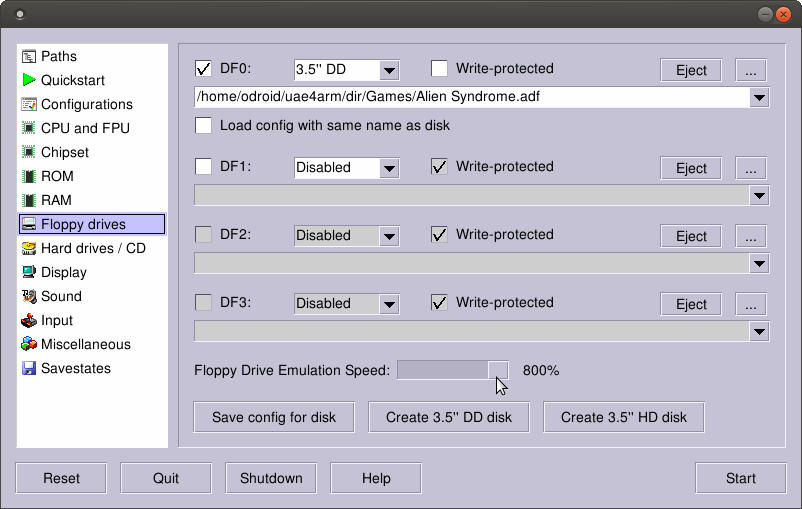
Click the Resume button if you already started your A1200 emulation or click the Start button. You should see a floppy disk icon on the Workbench desktop. Double click it to open it. Hold down the right mouse button while your mouse is at the workbench header, hover over Window, then Show, and select All Files.
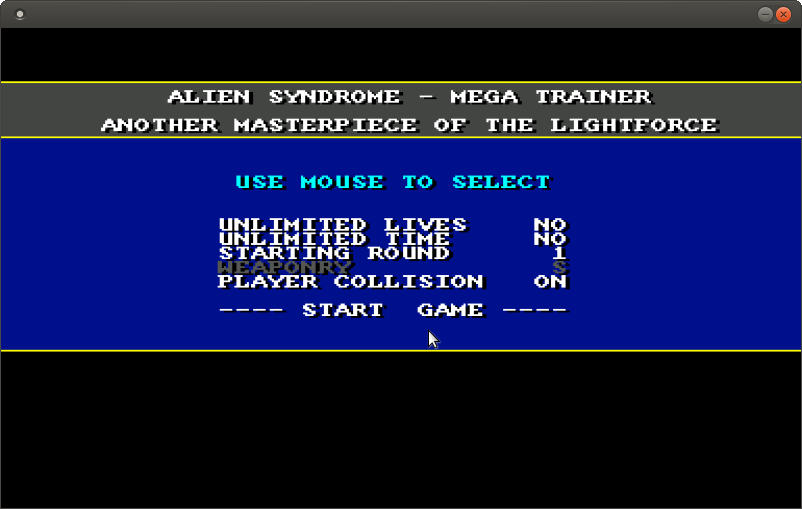
Now you should be able to see all files on the game floppy disk you loaded. Find the game executable and double click it. You should now be able to play the selected game on your ODROID-XU4 powered Amiga A1200 emulator. If the game crashes you may need to look up specific hardware requirements for that game and adjust your emulator's configuration to meet those needs.
The following screenshot shows the crack screen of a game I've loaded up from a floppy disk image, .adf file.
Using WHDLoad to Run Games
In this section we'll cover how to run Amiga games from the hard drive using WHDLoad. This approach has the added advantage of using a soft kick to launch the game with the proper kickstart ROM. You'll need to have a workbench boot drive and an empty harddrive, .hdf, that we downloaded earlier. I'm not sure if this process will work with a bootable workbench floppy disk, it might. I just haven't tried it.
So I used the Workbench-311.hdf from my copy of Amiga Forever but it's only about a 9MB drive. You'll run out of space very quickly. To create a new bootable drive with more free space, I've loaded up the 160MB blank .hdf drive, and we're going to clone the boot drive onto it.
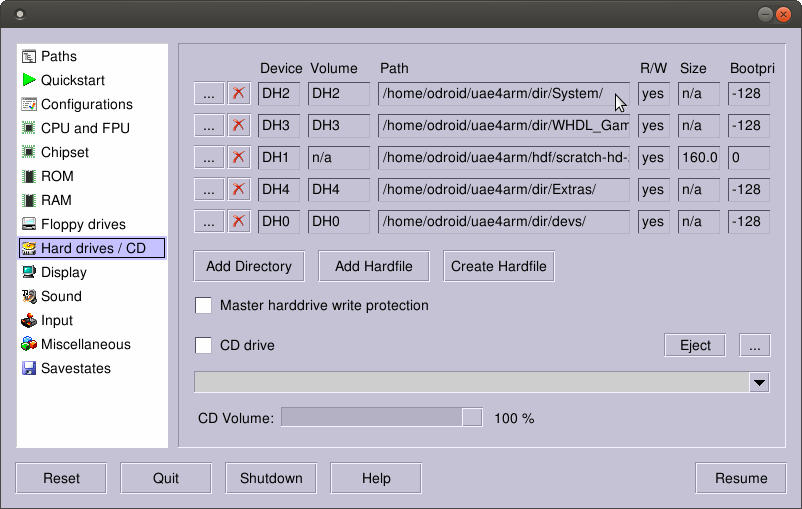
My initial harddrive setup is shown below. The key things to remember are that we only use "directory" based harddrives as a source for files. We won't be creating any new files or folders on them. So the Extras folder is where we'll store new Amiga software, DH4. The first drive is a smaller, but, preconfigured boot drive, DH2. Lastly the new blank 160MB harddrive is going to be our new boot drive and will eventually hold all the new Amiga software we need, DH3.
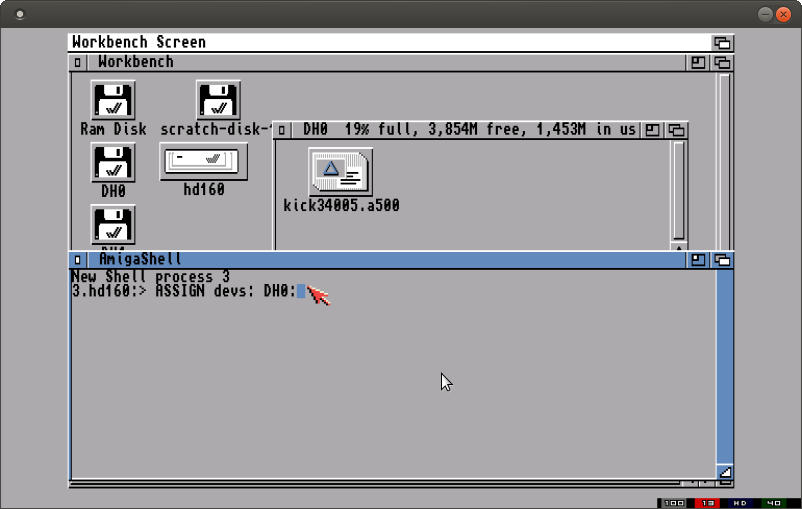
Find the AmigaSHELL program, it should be in the Workbench 3.1 drive's System folder. Double click the Shell icon. And run the following command.
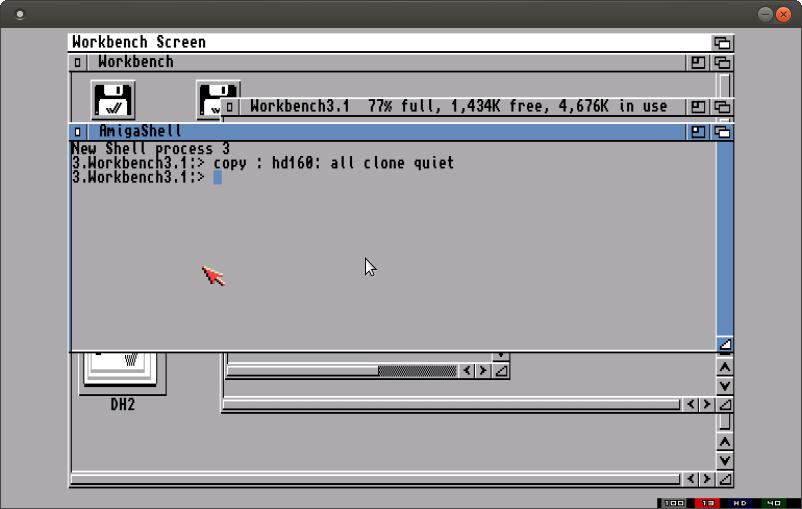
The AmigaSHELL command is copy : hd160: all clone quiet, where the second drive name, hd160 is whatever name your 160MB drive was assigned. This command will clone the drive and create a new bootable drive. When it completes you can close your emulation session and then remove the smaller drive and map the larger 160MB drive as the boot drive.
You're also going to map a new drive based on the Extras directory. This directory should contain the lha.run, and WHDLoad.lha files. You should also map the Games directory that has the WHDLoad prepped games. So you'll have a total of three drives listed below.
1. Larger boot drive, 160MB, based on .hdf 2. Extras drive, based on directory dir\Extras 3. Games drive, based on directory dir\Games
Since I've had trouble creating new files and folders in a directory based drive, not sure what was the cause. I always copy the programs I need to run to the boot .hdf drive. So in this case drag and drop the lha.run, WHDLoad.lha, and target game .lha files to the boot drive.
If you can't see the files in any drive or folder you're viewing simply right-click in the Workbench 3.1 header and while holding the button down drag the cursor to Window, then Show, and select All Files.
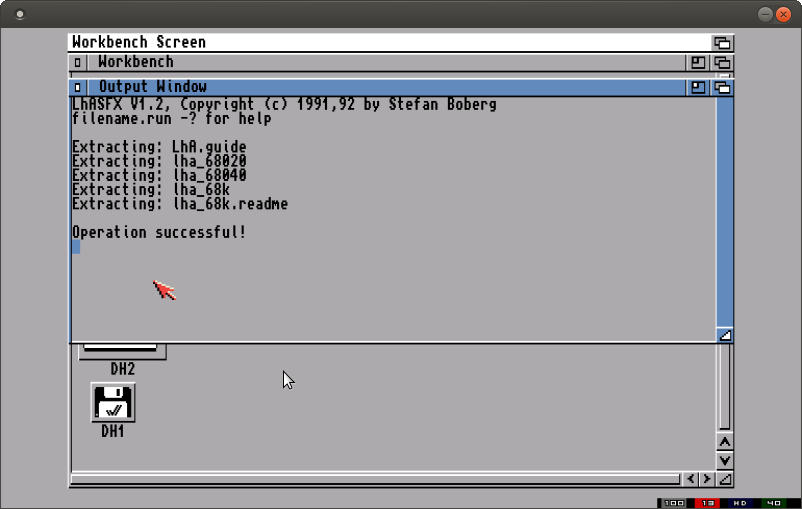
Once the files have copied over, run the lha.run program by double clicking on it. Make sure you're using the copy that's on the boot drive. Once it has completed installing, open up a new AmigaSHELL and type lha and press enter. You should see a list of arguments for the command.
You should be on the root of the boot drive and that's where WHDLoad should have been copied. From the AmigaSHELL, run lha x WHDLoad.lha. Let the expansion run and when it's complete find the WHDLoad folder on the boot drive. Open it and run the Install program. You can choose options to run the install as a test and not actually install it. That's fine to do first to make sure everything runs smoothly. Complete a real install and you're almost ready to run WHDLoad prepped games. I'm not going to cover how to convert .adf games to WHDLoad games in this tutorial. Using the links above will get you a whole bunch of games prepped for WHDLoad.
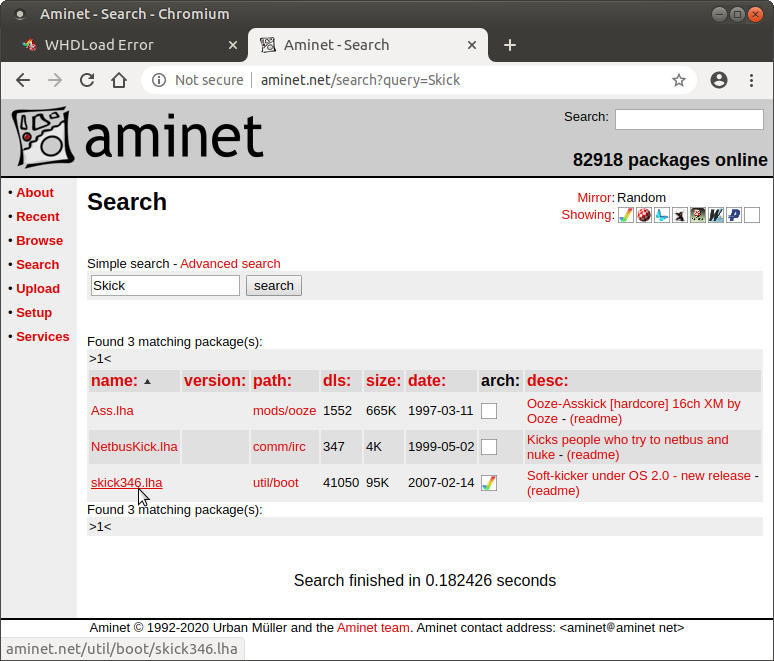
We're going to need to download one more piece of software before we can launch a WHDLoad game, however. Navigate your browser to: http://aminet.net and search for skick. Download a copy of the program as shown as follows.
Shutdown your Amiga A1200 emulator and copy the new skick346.lha file into the Extras directory with the other Amiga programs. Start up your A1200 and copy the skick346.lha file to the boot drive. Open up a shell, Workbench 3.1 -> System -> Shell. Create a new folder on the boot drive named kickstarts. Expand the file by running this command in the shell, lha x skick346.lha :kickstarts. Use the full name of the skick file you've downloaded if you have a different version.
Also, while you have the shell open, expand the WHDLoad prepped game by running lha x name_of_game.lha. Now you should have new folders on the boot drive. Run the WHDLoad prepped game file and you'll get some errors that look like the following.
DOS-Error #205 (object not found) on reading "devs:kickstarts/kick40068.a4000Make a copy of the a4000, or a500, or whatever missing kickstart file is indicated and move it into the boot drive in the same way you've moved the other Amiga programs. Copy it into the kickstarts folder on the boot drive. Make sure that it has been renamed to match the error. In my case the error was a missing a kick34005.a500 file so I used a 3.X kickstart ROM from the Amiga Forever set of included ROMs. For more information on which kickstart ROM to use with regard to Amiga Forever go to this URL: http://www.whdload.de/docs/en/need.html.
You'll need to create a symbolic link so that the devs: drive exists. Open up AmigaSHELL and run the following command, ASSIGN devs: hd0:, where the drive named hd0 is the name of your boot drive or the location of the kickstarts folder. Now you should have the path devs:kickstarts mapped, and no longer get the missing kickstart error that was shown above.
Once you get past that error, run the WHDLoad prepped game again. If you get an error about a missing RTB file then double check that you decompressed the skick346.lha archive into the proper location. If you still get a kickstart ROM error then double check that you have copied and properly renamed the correct kickstart ROM file. Also, make sure that you have used the ASSIGN command correctly so that you have a devs:kickstarts drive and folder that contains RTB files and kickstart ROMs.
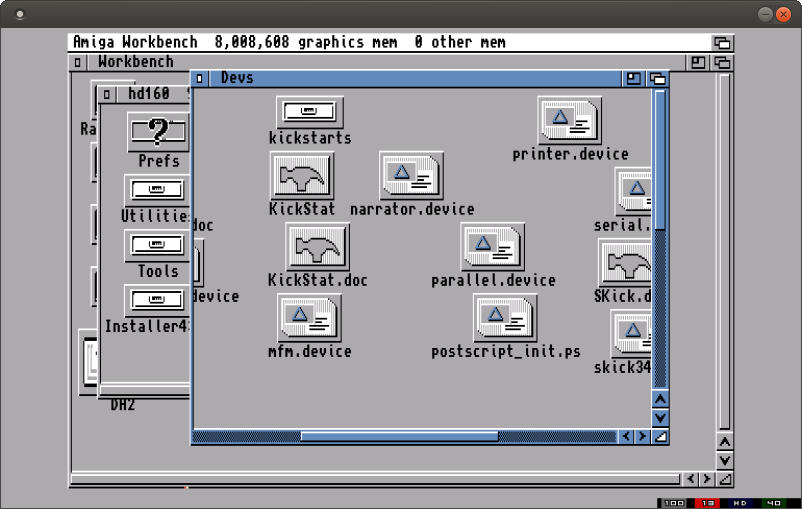
The Devs folder should look like what's shown below. It now contains the kick ROM you copied there and all the RTB configuration files from the soft kick Amiga program.
I used a helicopter game that was WHDLoad prepped and completed the above mentioned steps. The screenshot below shows the game up and running. Loaded cleanly from the hard drive giving us the ability to run a bunch of games quickly and easily right from the emulated Amiga system, no floppy drive swapping.
For more information, please visit the original article at http://middlemind.net/tutorials/odroid_go/mab_build.html.
Be the first to comment