

The ODROID-N2 seems like a perfect Android TV system - everything runs smoothly and converts a regular TV into a valuable smart TV. All is well if that is the only thing you want to do with your ODROID-N2, but for me, it is not enough. I wanted to use the ODROID-N2 to replace an ODROID-C2 that was running Linux, had some sensors (temperature and PIR) attached to its GPIO pins, and also ran Kodi. I could have used Linux on the ODROID-N2, but the Android TV experience was nicer for a media center.
So I embarked on a new journey of learning how to make Android and Linux coexist on the same hardware so that I could easily transfer my linux scripts that handled the sensor data from ODROID-C2 to ODROID-N2.
If you are starting your project from scratch you should look into Hardkernel's Android Things API implementation (https://magazine.odroid.com/article/android-things/) and build native Android apps that use the GPIO pins, but in my case I already had some python scripts that read temperature and movement data so I wanted to reuse them (https://bit.ly/2xhnGdH).
Installing Linux under Android TV
In order to port existing scripts to Android It is better to install a Linux environment in a chroot. The best app for the job is Linux Deploy (https://bit.ly/2UbeKPV) which you can find on the Play Store, but unfortunately It is not available for Android TV. You will need to download the apk from a different source (I used apkpure https://bit.ly/2wuiHGq) and install it on ATV. To install an apk package you have two options:
- Copy the apk file on a USB drive, attach it to the ATV and use a file explorer (there are some options available on the Play Store) to install it.
- Or install it via adb (either with a usb cable, or over the network):
$ adb connect odroid-ip
$ adb install ~/downloads/Linux\ Deploy_v2.6.0_apkpure.com.apk
I am using voodik's ATV image (https://bit.ly/3bkj3OI) with adb enabled over the network.
Once Linux Deploy is installed, use a mouse/keyboard (it is not designed for ATV and remote control input does not cover all options) to set up and deploy a Linux distribution of your choice on the ODROID. If you do not have access to a suitable input device you can install scrcpy (https://github.com/Genymobile/scrcpy) and access Android in a remote-desktop-like fashion from your computer. You may also need to install an extra launcher that sees non ATV apps, like Sideload Launcher (https://play.google.com/store/apps/details?id=eu.chainfire.tv.sideloadlauncher&hl=en).
Start the app and select the properties icon and set up your environment. Note that it requires root access, so make sure to grant it root. Here you can choose your favourite distro (I used Ubuntu 18.04), you can choose the size of the rootfs image (I went with 8G) and set up default credentials.

Under the INIT section make sure you Enable an initialization system. I went with sys-v which uses scripts in /etc/rc3.d/.
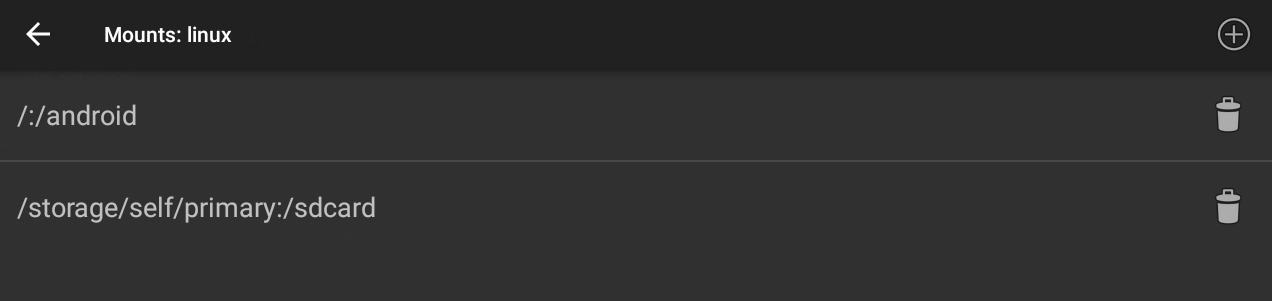
Under the mount options I wanted to expose some android settings to the guest Linux image, so I mapped / and /sdcard to internal mount points in Linux. Fortunately /dev and /sys are already shared.
In theory you can install in a directory and benefit from all the host's space, but for me that option did not work.
When you are ready you can select Start and the program will start downloading the required packages and build a minimal image for you. This may take a while, but when It is done you can go ahead and start that image. If you have enabled ssh you should now be able to log in to your ODROID's IP with ssh on port 22. Now you can use apt to update the package list and install the packages you need.
In my case I needed python3 and a bunch of python modules, so I installed them with:
# apt-get install python3-pip python3-paho-mqttSince I need to use the GPIO pins, I wanted to install Hardkernel's wiringpi branch for the ODROID-N2. The simplest way to do it (without compiling anything) is to grab it from Hardkernel's PPA as described in the wiki at https://wiki.odroid.com/odroid-n2/application_note/gpio/wiringpi:
# apt install software-properties-common
# add-apt-repository ppa:hardkernel/ppa
# apt update
# apt install odroid-wiringpi odroid-wiringpi-python
Once installed, verify that wiringpi can access the GPIO pins and read their state
# gpio readallIf all is well, transfer over your scripts and hook up the hardware. In my case I am using a DS18B20 temperature sensor (https://www.adafruit.com/product/381) that uses one-wire for communication and a HC-SR501 (https://www.hardkernel.com/shop/motion-detector-hc-sr501/) PIR sensor. The PIR sensor is the easiest to work with since it requires a GPIO pin set to input and you can simply read its state. I am using physical pin 12 which corresponds to wiringpi pin 1 if you consult the mapping (https://wiki.odroid.com/odroid-n2/hardware/expansion_connectors).
The temperature sensor is a bit more difficult to get working because it needs onewire support in the kernel. In my case the ATV kernel at that time did not have onewire support enabled:
$ zcat /proc/config.gz | grep -i W1
# CONFIG_W1 is not set
So check out the upcoming section about kernel compilation and flashing.
Once your programs are running correctly, you need to start them up when Linux starts (Linux Deploy takes care of starting it when Android starts if you enable autostart in Linux Deploy's settings). Unfortunately, since Linux Deploy runs in a chroot if you use the service command under Linux to start and stop services you will get a notice that It is running under a chroot and will not do anything. In my case, I needed only two scripts, so I had to create sys-v scripts for my processes. You can get a script template from https://github.com/fhd/init-script-template. Create /etc/init.d/pir-mqtt-agent, configure it to point to your script, make it executable and link it to /etc/rc3.d:
# chmod a+x /etc/init.d/pir-mqtt-agent
# cd /etc/rc3.d/
# ln -s ../init.d/pir-mqtt-agent S10pir-mqtt-agent
SYS-V may seem archaic, but it was fine for the past 20 years, and it is easier to understand than systemd. However, what if the scripts fail for some reason (e.g. the sensor is no longer there, network is offline, etc)? Without systemd to do service housekeeping there is nobody there to restart your dead scripts. I went the quick and dirty route and set up cron to periodically restart the scripts (even if they are not dead). That works fine for my needs, but this needs to be looked into, to create a more robust process management system.
# crontab -l
0 * * * * /usr/sbin/service pir-mqtt-service restart
Compiling the Android kernel
Compiling the Android kernel is almost the same as compiling the Linux kernel, but it has some quirks. Some of the most important changes are:
- compilation is done on a x86_64 system (cross compilation)
- the zImage needs to be combined with a initrd and packed into a 16M boot image
- the boot image needs to be flashed to the Android boot partition
- the dtb lives in a dtbs partition and needs to be flashed too in case you are making changes to it.
First you will need to set up your cross compilation environment. Assuming you are on a Ubuntu 18.04 x86_64 system you can:
$ sudo apt-get -y install bc curl gcc git libssl-dev \
  libncurses5-dev lzop make u-boot-tools device-tree-compiler
$ mkdir ~/toolchain
$ cd ~/toolchain
$ wget https://releases.linaro.org/components/toolchain/binaries/6.3-2017.02/aarch64-linux-gnu/gcc-linaro-6.3.1-2017.02-x86_64_aarch64-linux-gnu.tar.xz
$ unxz gcc-linaro-6.3.1-2017.02-x86_64_aarch64-linux-gnu.tar.xz
$ tar xvf gcc-linaro-6.3.1-2017.02-x86_64_aarch64-linux-gnu.tar
Next, download the Android kernel source:
$ mkdir ~/development
$ cd ~/development
$ git clone --depth 1 https://github.com/hardkernel/linux.git -b odroidn2-4.9.y-android
$ cd linux
Now, set some environment variables so that the build environment knows that it needs to use the cross compiler. You will need to rerun these commands each time you start a new terminal (they are not persistent):
$ export ARCH=arm64
$ export CROSS_COMPILE=aarch64-linux-gnu-
$ export PATH=~/toolchain/gcc-linaro-6.3.1-2017.02-x86_64_aarch64-linux-gnu/bin/:$PATH
You can now start from a base configuration - usually by doing this inside the Linux directory:
$ make odroidn2_android_defconfigIf you want to start with a different config, you can extract the current kernel configuration from the running Android system from /proc/config.gz, gunzip it and save it as ~/development/linux/.config.
You can now run
$ make menuconfig
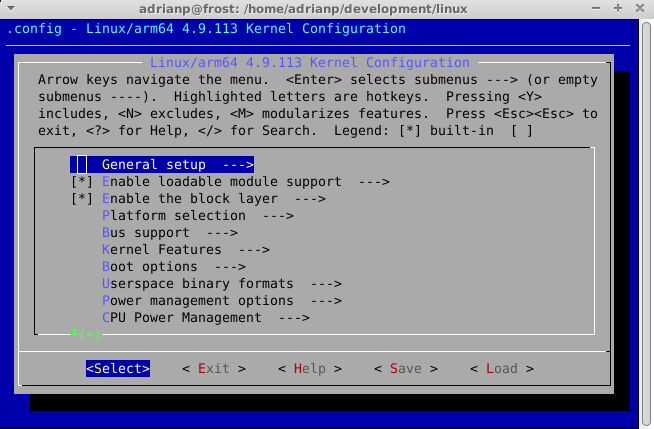
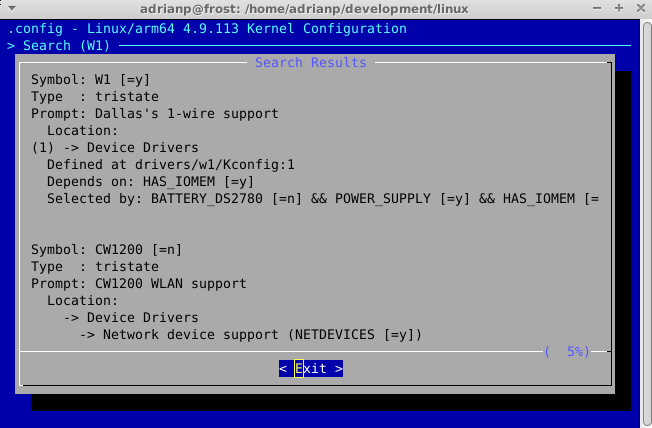
Here you can search for the items that you need and enable them. For efficiency reasons you can find where a configuration option is in the menu by typing '/' and typing in the option name (e.g. in my case W1 - short for onewire). The output will tell you where you can find that option (in my case under Device Drivers), what its current state is and if it depends on other options (and what their states are). If you cannot find an option in the menu it is most likely hidden because one if its dependencies isn't met. By using the search function you can find which dependency is missing.
Once you get to the menu you can find the item by pressing ALT and the highlighted shortcut letter and you should navigate through all options in the visible menu that share the same shortcut.
When enabling an option you generally have two choices - built-in or as a module. Traditionally, Linux uses modules and has the capability to auto-load modules on demand, but Android is a bit different and though it can use modules it does not auto-load them. The easiest choice is to build it in, but if you need too many options it might make the kernel grow in size too much and it will not fit (together with the initrd) in the 16M boot partition.
If you will build modules you will need to manually locate the module in the build environment (e.g. drivers/w1/masters/w1-gpio.ko) and copy it to /vendor/lib/modules/ on the Android side. Note that the /vendor partition is mounted read-only and needs to be remounted before copying:
:/ # mount -o remount,rw /vendor $ adb push drivers/w1/masters/w1-gpio.ko /vendor/lib/modules/
To load new modules at startup you will need to edit init.odroidn2.system.rc as described here: https://github.com/codewalkerster/android_device_hardkernel_odroidn2/blob/s922_9.0.0_master/init.odroidn2.system.rc#L96
For my needs (onewire support) I needed to enable the following modules (and have them built-in):
CONFIG_W1
CONFIG_W1_MASTER_GPIO
CONFIG_W1_SLAVE_THERM
Ok, now that the kernel configuration is done, you can save it and start building the kernel:
$ make -j$(nproc)The compilation should take a while the first time, but subsequent runs should compile only the differences. Have a look for any errors, but if it builds correctly you should get a ~/development/linux/arch/arm64/boot/Image.gz.
$ ls -l ~/development/linux/arch/arm64/boot/Image.gzIf you need to make changes to the dtb (e.g. enable or change settings), you can use fdtput (part of device-tree-compiler package) to make changes to the dtb. In my case I need to explicitly enable one-wire support in the dtb, otherwise the driver will not do anything:
$ fdtput -t s ~/development/linux/arch/arm64/boot/dts/amlogic/meson64_odroidn2_android.dtb /onewire status okayOnce the kernel and dtb are in order, we need to prepare the bootimg. To do this, first extract the boot partition from the working ATV version, so that we can keep the initrd from the original image. Next we install bootimg which is a tool for packing and unpacking Android boot images.
$ adb shell
# if=/dev/block/boot of=/dev/shm/boot.img
# exit
$ mkdir ~/development/bootimg
$ cd ~/development/bootimg
$ adb pull /dev/shm/boot.img
$ sudo apt-get install abootimg
We can now inspect the boot.img and extract the initrd and configuration:
$ file boot.img
boot.img: Android bootimg, kernel (0x1080000), ramdisk (0x1000000), page size: 2048, cmdline (otg_device=1 buildvariant=userdebug)
$ abootimg -x boot.img
The final step is to create the new bootimg with the new kernel:
$ abootimg --create boot-new.img -f bootimg.cfg -k ~/development/linux/arch/arm64/boot/Image.gz -r initrd.imgOk, now you are ready to flash the new kernel and dtb:
$ adb push boot-new.img /dev/shm
$ adb push ~/development/linux/arch/arm64/boot/dts/amlogic/meson64_odroidn2_android.dtb /dev/shm
$ adb shell
# dd if=/dev/shm/boot-new.img of=/dev/block/boot
# dd if=/dev/shm/meson64_odroidn2_android.dtb of=/dev/block/dtbs
Once you reboot your new kernel should take over and you can check that you get the functionality that you need. If it does not reboot you will need to recover the board by flashing the previous boot.img by using fastboot mode. Enjoy your Linux server with an Android TV GUI!
Be the first to comment