

Remember Part 1 of this guide? We set up a Bitcoin full node with Lightning from scratch, went to quite some length to secure our box, and started testing Bitcoin on testnet. If you did not catch Part 1, please read it first as this part won't make much sense without it. The goal of this guide is to switch our Thundroid from Bitcoin testnet to mainnet and to transact with real money.
Financial best practices Bitcoin is a bearer asset like physical cash, so transactions cannot be reversed. Controlling your bitcoin actually means controlling the private keys that allow you to use them. This means that if someone has access to your private keys, this person has full control over your bitcoin. Once they are sent to a different address, there's nothing you can do to get them back.
To manage your bitcoin, you need a wallet. This is an application that manages the private keys for you. There is an important distinction:
- Hot wallet: an application that manages your private key and is exposed to the internet. It is a very convenient mobile application, but could potentially be hacked. This type of wallet is used for smaller amounts and everyday use.
- Cold storage: your private key is never been exposed to any network. Examples are paper wallets which are created and/or printed using an offline computer, or hardware wallets like a Ledger or Trezor. This is how you secure your savings in bitcoin.
By definition, this project is a hot wallet as it is connected to the internet. That said, do not store large amounts of money on your Thundroid!
- Bitcoin: don't use the wallet built into Bitcoin Core at all. The way to go is to use a small hardware wallet to secure your private keys with Thundroid as your trusted backend to send / verify transactions. More on that later.
- Lightning: as the whole network is still in beta, it goes without saying that you should not put your life savings into it. Experimenting with small amounts is fine, but do it at your own risk.
Please be aware that while Bitcoin has been battle-tested for almost a decade and is used to move billions of US dollars every day, the Lightning Network is still in beta and under heavy development. This guide also allows you to set up your Bitcoin node while ignoring the Lightning part.
Moving to Mainnet The current setup of your Thundroid runs on Bitcoin testnet. Make sure that your box running smoothly so that we can move on to copy the mainnet blockchain that you already downloaded on a regular computer (see Part 1) to the box.
On your regular computer, check the verification progress in Bitcoin Core. To proceed, it should be fully synced (see status bar). Shut down Bitcoin Core on Windows so that we can copy the whole data structure to the Thundroid. This takes about 6 hours.
NOTE: If you get stuck, please check out my GitHub repository. You can search for answers among solved issues, or open a new issue if necessary.
Temporarily enable password login In order to copy the data with the user "bitcoin", we need to temporarily enable the password login. As user "admin", edit the SSH config file and put a # in front of "PasswordAuthentication no" to disable the whole line. Save and exit.
$ sudo nano /etc/ssh/sshd_config
# PasswordAuthentication no
Restart the SSH daemon.
$ sudo systemctl restart sshCopy mainnet blockchain using SCP We are using "Secure Copy" (SCP), so download and install WinSCP, a free open-source program. There are other SCP programs available for Mac or Linux that work similarly. Do not use rsync as this can lead to issues later on.
With WinSCP, you can now connect to your Pi with the user "bitcoin". Both protocols SCP and SFTP work, in my experience SCP is a bit faster.
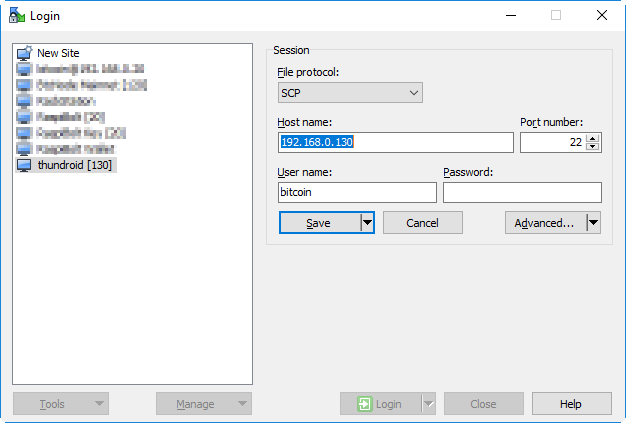
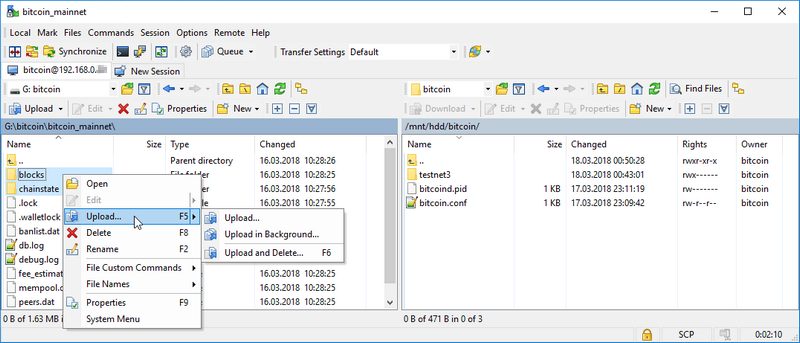
Accept the server certificate and navigate to the local and remote bitcoin directories:
- Local: d:\bitcoin\bitcoin_mainnet\
- Remote: \mnt\hdd\bitcoin\
You can now copy the two subdirectories blocks and chainstate from Local to Remote. This will take about 6 hours.
NOTE: The transfer must not be interrupted. Make sure your computer does not go to sleep. Disable password login again As user "admin", remove the # in front of "PasswordAuthentication no" to enable the line. Save, exit the config file and restart the ssh daemon.
$ sudo nano /etc/ssh/sshd_config
PasswordAuthentication no

# Restart the SSH daemon.
$ sudo systemctl restart ssh
Send back your testnet Bitcoin To avoid burning our testnet Bitcoin, and as a courtesy to the next testers, we close all our channels and withdraw the funds to the address stated on the website of the Bitcoin Testnet Faucet.
$ lncli closeallchannelsWait until the the channel balance is zero and the funds have been returned to our on-chain wallet.
$ lncli channelbalance
$ lncli walletbalance
Send the amount provided by walletbalance minus 500 satoshis to account for fees. If you get an "insufficient funds" error, deduct a bit more until the transaction gets broadcasted.
$ lncli sendcoins 2N8hwP1WmJrFF5QWABn38y63uYLhnJYJYTF [amount]Adjust configuration Stop the Bitcoin and Lightning services:
$ sudo systemctl stop lnd
$ sudo systemctl stop bitcoind
Delete LND wallet. Edit "bitcoin.conf" file by commenting ‘testnet=1’ out, then save and exit.
$ sudo nano /home/bitcoin/.bitcoin/bitcoin.conf
# remove the following line to enable Bitcoin mainnet
#testnet=1
Copy updated "bitcoin.conf" to user "admin" for credentials (the command bitcoin-cli looks up the "rpcpassword")
$ sudo cp /home/bitcoin/.bitcoin/bitcoin.conf /home/admin/.bitcoin/Edit "lnd.conf" file by switching from bitcoin.testnet=1 to bitcoin.mainnet=1, then save and exit.
$ sudo nano /home/bitcoin/.lnd/lnd.conf
# enable either testnet or mainnet
#bitcoin.testnet=1
bitcoin.mainnet=1
Delete the LND authorization files (*.macaroon). They are linked to the currently active wallet and need to be created when we create a new wallet for mainnet.
$ sudo rm /home/bitcoin/.lnd/*.macaroon
$ sudo rm /home/bitcoin/.lnd/data/macaroons.db
Restart bitcoind & lnd for mainnet NOTE: Do not proceed until the copy task of the mainnet blockchain is completely finished. Start Bitcoind and check if it's operating on mainnet:
$ sudo systemctl start bitcoind
$ systemctl status bitcoind.service
$ sudo tail -f /home/bitcoin/.bitcoin/debug.log  (exit with Ctrl-C)
$ bitcoin-cli getblockchaininfo
Wait until the blockchain is fully synced. "blocks" = "headers", otherwise you might run into performance / memory issues when creating a new lnd mainnet wallet. Start LND and check its operation. It will wait for the wallet to be created.
$ sudo systemctl start lnd
$ systemctl status lnd
Create mainnet wallet Once LND is started, we need to create a new integrated Bitcoin wallet for mainnet. Start a "bitcoin" user session and create a new wallet
$ sudo su - bitcoin
$ lncli create
If you want to create a new wallet, enter your password [C] as wallet password, select n regarding an existing seed and enter the optional password [D] as seed passphrase.
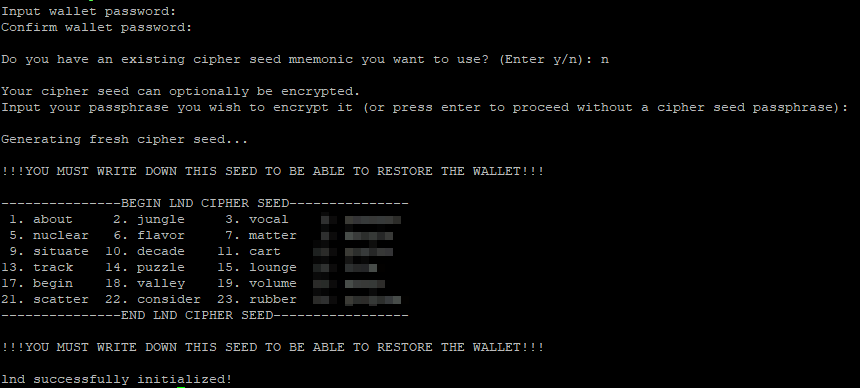
The 24 seed words that are displayed, combined with your optional passphrase, is the backup for your on-chain Bitcoin. The current state of your channels, however, cannot be recreated from this seed, this is still under development for LND.
NOTE: This information must be kept secret at all times. Write these 24 words down manually on a piece of paper and store it in a safe place. This piece of paper is all an attacker needs to completely empty your wallet! Do not store it on a computer. Do not take a picture with your mobile phone. This information should never be stored anywhere in digital form.
Exit the "bitcoin" user session. To use lncli with the "admin" user, copy the permission files and the TLS certificate. Check if it's working.
$ exit
$ sudo cp /home/bitcoin/.lnd/tls.cert /home/admin/.lnd
$ sudo cp /home/bitcoin/.lnd/admin.macaroon /home/admin/.lnd
Check if it works by getting some node infos
$ lncli getinfoRestart lnd and unlock your wallet (enter password [C] )
$ sudo systemctl restart lnd
$ lncli unlock
Monitor the LND startup progress until it has caught up with the mainnet blockchain (about 515k blocks at the moment). This can take up to 2 hours, after which you will see a lot of very fast chatter. Exit with Ctrl-C.
$ sudo journalctl -f -u lndThis command will return "synced_to_chain: true" if LND is ready.
$ lncli getinfoImprove startup process It takes a little getting used to the fact that the LND wallet needs to be manually unlocked every time the LND daemon is restarted. This makes sense from a security perspective, as the wallet is encrypted and the key is not stored on the same machine. However, for reliable operations this is not optimal, as you can easily recover LND if it has to restart for some reason (such as a crash or power outage), but then it's stuck with a locked wallet and cannot operate at all.
This is why a script that automatically unlocks the wallet is helpful. The password is stored in a root-only directory as plain text, so it’s clearly not as secure, but for reasonable amounts this is a good middle-ground. You can always decide to stick to manual unlocking or implement a solution that unlocks the wallet from a remote machine.
As user "admin", create a new directory and save your LND wallet password [C] into a text file:
$ sudo mkdir /etc/lnd
$ sudo nano /etc/lnd/pwd
The following script unlocks the LND wallet through its web service (REST interface). Copy it into a new file.
$ sudo nano /etc/lnd/unlock
#!/bin/sh
# LND wallet auto-unlock script
# 2018 by meeDamian, robclark56

# Delay is needed to make sure bitcoind and lnd are ready.  You can still
# unlock the wallet manually if you like.  Adjust to your needs:
/bin/sleep 300s

LN_ROOT=/home/bitcoin/.lnd

curl -s \
        -H "Grpc-Metadata-macaroon: $(xxd -ps -u -c 1000 ${LN_ROOT}/admin.macaroon)" \
        --cacert ${LN_ROOT}/tls.cert \
        -d "{\"wallet_password\": \"$(cat /etc/lnd/pwd | tr -d '\n' | base64 -w0)\"}" \
        https://localhost:8080/v1/unlockwallet > /dev/null 2>&1

echo "$? $(date)" >> /etc/lnd/unlocks.log
exit 0
Make the directory and all content accessible only for "root"
$ sudo chmod 400 /etc/lnd/pwd
$ sudo chmod 100 /etc/lnd/unlock
$ sudo chown root:root /etc/lnd/*
Note: I encountered the issue that curl was not running correctly on my machine and I had to reinstall a library before I got it working again:
$ sudo apt install --reinstall libroken18-heimdal.Create a new systemd unit that starts directly after LND.
$ sudo nano /etc/systemd/system/lnd-unlock.service

# Thundroid: system unit for lnd unlock script
# /etc/systemd/system/lnd-unlock.service

[Unit]
Description=LND wallet unlock
After=lnd.service
Wants=lnd.service

[Service]
ExecStart=/etc/lnd/unlock
Type=simple

[Install]
WantedBy=multi-user.target
Edit the LND config file to enable the REST interface on port 8080:
$ sudo nano /home/bitcoin/.lnd/lnd.conf
# add the following line in the [Application Options] section
restlisten=localhost:8080
Reload systemd and enable the new unit. Restart your Thundroid and watch the startup process to see if the wallet is automatically unlocked.
$ sudo systemctl daemon-reload
$ sudo systemctl enable lnd-unlock.service
$ sudo shutdown -r now
---- reconnect ----
# Unlocking the wallet will take several minutes due to the build in delay
$ sudo journalctl -u lnd -f
Note: a more elegant way were to run the script with ExecStartPost=+/etc/lnd/unlock in the lnd.service unit. This would enable it to unlock the wallet if LND service is restarted outside the startup process. The =+ is necessary to run LND with user "bitcoin" and the unlock script with root privileges. Unfortunately, this is only supported starting with systemd version 331, but we are using version 229. Start using the Lightning Network Fund your node Congratulations, your Thundroid is now live on the Bitcoin mainnet! To open channels and start using it, you need to fund it with some bitcoin. For starters, put only on your node what you are willing to lose, and treat it as monopoly money. Generate a new Bitcoin address to receive funds on-chain:
$ lncli newaddress np2wkh
> "address": "3.........................."
From your regular Bitcoin wallet, send a small amount of bitcoin to this address, or ask your one annoying Bitcoin friend to send you a few bucks. Next, check your LND wallet balance:
$ lncli walletbalanceMonitor your transaction on a Blockchain explorer as described at https://smartbit.com.au. LND in action As soon as your funding transaction is mined and confirmed, LND will start to open and maintain channels. This feature is called "Autopilot" and is configured in the "lnd.conf" file. If you would like to maintain your channels manually, you can disable the autopilot.
You can use the same commands that were listed in Part 1 of this guide or use, go to LND API reference or just type lncli --help. Try it out and explore Lightning mainnet There are a lot of great resources to explore the Lightning mainnet in regards to your own node.
- Lightning Spin: A simple Wheel of Fortune game
- Lightning Network Stores: Stores and services accepting Lightning payments
- Recksplorer: Lightning Network Map
- 1ML: Lightning Network Search and Analysis Engine
- lnroute.com: Comprehensive Lightning Network resources list
What's next? You now have your own Bitcoin/Lightning full node. The initially-stated goals were as follows and we achieved them all:
- A fully validating Bitcoin Full Node that does not require any trust in a 3rd party
- Runs reliably 24/7
- Supports the decentralization of the Lightning network by routing payments
- Can be used to send and receive personal payments using the command line interface.
- Usability? Not so much...
Is it the perfect Bitcoin Lightning node yet? It's clunky and the command line does just not cut it. In Part 3 of this guide we will therefore go on to extend the Thundroid with additional applications that use it as our own private backend.
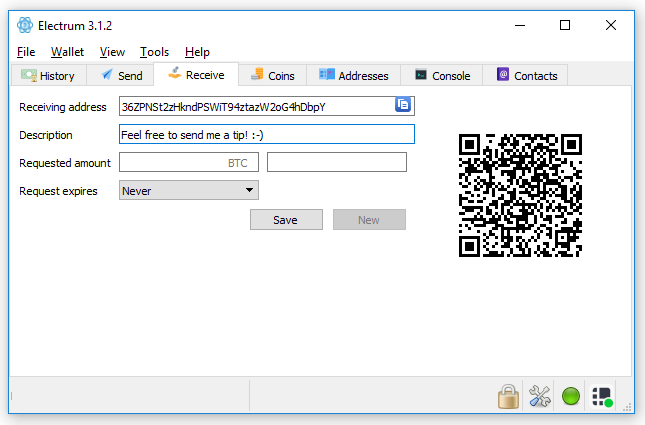
- The Electrum desktop wallet is the perfect power-user wallet to handle regular on-chain Bitcoin transaction. Because it supports a wide variety of hardware-wallets, you private keys never need to be exposed to any (possibly compromised) online computer. With the Electrum Personal Server running on Thundroid, you have full control to send, receive, and verify Bitcoin transactions with great security and privacy.
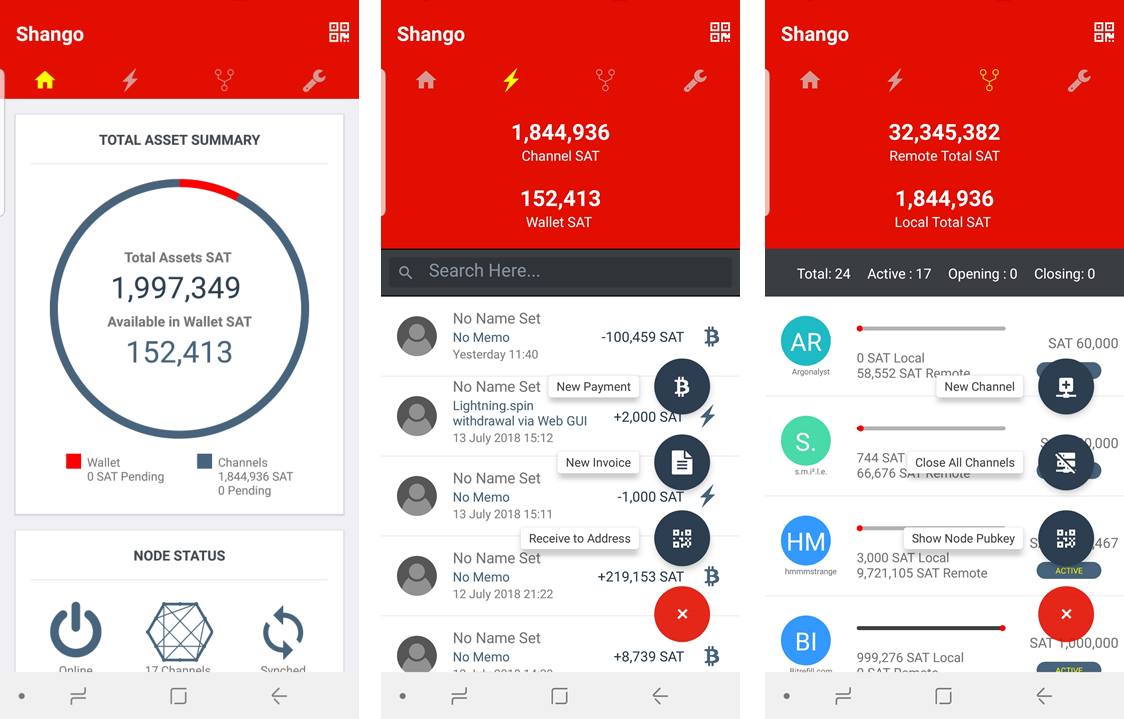
- The Shango lightning mobile wallet is perfect for small, instant payments on the go. It connects to your Thundroid and provides a neat user interface on your iOS / Android phone to send and receive payments, and manage peers and channels. While still in closed beta, I hope it will be public just in time.
Join me in part 3 of the guide "The perfect Bitcoin Lightning node" and discover some cutting edge applications that work on top of our own Bitcoin full node!
Be the first to comment