Five-Minute Fun with your Monku R1: A Sega Genesis Handheld SD Card
September 1, 2019By Brian ReeGaming, ODROID-C1+, ODROID-C2, ODROID-XU4, Tinkering
Now that you have your cool new retro gaming console all set up and you're enjoying playing some retro games, let's take a moment to think about what else we can do with our ODROID device. You'll need a Monku Retro device, like the one we show you how to build here (R1, R2), and here (R3). You can use it to create an expansion SD card for the AtGames line of Sega Genesis handheld devices. We'll show you how to prepare the SD card, which can only be done on a Linux based system, aka, your ODROID. This is actually pretty cool. The device isn't as awesome as an ODROID-GO but it does play Sega Genesis games very well and it has support for extending the game list with your own ROMs. Get your ODROID device ready and let's start the tutorial.
Tools Needed
A Monku Retro 1, 2, 3 / ODROID-C1+, ODROID-C2, ODROID-XU4. It is expected these devices are configured with Ubuntu and MATE. Click here for R1 and R2 devices, and here for R3 devices.
As it so happens, you can't use a Mac or a Windows machine to create a properly supported SD card for the AtGames series of Sega Genesis handhelds. It also just so happens that your ODROID device running Ubuntu is one of the only devices that can create a properly working one. Get the tools you'll need ready. I've laid out those that we'll need for this tutorial below.
Figure 1 - All the tools you’ll need for this project
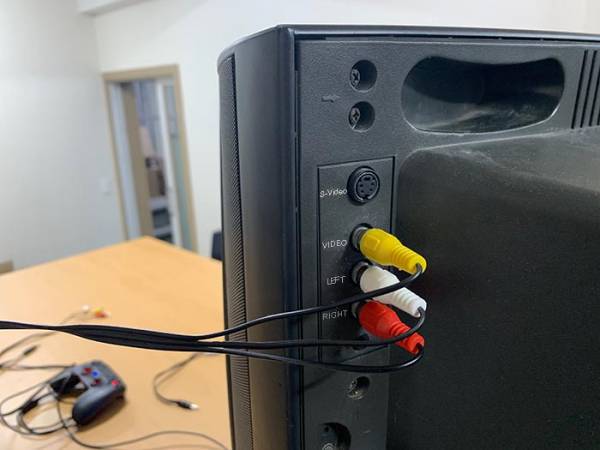
For this little project we'll need an AtGames Sega Genesis handheld with an SD card expansion slot, depicted below. We'll also need an SD card of some kind. Here we are using a micro SD card with SD card adapter. An SD card reader will also be required. Here we are using a dual SD/micro SD card to USB reader.
Figure 2 - Dual SD/micro SD card to USB reader
Get a copy of your Sega Genesis ROM collection. You'll need to make some changes to the way the files are named. The game ROMs should be copied into a folder on the root of the prepared SD card named Game. The game ROMs should have a .bin file extension and should be named camelCase with any non alphanumeric characters and spaces removed.
Figure 3 - Files should be camelCase with spaces and special characters removed
Plug your SD card and SD card reader into your ODROID device. If the SD card as a recognized file system, you should see a new icon appear on the desktop. Ignore it for now. If you don't have GParted installed, please run the following commands. Open the mate terminal at this menu location: Applications -> System Tools -> MATE Terminal.
$ sudo apt-get install gparted -y
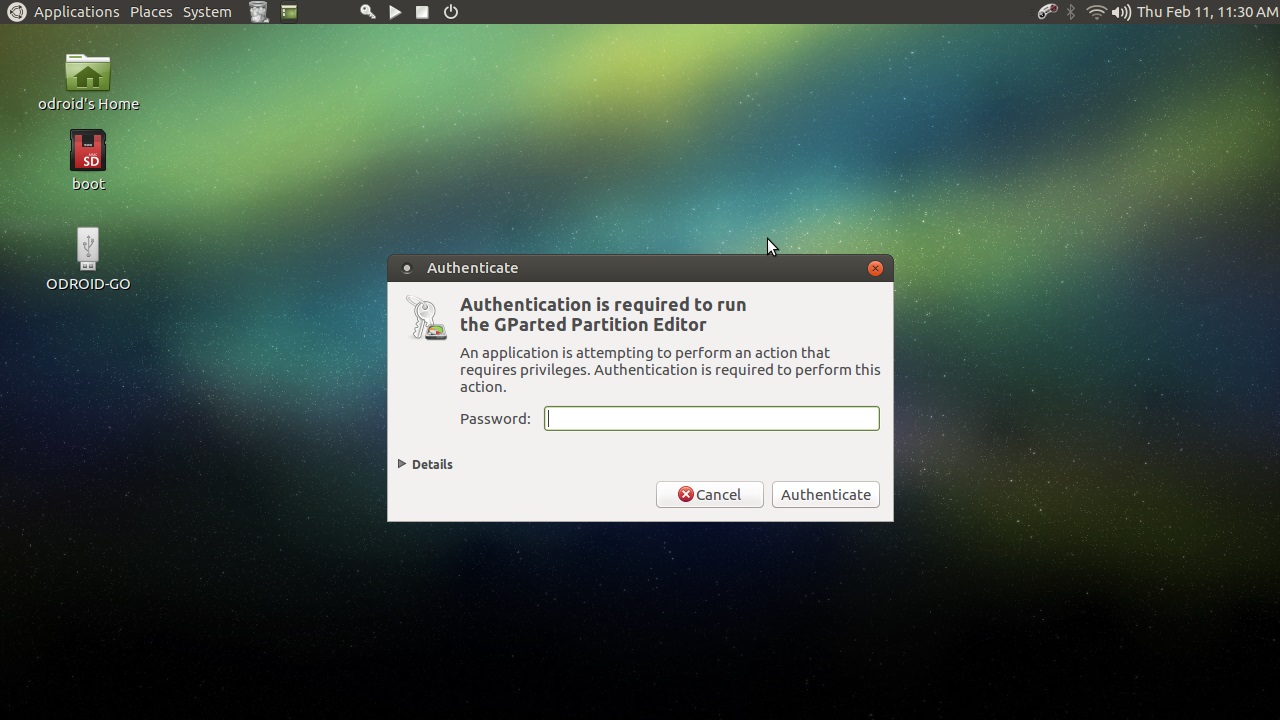
Next, run GParted. Open this menu location: System -> Administration -> GParted. An application like the one depicted below should appear. If you are prompted for a password, enter the default root password, odroid, or the password you are using.
Figure 4 - Enter your credentials
Select your SD card from the drop down list in the top right-hand corner of the application window. Double check to make sure you are referencing the new SD card and not the one the ODROID is running off. Right-click on any partitions that you see listed for the SD card and select Unmount. Right-click again and select delete. Do this until no partitions are available--only unallocated space.
Create a new primary partition with the settings depicted in the screenshot below. Set the following options.
Free Space Preceding: 1
New Size: maximum available
Free Space Following: 0
Align To: MiB
File System: Fat32
Create As: Primary Partition
Label: S_GEN_HH
Figure 5 - Use these settings to create your partition
GParted has logged the changes we're planning to make to the partitions on the new SD card, but hasn't done anything yet. In order to execute the steps we've outlined, you must click the ‘Apply All Operations’ green checkbox at the top of the window, as depicted below. The steps will be executed and we'll end up with a single unmounted partition with the settings listed above.
Figure 6 - Apply all operations
Wait for the process to complete, then click the Close button. Close GParted, then disconnect and reconnect the SD card to get it to mount again cleanly. You can now copy the ROMs into the Game directory on the SD card you just created.
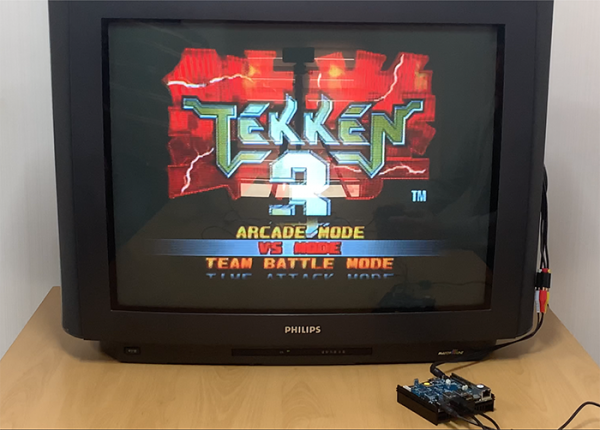
Pop the SD card into your device and turn it on. Select the SD Card option from the built-in menu system: it'll be on the last menu screen. Once you’ve selected it, you should see a ‘Searching For Games…’ message.
Figure 7 - Select SD card then wait while the system searches for games
You can now play any Sega Genesis ROM on your AtGames Sega Genesis handheld device thanks to your ODROID. Enjoy the fun!
Linux Gaming: PC-Engine / TurboGrafx - Part 6
September 1, 2019By Tobias SchaafGaming
With this article, we’ve reached the end of the PC-Engine / Turbografx series, which I admit went on much longer than I anticipated. It also was a lot more interesting than I thought it would be. Let’s see what this final installment will bring, and if the series of famous shooters will continue here as well, or if there are yet some surprises left to discover.
Games I liked
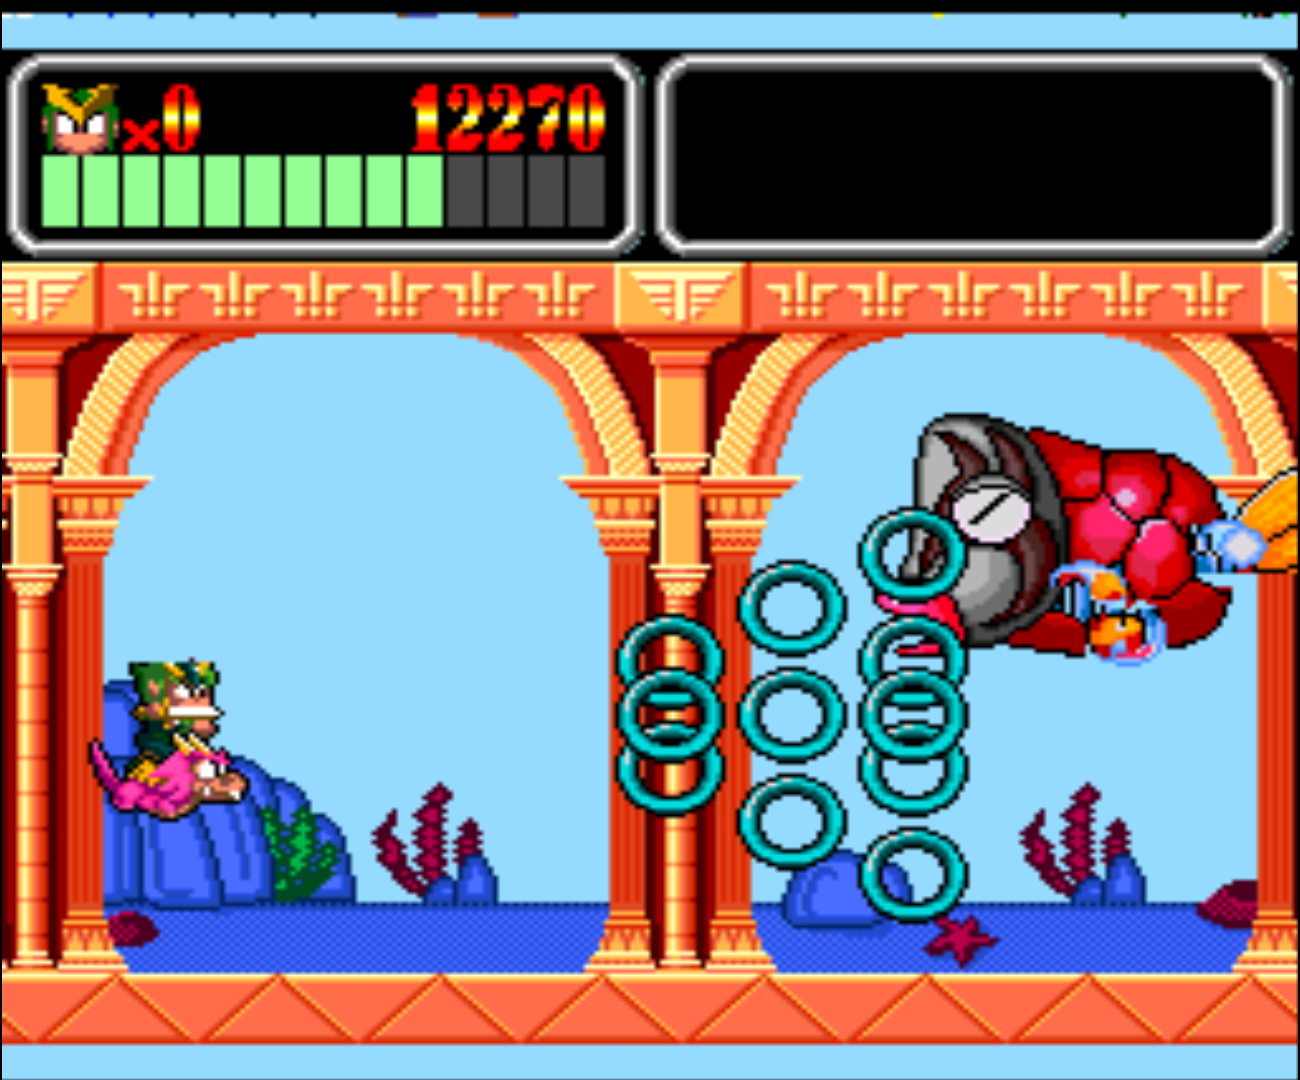
Valis Series
Figure 1 - Recap of Valis I of part 4 of this series
Figure 2 - Good graphics and very nice gameplay overall
Valis is a series of action platformers where you play as a young school girl with a magical sword that can fight off daemons. The first part I already covered in part 4 of this series under the name “Mugen Senshi Valis - Legend of a Fantasm Soldier”. It’s a remake of the original Valis game which came out first for the MSX and NES. The PC Engine port was a remake with highly improved graphics and anime cut-scenes. Although it’s the first in the series, it’s the last that was released for the PC Engine in 1992. The first to be released on the PC Engine was Valis II in 1989.
Valis II is very similar in gameplay as Mugen Senshi Valis - Legend of a Fantasm Soldier, but with some small differences. You can not slide as you can in the original Valis, and the weapons you collect are shown as icons. You magic can be activated by simply pressing the “up” key which can lead to some accidental activation over time. There is no magic point (MP) meter for your magic that decides how often you can use your magic and that you can refill. Instead, you collect items that allow you a certain number of uses of that particular skill. Besides that, it’s still slice and dice as well as jump and run. The graphics are not that good, there is no parallax scrolling in the game, and videos have very limited animations. They also have an ugly green border which was removed in later installments of the series. The game was completely dubbed in English which sounds quite cliche, but helps you understand the overall story.
Figure 3 - The green border in cut-scenes was removed in later parts of the series
Figure 4 - Bosses are rather easy
Valis III came out in 1990 for the PC Engine (and 1992 for Turbo Graphics). It improves over the Valis II in many ways. Gone is the ugly border around cut-scenes, and cut-scenes are actually rendered a lot bigger now with many more animations going on. The overall graphics improved as well.
Figure 5 - Overall improved graphics in Valis III
Figure 6 - Bosses are a little harder this time but still no real challenge
Back is the MP bar which can be filled by collecting items. You increase the strength of your attacks by increasing the length of your sword meter: the more the meter is filled before you do an attack, the more damage you do. You do no longer have different sword styles but instead can switch between different characters. Which have different attacks and attack-styles. You can switch between characters anytime within the game, except for boss fights where you have to keep the one with whom you entered the fight.
Back is also the sliding now on the “START” button while pressing down. Magic can be cast by hitting up AND the attack button rather than only up. Overall the game is a lot better than the second part in many ways. It llacks the parallax scrolling of the Mega Drive version of the game, but offers CD quality music instead.
Valis IV improves a little bit over Valis III im that you actually do have a little bit of parallax scrolling here and there. Released in 1991 (one year before the Valis I remake), it’s only available in Japanese. This time you play different characters though and you can switch between three different characters within the game (similar to Valis III). This time, though, this is needed to solve some puzzles, as only one of the characters can do a double jump in order to reach higher or further away places.
Figure 7 - More of the same in Valis IV it looks very similar to Valis III gameplay wise
Figure 8 - Bosses are fun and slightly more challenging this time
Magic is gone completely this time, and is replaced by a three-staged special attack for each character. Each Stage requires a certain amount of energy in your WP bar which is filled automatically as long as you don’t use it or get hit. Each stage has a different attack, and the third stage is a screen filling attack that does a lot of damage. Using it will decrease your overall WP meter to level 2, and you have to collect an item first to enlarge it to level 3 again. You don’t lose anything if you use Level 1 or 2 though.
All of the games in the series are fun to play, and I can highly recommend them if you like action platformers. With the second and third games being in English, it’s easy to follow the story for a while and enjoy the animated cut-scenes.
Wonderboy 3 - Monster Lair
This is a port of the classic arcade game to the PC Engine. There’s nothing much to say if you know the arcade game. You get a very good copy of it with improved CD sounds and that’s about it.
Figure 9 - Wonderful bright colors and comic like graphics
Figure 10 - Second stage of each level flying and boss fighting
If you don’t know this game, it is an arcade action platformer designed to eat your coins. The screen is constantly scrolling to the right, and you have to move forward to avoid being dragged along. The green life bar is also a time bar that reduces slowly over time, but can be replenished by collecting fruits and items. You can collect a couple of different weapons which, for a short time, will aid you in your quest. The game is fun, the music is good, and it’s a very nice port of the game.
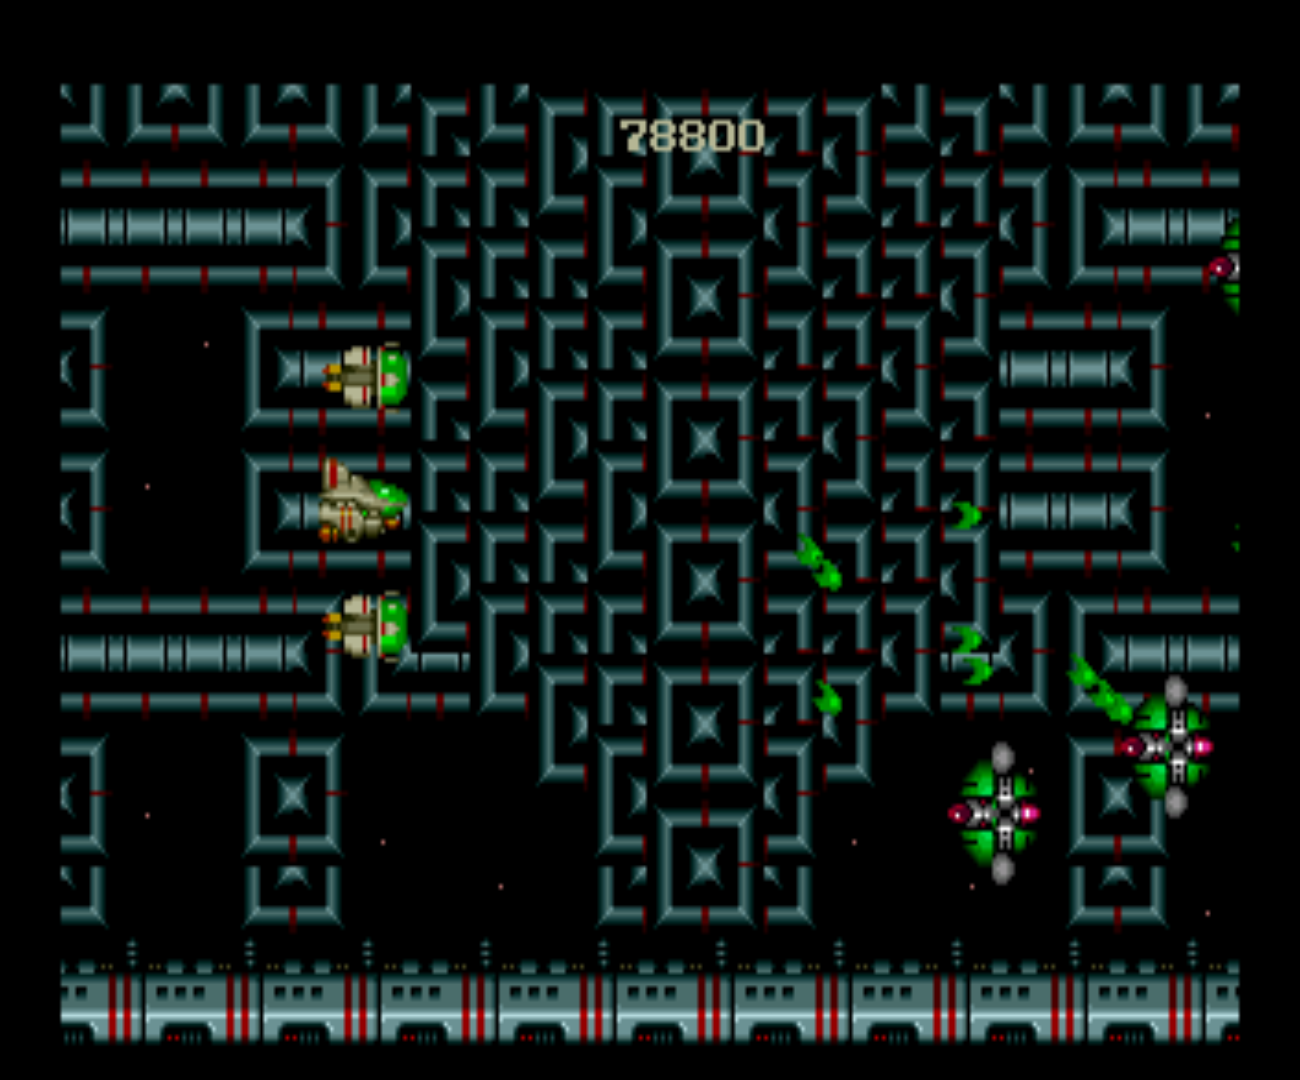
Zero Wing
Figure 11 - Zero Wing for the PC Engine
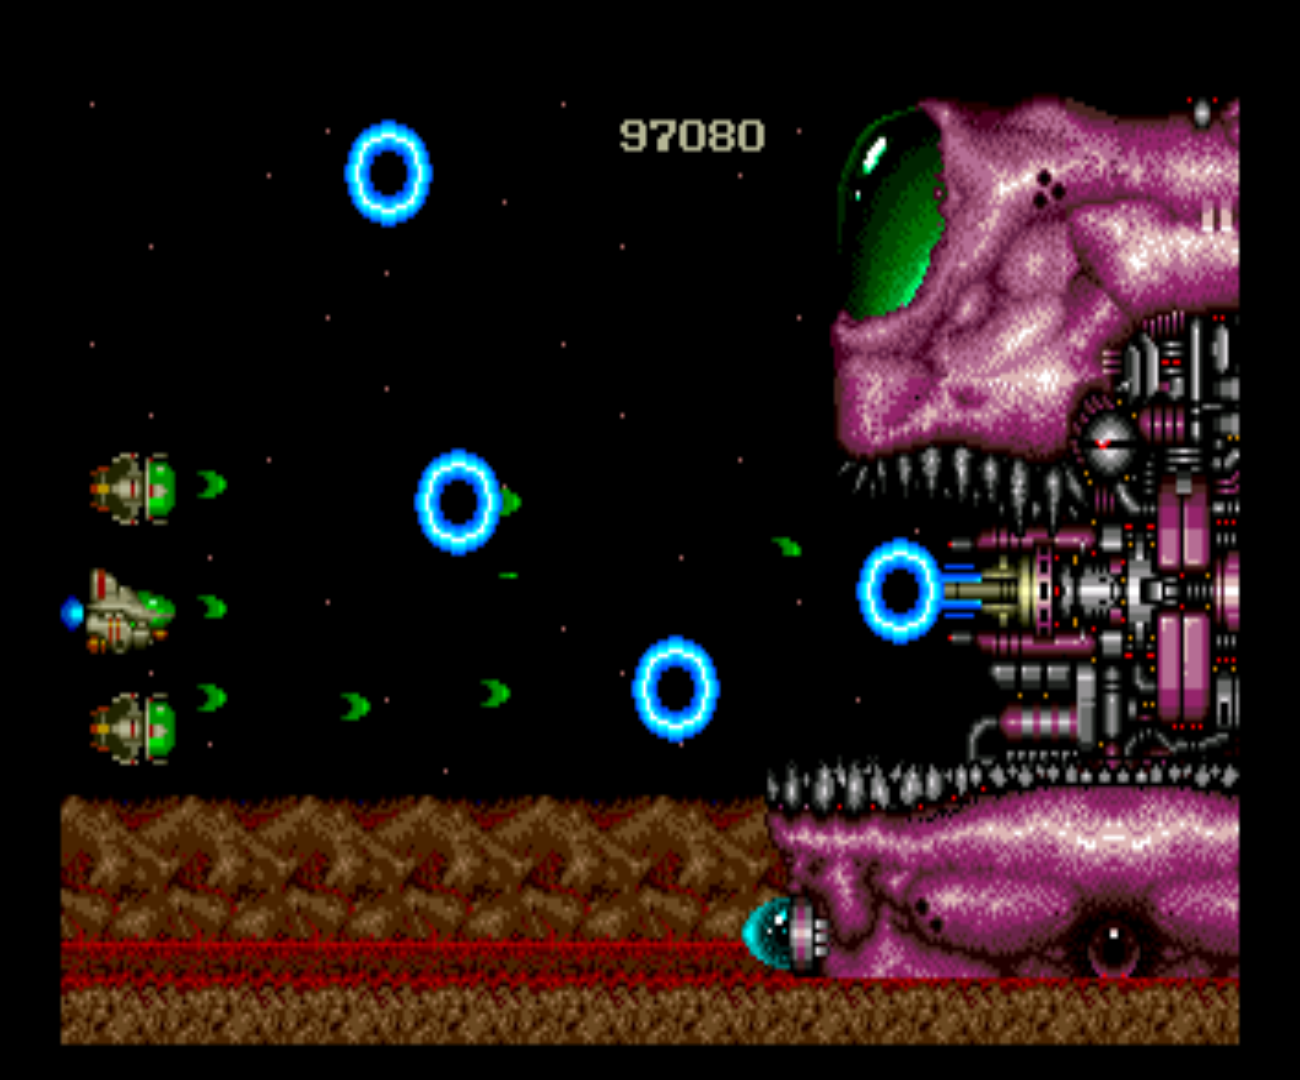
Figure 12 - Bosses can be huge and cause flicker
This shooter is not particularly impressive. It’s just the overall vibe with good graphics (but not impressive), nice gameplay, and fitting music. The game is good, not perfect, but it’s fun to play. The graphics lack good parallax scrolling, but you get a lot of big enemies and challenging situations without it being unfair. There are even some situations where you have to guide your space craft through very tight spaces, which worked perfectly fine, and I haven’t had trouble like in some other games. Bosses are huge, and it’s fun to find patterns to beat them.
You can collect three different weapon types represented by either the color red, blue, or green. The first is your standard pea shooter (vulcan cannon) in red, which fans out over time if you upgrade it and covers a lot of the screen. Blue is for a laser beam type of weapon, which goes straight forward and does a lot of damage. It is probably best for killing large enemies and bosses as it does the most damage over time. The last is green, which are self aiming shots that fly automatically to an enemy on the screen. Each of the weapons can be upgraded if you collect items of the same color. If you switch colors, you switch weapons, but do not increase or decrease the weapons power. There are also some other power ups that allow you to fly faster, for example, or will give you a bomb that you can throw at enemies, which does massive damage in a large radius over time.
You also have the ability to “capture” enemies and use them as a shield or throw them at other enemies., which is fun for a while, but I dropped that after a time. There are certainly better shooters out there for the PC Engine, but I really liked the simplicity of the style and gameplay.
Games I found ok
Tenchi wo Kurau (aka Dynasty Wars)
The fighting game with RPG elements is actually quite nice. You collect certain items to level up your character and get more HP, and you can collect a few weapons from enemies you killed to increase your overall strength a little. You can charge your attack to do extra damage and fight a bunch of bosses at the end of the level. Overall it is a rather good game. Graphically, it is not as good as the arcade version, but is very satisfying and not bad gameplay wise.
Tengai Makyo - Kabuki Itouryodan
This Street Fighter-style game offers 8 different characters to choose from. It’s actually quite good for the PC Engine and supports 6-button joysticks. However, it’s entirely in Japanese, and even the menus are hard to figure out. It also has a rather long loading time between levels compared to other games. Still, if you like Street Fighter like games you should definitely try this one as it’s one of the best of this genre for the PC Engine.
Tengai Makyou - Deden no Den
This is essentially Bomberman with a different graphics set, and there is nothing particularly good or bad about it.
The TV Show
I’m not sure if I like or dislike this game. You can choose between 8 different characters, each one with a silly background story, which shows them messing up, and then you go to something called “The TV Show”. This is a mixture of a puzzle and a fighting game. You can set different types of bombs, and some will kill or destroy objects nearby, while others will destroy entire floors underneath them. Your goal is to break certain objects (without dropping them in the endless pit underneath) to get what’s inside. The reward is mostly diamonds to increase your wealth which you need to “continue” when you die or mess up. It’s interesting, if only for a little while.
Uchuu Senkan Yamato (aka Space Battleship Yamato)
This game plays like an interactive animation film. You are the commander of the space battleship Yamato. For this, you can command different stations of your battleship and order them on tasks like shooting at enemies, sending fighter/bombers after them, determining where you want to concentrate your repairs, and setting the direction you want to fly and how quickly. Things like this, combined with decent graphics and sounds/music, make this game great, yet the game is completely in Japanese and I have a hard time understanding what I’m supposed to do. It’s easy enough to figure out the controls, but mission objectives are a different topic. It’s a shame, as I would love to play this game in a language I understand. It’s a very unique concept of a game and I very much enjoy playing it.
Vasteel
This game is a mixed bag. The animation is lengthy, with a fully English-voiced intro and fights, which is quite nice, with a good amount of detail. The gameplay itself is a little bit different though. It’s a tactical game similar to Advanced Wars for the Gameboy Advance, History Line 1914-1918, or Battle Isle. You command single units of an army, build new ones (as long as you have the funds), and send them toward enemy units and cities. Destroy the energy plant of a city, and you take it over, which in return gives you more funds. The goal is to eradicate the enemy main building and thereby win the map.
This sounds easy, but it can take many hours just to win a single map, with you constantly trying to capture and hold the same cities. A little different is the fact that you can control your units when it comes to a fight. Most of the time, your units have a fast but very ineffective gun and bigger gun that takes a long time to shoot, or is slow. You can try to avoid enemy shots and try to hit the enemy yourself. It’s not bad, but as I mentioned, a single level can take many, many hours and becomes very repetitive. It’s completely in English though, so if you like these kind of games, there should be nothing stopping you.
Vasteel 2
Although completely in Japanese, I found this game easier than its predecessor. It also uses the Arcade card, which means extra memory for animations, which you can see very well in the introduction. Overall this time, it feels more like you follow a storyline, unlike the previous game where you had a story and then just a map. This time you have mission objectives. You don’t need to destroy an enemy main building, but often have to destroy all enemies on screen. It’s fun, but still takes quite some time, although by far it is not as lengthy as the first game.
Where in the World is Carmen Sandiego
This puzzle game is nothing special. You travel around the world to collect clues about a crime suspect by following the hints of the people who have seen him. Create an arrest warrant when you have enough details about the person, then travel until you find the person. It’s fun for a little while to figure out the different clues, but the text scrolls rather slowly, and graphically it’s not even worth mentioning. Overall. it’s very average; not bad, but not good either.
World Heroes II
This Street Fighter 2 like game was very surprising for me. The graphics quality and animations are superb! You even see animations in the background of the stage like you have on “big consoles”. so I was really surprised to see that level of animation. Yet, the gameplay was extremely hard in my opinion (or I must be really bad). It was already extremely hard to beat the first enemy, although the game was set on “easy” mode. It’s a shame, since I enjoyed the game and graphics especially, but the game was way too hard for me to enjoy completely.
Xak III - The Eternal Recurrence
This RPG game was fully translated by some enthusiasts and can therefore be played in English, which is quite nice. The game itself is not bad, with an action RPG style similar to the Ys games (described below). You walk around and can slash at enemies and jump to overcome obstacles. Sometimes there are hidden switches behind coffins or a bookshelf, which can be moved. Boss fights can be long and rather hard. and while at any other time in the game standing around will heal you, in a boss fight this is disabled. The game and story is not bad, and the music is rather good, yet the graphics are very outdated. You can charge your attack and do either a magical ranged attack (a fireball) or build a stronger slash for extra damage. Sadly, controls are not all that good when trying to do this, and you often end up facing in a different direction than you intended to.
Ys Series
Although this is one of the few good and also few English RPG games for the system, I prefer playing it on other consoles such as the PSP, where the graphics are much better than on the PC Engine. Ys Book 1, 2, and 3 are available completely in English, with part 3 being the only one where you can jump and attack with a button. Part 4 goes back to the roots, and you start bumping into things again. It is in Japanese only, but there is a fan translation out there which at least translated all the texts, but not the audio. Overall, I think this series got better over time, and with it different ports to other systems, and as I said, I prefer playing it using a PSP emulator on ODROIDs.
Yu Yu Hakusho - Anshoubu!! Ankoku Bujutsukai
The graphics in this game are impressive both in the animated intro as well as in game, but it also feels just like an arcade shooter where you point your gun and shoot at an animated scene, and that’s basically what it is. You aim at the enemy’s head or other weak spots, such as when he’s running left and jumps right, and you try to repeatedly hit him before he hits you too often. The graphics are very impressive, and the animation is really good, but the gameplay quickly gets repetitive.
Games I disliked
Travel Epuru
This game might look cute at the start but, but it really isn’t all that cute. There are two little children that fight each other with bombs, grenades, sticks, and even magic. The goal is to knock out the other kid. The main focus is a boy and a girl fighting in silly penguin costumes. It’s neither a “cute” scenario nor is the gameplay anything interesting.
Conclusion
I was a little bit disappointed of the last part of the PC Engine / Turbografx series, since I guess that I was used to many impressive games while writing the other parts, and it took quite a while until the last part of the series brought forth some gems of its own.
It’s been a long time since I started this series, and I have to admit I did not expect it to take that long, nor that I would enjoy it that much. The PC Engine, especially the CD version, had some awesome games, and considering the hardware that was behind the Genesis / Sega CD and the SNES, it held up really well compared to these consoles, if you also keep in mind that the console was the first to utilize the CD format years before the Sega CD. It’s quite impressive what you could do with that console. I found plenty of games that I enjoyed immensely on the system, and with the recent port of PC Engine to the ODROID Go from @pelle7 I have even more awesome games that I can play on the go that I find far more impressive than, for example, some simple NES games.
In my opinion the PC Engine was really an underrated system. It was very advanced for its time, and I wished I could have played it “back in the day”. However, there are some downsides as well. The game was focused on the Japanese market and has a lack of good RPG games which I like, and other genres are also sparsely represented on this system. I might have not mentioned it previously, but I often played many many Japanese games as well, and I have to admit that it's a shame that I do not understand these games, as some of them are simply amazing and far beyond what other games had to offer for the platform.
A special example of this is the game "Private Eye Dol", which is an adventure game with lots of walking, searching, talking to people, interacting with objects, and so on. The game is simply amazing quality wise, since it utilized the extra memory of the Arcade Card for the system. There are many animations, many cut-scenes that are fully voiced, and overall the graphics and presentation is simply amazing and looks more like an SNES game than a PC Engine game. I just wished I could play this game in a language that I could understand.
nother example is "Seiya Monogatari - Anearth Fantasy Stories", which is an RPG game that looks more like it's from the SNES or a more powerful machine. The introduction is very detailed, and the overall game graphics look like they are from a more powerful console, paired with an incredible soundtrack. These are the games that I'm really missing out on due to the language barrier.
There are a lot more impressive games such as Snatcher, which fortunately also came out for the Sega CD two years after it was released for the PC Engine, but with some minor censorship compared to the PC Engine version. There are even more games that are really impressive for the console but are only available in Japanese. They show perfectly how far the hardware could have been pushed and what it was capable of doing. Overall, I was very impressed with the system, especially considering how old it is, and what things we now take for granted in more modern systems.
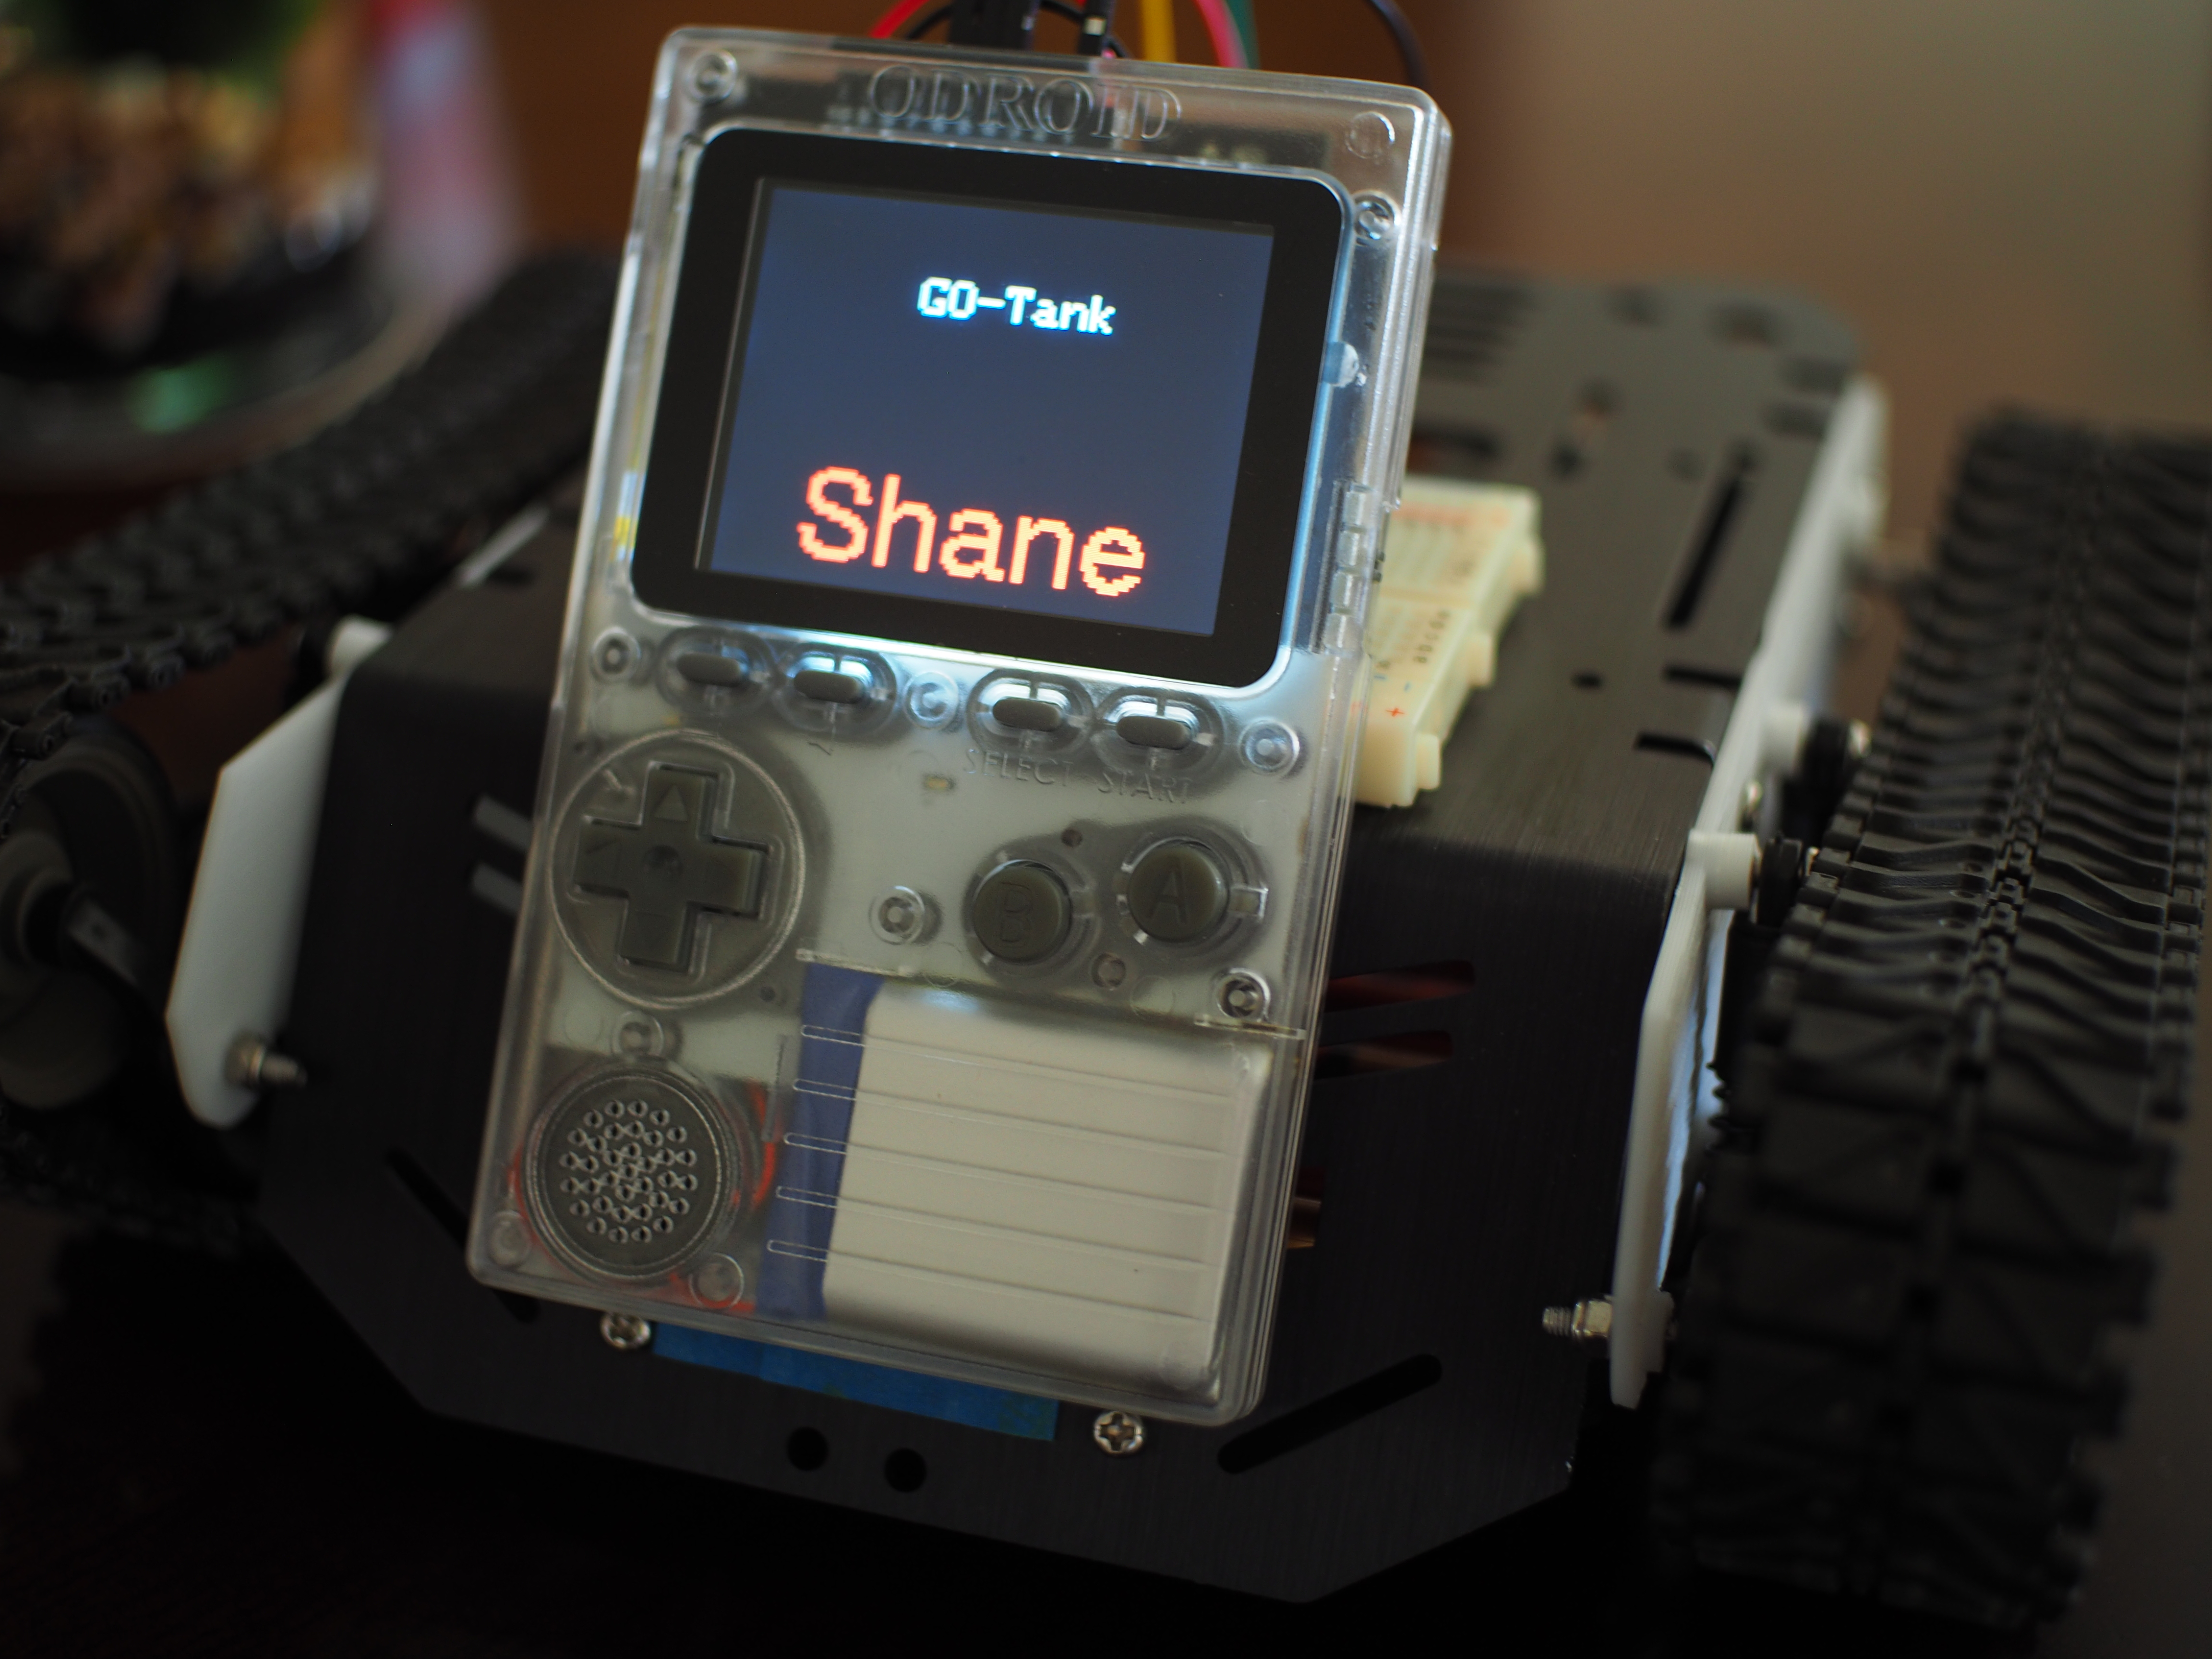
GO-Tank, Go! - Control a Treaded Bot with Your ODROID-GO
September 1, 2019By Dave ProchnowLinux, ODROID-GO, Tutorial
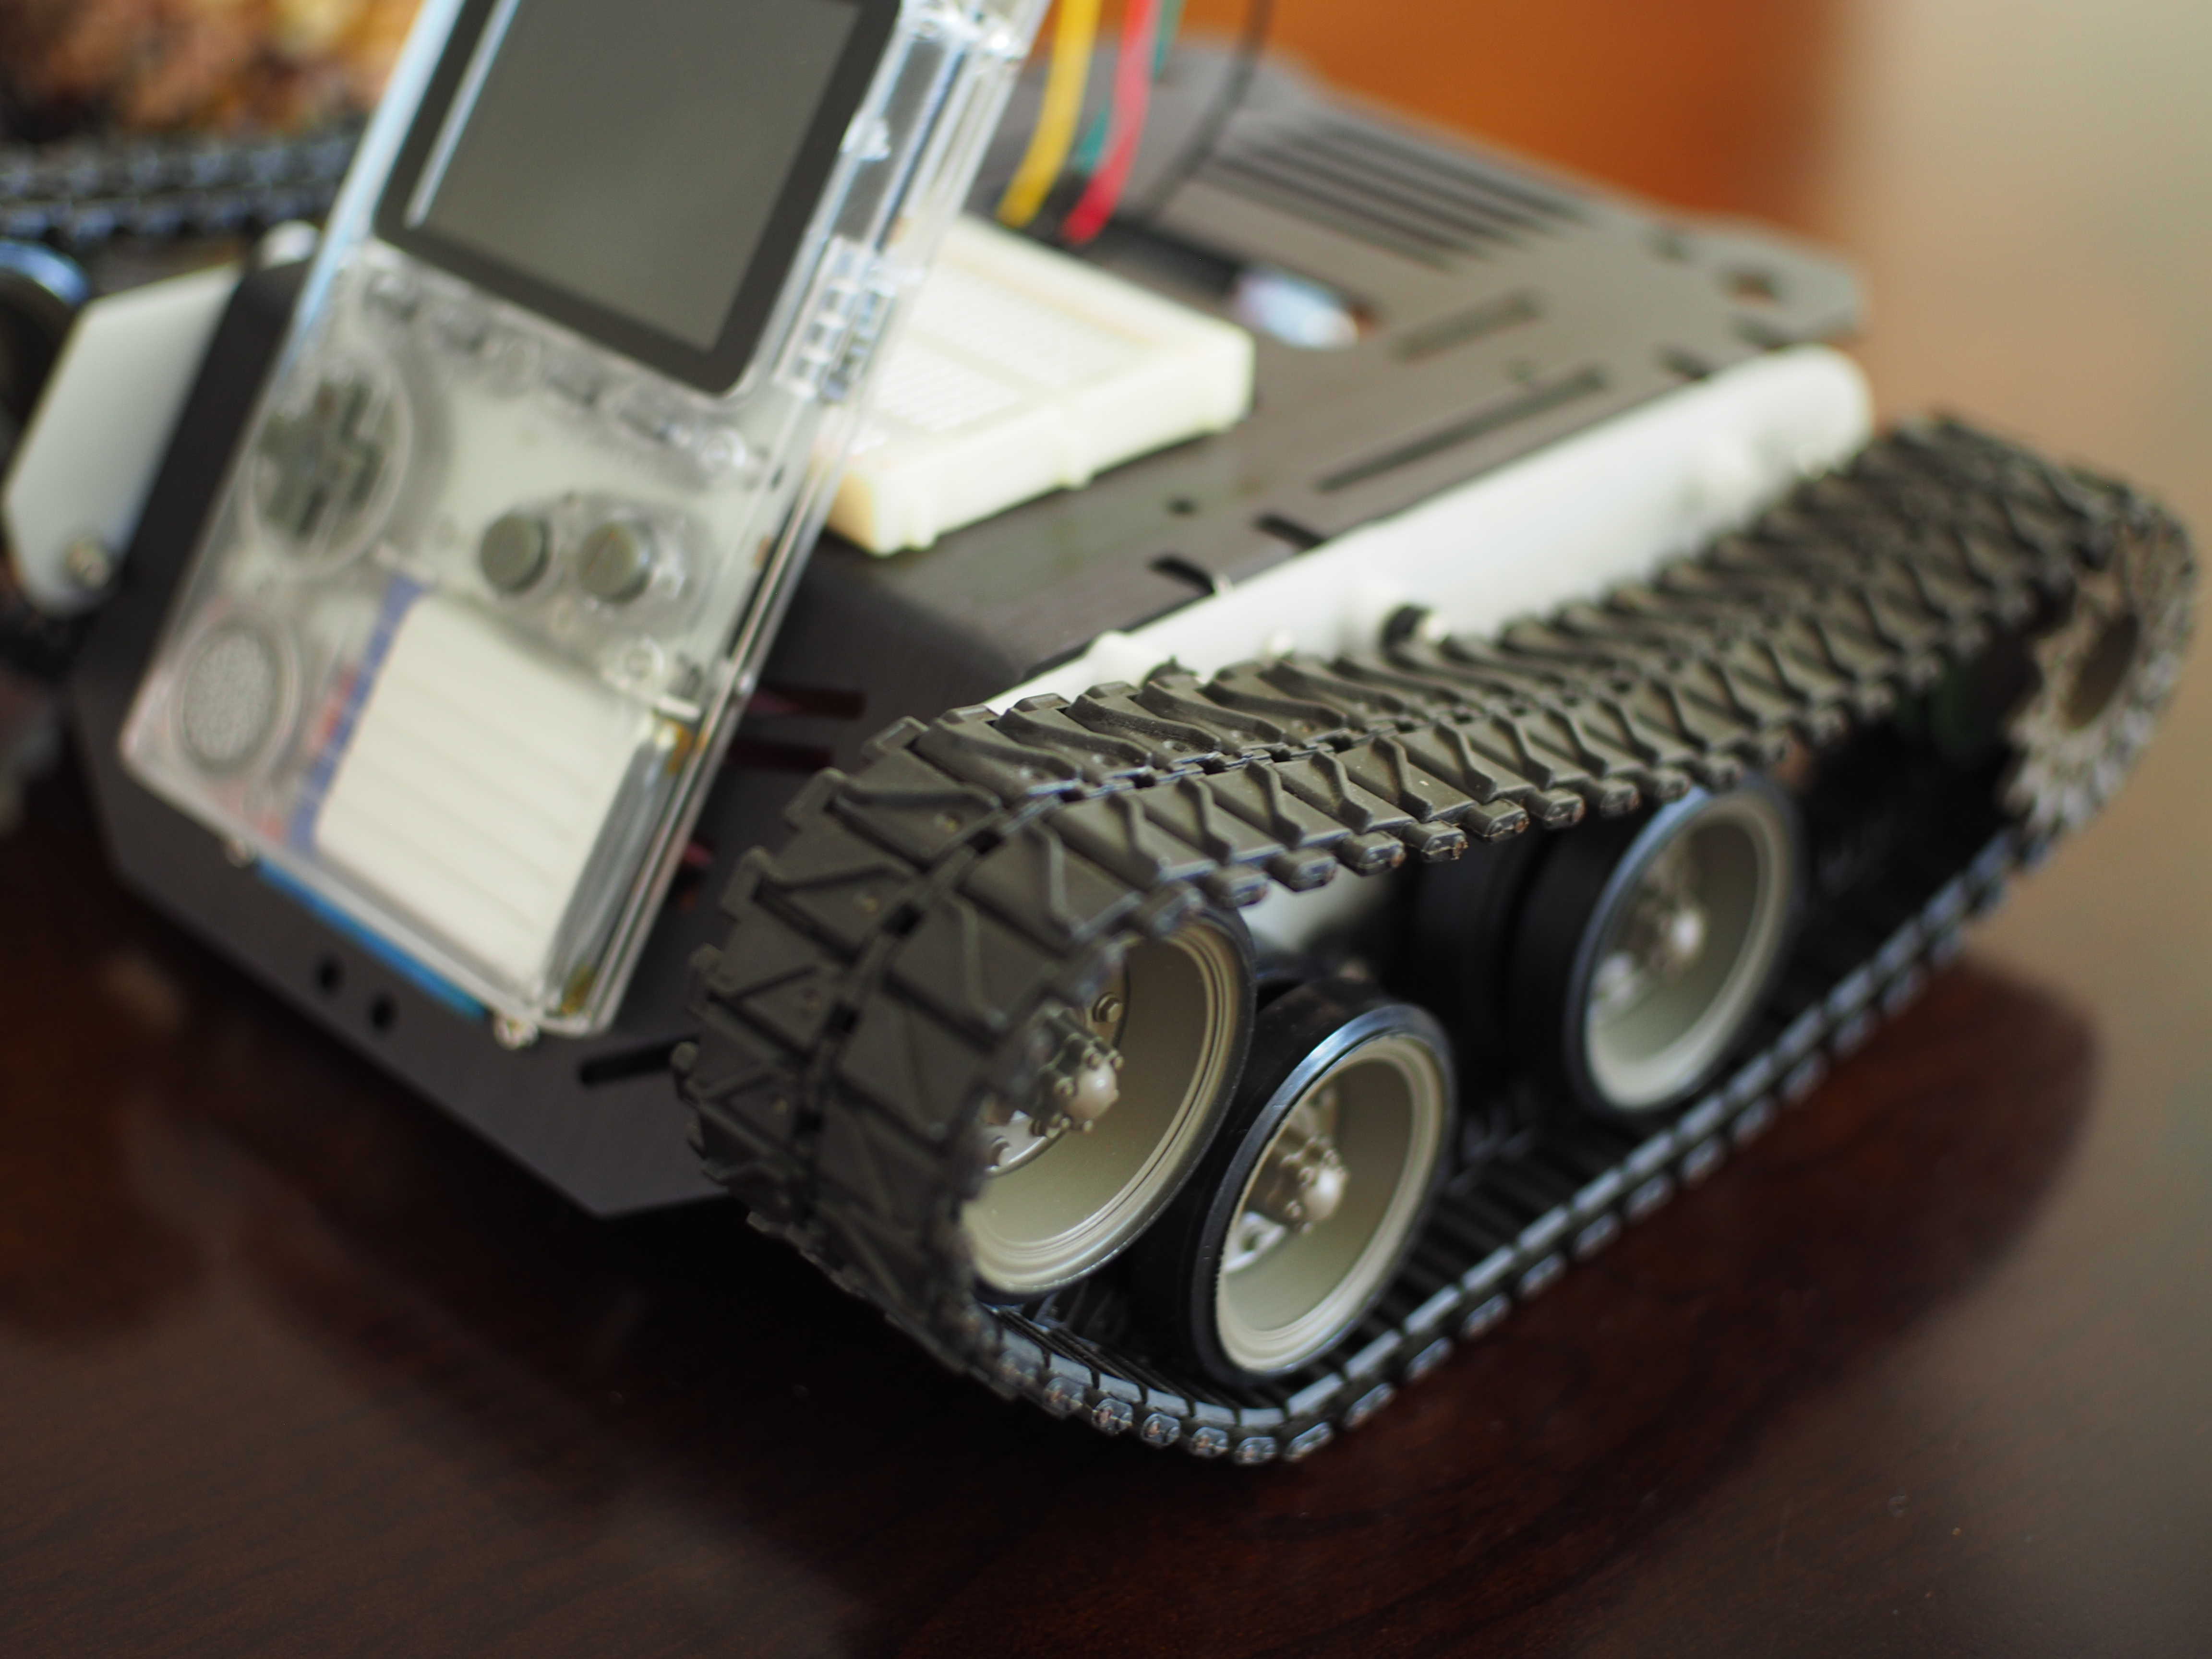
Using an ODROID-GO handheld gaming system for controlling a couple of small DC motors that are housed inside a treaded tank robot is easier than you may think. This chore is even more remarkable when you learn that only two of the GO’s general purpose input/output (GPIO) pins are used for this task.
Figure 1. Take your ODROID-GO on the road with this tank bot.
Generally speaking, a “typical” control interface for a DC motor consists of five separate and independent lines: the obvious power/control lines, such as 5V or GND, and three logic inputs from a robot controller (e.g., an input for forward, one input for backward movement, and a final logic line for controlling the motor’s speed). Sharp-eyed readers, however, will notice that only two lines actually connect to the motor. Those other three lines configure a motor controller for “driving” these two connected power lines (i.e., change polarity and drive a series of pulses to the motor via a pulse width modulated (PWM) signal). How is this possible?
The “secret sauce” for this whole operation is a small circuit that resides between the robot controller and the DC motor. This circuit can be variously referred to as a “motor driver,” “H-Bridge,” or “motor controller,” but its function is to operate the motor in accordance with the commands sent from the robot controller.
In our case, the ODROID-GO is the robot’s controller. A Devastator Tank Mobile Platform from DFRobot is our treaded tank bot. A small transistor switch circuit is our motor driver, this is NOT an H-Bridge circuit, however, it’s a simple power switch. Furthermore, only two GPIO pins will be used for driving our tank bot: GPIO #4 and GPIO #15. We will, however, also need to use the GND pin #1 and the 3.3V pin #6 from the ODROID-GO GPIO header interface. These power pins DO NOT drive the robot. Rather, these pins are used for helping the ODROID-GO “talk” with our transistor-based motor driver circuit.
Figure 2. Slide to the left – turn right.
Figure 3. Slide to the right – turn left.
Figure 4. Now cha-cha all about, ya’ll – drive forward.
And the best part of GO-Tank is that your WiFi-enabled smart device will be used for steering the tank bot.
Parts
DFRobot Devastator Tank Mobile Platform #ROB0128 $84.90 (mouser.com)
1. Out of the box, I didn’t think that the Devastator tank looked like a proper tank. Therefore, I created a pair of new lower hull side panels. These new panels enabled me to move the drive sprockets and motors to the rear of the robot.
Figure 5. This is what a proper tank should look like – rear-wheel sprocket drive.
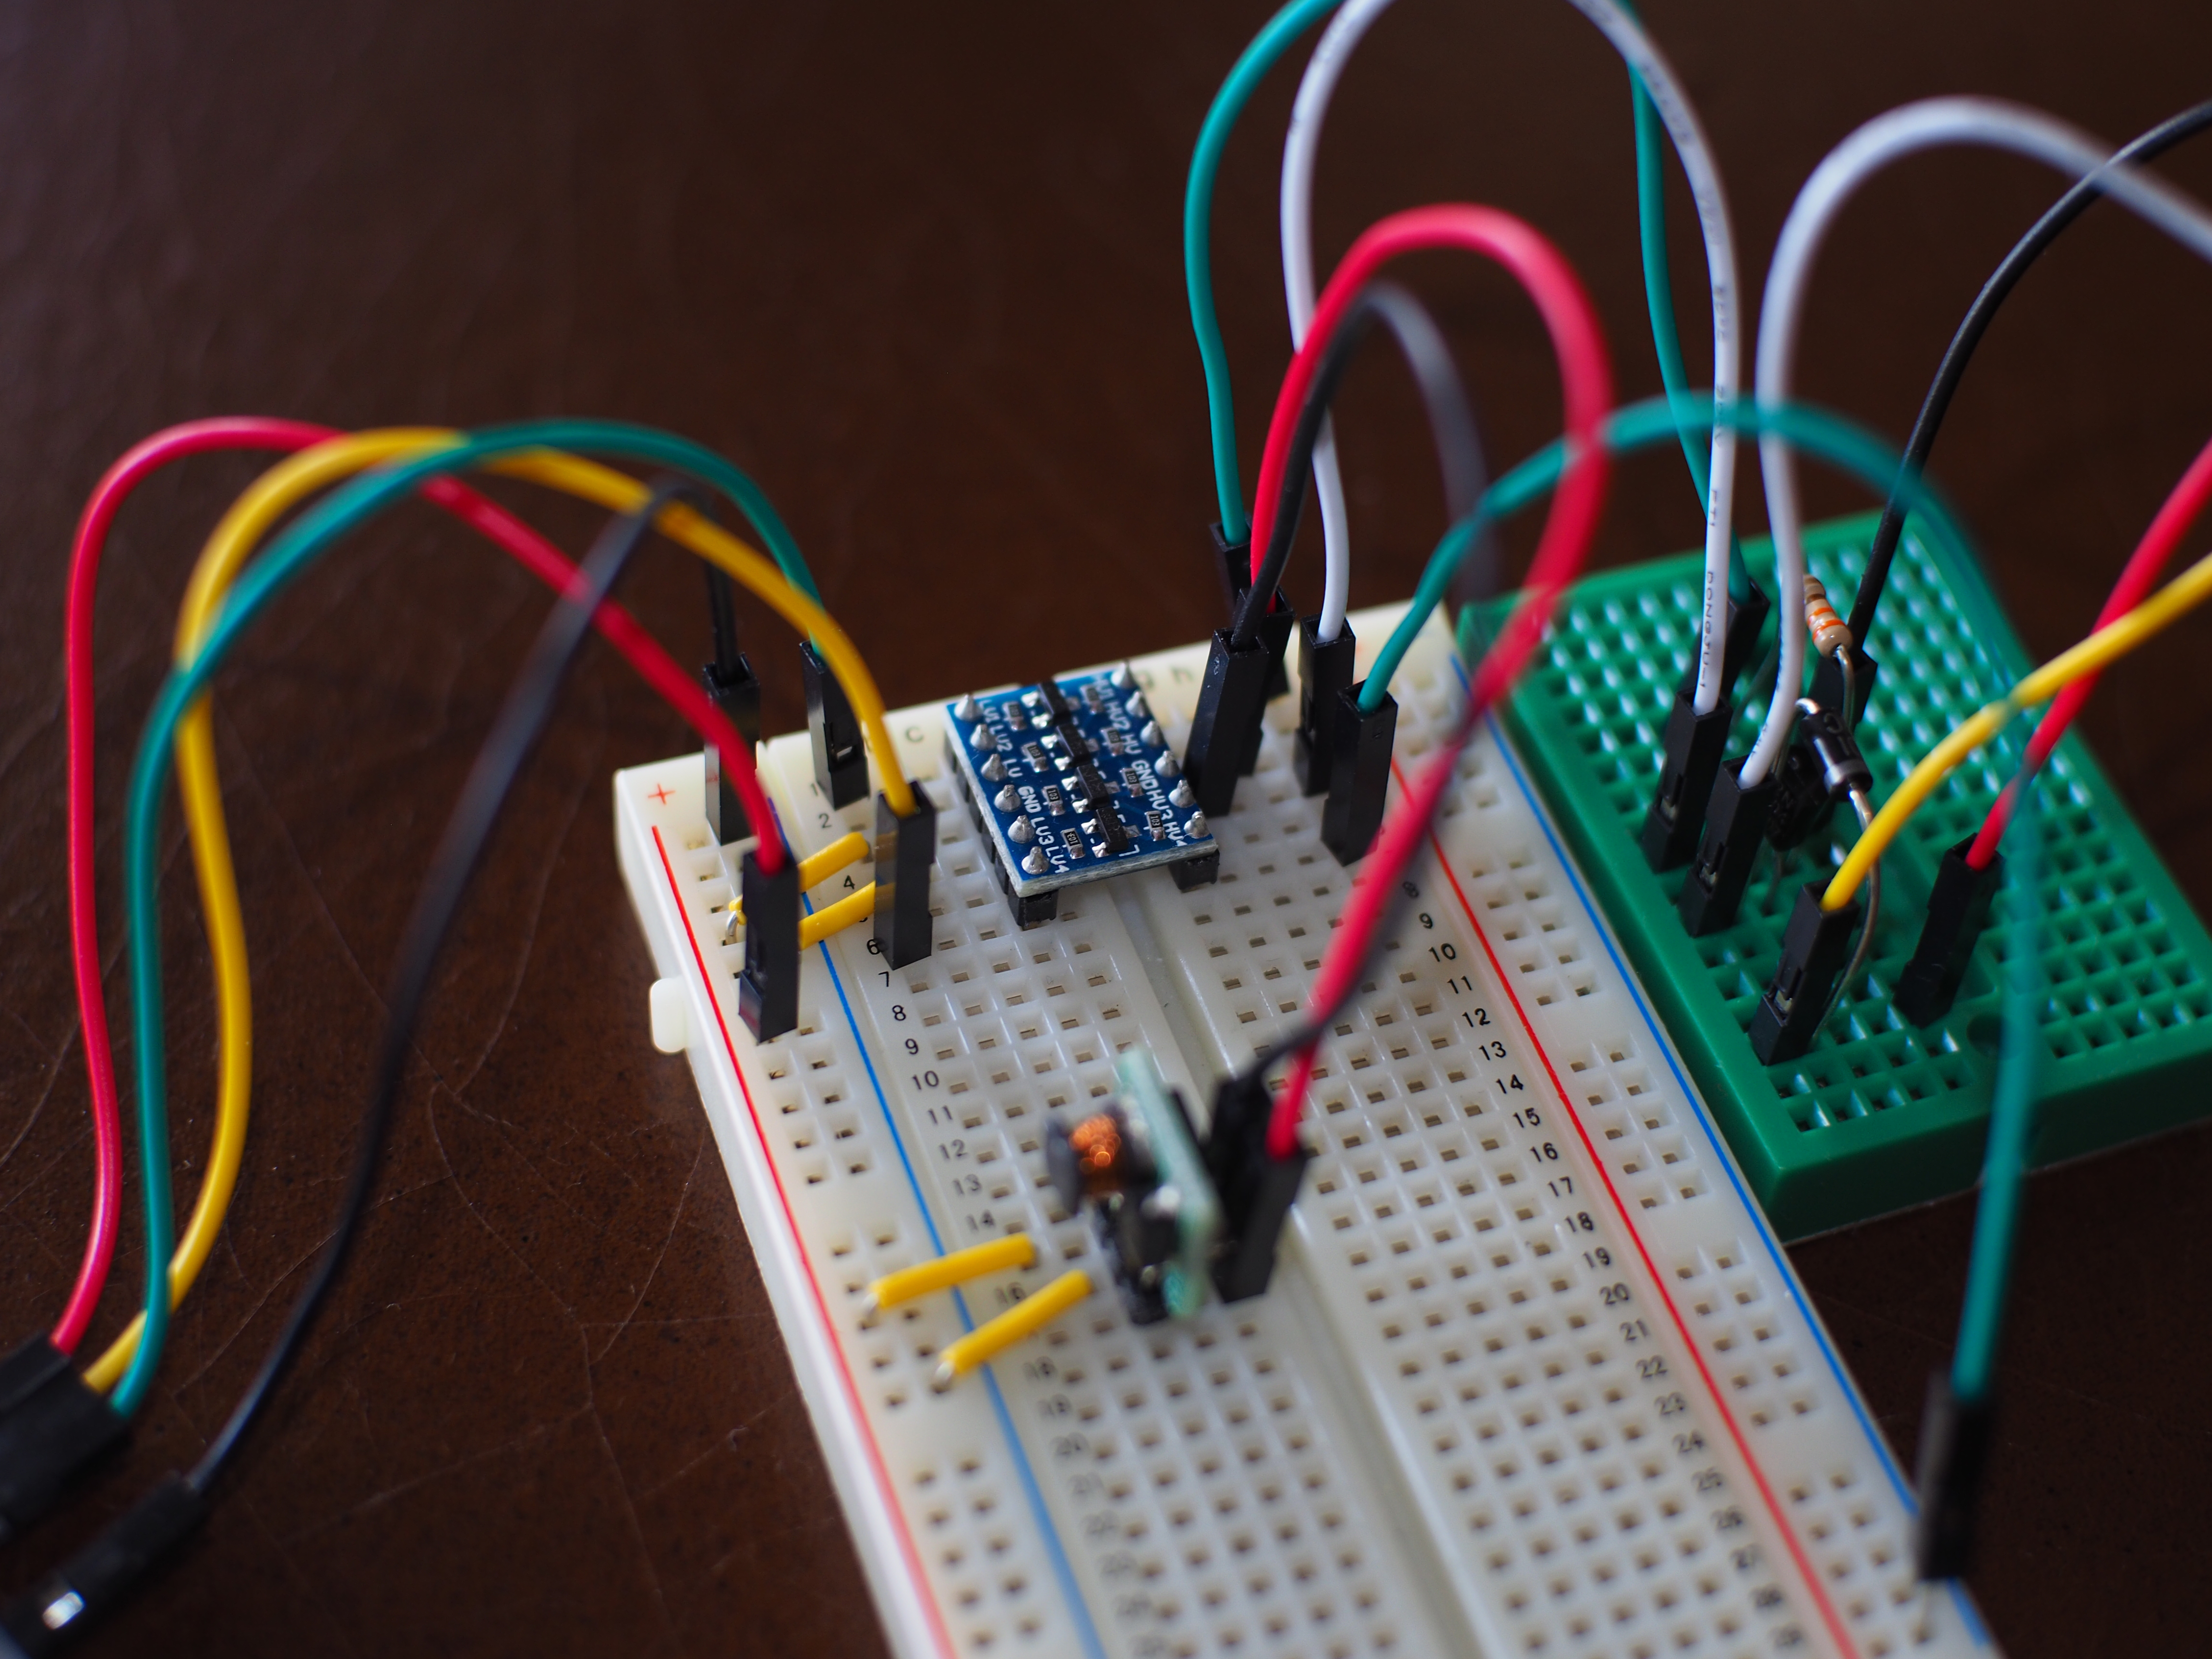
2. Follow the circuit design for the ODROID Ultrasonic Distance Meter wiki. This arrangement will allow the 3.3V GPIO pins on the ODROID-GO to control the 5V-powered transistorized power switch motor controls. In this case, the Step Up is used for powering the Level Shifter and NOT for powering the motors.
Figure 6. The level shifting and voltage boost circuit for driving the motor power switches and NOT the robot motors.
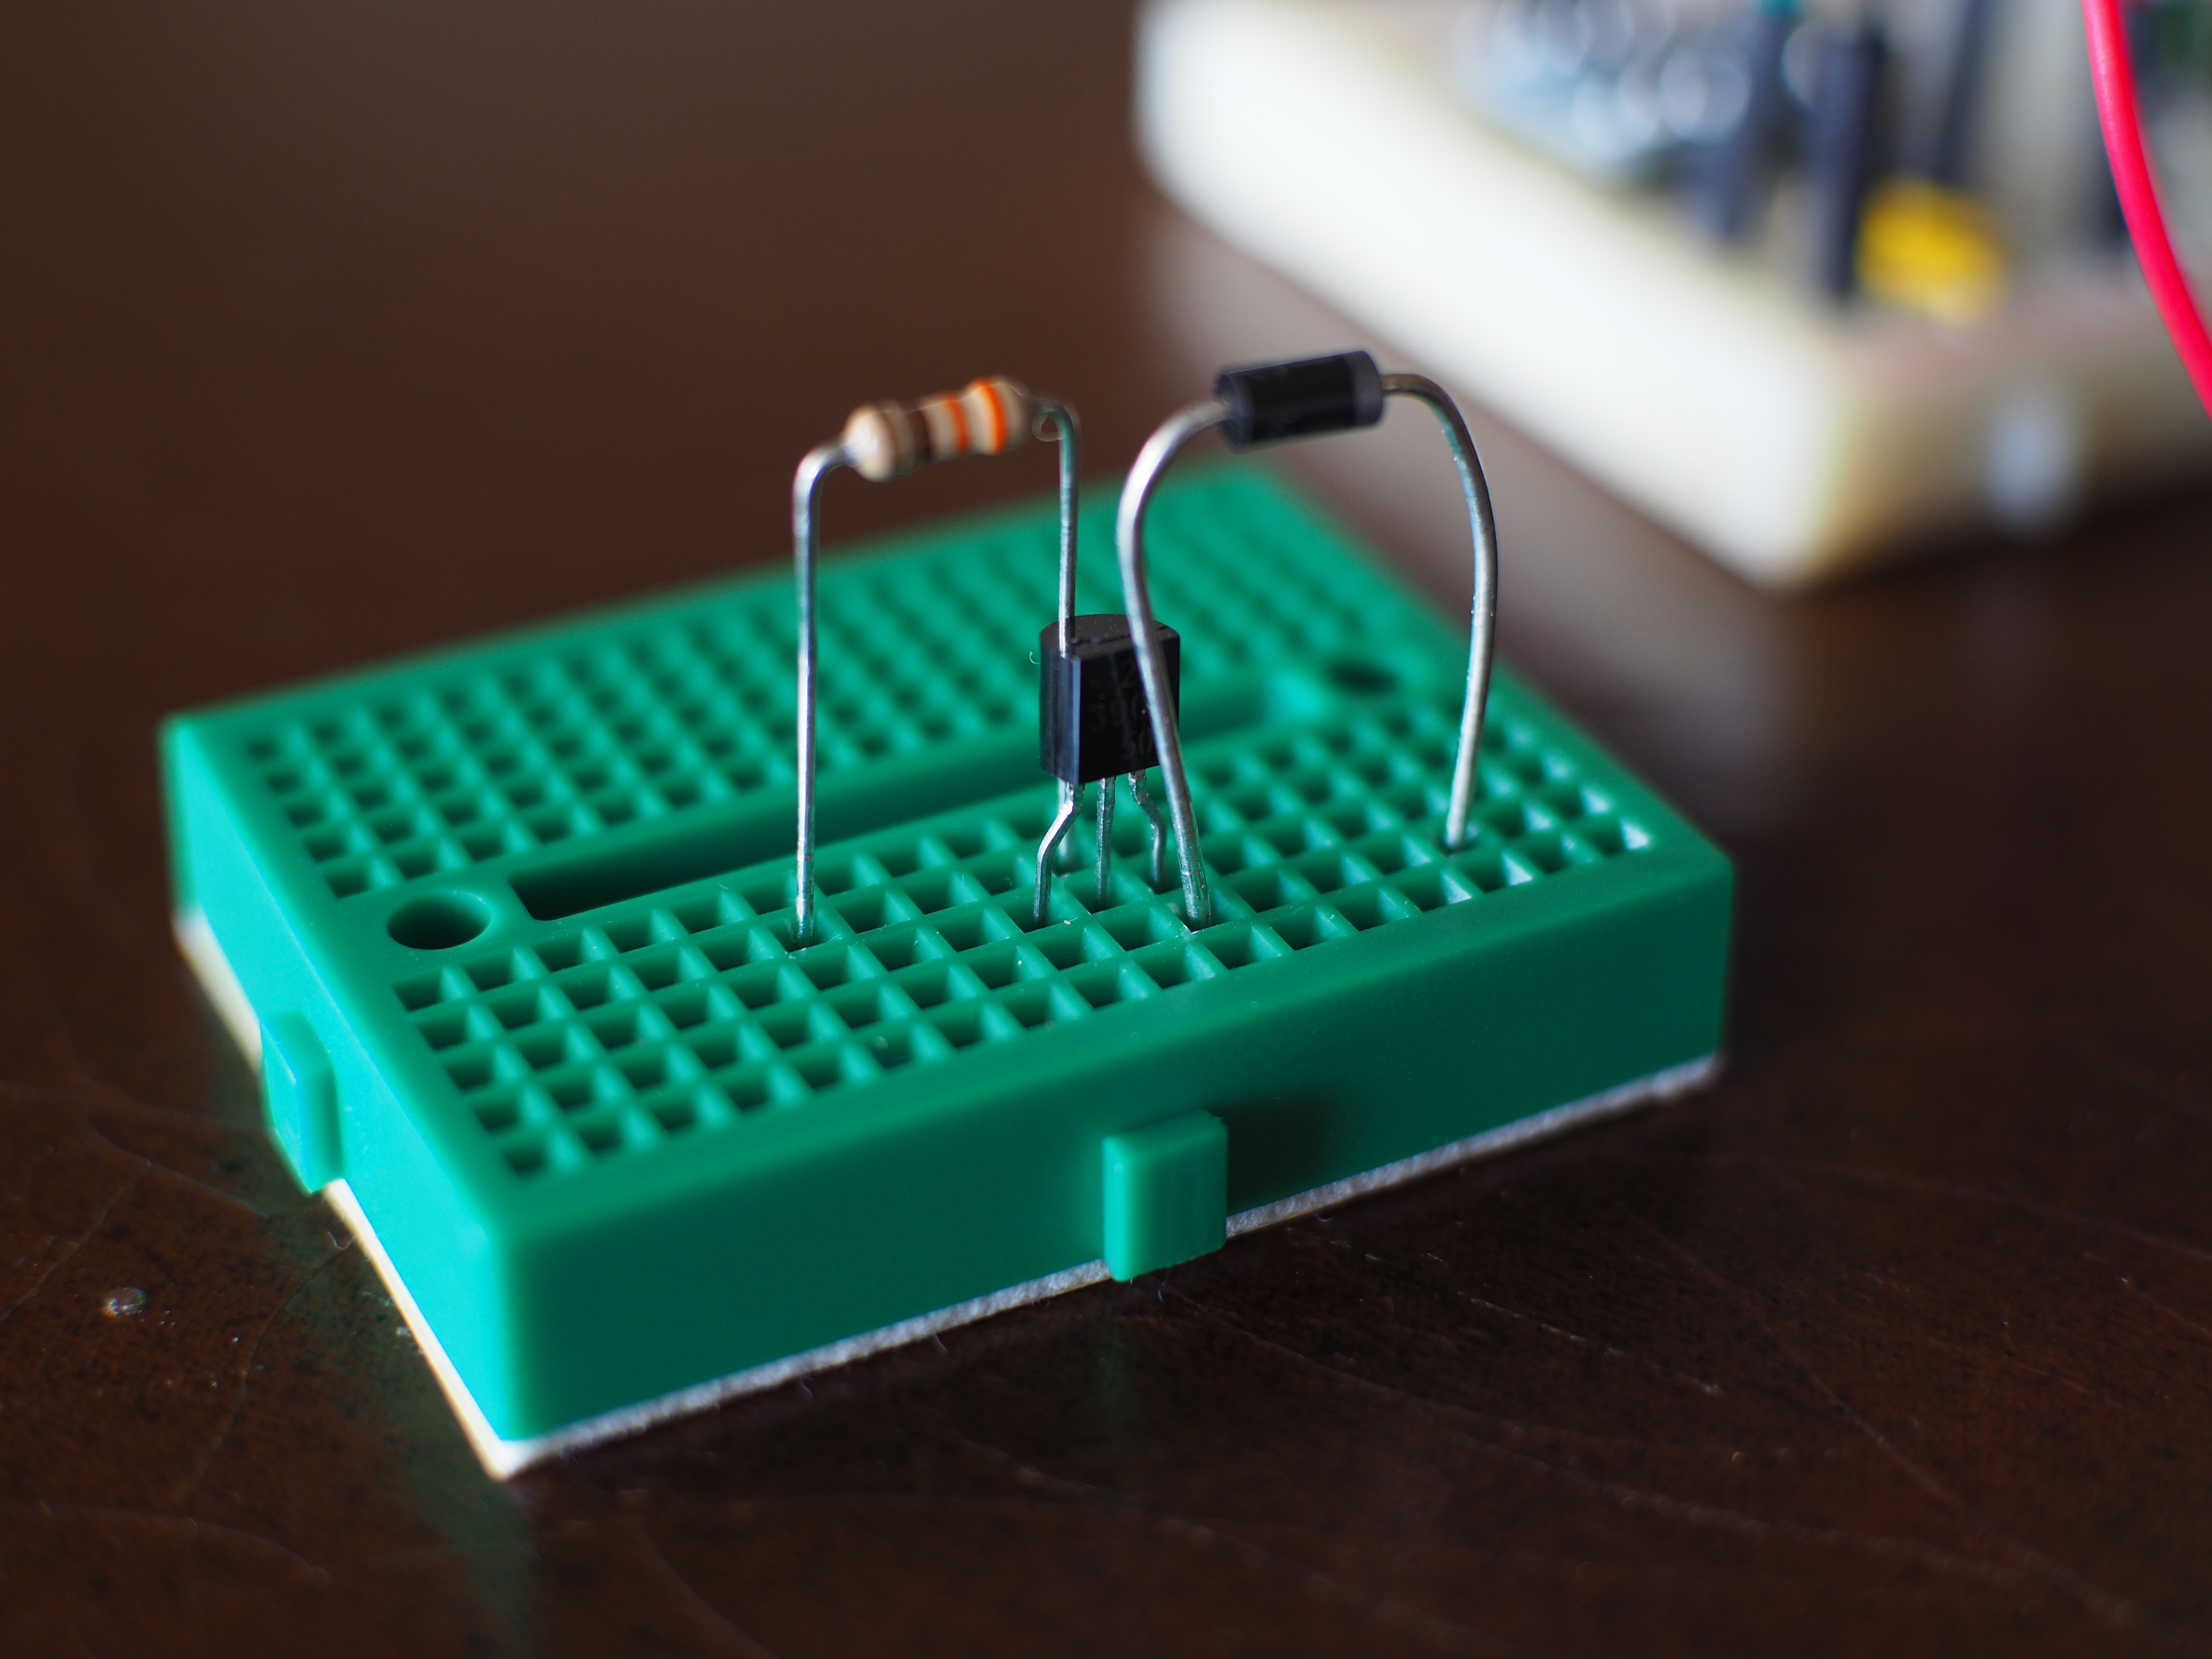
3. Wire two transistorized power switch motor controllers following the layout of this breadboard diagram (Figure 7) and photograph (Figure 7a):
Figure 7. Using a breadboard is a great way to create the circuits necessary for controlling this robot.
Figure 7a. This is an elegant solution for adding a simple ON/OFF control to a DC motor.
4. Connect one of the motor controller outputs to one of the DC motors power lugs. Repeat for the other motor controller and connect it to the second DC motor. Connect a ground (GND; black) wire to the other, unconnected lug on each motor.
Figure 8. The GPIO connections from the ODROID-GO.
Figure 9. Follow the GPIO connections to the motor controller. Only one of the two motor controllers is shown in this figure.
5. Wire the Devastator battery pack to both of the motor controllers (i.e., shown by the red and black GND wires in Figure 8). When a command is sent by one of the ODROID-GO GPIO pins, the transistors in these motor controllers will toggle the power from the battery pack directly into each motor. Sweet!
6. Program the ODROID-GO with code similar to these snippets:
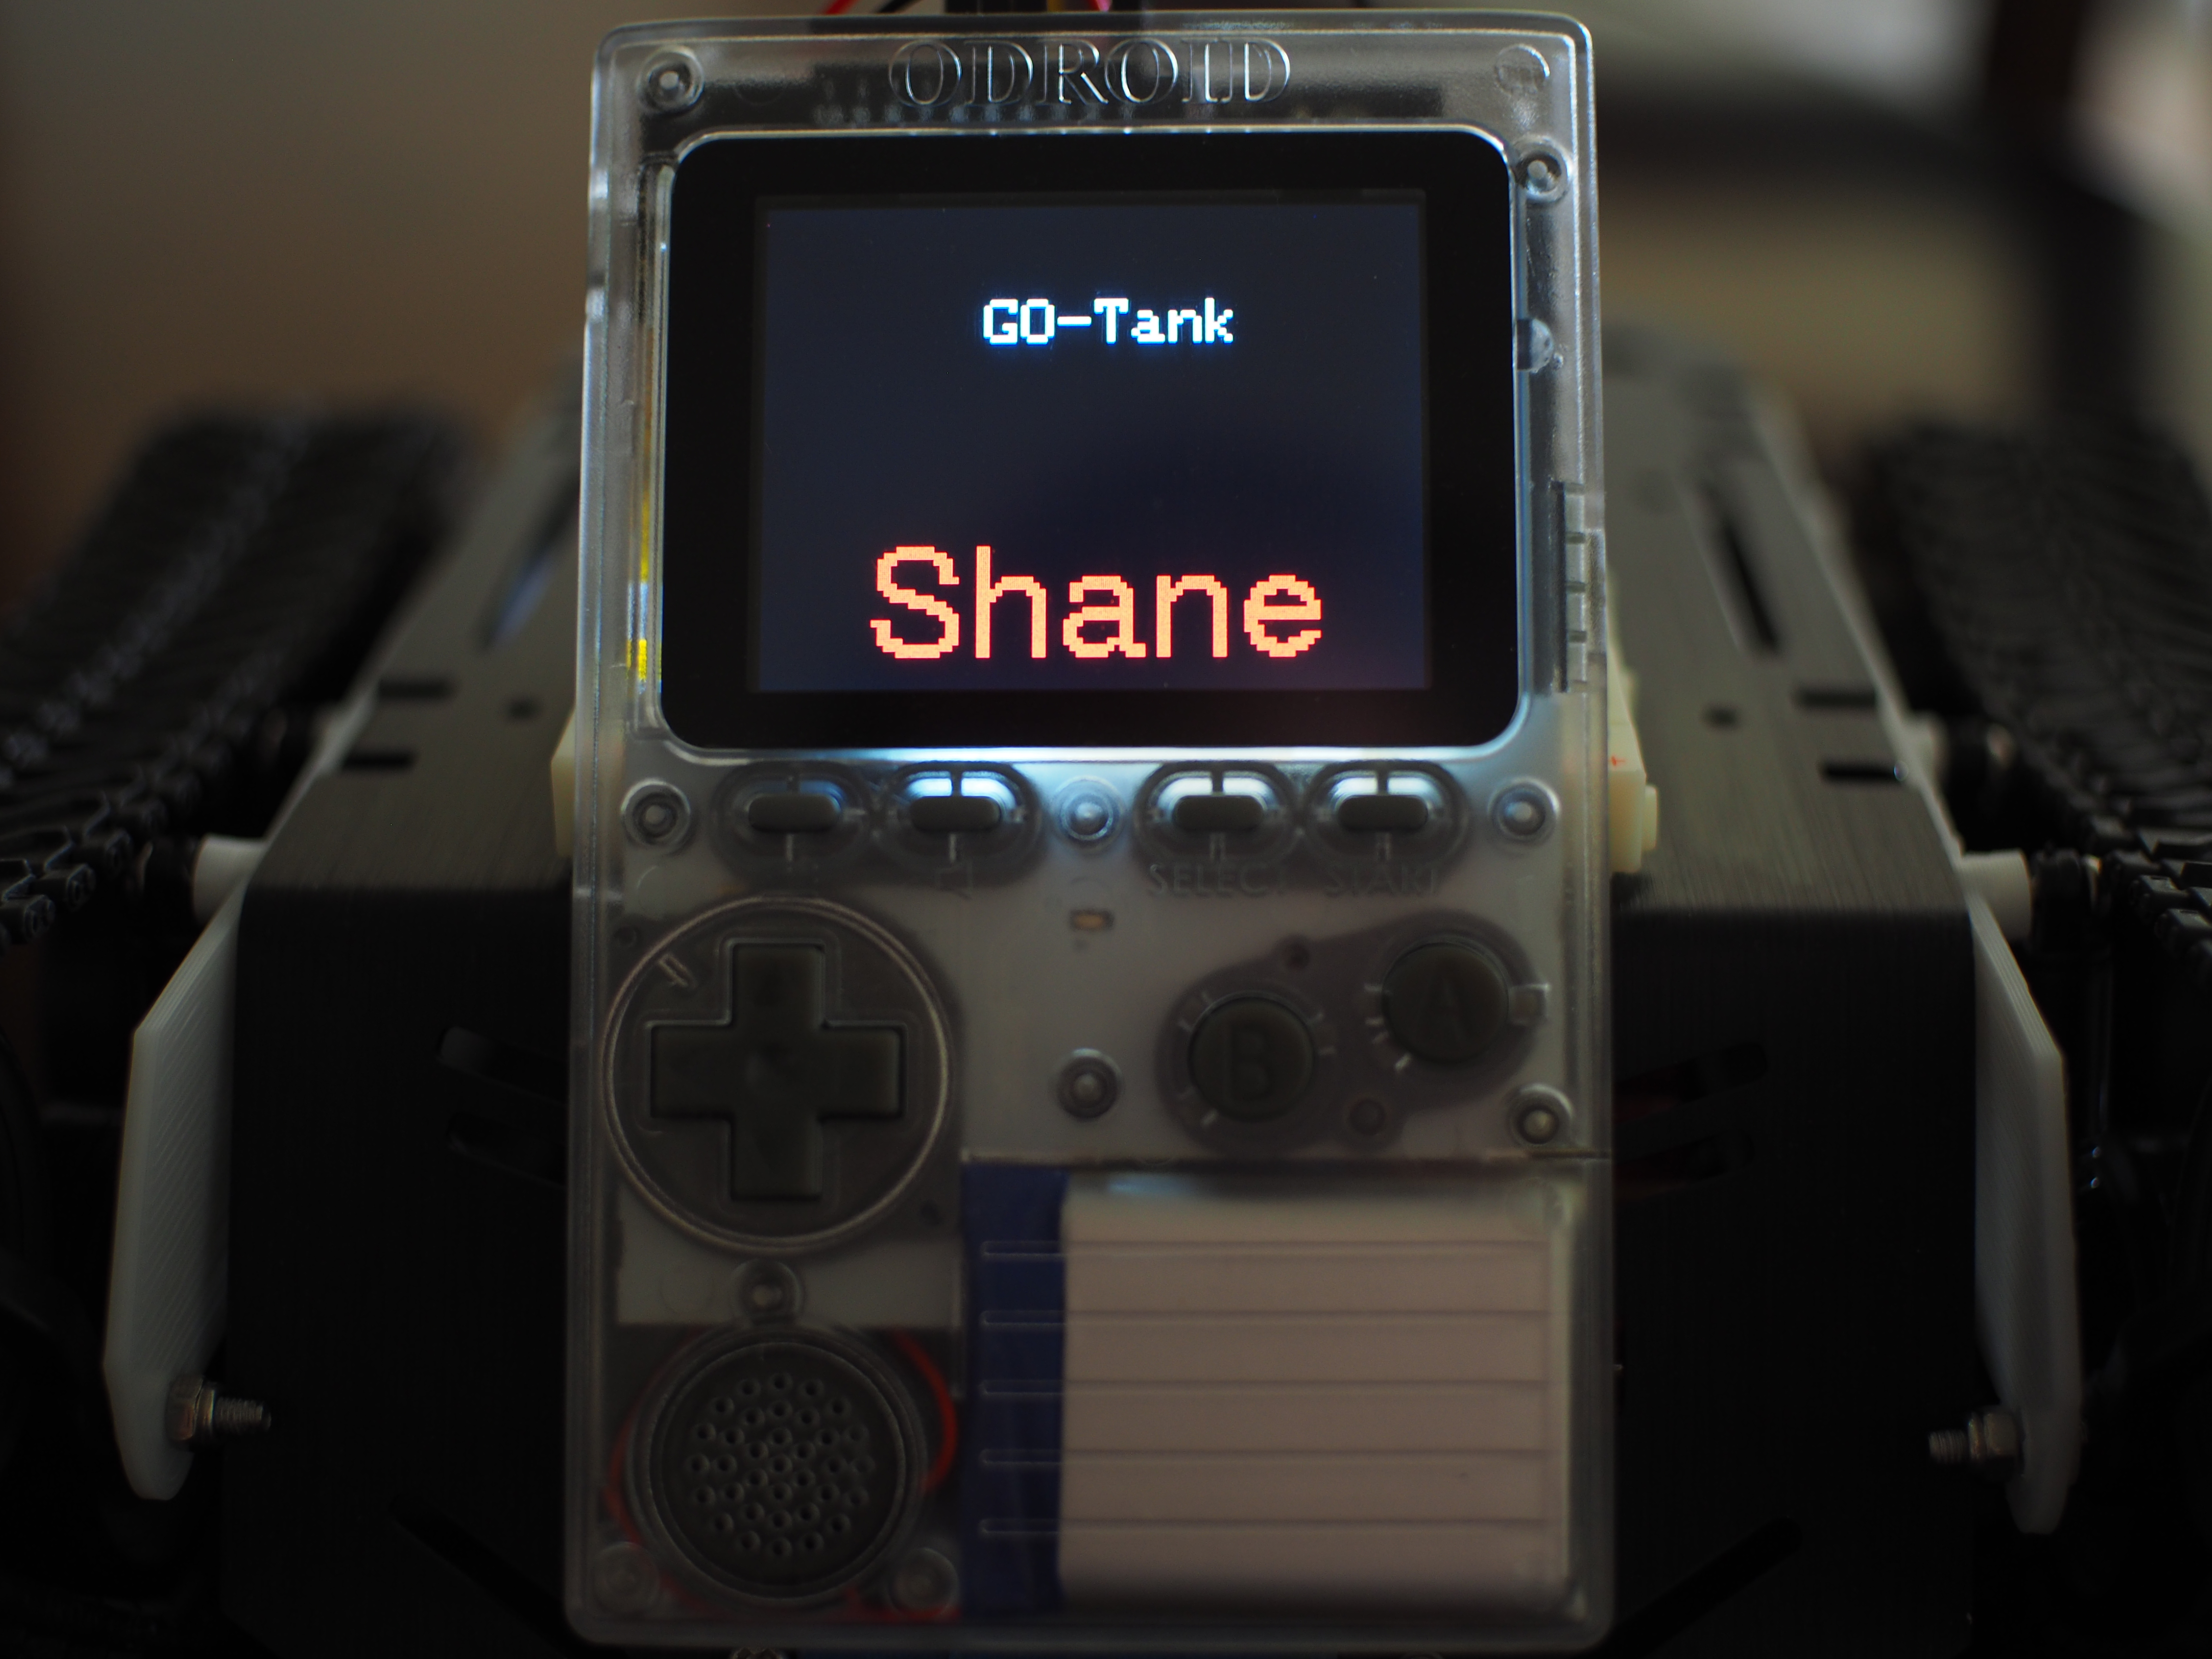
7. Place the Devastator robot on top of a small box for testing its operation.
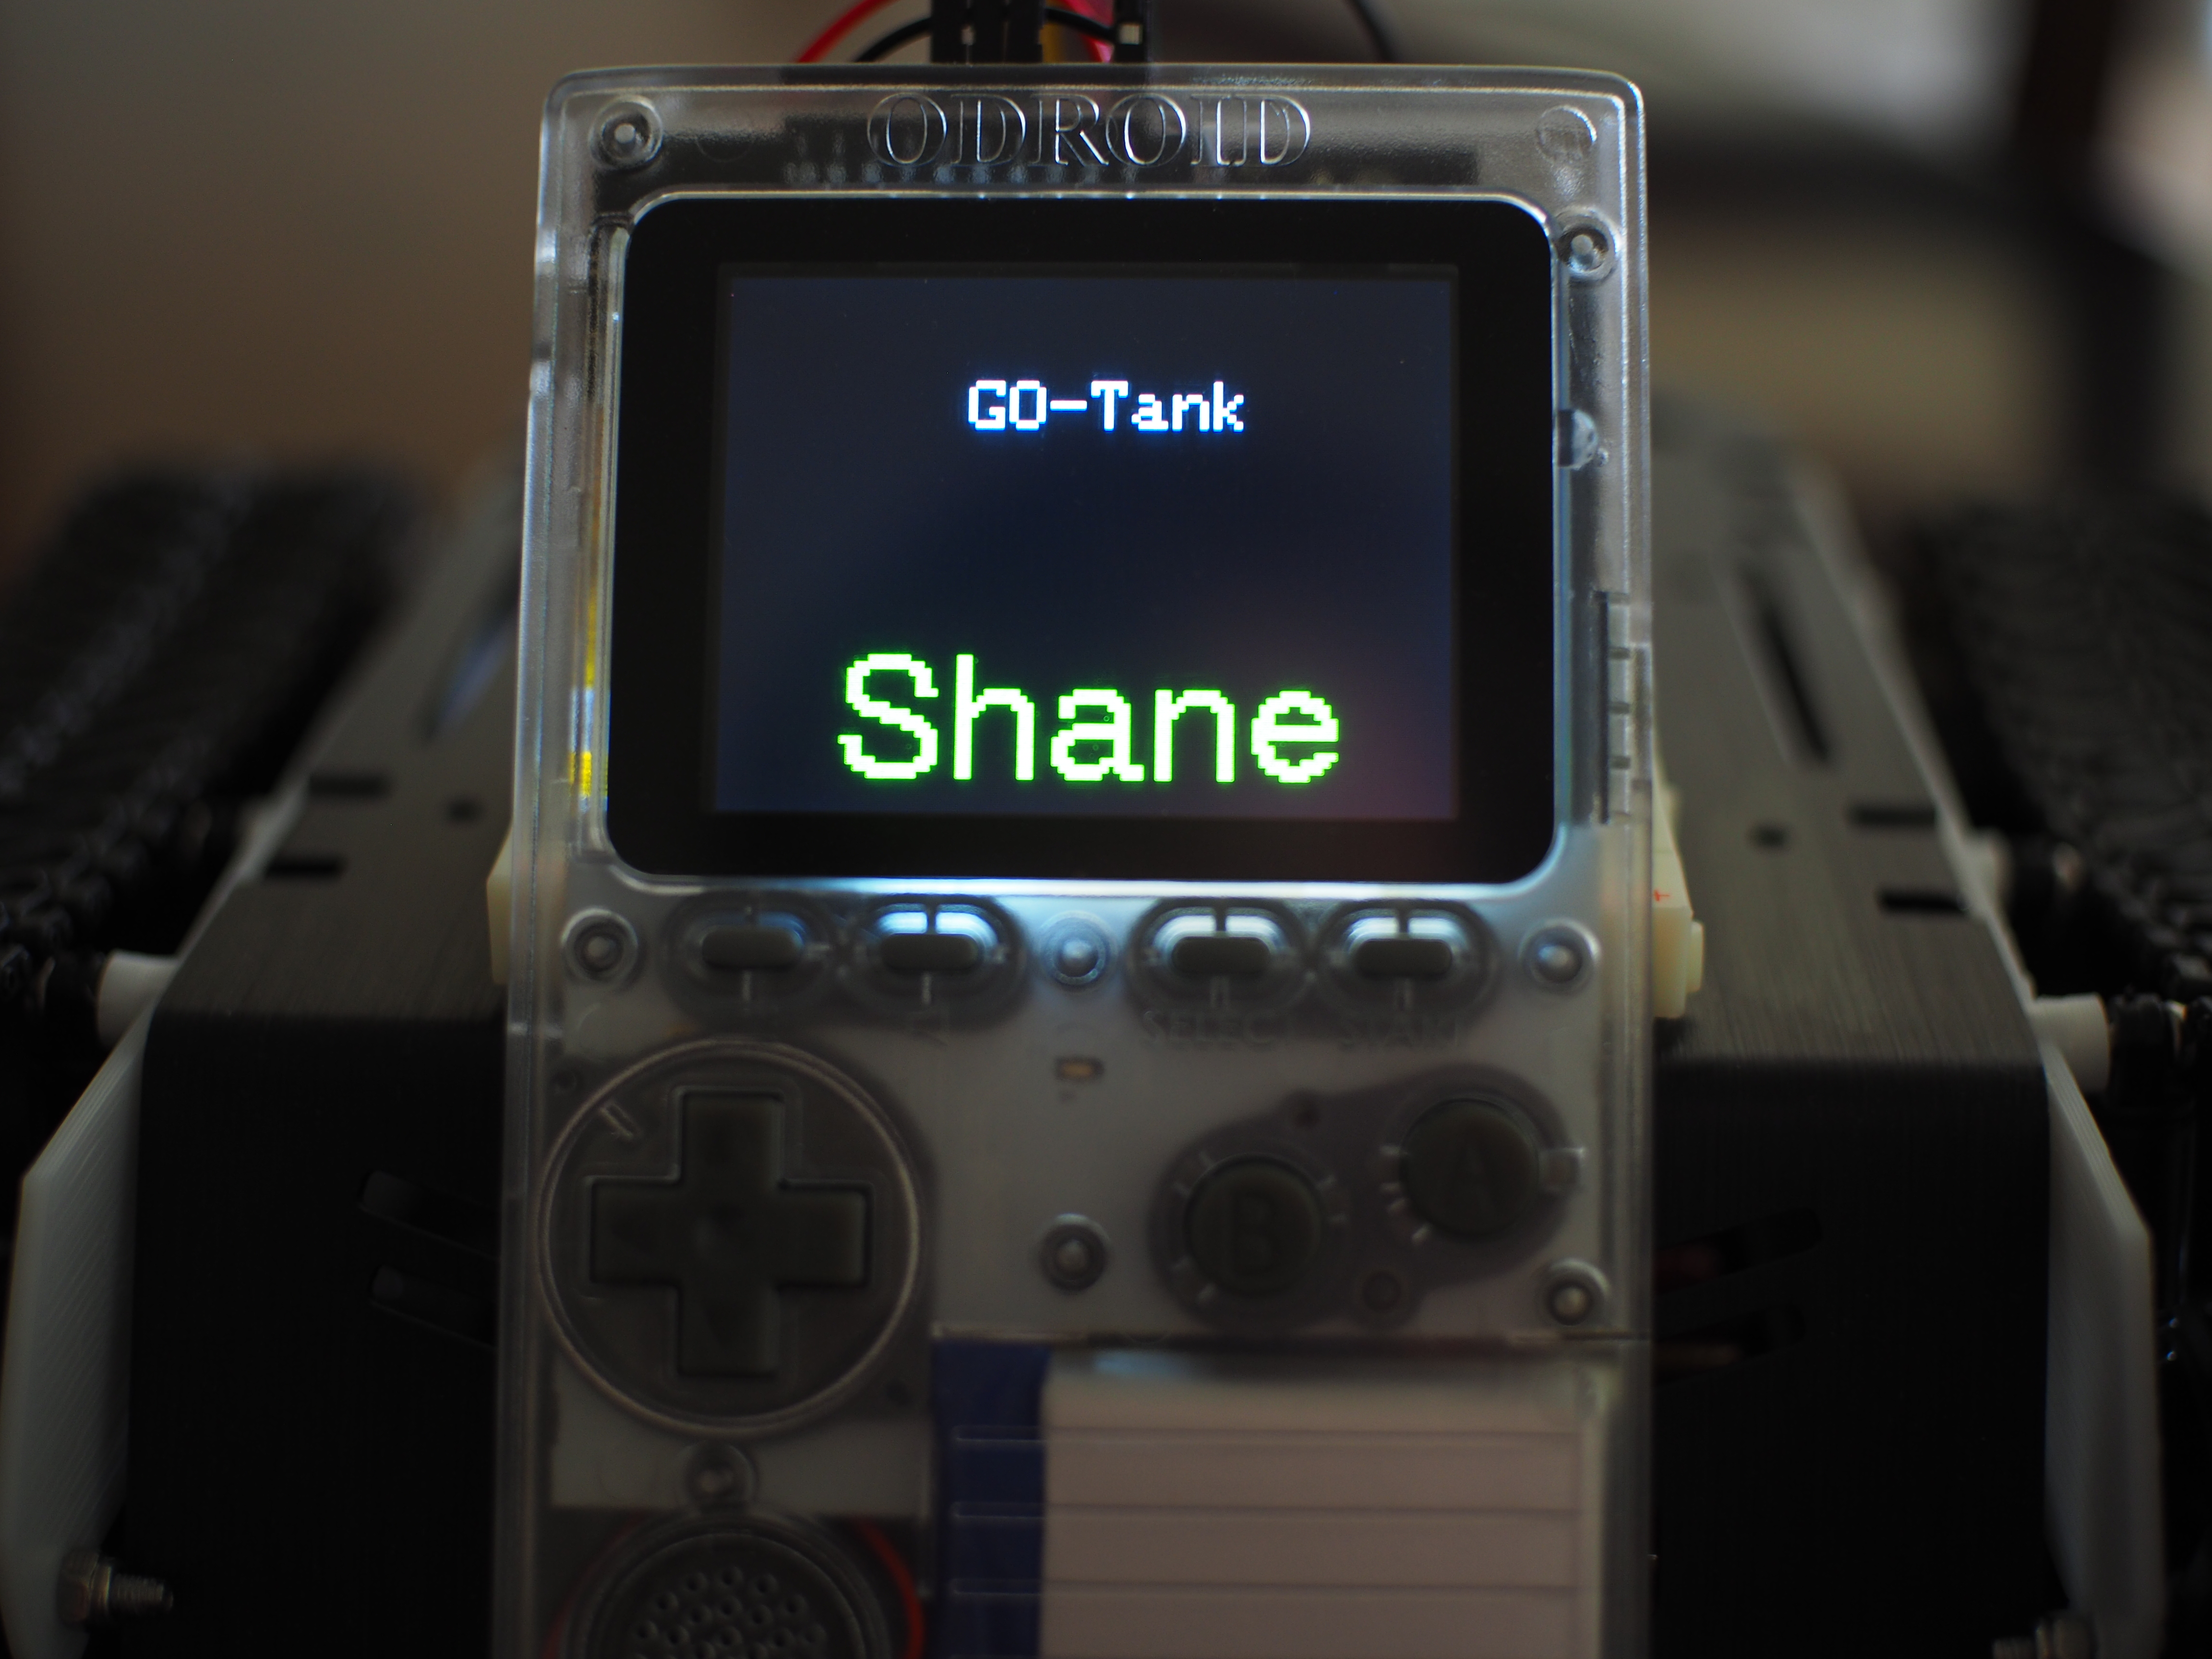
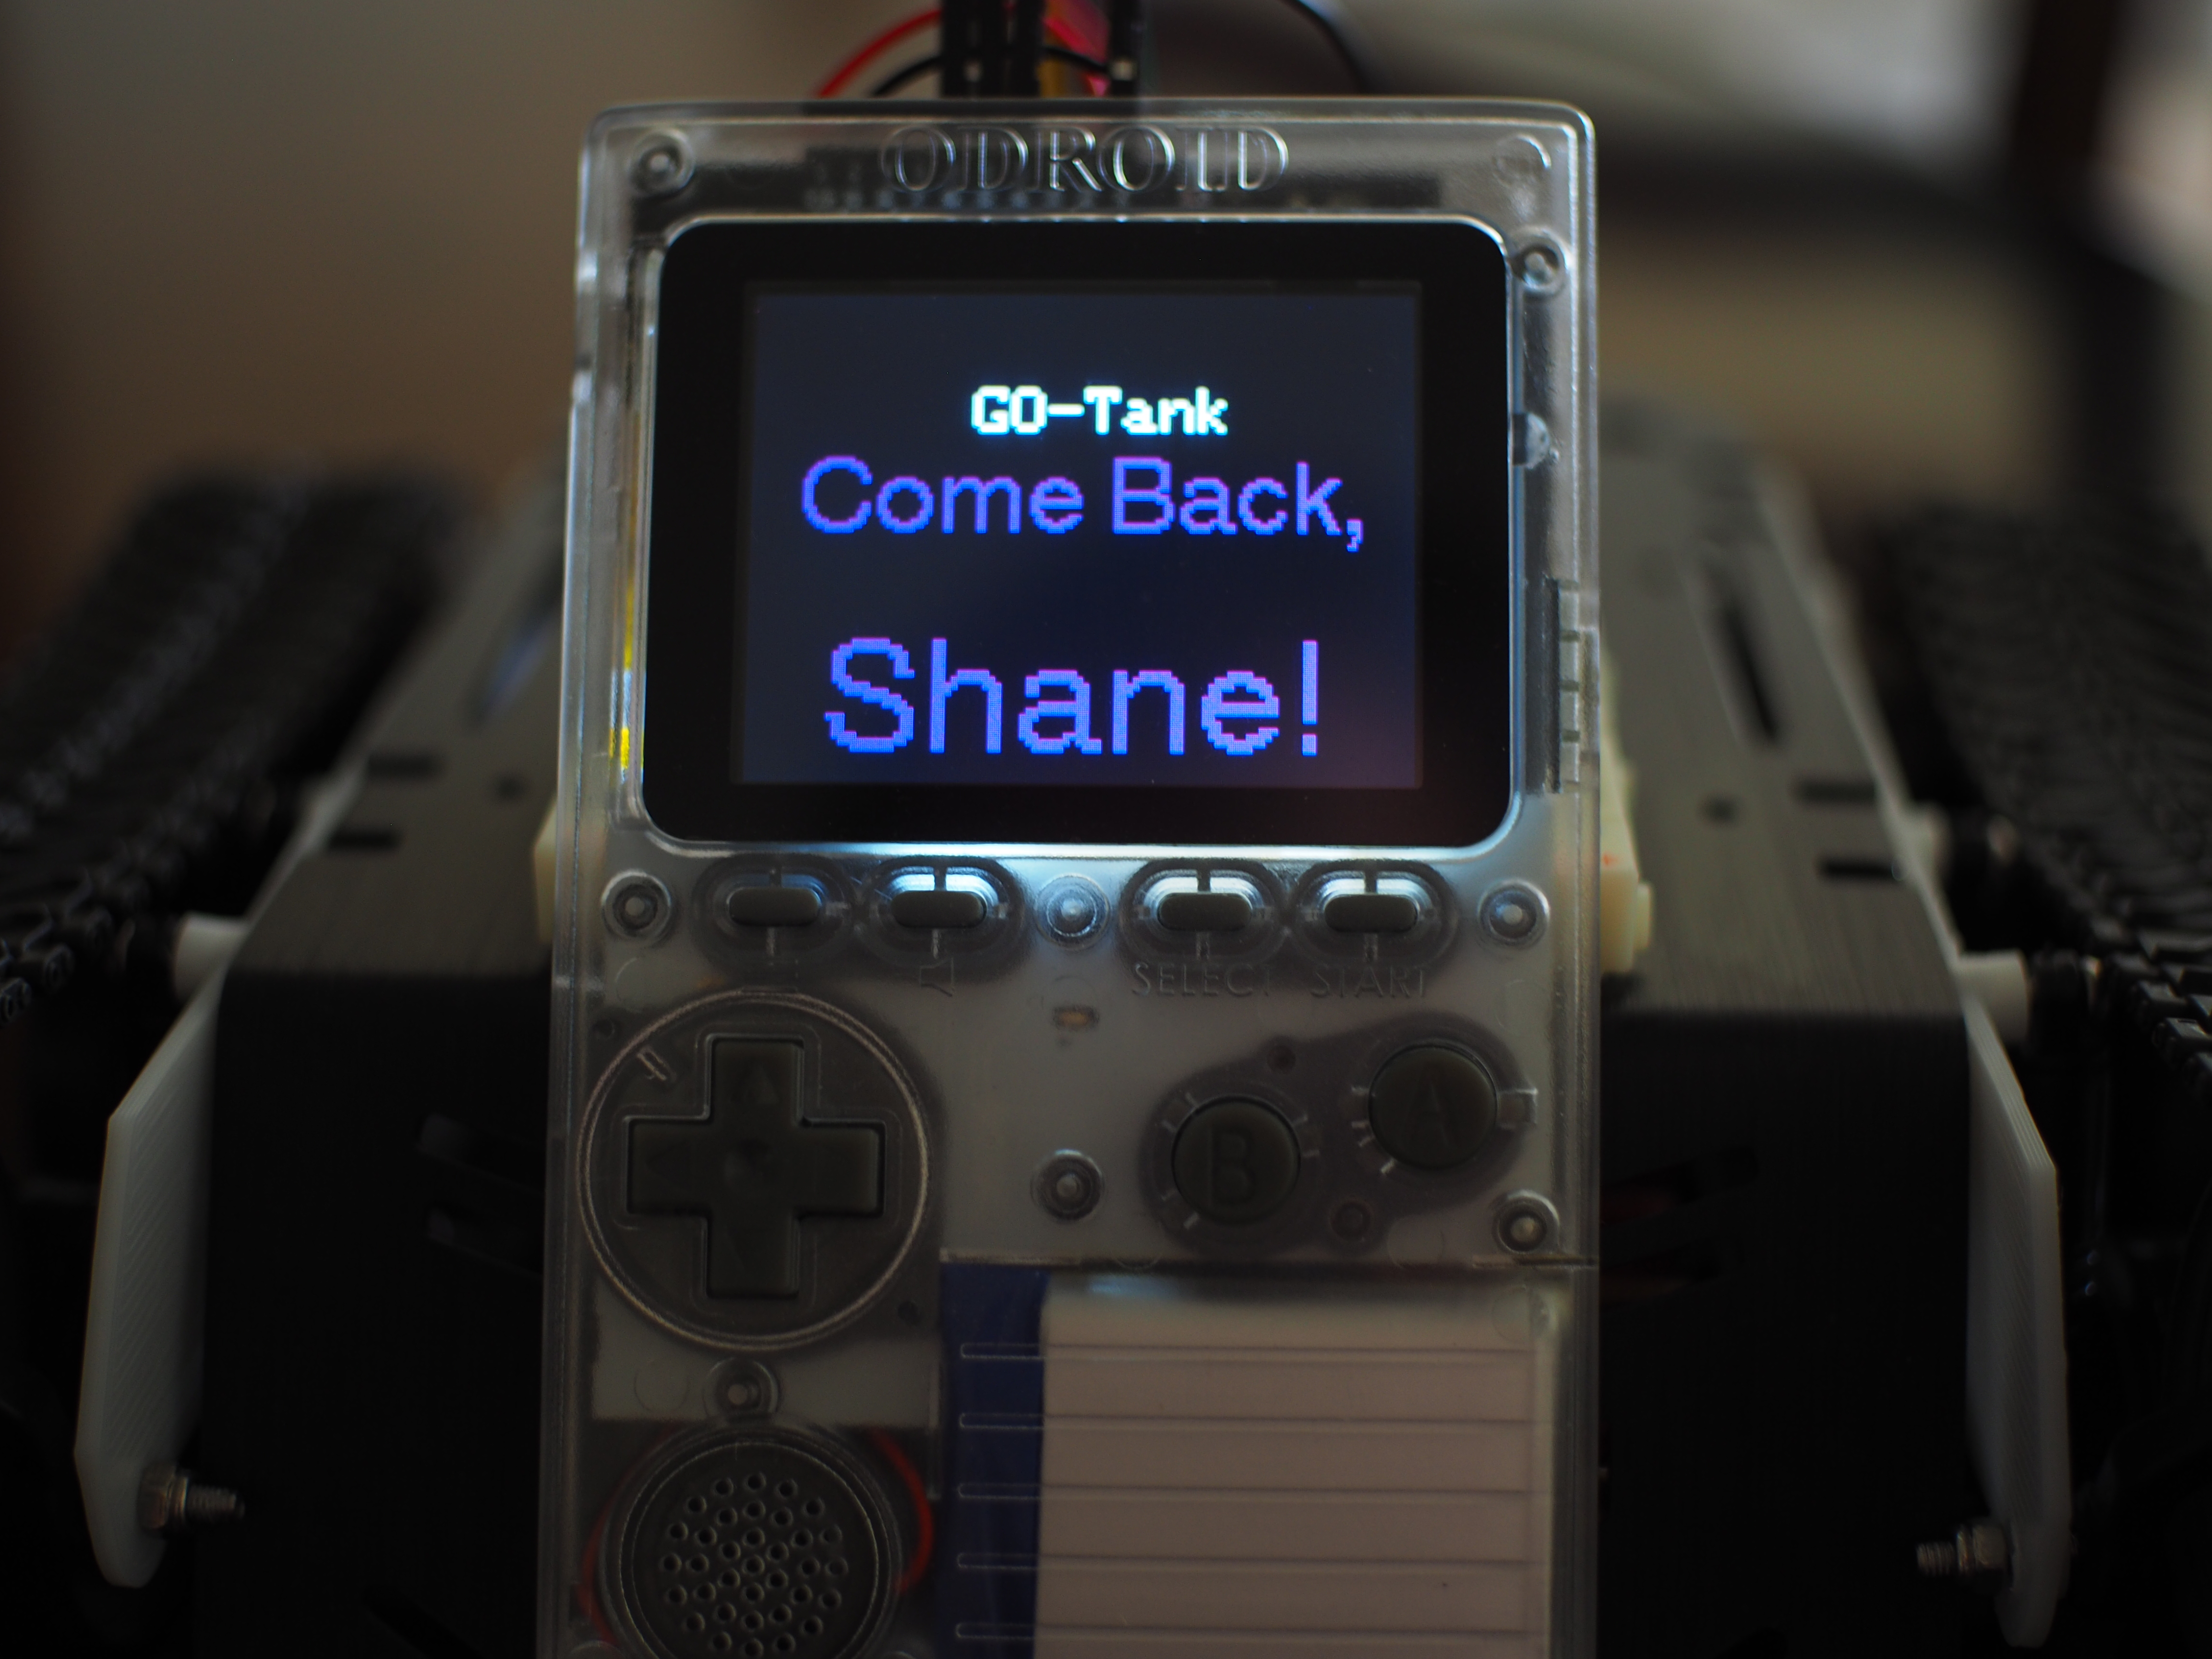
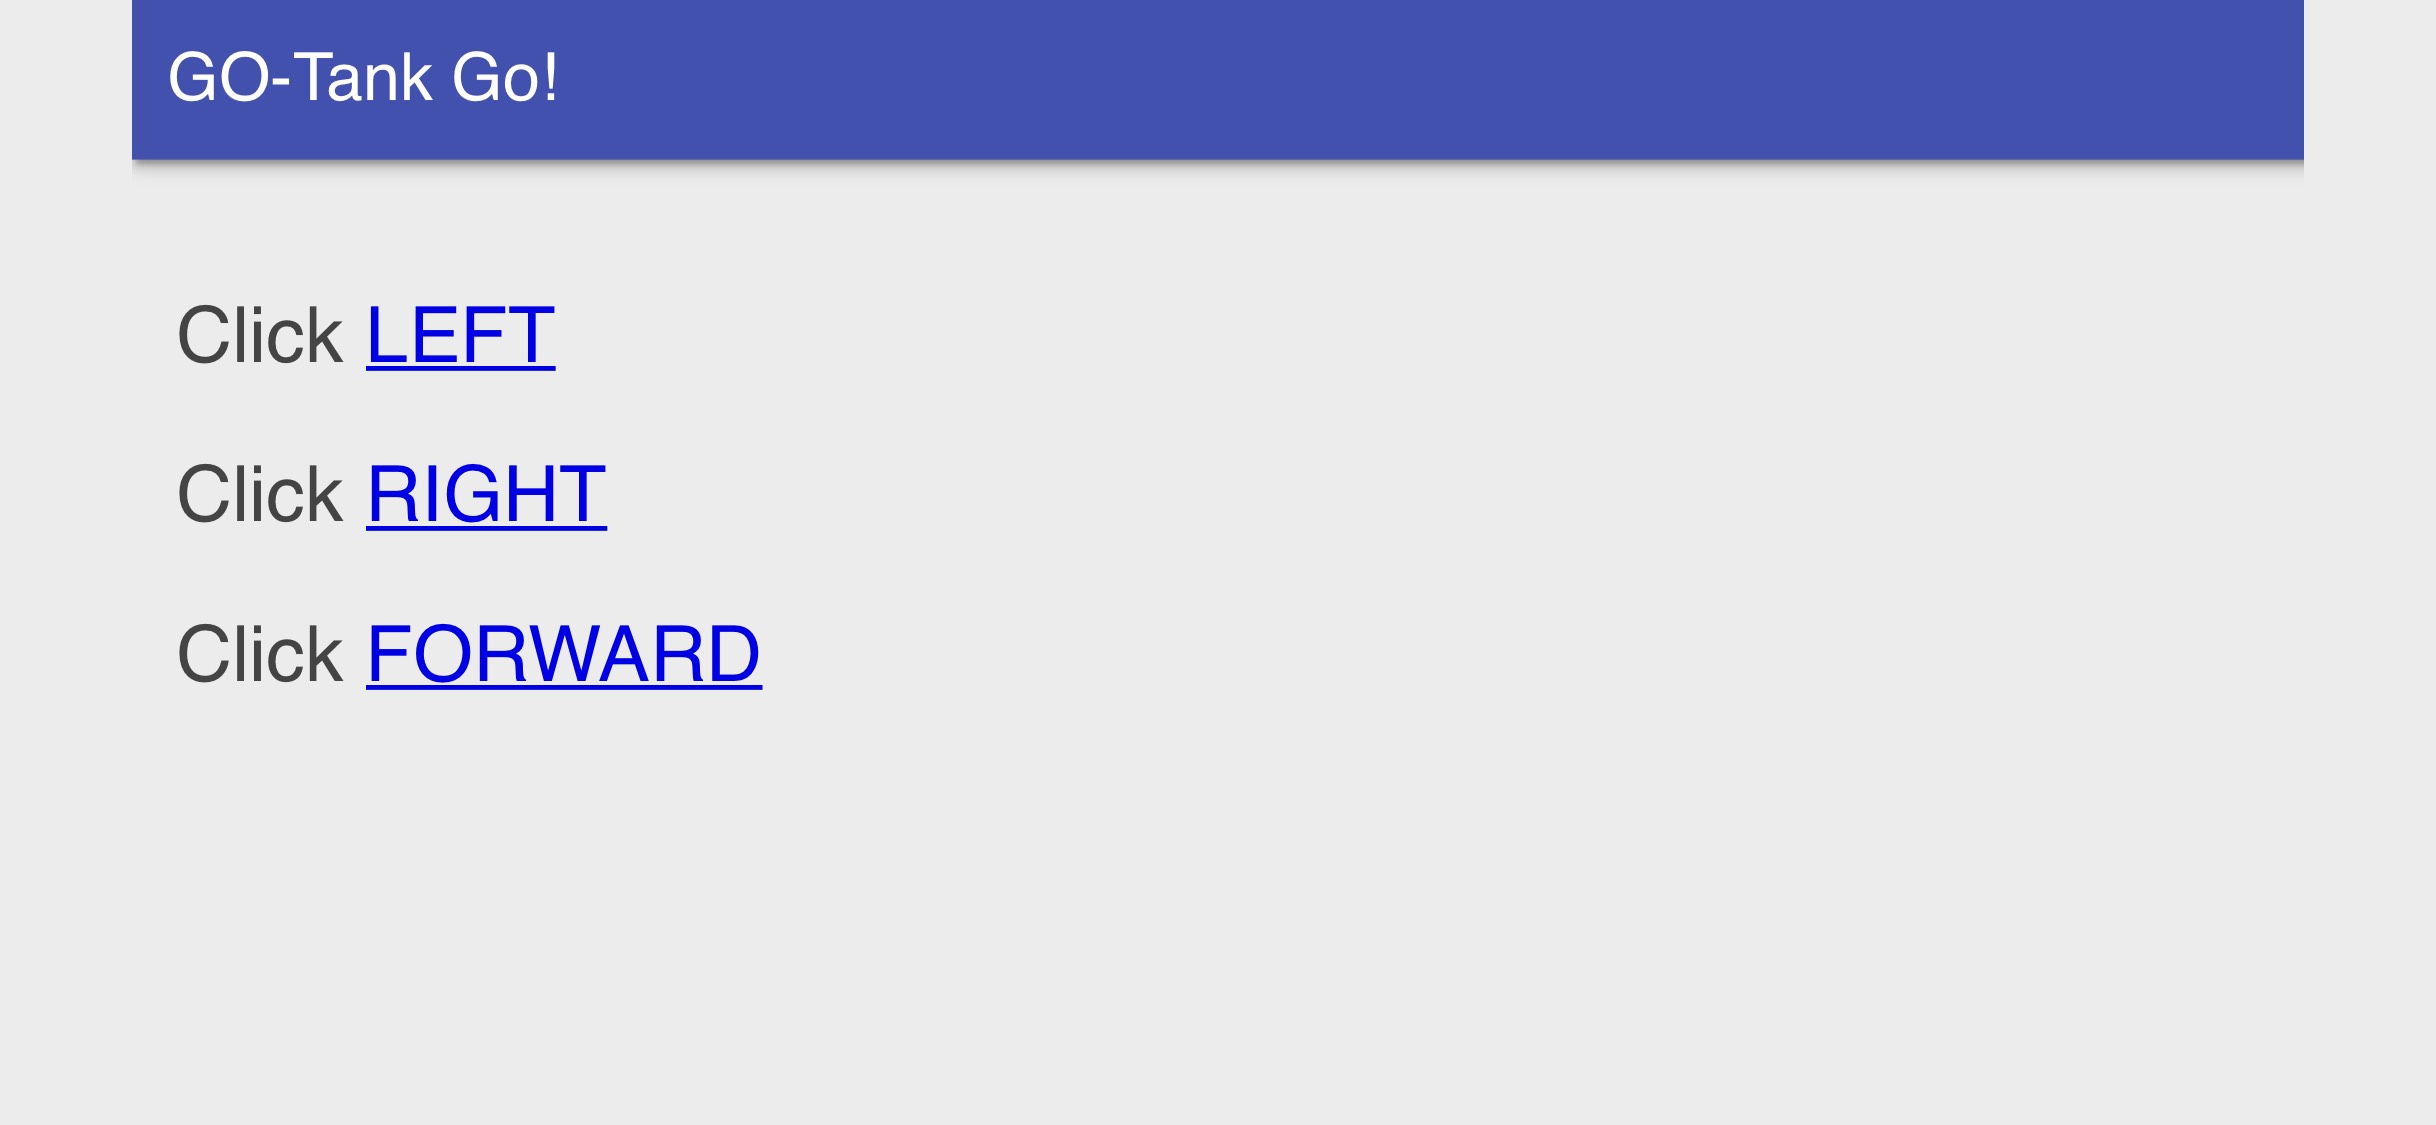
After switching on the ODROID-GO, connect your smart device to the ODROID-GO WiFi access point created inside the program’s code, and use your browser to load the code-generated Web page at: http://192.168.4.1. By pressing “LEFT” on this Web page, you should see a red display on the ODROID-GO and the left tread should move, this action will turn the tank right. Pressing “RIGHT” turns the display green and moves the tank left, while pressing forward runs both treads and drives the tank ahead.
Figure 10. The robot’s control interface on your smart device.
Now get out there and enjoy your newfound freedom with a mobile ODROID-GO-Tank.
Notes
1. ALL ground (GND) lines must be connected together—regardless of voltages!
2. Why Shane? Read the 1949 Jack Schaefer classic Western novel, or watch the 1953 film adaptation starring Alan Ladd and wait for little Joey’s plaintive cry at the departing gunslinger.
CoreELEC: For the ODROID-N2
September 1, 2019By @CI6N0zODROID-N2
Kodi has for years been one of the most popular media players and is often recommended when people ask for which multimedia solution to choose as it is available for multiple operating systems and a huge spectrum of devices. The majority of low-cost devices which are bought for the purpose of multimedia playback are equipped with an Android operating system where Kodi is often preinstalled or can easily be installed. Given that Android and Kodi are so widely used, one would think that combining them would be the ultimate multimedia experience. That’s not really the case and the experience can be somewhat mediocre when playback stutters and other problems occur. Fortunately, there are multiple alternatives to Android and one of the best is presented in this article – CoreELEC.
What is CoreELEC?
CoreELEC is a Linux distribution based on Kodi technology with the main purpose of being as light as possible, ideal for low-powered devices. It was forked from the widely known LibreELEC in 2018 and differentiated with a philosophy to make sure users get the best possible experience with the current status of hardware and software. With that in mind, CoreELEC on ODROID-N2 has shown to be a strong contender to be the best low-cost multimedia solutions to date. And with the support of the Enware package manager, it is capable of being a low-cost server in addition to a multimedia solution as seen later in this article.
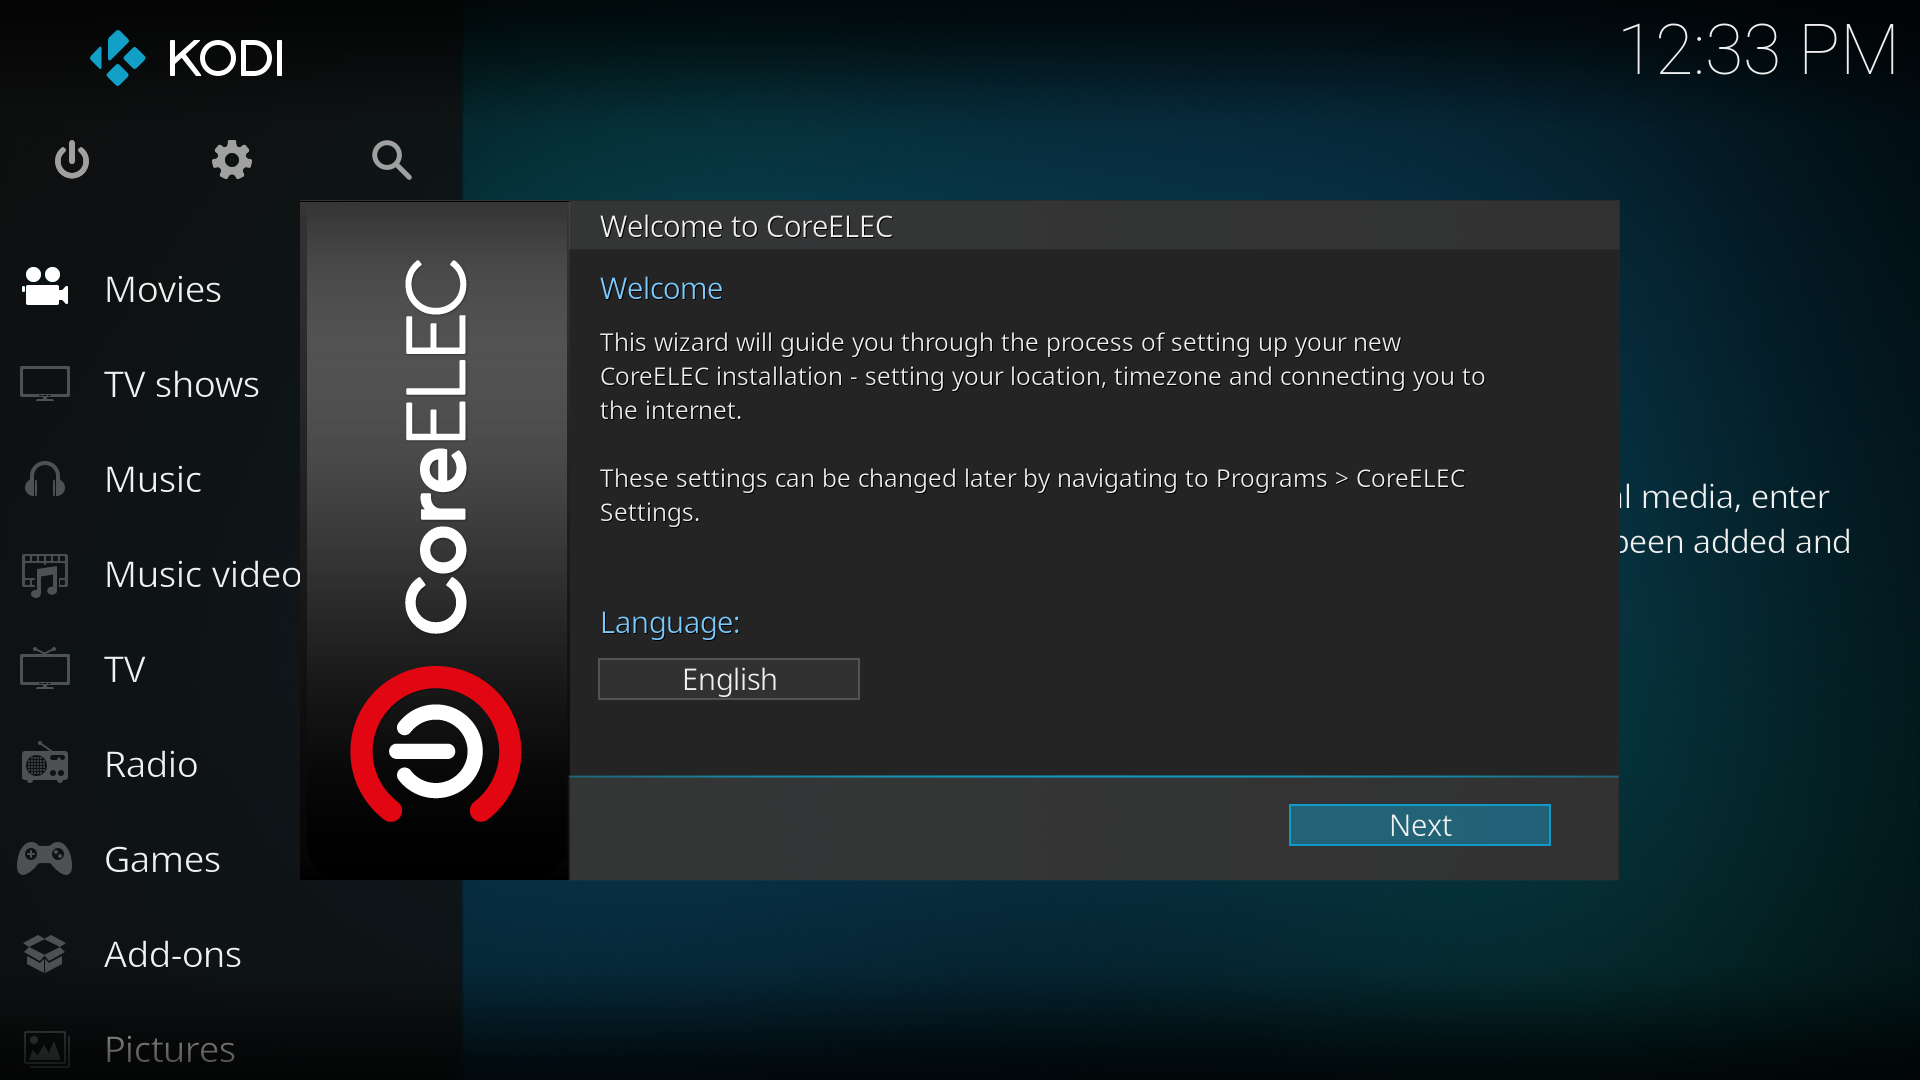
Figure 1: Welcome screen
Hardware setup
Below is a list of the hardware used with some recommendations and more information.
Recommended:
ODROID-N2 with 2/4 GB RAM
12V/2A power supply
High Speed 4K HDMI 2.0 Cable (Type A-A)
ODROID-N2 Case
IR Remote Controller
Micro SD card
Optional:
8/16/32/64/128 GB eMMC Module N2
Bluetooth Module 2
RTC Backup Battery
WiFi Module
As I wanted to use ODROID-N2 with CoreELEC as a home server using Entware in addition to multimedia usage, I chose 4GB of RAM. However, it’s worth noting that 2 GB is sufficient enough for most users. The same can be said about the eMMC module where 8/16 GB is more than enough for regular usage with Kodi. For the rest of the options, it depends on what you need and they all work as expected with CoreELEC.
Installation
CoreELEC was easily installed by following the installation guide at https://coreelec.org/. After inserting the flashed microSD and eventually unplugging eMMC before powering ODROID-N2 to make sure CoreELEC boots from the microSD card, in less than 2 minutes, CoreELEC was ready for usage. For increased performance, CoreELEC was installed to eMMC by running the command “installtoemmc” twice.
Setup of Kodi
The default settings after installation satisfy most users needs, yet there are still some settings which should get some additional attention. Let’s start with CoreELEC.
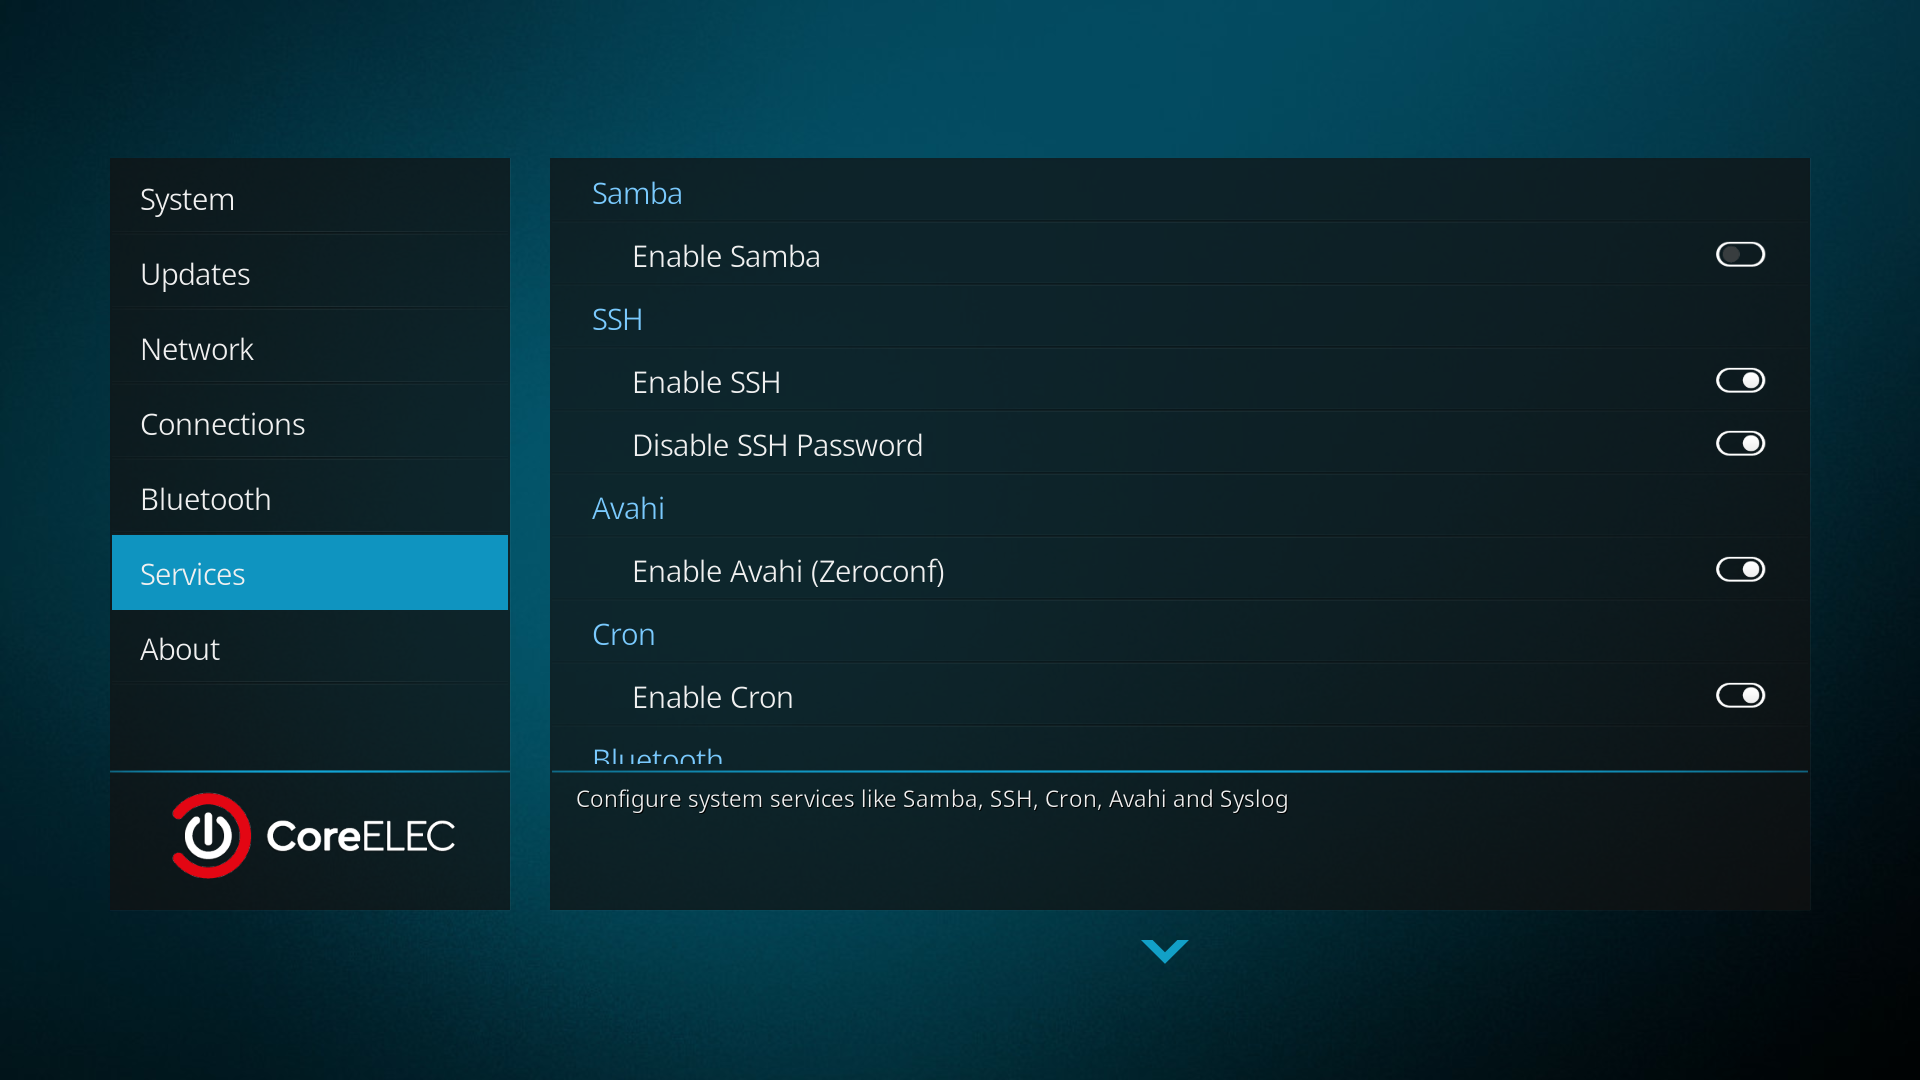
Figure 2: CoreELEC setting screen
Two features which are heavily used are Samba and SSH. If enabling any of them, remember to setup or change credentials. For Samba, “Use Samba Password Authentication” was enabled with a strong password. For SSH, one can either setup a new password or simply insert a public key. SSH keys are the most secure and the fastest solution, so copying my public key into .ssh/authorized_keys achieved it. Lastly “SSH Password” was disabled as it was no longer needed.
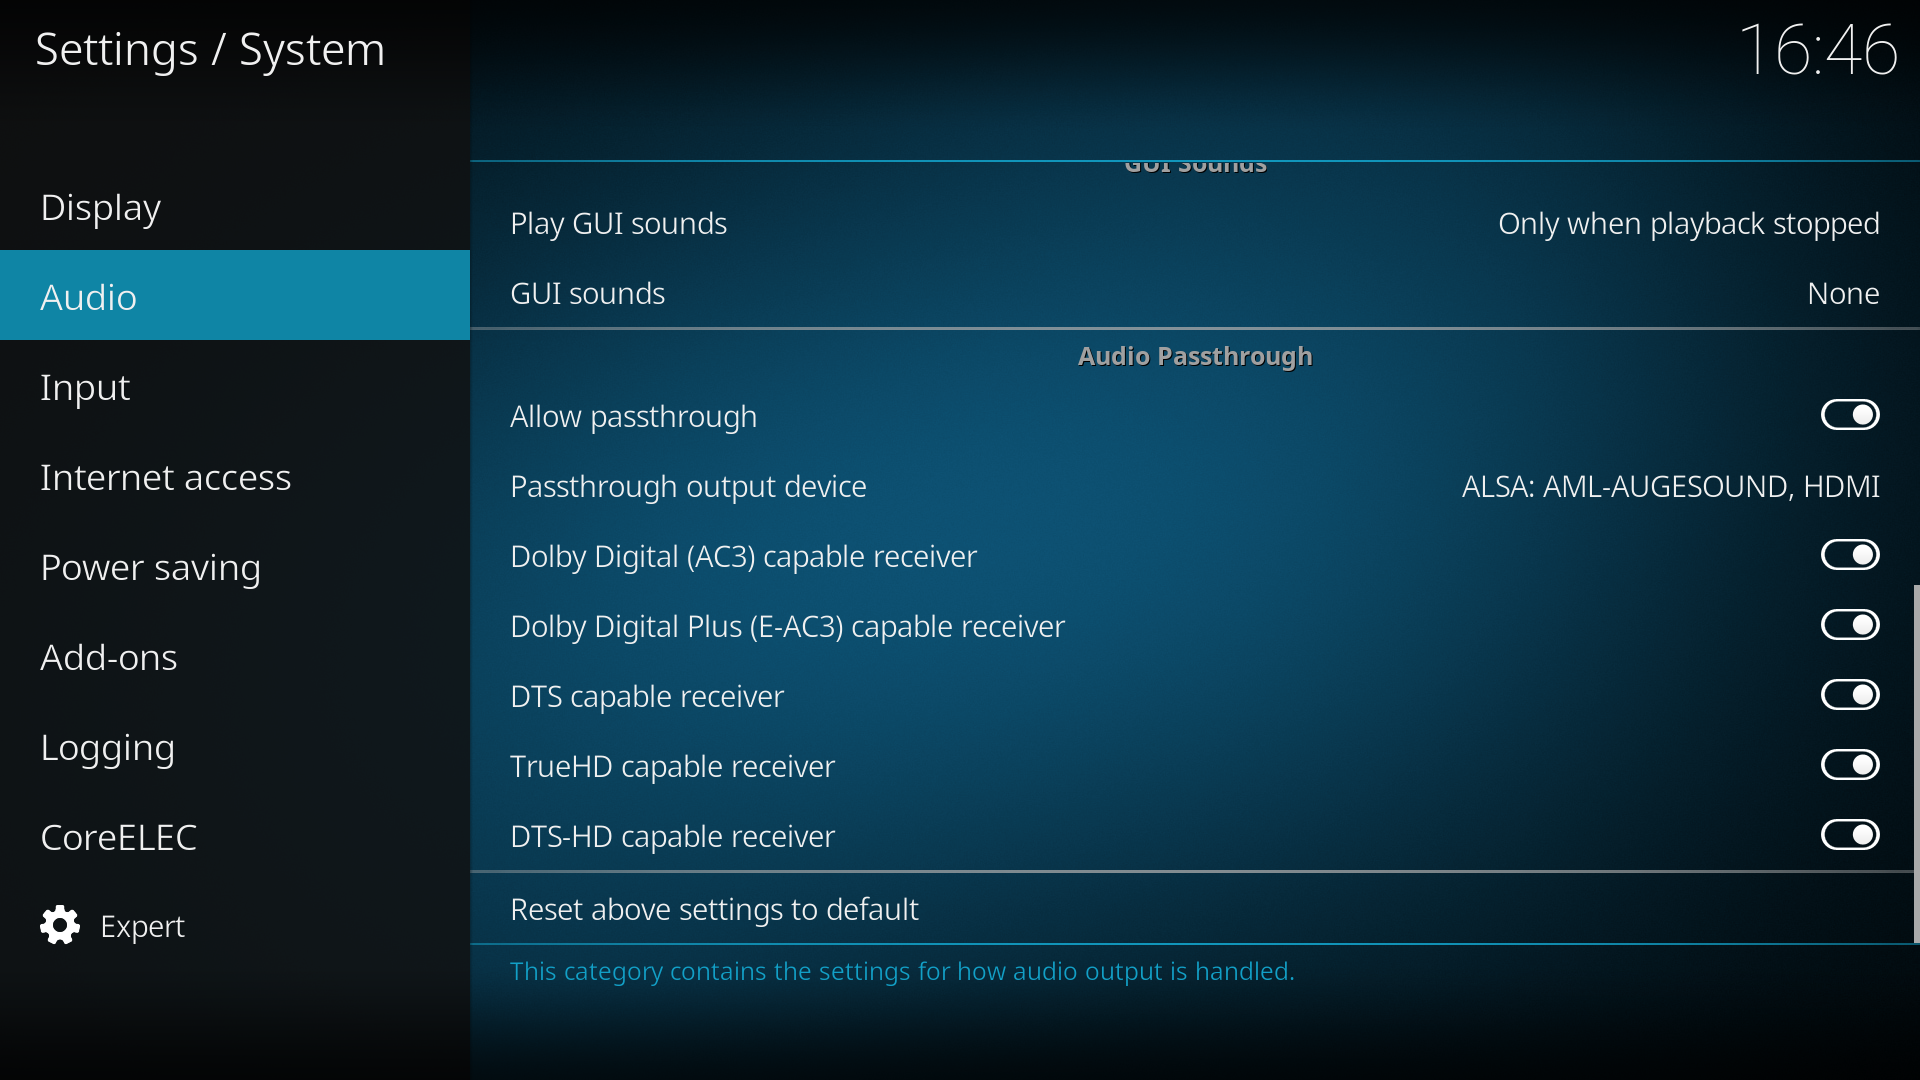
Further along on the setup-list was System, where the two aspects Display and Audio were worth diving into. If your TV has any issues with specific resolutions or you want to switch to a lower resolution than your Kodi GUI, select your TV’s capable resolutions in Whitelist. Some people might find it tempting to change the GUI resolution to 4K instead of 1080p. The ODROID-N2 is more than capable of running a 4K GUI, but I want the most responsive and clean experience, so I left the GUI at 1080p. This won’t affect the resolution of the media played and should, therefore, only be considered if one wants higher quality posters.
Lastly was Audio and as I’m going to use an AVR (Audio/Video Receiver), I want my AVR to do the decoding to get the purest audio quality. My settings were based on Kodi’s quickstart guide (https://kodi.wiki/view/Audio_quickstart_guide).
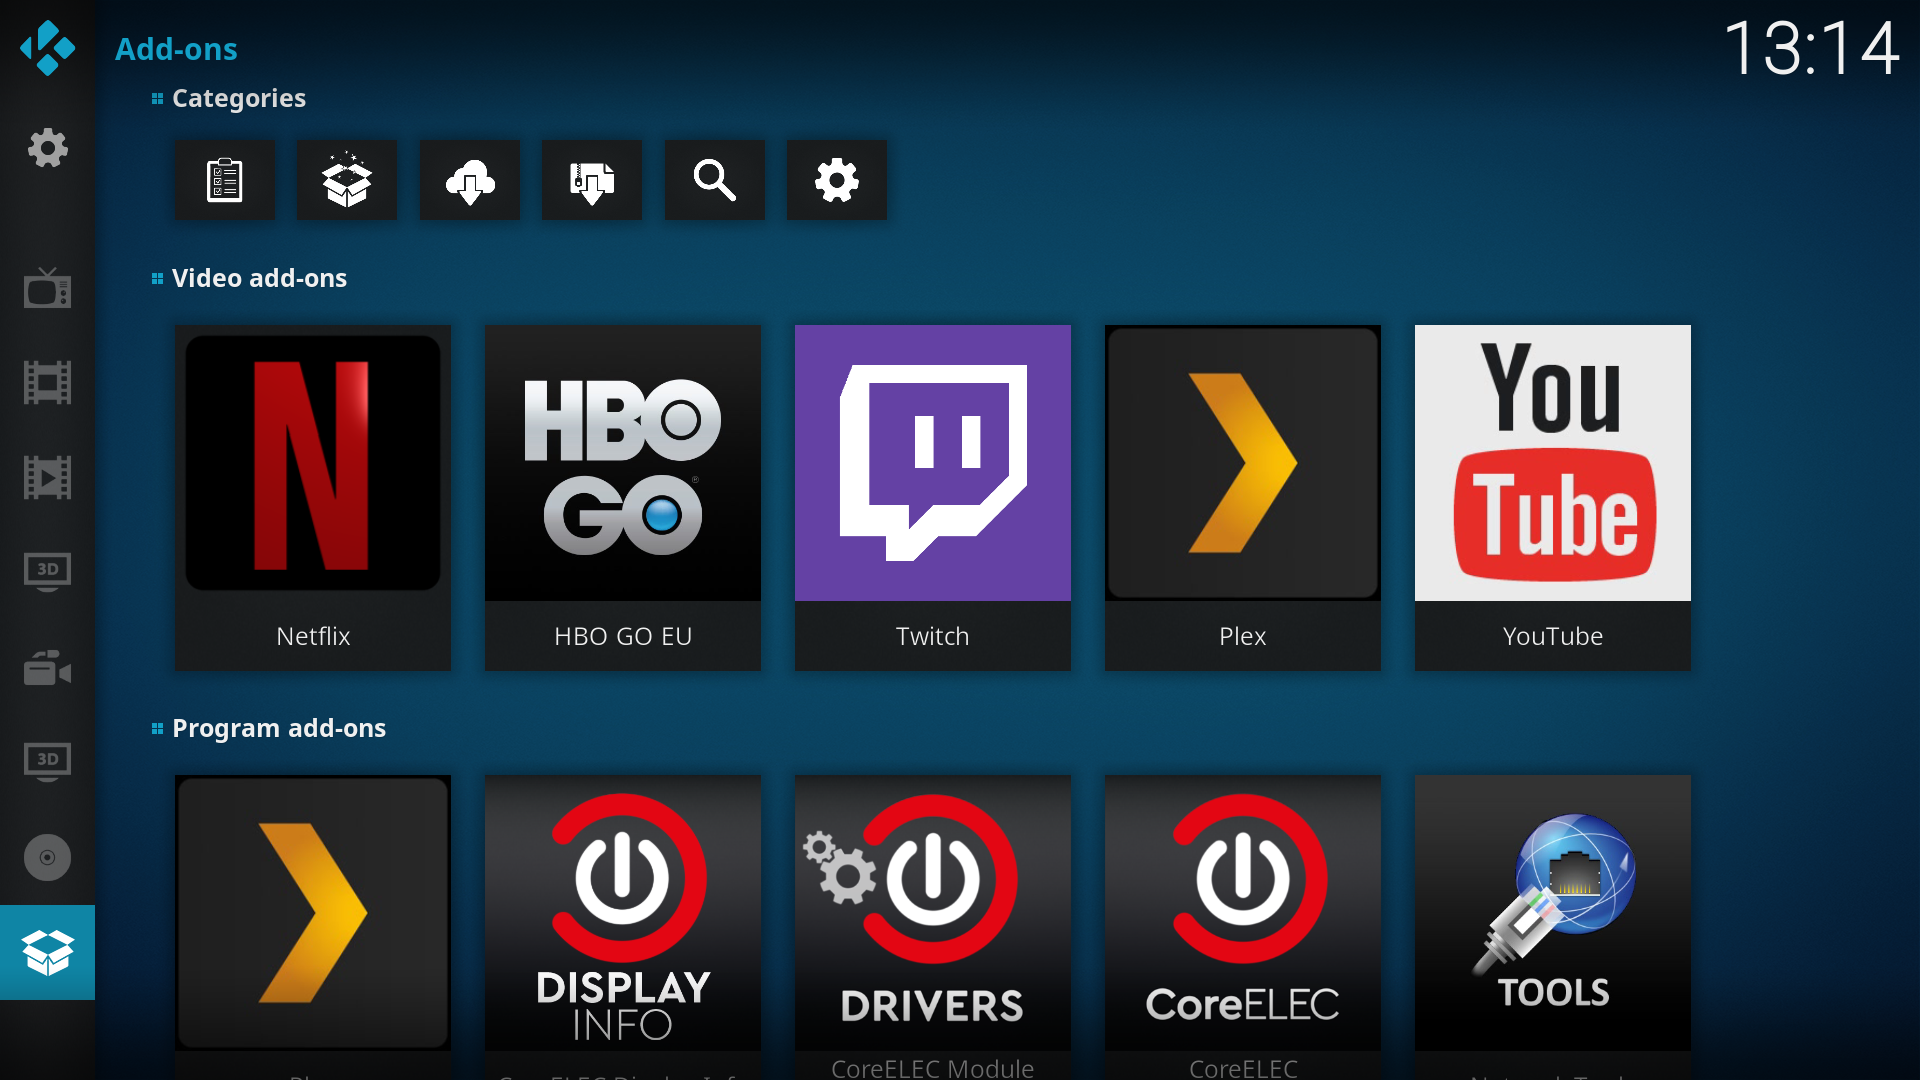
The selection of add-ons has for years been one of Kodi’s advantages and people are frequently using them, me included. Further are some add-ons that I use frequently:
Figure 5: Add-ons
Netflix
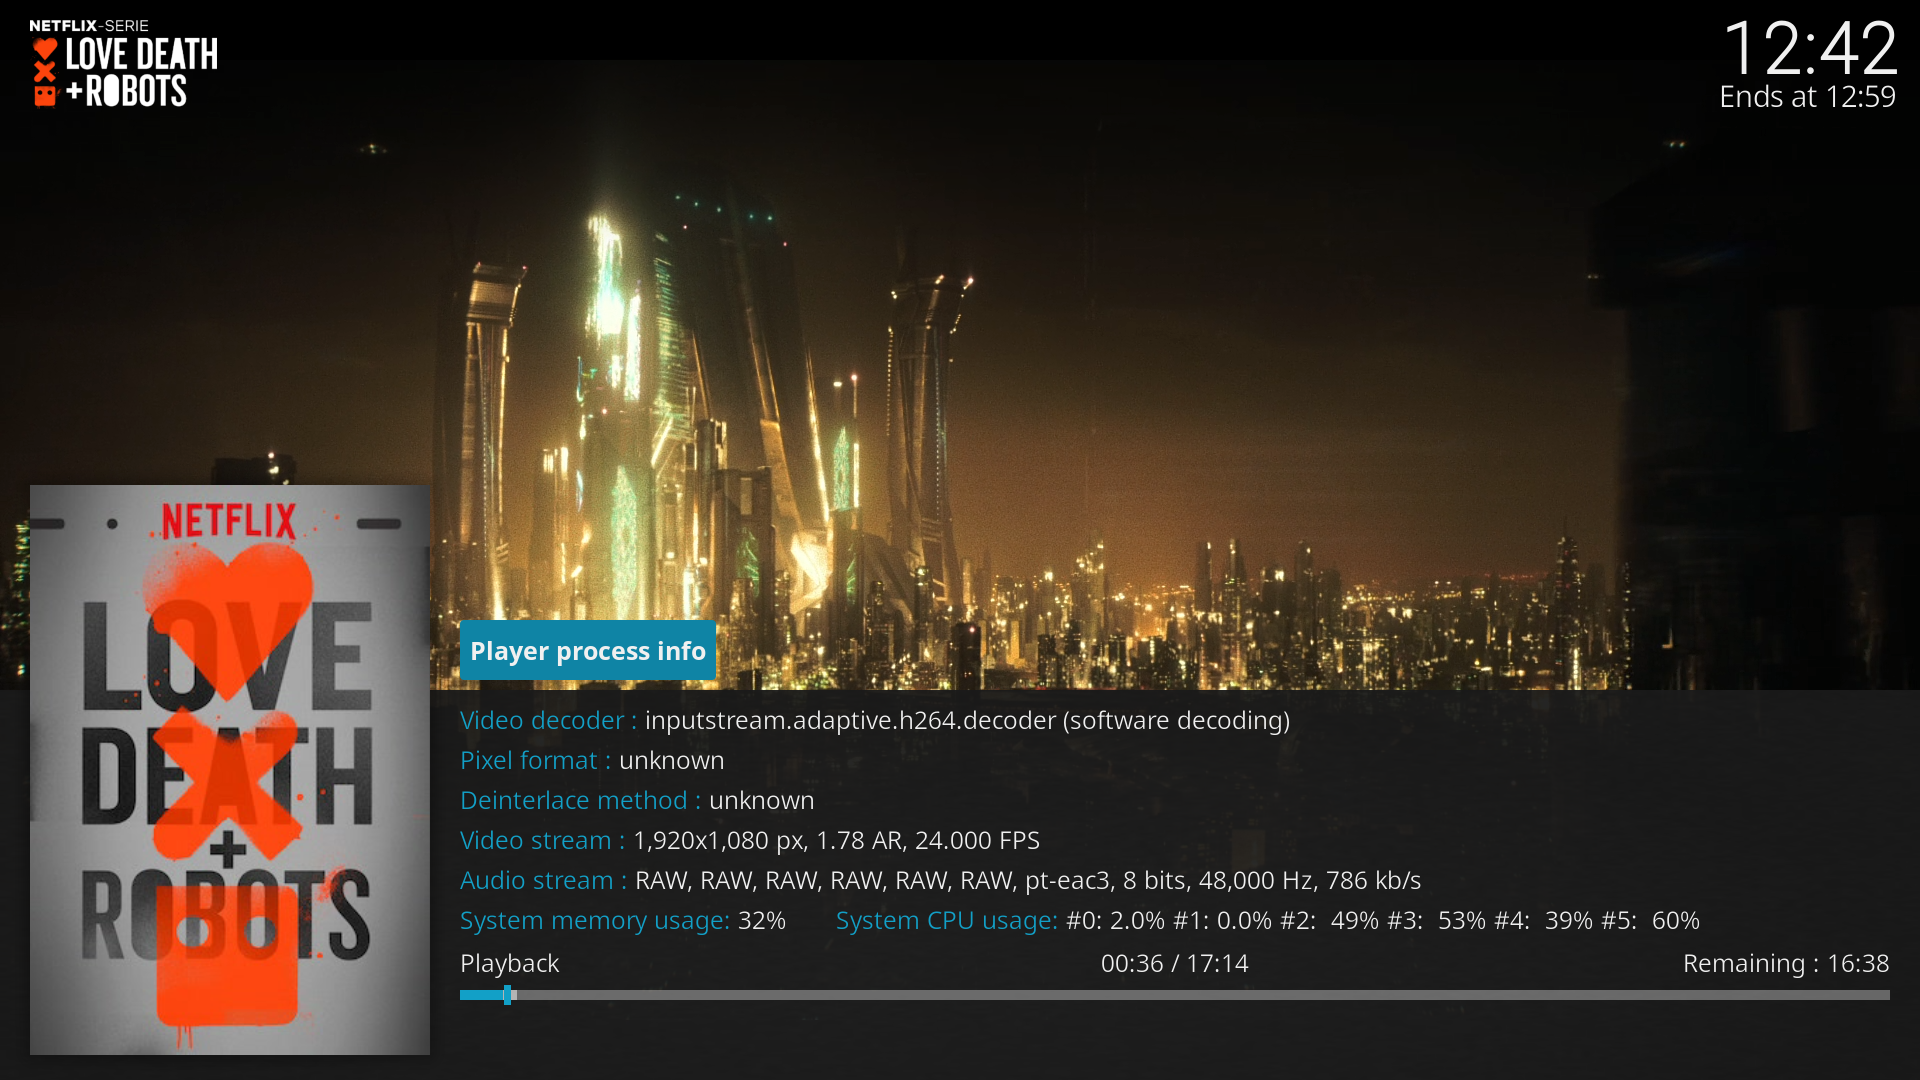
By visiting the following link (https://forum.kodi.tv/showthread.php?tid=329767) for installation instructions, Netflix is ready for usage. ODROID-N2 is powerful enough to watch Netflix in 1080p with DD+ 5.1 sound and subtitles.
Figure 6: Netflix with 1080p and DD+ 5.1
Youtube
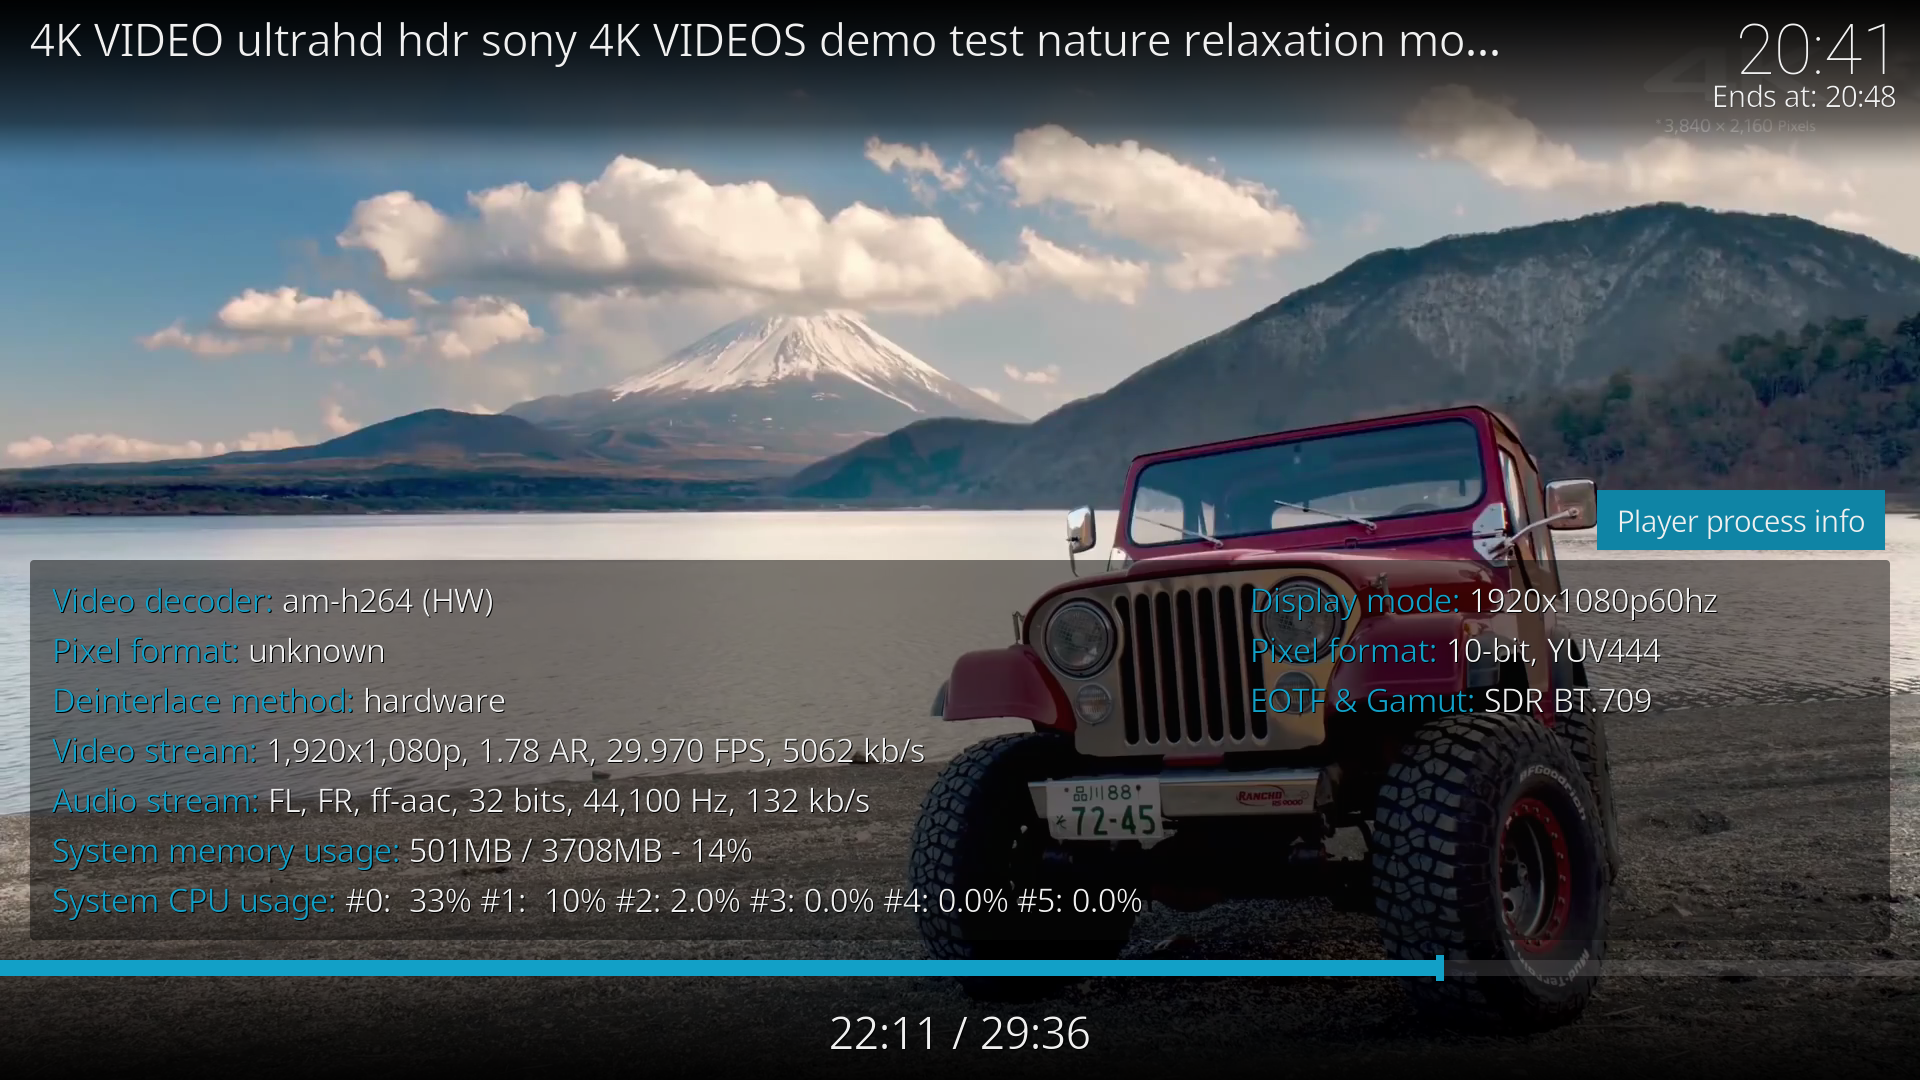
Youtube can be installed from Kodi Add-on repository and with the add-on InputStream Adaptive, found in CoreELEC Add-ons, one can setup Youtube with 4K playback.
Figure 7: Youtube in 1080p without a hassle. Same can be said for 4K.
(Figure 7: Youtube in 1080p without a hassle. Same can be said for 4K.)
Testing
By using the samples at https://kodi.wiki/view/Samples, one is able to test most audio and video formats. The following is the current status as of July 2019 with passthrough enabled and ODROID-N2 connected to an AVR.
Audio
Status
Video
Status
AC-3 (DD)
Working
720p and lower 23-60 Hz
Working
E-AC-3 (DD+)
Working
1080p 23-60 Hz
Working
Dolby TrueHD
Working
1080p 3D HSBS/HTAB
Working
DTS
Working
1080p 3D-MVC
Not working
DTS-HD
Working
2160p 23-60 Hz
Working
DTS-HD MA
Working
2160p 23-60 Hz HDR10
Working
LPCM
Not working, a workaround is selecting 2.0 channels and enabling AC-3 transcoding
2160p 23-60 Hz HLG
Working
FLAC
Partly working, see LPCM
2160p 23-60 Hz Dolby Vision
Not working
(Status of tested audio and video formats.)
To sum up, ODROID-N2 is more than capable of playback of Ultra HD Blu-Ray with HDR10 and Dolby Atmos / DTS-X. Even test samples which are 3 times the bitrate of the specification of UHD Blu-Rays (triple-layer - 128 Mbit) played flawlessly from a NAS.
Using ODROID-N2 with CoreELEC as a server
Entware, which is a package manager with more than 2000 packages, can be easily installed by running the script installentware through CoreELEC. Entware packages were initially designed to run on low-powered devices such as routers and NAS and are, therefore, especially lightweight. Packages are installed with opkg install *Package name* and one can search for packages with opkg search NAME or opkg find NAME. As I want to use my ODROID-N2 as a server, some of the commands I ran are the following:
$ opkg install lighttpd mc youtube-dl netdata
Some highlighted packages which are installed:
Lighttpd - An open-source web server optimized for speed-critical environments
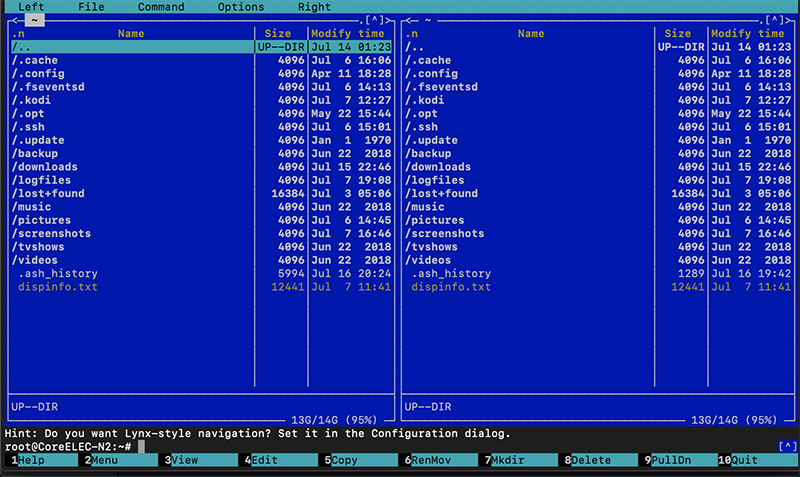
GNU Midnight Commander (mc) - A visual file manager
Youtube-dl - a program to download videos from YouTube and many more sites
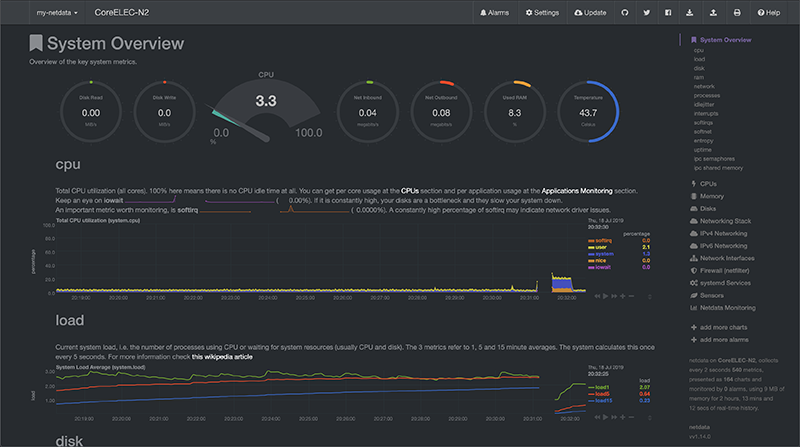
Netdata - a daemon providing real-time performance monitoring for Linux systems
Figure 8: Midnight Commander
Figure 9: Netdata
Support
One of the most underrated aspects concerning buying a single board computer (SBC) is the support, which causes the buyer to not account for the support of the SBC when they look at the price. The support of a SBC is extremely relevant to get the best possible user experience and this is one of the aspects were the ODROID-N2 shines. With great support over at https://forum.odroid.com/ and https://discourse.coreelec.org, one can ask questions for help and are often replied to from within minutes to a few hours. People over at the forums are eager to help and assist, which is important for the community to grow and the awareness around SBCs to increase even further.
Figure 10: CoreELEC forums
To read more about using CoreELEC with the ODROID-N2, check out a review of the ODROID-N2 CoreELEC Media Center at https://www.cnx-software.com/2019/08/26/odroid-n2-coreelec-edition-media-center/.
Editor’s Note
Personally, I have an ODROID-N2 running CoreELEC and found it to be a fast and responsive media player. After reading this article, it will be clear to see why the ODROID-N2 makes such a terrific media centric device. Additionally, Hardkernel has even put together a package with everything you need to get up and running with CoreELEC on an N2, so you can see first hand how amazing this device is even easier at https://www.hardkernel.com/shop/odroid-n2-2gb-coreelec-edition/ or, for those in the US, at https://ameridroid.com/collections/new/products/odroid-n2-coreelec-edition.
How to Build a Monku Retro Gaming Console - Part 3: Adding The Final Touches
September 1, 2019By Brian ReeGaming, Linux, ODROID-C2
This is a continuation of the Retro Gaming Console article from last month, where we learned how to configure the software for a retro gaming console. This installment will show you how to finish the project by showing you, in detail, how to polish off your Monku Retro 1 (ODROID-C1+) or Monku Retro 2 (ODROID-C2) video game console. We'll be optimizing the MATE Linux desktop environment, connecting our custom control button, setting up RetroArch in kiosk mode, and boot.ini configuration.
Tools and Parts
This tutorial doesn't require any new parts or tools. We'll be configuring the console you've already built, adjusting things to really make it shine.
Introduction and Tutorial Goals
Finalizing MATE...Almost
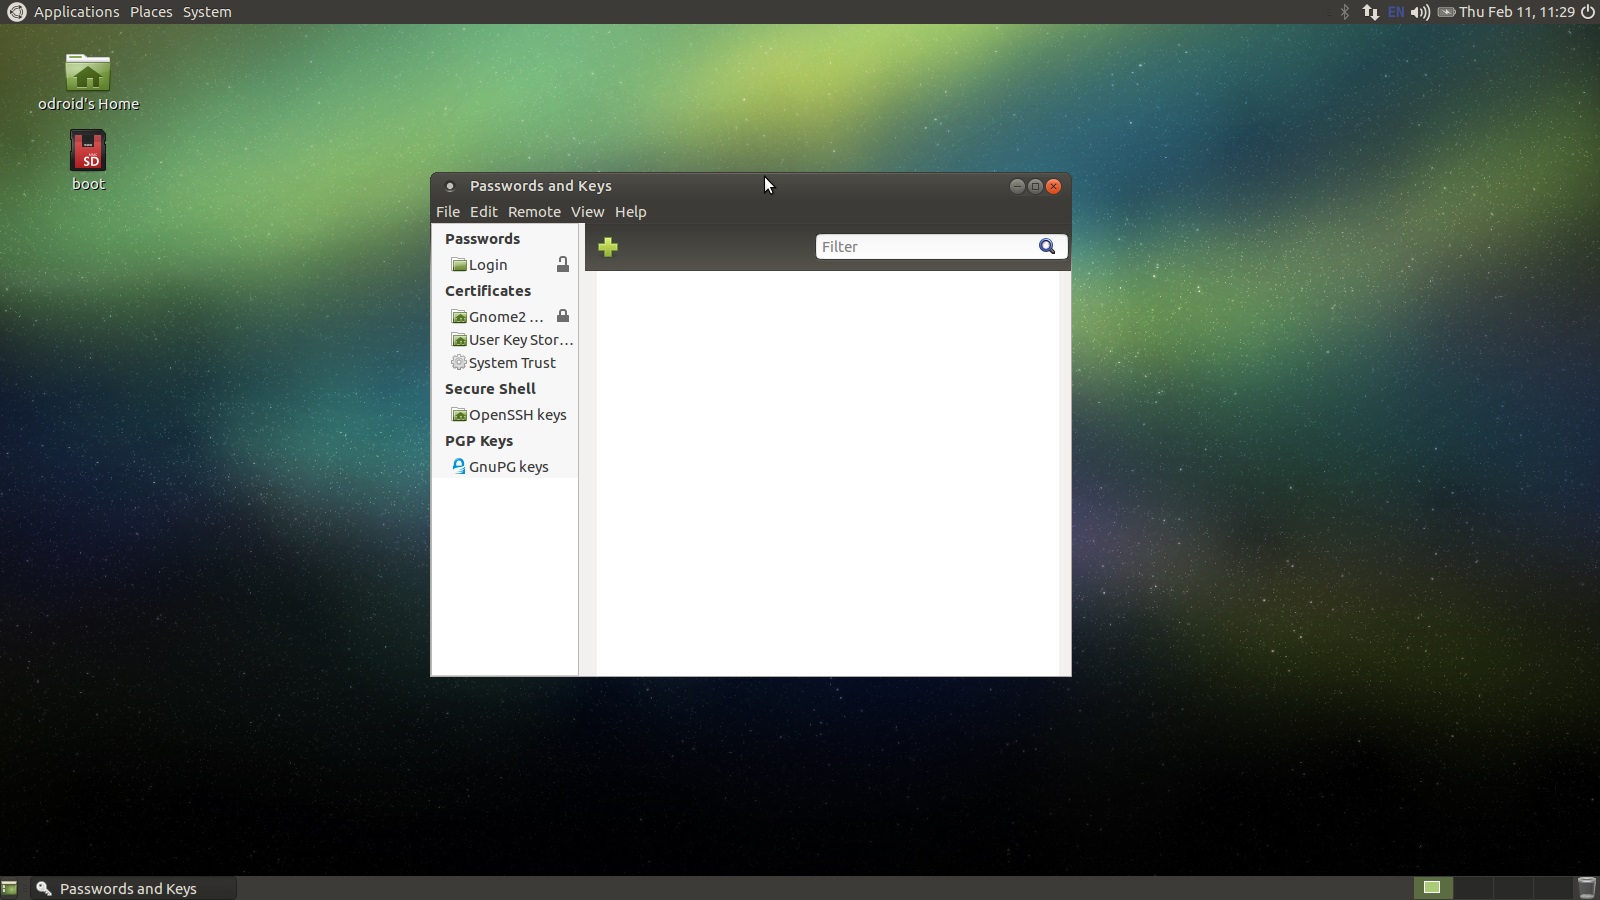
In this section, the first thing we're going to do is get rid of that pesky authentication prompt that pops up when you open a browser for the first time after logging in. ALERT: This is not a high security setup: we are purposely lowering the security level here to make it easier to use as a game console and web browsing set top box. Go to the following menu location: Applications -> Accessories -> Passwords and Keys and you should see a window popup similar to the one depicted below. ALERT: If at any time you are prompted for a login when working with the terminal use the password, odroid.
Figure 1 - Configuring your settings to remove the authentication prompt
Locate the Login entry in the list on the left-hand side of the window. If the authentication popup I mentioned references a different Password keychain then find that entry in the list on the left-hand side of the window. Follow the steps below to unlock the target keychain.
Right-click on the target entry and select Change Password.
You will be prompted to enter the old password: type in odroid and click Continue.
You will now be prompted to enter a new password: leave both fields blank and click Continue.
Another dialog will popup and ask you if it's ok to allow the keychain to be unlocked: click Continue.
Close out of all the dialogs and close the Password and Keys window; we're all set.
Next thing we'll do with the MATE environment is configure the panels and widgets a bit. You can do whatever you like here. I'll just show you how I configure things and why. First off, we're expecting to interface with this system, at least some of the time, with a gamepad. It works great, but it's not a mouse. We're not really going to be doing any rigorous Linux computing so there are a few things we don't need. The second benefit to this configuration step is that is does lower the memory overhead a little.
Follow these instructions to remove the bottom panel. We will be adding controls to the top panel to offset some of the functionality loss, but we won't be adding in the desktop selection widget. It's just a bit of overkill for our needs. If you want it, however, it won't harm anything to keep it. Follow these instructions to clean up the panels and widgets.
Go to the bottom panel and right-click, select Delete This Panel, then click Delete again when prompted.
Go to the top right-hand side of the screen and right-click the power button, select Remove From Panel.
What we're going to do is re-add some of the widgets, making the top panel a more centralized point of control. This makes using the gamepad to control things much much easier. Your desktop should look like the screenshot below.
Figure 2 - Your new, more centralized top panel
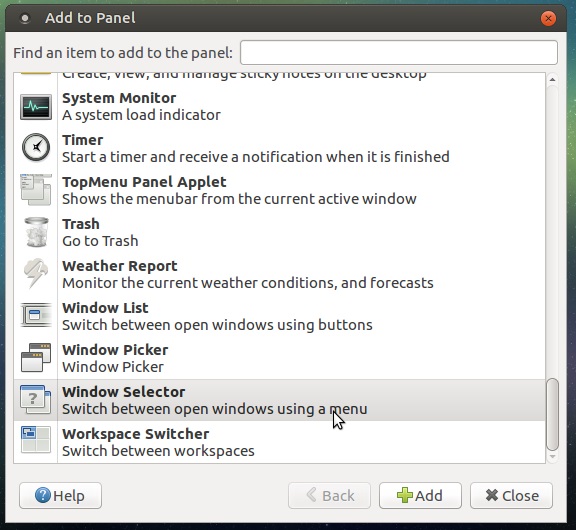
Since we got rid of our open window selection buttons when we deleted the bottom panel, let's add a new widget to the top panel that is better suited for a gamepad since it requires less cursor movement to utilize. Right-click on the top panel and select Add to Panel. Scroll down the list of options until you see the entry depicted below and then click Add.
Figure 3 - List of panel options
We have a few more steps to get through here regarding the tray apps and the date and time configuration but we're almost done.
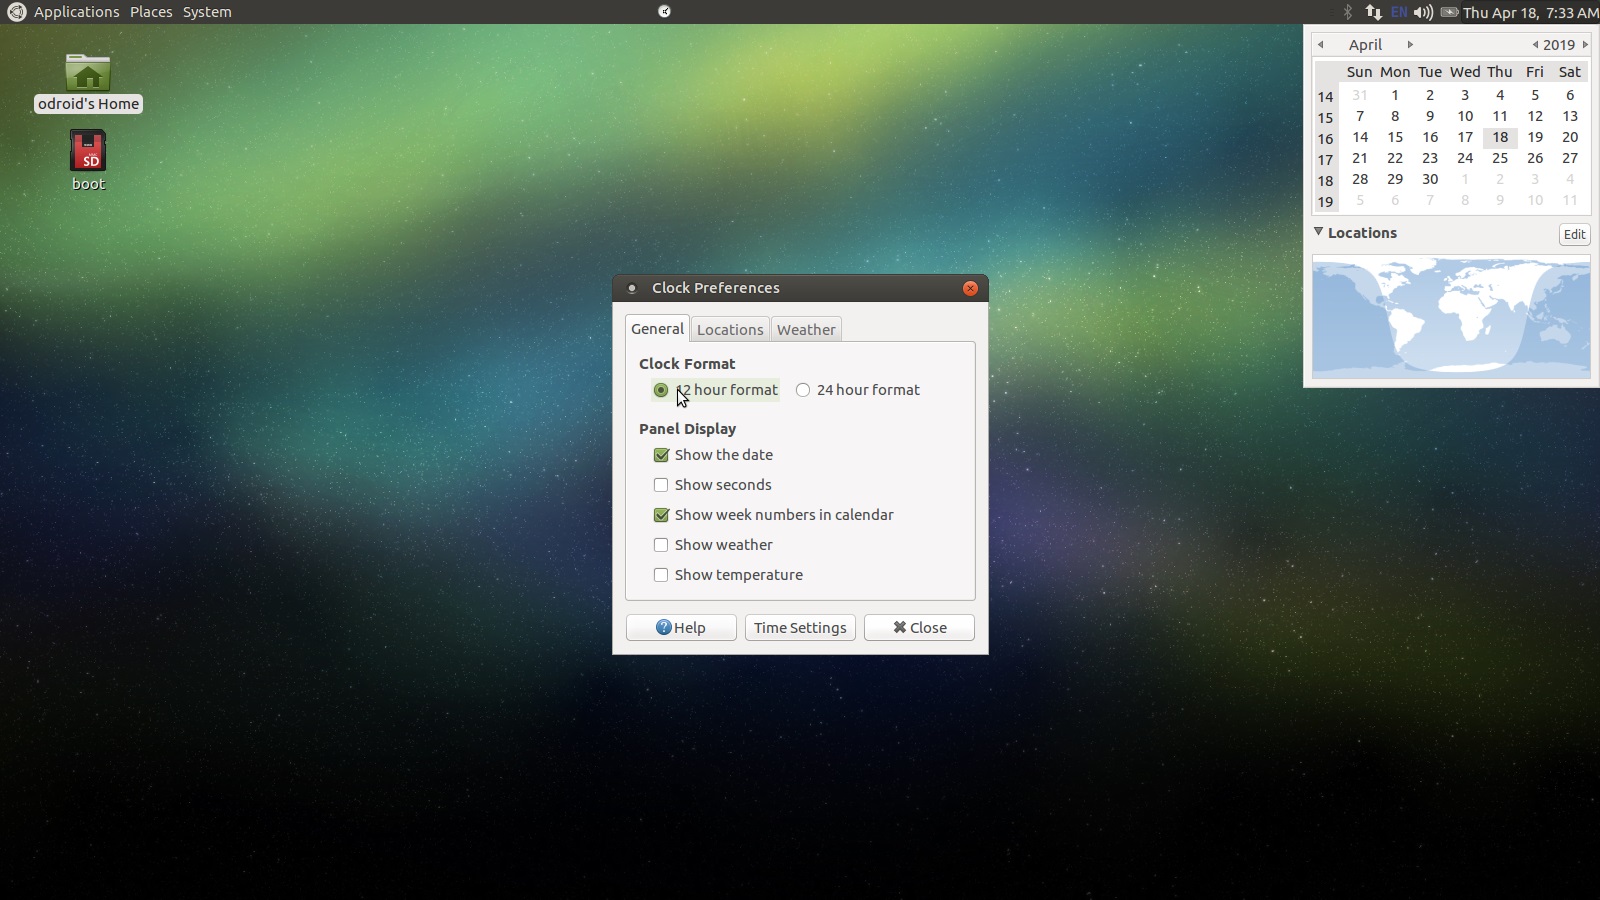
Next let's click on the Date and Time string in the top right corner. A calendar drop down should appear. Expand the Locations section and click the Edit button. Configure the General tab as depicted below or as you see fit.
Figure 4 - One possible configuration option
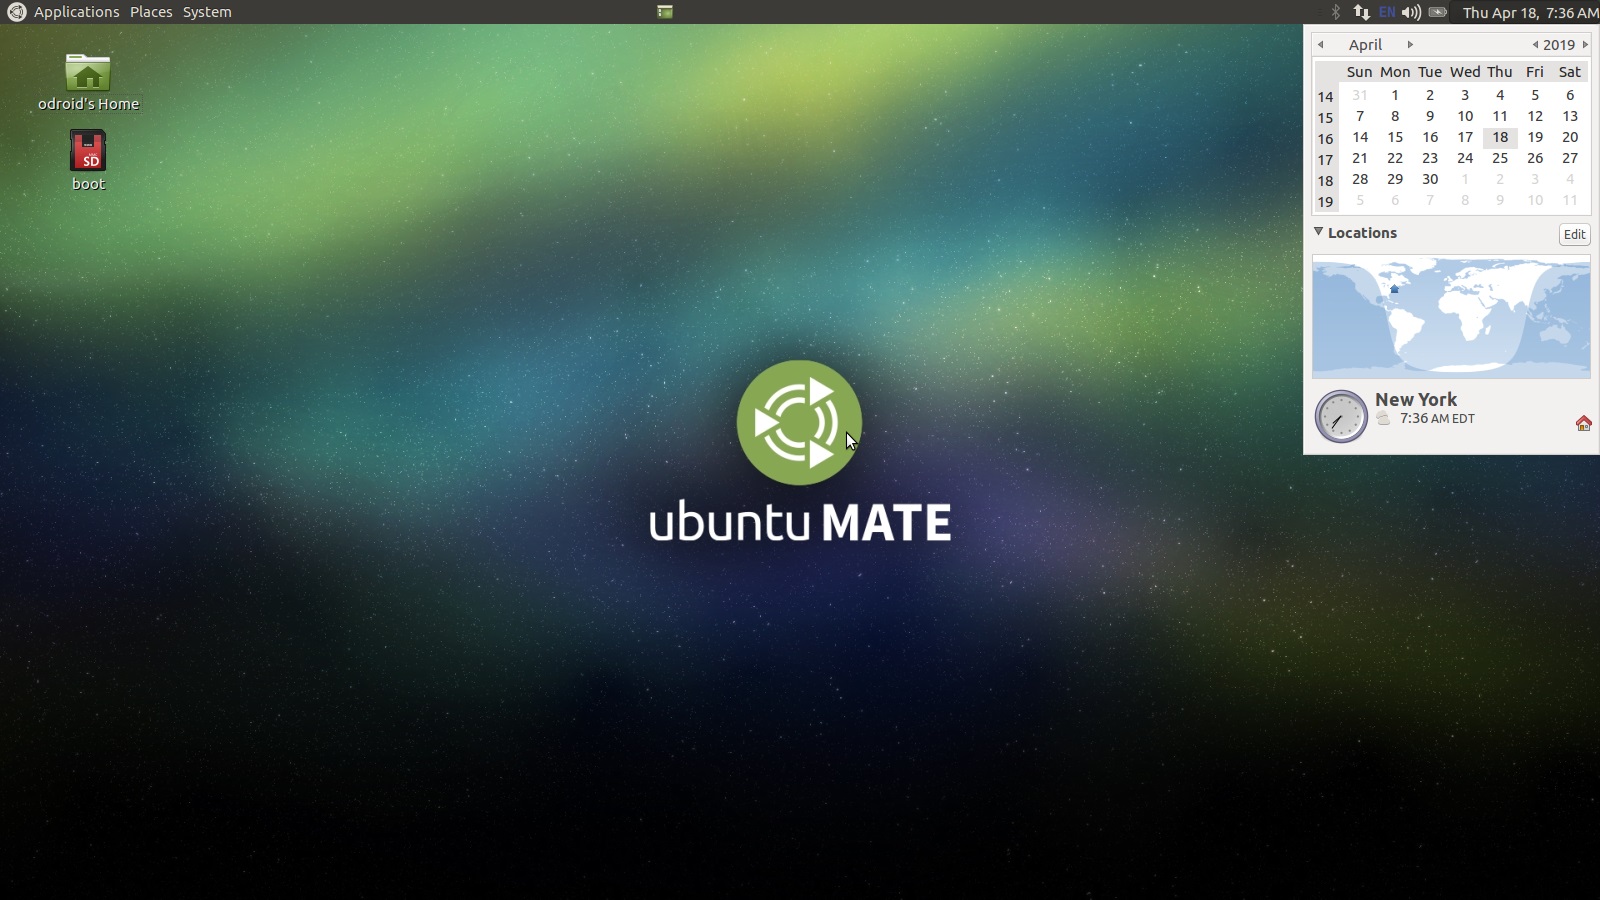
Let's add some location information so the time will be correct when we have an internet connection and sync with network time protocol (NTP). Click on the Locations tab then click the Add button.
Start typing the nearest major city into the Location Name text box. If that doesn't work, try another major city or the city representative of your time zone (e.g. mine is New York). Select a location from the list that pops up. Click Ok once you've found something suitable. Now you will see a location entry in the locations list as depicted below.
Figure 5 - Your location added to the locations list
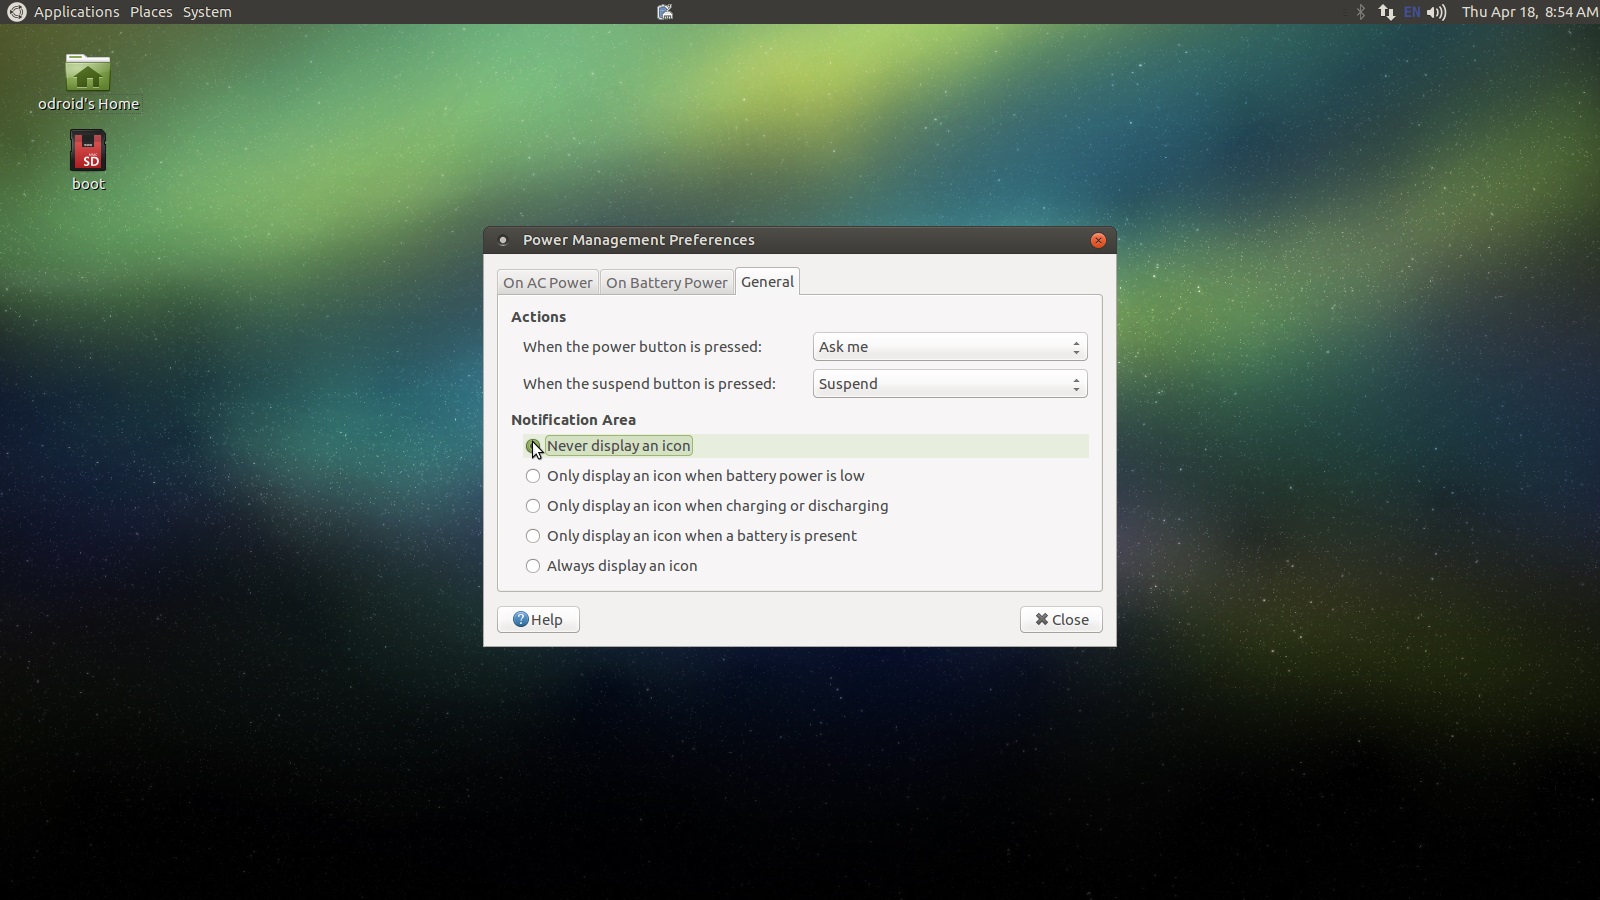
There are just a few more things left to do here. Right-click the battery icon in the top right tray. Select the Preferences option. Click on the General tab and toggle Never Display An Icon. If you have an EN or UK string in the system tray, right-click on it and select Preferences. On the General tab, uncheck Show Icon On System Tray. We won't really worry about switching the keyboard language. If you need this, you can turn both system tray icon back on by using the System -> Control Center menu option and clicking on Power Management and iBus Preferences respectively. The screenshots below show the forms we just discussed.
Figure 6 and 7 - Select your preferences
Figure 6 and 7 - Select your preferences
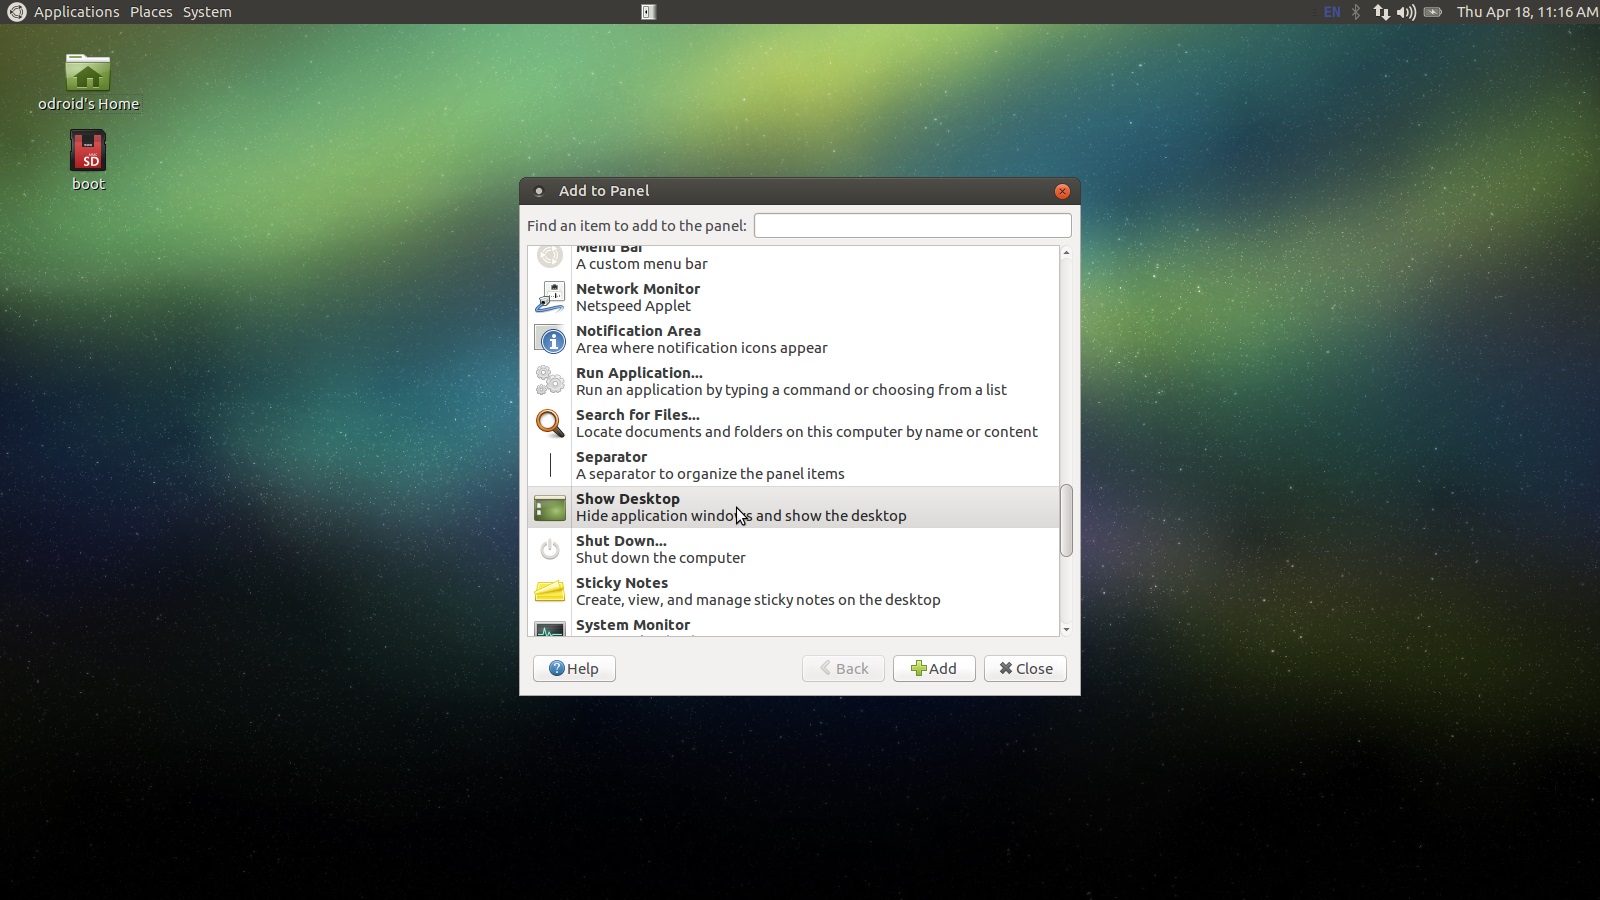
There are just two little things left in this section, then we'll be moving onto the custom control button and scripts! Move the mouse to the top panel and right-click. Select Add to Panel, then scroll down until you see the Show Desktop option as shown below. Do the same thing for the Trash option.
Figure 8 - Show desktop
Use the center mouse button, or the mouse wheel, to move the widget icons on the top panel. Let's drag these two new widgets a little closer to the System menu, and separate them a little bit. Now we're ready to start adding custom scripts. These scripts will automatically start RetroArch on boot, and start AntiMicro when RetroArch closes, returning mouse control to the gamepad. We'll also set up some magic with the custom control button.
Scripts and Custom Control Button
In this section, we're going to set up some custom scripts to control the software we installed and configured. This will bring the experience up from a Linux desktop experience to more of a game console experience. Download the script bundle for your device below and then copy and paste it into the install_zips folder you created in the second tutorial. It is located in the ODROID user's home directory.
Once you have downloaded and copied the zip file into the install_zips folder, right-click and select Extract Here. Eleven files should appear in a sub-directory. Open it and copy them all into the ODROID user's home directory. The ODROID user's home directory is the default location of the file browser. You can also access it from a link on the desktop, or from the left-hand side of the file browser where the folder shortcuts are listed.
Let's make sure these scripts have the correct permissions and can be executed. Open up a terminal, Applications -> System Tools -> MATE Terminal, and run the following commands.
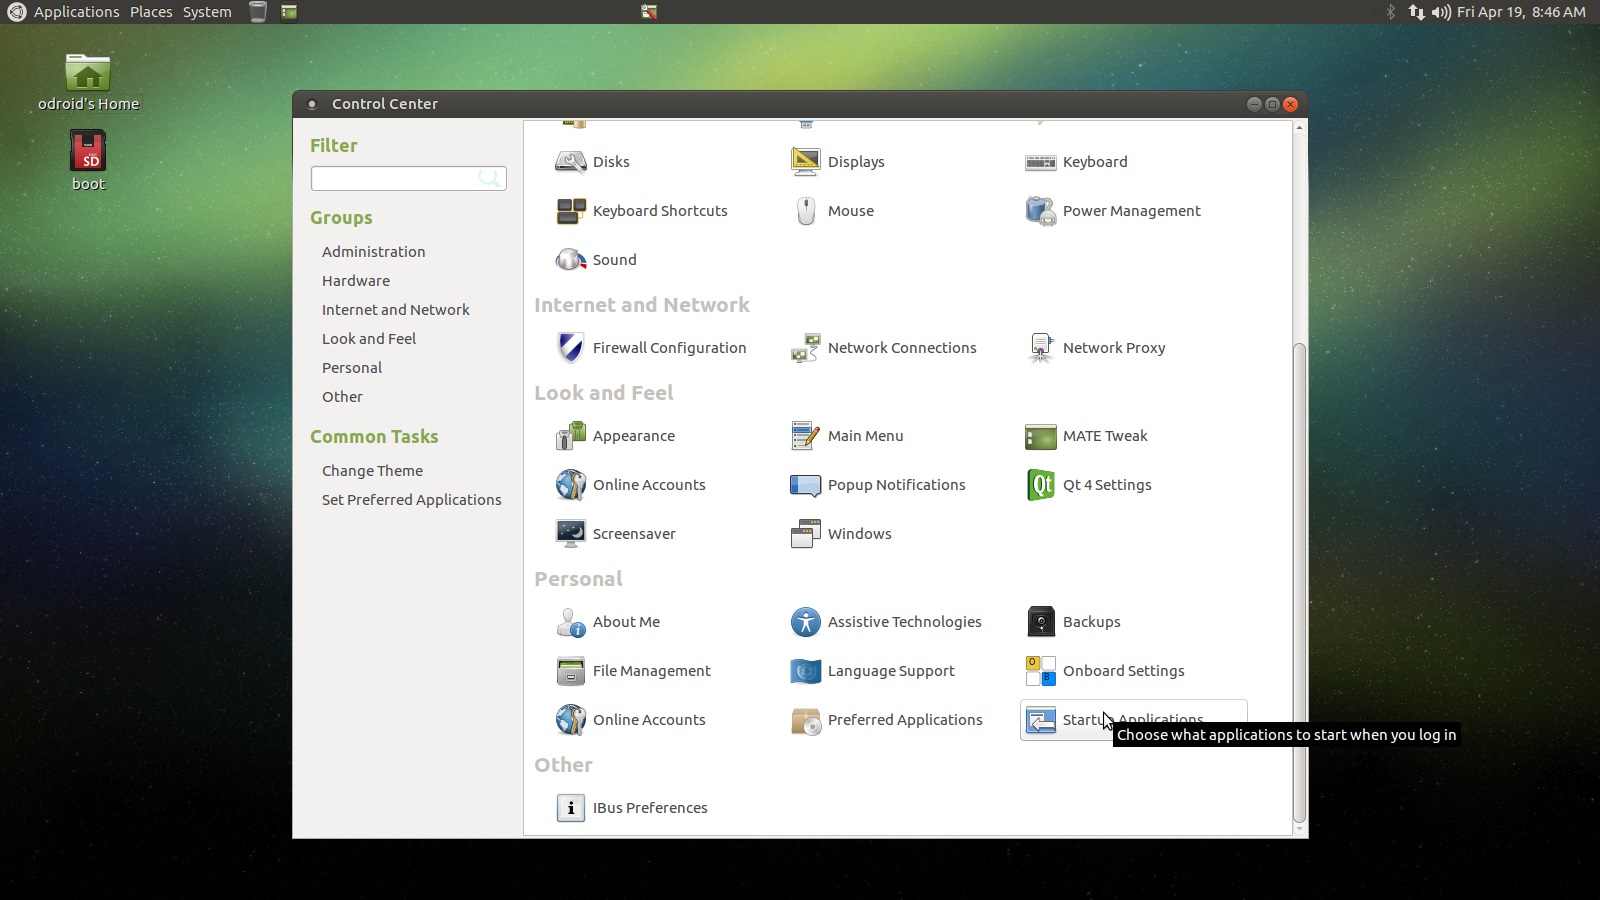
Now close the terminal and go to System -> Control Center in the menus. Find and select the Startup Applications option. You should see something similar to what's depicted below.
Figure 9 - System control center
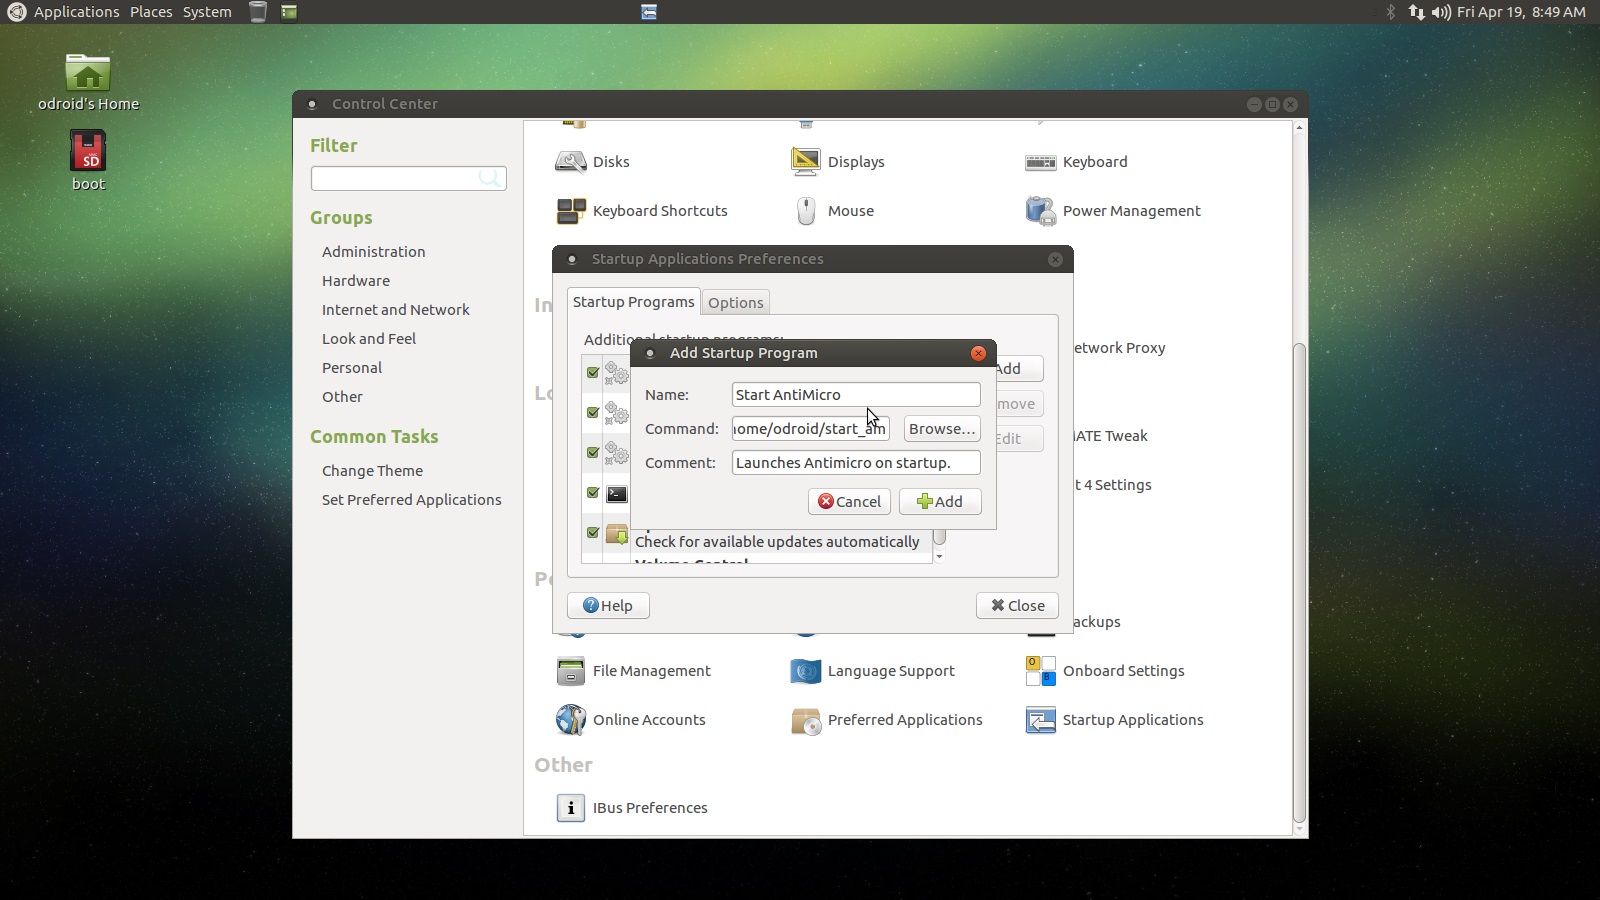
Click the Add button and fill out the form as depicted below. I'll put the exact text here also.
Name: Start RetroArch
Path: /home/odroid/start_ra
Description: Launches RetroArch on startup.
Now, we also want to start a special AntiMicro script. So let's do the same thing for that script, also shown below. Again I'll list the values used here.
Name: Start AntiMicro
Path: /home/odroid/start_am
Description: Launches AntiMicro on startup.
Figure 10 - Start RetroArch
Figure 11 - Start AntiMicro
Shutdown the device: System -> Shut Down. Use the hardware reset button to turn it back on. You should see RetroArch launch automatically. Now, if you close RetroArch and wait about 5 seconds, you should see AntiMicro popup into the system tray and restore gamepad control of the device.
Things are shaping up nicely now. Our beautiful ODROID is looking more and more like a great retro gaming console. Let's finally add custom control button support. Before we plug it into the system we should test it. Go to the terminal: Applications -> System Tools -> MATE Terminal and type sudo ./power_btn_test then hit enter. You may get a GPIO pin export error if you run it twice in a row. You can ignore this; the test will still work. You should see a series of 1's scroll across the terminal if you are using a C2, zero's for a C1+. Hold down the custom control button and see what happens. Make sure you don't hit the hardware reset button by accident or else you'll have to wait for a reboot. You should see something like what's depicted below.
Figure 12 - Power button test
For the C1+ the 0's and 1's are flipped, just the way I happened to set it up. The image above shows the C2 test. If you don't get the same results, turn off the device, separate your case -- remember, we decided not to close it -- and double check your jumper positions on the GPIO header. If it is working, then awesome! Try holding the button for different periods of time. It will print out to the terminal what script would run for that duration. Below is a listing of the functionality we'll setup.
Software Button Functions:
- 02 Second Hold: Software reset.
- 04 Second Hold: Software shutdown.
- 06 Second Hold: Turn off game kiosk mode.
- 08 Second Hold: Change to 1024x768x32bpp resolution and reboot.
- 10 Second Hold: Change to 720px32bpp resolution and reboot.
Now that we've tested the custom control button's functionality, let's add it to the system as a service. From time to time, depending on the SD card and a few other things, the device may act up. This software control button is really useful for forcing it to cleanly reboot in a safe and controlled way. Open up a terminal and run the following commands. These will register, start, and flag our service to start automatically on boot. Open up a terminal -- Applications -> System Tools -> MATE Terminal -- and run the following commands. Resist the urge to test the 6, 8, and 10 second functions. We don't want to mess with boot.ini just yet.
If you ever need to stop the service you can use this command, but don't run it now.
$ sudo systemctl stop pwrbuttonsvc
Are you ready? Hold the custom control button for 4 seconds and a tiny bit extra. You can practice on the test script we ran above. The system should shut down really fast and, if you counted correctly, it shouldn't boot up. If you held it for 2 seconds less, it would have done the same thing but then come back up from the reboot.
Finalizing MATE... Really This Time
I hope you're really enjoying everything so far. It's really very cool to finally connect the button and make that literally part of the operating system. We have a little bit more work to do with MATE but it'll go by quickly, I promise. Right-click the top panel and select Add to Panel, then scroll down through the list of options until you find the Shut Down entry. Click Add and use the middle mouse button or mouse wheel to grab the new widget and position it so that it is about an inch or so away from the open programs widget. By keeping all the controls in a tight group, we greatly enhance the user experience when controlling things with the gamepad.
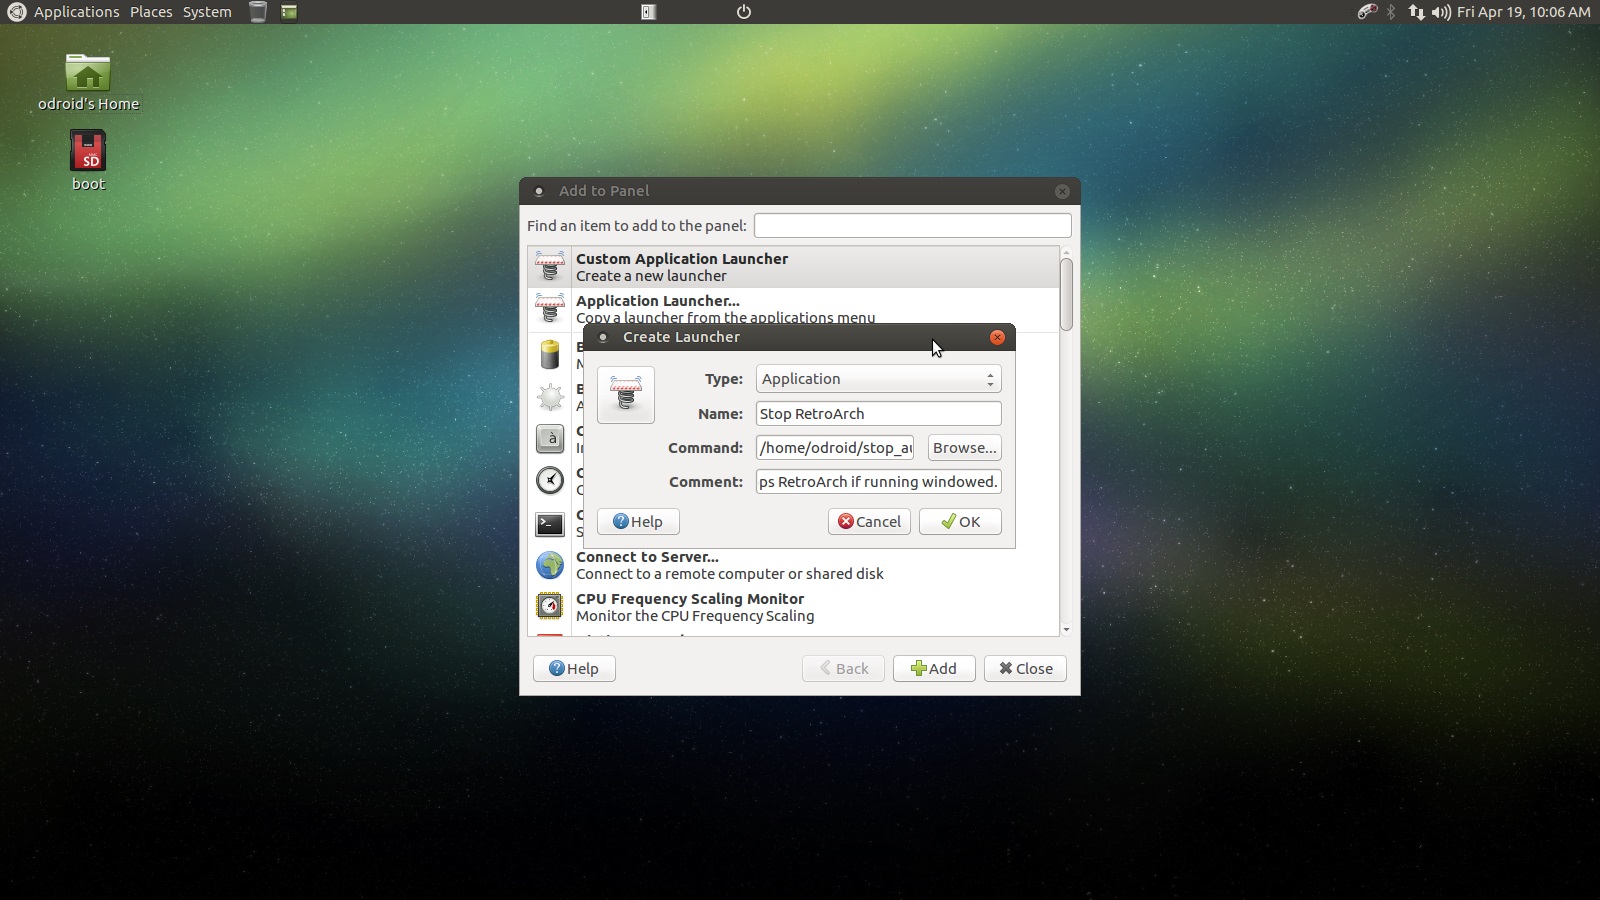
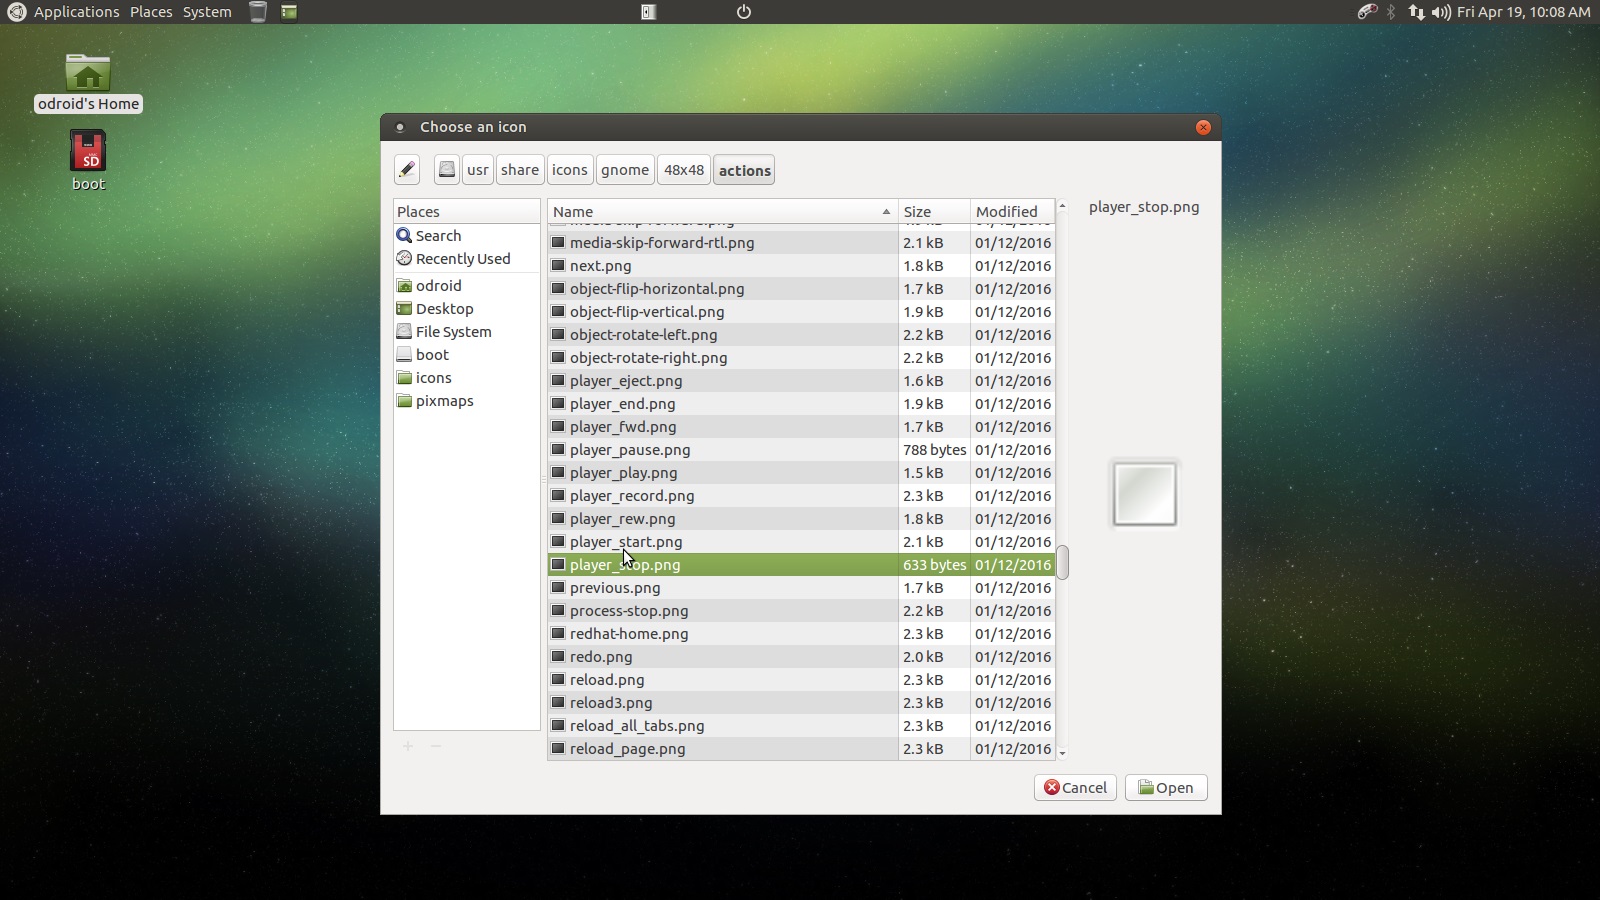
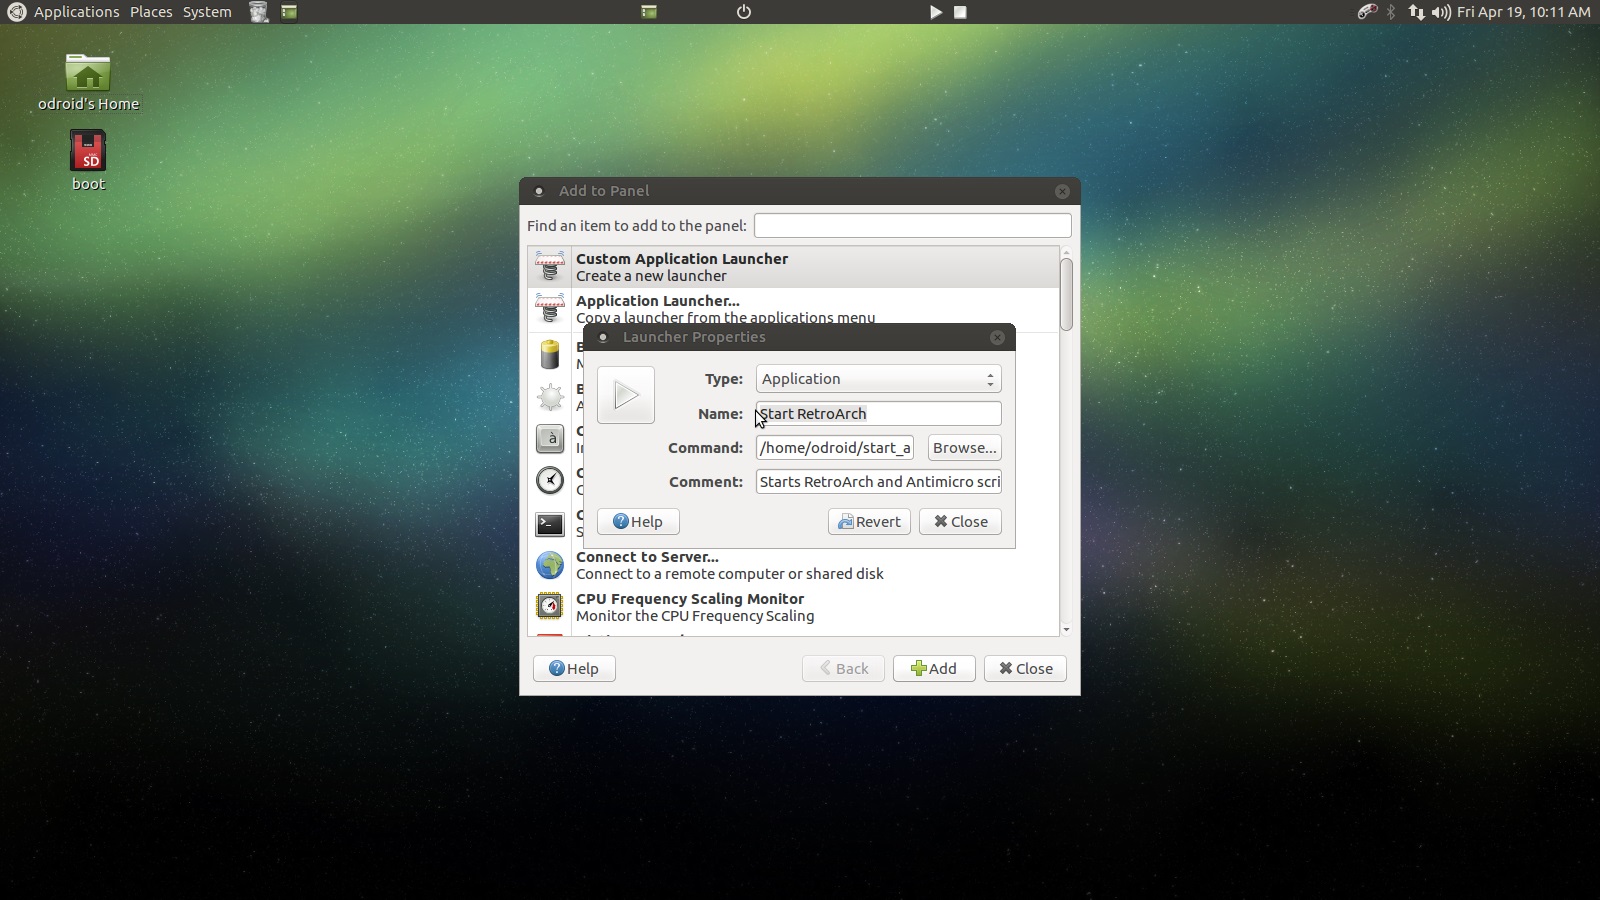
Next, we're going to add two custom buttons to the top panel. Right-click the panel and select Add to Panel. Choose the very first option, Custom Application Launcher. We'll add the stop button first and then the play button. The form field values are listed below. Use the screen shots to navigate to the proper icon. You can see the path in the screen capture near the top of the window.
Stop Button Values:
Type: Application
Name: Stop RetroArch
Command: /home/odroid/stop_auto
Comment: Stops RetroArch if running windowed. (Really just stops RetroArch and resets AntiMicro)
The screenshots below depict this step. Use them to help with finding the right icon if need be.
Figure 13, 14, and 15 - Setting up custom applications
Let's test the new controls. Close RetroArch and any other open window. Click on the play button and you should see RetroArch pop up. Click the stop button and RetroArch will close. Wait about 5 seconds, and you should see AntiMicro in the system tray giving us back full gamepad control.
Wow, this is really cool. We've completely customized our ODROID-GO hardware and software to create a retro gaming console with RetroArch kiosk mode and full Linux environment, if needed. The next thing we'll do is make RetroArch run in fullscreen mode and adjust a few video settings. I won't go into advanced configuration here. This tutorial is about as long as I like to make them, so I'll push advanced RetroArch and emulator errata to a small follow up tutorial.
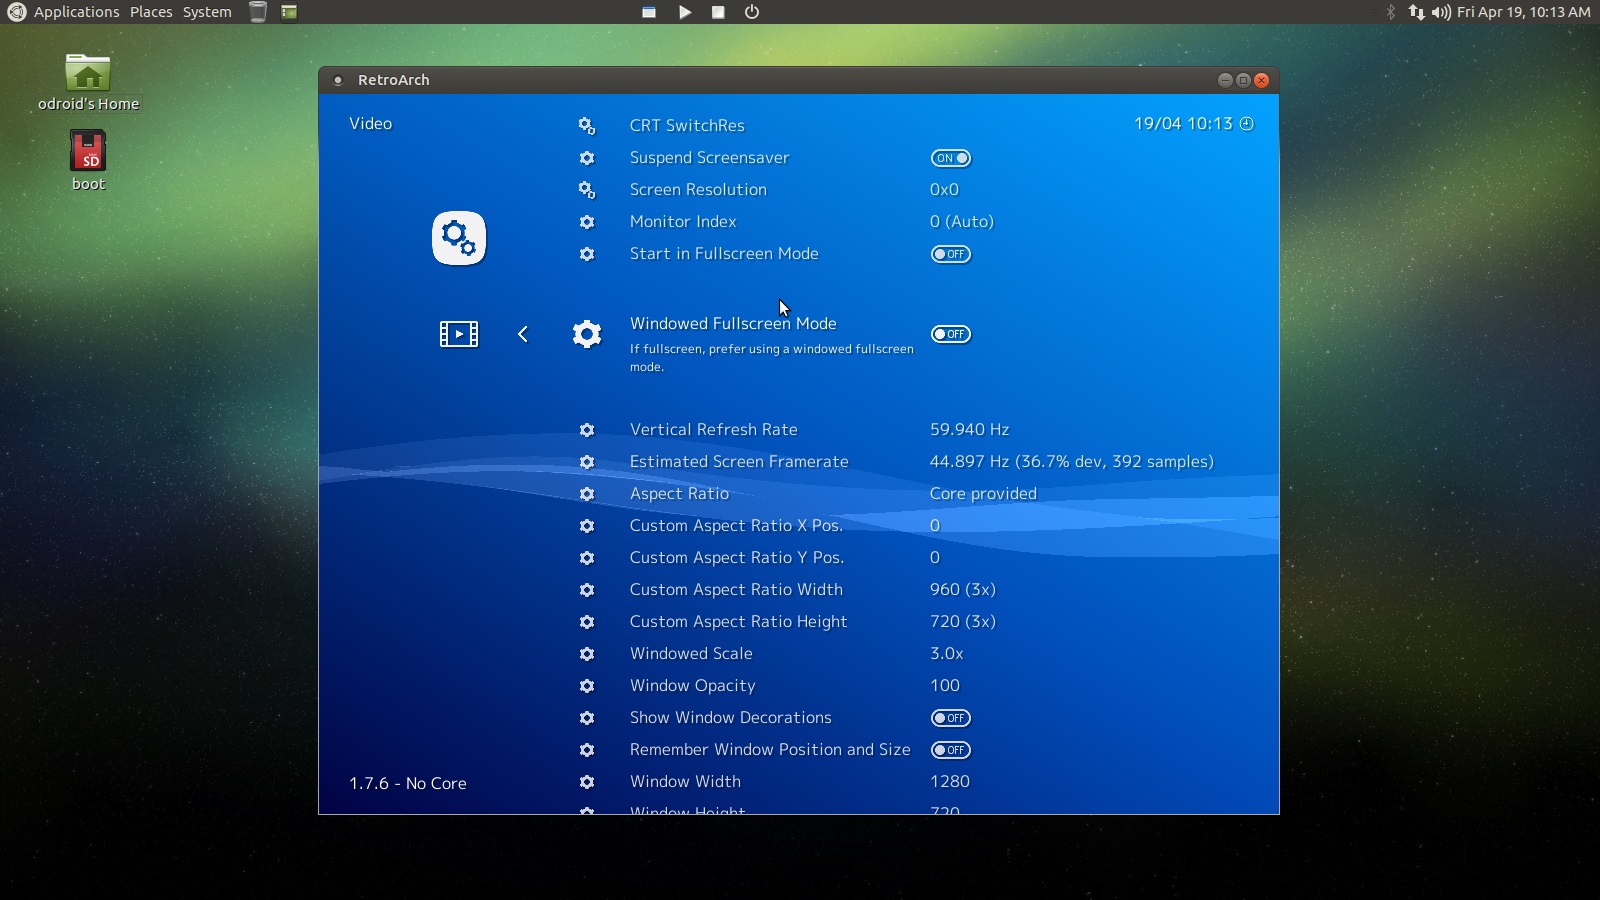
Start RetroArch, and you can use the little widget you just made! Scroll right to the Drivers section find the Video entry.
Figure 16 - Scroll right to the Drivers section find the Video entry
Apply the following settings listed below in the order they have been listed. The application may close and re-open for some of the settings you change; that is normal.
Windowed Fullscreen Mode: Off
Show Window Decorations: Off
Threaded Video: On
Bilinear Filtering: Off
Start in Fullscreen Mode: On
Use the ESC button to close RetroArch when it is in fullscreen mode or use the keyboard/mouse to navigate to the Main Menu section and select Quit RetroArch.
Hold your custom control button down for 2 seconds plus a tiny bit more and the system will reboot. When it comes back up, you should see a full RetroArch screen as depicted below. Scroll over to your ROMs with the gamepad and fire one up. Game on!
Figure 17 - Full RetroArch Screen
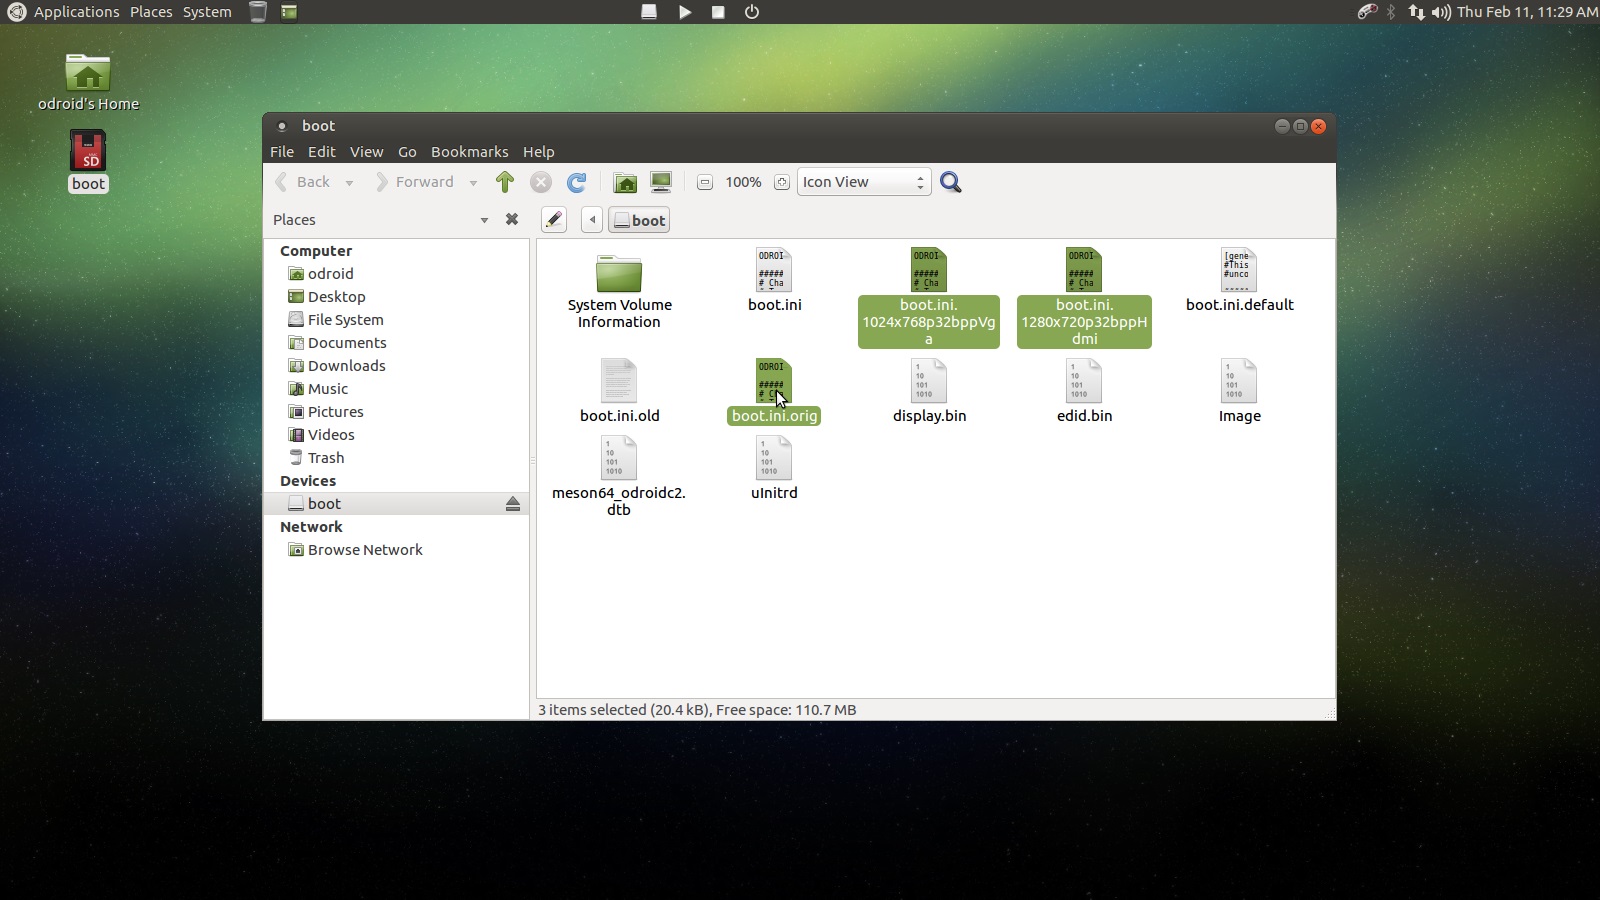
Updating boot.ini
For this section, the first thing we'll do is make a backup of the boot.ini file. Open the boot icon on the desktop and copy boot.ini to boot.ini.orig. We're also going to make two more copies: one you'll name boot.ini.1024x768p32bppVga, and one you'll name boot.ini.1280x720p32bppHdmi. We'll get to editing them in just a bit. You should have something similar to what's depicted below.
Figure 18 - Copy boot.ini to boot.ini.orig
In my experience, these video settings work really well. The VGA resolution of 1024x768 is supported on most, if not all, recent computer screens, and the resolution of 720p is supported on most, if not all, recent TVs. While the ODROID-C2 has noticeably more power, we really don't need more than 720p to display 8bit and 16bit games. Of course, you can make your own choices here as you see fit. The idea is if we plug our device into a TV, we can hold the custom control button for the proper amount of time and the device will reboot with the proper, memory efficient, HDMI resolution. If we bring the device with us to work and we want to play some awesome games at lunch we can hold the custom control button for the proper amount of time and the device will reboot with the proper VGA resolution.
Let's boot up our ODROID device and close RetroArch by hitting escape on the keyboard or navigating to the exit option using the controller. Open up a terminal, Applications -> System Tools -> MATE Terminal, and type the following command.
$ nano power_btn
Scroll down to the bottom of the file and edit the text such that it matches the image depicted below. Once you've adjusted the file hit Ctrl+O to write the file, and Ctrl+X to close the nano. I'll post the text we're focusing on below.
Note that the C1+ will be slightly different than the text above. It uses [ $GPIO_VALUE -eq 0 ] comparisons, but we're really only interested in the file copy commands and commented out commands. Keep in mind that you shouldn't be changing anything else. Next, run the following command in the terminal to activate the script.
$ sudo cp ./power_btn /usr/bin/power_btn_test
Once that is done we'll adjust the copied boot.ini file you made to reflect the proper output and resolution.
Essentially, we copy over the boot.ini file with a pre-configured version that is set to a certain screen resolution, then we reboot the device. I'll cover the changes we need to make to each file for the C1+ and the C2, but I'll also provide a download for them to make things a bit easier. We'll cover the C2 first.
Open a terminal and type in the following commands. We'll do the 1024x768 VGA mode first.
$ cd /media/boot/
$ nano boot.ini.1024x768p32bppVga
We want to set the video output to be 1024x768 VGA. Comment out the lines listed below. Make sure there are no uncommented video output modes except the one we want.
Make sure the lines below are uncommented. If you make a mistake, just restore the boot.ini.orig copy you made earlier. Any Windows or Mac computer will see the boot partition of your ODROID's SD card because it is a Fat32 partition. You can use that to fix your boot.ini if the device isn't booting up properly.
$ setenv m "1024x768p60hz"
$ setenv vout "vga"
Next we'll do the 720p HDMI mode. Open up a terminal and type the following commands:
$ cd /media/boot/
$ nano boot.ini.1280x720p32bppHdmi
We want to set the video output to 720p HDMI. Comment out the lines listed below. Make sure there are no uncommented video output modes except the one we want.
ALERT: Many computer screens don't support 720p. If that is the case, you'll likely end up booting into a blank screen. Just wait a minute or two then use the custom control button to change the video mode to 1024x768. It takes a little getting used to, but once you get the hang of it you can switch modes fairly easily. Below is a screenshot of a Monku Retro 2 (ODROID-C2) running in VGA mode on a computer screen after closing RetroArch.
Figure 19 - Monku R1 Build 36
And here is the R2 running in 720p on a TV.
Figure 20 - The R2 running in 720p on a TV
Like any good TV cooking show we have an already prepared dish to show you. For the C1+ use the guidelines above along with the files provided below. The process is similar, the files provided indicate the changes you need to make. Or you could just copy and paste them into your /media/boot directory, it's really up to you.
Closing up the case is pretty simple, but I'll go over it anyway. It's not fun to finish everything, close the case and tighten the outside screws before you remember to put in the inside screws, trust me. First thing you'll want to do is organize your jumpers. They can get a bit crazy so I usually curl and twist them up.
I highly recommend cutting out the SD card door because it gives you so much benefit as far as easily being able to swap in and out SD cards etc. I used a razor blade to scour all the little plastic tabs holding it on. Two close to the edge of the case are easy and safe to cut into with a bit of pressure. After a little while you'll cut through the two tabs near the edge of the case first. Then bend the door up to twist off the remaining tabs. Tip: Weaken the tabs as much as you can by scratching at them with a razor.
Mount the board in the case and place and tighten the two screws on the one side of the case. The remaining screws are inserted from the outside of the closed case. Before you close the case try to see if it goes together easily. You may have to adjust some jumpers to get it to do this. Snap the case together, place and tighten the outside screws, and you're all set.
Figure 21 - The final product
I hope you had fun going through this process to build your own retro gaming console from the ground up. I know I did. I'll have more to say in a follow-up tutorial that touches on some advanced topics regarding RetroArch and emulator configuration. Until then, game on!
ODROID-N2 Composite Video Connection: Use Your Legacy Monitor With Hardkernel’s Most Powerful Computer
September 1, 2019By DongJin KimODROID-N2, Tinkering
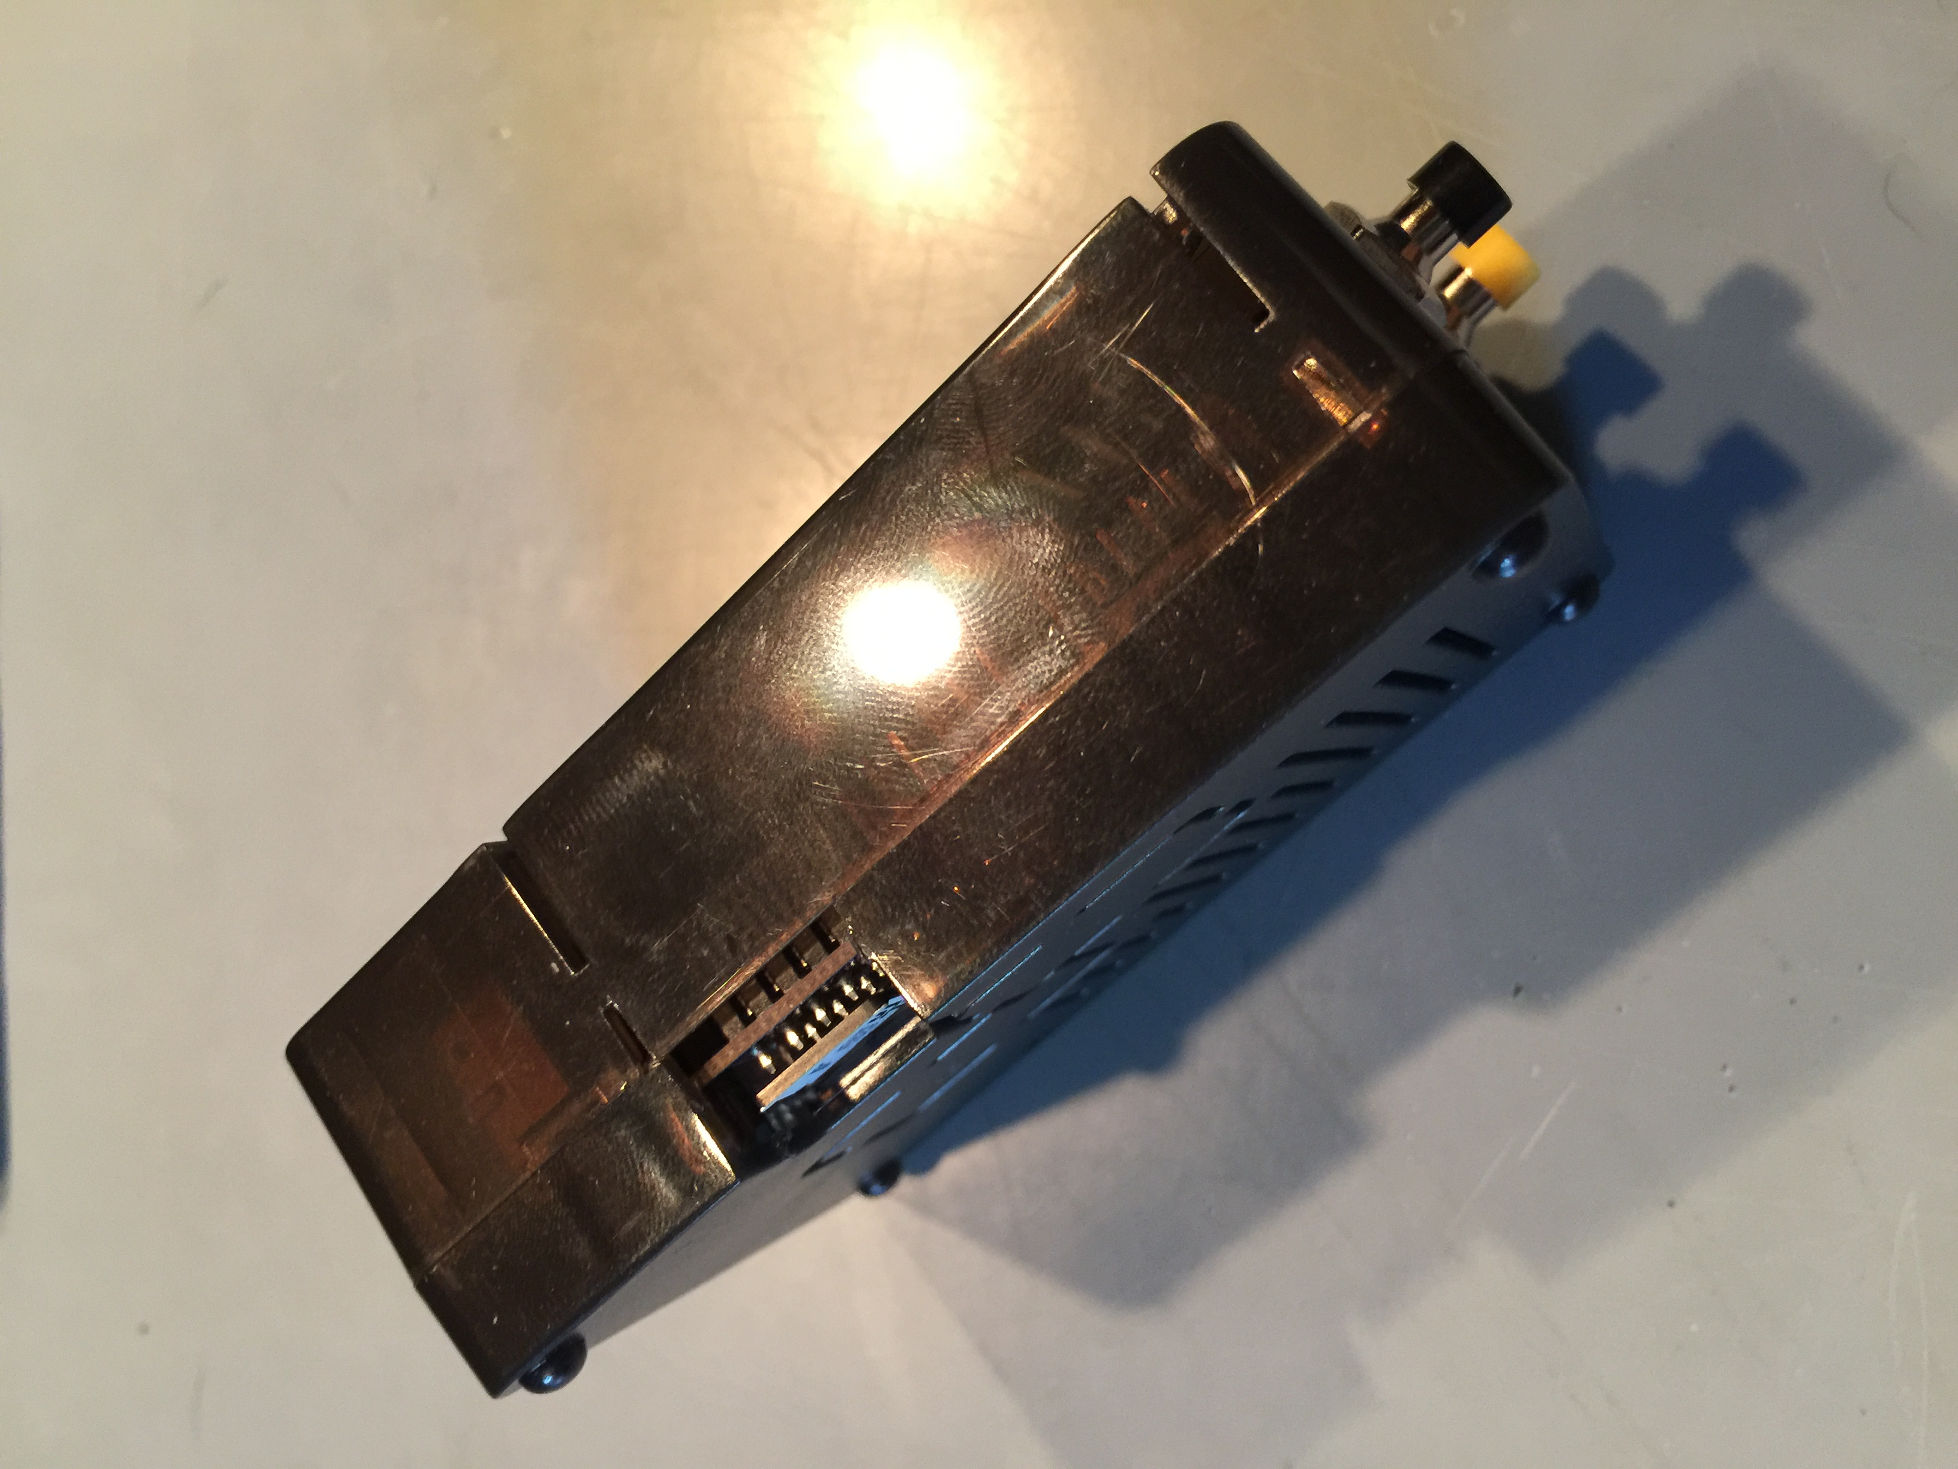
Composite video is an analog video transmission that was popular before the age of digital television, with supported resolutions of 480i and 576i. The ODROID-N2 supports this video feature, and is designed to connect with a TV through its audio jack.
Figure 1 - Composite video cable connected to the ODROID-N2
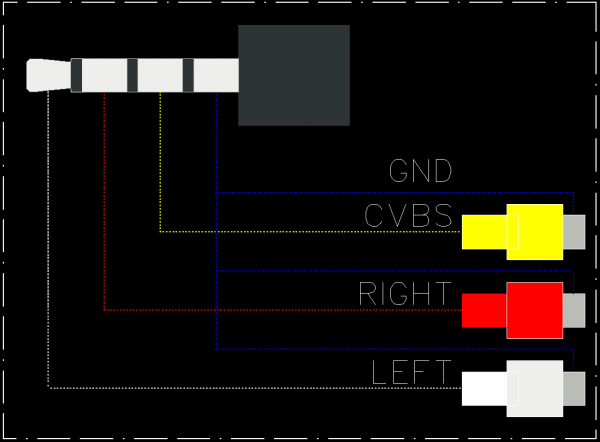
Figure 2 - Schematic of composite video cable connection
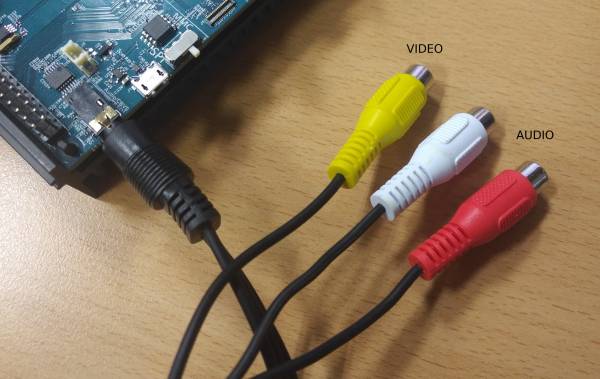
Figure 3 - TV connection with RCA male-to-male cables
Figure 4 - Composite video with a legacy monitor lets you enjoy retro gaming as it was originally intended
Software configuration
In order to select CVBS as a display output rather than HDMI, the Linux kernel command line must be configured properly and HDMI cable must not be attached. The CVBS picture format can be set in the boot.ini file:
# NTSC
setenv cvbsmode "480cvbs"
# PAL
#setenv cvbsmode "576cvbs"

setenv bootargs "${bootargs} cvbsmode=${cvbsmode} cvbscable=${cvbscable}"

For example, if the TV supports 480CVBS picture format and its cable is connected, the Linux kernel command line would look like this:

$ cat /proc/cmdline
console=ttyS0,115200n8 ... cvbsmode=480cvbs cvbscable=1 ...
Overscan (Android)
The Android operating system supports a zoom in/out method in order to manage the overscan. You can adjust it via the ODROID Settings Android app, or by directly editing the boot.ini file. The zoom rate value is between from 80% and 100%:
# Display Zoom Rate
setenv zoom_rate "100"

# Shrink the picture as 10%
setenv overscan=10

setenv bootargs "${bootargs} overscan=${overscan}"
The G Spot: Your Goto Destination for all Things That are Android Gaming
September 1, 2019By Dave ProchnowAndroid, Gaming, ODROID-N2, ODROID-XU4
The biggest game news for August has to be the July 29 release of Gigantic X for Android. As you’ll recall, this top-down sci-fi shooter was promised for release several months ago. Well, the wait is over. This is a great summertime treat for all shooter fans.
Figure 1 - A summer blockbuster–Gigantic X
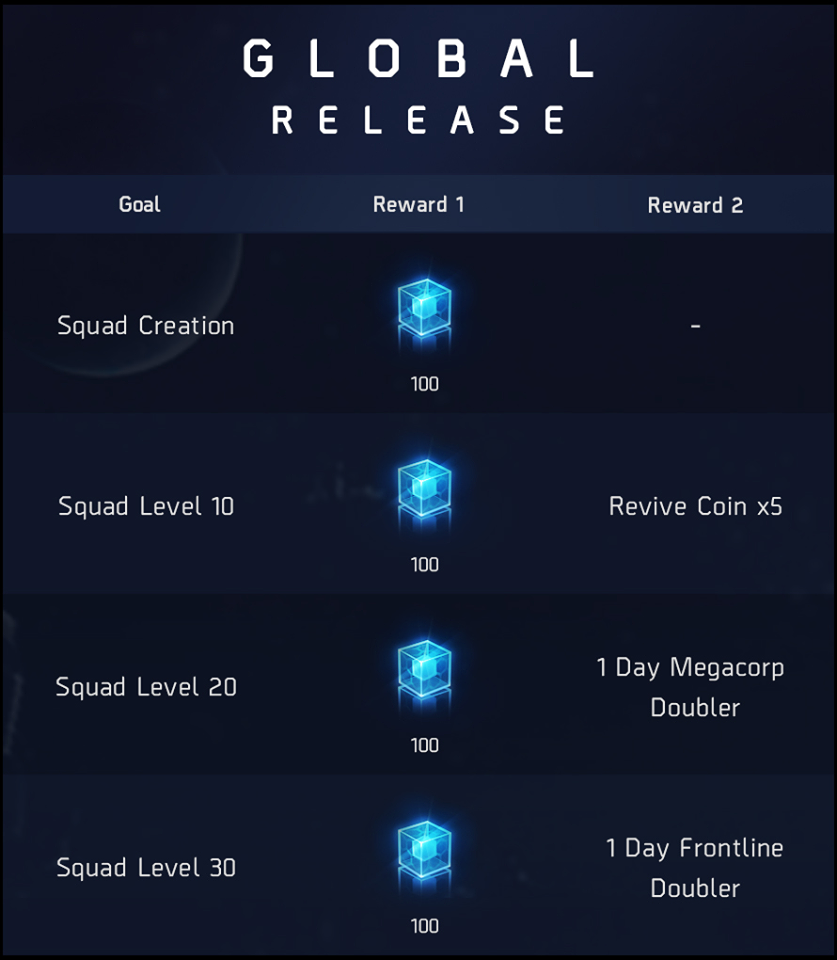
During gameplay, you’ll battle alien parasites throughout the galaxy while searching for all of the loot that you can unlock for upgrading your weapons. As a special bonus, there is a cooperative player mode which enables you to get your friends to help you purge all of these pesky parasites. As an added bonus, the developers have added a series of special launch-day rewards that players can win. So gear up at Google Play.
Figure 2 - Some of the special launch-day rewards that you can win. Image courtesy of Action Square
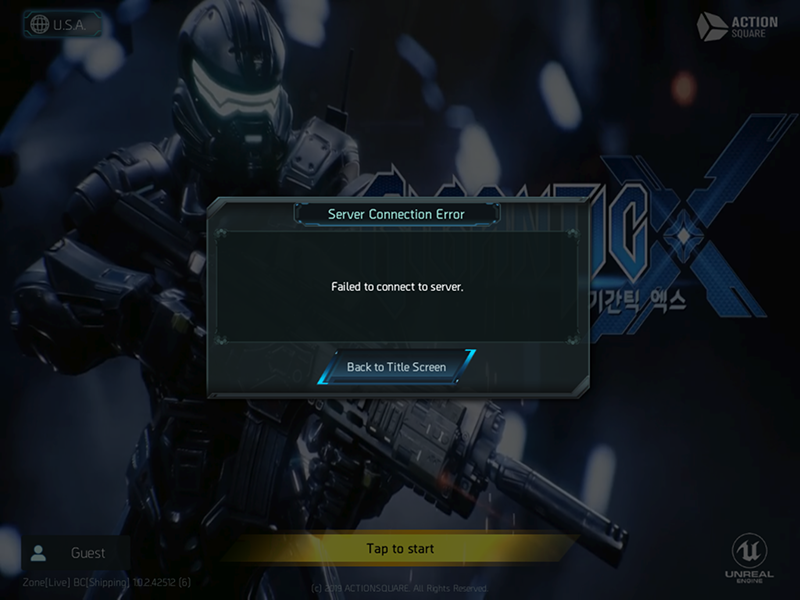
Be aware that if you want to play Gigantic X on an Android tablet without a WiFi connection, you’ll be disappointed unless you can jack into the net during game play. Unfortunately, the game’s developer, Action Square, requires the download/installation of an 40-100MB app patch prior to starting the game–every time! Arrgh! Why, Action Square, why?
Figure 3 - No server connection–no game play!
https://www.facebook.com/GiganticX/
Free Africa!
OK, so shoot-em-ups aren’t your bag. Well, if an addictive strategy premise is more your game style, then you’ll absolutely love what developer Łukasz Jakowski has done with Age of Civilizations: Africa.
This time-honored, turn-based strategy game still has the same game goal: total continental domination of Africa. In your attempt to conquer Africa, you must cope with 235 civilizations coupled with 436 provinces that are all wrapped up inside five game scenarios. The terrific twist for this summer is that Age of Civilizations: Africa is now FREE! Okay, so this title has been a free download for several months, but what better way to battle the summer heat than sitting in the air conditioning, trying to conquer one of the world’s hottest continents?
Figure 4 - There’s a lot of real estate to grab in this game
Save $5
Another popular game dev that is giving you a treat to beat the heat is Light Wave Games, the same crew that brought you Strike Team Hydra, with their title Demon’s Rise 2. This formerly $5.99 Android app is now on sale for just $0.99. Before you plunk down your USD, remember that this is a game with a twist. And that twist is that in this role-playing game you are a commander for the dark forces of beasts, barbarians, and of course, demons. Your talent at wielding hellfire will help you to scorch all of the civilized worlds that populate this game. No more Mister Nice Guy, indeed.
Cool Games for a Hot Summer
Majotori (Now FREE)
Venus Eleven
Traitors Empire Card
DOOM & DOOM II (Now $4.99 each on Google Play.)
ODROID-N2 Review
September 1, 2019By Carlos Eduardo de Paula (carlosedp.com)ODROID-N2
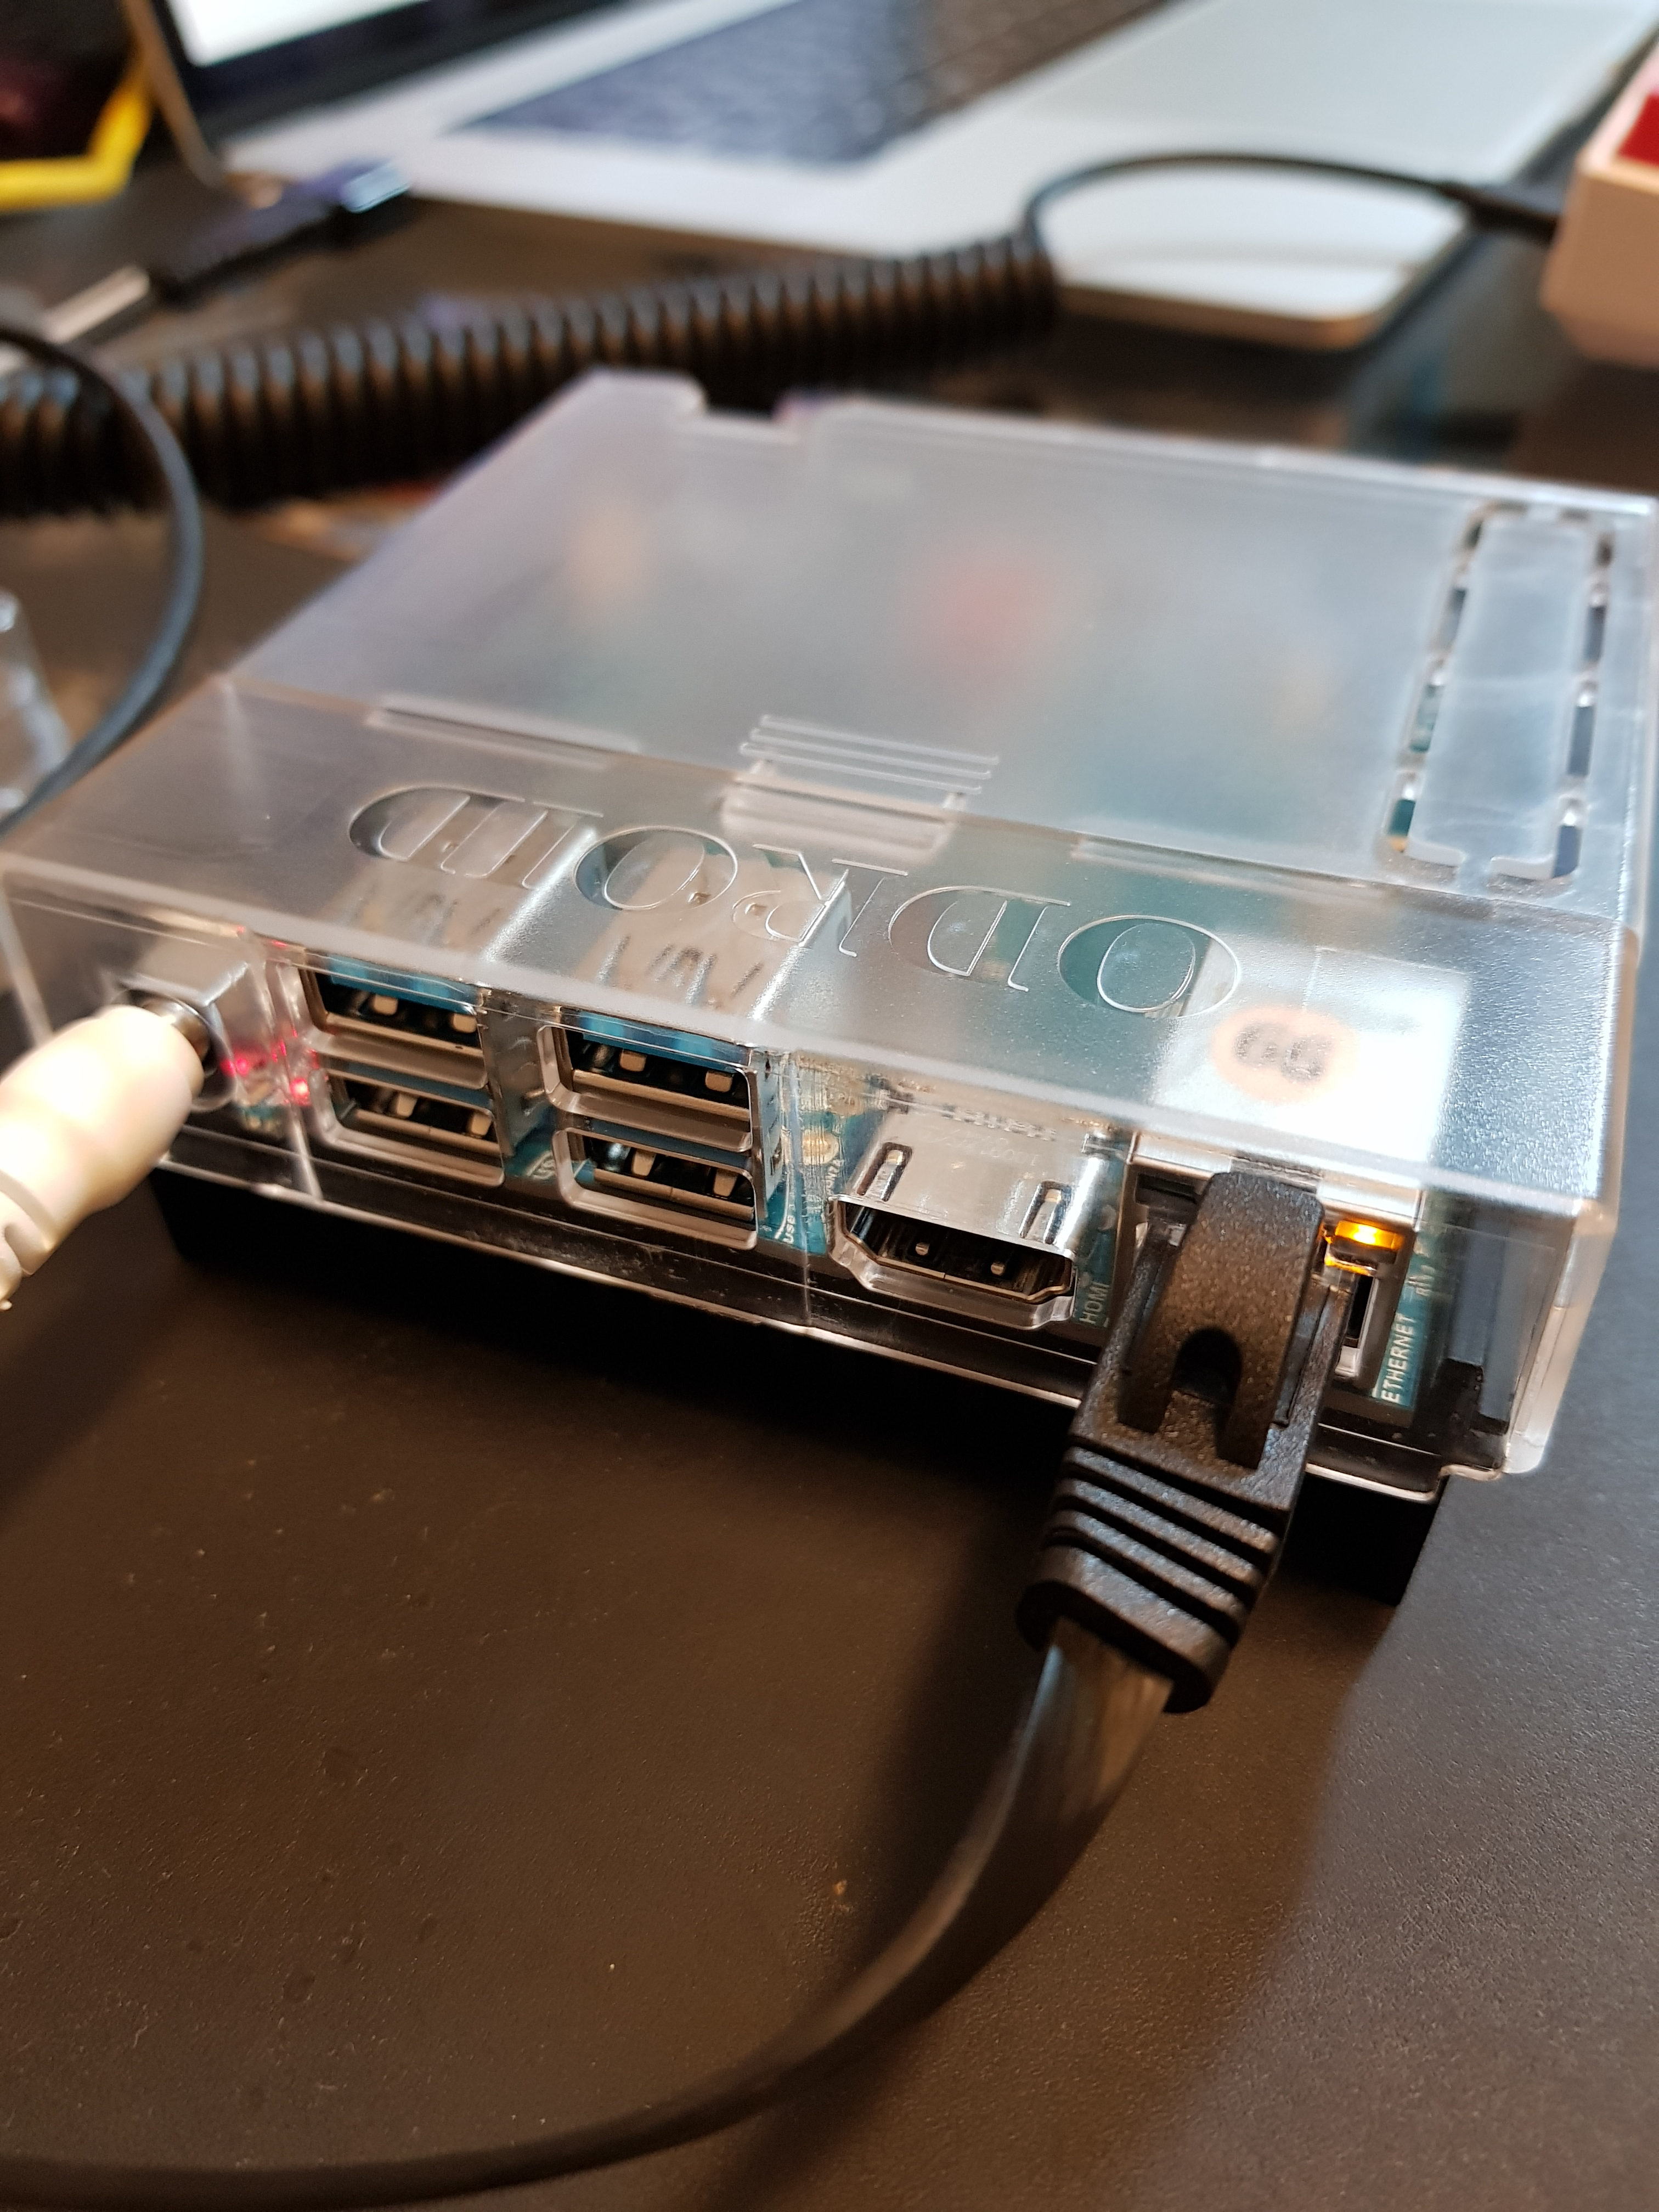
I recently received an ODROID-N2 SBC from Hardkernel, which is a new board replacing the previous ODROID-N1, which was cancelled. I purchased the ODROID-N2 board, power supply, a clear case, WiFi USB adapter and a 32GB eMMC card, since the eMMC is much faster than SD cards.
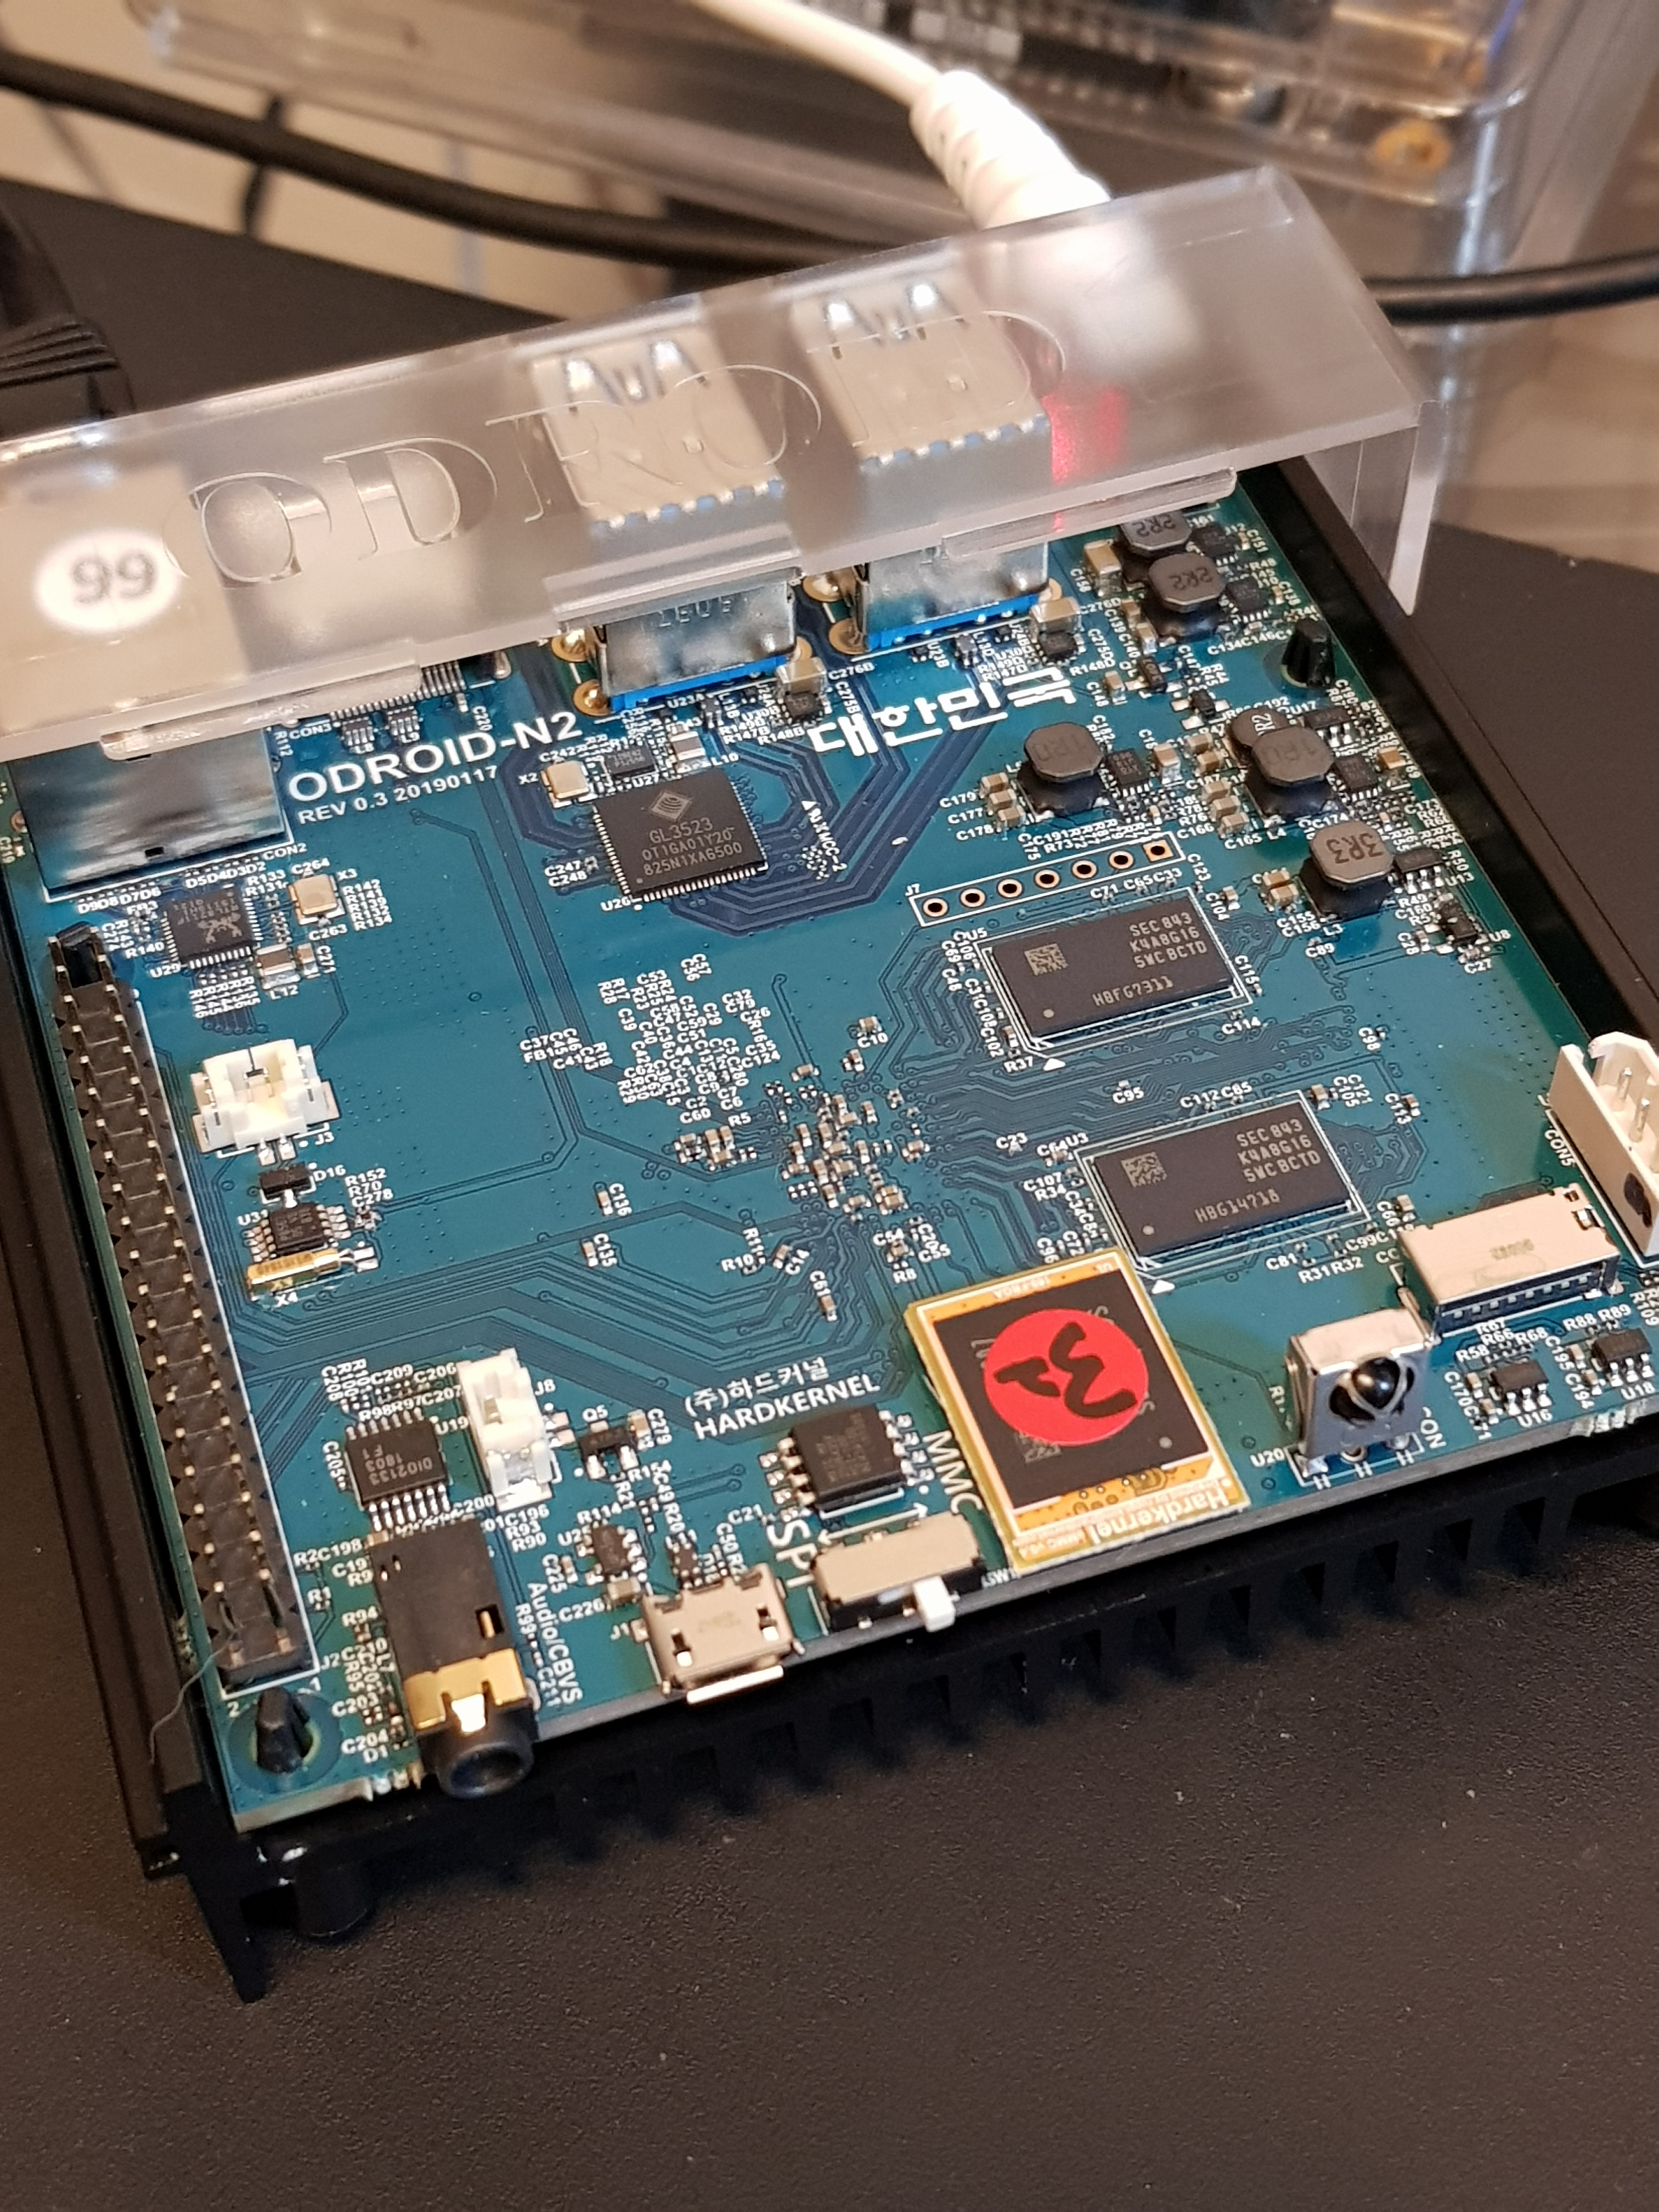
Figure 01 - The ODROID-N2
Figure 02
The nice thing about the ODROID-N2 is that is uses a different SOC, an Amlogic S922X, giving a new perspective compared to most RK3399 top-end boards we see these days.
Some board specs:
Hexa-core Amlogic S922X CPU with quad ARM Cortex-A73 and dual Cortex-A53 cores
4GB DDR4 RAM
1Gbps Ethernet
4 USB 3.0 ports (USB 3.0 hub behind a single USB 3.0 port from the SOC)
More details about the specifications can be found at https://www.hardkernel.com/shop/odroid-n2-with-4gbyte-ram/. My tests are always focused on server and console workloads. There are lots of benchmarks on Youtube and other blogs running games on either the Android or Linux desktops.
Now with the latest features from Docker, where you can build ARM images as easy as for x86 (as I wrote here https://bit.ly/321J80b), there are almost no drawbacks to use an ARM SBC for your server needs. I hope Hardkernel and Amlogic send the patches upstream to support this board. You will need to use Hardkernel’s own Kernel tree at https://github.com/hardkernel/linux. More details on their wiki at https://wiki.odroid.com/odroid-n2/odroid-n2.
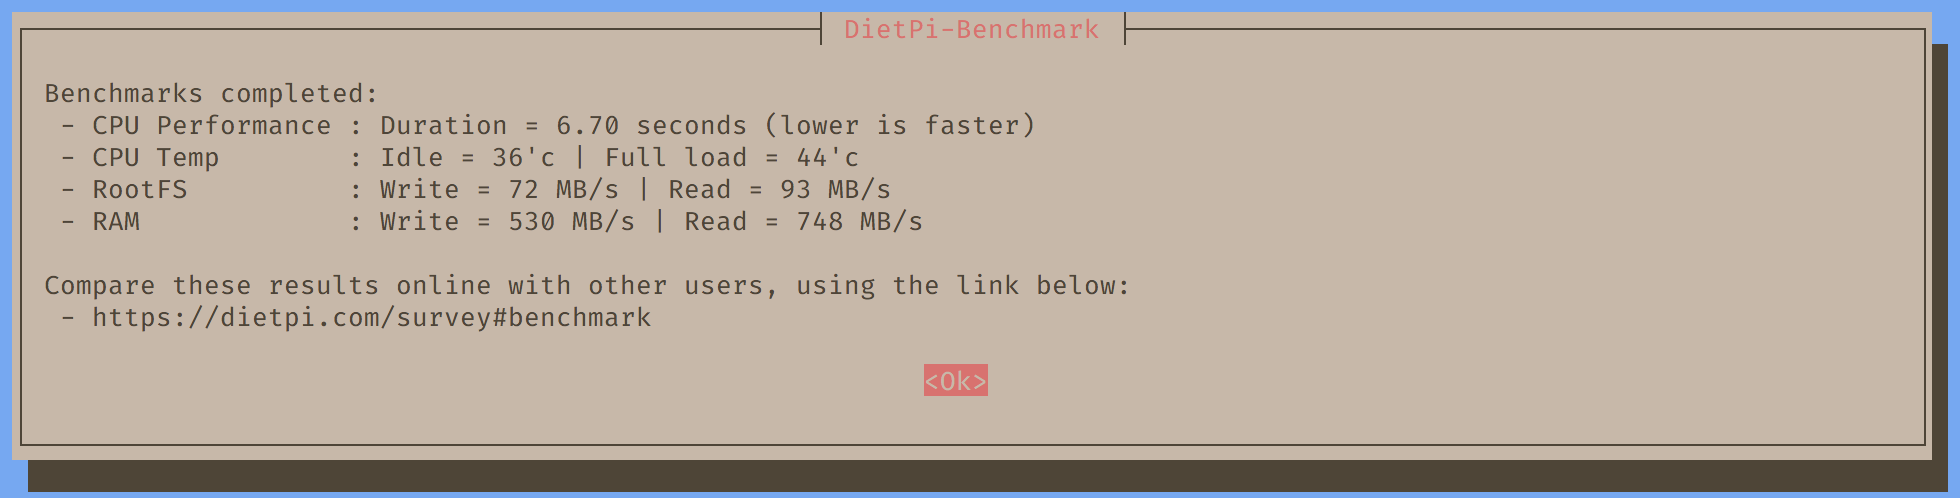
First thing I did was installing DietPi, a lightweight Linux distribution based on Debian. They already have an image for the ODROID-N2. I just downloaded, unpacked the file, and flashed it to the eMMC memory using Balena Etcher (https://www.balena.io/etcher/). Remember to order the ODROID eMMC-USB reader (https://bit.ly/2ZjxC2L)--it will make your life easy.
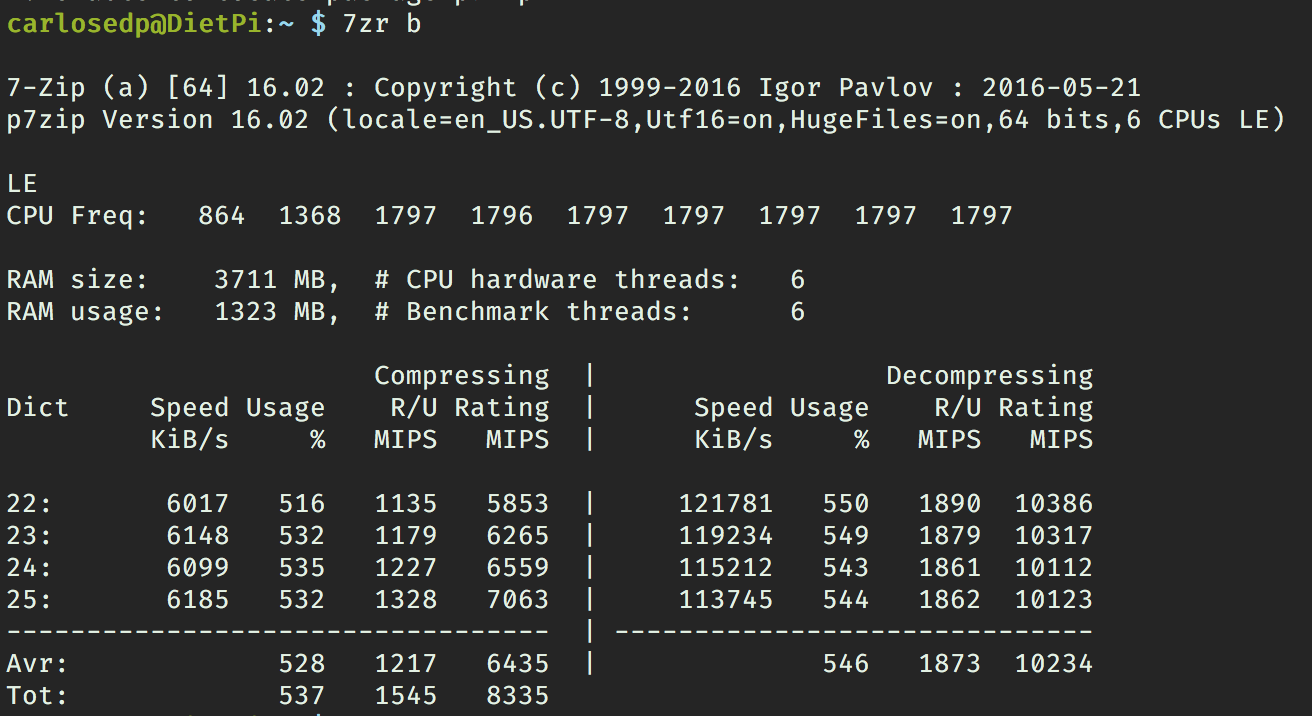
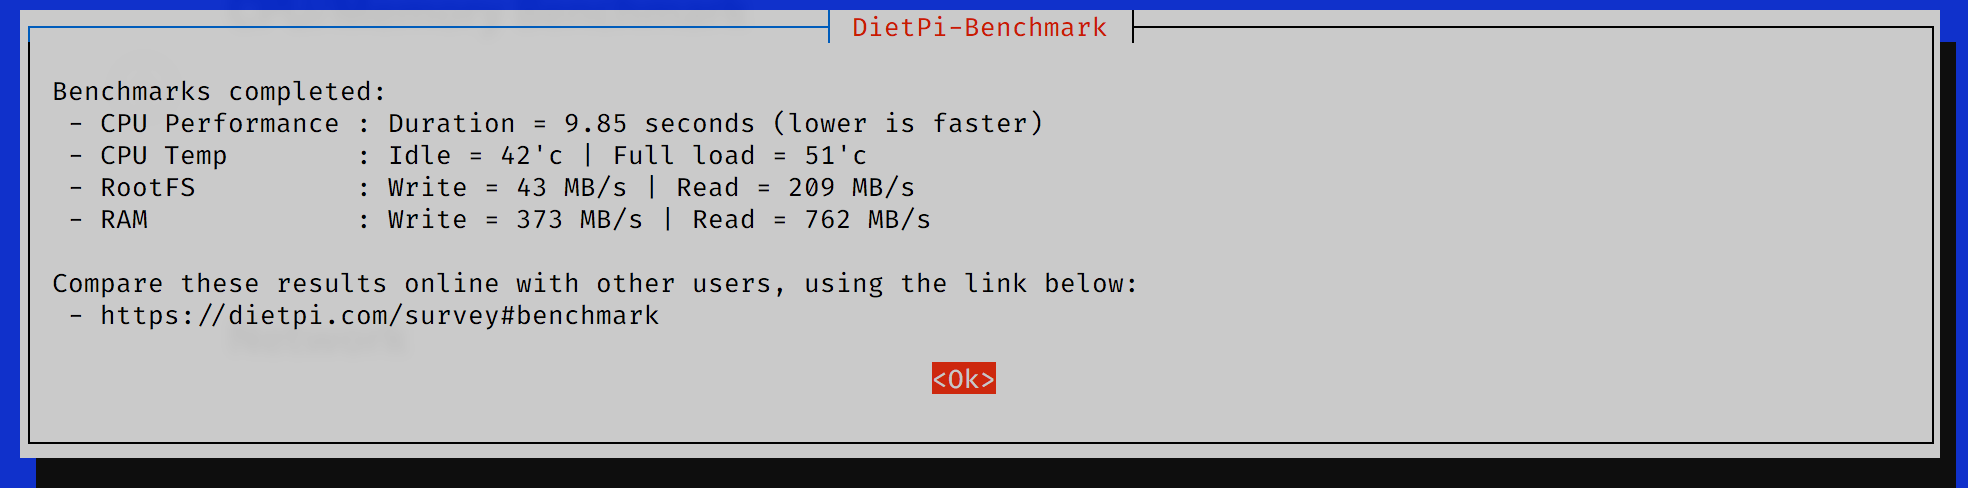
CPU/Memory Benchmark
First, I compared synthetic benchmarks (DietPi benchmark and 7zip). These tests give a brief overview of the performance of the ODROID-N2 and an RK3399-equipped SBC..
ODROID-N2–4GB
[ Fig. 03 ]
[ Fig. 04 ]
Firefly RK3399–4GB
[ Fig. 05 ]
[ Fig. 06 ]
On average, the ODROID-N2 is 30–35% faster than Firefly RK3399, my default board. Also it has way better memory throughput, up to 40% faster. I also benchmarked other RK3399 boards in the past and they all score close to the Firefly numbers.
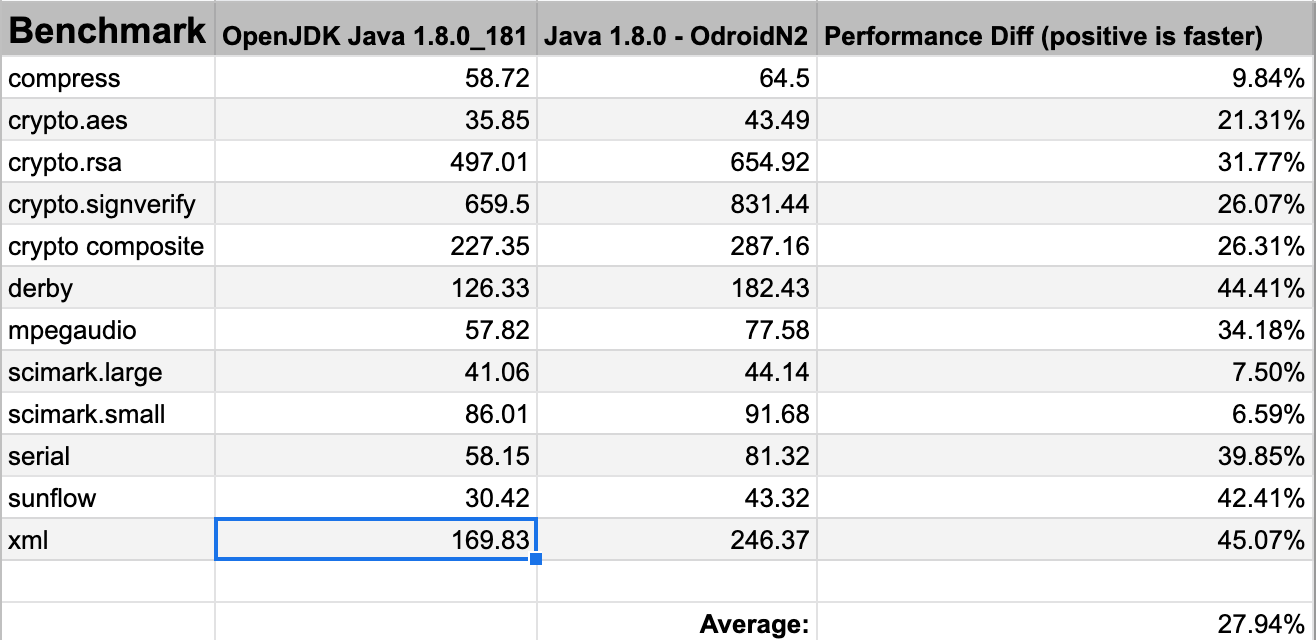
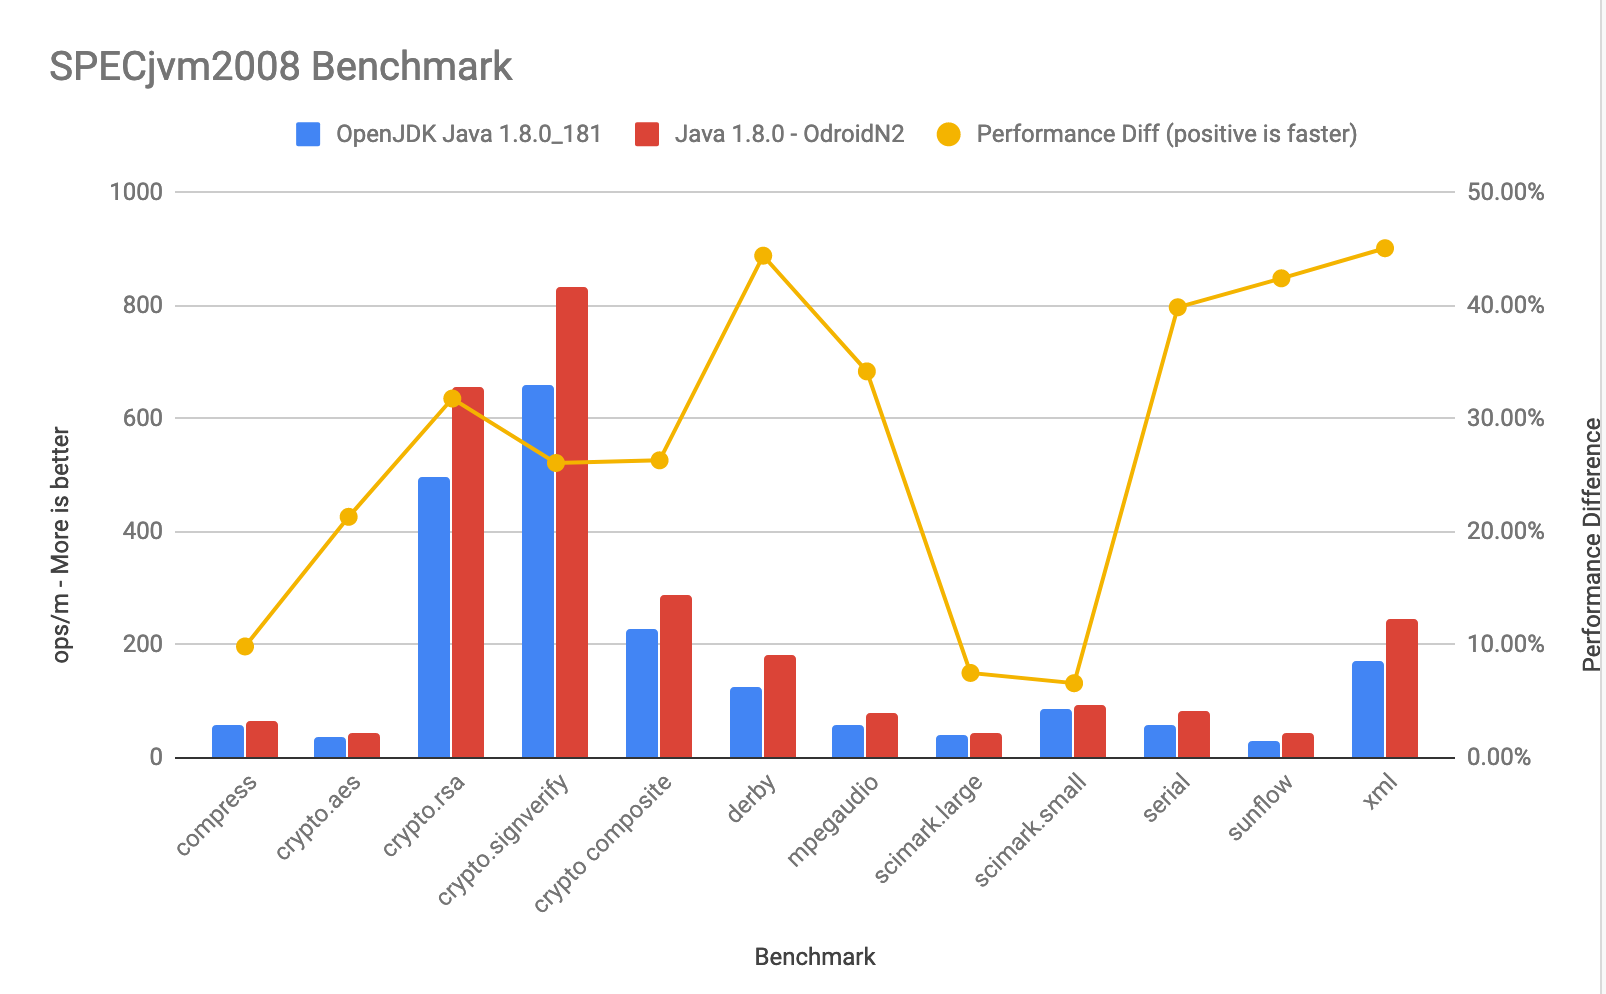
Java Benchmarks
Next, I ran some Java benchmarks aligned with my previous post comparing results on SPECjvm2008. On those tests, I ran them on the Firefly RK3399, as well, so the results will be aligned with the other benchmarks shown here.
The benchmarks were run in a Docker container with the parameters:
[ Fig. 07 ]
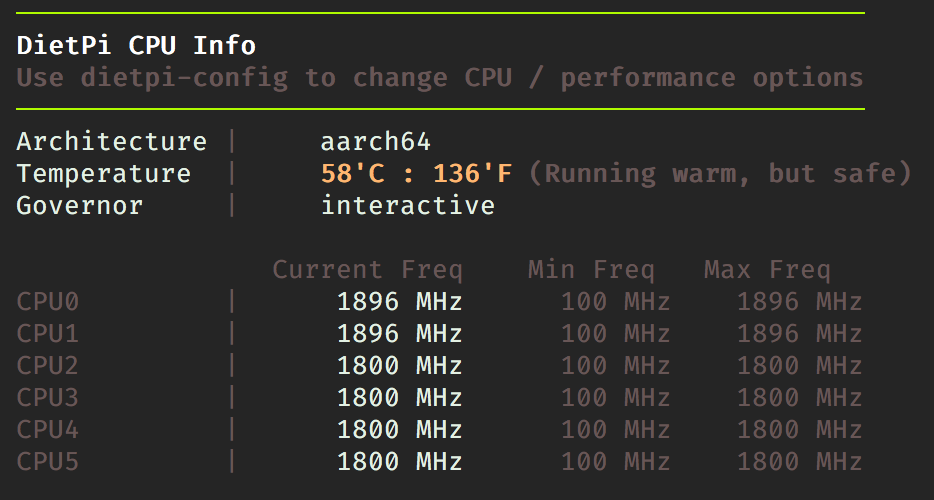
Here are the Core speeds and a temperature measurement during the benchmarks (100% on all cores)
[ Fig. 08 ]
[ Fig. 09 ]
[ Fig. 10 ]
As can be seen, the performance increases around 30% persists compared to RK3399.
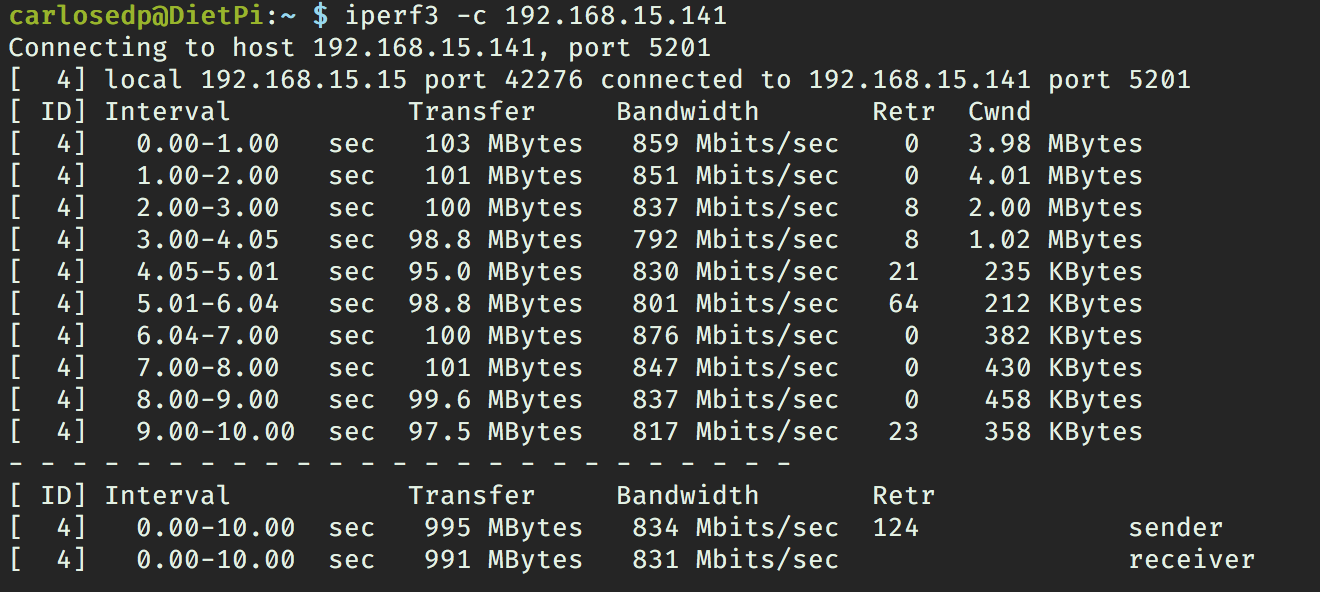
Network
I then tested the network using iperf3. I test both TX and RX using the 1Gbps Ethernet connected to the same switch as the other computer. For a server, I used my Macbook Pro connected with a 1Gbps Ethernet adapter. Figure 11 shows the results from the ODROID-N2:
[ Fig. 11 ]
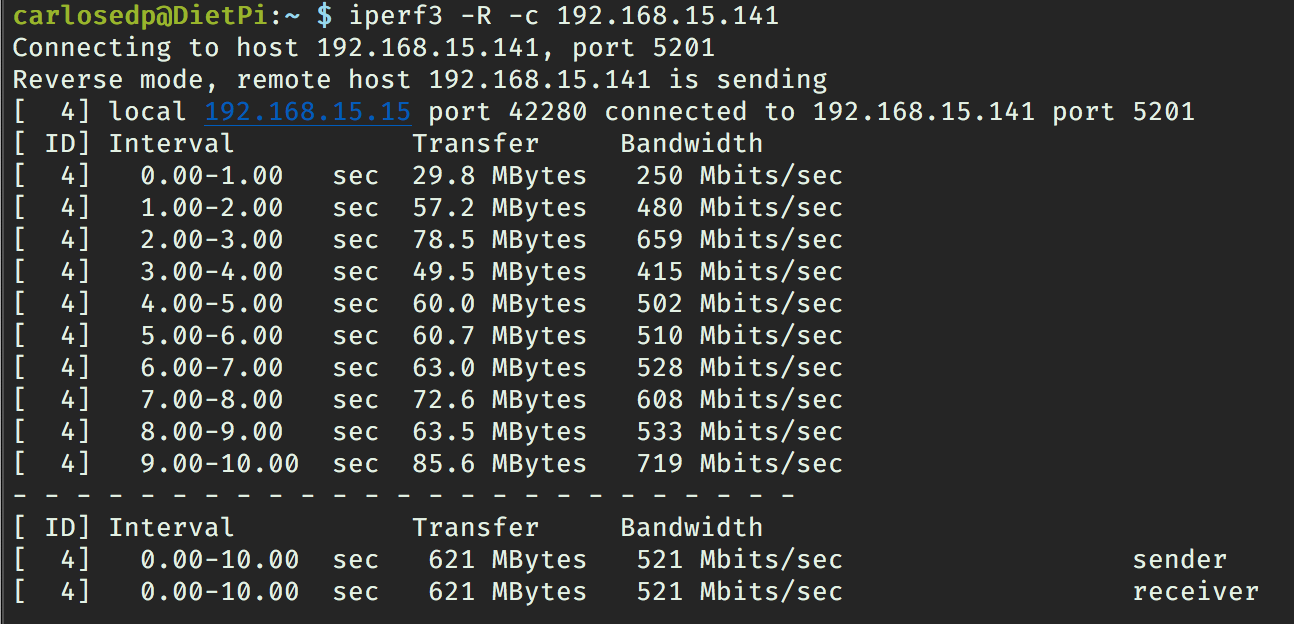
Reverse traffic mode gets lower numbers, but I saw similar results while testing the RK3399 board.
[ Fig. 12 ]
I tried disabling network checksum offload (a known issue on Rockchip SOCs) but the performance results were the same.
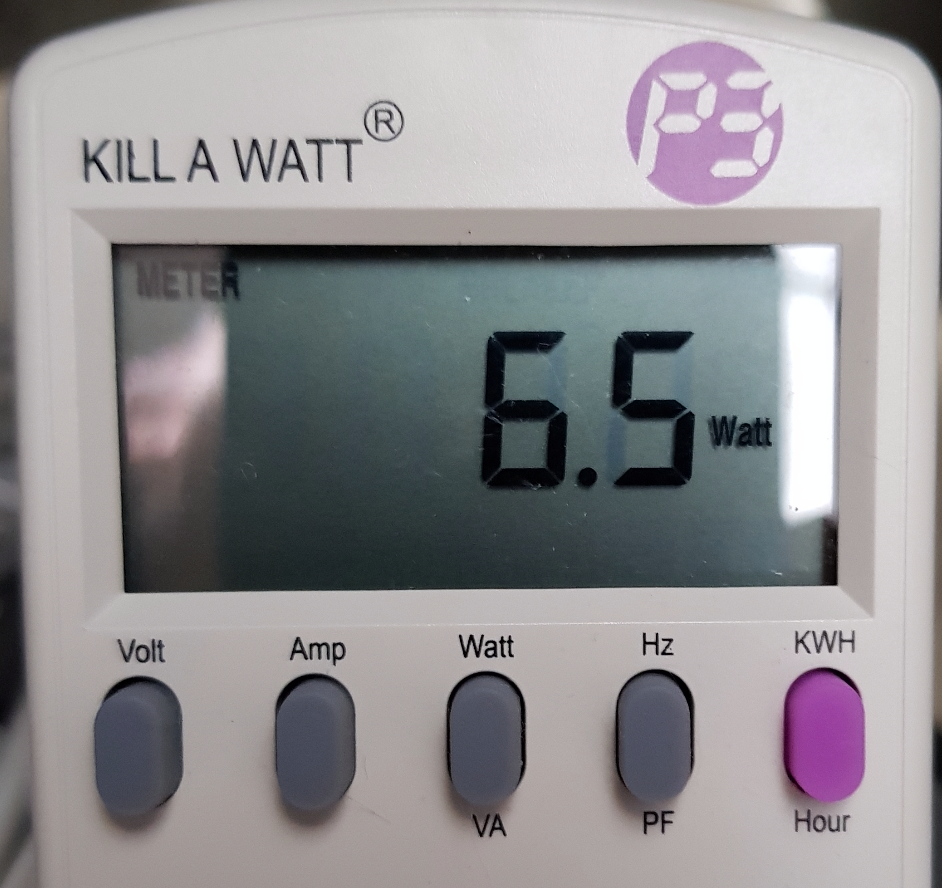
Conclusion
The board has a huge potential and is the most powerful ARM SBC I have ever seen. It suits many use cases, ranging from a home/mini server to a full-featured media center or desktop computer running almost any workload either installed or in containers. It is fantastically suited for a Kubernetes cluster with multiple nodes. Also it's power consumption is amazing and can be always ON with only 2.8W while idle and 6.5W while benchmarking with all 6 cores at 100%.
Figure 13 - Consumption while on 100%
It is easy to flash new images (using eMMC) and connectivity is plenty for most use cases. I would love to see a PCI-E slot or an M.2. connector for NVME drives. Actually I found a document that states that the S922XSOC contains a 1 lane PCI-E that, in the ODROID-N2 case, was used for the USB 3.0 port. Other companies could provide this PCI-E lane as a M.2 connector or PCI-E slot.
All in all, I highly recommend the board and place it on top of my list with it’s features and within a reasonable price point for its performance and features. Also, in the near future, I think I might transform it into an ARM64 desktop with a full-featured Linux distribution like Ubuntu or Fedora, if I can port it.
Five Minute Fun with your Monku R1: SD Card Partition Resizing
September 1, 2019By Brian ReeLinux, Tutorial
This tutorial will show you how to adjust the partitions on an SD card made from an image of a smaller sized SD card. For example, you have a fresh new 32GB SD card ready for your Monku1000 / ODROID-GO ( https://www.hardkernel.com/shop/odroid-go/ ) and you have a backup image from your friend's device but it's only 16GB. After you write the image to the new SD card you notice you can only address around 16GB of space. What happened to your other 16GB? No worries, I'll show you how to resize partitions using your ODROID device. You'll need a Ubuntu based ODROID device like the one we showed you how to build for R1 or R2 (http://middlemind.net/tutorials/odroid_go/mr1_build.html), and R3 (http://middlemind.net/tutorials/odroid_go/mr3_build.html).
Tools Needed
An ODROID-C1+, -C2, or -XU4
It's expected these devices are configured with Ubuntu MATE.
8GB or larger microSD card
MicroSD to USB adapter
Fire up your ODROID device and let's get started. If you have gparted installed, it will be available from the menu system at System -> Administration -> GParted. If you don't have gparted installed, please run the following commands. Open the MATE terminal at this menu location Applications -> System Tools -> MATE Terminal. Then, enter:
$ sudo apt-get install gparted -y
After installation, run gparted. Open this menu location System -> Administration -> GParted. An application like the one depicted below should appear. If you are prompted for a password, enter in the default root password, odroid, or, the password you are using.
Figure 1 - Password prompt when starting Gparted
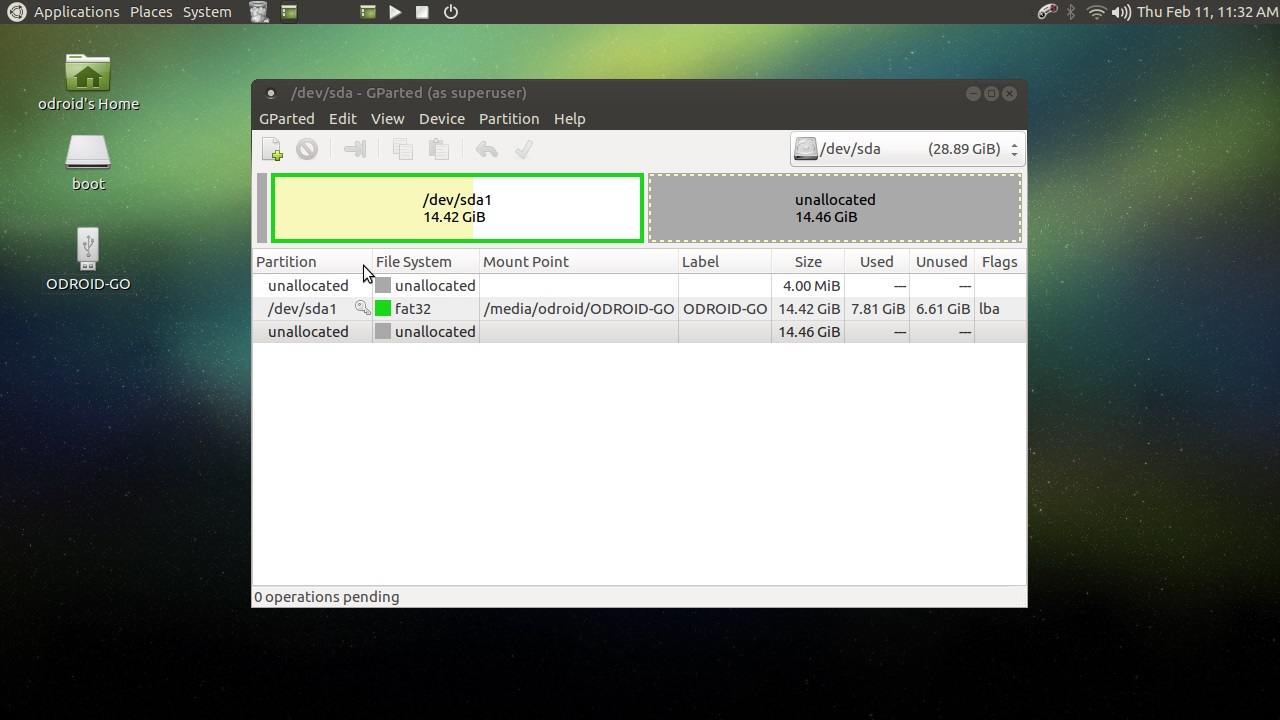
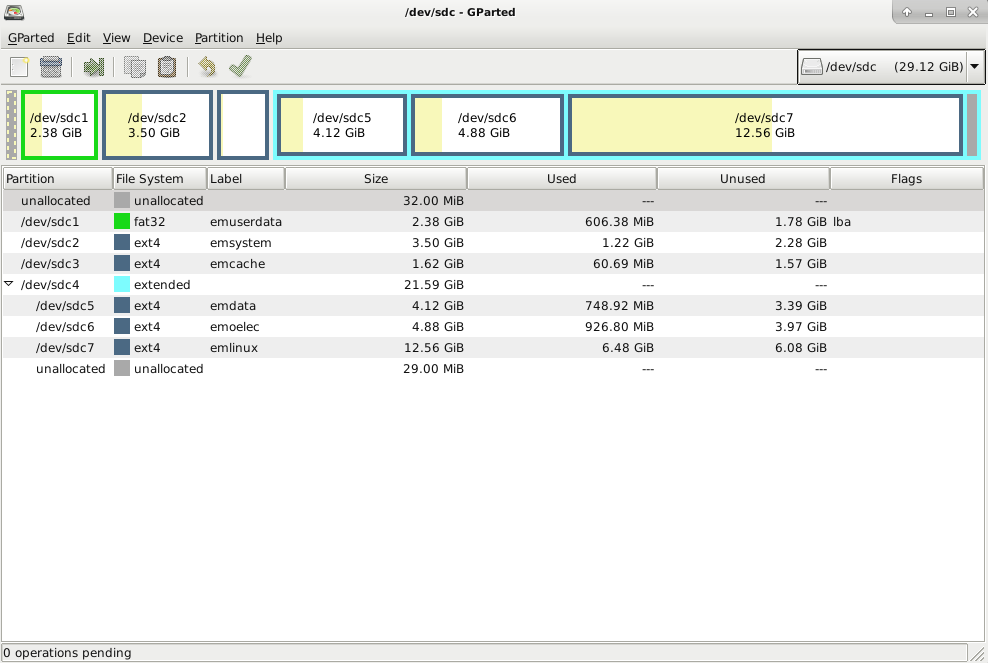
Make sure to select the correct drive from the drop down list in the top right hand corner of the screen. ALERT: Double check that you have the correct drive selected or you could potentially lose data by selecting the wrong drive. Notice how the partition information that comes up in gparted shows that 14GB of space are unallocated! We want to be able to use that extra space but since we flashed this SD card from an image based on a 16GB SD card it ignored the remaining storage space! Take note of the file system used for the active partition on the SD card, we'll need to use this when we create a new larger partition. ALERT: Write down the file system used if you're new to this procedure because you'll have to restore this file system later on.
Figure 2 - Gparted partition information
Resizing the Partition
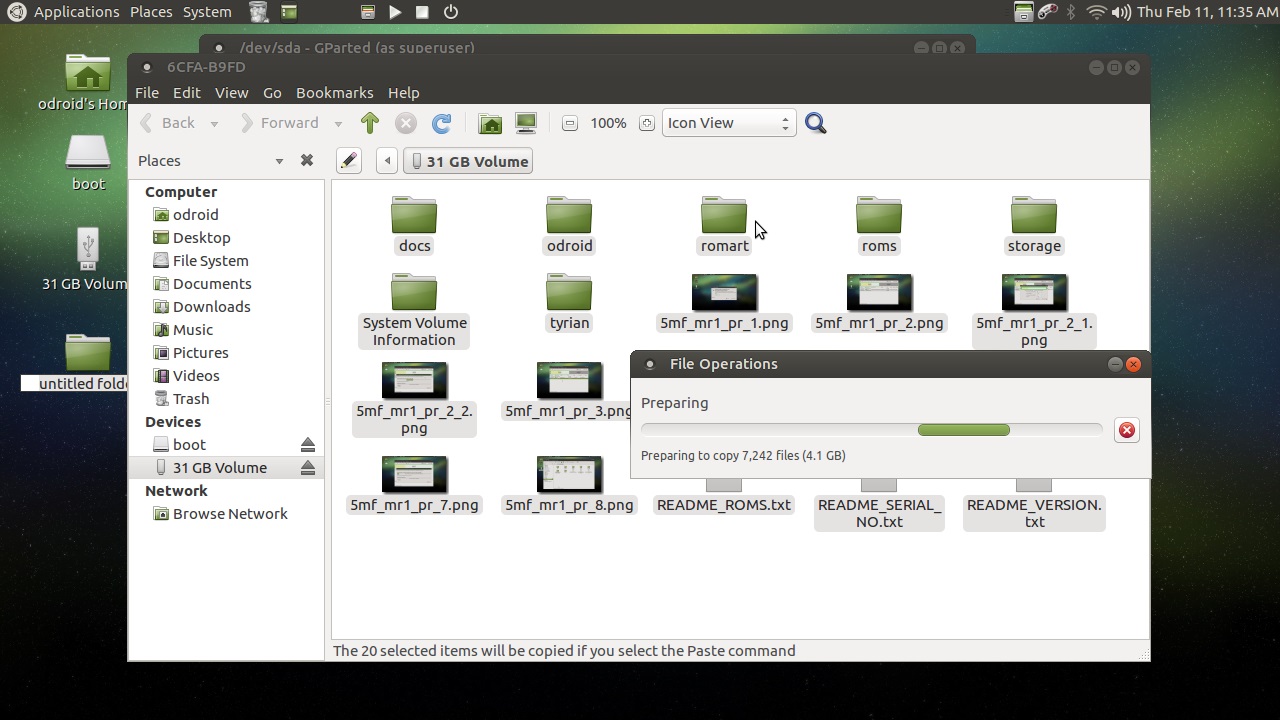
There are different ways to accomplish resizing the partition. The one I'll outline here takes a bit longer but will ensure that you have an SD card that MacOS and Windows will also be able to read. First thing you'll need to do is right click on the desktop and create a new folder. Name it whatever you like we'll just be using it temporarily to hold the original SD card's files. Copy all the files and folders from the SD card into the folder you just created. You should see a file copy bar come up like the one depicted below.
Figure 3 - Copying all the needed files to the SD card
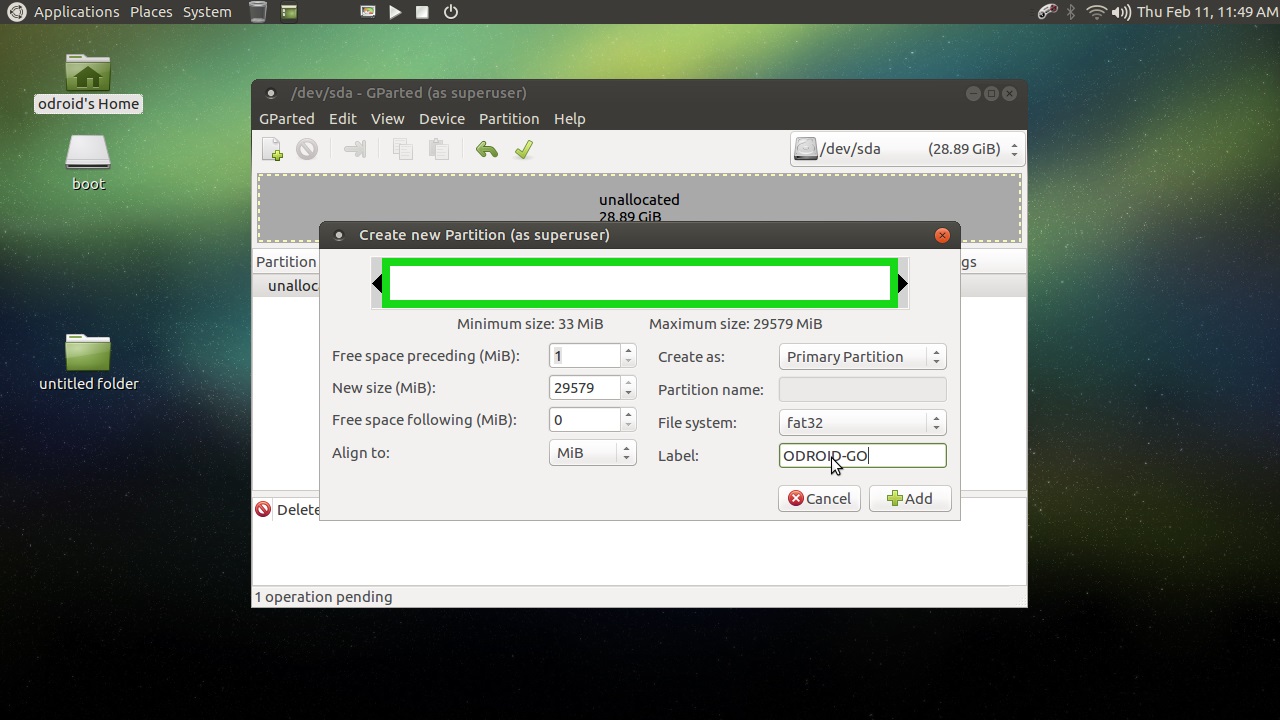
Once the file backup is complete close and re-open gparted from this menu location, System -> Administration -> GParted. Make sure you select the proper drive from the drop down menu on the top right hand side of the application window. Right click on the active partitions listed and unmount them, then delete them. You should end up with no partitions and one entry that shows the full SD card size as unallocated. Next, right click and select the option to Add a New partition. Use the options outlined below. Essentially, you want to keep the file system of the original SD card, in this case fat32, and you want to make sure there are 0 Mibs unused after the partition--the single partition is as large as it can be. Recall the file system you noted when we first viewed the SD card. Now click the Add button and then click the Apply All Operations button. A green check button will appear near the top of the application window and gparted will apply the partition changes you have selected.
Figure 4 - Create a new partition in Gparted
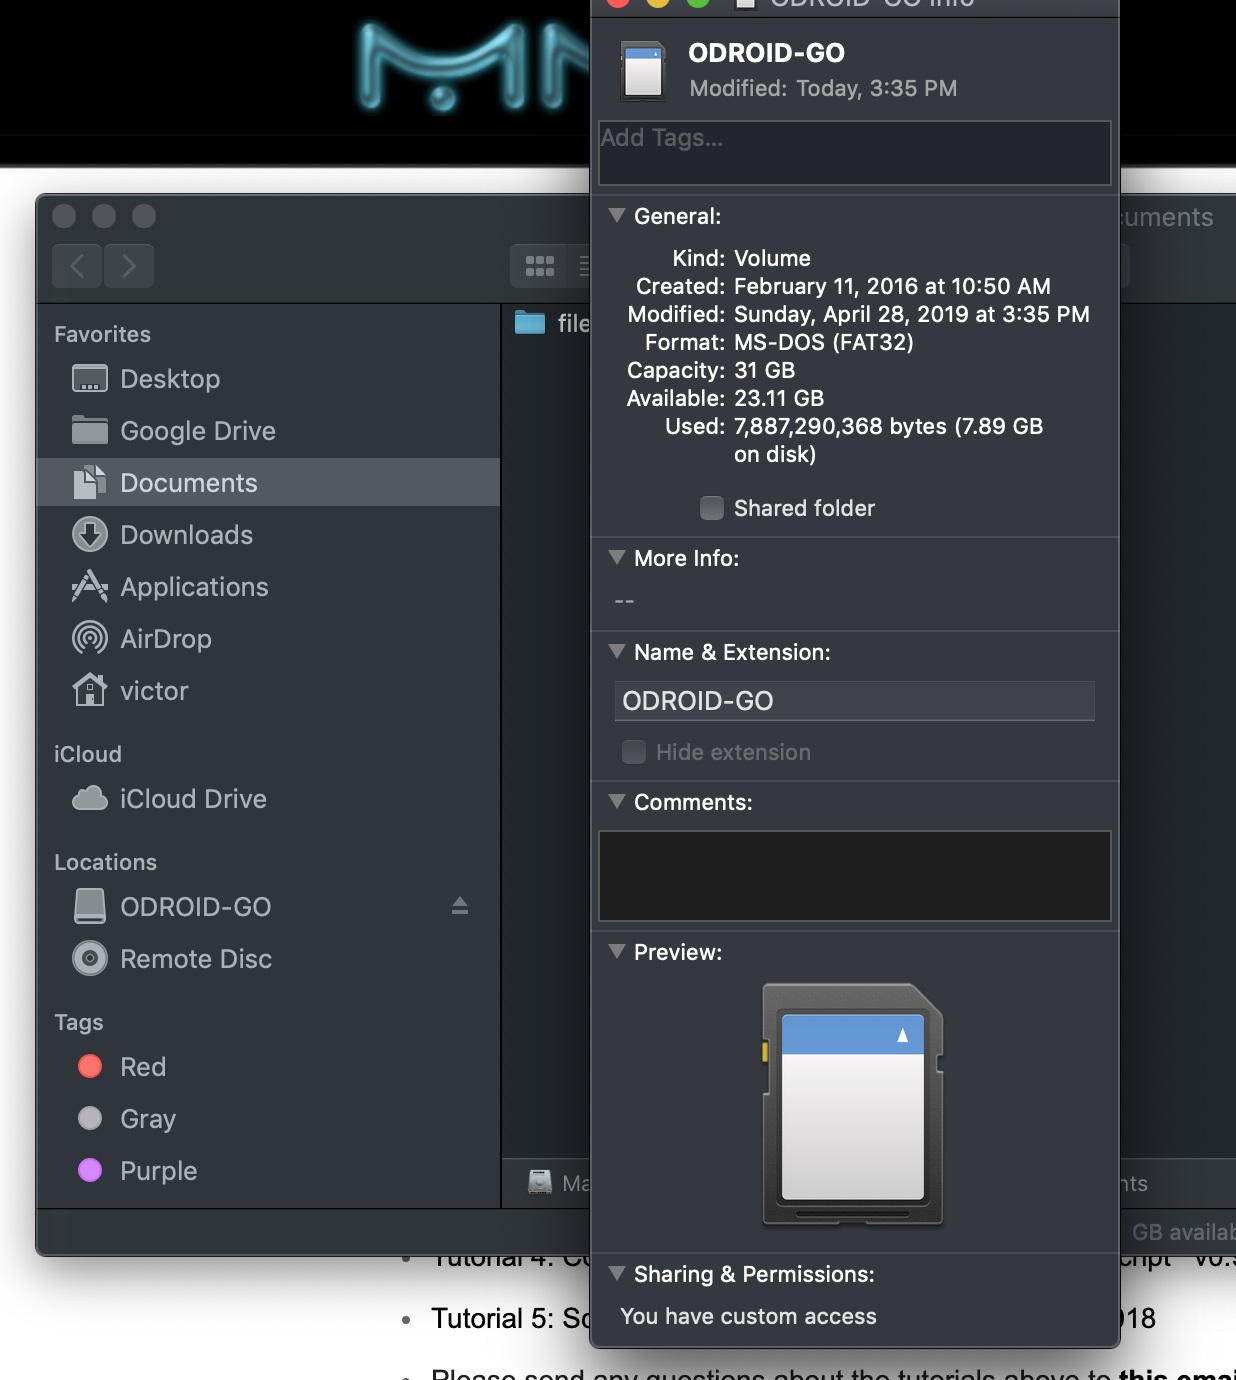
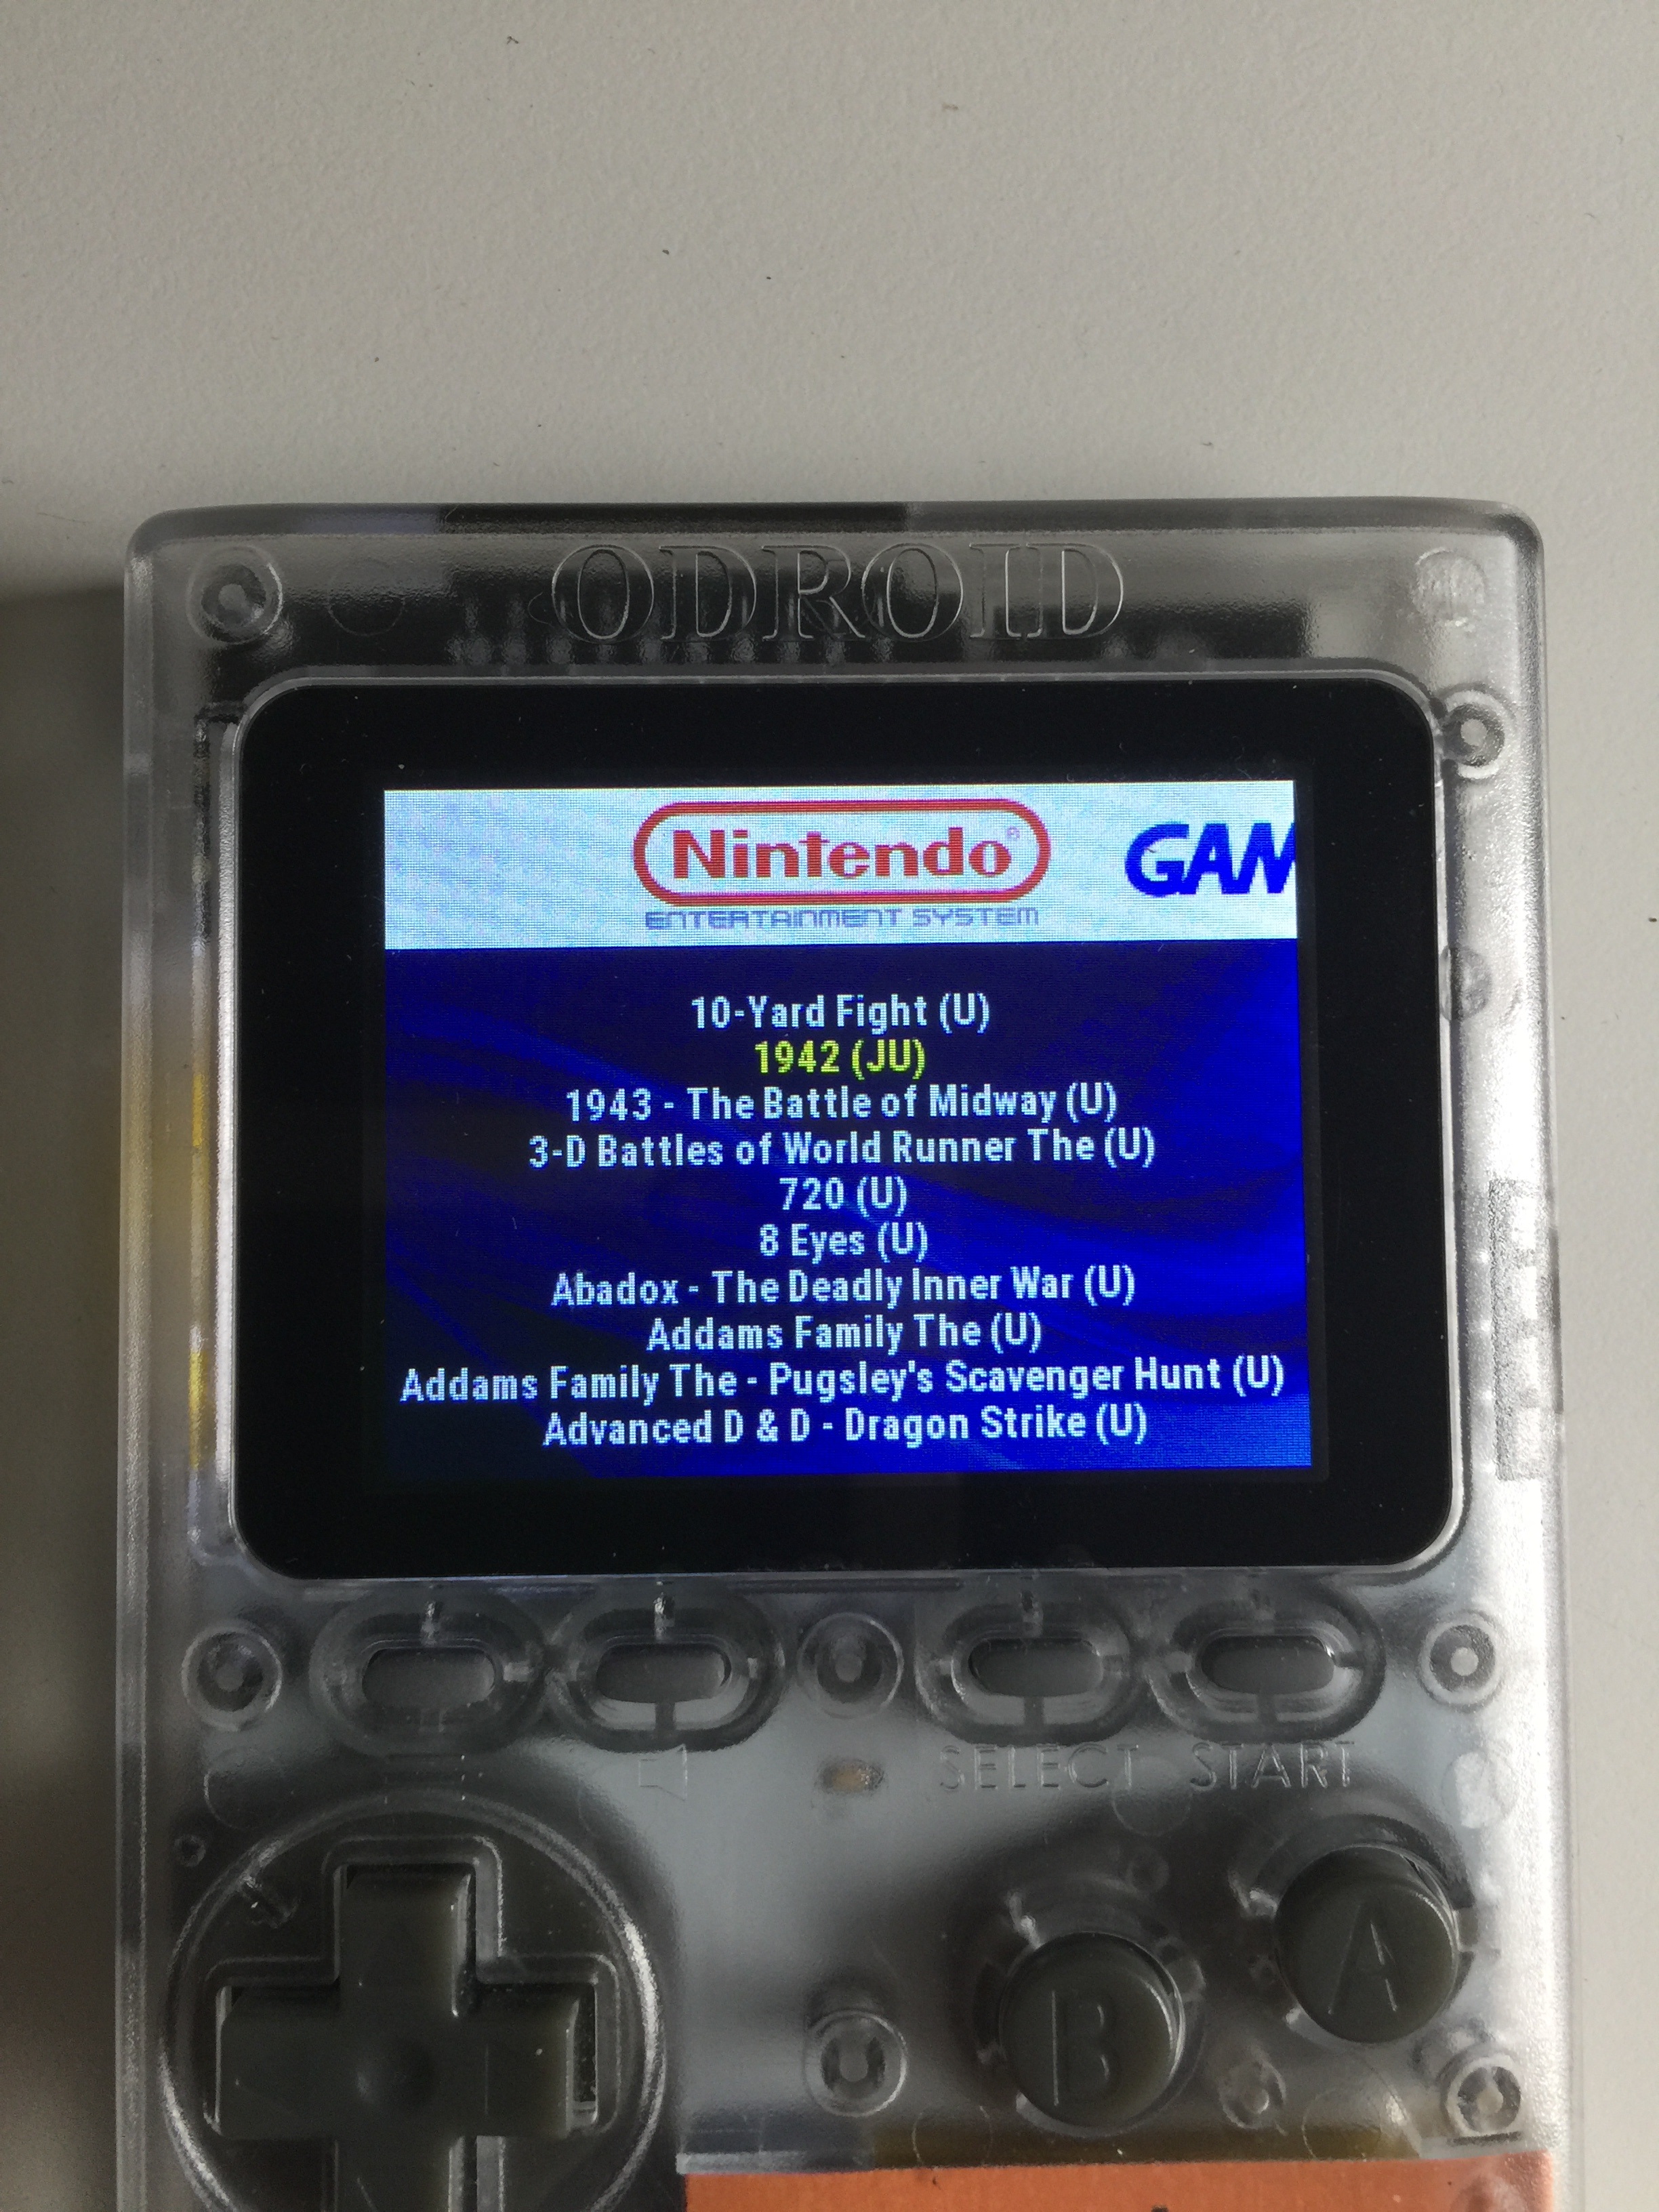
When the partition is ready, close gparted, disconnect and reconnect (mount) your SD card, and restore the original files you backed-up up to your ODROID device. When the files are finished being restored you can test the SD card by comparing it to the original or using it with the same device. Just pop the microSD card into your Monku1000 / ODROID-GO to see if it works. As depicted below our device powers up fine and recognizes our ROMs. Secondly, we need to check the card in a MacOS or Windows machine to make sure that it plays nice with those operating systems. Also depicted below, we can see that MacOS recognizes the SD card as having a 31GB capacity. ALERT: You won't see the full manufacturer-stated capacity listed on an SD card due to file system housekeeping and maintenance allocations. Now you can access that remaining 14GB of microSD card space. Awesome!
Figure 5 - ODROID-GO with all the files you need
Figure 6 - SD card mounted in macOS
We hope this tutorial provided you with a thorough understanding of how you can adjust the sizes of partitions on SD cards. This article has been adapted from http://middlemind.net/tutorials/odroid_go/5mf_mr1_pr.html, where further ODROID tutorials are available.
Manage your kid's computer time with mqttNanny
September 1, 2019By Adrian PopaLinux, Tutorial
In my last article I was setting up my ODROID-H2 as a first computer (running Linux) for my 7 year old son. As you know, with great power comes great responsibility, so this means I have to be able to enforce some limits on computer time. Especially since, my son will be spending some summer vacation time with his grandparents. This gave me the perfect excuse to create a time management and monitoring system for Linux and integrate it into Home Assistant.
How it works
The software is essentially a Python 3 script that runs as a daemon. It has two operation modes - local and remote. It starts in local mode when it cannot connect to a MQTT broker. In this mode it loads its limits from a file and is less flexible. When running in remote mode it gets the allowance for the current user from a MQTT broker and allows the parent to control (and follow what the user is doing) dynamically. Basically, remote mode offers all the features, while local mode is a fallback in case of connectivity issues.
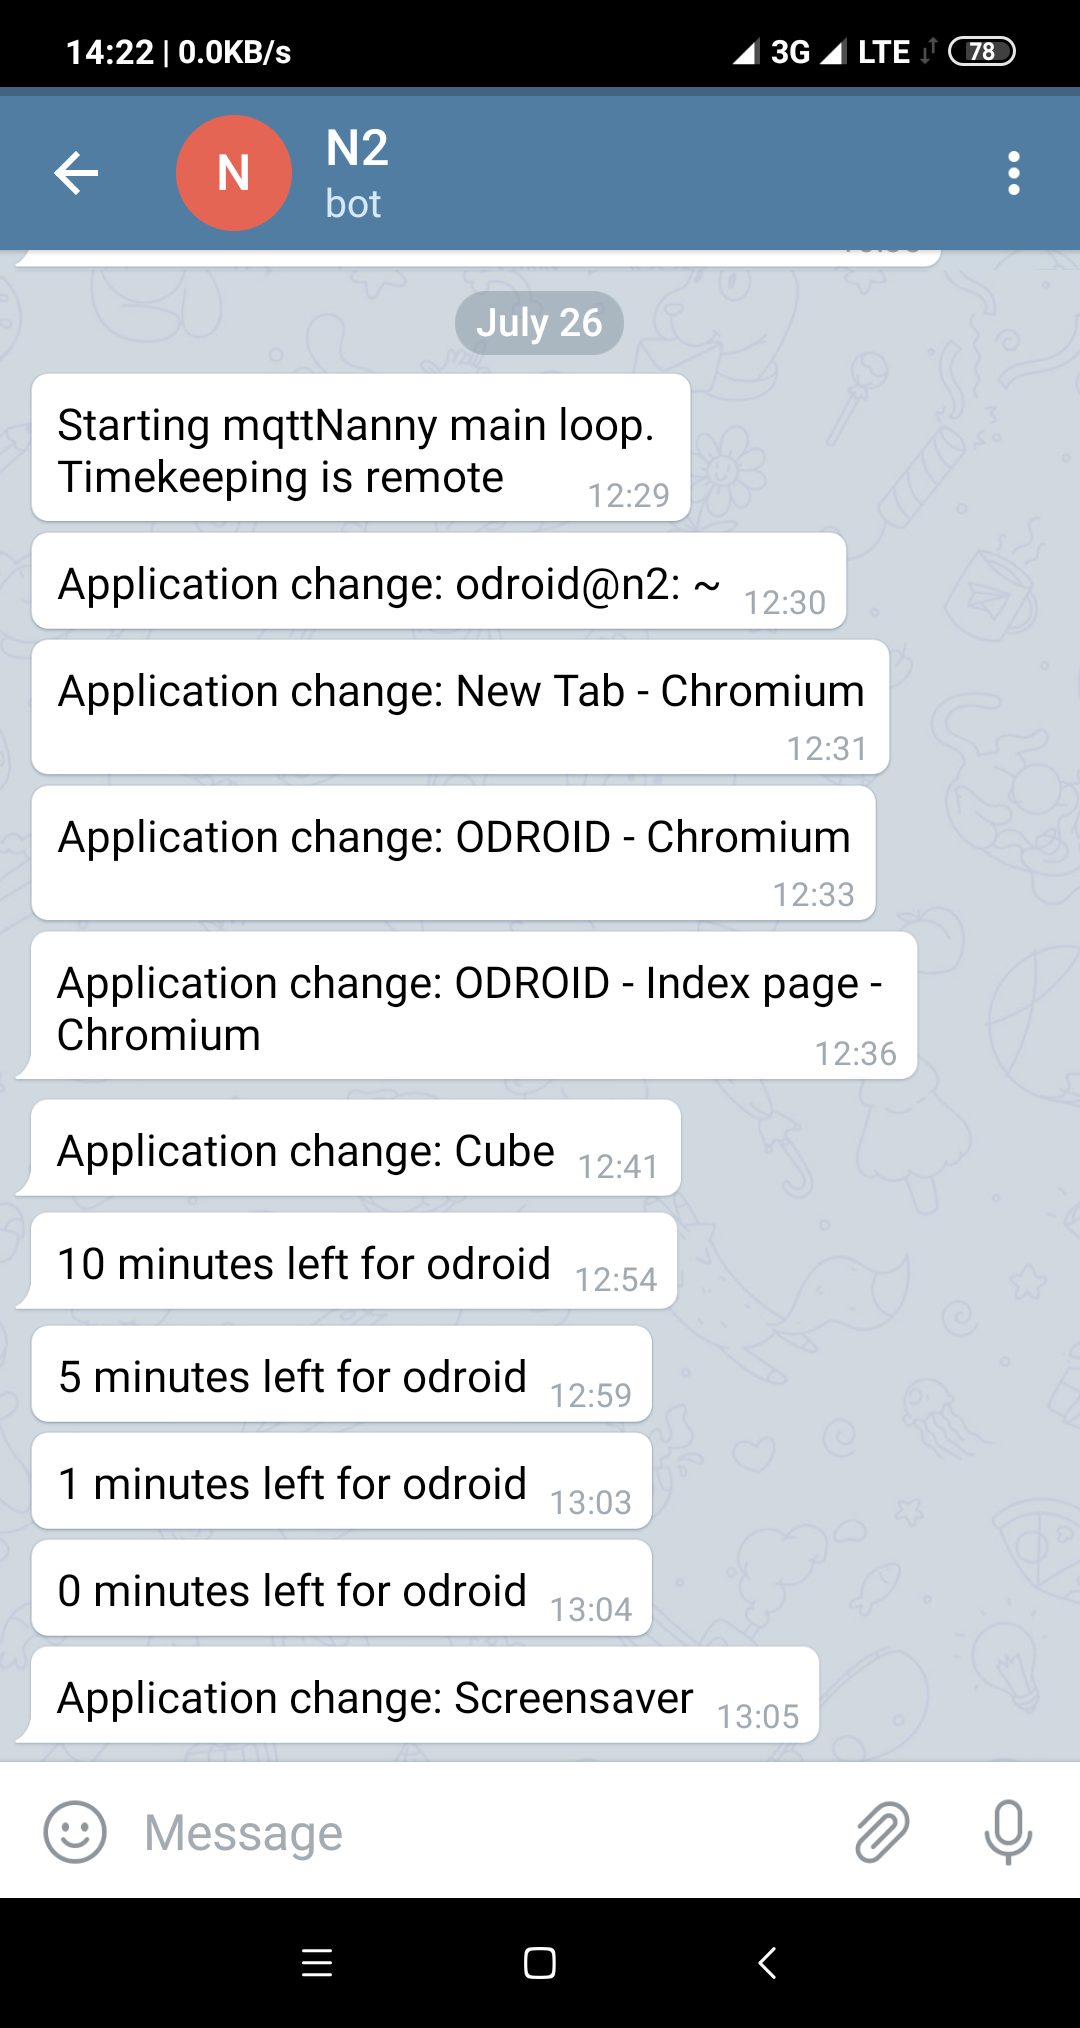
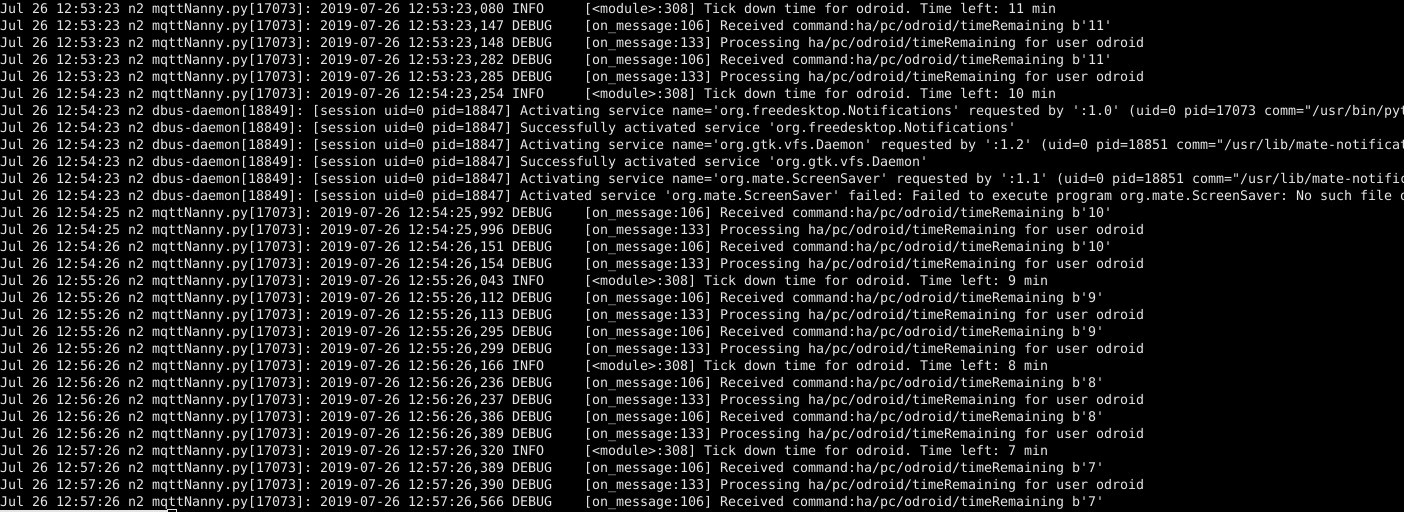
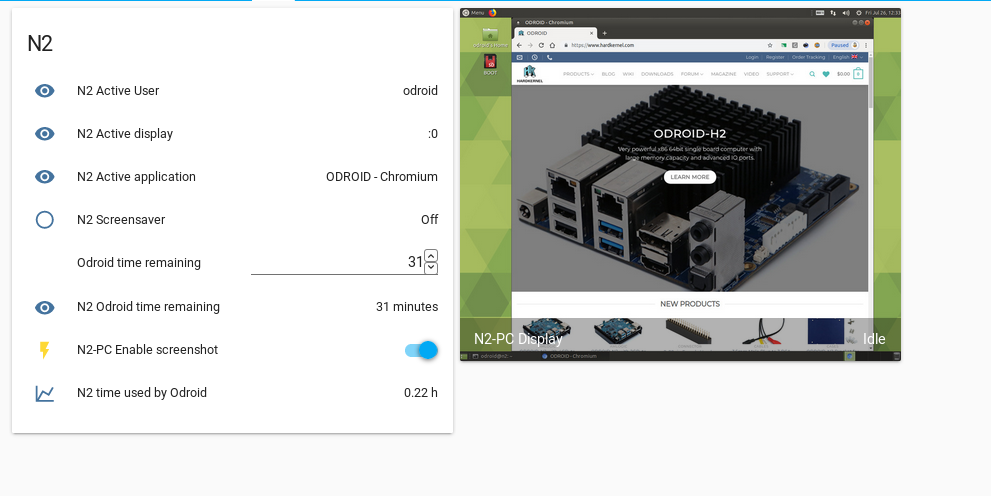
The main program loop runs every minute and gathers (and reports) information, such as:
what is the active TTY?
what user is logged in using X11 in the current TTY?
is the screensaver running?
what is the active application title?
For the currently logged in user a counter is decremented every minute while the screensaver is not running. There are some notifications sent to the user (via notify-send and audible) when there are 10/5/1 minutes left. When time runs out, the screensaver is enabled and the user account is disabled (makes password login fail). Should the screensaver fail to enable 5 times in a row, the system is shutdown instead. Once allowance is greater than zero, the daemon restores the password of that account.
MQTT gives you the ability to see the collected data, to change the allowance for each user and also to request screenshots of the user's desktop session. To follow through you will need to understand and have a MQTT broker and also run Home Assistant - both are out of the scope of this article, but have been discussed before.
Installation and configuration
You can download and install the code from my GitHub page:
Note that, currently, only Linux systems are supported, but the code is written so that it could be extended for other OSes, as well (pull requests are welcome). The Linux system needs to be running Xorg (Xwayland probably needs many changes) and the screensaver program needs to be Xscreensaver (not mate-screensaver, xfce-screensaver, etc). Support for other screensavers could be added in the future, though (pull request welcome). The code was tested on a ODROID-H2 (x86_64), ODROID-XU4 (armhf) and an ODROID-N2 (arm64). To migrate from mate-screensaver to xscreensaver, you can do the following:
While running xscreensaver-demo you can select which screensavers you want to use and also enable "Lock screen after" option to force it to ask for a password. You will need to make the desktop environment start the screensaver automatically by copying it to the autostart folder:
Also, make sure the system time is set correctly at boot (either via a RTC, NTP or fake-hwclock), otherwise local mode timekeeping will not work correctly.
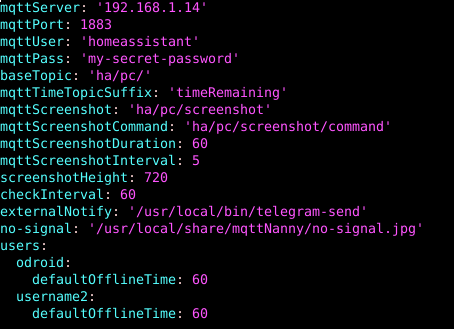
You will need to edit the configuration (/etc/mqttNanny.yaml) and set your relevant defaults. Make sure indenting is correct in the file (you can validate it with http://www.yamllint.com/), otherwise the program will fail to start. The options available are described below:
mqttServer - the ip/dns name of your MQTT broker
mqttPort - the TCP port your broker runs on (default is 1883)
mqttUser/mqttPass - your MQTT credentials. If your broker does not use authentication, simply omit the lines
baseTopic - a prefix used to build the topics used to send/receive messages. I personally use ha//
mqttTimeTopicSuffix - the time remaining for each user will be transmitted in a topic built from //. In my case it is something like ha/pc/odroid/timeRemaining
mqttScreenshot - the topic where you want to receive screenshot images (MQTT can transport binary data as well)
mqttScreenshotCommand - the topic where you can request screenshots or not. This can be mapped to a switch in Home Assistant to toggle screenshots on or off
mqttScreenshotDuration - how long until the screenshot feature turns itself off. If you want it always on, set it to 0
mqttScreenshotInterval - how often (in seconds) should it grab screenshots
screenshotHeight - resize the screenshot to this height (keeping aspect ratio), for efficiency reasons
checkInterval - how often should the script's internal clock tick. A value of 60 seconds means that allowance is checked every minute. You also get application changes every minute.
externalNotify - should either be False or point to a program/script that takes a string as an argument and sends the message to you. For instance, I set it up to /usr/local/bin/telegram-send and get notified of events through a telegram bot
Figure 1. External notifications
no-signal - should point to an image file that is displayed when screenshots are turned off
users - contains a list of users to monitor. If a user which is not on the list logs in, their time is not managed, but data about their session and screenshots still get reported via MQTT
defaultOfflineTime - how many minutes the user gets at program startup in case the program runs in local mode, without a connection to the MQTT broker. In case a file with the user's current allowance is found in /usr/local/share/mqttNanny//, that value is loaded instead. That file is updated on every allowance change/decrease
Figure 2. Sample configuration for two users.
To address security concerns, make the configuration file readable only by root:
Once mqttNanny is running on the target computer it is nice to be able to control it from a web interface. I found Home Assistant to be the perfect interface for Home Automation and custom/DIY scripts.
We will be adding a few components to Home Assistant's configuration.yaml that will communicate with the script via MQTT. Consult the appropriate component documentation for more details.
Once you reload Home Assistant's configuration you can add the new items in the Lovelace web interface. Below is a sample configuration based on the values above.
camera-view: live
entity: camera.n2_pc_display
type: picture-entity
The end result should look like the Figure below:
Figure 4. Home Assistant control
You will also need to set up some automation to be able to change the time allowance for a user. Make your edits in automations.yaml and restart Home Assistant:
- id: '1557839383'
  alias: N2 change remaining time for Odroid
  trigger:
  - entity_id: input_number.pc_odroid_time_remaining
  platform: state
  action:
  - data:
    payload: '{{ states(input_number.pc_odroid_time_remaining) | int }}'
    retain: true
    topic: ha/pc/odroid/timeRemaining
  service: mqtt.publish

- id: '1562675409185'
  alias: N2 get remaining time for Odroid
  trigger:
  - platform: mqtt
  topic: ha/pc/odroid/timeRemaining
  condition: []
  action:
  - data_template:
    entity_id: input_number.pc_odroid_time_remaining
    value: '{{ trigger.payload }}'
  service: input_number.set_value

- id: '1562675848675'
  alias: N2 set daily time allowance for user Odroid
  trigger:
  - at: 00:15:00
  platform: time
  condition: []
  action:
  - data:
    payload: 35
    retain: true
    topic: ha/pc/odroid/timeRemaining
  service: mqtt.publish
The last automation sets the daily allowed time for the odroid user to 35 minutes and runs at 00:15. This is just an example. You can devise your own automations which define when the user can use the computer. For example, if you want to give access only during a time interval you could run an automation to add allowance at the desired start time and a different automation to remove allowance before bed-time. You can control the amount of time each user is allowed based on things like school-day (https://www.home-assistant.io/components/workday/) or maybe if they have finished their chores (I would like to hear how you can measure that automatically).
Bugs and future improvements
None of the code I write is perfect and this is no exception. There are some problems and ways around mqttNanny that I have identified so far (patches/ideas welcome). The program is intended to lock out a person with little Linux experience, but it will not be very effective against a seasoned sysadmin.
When running in local mode there is no built-in mechanism to give more time to the user. If the computer is on for an extended period of time you need to restart the mqttNanny service daily to add a daily allowance. So it might not work as expected if you suspend your computer instead of shutting it down.
When switching between local/remote modes data received from the MQTT broker has higher priority. For example the kid could start with no network connectivity, use up their default allowance and then restart with network connectivity to the broker. They would receive their remote allowance as if nothing happened.
When running in local mode the protection is weak if the 2user can change the system time. They could "borrow" time from other days in the future/past.
Only the X11 session is monitored/locked. The user can log in a TTY before the lockdown, or via ssh with key authentication and can keep using the system (terminal based).
If the user kills the screensaver process, there's nothing to lock the session. The process tries to lock the screensaver on 5 consecutive times and if it fails, it will shutdown the system instead. But the user could use the exploit in number 4 and unlock the screensaver from the command-line (could run a script to continuously unlock it).
If the computer is not shut down gracefully (e.g. it is unplugged) you will not have the correct state in MQTT.
The file /etc/mqttNanny.yaml used by the code needs to be readable only by root, since it holds your MQTT credentials. Otherwise the user could learn them and use mosquitto_pub to change their time allowance.
The files that store used allowance per day located in /usr/local/share/mqttNanny// are not cleaned up automatically and may eventually fill up your disk in a few centuries (1.5MB/year). A cron job to delete old files may help.
I hope that future versions of the code will add support for other screensavers for Linux, as well as MacOS and Windows support (the os-specific code is modular and should be easily extendable). Looking forward to issues/patches.
A Powerful Multiboot Image for the ODROID-C2: Run Android, Ubuntu MATE, and LibreELEC From A Single Boot Device
September 1, 2019By Alexander G (@alexxgg)Android, Linux, ODROID-C2, Tutorial
I am a web developer and I have been amazed with Multiboot environments, especially on System On a Chip (SoC) devices. I started this journey with a Raspberry Pi 2 device and a bootloader called: “Berryboot” (I am not its developer) that actually is still active and supported by the Raspberry Pi community.
Then I heard about this amazing device called ODROID-C2 more powerful than a Raspberry Pi 2 device and actually the same price, so more power more fun, right? A couple of weeks later I had a ODROID-C2 device in my hands and the tests started. I tested Ubuntu (Xenial at that time), Android, LibreELEC, Recalbox, Lakka and few more operating systems. Later I found out that someone (@loboris) in the ODROID Forum (https://forum.odroid.com) had developed bash scripts to make multiboot images on ODROID devices including the ODROID-C2, after a couple of days and a few tests, it worked. Since that moment, I have generated by myself, multiboot images out-of-the-box and ready to boot for ODROID-C2.
You can download more multiboot images and standalone images for ODROID-C2 from here (https://berryboot.alexgoldcheidt.com/odroid-c2/). I run that web site by myself and I’ll be glad to hear all your suggestions, resolve issues and take image requests.
Recently, I generated the Multiboot Image (Ver. 4) for ODROID-C2 with the following OS's preinstalled:
Android 6.0.1 [2019-01-17]
Ubuntu MATE 18.04 Bionic LTS [2018-06-21] (Linux in the boot menu)
LibreELEC RR 9.1 [2019.04.24] (OpenELEC in the boot menu)
I want to show you how you can generate this multiboot image by yourself, so I’m sharing these files and steps as a reference how-to guide.
First, what is LibreELEC RR? Well, this version of LibreELEC includes EmulationStation, RetroArch and Pegasus. More information about this build here https://bit.ly/30Aifjw. With this amazing, build one can avoid installation of additional images like: RetroPie, Lakka, or Recalbox. It worked very well in my case. Android and Ubuntu also work well as previous multiboot images.
What you will need
Linux (I have used Debian with Xfce desktop environment). You can download it here (https://www.debian.org/CD/http-ftp/#stable), and just select the right architecture for your ODROID or you can download any Live version (no install required) like Ubuntu MATE, that can be downloaded here (https://ubuntu-mate.org/download/). Again, just select the right architecture for your ODROID.
Internet Connection.
ODROID-C2 Device.
First, start with the multiboot base image. I have used @sdip custom repo because that repo fixes a couple of issues from the original repo of @loboris. Additional information can be found here: https://bit.ly/2Hs1obf. You can generate the base image by yourself or download the base image ready-to-boot here: https://bit.ly/2ZnJwbL. Once the download is complete, unpack it and flash it onto a microSD card or eMMC module. I recommend the supported eMMC module.
OS #1: Android. Download Android Daily file here: https://bit.ly/2Nxxczg. Once the download is complete, rename it: update.tar.gz and put that file onto a USB drive with a fresh single EXT4 partition format.
OS #2: Ubuntu. Download Ubuntu MATE 18.04 Bionic LTS here: https://bit.ly/2Nwt4zr. Once the download is complete, unpack it and rename it: linux.img and put that file onto the same USB drive with the Android file.
OS #3: LibreELEC RR. Download LibreELEC RR v9.1 here: https://bit.ly/30zIrLp. Once the download is complete, rename it: oelec.tar and put that file onto the same USB drive with the Android and Ubuntu files.
Now insert the microSD card or the eMMC module with the base image and plug the USB drive (containing Android, Linux and LibreELEC) into your ODROID-C2 device and turn it on. Once you see the multiboot main screen, follow these steps:
Press “I” (Prepare the card for MultiBoot, Install OS's).
Change partitions sizes as you wish.
Once again, press “I” to start the installation.
When this process is completed, reboot the device.
In case you are not sure about which sizes do you need to use on partitions, these are my suggestions: use at least 9GB to 10GB on the Ubuntu partition since that is the biggest OS in the multiboot image--Ubuntu raw image size is around 7GB. Also, make enough space on the LibreELEC partition if you are planning to storage game ROMs.
Figure 1 - This is my eMMC module partition layout
Now, at this point you will be able to boot Android & Ubuntu without any extra steps, to boot LibreELEC RR you need to follow the steps listed at: https://bit.ly/324hcJi from (and thanks to) @malomehi. As reference, I will share my current multiboot directory from my eMMC module in case you want to compare or download files at your end. You can see these files here: https://bit.ly/30yAI04.
Be aware that if you compare my boot files (from the eMMC module) with the microSD card, you have to change partitions labels. For example: emuserdata is used on eMMC modules but on the microSD card sduserdata is used instead. Also, in my boot files I have set up a 1360x768p60hz resolution for Android and Ubuntu since that is the max resolution of my displays. You may need to change this resolution to fit your display.
If you made it this far, congratulations, you now have a multiboot image featuring the three most popular operating systems in this world. If, for some reason, something goes wrong before, during, or after the installation process, let me know it here: https://bit.ly/2zic1Jk. I can take a look at the problem and try to address it.
Known issues
After a Ubuntu full upgrade
apt upgrade -y; apt dist-upgrade -y
these files: Image, meson64_odroidc2.dtb and uInitrd are updated outside of the multiboot directory. All you have to do is go to the boot partition: emuserdata on eMMC modules or sduserdata on SD cards, append .linux to the file names (example: Image.linux) and move them to the multiboot directory (you can overwrite them).
Lastly, I want to thank @loboris, @odroid, @dimitris_c, @barturblits, @luffyman, @sdip and @malomehi from ODROID Forum for making this possible. I am honored to be part of this community and do my best to make it better.


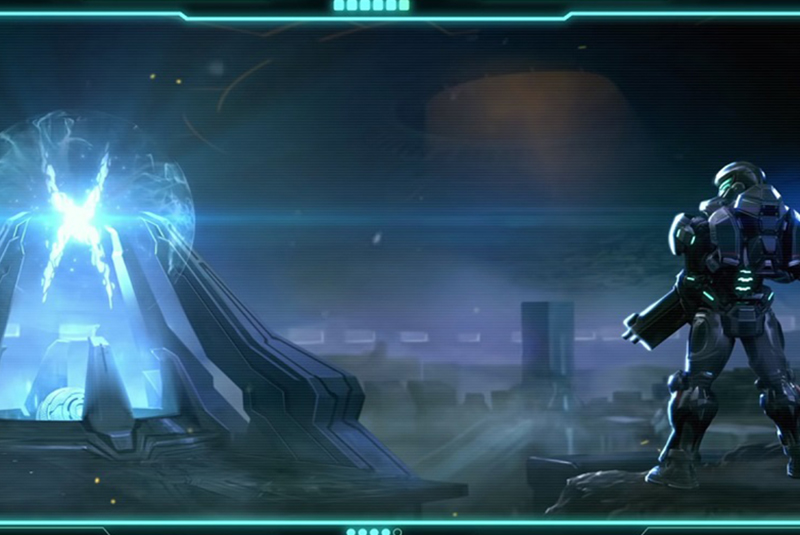
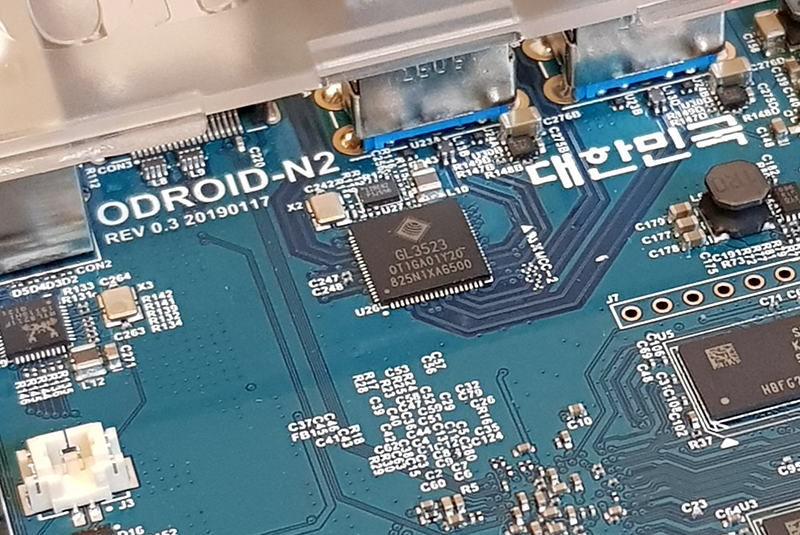
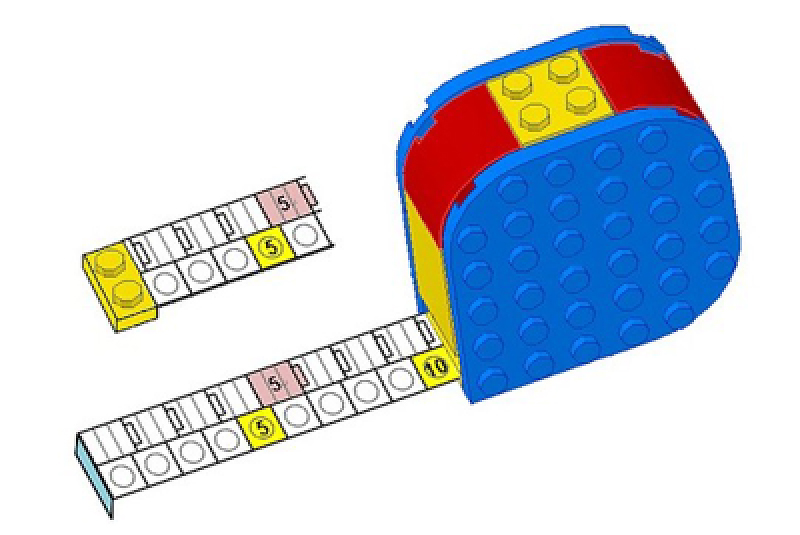


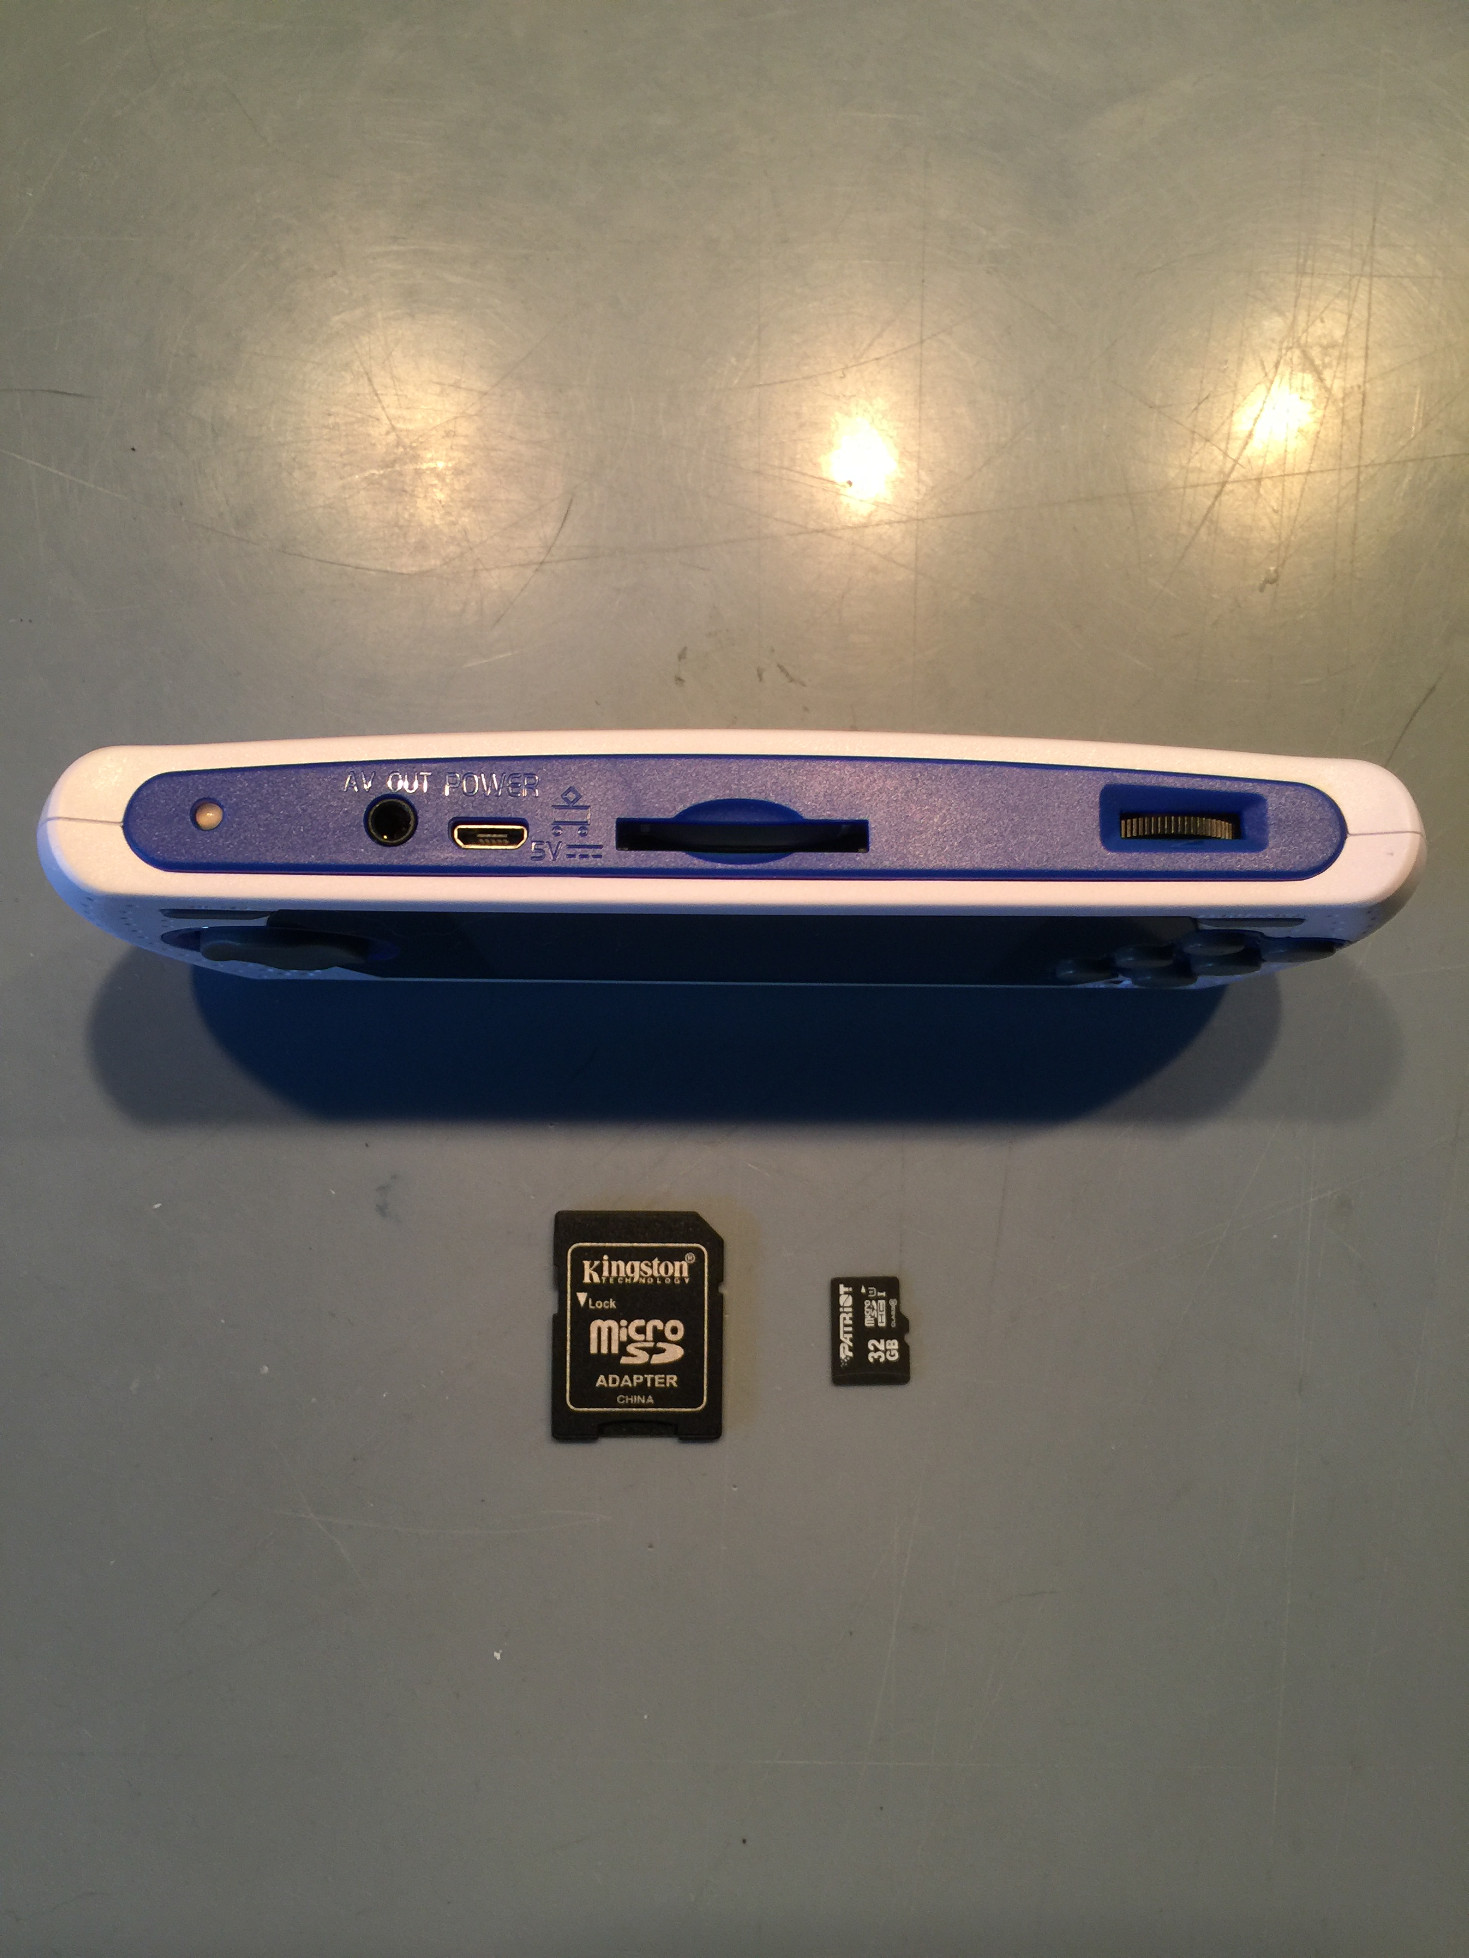
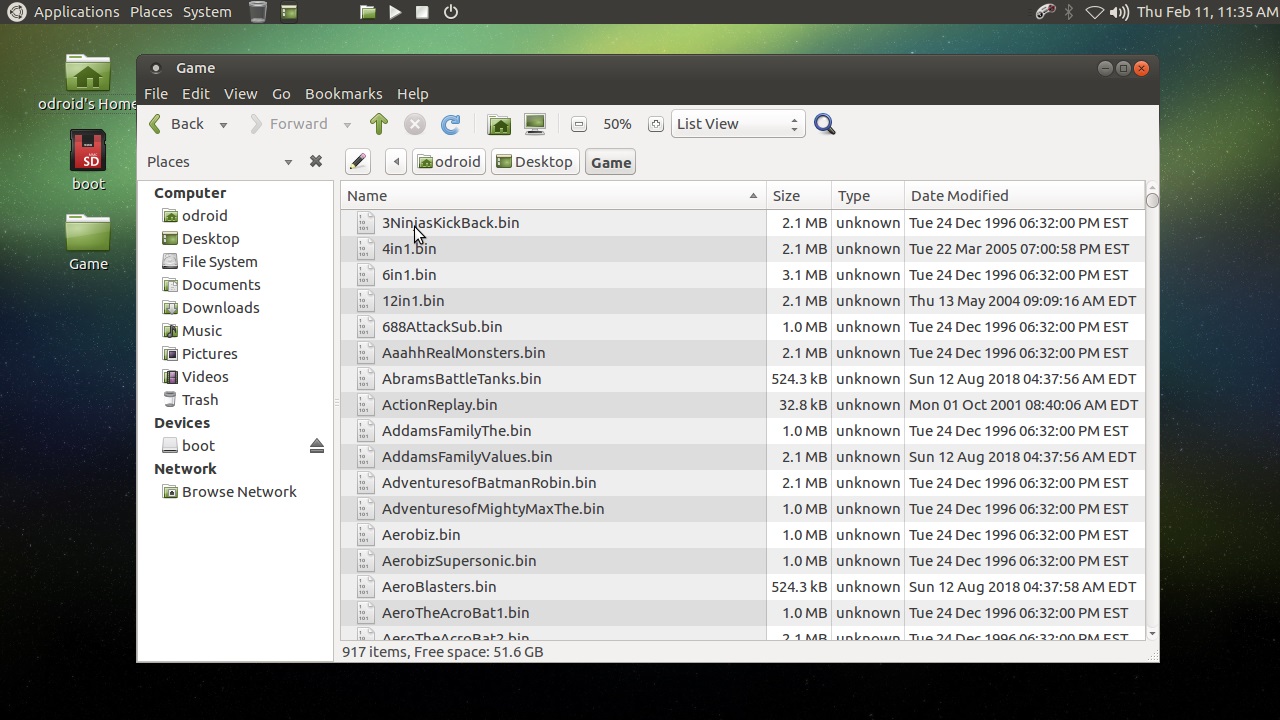
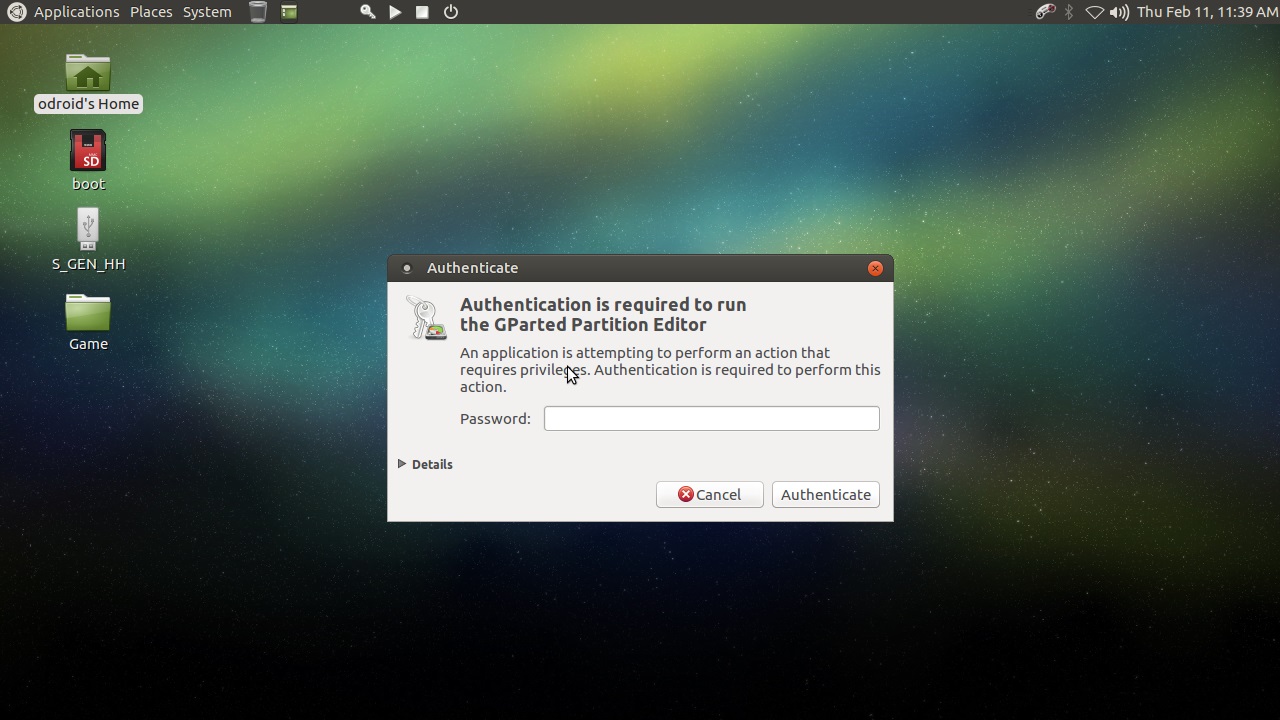
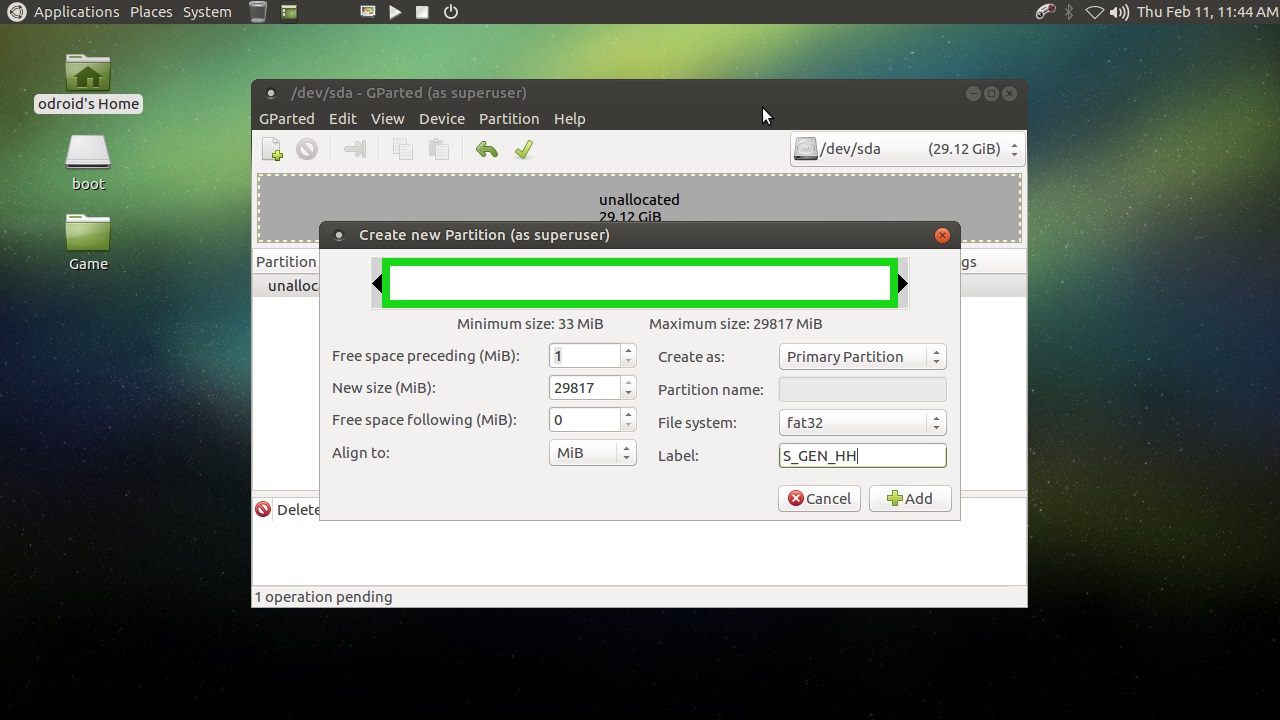

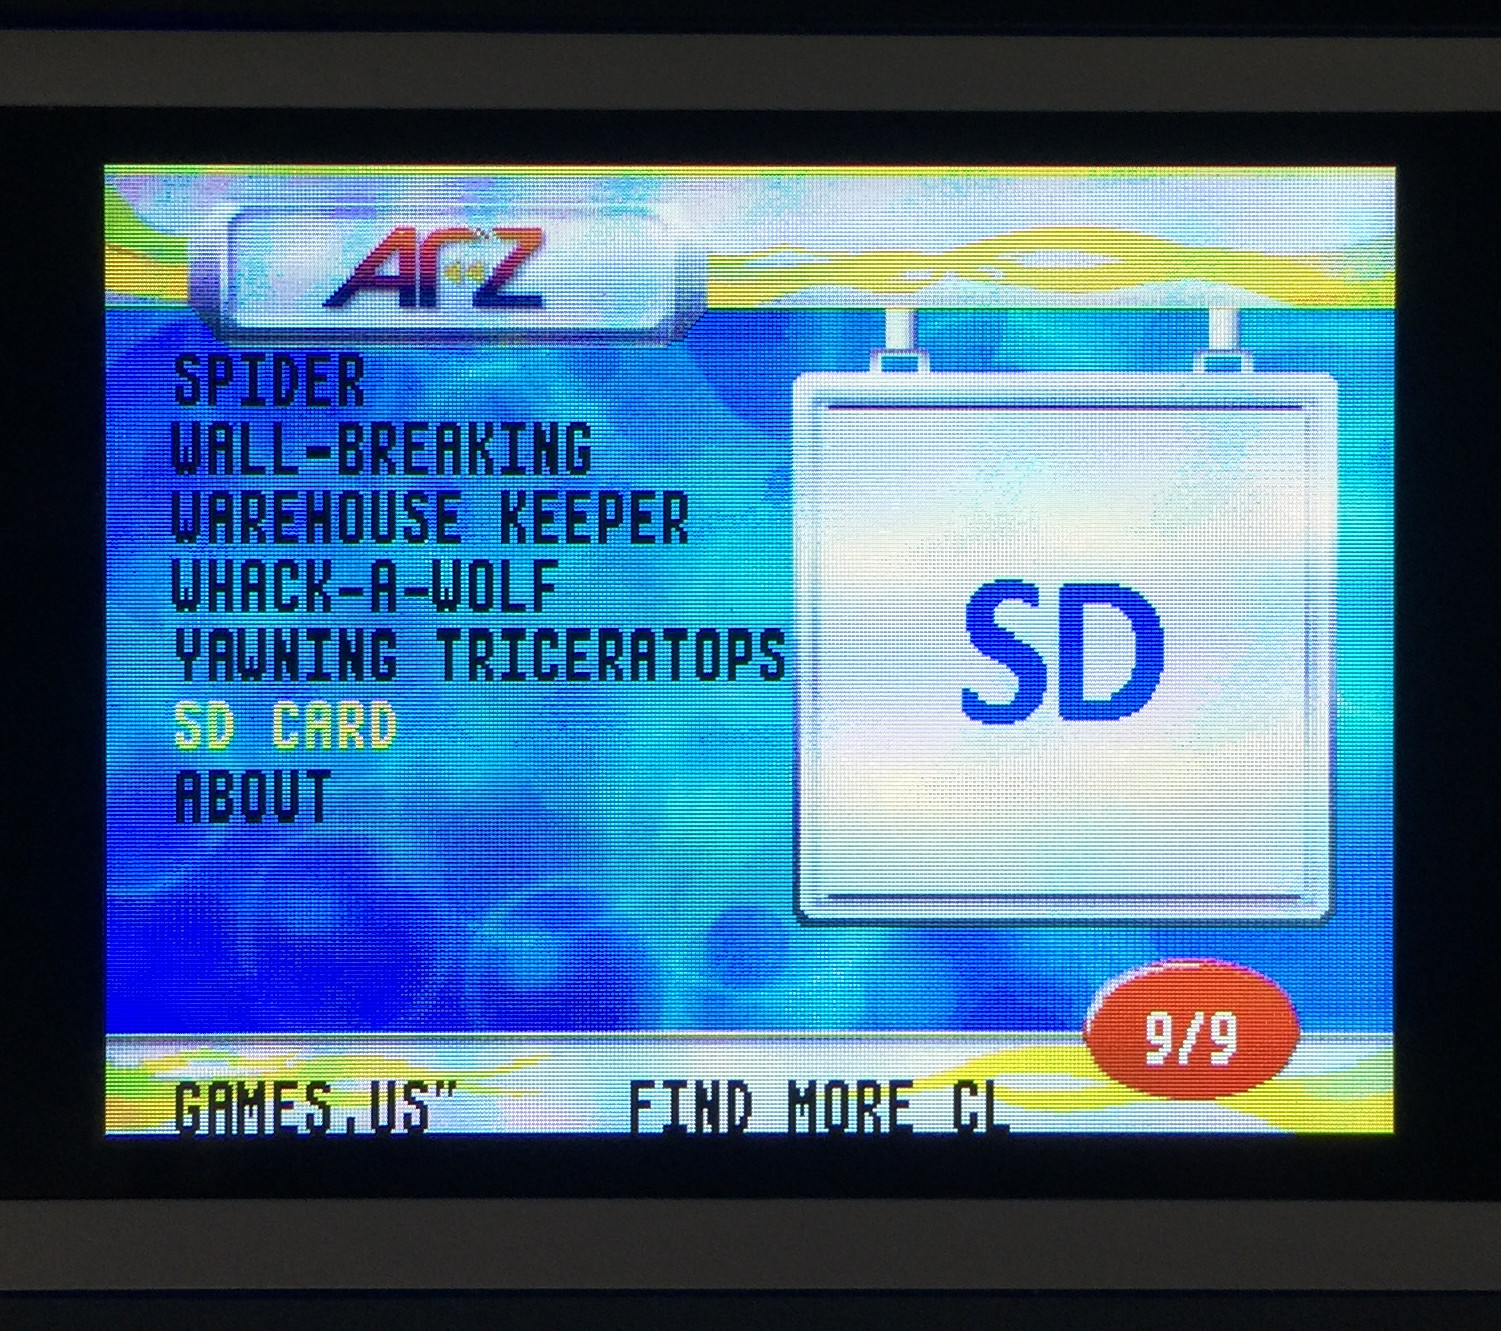
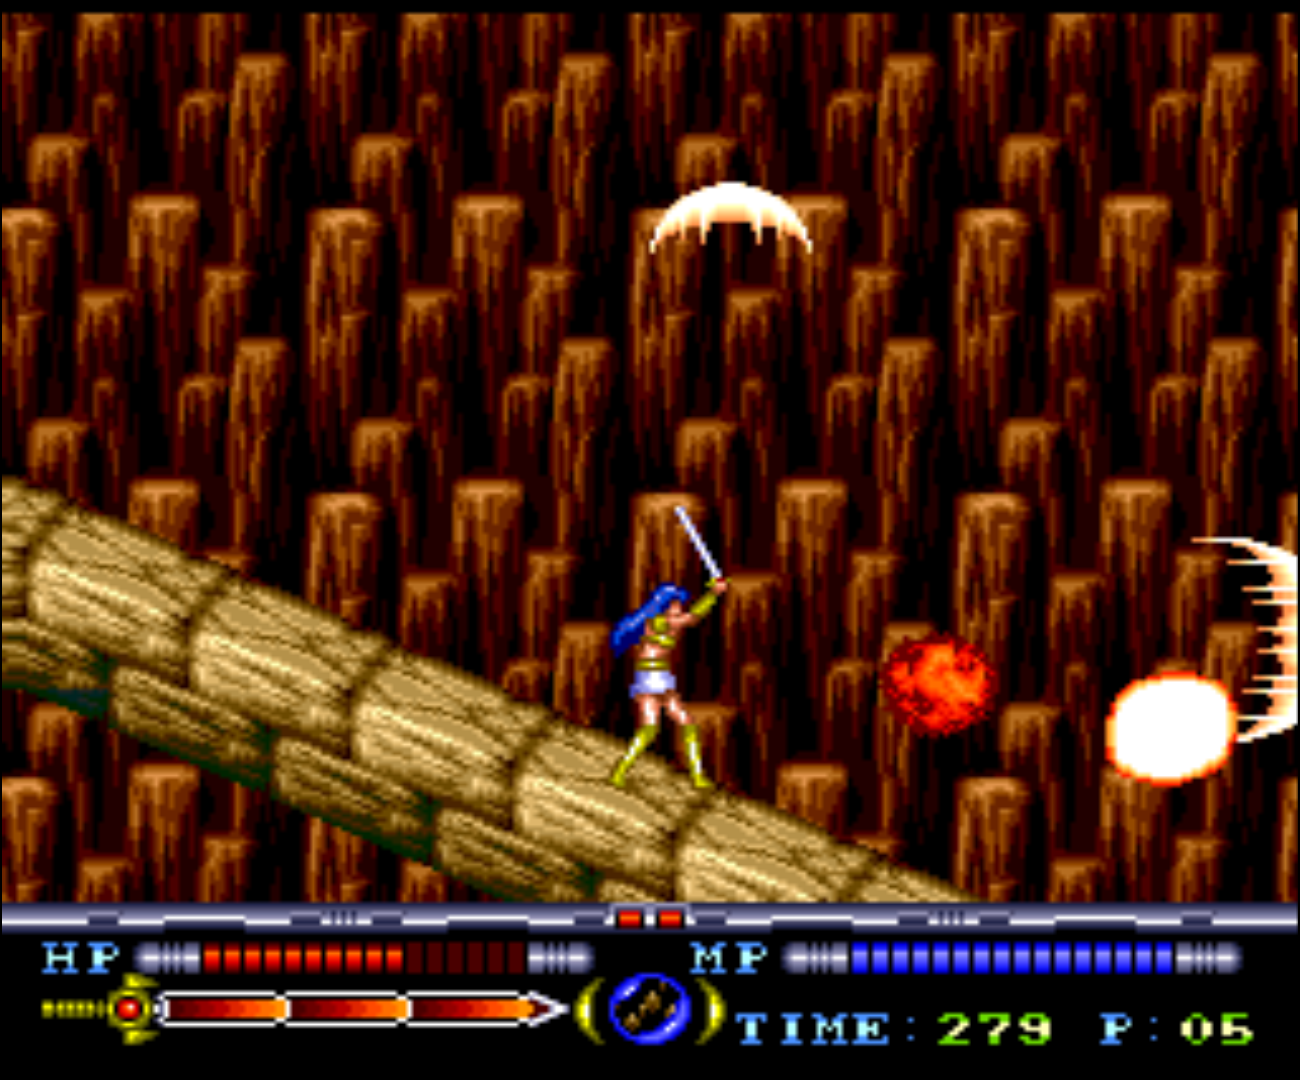
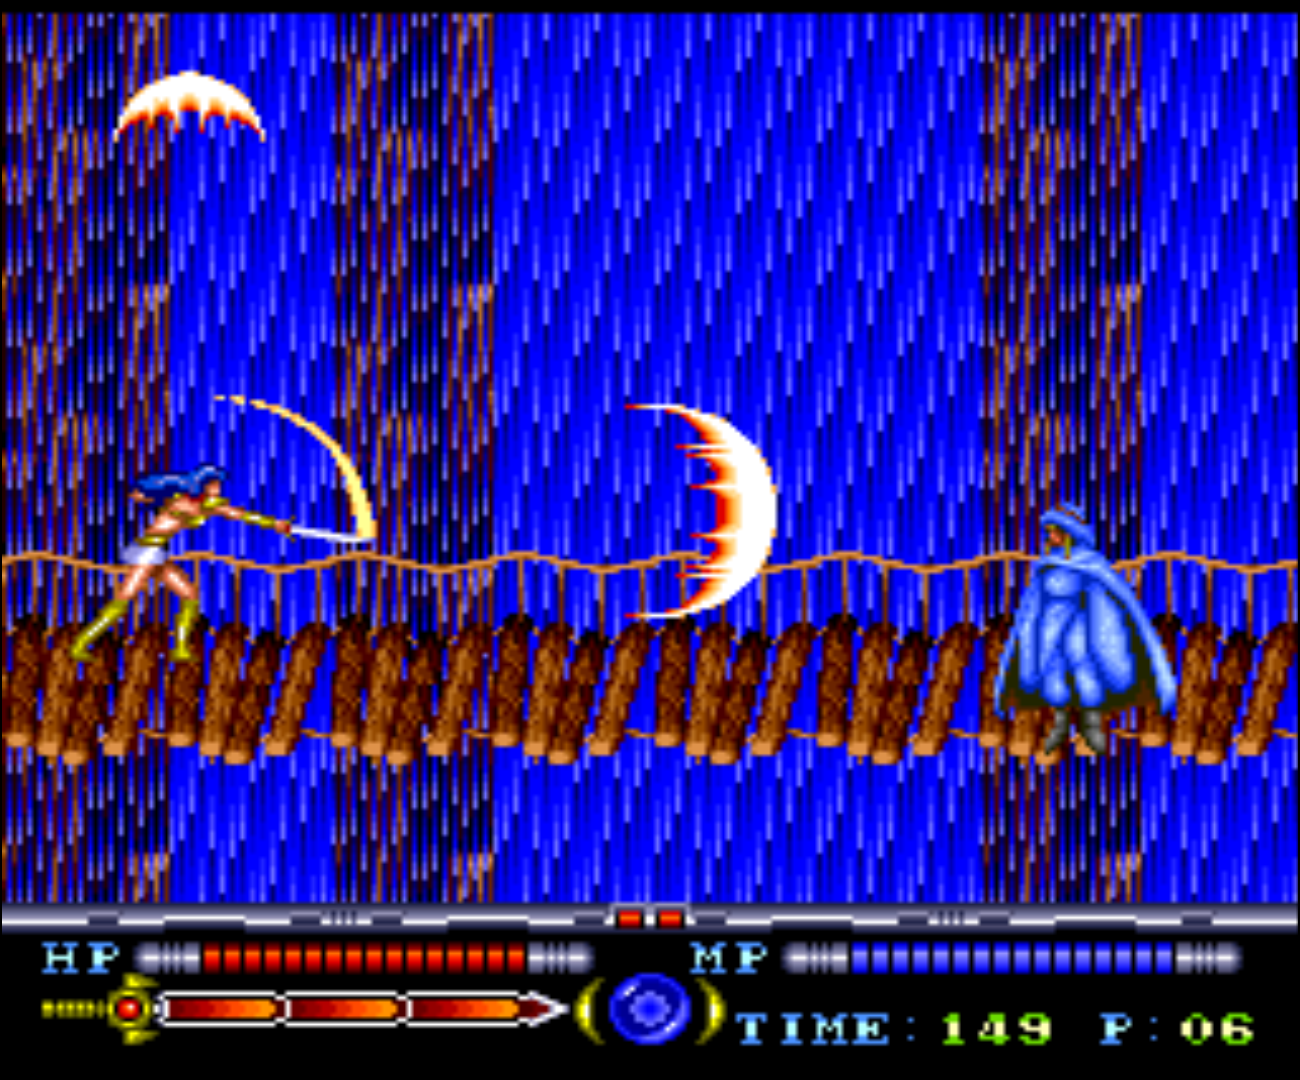
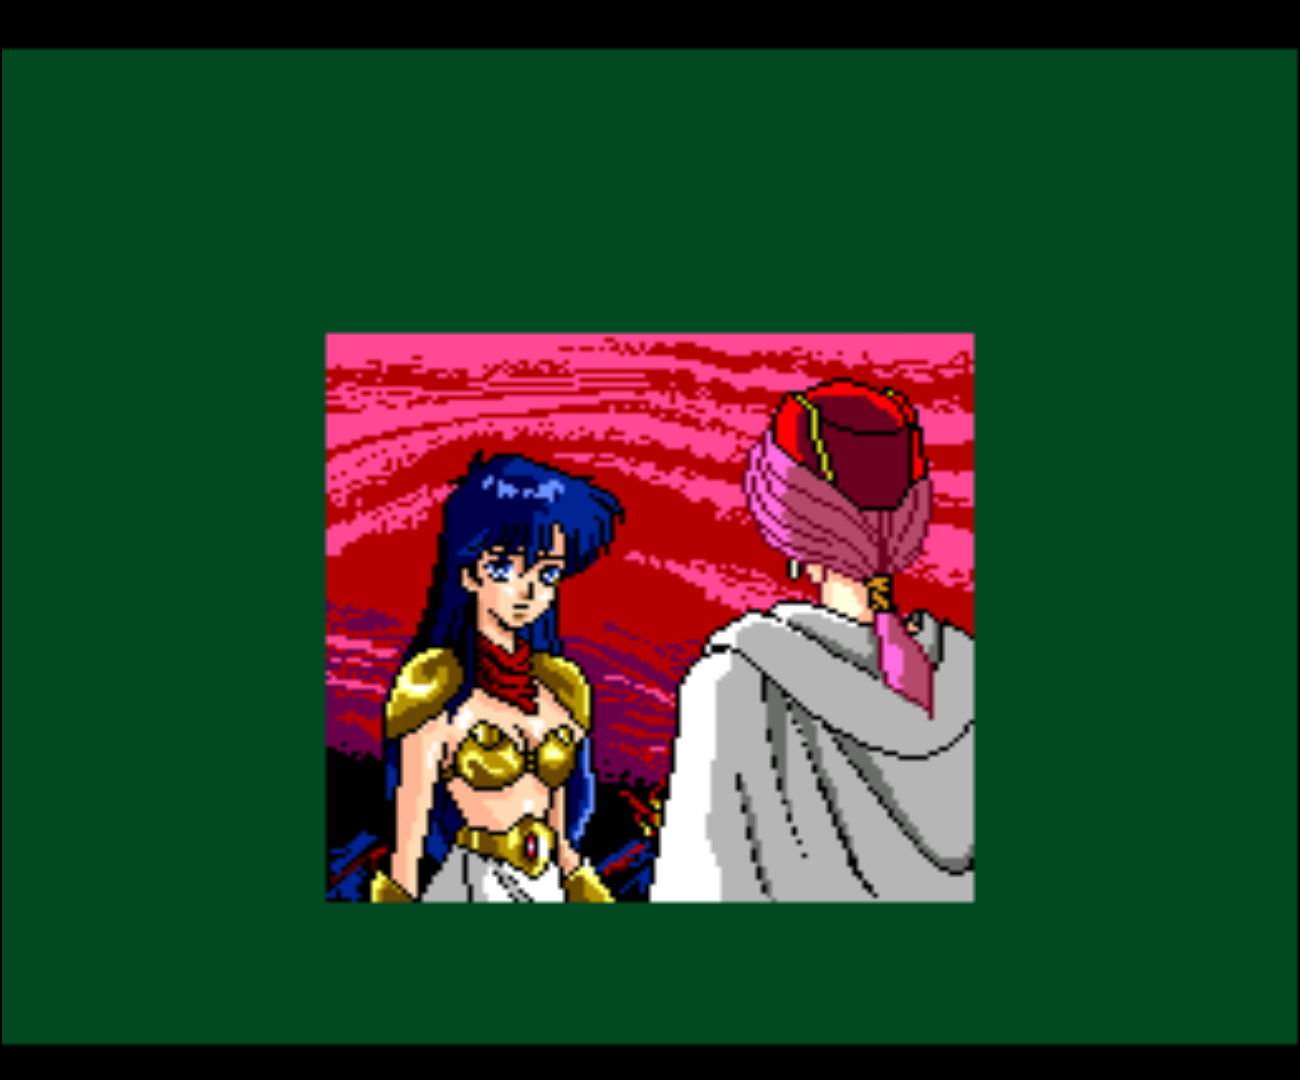
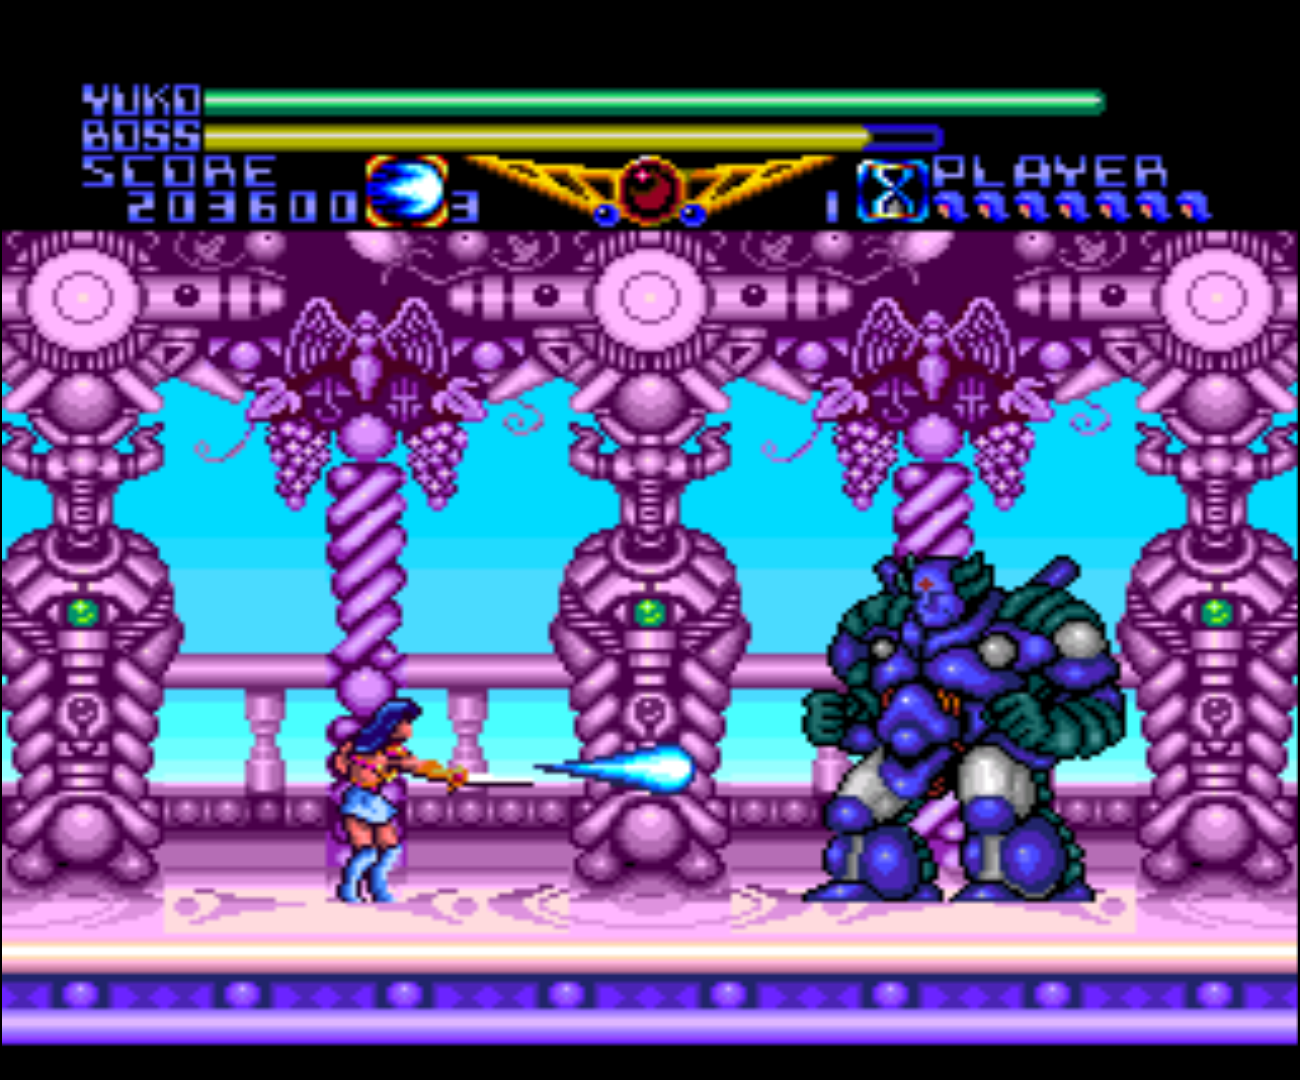

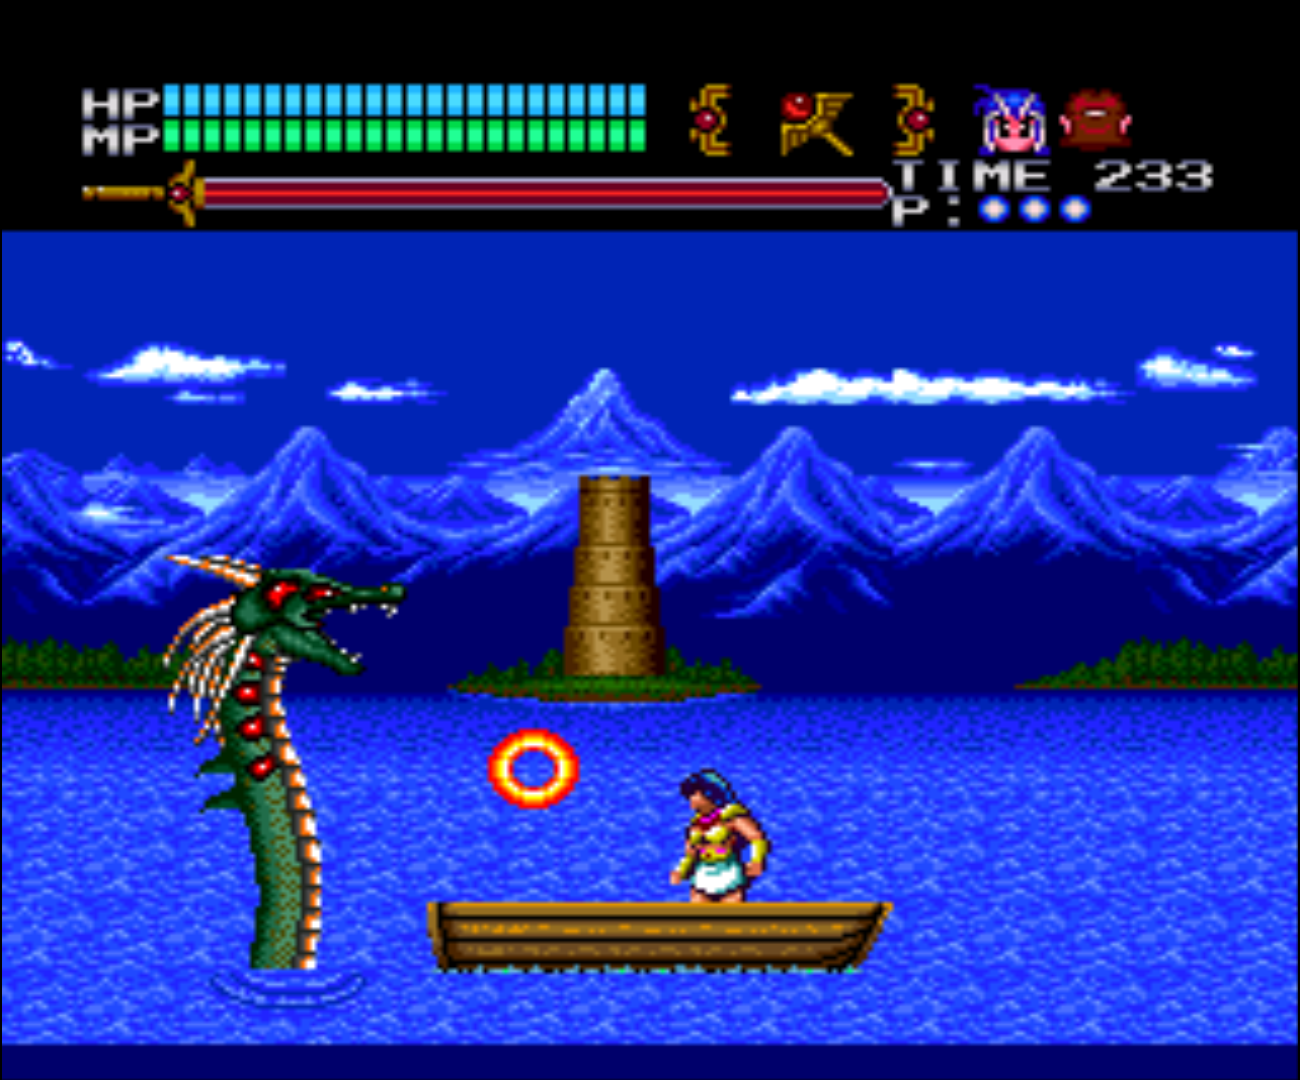
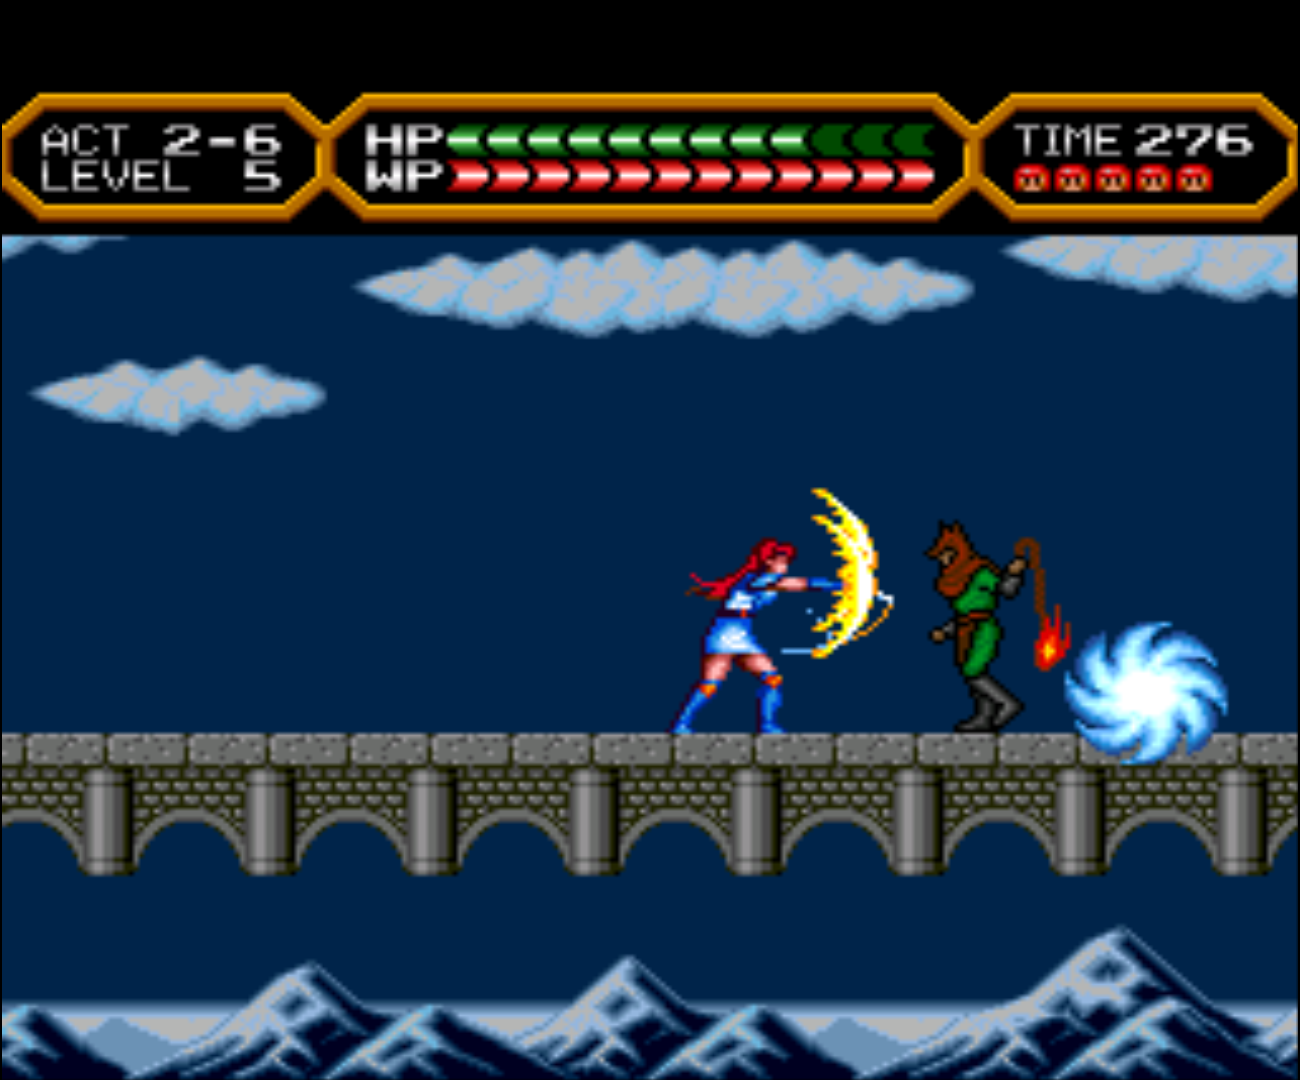
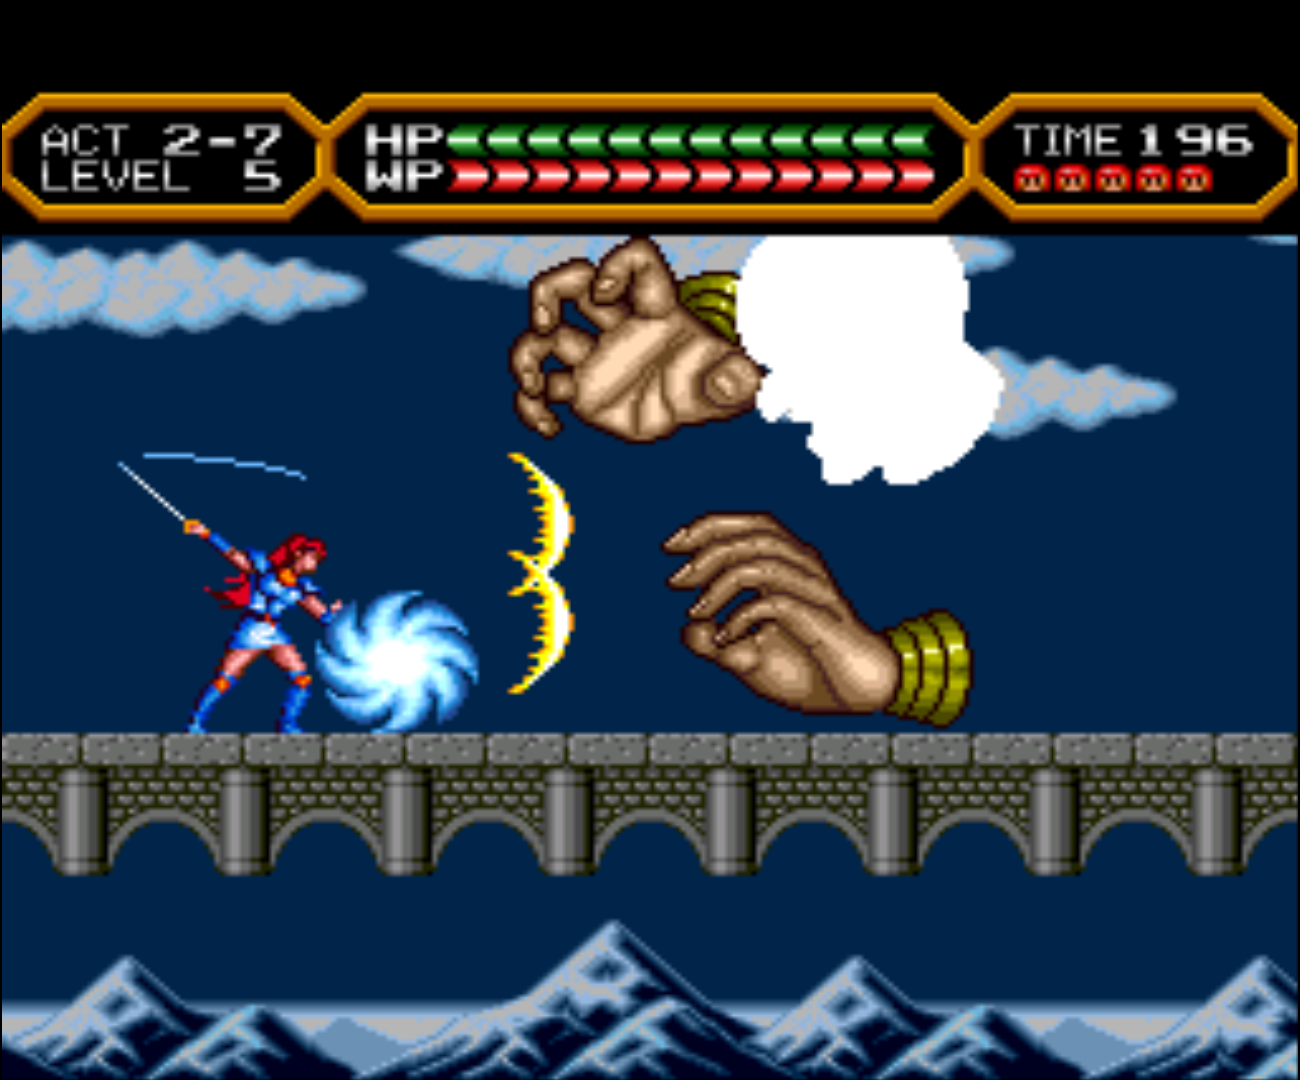
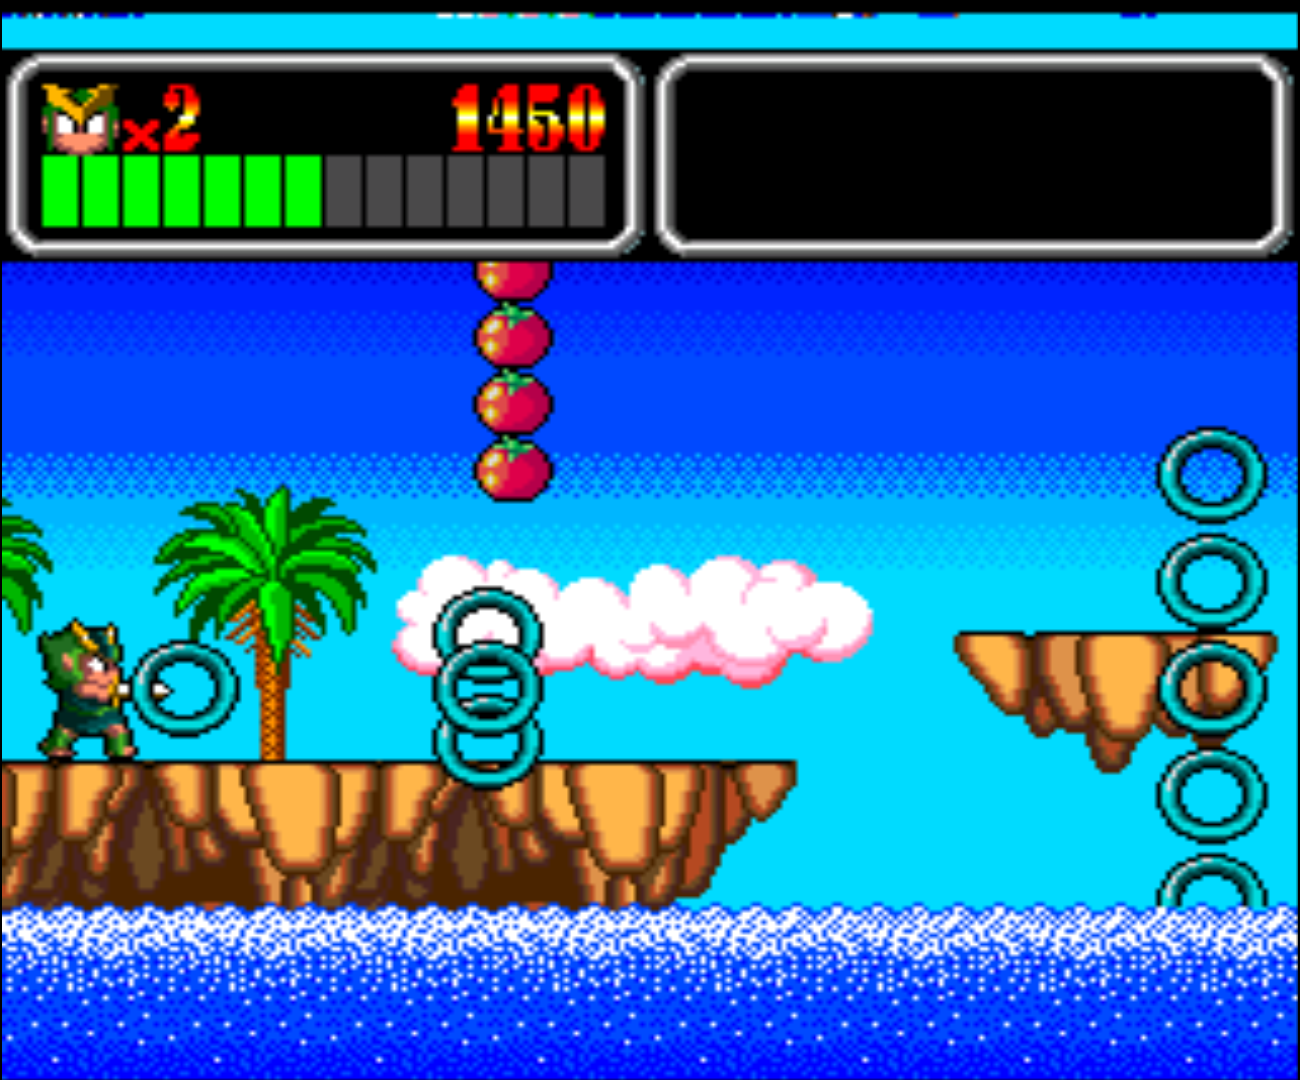 Figure 9 - Wonderful bright colors and comic like graphics