

I remember being an early adopter of 1 GbE networking in the 90s and many of my friends were wondering: who needs 1 GbE anyway? Twenty years later, I am an early adopter (but really not the first) of faster than 10 GbE at home and I hope that this article will convince you to become one too.
As of today economical solutions for deploying a 10 GbE network at home or in a small office are still uncommon and costly. The 10 GbE consumer market is unjustifiably overpriced (10 GbE has been in use in data centers and large organizations for around 15 years. All the issues and glitches have been tamed for quite some time. 10 GbE is NOT a new thing in the enterprise world, it’s more like “so passé”. This will not prevent consumer market companies to present it as the new best thing you must have). RJ-45 based 10 GbE NICs can cost more than $400. Only cards based on the Tehuti or Aquantia chipsets provide sub-$100 solutions. On the switch side, 10 GbE switches cost $300-500 for a limited (let’s say 4 or 5) number of ports (If you need at least 8 ports, the prices climb quickly; see, for instance, https://www.newegg.com/p/N82E16833156580 or https://www.newegg.com/p/N82E16833122848). If you need 18 ports or more, a 10 GbE switch will burn around $1,500 of your hard won money. Microtik, a Latvian company, sells 10 GbE switches at more affordable prices (sub-$200), but they use SFP+ not RJ45 (SFP+ by the way is a less expensive solution as of this writing). You also need to update your cabling, CAT-5e won’t carry 10 GbE, preferably you want to invest into CAT-6a. The main PC motherboards OEMs or NAS vendors are just finally proposing boards and appliances with 10 GbE NICs onboard.
Clearly the 10 GbE RJ-45 market is still nascent and prices still need to go down for it to become a mass market, as 1 GbE is today. I was tired of waiting for affordable 10 GbE solutions so I started to look for alternatives or second-hand hardware on eBay.
Although at first glance you may think it sounds a little preposterous if not ridiculous to think you can communicate at 10,000+ Mbps with a small single board computer (SBC), it is exactly what this article is going to show. It will also explain how you can do it yourself. So no I didn’t blow up a few MOSFETs in the upper layers of the gray matter that serve as my brain.
Intel was the initiator and king of the 1 GbE networking revolution back in the 90s. Most cards of the period were bearing the Intel chipsets. Not so with 10 GbE or higher. During the last 20 years successful start-ups like Mellanox, QLogic, and others targeted the data center market by offering 20 Gb/s, 40 Gb/s, 100 Gb/s, 200 Gb/s solutions (1 GbE means one gigabit over Ethernet per second. 1 Gb/s means one gigabit over a network the latter being Ethernet or something else). It does not stop at 200 Gb/s. If one doubles or triples the cabling then speeds of 400 Gb/s or 600 Gb/s can “easily” be achieved. As of this writing there is an AI company whose training and inference appliances have enough onboard RDMA-based NICs providing a whopping 2.4 Tb/s bandwidth. See interesting news report at https://www.servethehome.com/favored-at-facebook-habana-labs-eyes-ai-training-and-inferencing/. Nvidia has since then acquired Mellanox. Intel acquired QLogic. While acquisitions and consolidation have maintained a quick pace in the last 10 years, Mellanox was and is definitely the 800-pound gorilla of the fast interconnect industry.
Mellanox came up with an alternative to Ethernet: InfiniBand (aka IB) and RDMA. The latter means Remote Direct Memory Access. I will not spend time detailing the advantages of InfiniBand, just google it for more information. RDMA deserves some explanation. When you communicate over Ethernet using the IP (Internet Protocol) stack (i.e. TCP/IP) a lot of things happen on the local and destination computers. The data to be sent gets copied several times through the IP stack buffers on your local computer, then the packets transit as frames over the network, these packets are then reassembled on the destination computer where again the data gets copied multiple times through the IP stack buffers to finally end up in the destination application. Note that all these manipulations and data copying are performed by the CPU on each computer. That’s a lot of CPU cycles!
RDMA works in a drastically different manner: the “client” computer runs the application that initiates a request with the “server” computer that runs the target/destination application. The data to be sent is already present in the client application memory space so RDMA copies it directly over the network (InfiniBand) to the server application memory space. Done! No CPU involved, the communication is entirely handled by the InfiniBand NIC. Obviously, I’m somewhat simplifying but this the essence of RDMA in a few sentences, so you can imagine how performing RDMA let’s say over a 40 Gb/s network can be compared to IP over a 1 GbE Ethernet network.
Mellanox made a lot of $$$ and a name for itself by selling InfiniBand/RDMA hardware in huge numbers. Data centers and large organizations loved it. So much that they asked Mellanox if it could implement IP on top of it so that IP-based applications could run over InfiniBand/RDMA without code change. Mellanox obliged and came up with IP over IB (Internet Protocol over InfiniBand aka ipoib). Under competitors pressure and feature requests Mellanox then came up with RoCE (RDMA over Converged Ethernet). That’s basically the reverse: running RDMA over existing good quality Ethernet cables (saving data centers and large organizations a re-cabling of their facilities.)
After 20 years of activity and multiple upgrades and re-provisioning of InfiniBand hardware in data centers and large organizations it is not surprising to find a huge stash of used IB hardware on eBay at incredible prices. You can get 40 Gb/s NICs at prices starting as low as $20. You can also get 18-port 40 Gb/s unmanaged switches costing as low at $100~$125.
So why paying several hundred dollars for 10 GbE brand new hardware when you can get 40 Gb/s hardware for an order of magnitude less! You start thinking “But I know nothing about InfiniBand and RDMA”. Don’t worry, neither I did less than one year ago 🙂 You just have to be an avid reader of manuals and technical documentation.
Tips about eBay
- Check out the vendor before clicking on the Buy button.
- Good used enterprise computer hardware vendors include several pictures of the product, especially the one with the product label.
- If unsure contact the vendor for more details. The good ones do answer.
- Do not buy on impulse, do your homework and make a list of what you exactly want to buy.
- If you do not find a good deal, try again day after day for several weeks, good deals are constantly coming and going.
- One you received the items, test them right away. If you are sure they do not work contact the vendor, the good ones will accept returns or replacements.
Concise Minimal InfiniBand Vocabulary
| VPI | Virtual Protocol Interconnect |
| VPI Card | A Mellanox network card that can be configured as InfiniBand card or as Ethernet. With dual cards, one port can be InfiniBand and the other port Ethernet. |
| EN Card | A Mellanox network card that is exclusively Ethernet. |
| RDMA | Remote Direct Memory Access |
| IPoIB | Internet Protocol over InfiniBand. Allows you to run IP-based applications on top of RDMA. |
| RoCE | RDMA over Converged Ethernet. If you are wondering what the “Converged” means just know it is just a marketing buzzword. From a technological viewpoint there is no converged Ethernet. There is just Ethernet. The converged qualifier was invented to sell the fact that most network protocols were now converging to run on top of Ethernet. It was part of the marketing war that occurred between Mellanox and Chelsio (iWarp) during which the latter was trying to disparage InfiniBand. Anyway, it’s like saying that celebrities are converged people. |
| SFP | Small Form-factor Pluggable. A small transceiver that plugs into the SFP port of a network switch and connects to Fibre Channel and Gigabit Ethernet (GbE) optical fiber cables at the other end. There are multiple types. Usually 1 GbE. |
| SFP+ | Enhanced small form-factor pluggable. Usually 10 GbE or 10 Gb/s. |
| QSFP, QSFP+ | Quad Small Form-factor Pluggable (QSFP). 4-lane cable, up to 40 Gb/s. |
| QSFP14 | Cables up to 56 Gb/s |
| QSFP28 | Cables up to 100 Gb/s |
| DAC | Direct Attached Cable (almost a synonym of passive copper cable) |
| AOC | Active Optical Cable |
Network Bandwidth
| Name | Line Encoding | Speed for 4 x lane cables | |
|---|---|---|---|
| SDR | Single Data Rate | 8b10b | 10 Gb/s |
| DDR | Double Data Rate | 8b10b | 20 Gb/s |
| QDR | Quad Data Rate | 8b10b | 40 Gb/s |
| FDR10 | Fourteen Data Rate | 8b10b | 56 Gb/s |
| FDR | Fourteen Data Rate | 64b66b | 56 Gb/s |
| EDR | Enhanced Data Rate | 64b66b | 100 Gb/s |
| HDR | High Data Rate | 64b66b | 200 Gb/s |
All these speeds are available today. The vast majority of InfiniBand (or Ethernet SFP) cables are 4-lane cables. However there are 8-lane and 12-lane cables. With these cables the maximum theoretical speed is doubled or tripled.
So when you look at IB products on eBay, you will mostly see QDR or FDR cards, switches and cables for reasonable prices. The used EDR hardware is more expensive. Be careful with FDR and FDR10, many vendors do not distinguish although there is a real difference between the two.
This leads me to the “Line Encoding” column included in the table above. Transmitting bits over a line consists in the case of let’s say a copper wire in squared signals of high and low voltage using a frequency based on the clock. If we want to send 1,000 bits equal to 1 as is the electrical would become a very long signal of high voltage. This bring multiple issues: first such a long signal will not work well, second the transceivers will have great pain to maintain the synchronization of their clocks: the square signal becomes basically MIA. So for physical reasons you want to limit the number of consecutive bits of the same value. To do so the transceivers scramble the data. The transmitter scrambles the data and add a few bits that will allow the receiver to descramble them. I’m simplifying here, but that’s basically the story.
The 8b10b line encoding means each time you send 8 bits, the very low level of the NIC will scramble them and add 2 bits to allow the receiver to descramble them. This has an obvious effect on the bandwidth purely dedicated to your data aka the payload. If you feel a sudden angry pressure to start a “Save the Bandwidth!” online movement, don’t do it. Line encoding is pervasive and you have been using it since you were born. Examples: PCI Express 3, SATA 3, DisplayPort 2.0 use 128b/130-132b, USB 3.1 Gen 1 uses 8b/10b while USB 3.1 Gen 2 128b/132b.
The difference between FDR10 and FDR is now easily explained. FDR10 provides 56 x 8 / 10 = 44.8 Gb/s max bandwidth. FDR provides 56 x 64 / 66 = 54.3 Gb/s. So before buying an FDR card, switch or cable refer to the model number and its documentation to be sure. Mellanox has switches that bear the same model number where only the sub-number tells you if it is FDR10 or FDR. In doubt, ask the vendor to confirm what the model is.
For QDR, the max bandwidth is 40 x 8 / 10 = 32 Gb/s.
After this introduction, let’s now see how you can do 10,000+ Mbps with the ODROID-H2.
ODROID-H2
The ODROID-H2 is an SBC from Hard Kernel, a Korean based manufacturer of small boards. You probably have heard of Raspberry Pi the first series of products who popularized the usage of SBCs. Many agree that Hard Kernel is the number two of the SBC market. Hard Kernel makes more powerful SBCs than Raspberry, makes sure that the Linux and Android solutions are of good quality and supports the hardware well, sells plenty of accessories allowing you to extend the applicability of their boards, publishes a magazine, maintains a wiki and has a very active forum community with dedicated members who are glad to answer questions and provide help.
If you combine all of that think of Hard Kernel like the Ikea of the SBC world.
For a detailed reference about the H2, see:
- the product page at https://www.hardkernel.com/shop/odroid-h2/
- the wiki page at https://wiki.odroid.com/odroid-h2/start
- the forum pages at https://forum.odroid.com/viewforum.php?f=167
- the main Odroid distributor in the US is Ameridroid: https://ameridroid.com/products/odroid-h2
PCIe with H2
The Mellanox NICs are PCIe cards. The H2 has no PCIe slot. So what are we going to do? The H2 board has on the back an NVMe slot PCIe 2 with 4 lanes (PCIe 2 x4). We can use an NVMe PCIe x4 SSD for very fast disk I/O… or we can use an NVMe to PCIe x4 adapter to get the PCIe slot we need. A good adapter is the ADT Link model or a similar alternative, as shown in Figures 1 and 2.
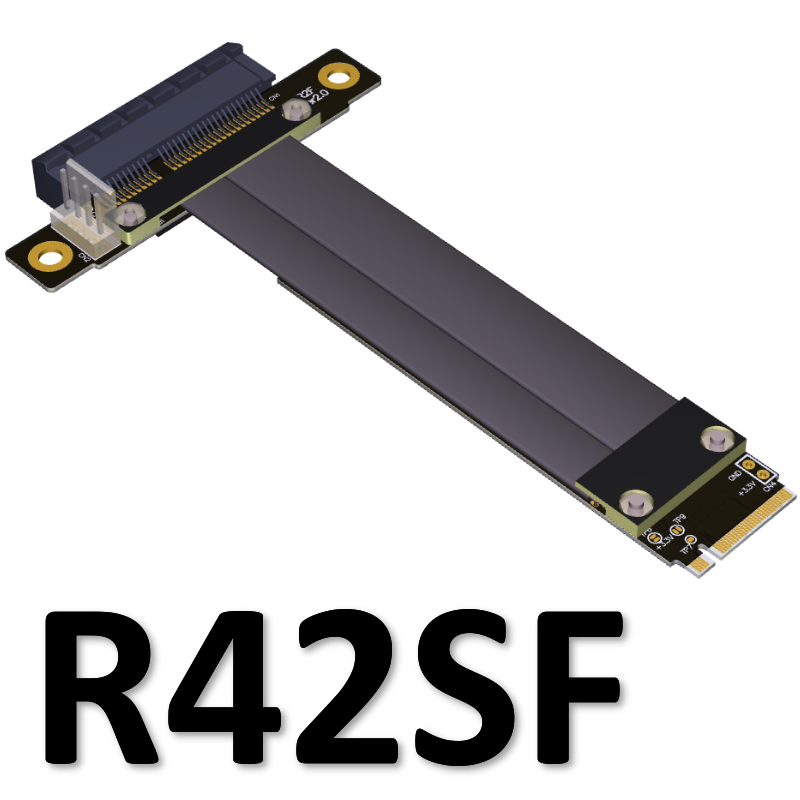
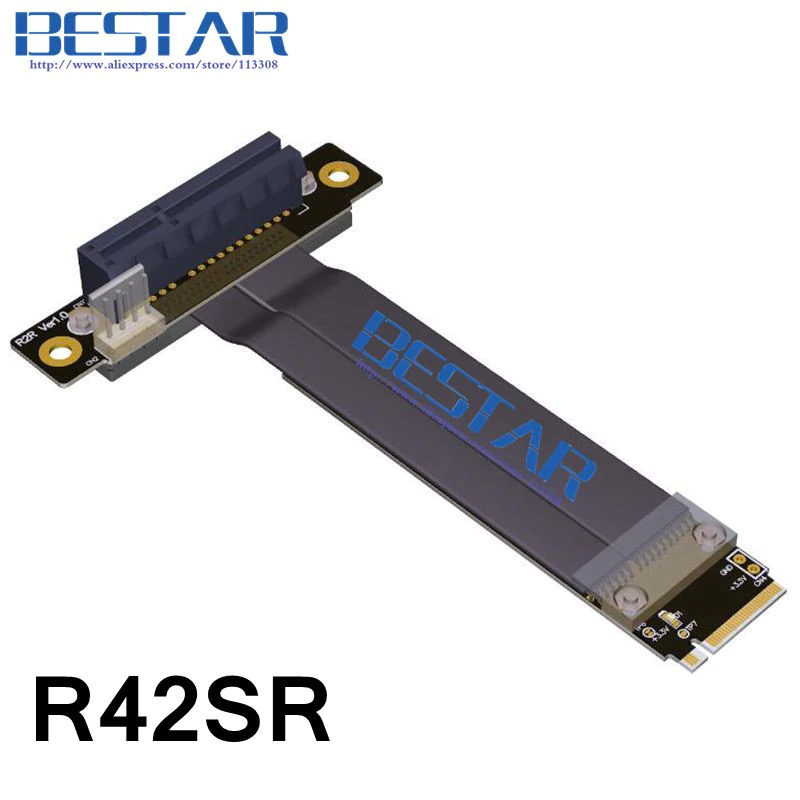
In both cases, you can customize the adapter: its length, the orientation of the PCIe slot (forward, top, bottom). Choose the option the most convenient to your project. On one end you have an M.2 M key connector, on the other end an open ended PCIe x4 slot.
Software Packages
Let’s now install the minimal set of packages we need for going through this article.
# Linux utilities
~$ sudo apt install vim htop iperf3 net-tools parted inxi smartmontools ssh# InfiniBand packages
~$ sudo apt install rdma-core opensm ibutils ibverbs-utils infiniband-diags perftest mstflint
Linux Utilities Packages Description
| vim | Vim is an almost compatible version of the UNIX editor Vi. Many new features have been added: multi level undo, syntax highlighting, command line history, on-line help, filename completion, block operations, folding, Unicode support, etc.
Note: many of you use nano anyway. |
| htop | htop is an ncurse-based process viewer similar to top, but it allows one to scroll the list vertically and horizontally to see all processes and their full command lines. |
| iperf3 | iperf3 is a tool for performing network throughput measurements. It can test either TCP or UDP throughput. This is a new implementation that shares no code with the original iperf from NLANR/DAST and also is not backwards compatible. This package contains the command line utility. |
| net-tools | This package includes the important tools for controlling the network subsystem of the Linux kernel. This includes arp, ifconfig, netstat, rarp, nameif and route. Additionally, this package contains utilities relating to particular network hardware types (plipconfig, slattach, mii-tool) and advanced aspects of IP configuration (iptunnel, ipmaddr). In the upstream package 'hostname' and friends are included. Those are not installed by this package, since there is a special "hostname*.deb". |
| parted | GNU Parted is a program that allows you to create, destroy, resize, move, and copy disk partitions. This is useful for creating space for new operating systems, reorganizing disk usage, and copying data to new hard disks. Parted currently supports DOS, Mac, Sun, BSD, GPT, MIPS, and PC98 partitioning formats, as well as a "loop" (raw disk) type which allows use on RAID/LVM. It can detect and remove ASFS/AFFS/APFS, Btrfs, ext2/3/4, FAT16/32, HFS, JFS, linux-swap, UFS, XFS, and ZFS file systems. Parted also has the ability to create and modify file systems of some of these types, but using it to perform file system operations is now deprecated.
Note: parted is the replacement for fdisk when you have to create partitions larger than 2TB. Once you get used to parted, you use it no matter the size of the partitions you want to create and stop using fdisk. |
| inxi | inxi is a system information script that can display various things about your hardware and software to users in an IRC chatroom or support forum. It runs with the /exec command in most IRC clients. |
| smartmontools | The smartmontools package contains two utility programs (smartctl and smartd) to control and monitor storage systems using the Self-Monitoring, Analysis and Reporting Technology System (S.M.A.R.T.) built into most modern ATA and SCSI hard disks. It is derived from the smartsuite package, and includes support for ATA/ATAPI-5 disks. It should run on any modern Linux system. |
| ssh | This metapackage is a convenient way to install both the OpenSSH Client and the OpenSSH Server.
ssh (Secure Shell) is a program for logging into a remote machine and for executing commands on a remote machine. It provides secure encrypted communications between two untrusted hosts over an insecure network. X11 connections and arbitrary TCP/IP ports can also be forwarded over the secure channel. It can be used to provide applications with a secure communication channel. OpenSSH Client This package provides the ssh, scp and sftp clients, the ssh-agent and ssh-add programs to make public key authentication more convenient, and the ssh-keygen, ssh-keyscan, ssh-copy-id and ssh-argv0 utilities. OpenSSH Server This package provides the sshd server. |
InfiniBand Packages Description
| rdma-core | RDMA core userspace infrastructure and documentation
This package provides the basic boot time support for systems that use the Linux kernel's remote direct memory access (RDMA) sub-system which includes InfiniBand, iWARP, and RDMA over Converged Ethernet (RoCE). Several kernel RDMA support daemons are included: - The rdma-ndd daemon which watches for RDMA device changes and/or hostname changes and updates the Node Description of the RDMA devices based on those changes. - The iWARP Port Mapper Daemon (iwpmd) which provides a kernel support service in userspace for iWARP drivers to claim TCP ports through the standard socket interface. |
opensm | InfiniBand subnet manager
OpenSM provides an implementation of an InfiniBand Subnet Manager (SM) and Administrator (SA). One Subnet Manager is required to run on each InfiniBand subnet in order to initialize the InfiniBand hardware. |
| ibutils | InfiniBand network utilities
This package contains a set of utilities useful for diagnosing and testing InfiniBand based networks. |
| ibverbs-utils | Examples for the libibverbs library
libibverbs is a library that allows userspace processes to use RDMA "verbs" as described in the InfiniBand Architecture Specification and the RDMA Protocol Verbs Specification. iWARP ethernet NICs support RDMA over hardware-offloaded TCP/IP, while InfiniBand is a high-throughput, low-latency networking technology. InfiniBand host channel adapters (HCAs) and iWARP NICs commonly support direct hardware access from userspace (kernel bypass), and libibverbs supports this when available. This package contains useful libibverbs1 example programs such as ibv_devinfo, which displays information about InfiniBand devices. |
| infiniband-diags | InfiniBand diagnostic programs
InfiniBand is a switched fabric communications link used in high-performance computing and enterprise data centers. Its features include high throughput, low latency, quality of service and failover, and it is designed to be scalable. This package provides diagnostic programs and scripts needed to diagnose an InfiniBand subnet. |
| perftest | InfiniBand verbs performance tests
This is a collection of tests written using InfiniBand verbs intended for use as a performance micro-benchmark. The tests can measure the latency and bandwidth of InfiniBand fabrics. |
| mstflint | Mellanox firmware burning application and diagnostics tools
This package contains a burning tool and diagnostic tools for Mellanox manufactured host channel adapters (HCA) and network interface cards (NIC). This burning tool should be used only with Mellanox manufactured HCA/NIC cards. Using it with cards manufactured by other vendors may be harmful to the cards (due to different configurations). Using the diagnostic tools is normally safe for all HCAs/NICs. |
Mellanox InfiniBand Network Cards
At this point we assume the ADT link is securely connected to the board, the card inserted in the PCIe slot, the H2 has a working Ubuntu 18.04 OS. Let’s start the H2 and open a terminal.
Identifying the Mellanox card on the PCIe bus
Let’s look for the card using the lspci utility command. Type:
~$ lspci | grep MellanoxThis should return something similar to this:
01:00.0 InfiniBand: Mellanox Technologies MT25408A0-FCC-QI ConnectX, Dual Port 40Gb/s InfiniBand / 10GigE Adapter IC with PCIe 2.0 x8 5.0GT/s In... (rev b0)To get the Link capabilities and status, type:
~$ sudo lspci -vv -s 01:00.0 | grep WidthThis should return two lines similar to these:
LnkCap: Port #8, Speed 5GT/s, Width x8, ASPM L0s, Exit Latency L0s unlimited, L1 unlimited
LnkSta: Speed 5GT/s, Width x4, TrErr- Train- SlotClk- DLActive- BWMgmt- ABWMgmt-
LnkCap means link capabilities. See above (Speed 5GT/s, Width x8). This card is capable of handling 5 GT/s (GigaTransfers per second - see https://en.wikipedia.org/wiki/Transfer_(computing) and https://paolozaino.wordpress.com/2013/05/21/converting-gts-to-gbps/) over 8 PCIe lanes. LnkSta means link status. See above (Speed 5GT/S, Width x 4). The card will handle 5GT/s but only 4 PCIe lanes are available.
Due to this reduction in available PCIe lanes, we will lose more bandwidth.
What to do if the card does not show up?
1. Did you type lspci | grep Mellanox or lspci | grep mellanox? The “M” should be capitalized.
2. If the card is really not showing up
- reboot the H2,
- press the Delete key several times at boot time (when the Hard Kernel logo appears) so that you enter the BIOS,
- inside the BIOS, go to Chipset and then PCI Express Configuration
- inside PCI Express Configuration disable PCI Express Clock Gating:
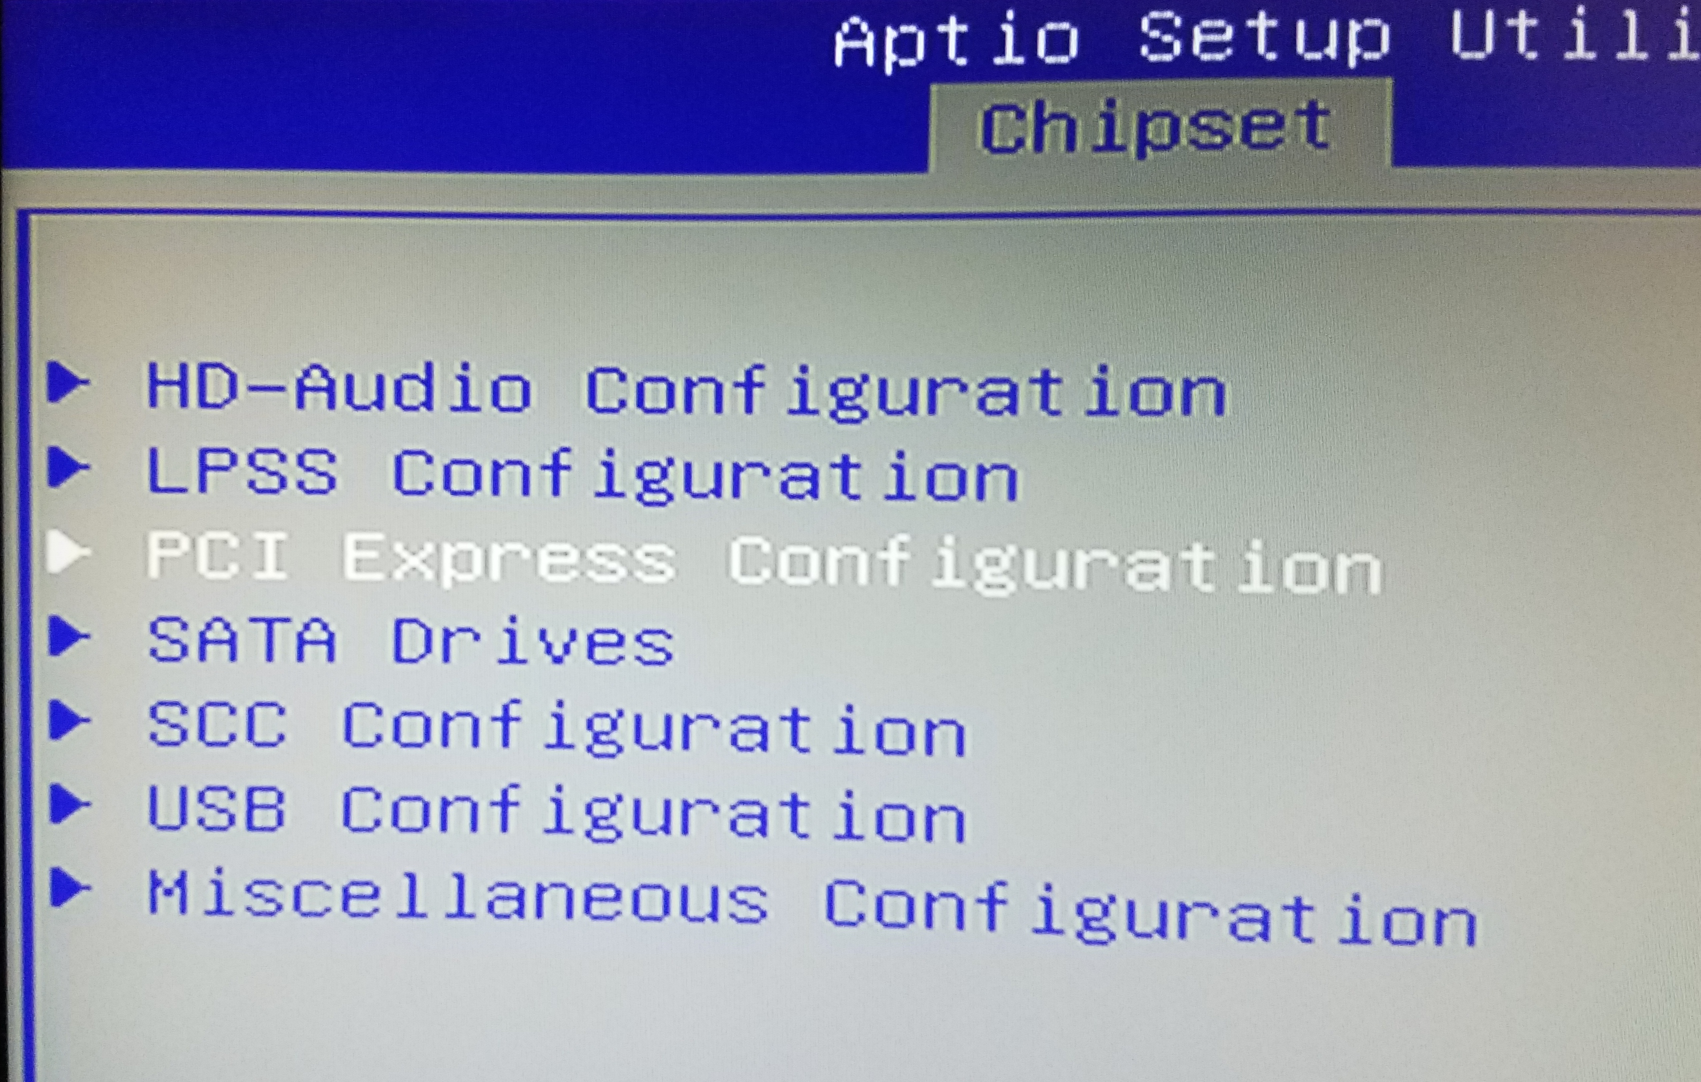
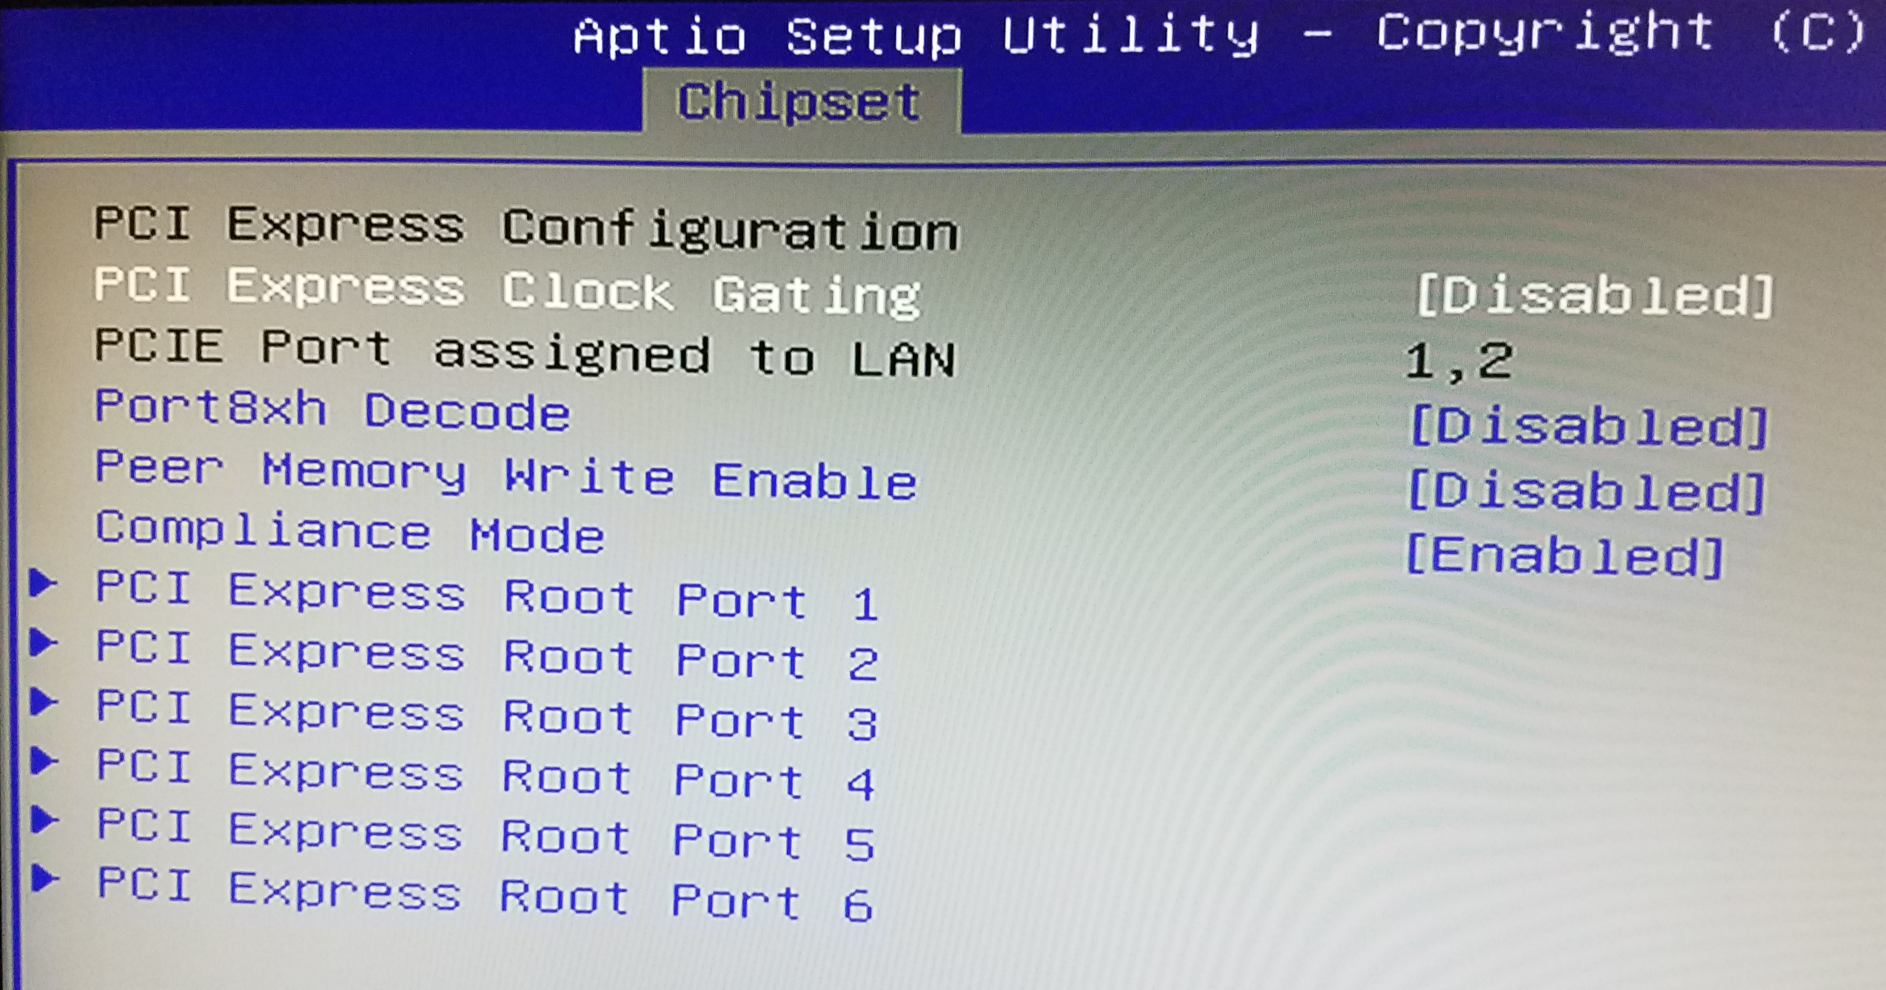
Save the BIOS changes, wait for the H2 to reboot and try again.
From this point, we assume the card correctly shows up in lspci, inxi and any other Linux tools showing the hardware present on the board. To display more information about the Mellanox card, let’s use the mstflint command:
~$ sudo mstflint -d 01:00.0 queryThis should return something similar to this:
Image type:            FS2
FW Version:            2.9.1000
Device ID:             26428
Description:           Node             Port1            Port2            Sys image
GUIDs:                 0002c9030010ea44 0002c9030010ea45 0002c9030010ea46 0002c9030010ea47
MACs:                                       0002c910ea44     0002c910ea45
VSD:
PSID:                  MT_0FC0110009
The three fields that interests us at this point are FW Version, Device ID and PSID.
FW Version: it is the firmware version currently running on the card. For this particular card, 2.9.1000 is the current (and final) firmware. No update necessary.
PSID (Parameter-Set Identification): it is a 16-ascii character string embedded in the firmware image which provides a unique identification of the device. An intrinsically identical model (in terms of hardware) will have different PSID depending on who is distributing the product and under which brand.
Device ID: not sure, never got the gist of that one. Looks like a device ID that can be shared by several model revisions.
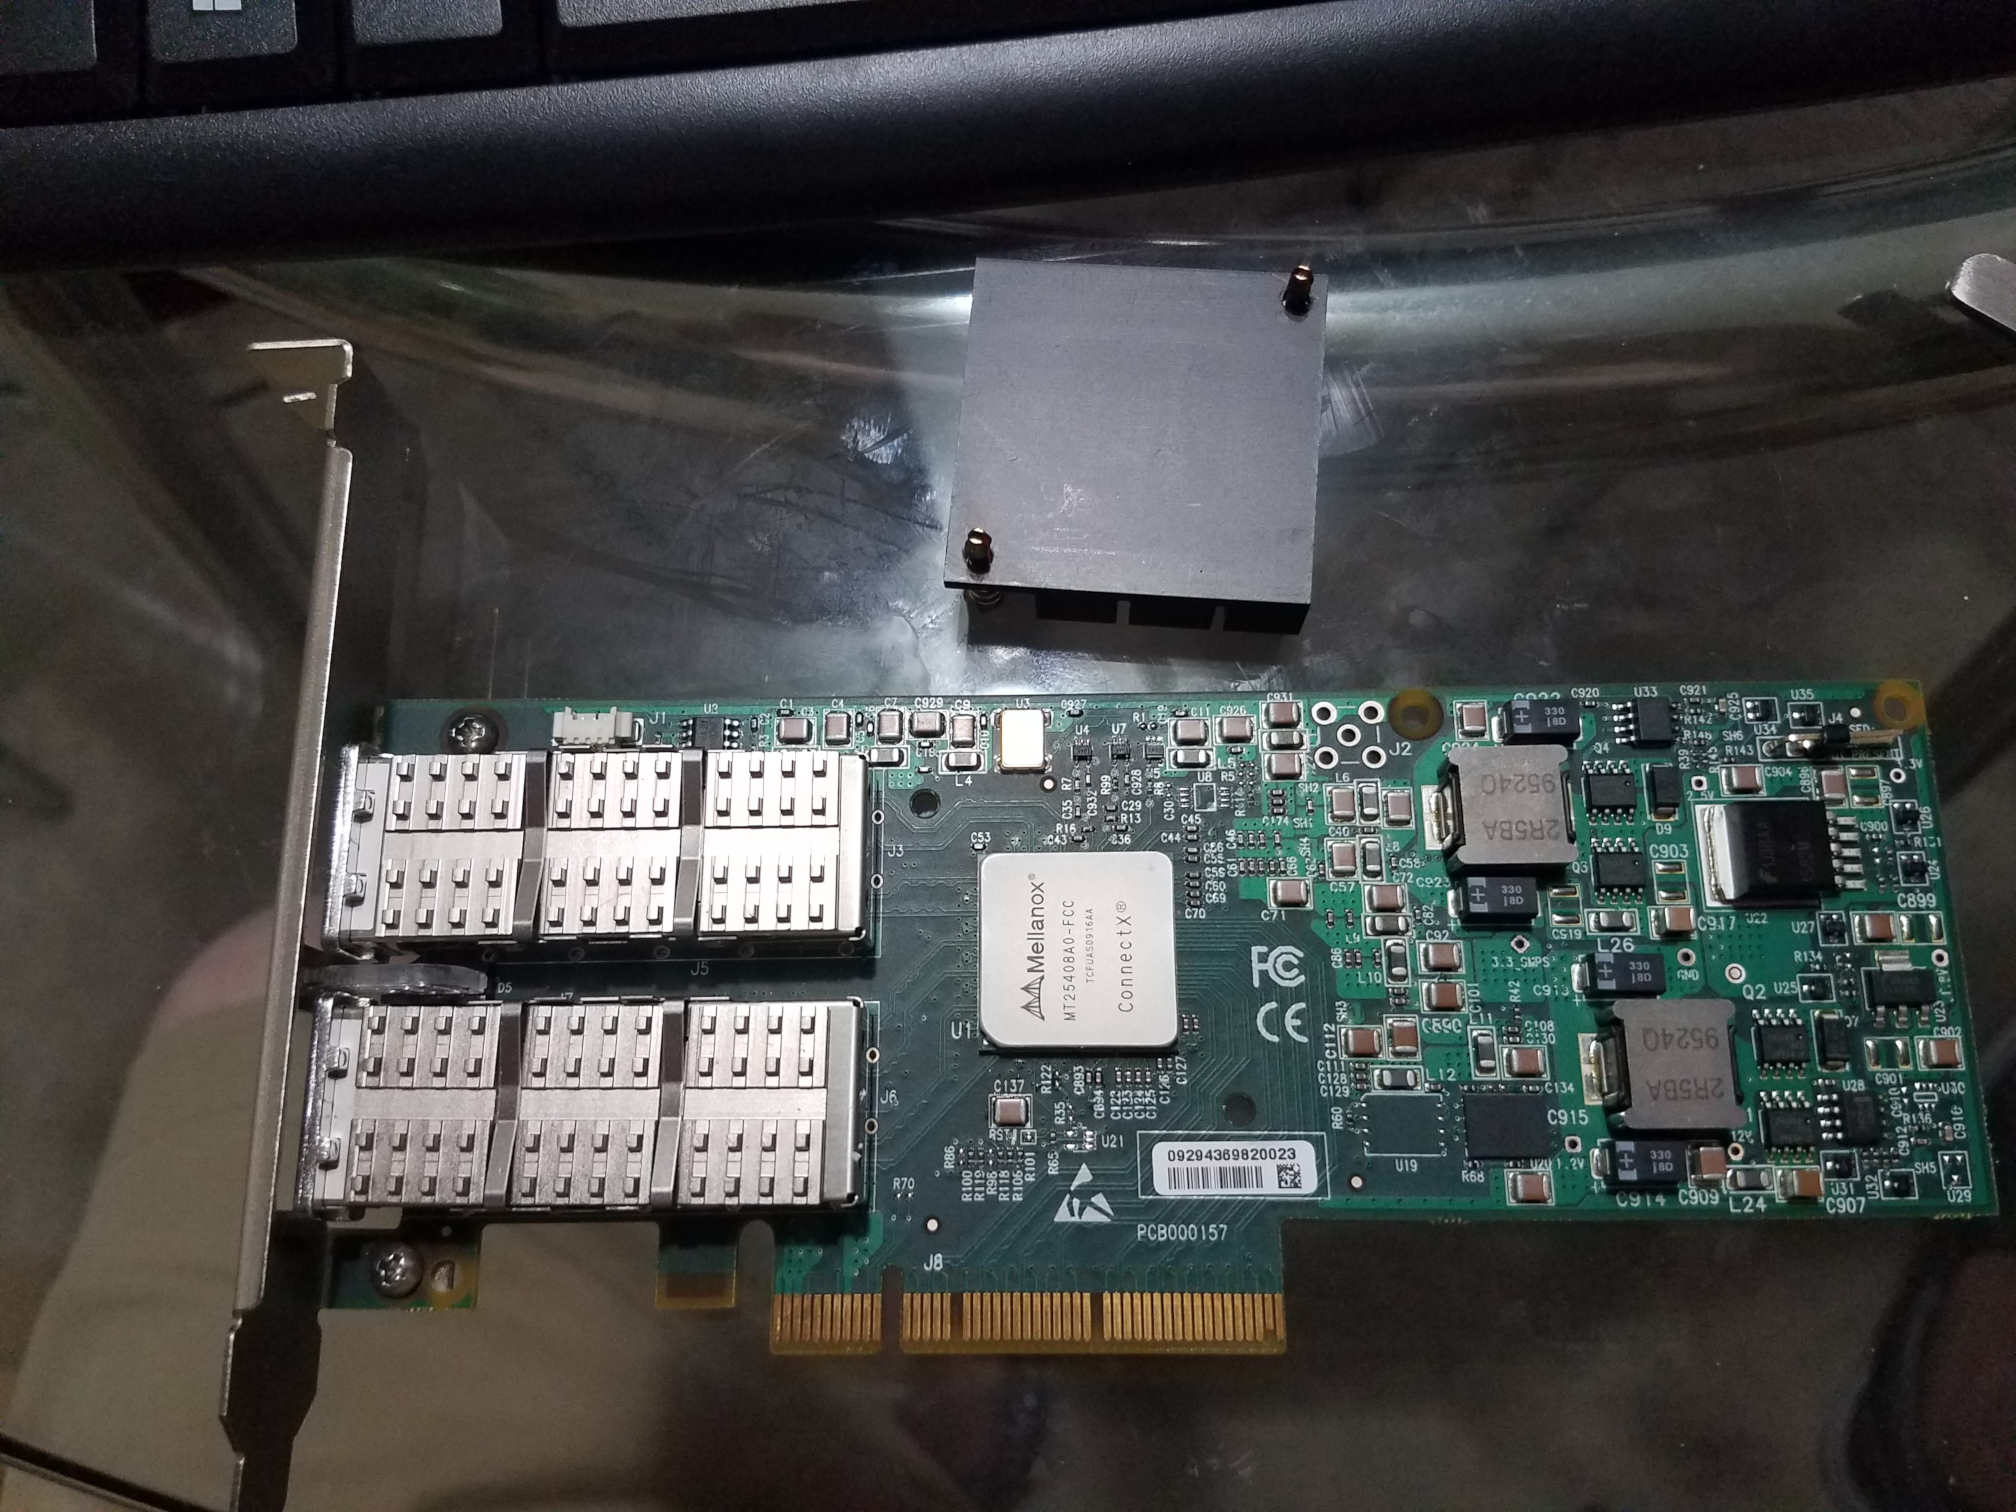
Which cards work on the ODROID-H2?
Here are 3 examples I validated:
Mellanox SeriesConnectX-2 VPI up max 20Gb/s
| Label on the card | 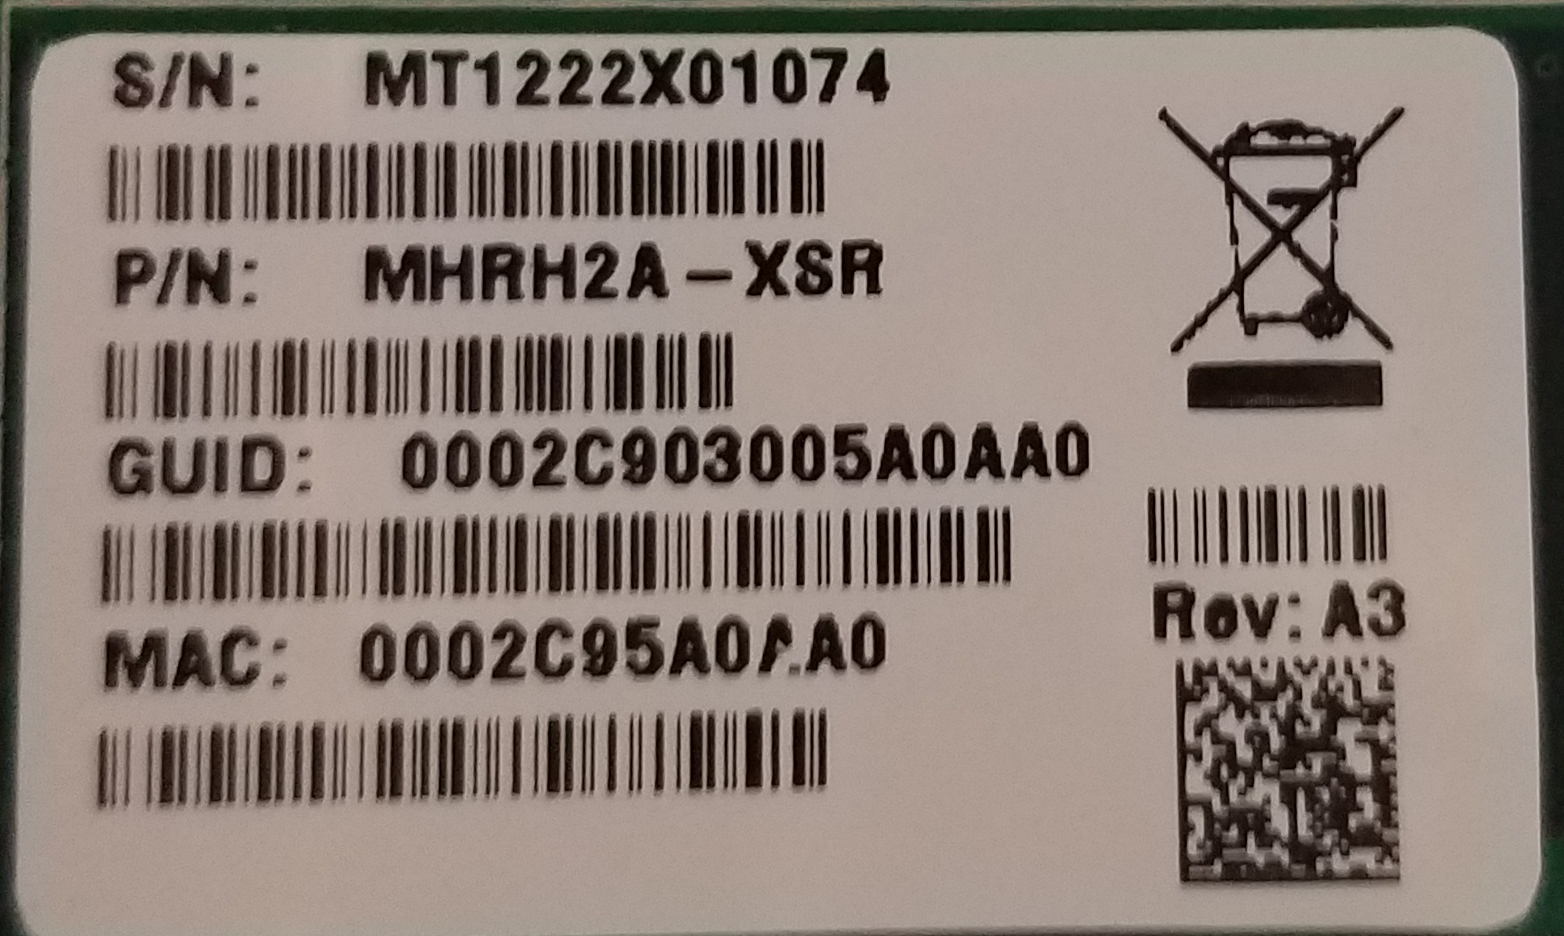 |
| lspci | grep Mellanox | InfiniBand: Mellanox Technologies MT25408A0-FCC-GI ConnectX, Dual Port 20Gb/s InfiniBand / 10GigE Adapter IC with PCIe 2.0 x8 5.0GT/s In... (rev b0) |
| sudo lspci -vv -s 01:00.0 | grep Width | LnkCap: Port #8, Speed 5GT/s, Width x8, ASPM L0s, Exit Latency L0s unlimited, L1 unlimited LnkSta: Speed 5GT/s, Width x4, TrErr- Train- SlotClk- DLActive- BWMgmt- ABWMgmt- |
| sudo mstflint -d 01:00.0 query | Image type: FS2 FW Version: 2.9.1000 Device ID: 26418 Description: Node Port1 Port2 Sys image GUIDs: 0002c903005a0aa0 5849560e65cf0d01 5849560e65cf0d02 0002c903005a0aa3 MACs: 0002c95a0aa0 0002c95a0aa1 VSD: PSID: MT_0F90120008 |
| Sudo iblinkinfo | 3 7[ ] ==( 4X 5.0 Gbps Active/ LinkUp)==> 1 1[ ] "h2a mlx4_0" ( ) |
Mellanox SeriesConnectX-2 VPI up max 40Gb/s
| Label on the card | 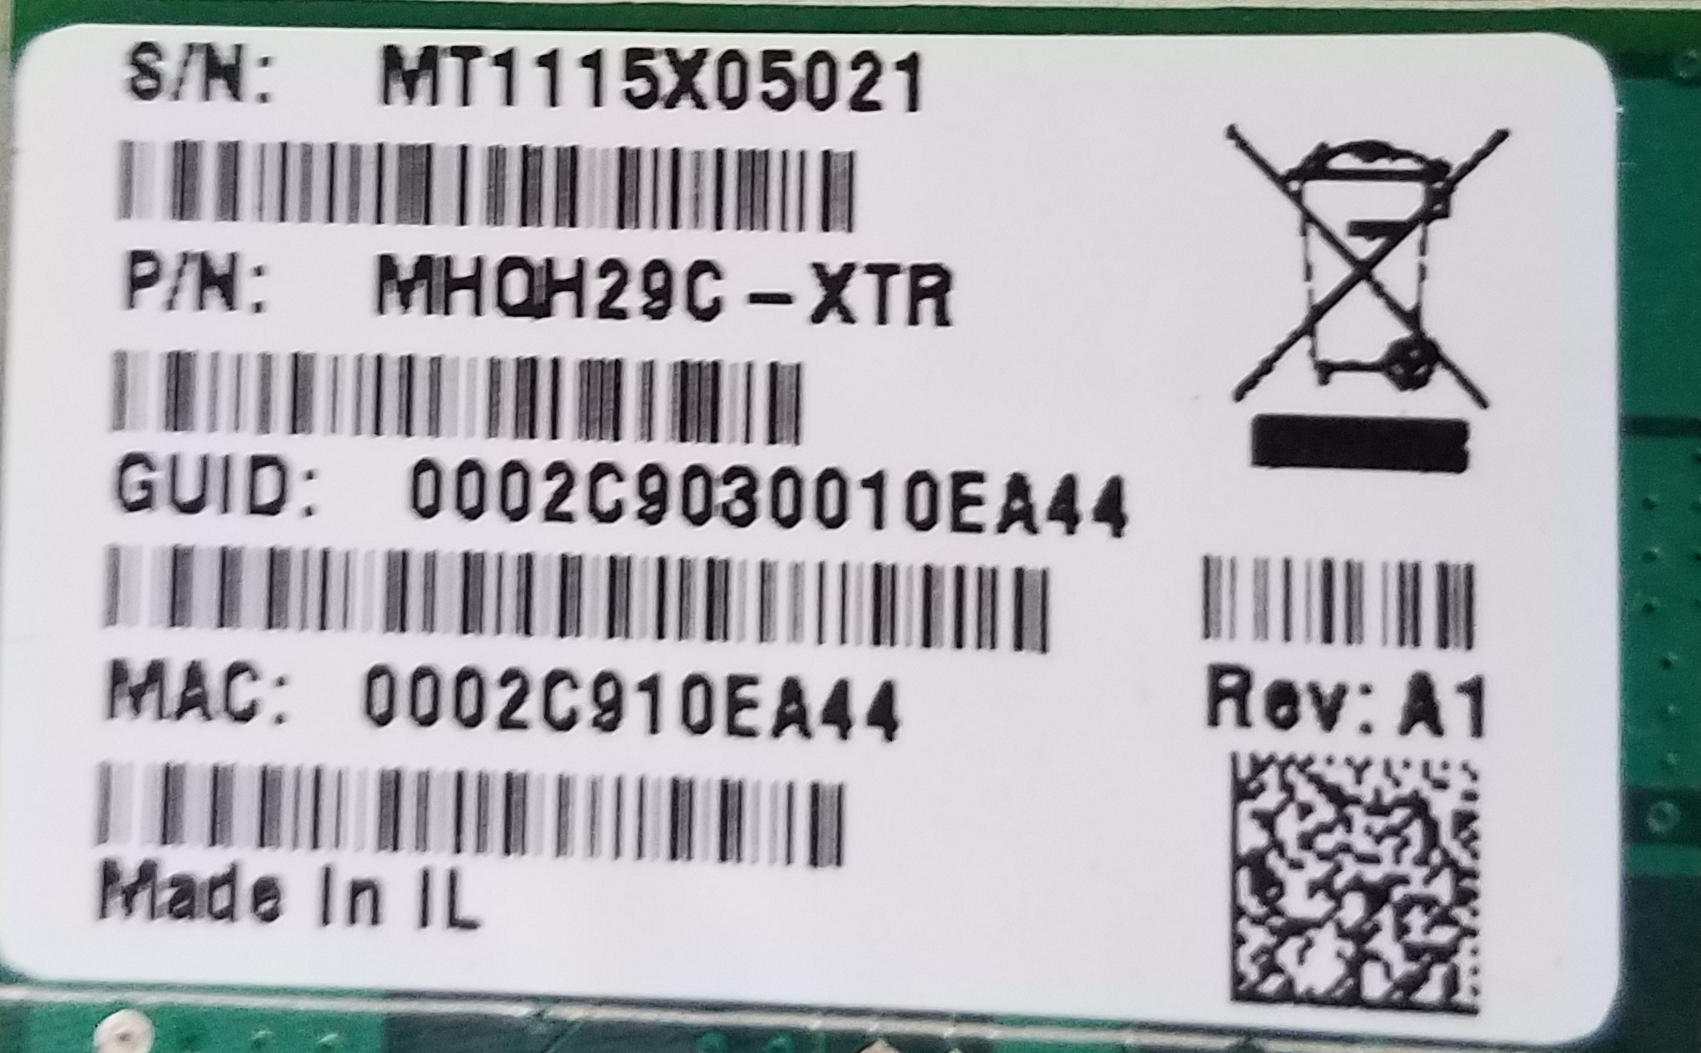 |
| lspci | grep Mellanox | InfiniBand: Mellanox Technologies MT25408A0-FCC-QI ConnectX, Dual Port 40Gb/s InfiniBand / 10GigE Adapter IC with PCIe 2.0 x8 5.0GT/s In... (rev b0) |
| sudo lspci -vv -s 01:00.0 | grep Width | LnkCap: Port #8, Speed 5GT/s, Width x8, ASPM L0s, Exit Latency L0s unlimited, L1 unlimited LnkSta: Speed 5GT/s, Width x4, TrErr- Train- SlotClk- DLActive- BWMgmt- ABWMgm |
| sudo mstflint -d 01:00.0 query | Image type: FS2 FW Version: 2.9.1000 Device ID: 26428 Description: Node Port1 Port2 Sys image GUIDs: 0002c9030010ea44 0002c9030010ea45 0002c9030010ea46 0002c9030010ea47 MACs: 0002c910ea44 0002c910ea45 VSD: PSID: MT_0FC0110009 |
| Sudo iblinkinfo | 3 7[ ] ==( 4X 10.0 Gbps Active/ LinkUp)==> 1 1[ ] "h2a mlx4_0" ( ) |
You find the product brief of the ConnectX-2 VPI cards at https://www.mellanox.com/related-docs/prod_adapter_cards/ConnectX-2_VPI_Card.pdf. The cards listed at the bottom of this PDF should work fine on the ODROID-H2:
| MHRH19B-XTR | Single 4X QSFP 20GbE/s InfiniBand | 6.7W |
| MHQH19B-XTR | Single 4X QSFP 40GbE/s InfiniBand | 7.0W |
| MHRH29B-XTR | Dual 4X QSFP 20GbE/s InfiniBand | 8.1W (both ports) |
| MHQH29C-XTR | Dual 4X QSFP 40GbE/s InfiniBand | 8.8W (both ports) |
| MHZH29B-XTR | 4X QSFP 40GbE/s InfiniBand, SFP+ 10 GbE | 8.0W (both ports) |
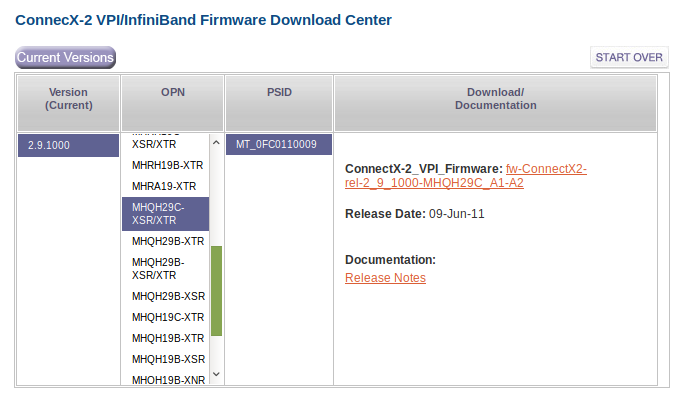
You find these cards on eBay at https://www.ebay.com/sch/i.html?_from=R40&_nkw=Mhqh29c&_sacat=0&_sop=15, expect $20~$25 for the cheapest offers. Change the search keyword to look for another card model to find alternates. Note that some of these cards top at 20 Gb/s while the others top at 40 Gb/s. Given the almost no difference in pricing, go with the 40 Gb/s ones. You find the latest firmware of these cards at https://www.mellanox.com/page/firmware_table_ConnectX2IB.
Use the card label, the lspci description and the mstflint DeviceID and PSID to select the right firmware to download and then install. The ConnectX2 cards are no longer officially supported by Mellanox. The latest firmware is 2.9.1000 (from 2011). If you card is already running this firmware, you have nothing to do.
Mellanox SeriesConnectX IB max 40Gb/s
| Label on the card | 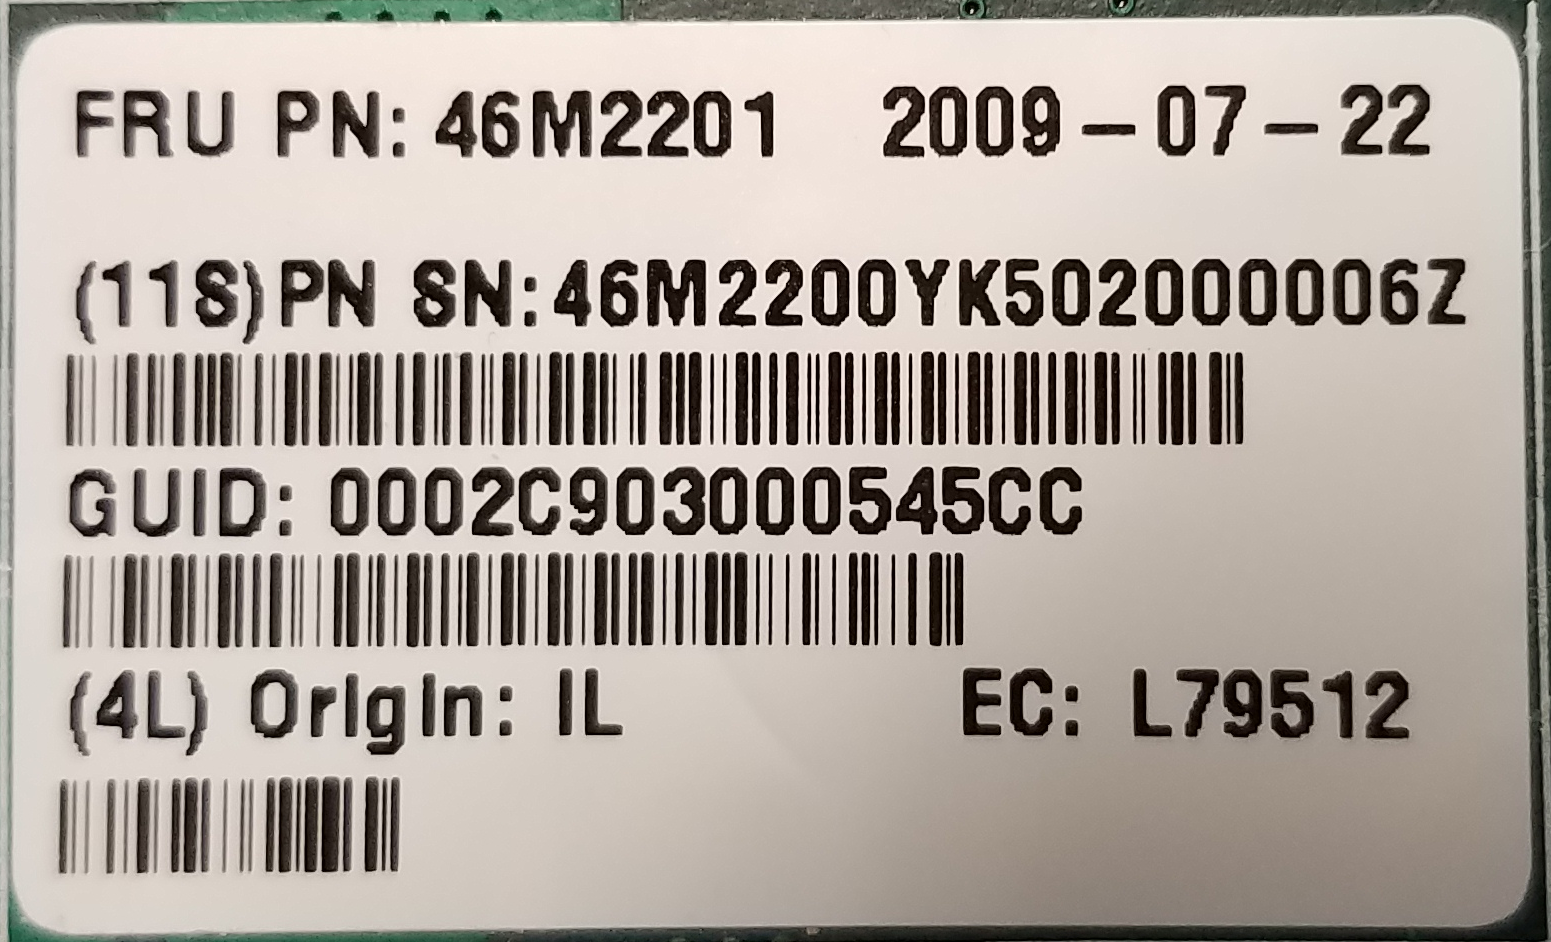 |
| lspci | grep Mellanox | InfiniBand: Mellanox Technologies MT25408A0-FCC-QI ConnectX, Dual Port 40Gb/s InfiniBand / 10GigE Adapter IC with PCIe 2.0 x8 5.0GT/s In... (rev a0) |
| sudo lspci -vv -s 01:00.0 | grep Width | LnkCap: Port #8, Speed 5GT/s, Width x8, ASPM L0s, Exit Latency L0s unlimited, L1 unlimited LnkSta: Speed 5GT/s, Width x4, TrErr- Train- SlotClk- DLActive- BWMgmt- ABWMgmt |
| sudo mstflint -d 01:00.0 query | FATAL - Can't find device id. -E- Cannot open Device: 01:00.0. File exists. MFE_UNSUPPORTED_DEVICE |
| Sudo iblinkinfo | 3 7[ ] ==( 4X 10.0 Gbps Active/ LinkUp)==> 6 1[ ] "h2a mlx4_0" ( ) |
You find the product brief of the ConnectX-IB at https://www.mellanox.com/pdf/products/silicon/ConnectX_IB_Silicon.pdf. The cards listed at the bottom of this PDF should work fine on the ODROID-H2.
| MT25408A0-FCC-SI | Dual 4X (10Gb/s) | PCIe 2.0 2.5GT/s | 8.1W |
| MT25408A0-FCC-DI | Dual 4X (10, 20Gb/s) | PCIe 2.0 2.5GT/s | 8.6W |
| MT25408A0-FCC-GI | Dual 4X (10, 20Gb/s) | PCIe 2.0 5.0GT/s | 9.1W |
| MT25408A0-FCC-QI | Dual 4X (10, 20, 40Gb/s) | PCIe 2.0 5.0GT/s | 9.7W |
These ConnectX-IB cards are now kind of difficult to find on eBay. They are very old and often appears in the seller description under a totally different name. These cards are pre-ConnectX-2 era. You better go with a ConnectX-2. But if you have one (I have a MT25408A0-FCC-QI) it will work. Note that only the QI goes up to 40 Gb/s anyway. You find the latest firmware of these cards at https://www.mellanox.com/page/firmware_table_ConnectXIB. IMHO, the ConnectX-2 VPI 40 Gb/s is your best bet for usage on the ODROID-H2. Do you need to update the firmware right away? No. If it works, get the time to get acquainted with the thing before updating its firmware.
If the card is actually a Mellanox one, not a distributor, mstflint can grab the appropriate most recent firmware upgrade online and do the upgrade for you. You don’t have to play archaeologist in the archives pages of the Mellanox web site. If the card is from a distributor and not a Mellanox one, you will have to.
What to do when mstflint does not recognize the card?
The version of mstflint that comes from the APT repositories is 4.11.0 which is a relatively recent one. The recent versions no longer support the “old” ConnectX IB or ConnectX-2. In the examples above, it did not recognize the MT25408A0-FCC-QI. Because mstflint is the tool you use to update the firmware of the cards, that is a problem.
In addition, you may end up buying a non-Mellanox “flavor” of a card. IBM, Sun, Oracle, HP, Dell, EMC (non-exhaustive list) all distributed Mellanox cards under their brand because at the time it was the only show in town for 10, 20 or 40 Gb/s. In these cases, the PSID on the card will not be a Mellanox one. Mellanox did it this way so that customers of these major brands would download the new firmware and get their support from the distributors and not Mellanox. You will find tons of IBM, Oracle, HP cards on eBay. But while the brand and the PSID of the cards are not Mellanox it is bona fide regular Mellanox technology on these cards.
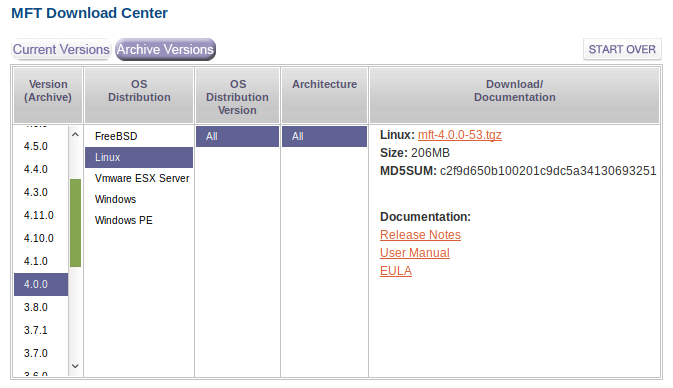
Because the “modern” versions of mstflint do not allow you to overwrite the PSID of a card, you have to go back in time and find a version of MST that does. But not too old, otherwise it would not recognize more modern cards. One of the “optimal” versions of MST in this matter is version 4.0.0. It’s a modern enough and it still include the old flint tool which has no qualms in overriding the PSID of a card. Hence you can update the firmware.
To download this version, go to: https://www.mellanox.com/page/management_tools and scroll to the bottom of the page (after obviously reading what the page is saying). You see:
Click on Archive Versions and select the appropriate values in the columns on the right, as shown in Figure 11.
Here is an example of updating a card to the new firmware
# Become root
~$ sudo su -
# Start the firmware manager
~$ mft start
# Query the card to find out the current firmware
~$ flint -d 02:00.0 query
# If not the latest firmware, update it with the one you downloaded
# Note the use of –allow_psid_change to deal with non-Mellanox versions of the card:
~$ flint -d 02:00.0 -i fw-25408-2_9_1000-MHQH29-XSC_A1-A5.bin --allow_psid_change burn
Warning
If you use the --allow_psid_change option, the flint tool will gladly attempt to burn whatever firmware bin file you passed as parameter with zero checking. Using a wrong firmware bin file will obviously and simply brick the card. So check, check and check again you know what you are doing. Otherwise you’ll win a free visit to eBay to buy another card. Was I anxious the first time I burnt the firmware with that option? Yep.
My ODROID-H2 is going to talk to modern PCs. Should I use a ConnectX-2 on my PCs?
The answer is a very direct and simple: no. ConnectX-2 card are no longer supported by Mellanox, they are PCIe 2 (which is great for embedded boards like the ODROID-H2). Chance is that your “modern” PCs are probably providing PCIe 3 or even PCIe 4 with the Ryzen 3000 series and chipset X570. For your PCs, use ConnectX-3 Mellanox cards. You can find the product brief of these cards at https://www.mellanox.com/related-docs/prod_adapter_cards/ConnectX3_VPI_Card.pdf. My favorite is the MCX354A-FCBT Dual FDR 56 Gb/s or 40/56 GbE because it has two ports, supports QDR, FDR10 and FDR.
On eBay, see https://www.ebay.com/sch/i.html?_from=R40&_nkw=MCX354A-FCBT&_sacat=0&_sop=15. Expect around $50~$75 for a dual card. Better deals show up on a regular basis. You will also find non-Mellanox ones (mostly HP or Oracle) for $30. Upgrading the firmware on ConnectX-3 cards works like on ConnectX-2 cards. So even though you buy an HP or Oracle one, you can update its firmware. Upgrading the firmware of the ConnectX-3 to the most recent version is necessary if you are planning to use the Mellanox OFED packages. In this article we use the packages from the Ubuntu APT repository, so there is no immediate need to update the firmware.
Note: do PCIe 3 Mellanox ConnectX-3 cards work on PCIe 4? The ones I tried do.
For your PCs, you can also use ConnectX-3 Pro Mellanox cards. On eBay you find them for about $100~$120 with a better deal from time to time. Again, think about the fact that you want a VPI (that supports both IB and Ethernet) and do not forget the top speed: QDR, FDR10 or FDR.
You find the product brief of the Pro cards there: https://www.mellanox.com/related-docs/prod_adapter_cards/PB_ConnectX-3_Pro_Card_VPI.pdf. ConnectX-3 and ConnectX3 Pro are still supported by Mellanox. This translates into support in the Mellanox OFED packages. For Linux, you can download the Mellanox OFED software from https://www.mellanox.com/page/products_dyn?product_family=26. Scroll down the page, click on the Download tab and select the flavor for your Linux distribution.
Note: do Mellanox ConnectX-3 cards also work on the ODROID-H2? As of this writing only the Pro version works. The non-pro versions do not. Know anyway that in terms of max speed achievable on the H2, the ConnectX-3 will provide the same result as the ConnectX-2. The ConnectX-2 provide 40 Gb/s in IB mode but only 10 GbE in Ethernet mode. The connectX-3 provide 40 Gb/s in IB mode and 40 GbE in Ethernet mode. However IP over IB provides a speed as good (if not a little bit better) with a port configured for IB as IP on a port configured for Ethernet. So really, no need to run a ConnectX3 Pro on the H2 (unless you already have a 20 or more GbE network running at home based on Ethernet).
Warning
The latest Ubuntu 18.04 apt update brings in kernel 5.x. The current Mellanox OFED package for Ubuntu 18.04 as of this writing (MLNX_OFED_LINUX-4.6-1.0.1.1-ubuntu18.04-x86_64.tgz) will not build correctly (probably the KDMS). This is the reason why in this article we use the packages from the Ubuntu APT repository.
Note: since then, Mellanox has released the Mellanox OFED package version 4.7-1.0.0.1 available for Ubuntu 18.04 as well as Ubuntu 19.04.
Is there a difference between Mellanox OFED and your distribution packages for InfiniBand? Yes, there is but you won’t see the difference at the beginning. The Linux distribution packages for InfiniBand are mostly written by the Mellanox engineers who also write the Mellanox OFED software. What the latter brings is more tools, more configuration, more docs, more late bugs fixes, more “candies”. You really do not need to worry about that.
For Windows, you can download the Mellanox OFED software there: https://www.mellanox.com/page/products_dyn?product_family=32 To support the ConnectX-3 series, use the Windows – WinOF versions. Mellanox OFED for Windows is the only “simple” way to install the InfiniBand on Windows. This is definitely what you want to use if want to use SMB/CIFS full speed between a Windows Server and Windows 10. For more information start there: https://docs.microsoft.com/en-us/windows-server/storage/file-server/smb-direct
As of this writing, Linux Samba does not support RDMA yet. So if you are running Linux on your ODROID-H2 with Samba, the only way your Windows machine can access it is to use regular SMB/CIFS with IP over IB. From this point, we will not talk too much about Windows.
Warning
When buying Mellanox network cards on eBay, make sure you are buying what you really want. VPI cards both support InfiniBand and Ethernet. EN cards only support Ethernet. Dual port cards are usually the best solution because the two ports can be configured to InfiniBand and you can have 3 PCs connected without the need for a switch (meaning PC A is connected directly to PC B and PC C, when B and C want to talk, they go through the daisy chaining via PC A). Two port cards also allow a PC to be on an InfiniBand subnet via port 1 and (usually a 10 GbE) Ethernet subnet via port 2 (as long as you connect it to another PC or switch with SFP+ connectors, not RJ-45).
Why do I look insisting in using an InfiniBand network rather than Ethernet one? In other words, let’s talk about switches.
It is pretty easy to find a used 18, 24 or 36-port QDR, FDR10 or FDR InfiniBand switch on eBay in $125 to $250 price range. On the other hand, a similar switch but Ethernet will deeply hurt the feelings of your bank account (like $1,500 ~ $2,500 hurt.)
Mellanox IS5023 18-port 40Gbps https://www.ebay.com/sch/i.html?_nkw=Mellanox+IS5023 (this is the one I’m currently using)
Mellanox SX6015 18-port 56Gbps (FDR10) https://www.ebay.com/sch/i.html?_nkw=Mellanox+SX6015 (I tested OK this one, but it still has to be put it in “production”)
Conclusion: using IP over IB with an IB QDR, FDR10 or FDR switch costs much much less while not limited to 10 GbE.
Do you need a switch? Not right away. With 1-port cards you can connect the ODROID-H2 to one PC. With a 2-port card you can connect 2 PCs. If you have more devices you can still daisy chain 2-port cards. Bandwidth will suffer when traffic has to go through multiple cards between device X and Y tough. I did not try the daisy chaining myself I went straight for a switch when I saw the low prices.
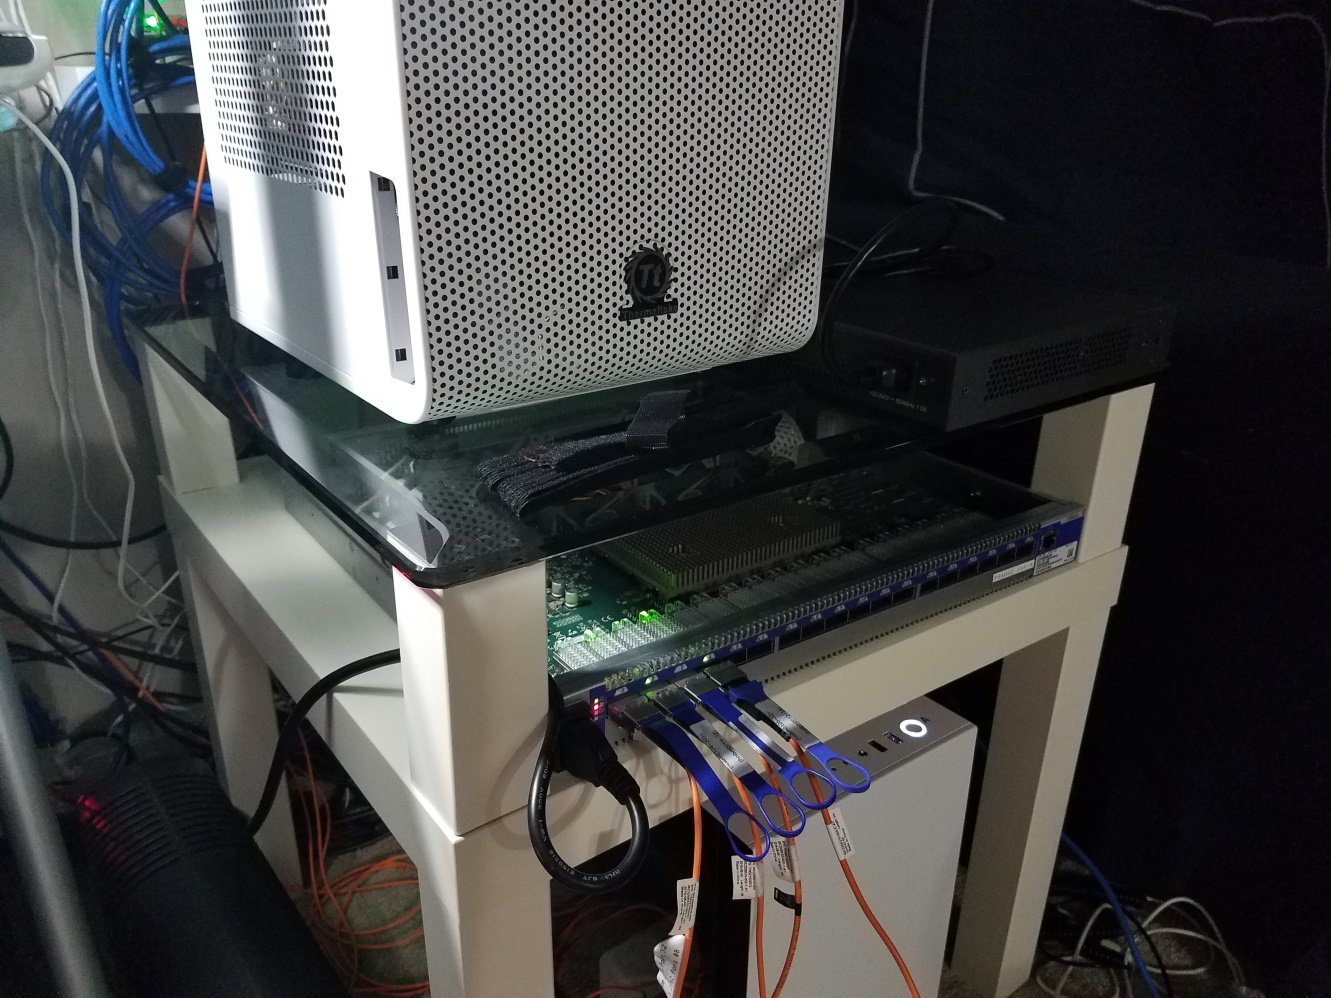
The Mellanox switches are built like trucks. The case is quasi unbreakable with thick metal plates. But the switches are also very NOISY beast. The IS5023 has four 40mm fans running at 15K rpm, the SX6015 has six. Remember these are data center models and nobody squats inside a data center so noise is not and issue. For home usage this is an entirely different story. So unless you have a home with a garage attached to the house or a sound-proof attic or basement the other family members will kick the switch out of the home or the apartment probably in the next 5 minutes you turn it on. I’m currently living in an apartment, no attached garage, no attic, no basement, no sound proof room. To solve that, I customized the switch to replace the fans, as shown in Figure 12.
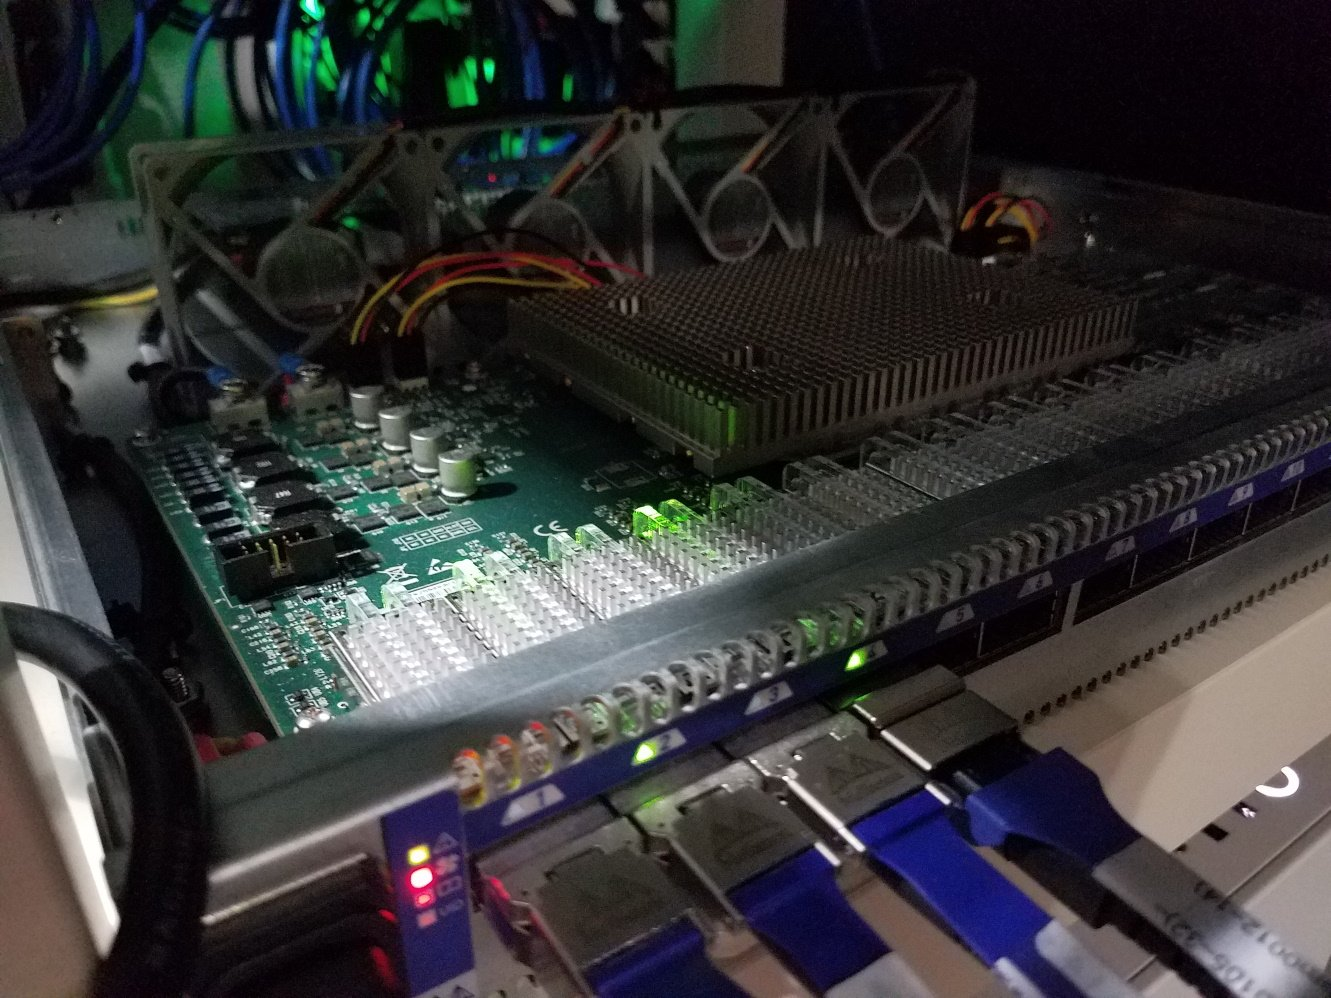
Gone the four noisy 15K rpm gremlins, four gentle Noctua 80mm redux took their place. The top plate is gone. Obviously the Noctua fans do not run at the same speed so the switch LED for the fan status is shining bright red. Not a problem. The switch has software thermal protection anyway. Never saw it being triggered. Not placing back any top plate solves multiple issues: (a) I would have have to design one to adapt to the 80mm fans (b) The 80mm fans easily push away the heat emanating from the main heat sink (c) The heat from the AOC transceiver electronics can get away by convection. So far so good. Even by night, the thing is barely audible, just a gentle hum because you know it’s there, otherwise you would not notice.
Which cables should I use?
You can use passive copper cables (DAC) for short distances (i.e. from 1 to 5 meters) or active optical cables (AOC) for longer distances (from 1 to 100 meters). You can use a mix of both.
The AOC are more “fragile” than the copper ones. Mellanox advise to not bend AOC cables under a radius of 17 cm (when in use). A badly bent AOC will trigger a lot of retries at the RDMA level.
Tips about AOC cables
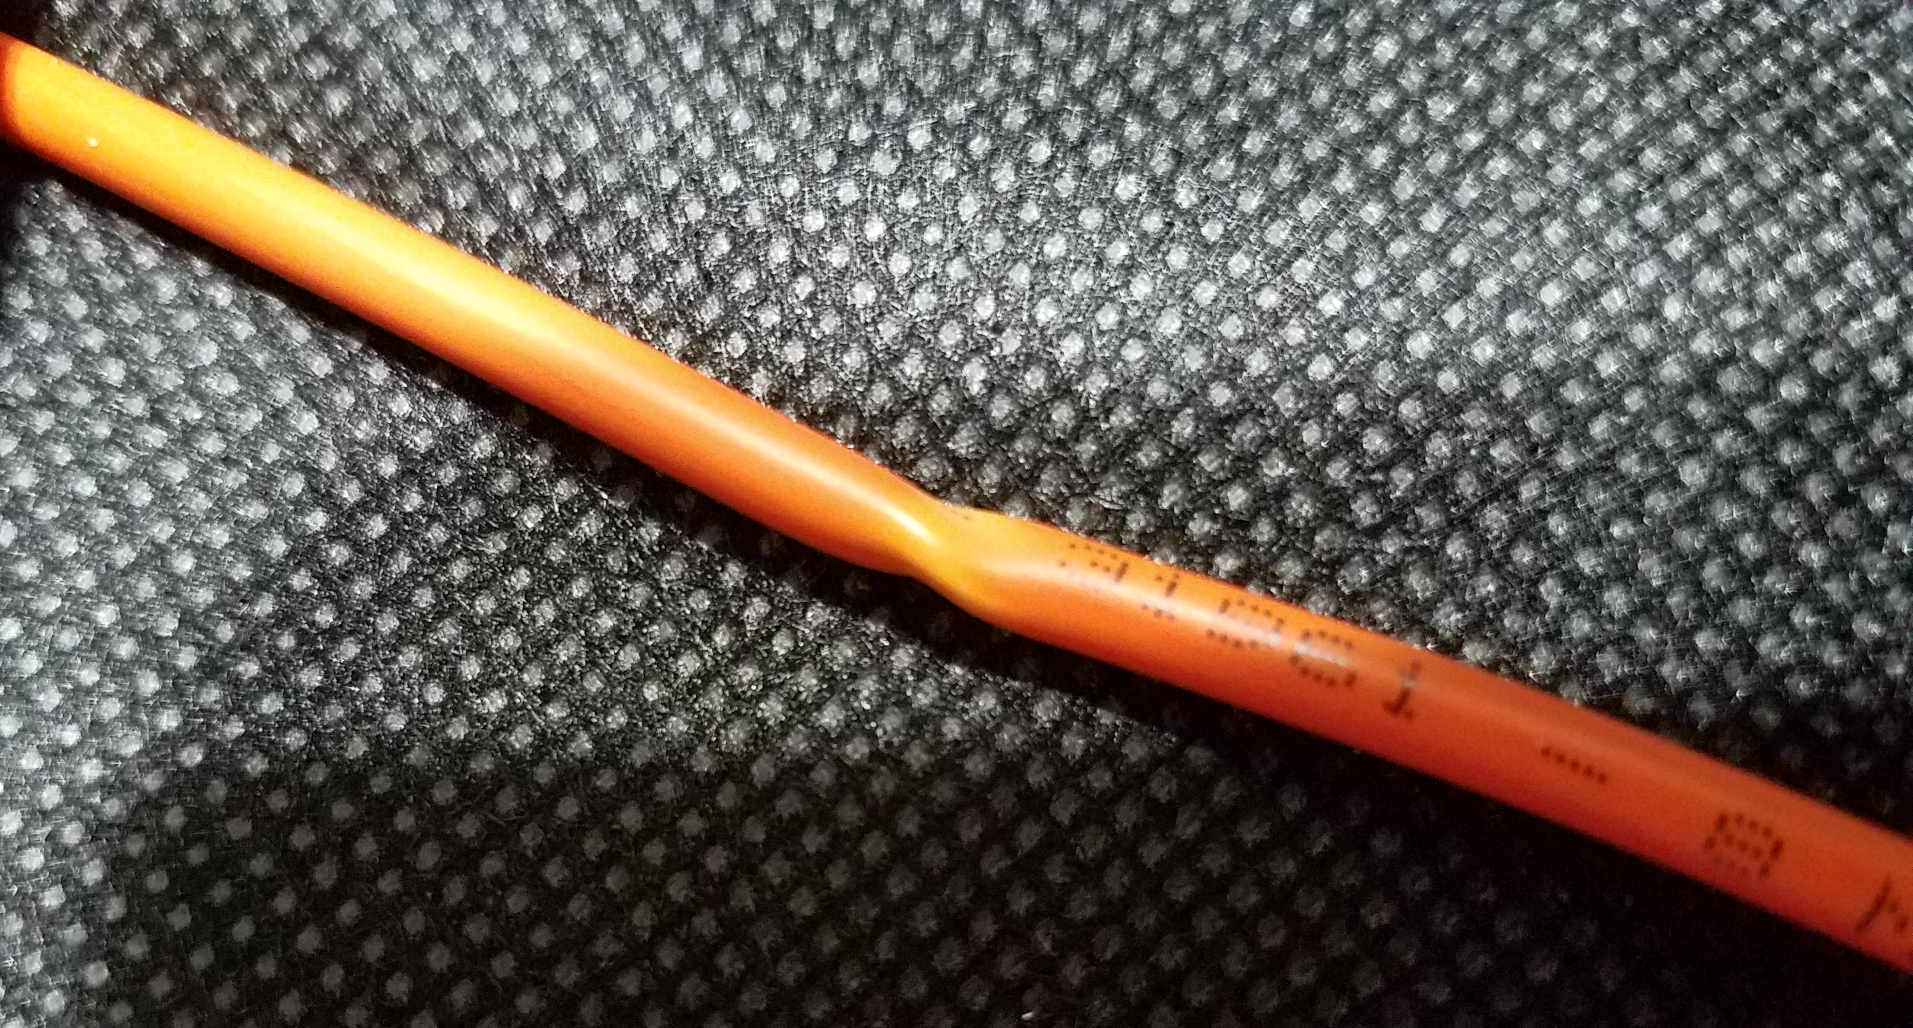
a) AOC cables can get damaged in various ways, as shown in Figures 14 and 15.
In Figure 14 someone bent the cable very badly. The best way to check if the cable is still good is to run iperf3 for 10 minutes using that cable. If you see too many retries, the cable is dead and irreparable.
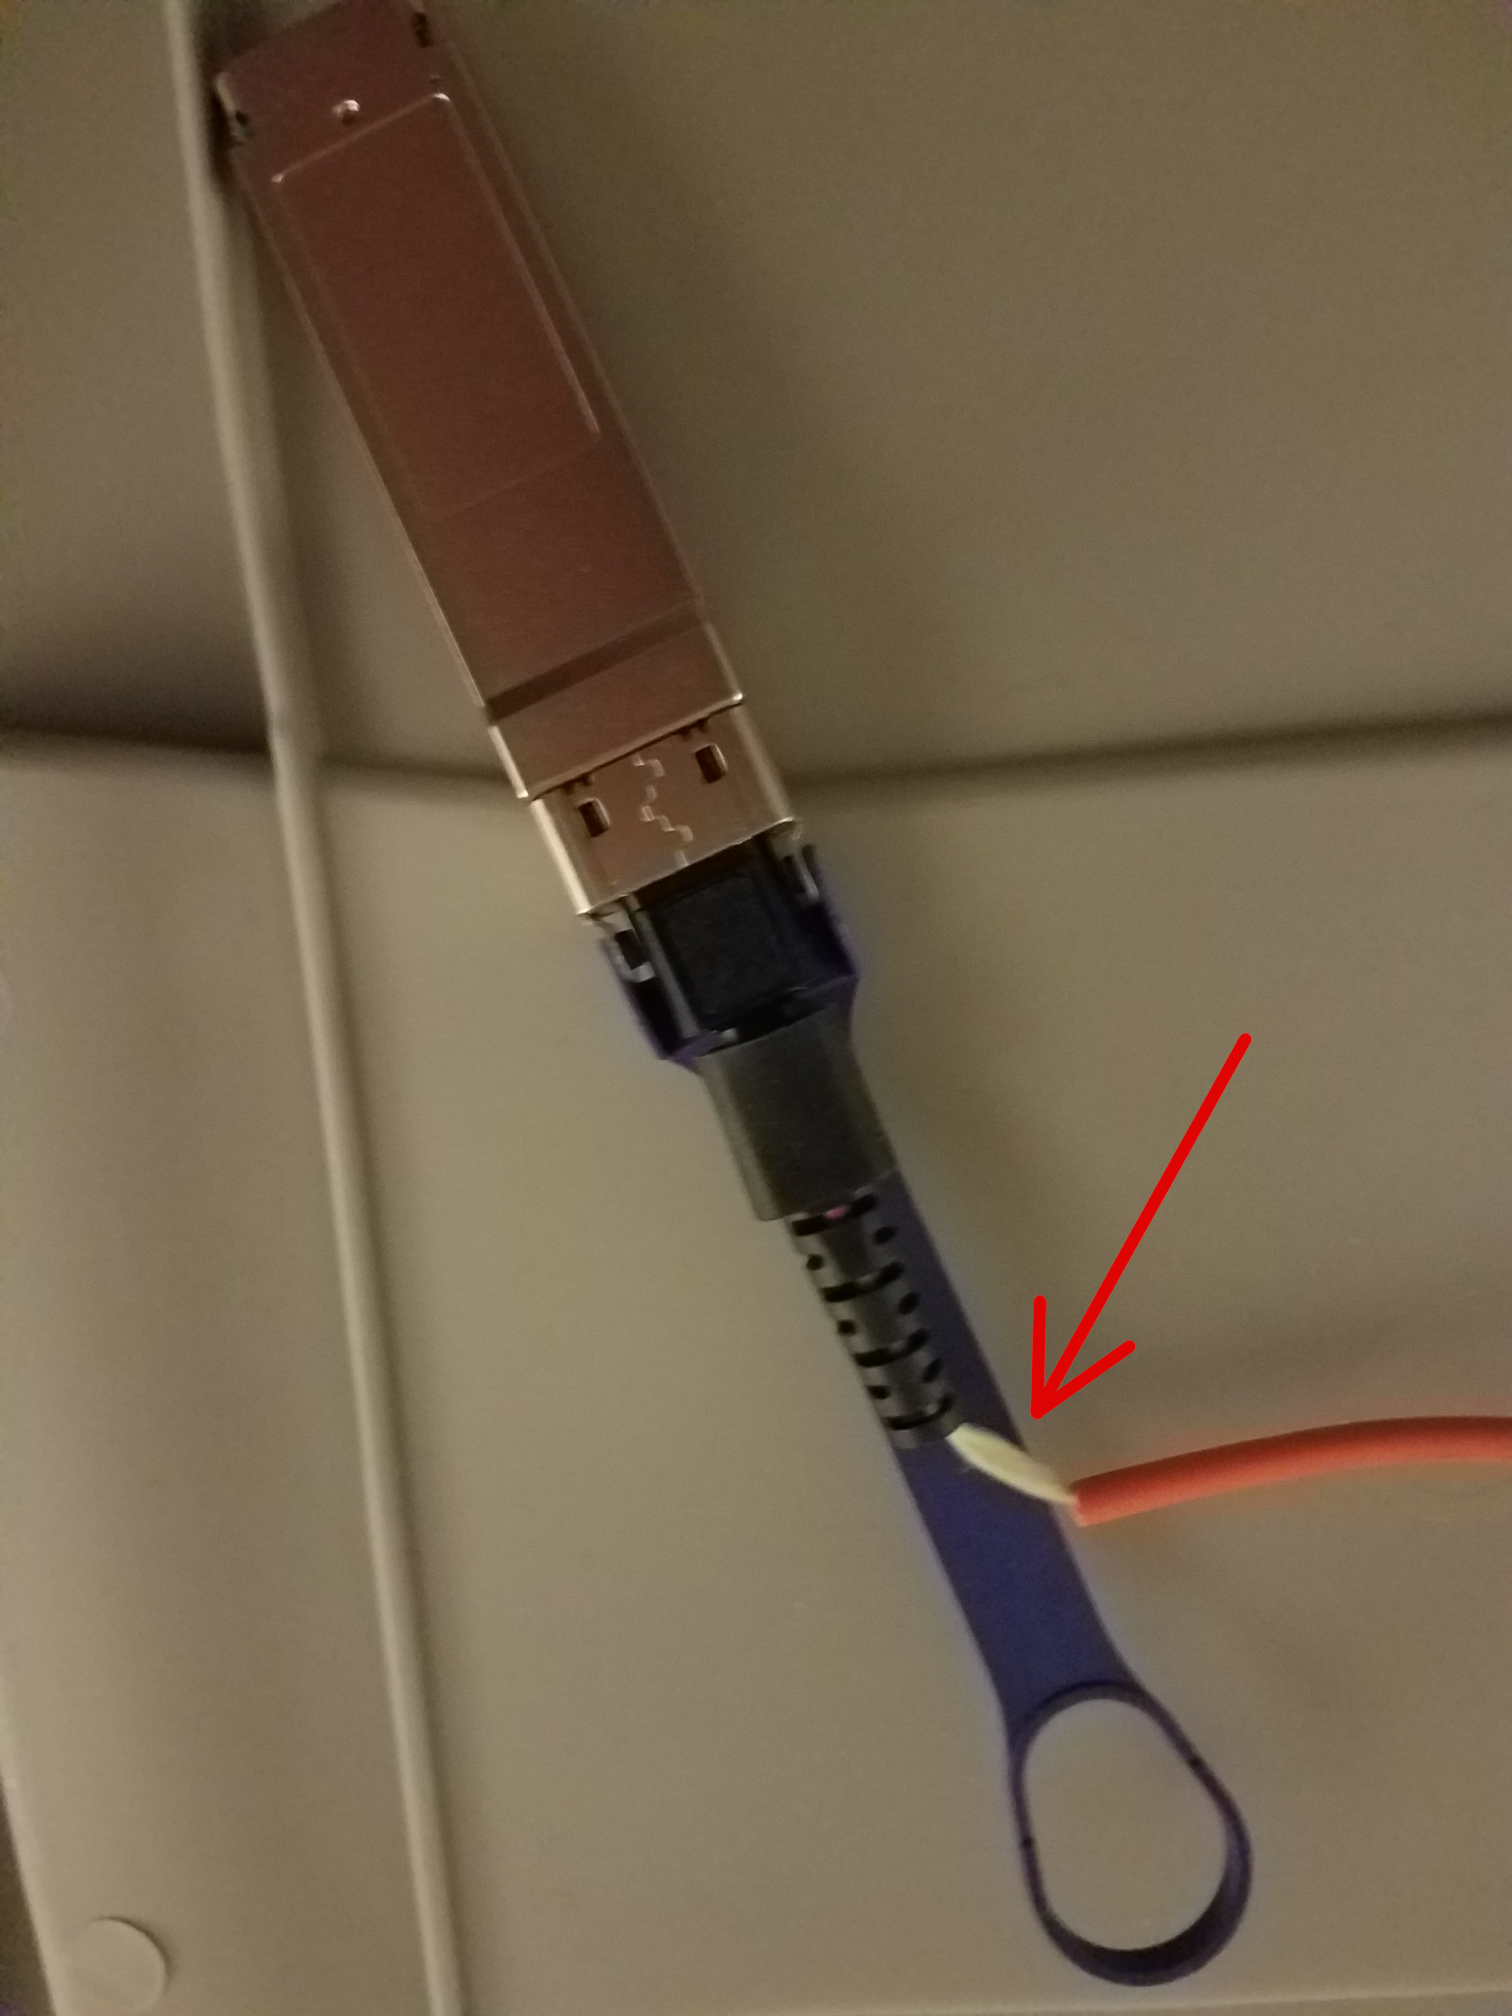
b) Use copper cables to connect computers close to a switch and where space is reduced: AOC cables would start to bend too much and get entangled. The more bulky copper cables won’t.
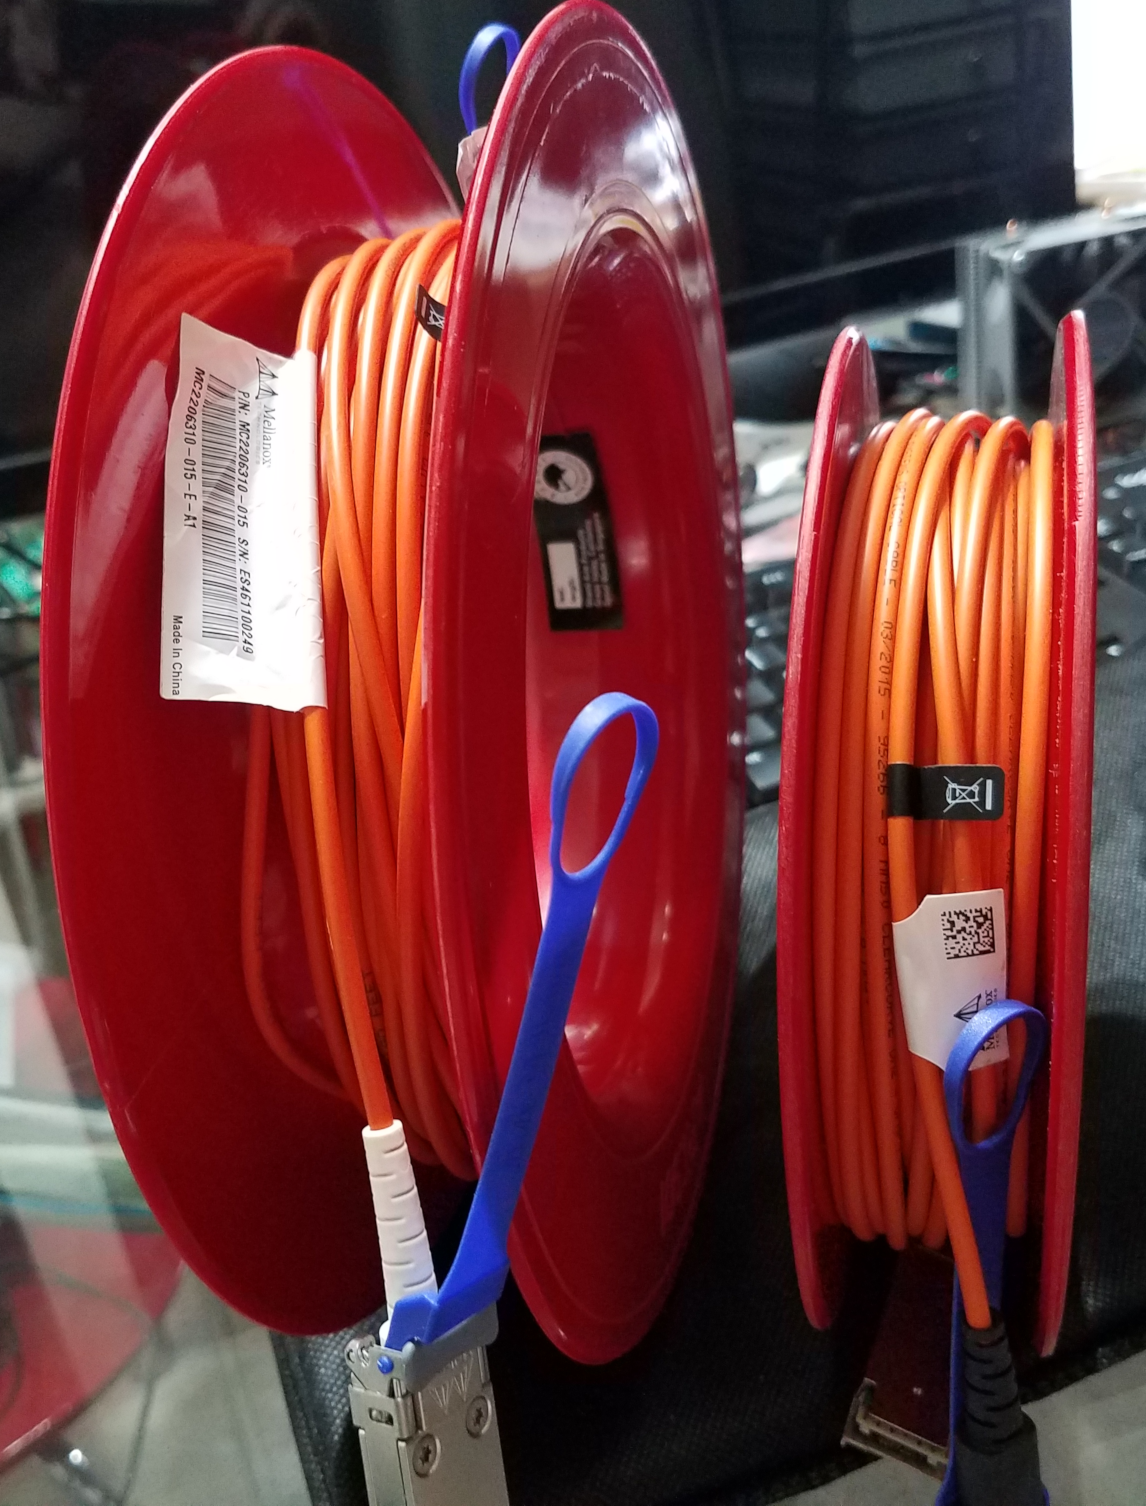
c) Keep them in a box when not in use. To avoid the spaghettification of multiple cables and the risk of damaging one when disentangling them, roll them around spools. A simple solution is to use kite winding plastic hoop spool, as shown in Figure 16.
For more tips, see: https://www.mellanox.com/products/interconnect/pdf/Mellanox_Cable_Management_Guidelines_and_FAQs_Application_Note.pdf
Next you have to decide what eventual theoretical maximal speed you want to have right away or use in the future: 40 Gb/s (QDR), 56 Gb/s (FDR10) or 56 Gb/s (FDR). As you may guess a 40 Gb/s cable will NOT go faster when you connect it to a network card or switch capable of FDR10 or FDR. On the other hand, an FDR cable will happily work with a QDR or FDR10 network card or switch.
Last but not least, you are buying these cables used or refurbished on eBay. The prices for brand new cables are crazy expensive. Short length DAC coppers cables on eBay are numerous, the longer cables are rarer. For AOC it is basically the reverse: 3m, 5m, 10m are common on eBay, good luck finding a 1 meter.
Tip: when you receive a used DAC or AOC cable from an eBay vendor inspect it and try it for 10 minutes right away. If the cable is faulty, contact the vendor for return or replacement.
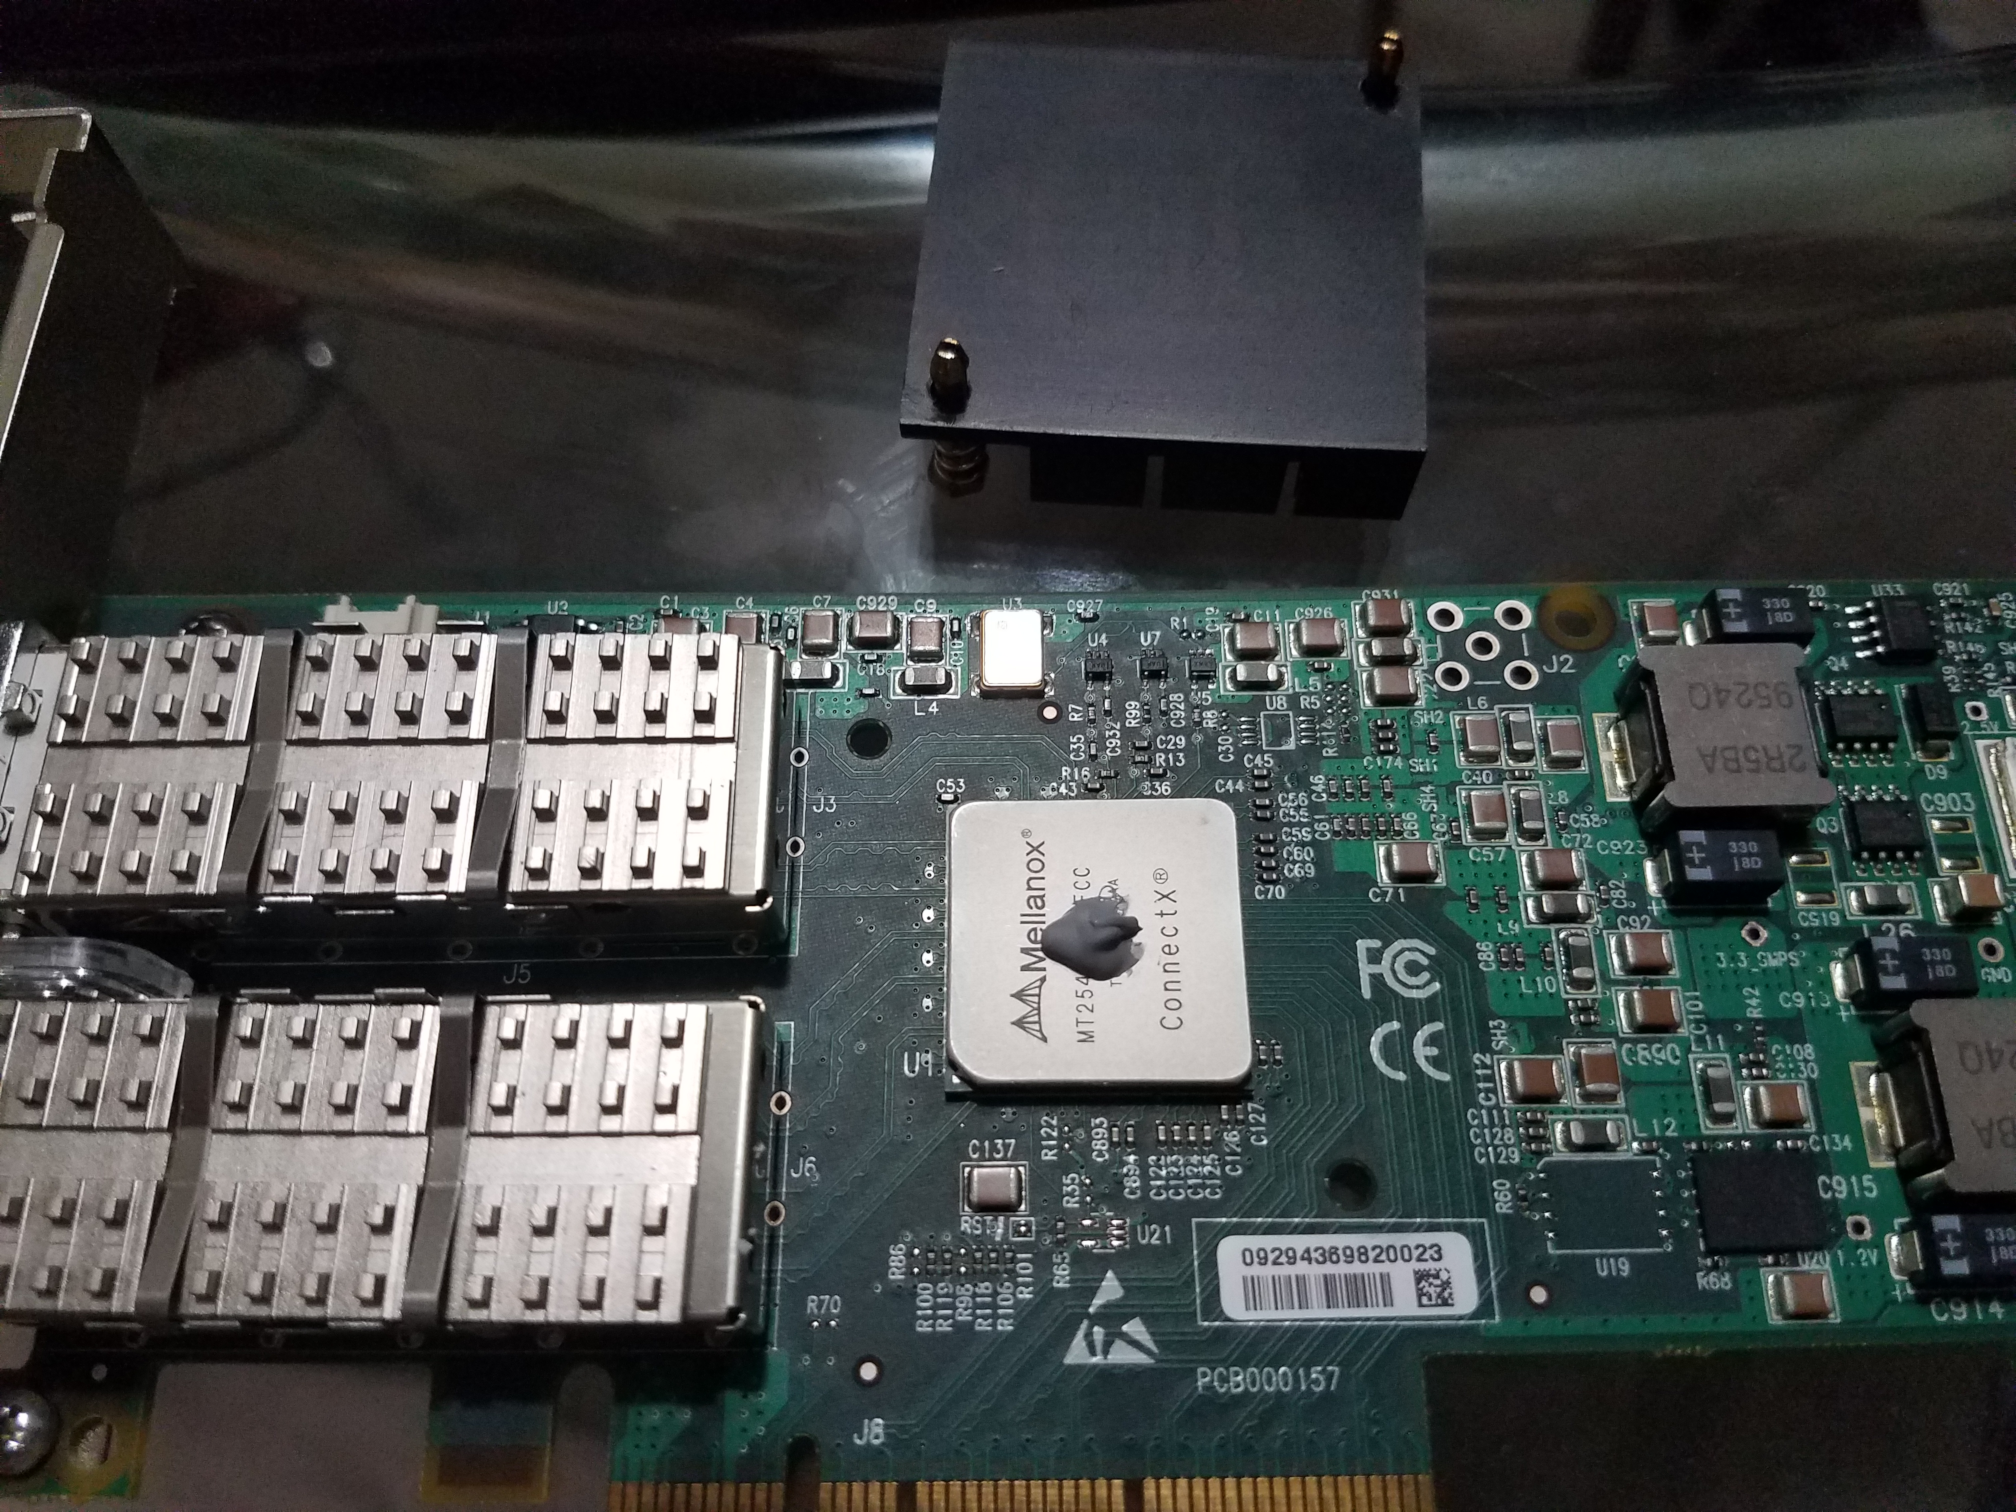
Be nice to your hardware and your hardware will be nice to you - especially with the cards. These used cards probably already have 10+ years of activity under the belt. As you may have noticed they come with a heat sink and I can tell you they easily reach 50+ C. A heat sink implies some thermal compound between the heat sink and the chip. That compound has already cooked for 10+ years. Time for a complementary refresh!
The heat sink is attached to the card with two spring rivet fastener push pin. On older cards they were using brass (easy to remove), the more modern cards use plastic ones (a pain in the neck).
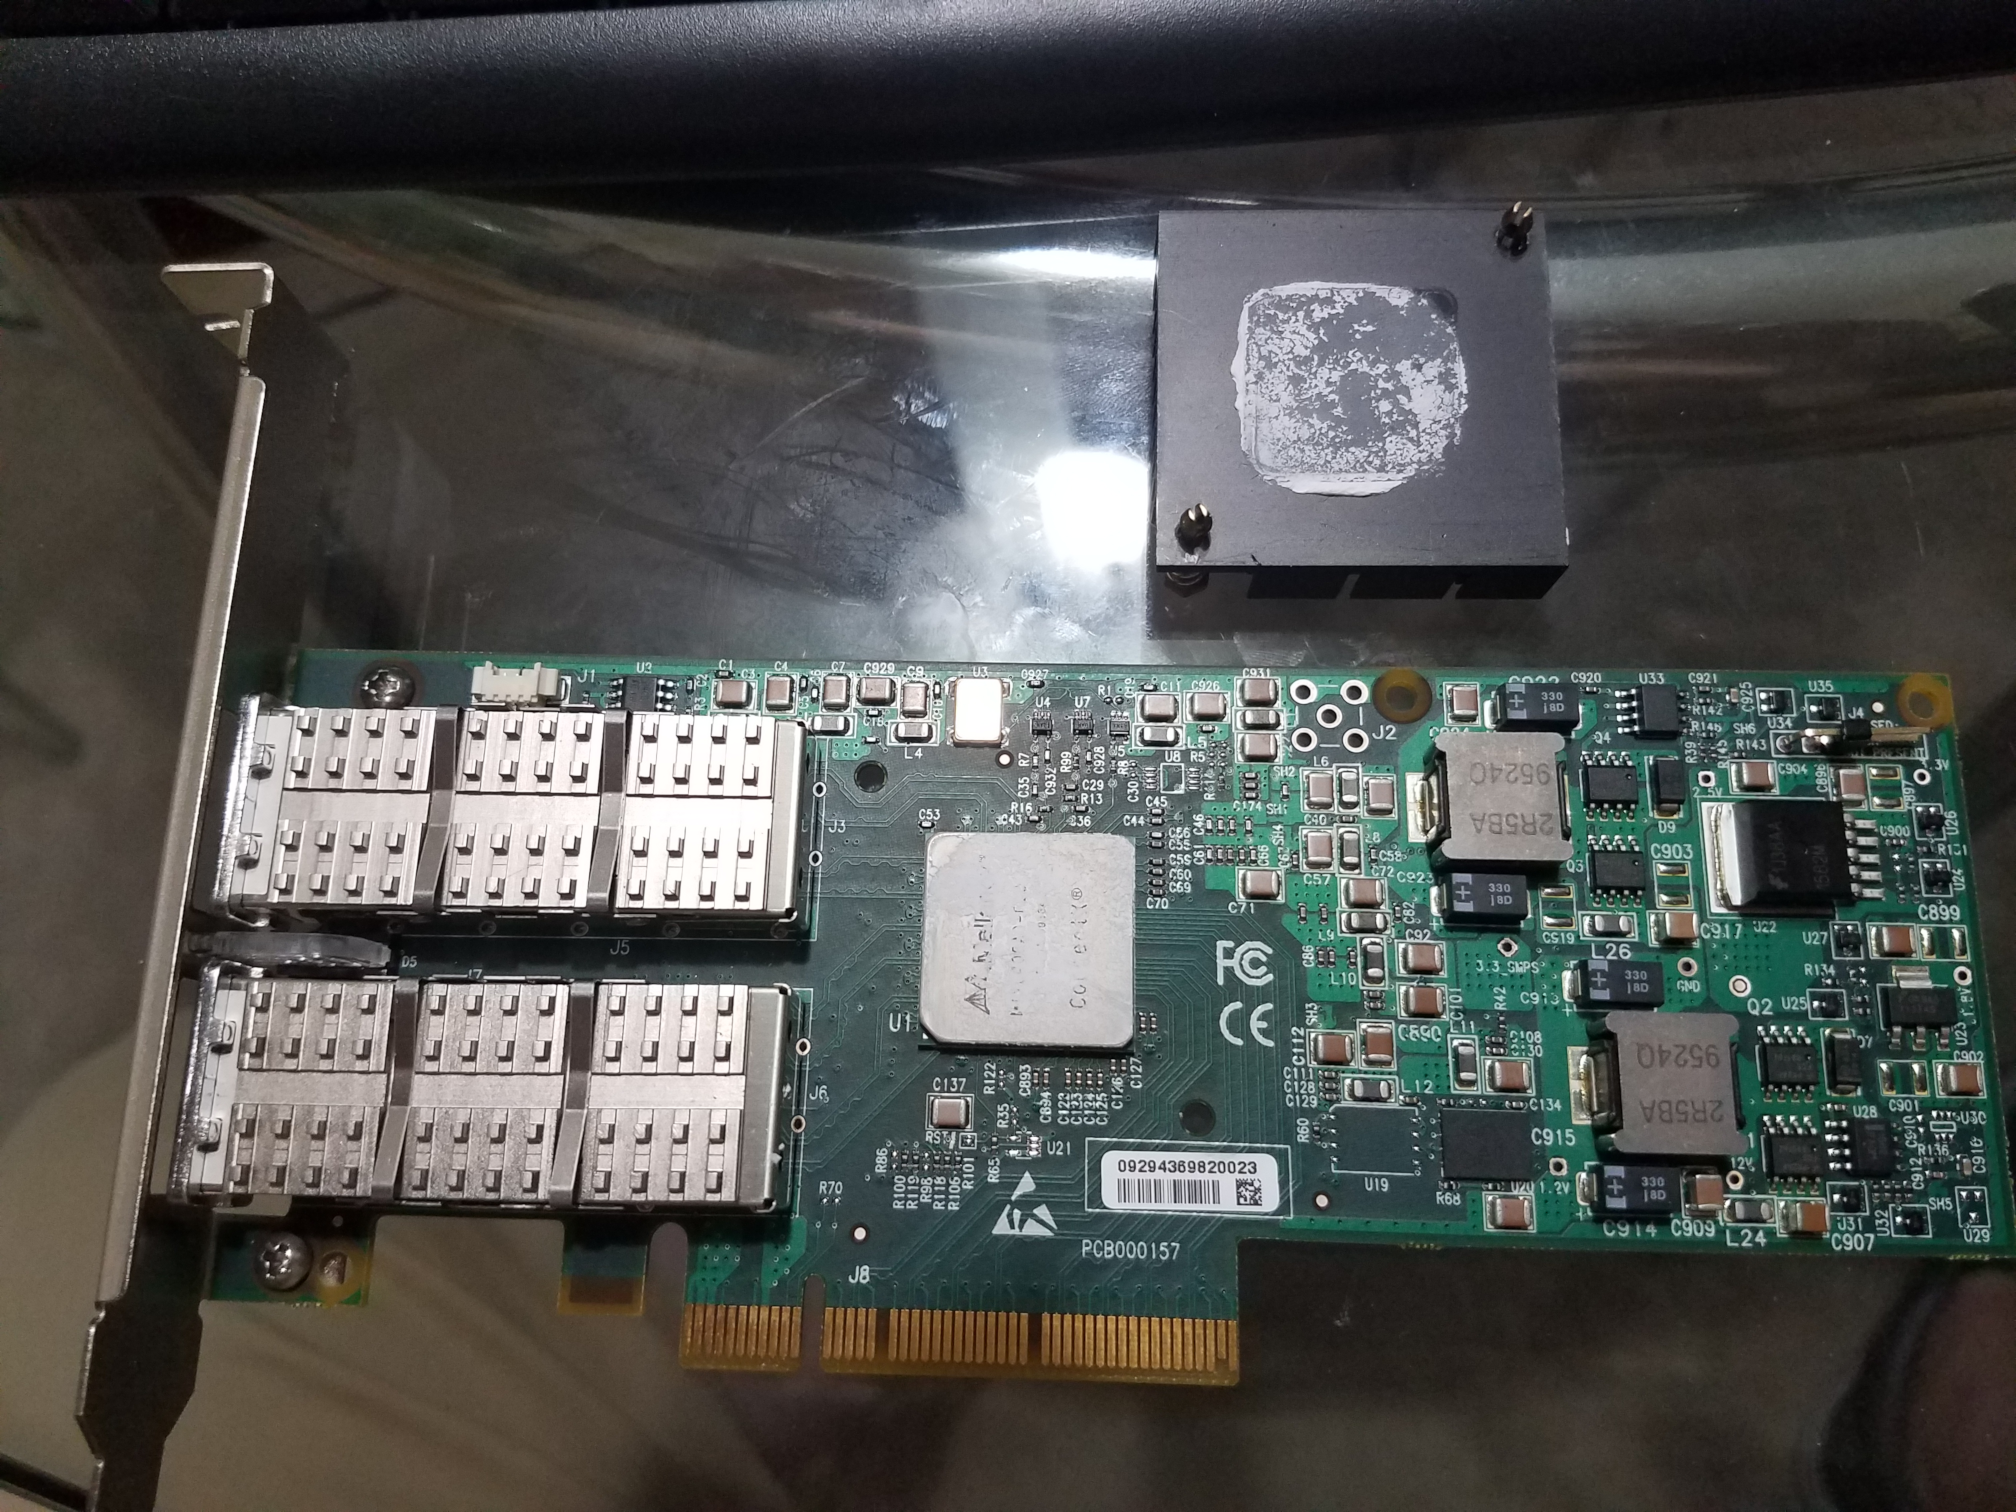
Push down on the rivets front side if they are a little bit sticky to the back side. Then use a pair of tweezers (or hemostat) to compress the back pins while gently pulling on the rivet from the front side. If everything goes well, the rivet will go through the board and heat sink holes. The keyword here is “gently” so that you do no break the pins (if plastic). Your mileage will vary, mine is 50% success. If you break the rivet, it is not the end of the world. Either you have bolts and nuts in you stash that will work either you go to https://www.ebay.com/sch/i.html?_nkw=Heatsink+Cooler+Cooling+Fan+Spring+Rivet
Once separated, use isopropyl rubbing alcohol 70% (or similar) to entirely remove the dead compound. You get a very clean new chip and heat sink, as shown in Figure 18. Give the time to the alcohol traces to fully evaporate. Apply some brand new compound (I’m using the extra compound I got with a Noctua CPU cooler. Otherwise you can use a compound such as Artic MX, see Figure 19), then put back the heat sink and plug back the rivets.
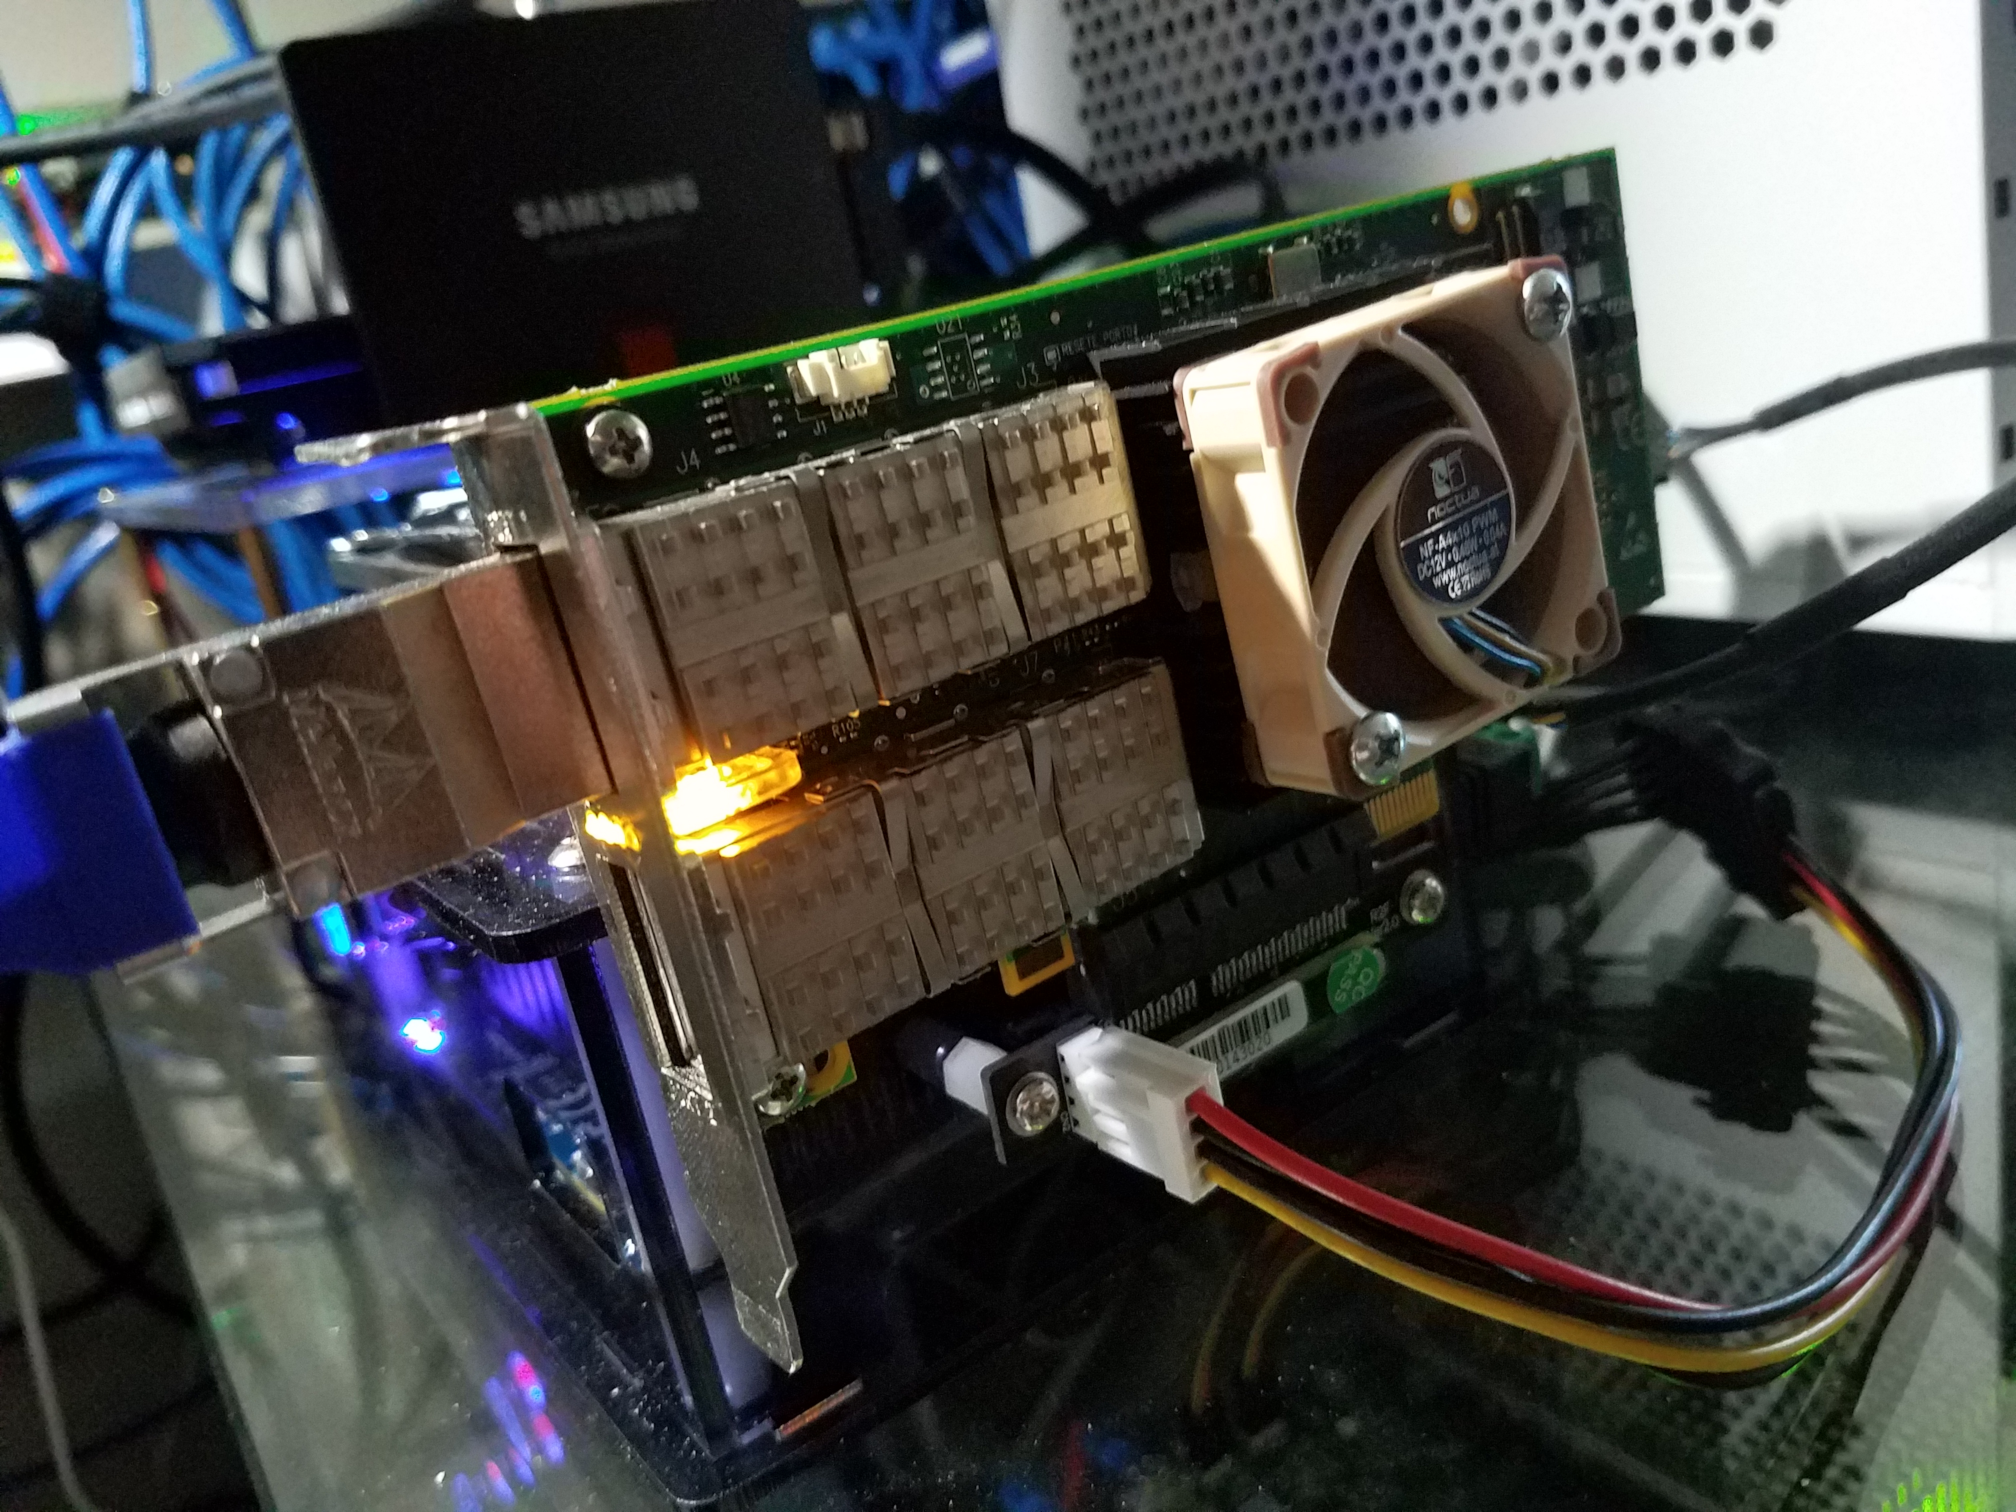
Finally, if you have the funds, add a Noctua 40x10mm to pull the heat from the heat sink as shown in Figure 20. The screws to use are: pan head Phillips 6 x 3/4, they bite exactly the right way between the fins of the heat sink. You card will reward you by not dying in 2 or 3 years.
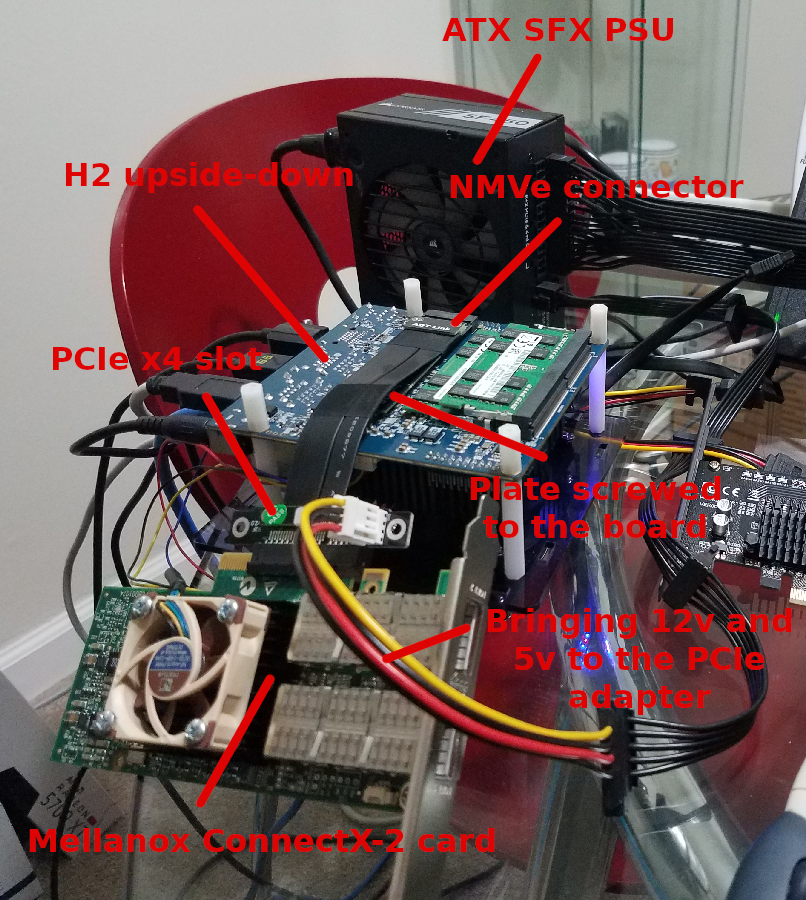
Powering the whole system
The official ODROID-H2 power brick provides 15V x 4A = max 60W. The Hard Kernel documentation (Wiki) indicates that the H2 can be powered by a DC 14V-20V (up to 60W) power supply.
The initial testing of the system (H2 + 10TB WD Red + 1 TB SSD + eMMC + 32Gb memory + Mellanox network card + card fan + chassis fan) showed a burst power consumption of 53W, then 35W to 45W during the various phases of booting to finally land at around 34.5W when idle, 38.5W with the IB card link up and 49.5W when running iperf3 network tests (where disks were not involved.) These measurements were made using the H2 power brick powering everything except the PCIe bus/IB card powered by a separate SFX PSU, which is the small format version of the regular ATX PSU.
This is too close to comfort to the max 60W supported by the lines of the H2 board, for we need some room space for additional devices connecting to the USB ports, and the chassis fan going full speed. So using a separate SFX PSU is warranted. Now it would be nice to solve the simultaneous usage of the two power supplies, this means powering the H2 with the SFX PSU and eliminate the H2 power brick from the equation.
But the SFX PSU can only provide 12V, not in the range of the14V-20V expected by the H2. A DC converter from 12V to 19V (easy to find on Aliexpress.com) could solve the issue. However, the 14V-20V requirement is not an absolute one. The H2 will be a perfectly happy camper with 12V as long as you do not ask him to power the hard disk and SSD. So the SFX PSU will power everything including the H2 itself and the SATA disks will get their power from the SFX PSU, not the H2.
Eliminating one power supply led to a significant reduction in power consumption: the system now idles at 24W (with a burst at 38W during boot), which is very manageable from the monthly electric bill viewpoint. Power consumption only climbs to 32W when running iperf3 network tests and max at 35W while copying files back and forth between the H2 and its clients over NFS.
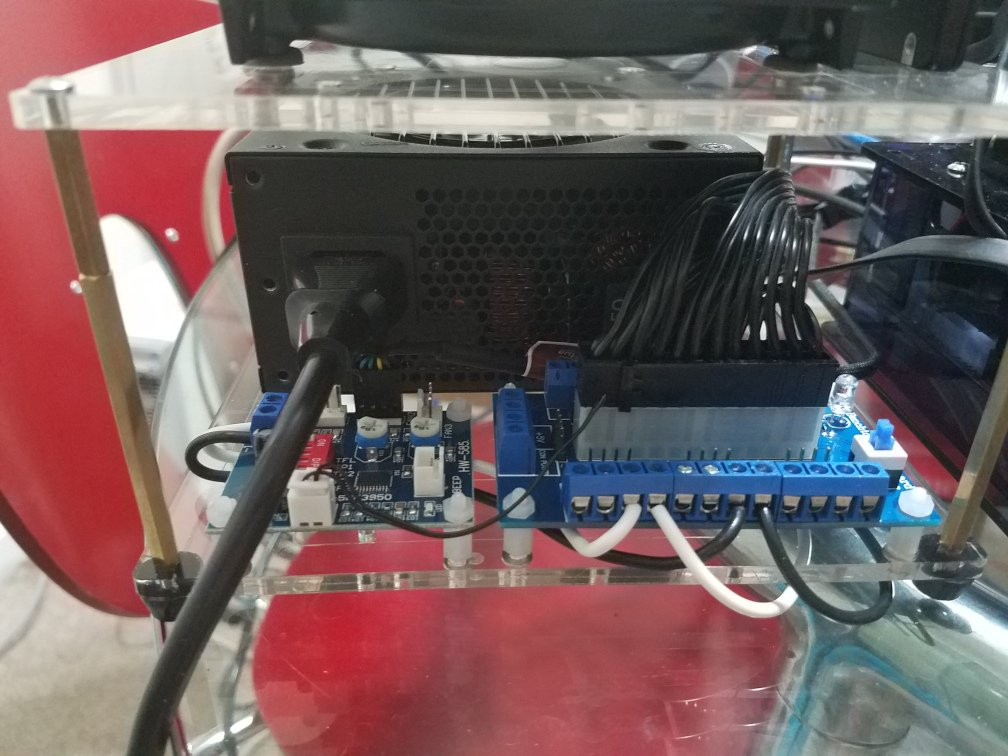
The blue ATX breakout board is in the foreground on the right. It includes (on the right) a power button to power the ATX PSU on and off. A blue light LED (behind the button turns on). The ATX power cable plugs in the middle of the board. Such a board makes it easy to get the 12V, 5V and 3.3V power lines without cutting cables, soldering, etc. In other words, the SFX PSU and its cables are left intact for reuse in the future if necessary.
Note: with this configuration, powering the H2 therefore consists in two steps. First, power on the SFX PSU, then power on the H2. And once you shutdown the H2 you have to manually turn off the SFX PSU so that the network card and disks do not consume power for nothing. The white (+12V) and black (GND) wires connected to the board bring power to the small fan PWM controller board (foreground left) and the H2 itself. To plug the power into the H2 you just need one male 2.1x5.5mm DC power jack plug adapter. The fan PWM controller board permits to control the 40x10mm fan fixed on the Mellanox network card heat sink (basically bringing it down to sufficient speed while being silent.)
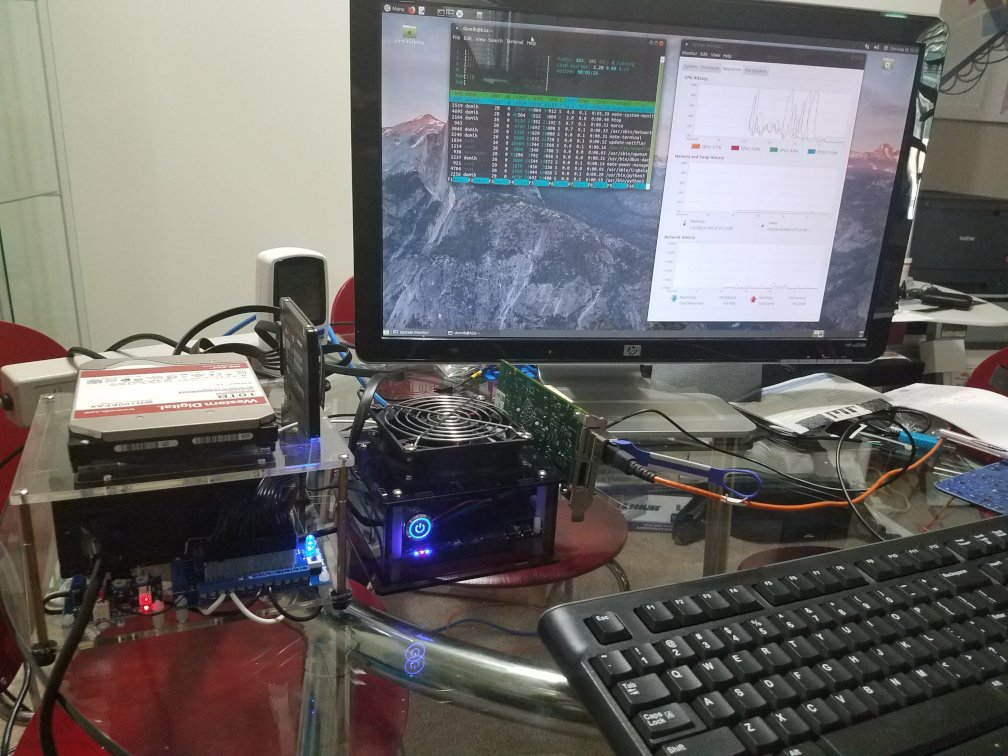
The complete assembled system is shown in Figures 22 and 23.
At this point, we are done with the hardware side of the story. Let’s switch to the software side.
Setting Up the IP addresses for InfinBand IP over IB
First check that your Ubuntu 18.04 or 19.04 have its netplan delegating all network configuration to the good old Network Manager:
~$ ls /etc/netplan
01-network-manager-all.yaml
~$ cat /etc/netplan/01-network-manager-all.yaml
# Let NetworkManager manage all devices on this system
network:
  version: 2
  renderer: NetworkManager
In the rest of this article, we will use the Network Manager. If you prefer netplan because it is the new best thing on the planet and are a netplan expert guru, you will have no problem following what’s below and translating it to the appropriate YAML configuration. At this point, the PCIe IB network card is installed and we successful established that it is recognized. So we should see the two ports available for configuration and activation. Let’s see:
~$ ip a
1: lo: <LOOPBACK,UP,LOWER_UP> mtu 65536 qdisc noqueue state UNKNOWN group default qlen 1000
    link/loopback 00:00:00:00:00:00 brd 00:00:00:00:00:00
    inet 127.0.0.1/8 scope host lo
       valid_lft forever preferred_lft forever
    inet6 ::1/128 scope host
       valid_lft forever preferred_lft forever
2: enp2s0: <BROADCAST,MULTICAST,UP,LOWER_UP> mtu 1500 qdisc fq_codel state UP group default qlen 1000
    link/ether 00:1e:06:45:0d:47 brd ff:ff:ff:ff:ff:ff
    inet 192.168.1.70/24 brd 192.168.1.255 scope global noprefixroute enp2s0
       valid_lft forever preferred_lft forever
    inet6 fe80::bdf4:34b7:f1a3:eb1/64 scope link noprefixroute
       valid_lft forever preferred_lft forever
3: enp3s0: <NO-CARRIER,BROADCAST,MULTICAST,UP> mtu 1500 qdisc fq_codel state DOWN group default qlen 1000
    link/ether 00:1e:06:45:0d:48 brd ff:ff:ff:ff:ff:ff
4: ibp1s0: <BROADCAST,MULTICAST,UP,LOWER_UP> mtu 65520 qdisc fq_codel state UP group default qlen 256
    link/infiniband 80:00:02:08:fe:80:00:00:00:00:00:00:00:02:c9:03:00:10:ea:45 brd 00:ff:ff:ff:ff:12:40:1b:ff:ff:00:00:00:00:00:00:ff:ff:ff:ff
5: ibp1s0d1: <BROADCAST,MULTICAST,UP,LOWER_UP> mtu 65520 qdisc fq_codel state UP group default qlen 256
    link/infiniband 80:00:02:09:fe:80:00:00:00:00:00:00:00:02:c9:03:00:10:ea:46 brd 00:ff:ff:ff:ff:12:40:1b:ff:ff:00:00:00:00:00:00:ff:ff:ff:ff
The labels enp2s0 and enp3s0 represent the two ODROID-H2 onboard 1 Gbe ports and yes (!) we have ibp1s0 and ibp1s0d1 (4: and 5: as shown above), the two ports of the ConnectX-2 card. Note that on your ODROID-H2 or other PCs they may show up as ib0 and ib1. It depends on how the naming scheme the NICs has been configured.
What to do if you do not see the IB ports?
If you just installed the IB packages as described earlier a complementary reboot will help a lot. If, after rebooting, you still do not see the network IB ports, you have to dig in to find out what is going on. Is the ib_ipoib kernel module loaded?
~$ sudo lsmod | grep ib_ipoib
Should show something like:
ib_ipoib              110592  0
ib_cm                  57344  2 rdma_cm,ib_ipoib
ib_core               249856  10 rdma_cm,ib_ipoib,rpcrdma,mlx4_ib,iw_cm,ib_iser,ib_umad,rdma_ucm,ib_uverbs,ib_cm
If it does not show up, it means the ib_ipoib Kernel module was not loaded. Try:
~$ sudo modprobe ib_ipobibIf still not successful and depending the error message, your best option is to apt remove the IB packages and reinstall them and reboot. If by any chance you previously had the Linux Mellanox OFED installed, proceed as follows:
# Become root
~$ sudo su -
# Go to the Mellanox OFED installation kit
~$ cd MLNX_OFED_LINUX-4.6-1.0.1.1-ubuntu18.04-x86_64/
# Uninstall it
~$ ./uninstall.sh
# Get rid of it
~$ cd ..
~$ rm -fr MLNX_OFED_LINUX-4.6-1.0.1.1-ubuntu19.04-x86_64
~$ rm -f MLNX_OFED_LINUX-4.6-1.0.1.1-ubuntu18.04-x86_64 MLNX_OFED_LINUX-4.6-1.0.1.1-ubuntu18.04-x86_64.tgz
~$ exit
# Install the apt repositories versions
~$ sudo apt install rdma-core opensm ibutils ibverbs-utils infiniband-diags perftest mstflint
# Reboot
~$ sudo shutdown -r now
If you still do not see the IB ports, go to the ODROID-H2 forum and ask for help from a good Samaritan, and/or google until exhaustion for solutions from other lost souls who had the same issue(s).
Configuring the IB ports for IPoIB use
At this point, we assume that you do see the IP ports. Let’s configure and activate them using the Network Manager nmtui command
~$ sudo nmtui
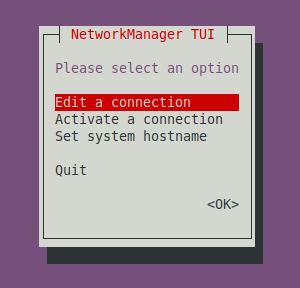
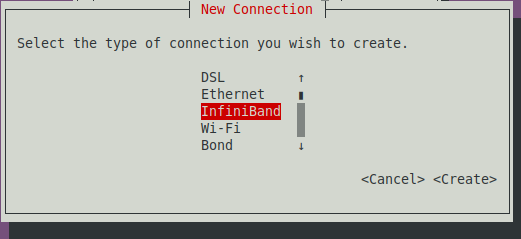
Select Edit a connection in the ncurse dialog, then Select Add and choose InfiniBand and select Create:
The Edit connection dialog appears, as shown in 26.
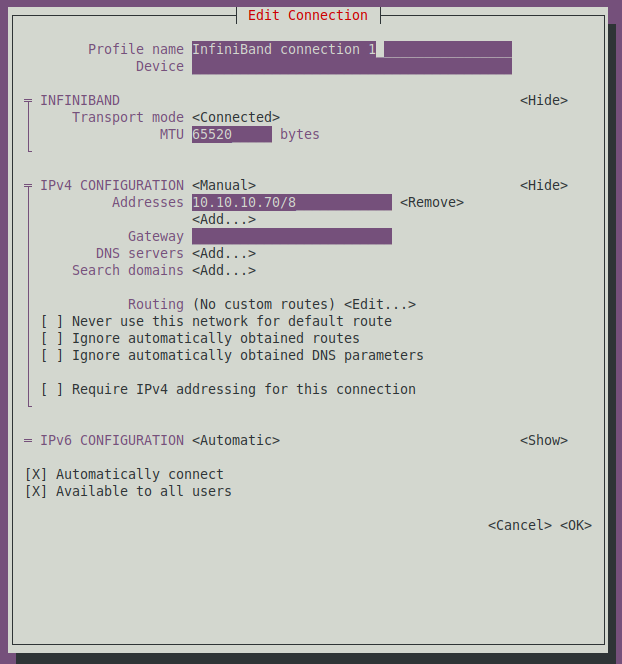
Select or enter the following options:
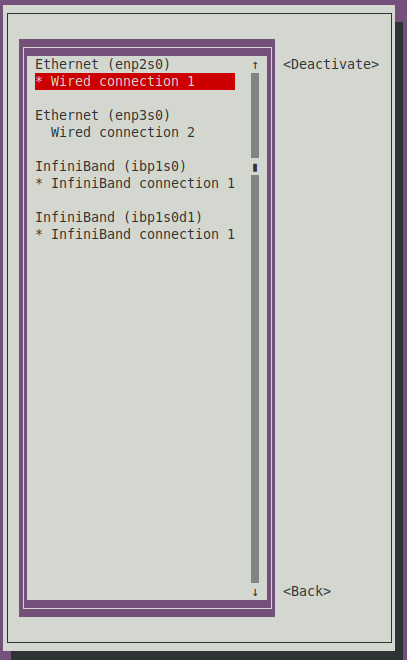
- Transport Mode: Connected,
- MTU: 65520,
- Manual IPv4: 10.10.10.70/8
The IP is whatever subnet and mask you prefer as long as it is not the subnet of you regular 1 Gbe network. There is no need for Gateway, DNS servers or Search Domains, the H2 (and PCs) will find the IP addresses of the regular domain names via the 1 Gbe network or wireless. Finally select OK. After exiting this screen, select Back and select Activate a Connection in the main dialog to verify that your new NIC port is active. If not, activate it, as shown in Figure 27.
Do not forget to add the IP addresses of your IB ports and host names to the host files of your H2 and PCs, or if you are running your own local DNS to add them to it.
Let’s verify that our connection is working and the link is up:
~$ ip a
1: lo: <LOOPBACK,UP,LOWER_UP> mtu 65536 qdisc noqueue state UNKNOWN group default qlen 1000
    link/loopback 00:00:00:00:00:00 brd 00:00:00:00:00:00
    inet 127.0.0.1/8 scope host lo
       valid_lft forever preferred_lft forever
    inet6 ::1/128 scope host
       valid_lft forever preferred_lft forever
.../...
4: ibp1s0: <BROADCAST,MULTICAST,UP,LOWER_UP> mtu 65520 qdisc fq_codel state UP group default qlen 256
    link/infiniband 80:00:02:08:fe:80:00:00:00:00:00:00:00:02:c9:03:00:10:ea:45 brd 00:ff:ff:ff:ff:12:40:1b:ff:ff:00:00:00:00:00:00:ff:ff:ff:ff
    inet 10.10.10.70/8 brd 10.255.255.255 scope global noprefixroute ibp1s0
       valid_lft forever preferred_lft forever
    inet6 fe80::76fa:9754:1f17:3ca7/64 scope link noprefixroute
       valid_lft forever preferred_lft forever
Testing connection and bandwidth with iperf3
Note: If iperf3 does not connect between the server and the client, double-check your nmtui configuration then if the problem persists, double check that the kernel module ib_ipoib is loaded. It may also be because the IB network is not yet managed, execute the following command on the H2 or the PC:
$ sudo /etc/init.d/opensmd start
Once OpenSM is started, execute the following command on the H2 or the PC:
$ sudo iblinkinfo
It should return something similar to this (LIDs are marked with **):
CA: h2a mlx4_0:
0x0002c9030010ea45 1** 1[ ] ==( 4X 10.0 Gbps Active/ LinkUp)==>
3 6[ ] "Infiniscale-IV Mellanox Technologies" ( )
Switch: 0x0002c902004a3e78 Infiniscale-IV Mellanox Technologies:
3 1[ ] ==( Down/PortConfigurationTraining)==> [ ]
"" ( )
3 2[ ] ==( 4X 10.0 Gbps Active/ LinkUp)==> 9** 1[ ] "ripper
HCA-1" ( )
3 3[ ] ==( Down/ Polling)==> [ ] "" ( )
3 4[ ] ==( Down/ Polling)==> [ ] "" ( )
3 5[ ] ==( Down/ Polling)==> [ ] "" ( )
3 6[ ] ==( 4X 10.0 Gbps Active/ LinkUp)==> 1** 1[ ] "h2a
mlx4_0" ( )
3 7[ ] ==( Down/ Polling)==> [ ] "" ( )
3 8[ ] ==( Down/ Polling)==> [ ] "" ( )
3 9[ ] ==( Down/ Polling)==> [ ] "" ( )
3 10[ ] ==( Down/ Polling)==> [ ] "" ( )
3 11[ ] ==( Down/ Polling)==> [ ] "" ( )
3 12[ ] ==( Down/ Polling)==> [ ] "" ( )
3 13[ ] ==( Down/ Polling)==> [ ] "" ( )
3 14[ ] ==( Down/ Polling)==> [ ] "" ( )
3 15[ ] ==( Down/ Polling)==> [ ] "" ( )
3 16[ ] ==( Down/ Polling)==> [ ] "" ( )
3 17[ ] ==( Down/ Polling)==> [ ] "" ( )
3 18[ ] ==( Down/ Polling)==> [ ] "" ( )
CA: ripper HCA-1:
0xf452140300346ea1 9** 1[ ] ==( 4X 10.0 Gbps Active/ LinkUp)==>
3 2[ ] "Infiniscale-IV Mellanox Technologies" ( )
Check that both devices are listed. In the example above, there are "ripper HCA-1" and "h2a mlx4_0" within the Switch list as well as in independent CA entries. Without a switch it will look the same without the Switch list.
Finally, you can check pinging over InfiniBand, to do so see this man page. Note that ibping does not work like ping, and you have to start it in server mode on one machine and then only you can target it from another IB connected machine. Note also that ibping expects a LID as target, not an IP address.
In the example above, the h2a has a LID of 1 and the PC has a LID of 9. So to check that the two devices can talk to each other over IB, you would execute:
# On the PC
sudo ibping -S -d -v
# On the H2
sudo ibping 9
# OR
# On the H2
sudo ibping -S -d -v
# On the PC
sudo ibping 1
Once you have established that the two devices can talk over IB, you can then further troubleshoot at the IP level with ping and other IP tools over IPoIB. Let’s use an i5 9600K PC to talk with the H2 using IP over OB. First let’s start iperf3 in server mode on the i5:
~$ iperf3 -s --bind 10.10.10.21
-----------------------------------------------------------
Server listening on 5201
-----------------------------------------------------------
Note: press Ctrl-C to exit the server mode once you’re done testing.
Then connect to it as client from the H2:
~$ iperf3 -c 10.10.10.21 --bind 10.10.10.70 -t 10
Connecting to host 10.10.10.21, port 5201
[  5] local 10.10.10.70 port 54865 connected to 10.10.10.21 port 5201
[ ID] Interval           Transfer     Bitrate         Retr  Cwnd
[  5]   0.00-1.00   sec  1.29 GBytes  11.1 Gbits/sec    0   3.18 MBytes
[  5]   1.00-2.00   sec  1.29 GBytes  11.1 Gbits/sec    0   3.18 MBytes
[  5]   2.00-3.00   sec  1.29 GBytes  11.1 Gbits/sec    0   3.18 MBytes
[  5]   3.00-4.00   sec  1.29 GBytes  11.1 Gbits/sec    0   3.18 MBytes
[  5]   4.00-5.00   sec  1.29 GBytes  11.1 Gbits/sec    0   3.18 MBytes
[  5]   5.00-6.00   sec  1.29 GBytes  11.1 Gbits/sec    0   3.18 MBytes
[  5]   6.00-7.00   sec  1.29 GBytes  11.1 Gbits/sec    0   3.18 MBytes
[  5]   7.00-8.00   sec  1.29 GBytes  11.1 Gbits/sec    0   3.18 MBytes
[  5]   8.00-9.00   sec  1.29 GBytes  11.1 Gbits/sec    0   3.18 MBytes
[  5]   9.00-10.00  sec  1.29 GBytes  11.1 Gbits/sec    0   3.18 MBytes
- - - - - - - - - - - - - - - - - - - - - - - - -
[ ID] Interval           Transfer     Bitrate         Retr
[  5]   0.00-10.00  sec  12.9 GBytes  11.1 Gbits/sec    0             sender
[  5]   0.00-10.00  sec  12.9 GBytes  11.1 Gbits/sec                  receiver
Let’s now do the reverse, let’s start iperf3 in server mode on the H2:
~$ iperf3 -s --bind 10.10.10.70
-----------------------------------------------------------
Server listening on 5201
-----------------------------------------------------------
Then connect to it as client from the i5:
~$ iperf3 -c 10.10.10.70 --bind 10.10.10.21 -t 10
Connecting to host 10.10.10.70, port 5201
[  4] local 10.10.10.21 port 49411 connected to 10.10.10.70 port 5201
[ ID] Interval           Transfer     Bandwidth       Retr  Cwnd
[  4]   0.00-1.00   sec  1.67 GBytes  14.4 Gbits/sec    0   3.12 MBytes
[  4]   1.00-2.00   sec  1.67 GBytes  14.4 Gbits/sec    0   3.12 MBytes
[  4]   2.00-3.00   sec  1.68 GBytes  14.4 Gbits/sec    0   3.12 MBytes
[  4]   3.00-4.00   sec  1.67 GBytes  14.4 Gbits/sec    0   3.12 MBytes
[  4]   4.00-5.00   sec  1.68 GBytes  14.4 Gbits/sec    0   3.12 MBytes
[  4]   5.00-6.00   sec  1.67 GBytes  14.4 Gbits/sec    0   3.12 MBytes
[  4]   6.00-7.00   sec  1.68 GBytes  14.4 Gbits/sec    0   3.12 MBytes
[  4]   7.00-8.00   sec  1.67 GBytes  14.4 Gbits/sec    0   3.12 MBytes
[  4]   8.00-9.00   sec  1.68 GBytes  14.4 Gbits/sec    0   3.12 MBytes
[  4]   9.00-10.00  sec  1.67 GBytes  14.4 Gbits/sec    0   3.12 MBytes
- - - - - - - - - - - - - - - - - - - - - - - - -
[ ID] Interval           Transfer     Bandwidth       Retr
[  4]   0.00-10.00  sec  16.7 GBytes  14.4 Gbits/sec    0             sender
[  4]   0.00-10.00  sec  16.7 GBytes  14.4 Gbits/sec                  receiver
With 11.1 GbE in one direction and 14.4 GbE in the other we passed the 10 GbE mark, hence the eye catching title of this article! At this point you may start thinking, but wait a minute! 11.1 and 14.4 is way below the 40 Gb/s of the InfiniBand network. And you would be entirely right.
However, let’s take a closer look at what is going on here:
- We start at 40 Gbe max.
- Remember the 8b10b line encoding? So we are now at 32 Gbe max.
- Remember the card is a PCIe 2 x8, but we only have a PCIe x4 slot, so the traffic on the PCIe bus get reduced by a factor of 2. So we are now at 16 Gb/s max (PCIe 2.0 uses an 8b/10b encoding scheme, therefore delivering, per-lane, an effective 4 Gbit/s max transfer rate from its 5 GT/s raw data rate, and 4 Gbit/s x 4 lanes = 16 Gbit/s)
- Add the processing of the IP stack, the processing of iperf3 itself over the speed of the Celeron J4105 (which is not an i9 9900k or Ryzen 3900x) and yes, we are in the neighborhood of the witnessed 11.1 GbE and 14.4GbE.
Another way to test the connection if you do not have (yet) a second PC with an IB card, and if you have a 2-port card on the H2 is to configure and activate both ports and then connect them to each other:
# In one terminal window:
~$ iperf3 -s --bind 10.10.10.70
# In a second terminal window:
~$ iperf3 -c 10.10.10.70 --bind 10.10.10.71 -t 300
Connecting to host 10.10.10.70, port 5201
[  4] local 10.10.10.71 port 49363 connected to 10.10.10.70 port 5201
[ ID] Interval           Transfer     Bandwidth       Retr  Cwnd
[  4]   0.00-1.00   sec  3.18 GBytes  27.3 Gbits/sec    0   1.75 MBytes
[  4]   1.00-2.00   sec  3.14 GBytes  27.0 Gbits/sec    0   1.75 MBytes
.../...
[  4] 299.00-300.00 sec  3.08 GBytes  26.5 Gbits/sec    0   3.12 MBytes
- - - - - - - - - - - - - - - - - - - - - - - - -
[ ID] Interval           Transfer     Bandwidth       Retr
[  4]   0.00-300.00 sec   895 GBytes  25.6 Gbits/sec    0             sender
[  4]   0.00-300.00 sec   895 GBytes  25.6 Gbits/sec                  receiver
Because the server and client are on the same machine iperf3 sums the input and output traffic. Not too surprisingly 25.6 ~= 14.4 + 11.1. For a comparison with more powerful PCs and CPUs, here are additional results.
# In one terminal window:
~$ iperf3 -s --bind 10.10.10.24
# In a second terminal window:
~$ iperf3 -c 10.10.10.24 --bind 10.10.10.25
Connecting to host 10.10.10.24, port 5201
[  4] local 10.10.10.25 port 38783 connected to 10.10.10.24 port 5201
[ ID] Interval           Transfer     Bandwidth       Retr  Cwnd
[  4]   0.00-1.00   sec  5.56 GBytes  47.7 Gbits/sec    0   1.37 MBytes
[  4]   1.00-2.00   sec  5.61 GBytes  48.2 Gbits/sec    0   1.37 MBytes
[  4]   2.00-3.00   sec  5.64 GBytes  48.5 Gbits/sec    0   1.37 MBytes
[  4]   3.00-4.00   sec  5.60 GBytes  48.1 Gbits/sec    0   1.44 MBytes
[  4]   4.00-5.00   sec  5.65 GBytes  48.5 Gbits/sec    0   1.44 MBytes
[  4]   5.00-6.00   sec  5.55 GBytes  47.7 Gbits/sec    0   1.44 MBytes
[  4]   6.00-7.00   sec  5.61 GBytes  48.2 Gbits/sec    0   1.44 MBytes
[  4]   7.00-8.00   sec  5.58 GBytes  48.0 Gbits/sec    0   1.44 MBytes
[  4]   8.00-9.00   sec  5.52 GBytes  47.5 Gbits/sec    0   1.44 MBytes
[  4]   9.00-10.00  sec  5.66 GBytes  48.6 Gbits/sec    0   1.44 MBytes
- - - - - - - - - - - - - - - - - - - - - - - - -
[ ID] Interval           Transfer     Bandwidth       Retr
[  4]   0.00-10.00  sec  56.0 GBytes  48.1 Gbits/sec    0             sender
[  4]   0.00-10.00  sec  56.0 GBytes  48.1 Gbits/sec                  receiver
Note: this was performed with an industrial board running an AMD v1605b.
# In one terminal window:
~$ iperf3 -s --bind 10.10.10.20
# In a second terminal window:
~$ iperf3 -c 10.10.10.20 --bind 10.10.10.21
Connecting to host 10.10.10.20, port 5201
[  4] local 10.10.10.21 port 57059 connected to 10.10.10.20 port 5201
[ ID] Interval           Transfer     Bandwidth       Retr  Cwnd
[  4]   0.00-1.00   sec  11.4 GBytes  98.1 Gbits/sec    0   1.56 MBytes
[  4]   1.00-2.00   sec  11.6 GBytes  99.4 Gbits/sec    0   1.56 MBytes
[  4]   2.00-3.00   sec  11.4 GBytes  98.3 Gbits/sec    0   1.56 MBytes
[  4]   3.00-4.00   sec  11.7 GBytes   100 Gbits/sec    0   1.56 MBytes
[  4]   4.00-5.00   sec  11.5 GBytes  98.7 Gbits/sec    0   1.56 MBytes
[  4]   5.00-6.00   sec  11.5 GBytes  98.4 Gbits/sec    0   1.56 MBytes
[  4]   6.00-7.00   sec  11.5 GBytes  98.4 Gbits/sec    0   1.56 MBytes
[  4]   7.00-8.00   sec  11.8 GBytes   101 Gbits/sec    0   1.56 MBytes
[  4]   8.00-9.00   sec  11.4 GBytes  98.1 Gbits/sec    0   1.56 MBytes
[  4]   9.00-10.00  sec  11.5 GBytes  98.7 Gbits/sec    0   1.56 MBytes
- - - - - - - - - - - - - - - - - - - - - - - - -
[ ID] Interval           Transfer     Bandwidth       Retr
[  4]   0.00-10.00  sec   115 GBytes  98.9 Gbits/sec    0             sender
[  4]   0.00-10.00  sec   115 GBytes  98.9 Gbits/sec                  receiver
Note: this was performed with a host running an i5 9660K (the motherboard is an ASRock Z390M-ITX/ac, memory is at 3200MT/s) and over FDR.
Not too surprisingly, the more money you throw at something, the best result you get… usually. But the point here is that the ODROID-H2 can do up to 14.4Gbe. Not bad for a $111 embedded board. Let’s now see it behaves as an NSF server.
Using NFS over InfiniBand
To prepare the volumes to be shared, let’s partition and format the 1 TB SSD (/dev/sda).
~$ sudo parted /dev/sda
GNU Parted 3.2
Using /dev/sda
Welcome to GNU Parted! Type 'help' to view a list of commands.
(parted) mklabel gpt
(parted) unit tb
(parted) mkpart primary 0.00 1.00
(parted) align-check optimal 1
1 aligned
(parted) q
Information: You may need to update /etc/fstab.

~$ sudo mkfs -t ext4 /dev/sda1
mke2fs 1.44.6 (5-Mar-2019)
Discarding device blocks: done
Creating filesystem with 250050816 4k blocks and 62513152 inodes
Filesystem UUID: 48956888-5174-45bb-89d7-c287615650b8
Superblock backups stored on blocks:
  32768, 98304, 163840, 229376, 294912, 819200, 884736, 1605632, 2654208,
  4096000, 7962624, 11239424, 20480000, 23887872, 71663616, 78675968,
  102400000, 214990848

Allocating group tables: done
Writing inode tables: done
Creating journal (262144 blocks): done
Writing superblocks and filesystem accounting information: done
Let’s partition and format the 10 TB WD Red (/dev/sdb).
~$ sudo parted /dev/sdb
GNU Parted 3.2
Using /dev/sdb
Welcome to GNU Parted! Type 'help' to view a list of commands.
(parted) mklabel gpt
(parted) unit tb
(parted) mkpart primary 0.00 10.00
(parted) align-check optimal 1
1 aligned
(parted) q
Information: You may need to update /etc/fstab.

~$ sudo mkfs -t ext4 /dev/sdb1
mke2fs 1.44.6 (5-Mar-2019)
Creating filesystem with 2441608704 4k blocks and 305201152 inodes
Filesystem UUID: 5f3bb840-7d13-4052-8444-42f9c55c9abf
Superblock backups stored on blocks:
  32768, 98304, 163840, 229376, 294912, 819200, 884736, 1605632, 2654208,
  4096000, 7962624, 11239424, 20480000, 23887872, 71663616, 78675968,
  102400000, 214990848, 512000000, 550731776, 644972544, 1934917632

Allocating group tables: done
Writing inode tables: done
Creating journal (262144 blocks): done
Writing superblocks and filesystem accounting information: done
Check whether or not these new volumes can be mounted without problem:
# Create the mount points
~$ sudo mkdir /mnt/ssd
~$ sudo mkdir /mnt/hdb

# Mount the volumes
~$ sudo mount /dev/sda1 /mnt/ssd
~$ sudo mount /dev/sdb1 /mnt/hdb

# Are they mounted?
~$ df -h
Filesystem      Size  Used Avail Use% Mounted on
.../...
/dev/sda1       938G   77M  891G   1% /mnt/ssd
/dev/sdb1       9.1T   80M  8.6T   1% /mnt/hdb
# Yep!
Add these volumes to /etc/fstab using their UUID:
# Fetch the UUID of /dev/sda1 and /dev/sdb1
~$ sudo blkid
.../...
/dev/sda1: UUID="48956888-5174-45bb-89d7-c287615650b8" TYPE="ext4" PARTLABEL="primary" PARTUUID="b660dfe2-1a2f-4238-a460-3eabbcb39c23"
/dev/sdb1: UUID="5f3bb840-7d13-4052-8444-42f9c55c9abf" TYPE="ext4" PARTLABEL="primary" PARTUUID="3b46613a-302f-4cd0-91bc-80cdd6f81a41"

# Edit /etc/fstab
~$ sudo vi /etc/fstab
# To add these two lines:
.../...
UUID=48956888-5174-45bb-89d7-c287615650b8       /mnt/ssd        ext4    defaults  0  0
UUID=5f3bb840-7d13-4052-8444-42f9c55c9abf       /mnt/hdb        ext4    defaults  0  0
.../...

# Unmount the volumes previously manually mounted
~$ sudo umount /mnt/ssd
~$ sudo umount /mnt/hdb

# Mount all volumes according to /etc/fstab
~$ sudo mount -a

# Are our two new volumes mounted?
~$ df -h
Filesystem      Size  Used Avail Use% Mounted on
.../...
/dev/sda1       938G   77M  891G   1% /mnt/ssd
/dev/sdb1       9.1T   80M  8.6T   1% /mnt/hdb
# Yep!
Setting up NFS (server side)
Let’s install the NFS server package on the H2:
~$ sudo apt update
~$ sudo apt upgrade
~$ sudo apt install nfs-common nfs-kernel-server
Configure the exports (adding the two lines shown below):
~$ sudo vi /etc/exports
.../...
/mnt/ssd/nfs    *(rw,sync,no_subtree_check)
/mnt/hdb/nfs    *(rw,sync,no_subtree_check)
.../...
Let’s set the permissions without bothering at all for security at this point (we’re testing!):
~$ sudo chown -R nobody:nogroup /mnt/ssd/nfs
~$ sudo chmod -R 0777 /mnt/ssd/nfs
~$ sudo chown -R nobody:nogroup /mnt/hdb/nfs
~$ sudo chmod -R 0777 /mnt/hdb/nfs
Load the RDMA kernel module for NFS server over RDMA:
~$ sudo modprobe svcrdmaRestart the NFS service:
~$ sudo systemctl restart nfs-kernel-serverOnce restarted, tell the NFS service to also listen on the RDMA ports:
~$ echo rdma 20049 | sudo tee /proc/fs/nfsd/portlistNote: you have to do this each time you restart the NFS service. Eventually you will want to put it all into a script.
Check whether or not it is correctly set up:
~$ sudo systemctl status nfs-kernel-server
  nfs-server.service - NFS server and services
   Loaded: loaded (/lib/systemd/system/nfs-server.service; enabled; vendor preset: enabled)
   Active: active (exited) since Sun 2019-09-15 14:47:12 PDT; 18s ago
  Process: 2386 ExecStartPre=/usr/sbin/exportfs -r (code=exited, status=0/SUCCESS)
  Process: 2387 ExecStart=/usr/sbin/rpc.nfsd $RPCNFSDARGS (code=exited, status=0/SUCCESS)
 Main PID: 2387 (code=exited, status=0/SUCCESS)

Sep 15 14:47:12 h2a systemd[1]: Starting NFS server and services...
Sep 15 14:47:12 h2a systemd[1]: Started NFS server and services.

~$ sudo cat /proc/fs/nfsd/portlist
rdma 20049
rdma 20049
udp 2049
tcp 2049
udp 2049
tcp 2049
Setting up NFS (client side)
Let’s use again an i5 9600K PC as testing client. In the text below, the name “h2a” is the host name of the ODROID-H2 over the 1 GbE network and the name “h2a.ib” is the host name of the H2 over the InfiniBand network. These names get their associated IP addresses via the /etc/hosts file setup on both machines (or a local DNS if you run one.)
Let’s install the NFS client package on the i5:
~$ sudo apt update
~$ sudo apt upgrade
~$ sudo apt install nfs-common
Load the RDMA kernel module for NFS client over RDMA:
~$ sudo modprobe xprtrdma
Testing
For testing, we copied various files from the i5 to the H2:
- CentOS-7-x86_64-DVD-1804.iso, the ISO image of the CentOS7 64-bit install DVD. What matters here is the file size: 4.5GB
- Lunar_LRO_WAC_GLD100_DTM_79S79N_100m_v1.1.tif, a TIFF image of the Moon. File size: 10.5GB
- VMware-image-folder, a directory containing a Vmware image for a total size of 41GB with 41 files.
On the i5, we proceed as follows:
# Create the mount points:
~$ sudo mkdri h2a:/mnt/nfs/h2a/ssd
~$ sudo mkdri h2a:/mnt/nfs/h2a/hdb
# Mount the SSD remote volume from the H2 over the 1 GbE network:
~$ sudo mount h2a:/mnt/ssd/nfs /mnt/nfs/h2a/ssd
# Measure the time it takes to copy a file:
~$ time cp /home/domih/Downloads/CentOS-7-x86_64-DVD-1804.iso /mnt/nfs/h2a/ssd
# Mount the hard disk remote volume from the H2 over the 1 GbE network:
~$ sudo mount h2a:/mnt/hdb/nfs /mnt/nfs/h2a/hdb
# Measure the time it takes to copy a file:
~$ time cp /home/domih/Downloads/CentOS-7-x86_64-DVD-1804.iso /mnt/nfs/h2a/hdb
# Unmount the volumes:
sudo umount /mnt/nfs/h2a/ssd
sudo umount /mnt/nfs/h2a/hdb
# Mount again but this time over NFS RDMA
sudo mount -o rdma,port=20049 h2a.ib:/mnt/ssd/nfs /mnt/nfs/h2a/ssd
# Measure the file copy again.
sudo mount -o rdma,port=20049 h2a.ib:/mnt/hdb/nfs /mnt/nfs/h2a/hdb
# Measure the file copy again.
Tests for the 4.5GB file were made 3 times over NFS in sync mode and then in async mode. The test were made only once for the bigger file and directory over NFS in async mode.
To switch the NFS server from sync to async mode, we just change the shares in the /etc/exports file and restart the NFS server (without forgetting the echo rdma...):
~$ sudo vi /etc/exports
.../...
/mnt/ssd/nfs    *(rw,async,no_subtree_check)
/mnt/hdb/nfs    *(rw,async,no_subtree_check)
.../...
~$ sudo systemctl restart nfs-kernel-server
~$ echo rdma 20049 | sudo tee /proc/fs/nfsd/portlist
Here are the results:
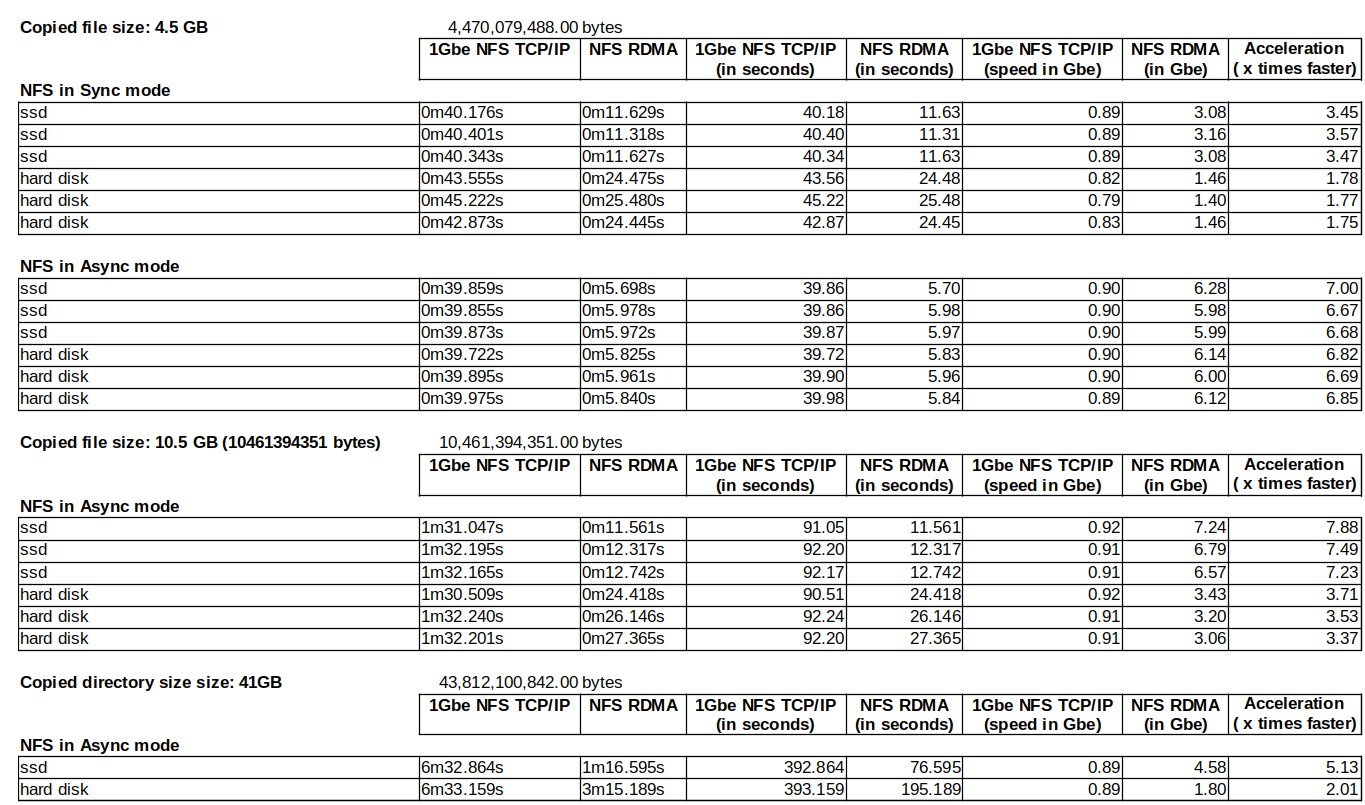
The formula to compute the speed in Gbe is:
File Size in Bytes x 8 / Time in secs / 1000000000 = Speed in Gbe
What to conclude from these numbers
- The resources (CPU) and time consumed writing to the SSD or hard disk do not affect the speed of the 1 GbE Ethernet because the network speed is slow enough to cover it up. On the other hand they do affect the 10+ GbE interconnect. You particularly see this comparing the NFS RDMA results in sync mode between the SSD and the hard disk. This effect disappears after switching NFS RDMA to async mode. Is there a “danger” penalty to switch to async? Not really as long as your server is behind a UPS and does not fail, meaning I/O error on the disk or crash. Both Windows and Linux in a certain extent cache disk writing anyway so in case of failure, the story is the same. For a longer discussion, see https://www.google.com/search?q=nfs+sync+vs+async.
- The acceleration varies from a little less than x2 to close to x8. The acceleration varies depending on what you copy and where you copy it. In any case, not bad at all for an embedded board that costs slightly more than $100.
- Beyond the numbers the human psychological effect is more about how long you wait for an operation: 1m16 is definitely much faster than 6m32! With the former you wait, with the latter you go grab a coffee.
- These are realistic numbers without time spent on optimizing. See Postscript below.
To play with unrealistic numbers, let’s use a RAM disk on one of the machines (here the i5) and copy from the H2 to the I5:
sudo mkdir -p /mnt/ramdisk
sudo mount -t tmpfs -o size=20480M tmpfs /mnt/ramdisk

time cp /mnt/nfs/h2a/ssd/CentOS-7-x86_64-DVD-1804.iso /mnt/ramdisk
4470079488*8/3.338/1000/1000/1000 = 10.71 Gbe

time cp /mnt/nfs/h2a/ssd/Lunar_LRO_WAC_GLD100_DTM_79S79N_100m_v1.1.tif /mnt/ramdisk
10461394351*8/7.385/1000/1000/1000 = 11.33 Gbe
Yeah, we are back above the 10Gbe mark! So if you really want to pump up the numbers, use a RAM disk (on the server and/or the client), the amount of data you can transfer will be limited to the size of the RAM disk (here 20GB) and you will have to write a CRON job or something like that to eventually copy the RAM disk to the physical disk on the server and/or the client for actual long term persistent storage.
Postscript
We hope you enjoyed reading this article. As mentioned earlier, remember that I am not an embedded computing nor and InfiniBand expert. If you are, do not hesitate to send your feedback to the Odroid Magazine or forum because I and others like to learn more about new things. Due to time and resource restrictions as well as reasonable article length for a magazine publication, I did not address the following topics:
- Possible CPU affinity, IRQ affinity and TCP/IP optimizations,
- Use LVM2 to create a cached logical volume for optimizing disk I/O,
- Samba usage over this type of interconnect,
- Windows Server 2012 (or later) and Windows 10 integration with SMB direct,
- Alternate solutions using 10 GbE Ethernet SFP+ cards and switches (SFP+ is significantly less expensive than their RJ-45 cousins as of this writing),
- Other technologies leveraging RDMA, such as distributed file systems (Hadoop, Lustre, Ceph, GlusterFS…), distributed databases, etc.
Depending on interest, there might be follow-up articles by me or others. Do not hesitate to express your interest to the Odroid Magazine.
About the author

Dominique has grown up since the above image was taken, and has been working as CTO or SVP of Engineering in multiple start-ups located around the San Francisco bay area (Silicon Valley) for the last 30 years. Dominique is currently SVP of Engineering at bonafeyed.com a start-up just getting out from under the radar. Its main product, Cy4Secure, is a data security solution that protects data or information when it is shared with others, through or in the cloud or an application, keeping the data always encrypted while on the move as well as at rest. Cy4Secure represents the last line of data protection after a security breach. Dominique is also consulting for mkrypt.com which is working on a Bluetooth low-energy fob providing true voice encryption for mobile and smartphones. You can reach Dominique on the ODROID forum by messaging @domih.
Be the first to comment