

Assembly
I mostly followed the Hardkernel easy install guide on the wiki with only a couple of changes. Most notably, I didn’t bother with the IR sensor configuration, and I didn’t install the cloudshell-lcd package in favor of something more custom. Assembly is fairly straightforward when following the assembly guide. The only tool required is a Philips head screwdriver. Go slow and don’t try to force any of the acrylic fittings. They should slide together easily, and you may break tabs if you use too much force, I broke two.
Drive Setup
After dialing in the RAID controller, you will need to make some decisions about drive partitioning, file system type, and mounting location. Everyone will have their own preferences on this configuration, but I settled on RAID 1 formatted with an ext4 filesystem with only 1 partition mounted at /mnt/storage.
I am planning on managing everything on this system with Docker, leaning on a docker-compose file that lives on the eMMC, and backed up in a private repo. The thinking is that all volumes defined in Docker will be housed on the /mnt/storage RAID drive, and nothing else. This simplifies offsite backups and recovery. A backup script can run across the whole drive knowing that it will only be getting relevant data and no OS cruft. Further, if the RAID drive fails and needs replacement, new drives can be swapped in, formatted, and mounted. Afterward a simple docker-compose up command will build a fresh setup, or offsite backups can be restored, and Docker will chug along like nothing happened.
nmon on the LCD
CloudShell2 comes with a small (320x240) LCD screen attached. If you follow the Quick Setup guide from HardKernel it will be enabled with a simple script displaying some hardware stats. This is okay, but I’m much more interested in being able to see activity at a glance. Dave Burkhardt’s excellent work modifying nmon for the CloudShell display fits the bill nicely. Installation is straight forward, and it is well detailed in the project readme here: https://github.com/DaveBurkhardt/cloudshell-nmon#readme
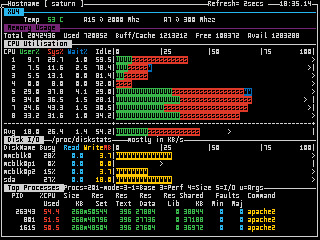
By default, the script will show network activity, which when using Docker becomes a bit useless due to clutter. Mostly I want to see CPU and drive activity, so I’ve modified the nmon options in nmon-xu4 as follows:
$ export NMON=xtfcdGThese options will show CPU activity, drive activity, and a short top list of processes.
Fan Upgrade
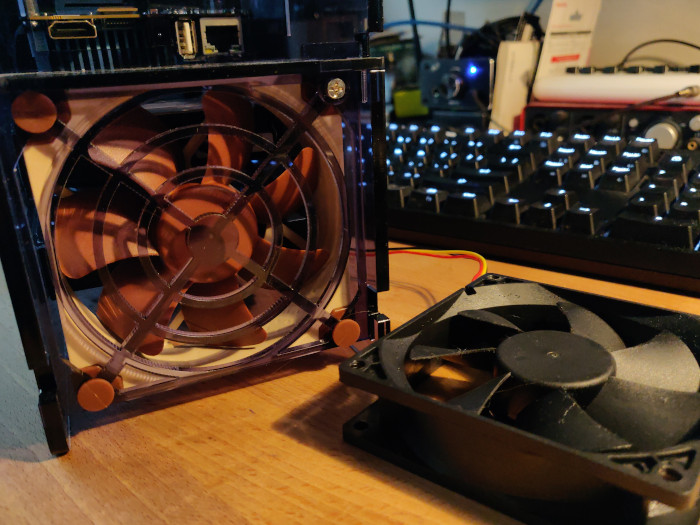
The fan that ships with the Cloudshell kit is adequate but noisy. I don’t think this would be much of a problem if you are keeping the Cloudshell in a closet, or a good distance from you. However, I have it sitting on my desk and the fan noise began to slowly erode my sanity. Time for an upgrade! The kit takes a 92mm 5V 3-Pin fan and there are plenty of high-quality quiet fan options out there that fit this spec. I settled on a Noctua NF-A9 and it has been a huge improvement.
Docker
There is a lot of documentation on the web about using Docker, and it is a bit out of scope for this document to detail its use. It has been a good experience managing things with Docker Compose and I can recommend doing so. There are a couple of XU4/ARM related issues I ran across while getting things installed that are worth mentioning:
Installing Docker
Installing Docker via apt on ARM does not seem possible at this time, resulting in the following error:
E: Package 'docker-ce' has no installation candidateHowever, using the Docker installation script from get.docker.com works just fine.
$ sudo apt install curl
$ curl -fsSL get.docker.com -o get-docker.sh
$ sh get-docker.sh
Once the script has finished, be sure to add your user to the Docker group.
$ usermod -aG docker
Docker Compose Installation
Presently there is not a binary release for ARM64. It appears there is movement to get this into the official builds, so this may not be necessary in the near future. For now, however, you can install via pip.
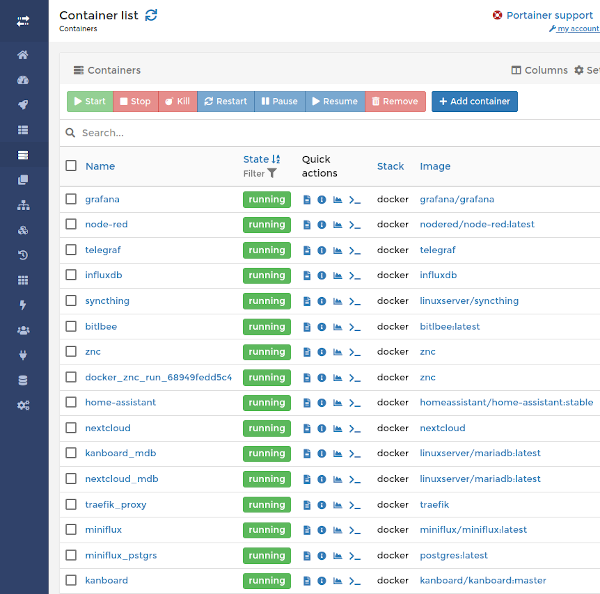
$ sudo apt install python-pip libffi-dev
$ pip install docker-compose
$ Portainer
While I don’t wish to detail all of the containers/applications I have running, I feel that Portainer is worth mentioning. Portainer provides a nice web GUI where you can quickly see the status of all of your containers, volumes, networks, etc. Further, you can perform actions on them like restarting a container. I’ve found this very useful to quickly troubleshoot things without having to shell into the box to see what’s going on.
Traefik with Pi-hole DNS
Another very common application used in a docker setup is the traefik reverse proxy. While I have no intention of exposing this NAS to the greater web, I do want to be able to access the various applications using human friendly domain names. Thankfully my local network has a box running pi-hole for LAN-wide ad blocking. Pi-hole uses dnsmasq, and if you use pi-hole on your network you can set a config file to tell dnsmasq to wildcard a domain suffix. For instance on the box running pi-hole you can create a conf file in /etc/dnsmasq.d/, let’s call it 02-nas.conf, and the file should contain the line:
# Wildcarding for domains to the NAS
address=/.nas/192.168.xxx.xxx
Where 192.168.xxx.xxx is the local IP of your NAS, then restart the dnsmasq service.
$ pihole restartdnsWhat this configuration does is direct dnsmasq to point everything on the LAN requesting a domain with the. nas suffix to the NAS. Now on the traefik side we can use. nas domains for our containers. For instance, we could add this label for Portainer in our Docker Compose file:
labels:
  - "traefik.frontend.rule=Host:portainer.nas"
Now if you navigate to portainer.nas in a browser on a machine on the LAN, you will be presented with the Portainer application! I’ve found this to be incredibly handy, especially as the number of applications with a web interface I have on the NAS increases.
Impressions
As of this posting I have been using this setup for just over a year, and I am very pleased with it. The system itself is on 24/7 and has been very stable. Setting things up with Docker has also proven to be quite useful. It’s easy to spin up and try out new applications, conversely its equally trivial to completely remove applications I am no longer interested in. This has made for an excellent self-hosted testbed.
It has been interesting to see what the standout applications for me are. There are three I actively use every day, Nextcloud, Miniflux RSS reader, and ZNC IRC bouncer. I have my phone syncing images, contacts, and calendars with NextCloud and this feature alone has become indispensable for me. Since the demise of Google Reader I had been using Feedly to handle all of my RSS subscriptions. Happily, importing an opml file containing my subscriptions and tags from Feedly was simple. I was able to seamlessly begin using miniflux, and I haven’t looked back. Lastly, I went down a small rabbit hole after getting frustrated having multiple chat windows open to converse with people across various chat platforms (hangouts, slack, discord, irc). I wound up being able to let ZNC not only stay logged into IRC, but through the use of BitlBee, all of my other chat accounts as well. This means all of my chats can be consolidated into one IRC client connecting to my self-hosted ZNC instance.
This setup has also been useful in exploring new projects and experimentation. For instance, I’ve been working on local first/only home automation. Running node-red, Telegraf/InfluxDB, Grafana, and HomeAssistant has worked out very well in this box, and so far has proven to be an excellent ‘hub’ communicating to other SBCs running these automation projects.
The question that always seems to come up when I talk about this device is about performance. While I have not run any serious performance tests, for my somewhat modest needs, it has been more than adequate. The only place I’ve noticed any lag is when viewing very large NextCloud galleries, which I believe is more of a software issue. I have not setup something like Plex, Emby, or Jellyfin (though I have been considering it), so I cannot speak to the application performance there.
Overall the XU4 CloudShell2 has proven to be a capable little home server, especially for the price. I’ve learned a lot during its setup and use, and it has comfortably become a part of my daily workflow. If I were to do it all again, I think I may attempt a cluster of ARM devices much like Nikhil Jha has detailed. This is not because I’m in any way disappointed with this device, but rather you can build up to a very robust machine one piece at a time. However, I am in no hurry to move off the XU4 CloudShell2, and I fully expect it to continue serving my needs for the foreseeable future.
Resources
The official ODROID Cloudshell-2 wiki. https://wiki.odroid.com/accessory/add-on_boards/xu4_cloudshell2/xu4_cloudshell2
Dave Burkhardt’s excellent modifications to nmon for the XU4 and CloudShell LCD https://github.com/DaveBurkhardt/cloudshell-nmon
Nikhil Jha’s blog post about self-hosting on an ARM cluster. https://nikhiljha.com/posts/armclustertutorial/
A great self-hosting rundown from s-ol using Docker and some cool automatic deployment with git. https://mmm.s-ol.nu/blog/self-hosted_virtual_home/
Awesome-Selfhosted is a curated list of applications and services that can be hosted locally. https://github.com/Kickball/awesome-selfhosted
The Self-Hosted Podcast is a fantastic source of ideas and inspiration. https://selfhosted.show/
The original article can be found at the following like: https://electro.pizza/2020/05/selfhosting-cloudshell2/index.html
Be the first to comment