Build a Rootin’ Tootin’, Dual-Bootin’ ODROID Tablet: Using the ODROID-C0 to Make a Professional Grade Tablet for Under USD$100
August 1, 2019By Dave ProchnowAndroid, ODROID-C0, Tinkering
Hiding in plain sight in the powerful Hardkernel single board computer (SBC), the unassuming ODROID-C0. Slightly larger than a 3,000 mAh battery pack yet powered by a power-sipping Amlogic S805 System-on-a-Chip (SoC) featuring 1Gb of RAM, dual USB (2.0) ports, an eMMC interface, and a microSD storage card socket, this SBC is the best-kept secret in the ODROID world.
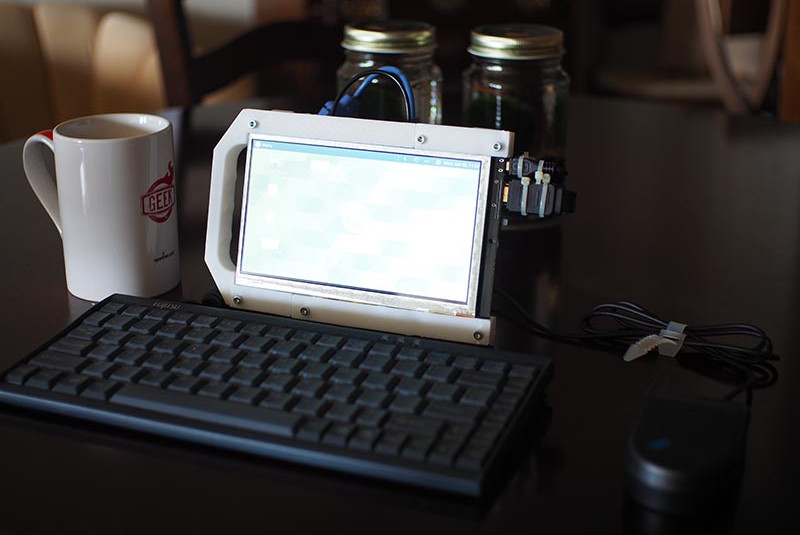
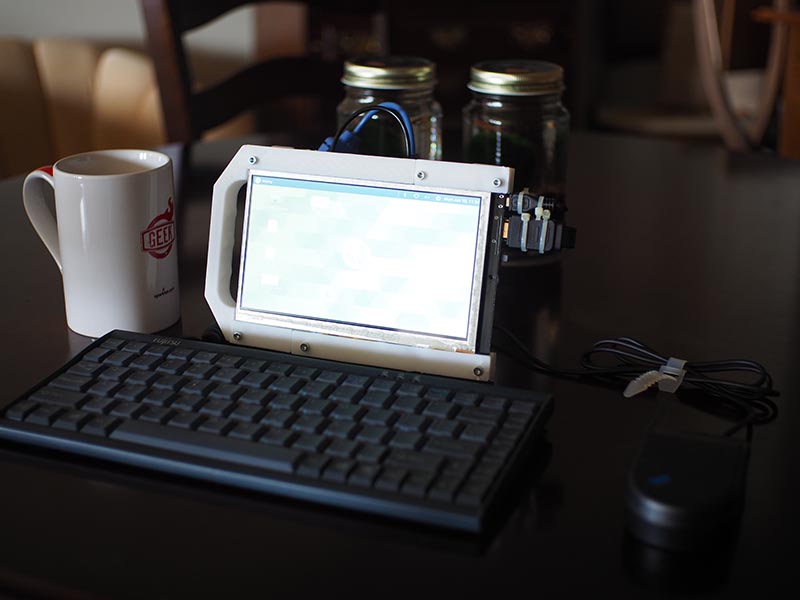
Figure 1 - The ODROID tablet running Ubuntu 18.04 Mate with an optional keyboard and mouse.
Most of the more common attributes of the ODROID-C0 are well known and well documented: it can be powered by a 3.7V battery, there is an on-board charger for a battery, most of the main interface ports can be soldered onto the SBC(via the separately sold Connector Pack) on an “as-needed” basis, and an external monitor can be driven through an available HDMI port. What you might not know about the ODROID-C0, however, can be learned only by studying the schematic diagram for this SBC.
Reading this schematic diagram reveals that jumper J1 can be used for selecting either the eMMC or the microSD card interfaces for booting the ODROID-C0. Furthermore, the general purpose input/output (GPIO) pins feature a 5V power source. These are two incredible, hardware gems that can be exploited for building a dual booting ODROID tablet for less than $100.
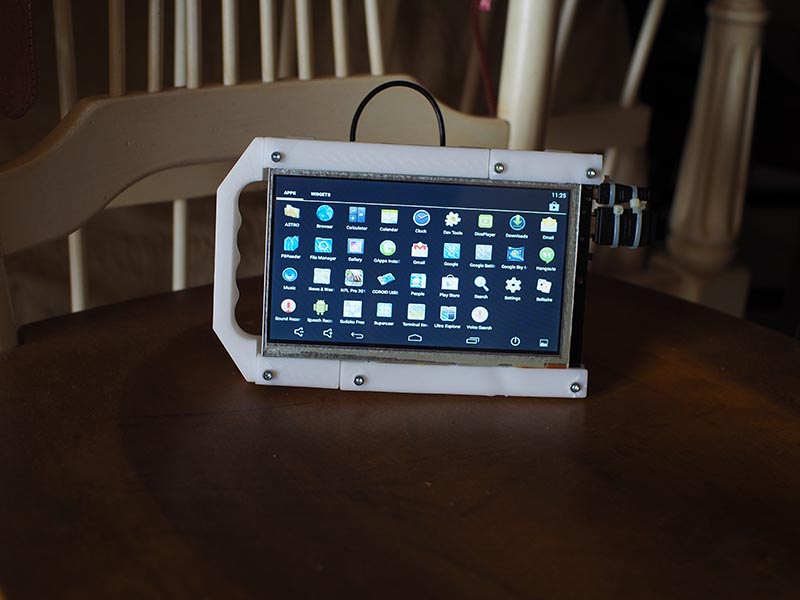
Figure 2 - Switching jumper J1 converts the ODROID tablet into a handheld Android 4.4.4 device.
Parts
Note: the parts for this project can be purchased either from Hardkernel or ameridroid.com
ODROID-C0
ODROID-VU7
RTC Backup Battery
16Gb eMMC C1+/C0 Android Module
16Gb microSD C0/C1 Linux Card
3,000 mAh Battery
Connector Pack for ODROID-C0
40x40x10-mm USB Cooling Fan (Optional)
(1) 2-Pin Header with Jumper (this can be purchased from BGMicro.com)
(1) 2-Pin Header
(2) Female Jumper Wires
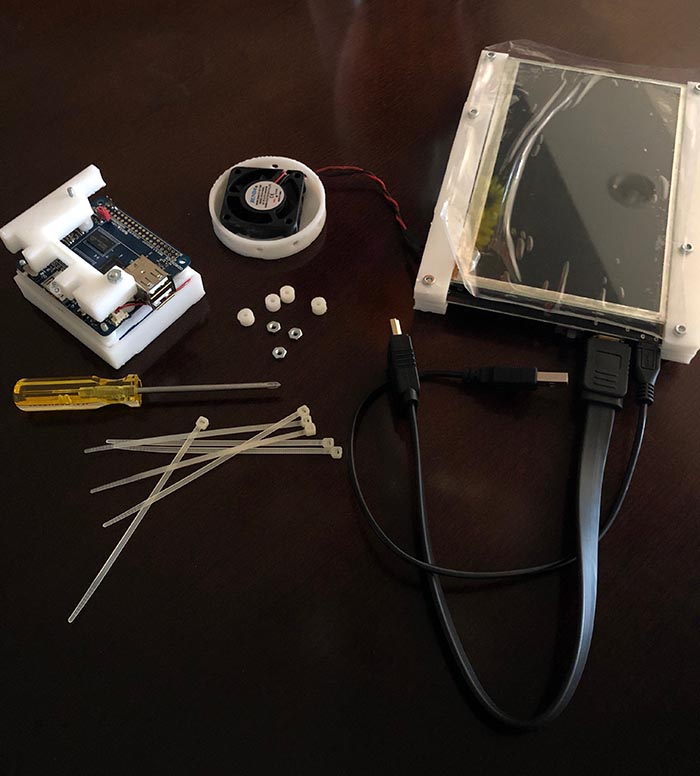
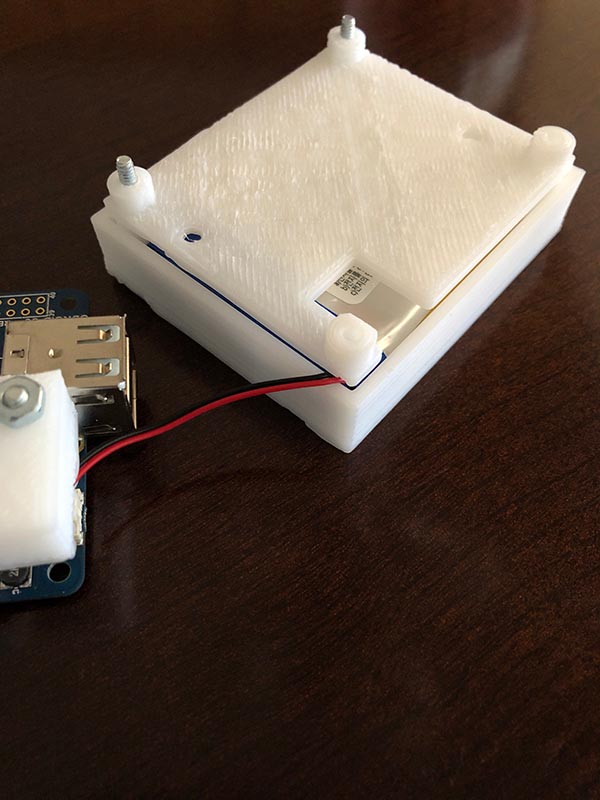
Figure 3 - All of the parts that you’ll need for building your own ODROID tablet.
Step-by-Step
1. Solder the dual USB port, from the Connector Pack, to the ODROID-C0.
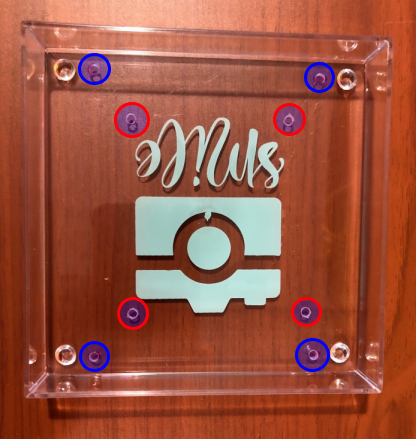
2. Solder the 2-pin header with jumper to port J1 on the SBC printed circuit board (PCB).
3. Solder the other 2-pin header to pins 4 and 6 on the PCB GPIO interface. Please note: you might need to increase the temperature of your soldering iron to 365 Celsius (690 Fahrenheit) for making a solid connection to these pins.
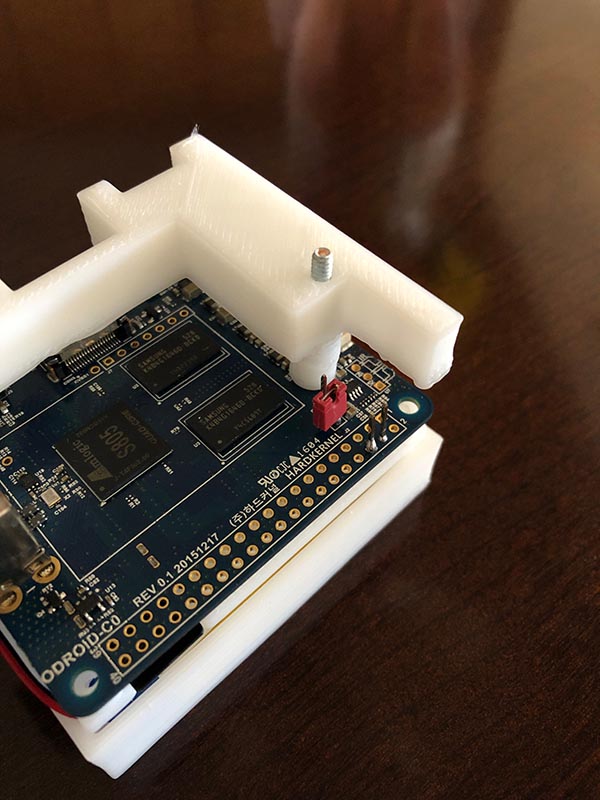
Figure 4 - One 2-pin header has been soldered to jumper J1 and another header has been connected to the ODROID-C0 GPIO pins.
4. Snip off the USB plug from the fan exposing the red and black wires and solder the two female jumper wires to these red and black wires.
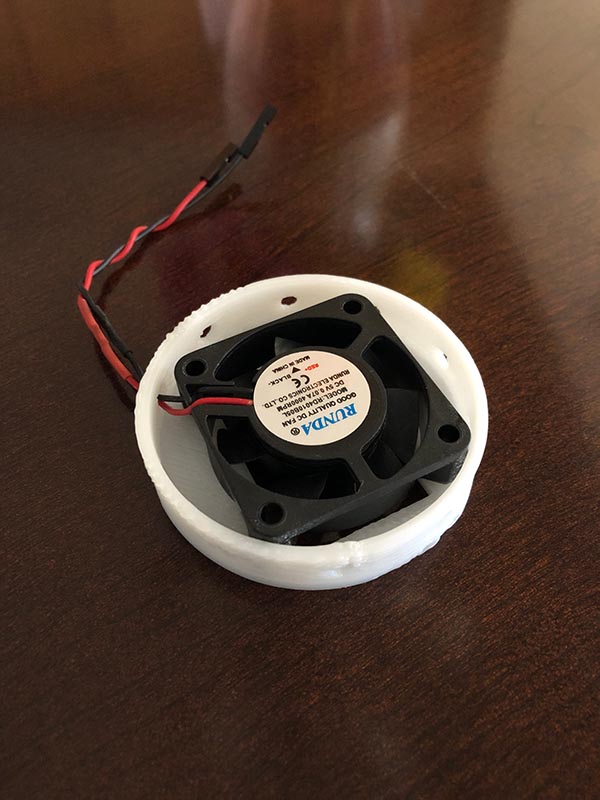
Figure 5 - The optional USB fan can now be connected to the GPIO 5V power pins.
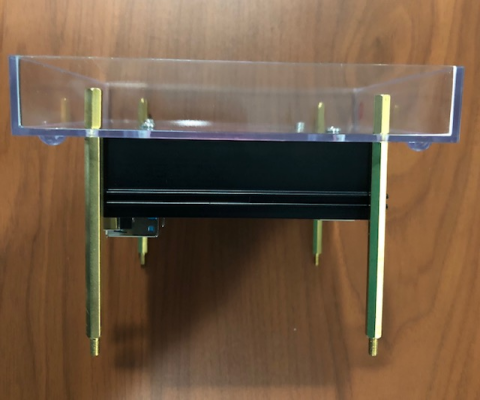
5. Optionally, you can build a simple frame with your preferred fabricating material (e.g., wood, plastic, 3D prints, LEGO, etc.) for holding the ODROID-VU7, ODROID-C0, RTC battery, main power battery, and fan.
Figure 6 - A frame and battery case were 3D-printed for my ODROID tablet.
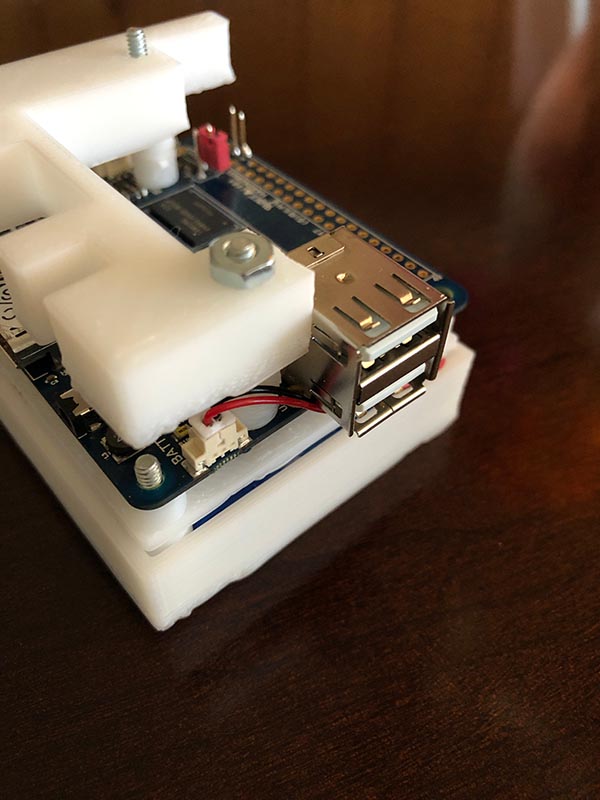
6. Assemble the tablet’s components: connect the RTC battery, main power battery, fan, and J1 boot jumper. Placing the jumper over BOTH J1 pins will boot from the microSD card. While removing the jumper will boot the ODROID-C0 from the eMMC interface. Also, plug the red (+) wire from the fan into pin #4 on the GPIO and the fan’s black (GND; -) wire into pin #6.
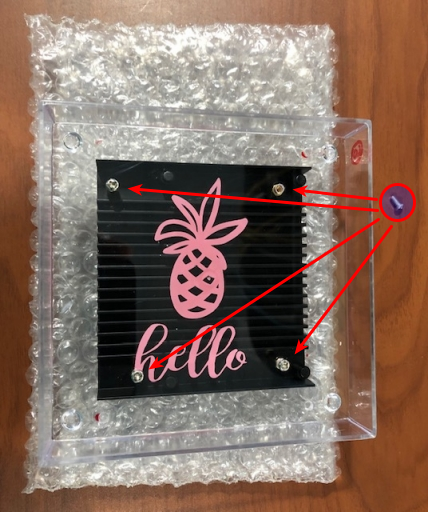
Figure 7 - Ready for connection to the ODROID-VU7.
7. Connect the ODROID-VU7 to the ODROID-C0. Use the provided HDMI cable and USB micro-to-Type A cable.
8. Insert a pre-configured, boot Linux OS microSD card into the card socket and plug a pre-configured boot Android OS eMMC module into its interface.
9. Adjust jumper J1 to your preferred boot OS. Ensure that the ODROID-VU7 USB and HDMI cables are plugged into the ODROID-C0. Verify that the fan’s red wire is firmly connected to GPIO pin #4 and the black wire is firmly connected to GPIO pin #6.
10. Switch the ODROID-VU7 display to ON and set the ODROID-C0 power switch to ON.
Enjoy your hardware-controlled dual booting ODROID tablet.
Fun Facts About the ODROID Tablet
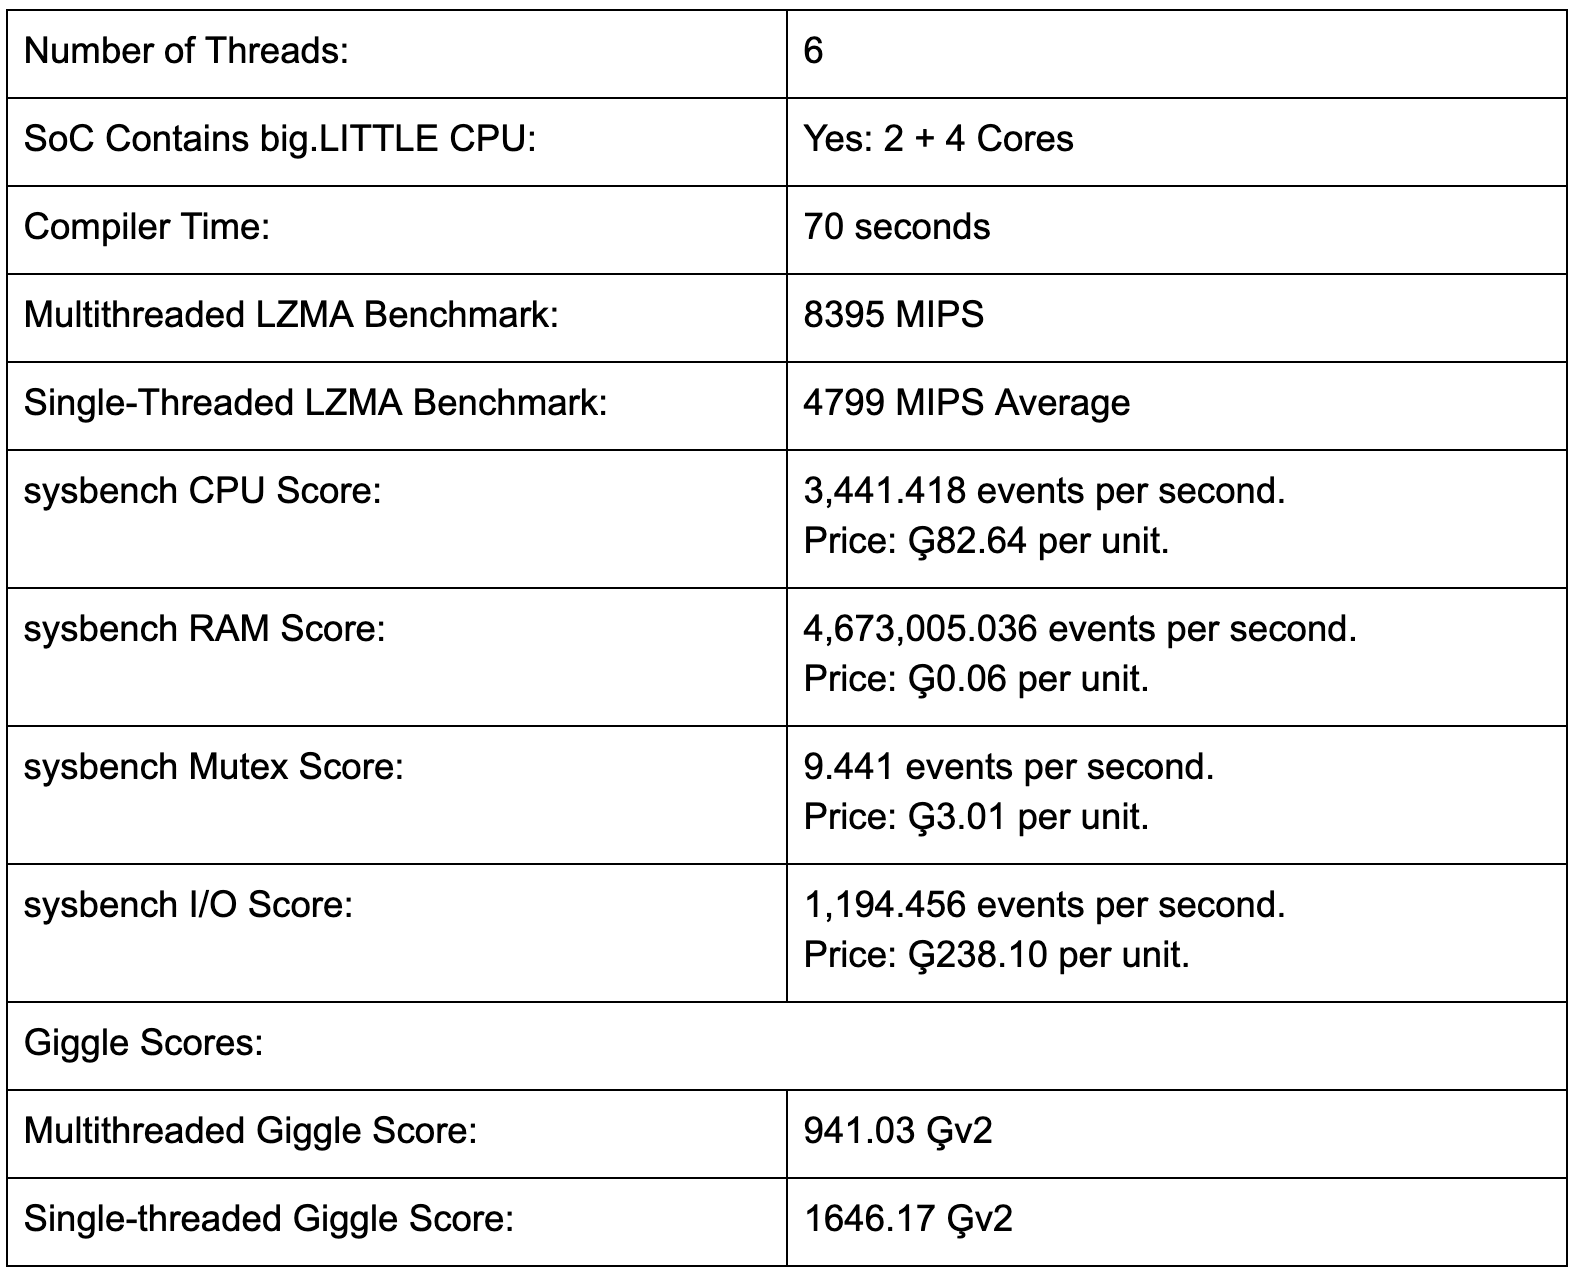
When running the sysbench prime number “stress test” with 10,000 prime numbers, the ODROID-C0 tablet will finish in about 45.9 seconds.
During this “stress test,” when using the cooling fan, the SoC temperature will spike to 54 degrees Celsius (129 Fahrenheit) then quickly cool to 44C (110F).
The resting temperature, without the cooling fan, of the Amlogic S805 is about 47 degrees Celsius (116 Fahrenheit). Enabling the cooling fan lowers this temperature to 38 degrees Celsius (100 Fahrenheit).
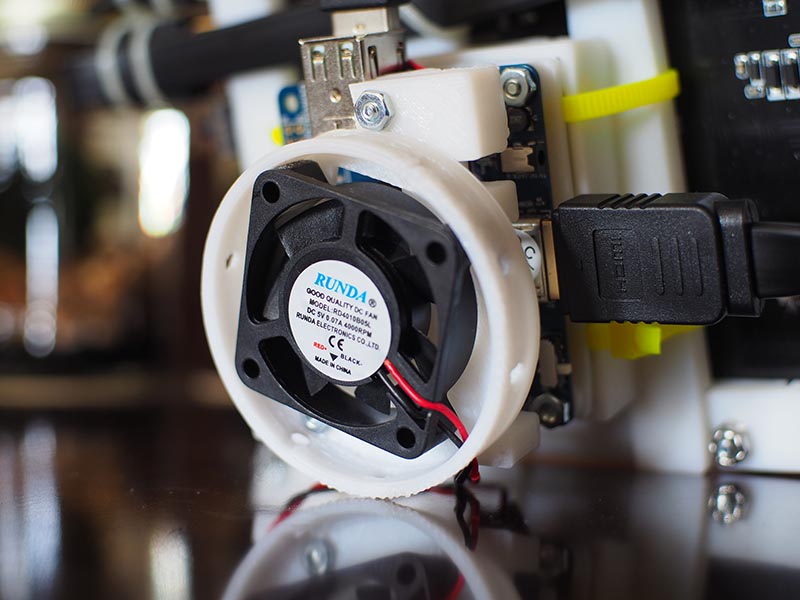
Figure 8 - The optional cooling fan attached to the ODROID-C0.
Booting from the microSD card, Linux takes about 53.65 seconds.
A freshly-charged 3,000 mAh battery will run the microSD-based Linux OS for approximately 94 minutes.
Spare 3,000 mAh batteries can be swapped on the tablet. The tablet MUST be turned off before swapping batteries, however.
Using the optional fan could cause a power consumption issue with an optional WiFi dongle. If you notice a power loss when connecting to your router, just disconnect the fan from the GPIO power pins.
The G Spot: Your Goto Destination for all Things That Are Android Gaming
August 1, 2019By Dave ProchnowAndroid, Gaming
As the July issue was going to press, several blockbuster game announcements flew in over the transom and plopped down onto my desk. Therefore, I’ll begin this article for the August issue with a summarized update regarding each of these major events. These significant events include: the Electronic Entertainment Expo (E3) landing in Los Angeles; Google releasing a Stadia update; and the first ‘real’ public sighting of the upcoming AMD Ryzen™ V1000-equipped portable gaming PC.
On with the show, right? Except this year’s convention wasn’t really like other E3 conventions. Why? Because Sony was a no-show. Yup, the Playstation maker wasn’t in attendance at this, the 25th Electronic Entertainment Expo at the Los Angeles Convention Center in California. Considering that E3 is the self-proclaimed ‘world premier event’ for computer and video games and related products, the absence of Sony was a major story for an event that would rather concentrate on promoting new and upcoming video game releases.
Figure 1 - Sony didn’t attend E3 2019
Thankfully, Nintendo, Microsoft, Square Enix, and a raft of other companies had enough powerhouse announcements to make up for Sony’s rather conspicuous absence—you know, the elephant in the room nobody wanted to talk about, but did. Talk, that is.
Scrolling through the huge list of upcoming game releases announced at E3 2019, there was one Android-related title that should interest ODROID users: Commander Keen from Bethesda is coming to green machines later this year.
Google Stadia is Almost ‘Readia’
Also scheduled for arrival later this year will be the Google game streaming service known as Stadia. In an announcement two days prior to E3 2019, Google’s Stadia head honcho, Phil Harrison, informed gamers that Stadia will cost $9.99 per month for unlimited game streaming. You’ll be able to play these games at 4K resolution at speeds up to 60 frames per second (fps), and annoy the neighbors with 5.1 surround sound. Furthermore, these Stadia games will be available on both Chromecast Ultra TVs and inside Chrome browsers for both laptop and desktop computers. The only supported smart devices are Google Pixel phones.
There is a special ‘Founder’s Edition’ package featuring ultimate Stadia access, an exclusive game controller, a Google Chromecast Ultra dongle, and more goodies at the Google online purchase price of $129. This is a pre-order package that will ship in November 2019.
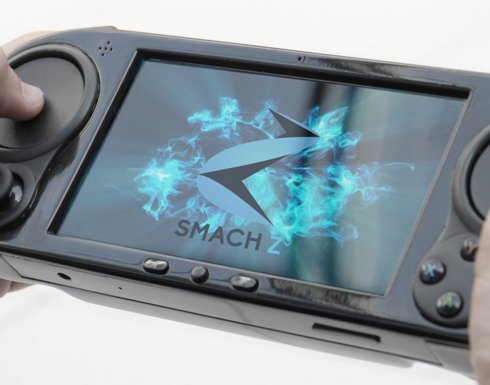
Die-hard gamers are dying for the upcoming release of SMACH Z, a portable gaming PC that resembles a Sony PSP on steroids. Funded by a Kickstarter campaign that raised over $500K, the SMACH Z was actually seen and played by some lucky gamers at E3 2019.
Figure 2 - A lucky few at E3 2019 were able to play an upcoming DOOM game title on the soon-to-be-released SMACH Z handheld gaming PC
Designed in conjunction with WB Games (Portkey Games) and Niantic, the release of the new augmented reality (AR) title Harry Potter: Wizards Unite has seen some serious downloads from the Google Play Store. In a concept is similar to Pokemon: Go (also developed by Niantic), Harry Potter: Wizards Unite is a wizardly game title that is fully supported by Harry’s creator, J.K. Rowling. Best of all, Wizards Unite is a free download.
Figure 3 - Prepare for hordes of wizard wannabes running through parks with smart phones in hand this summer
Android Game Picks for the Dog Days of Summer
Jurassic World Alive - FREE
Farm Punks - FREE
Harry Potter: Wizards Unite - FREE
Talion - FREE
Toy Story Drop - FREE
Implementing GPIO IRQ Handlers: Using Python 3 To Control RPi.GPIO
This code and guide are intended to demonstrate GPIO IRQ handling on the ODROID-C1+/C2/XU4/N2. The guide was adapted from the ODROID wiki page at https://wiki.odroid.com/odroid-xu4/application_note/gpio/rpi.gpio_irq.
We can simply implement GPIO IRQ handler with Python 2/3. In this guide, we will use Python 3 for programming the handler. Before getting started, however, we have to install RPi.GPIO for ODROID. Please see the Wiki page at https://wiki.odroid.com/odroid-xu4/application_note/gpio/rpi.gpio for the installation instructions.
Sample Code
#!/usr/bin/env python3

import sys
import time
import RPi.GPIO as GPIO

# https://wiki.odroid.com/odroid-xu4/application_note/gpio/rpi.gpio#about_bcm_numbering
IRQ_GPIO_PIN = 25
IRQ_EDGE = GPIO.FALLING
count = 0

def handler(channel):
global count

count += 1

def print_status():
global count

print(count)
count = 0

if __name__ == '__main__':
GPIO.setmode(GPIO.BCM)
GPIO.setup(IRQ_GPIO_PIN, GPIO.IN, pull_up_down=GPIO.PUD_UP)
GPIO.add_event_detect(IRQ_GPIO_PIN, IRQ_EDGE, callback=handler)

print('Press Ctrl-C to exit')
try:
while True:
time.sleep(1)
print_status()
except KeyboardInterrupt:
GPIO.cleanup()
sys.exit(0)
This is a very basic template script for using GPIO IRQ handler. It counts how many interrupts are requested within 1 second and print that count number. If a user presses Ctrl + C, then the script will be closed.
There's a handler() function that receives a parameter channel. This parameter is necessary since the library requires it when registering the handler function internally. This function increases count number by 1 when an interrupt is received. The print_status() function shows the count number and initializes count variable to 0.
If the script file is the main executed file, which means it is the first file of the Python project, RPi.GPIO initially configured using GPIO.setmode(). This function clears the user and uses BCM numbering for selecting a GPIO pin.
In GPIO.setup(), the selected GPIO pin is set as an interrupt source in this timing to use in the way the user intended. We should input 3 parameters, which are GPIO pin number in BCM numbering, signal direction, and pull mode. We should set signal direction and pull up mode to receive GPIO interrupt in this guide.
We have to add an event handler function using GPIO.add_event_detect(). This has 3 parameters, which are GPIO pin number in BCM numbering, IRQ edge mode, and handler function pointer as its name. RPi.GPIO library will register the handler for the GPIO pin to an internal loop. We specify interrupt edge mode to falling edge using this function.
Finally, there are exception handling codes that detect keyboard interrupts (SIGINT). If the interrupt is received, the RPi.GPIO cleans itself with GPIO.cleanup() function and that program will be closed. If the interrupt isn’t received, the infinite loop runs and calls print_status() every 1 second, so we can clean up these long descriptions.
Functions
def handler(): An interrupt handler. Increase count number by 1 when the interrupt occurs. At least 1 parameter is required.
def print_status(): Shows current count number and initialize to 0.
GPIO.setmode(): Initializes RPi.GPIO with a pin number guide which must be used.
GPIO.setup(): Sets the GPIO pin as an interrupt source. Also set the signal direction and pull mode.
GPIO.add_event_detect(): Set the same GPIO pin which was set up before, with interrupt edge mode and handler function.
Runs print_status function every 1 second and detects keyboard interrupt to close the program appropriately.
Environments
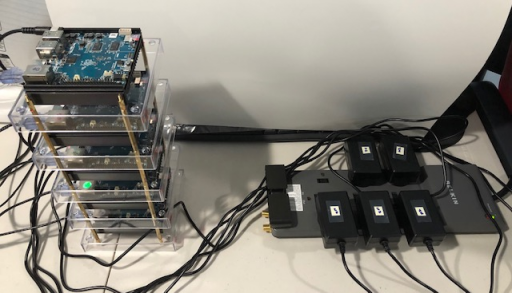
To test its IRQ handling performance, I used the following set of test devices:
ODROID C1/C2/XU4/N2
Function generator
Oscilloscope
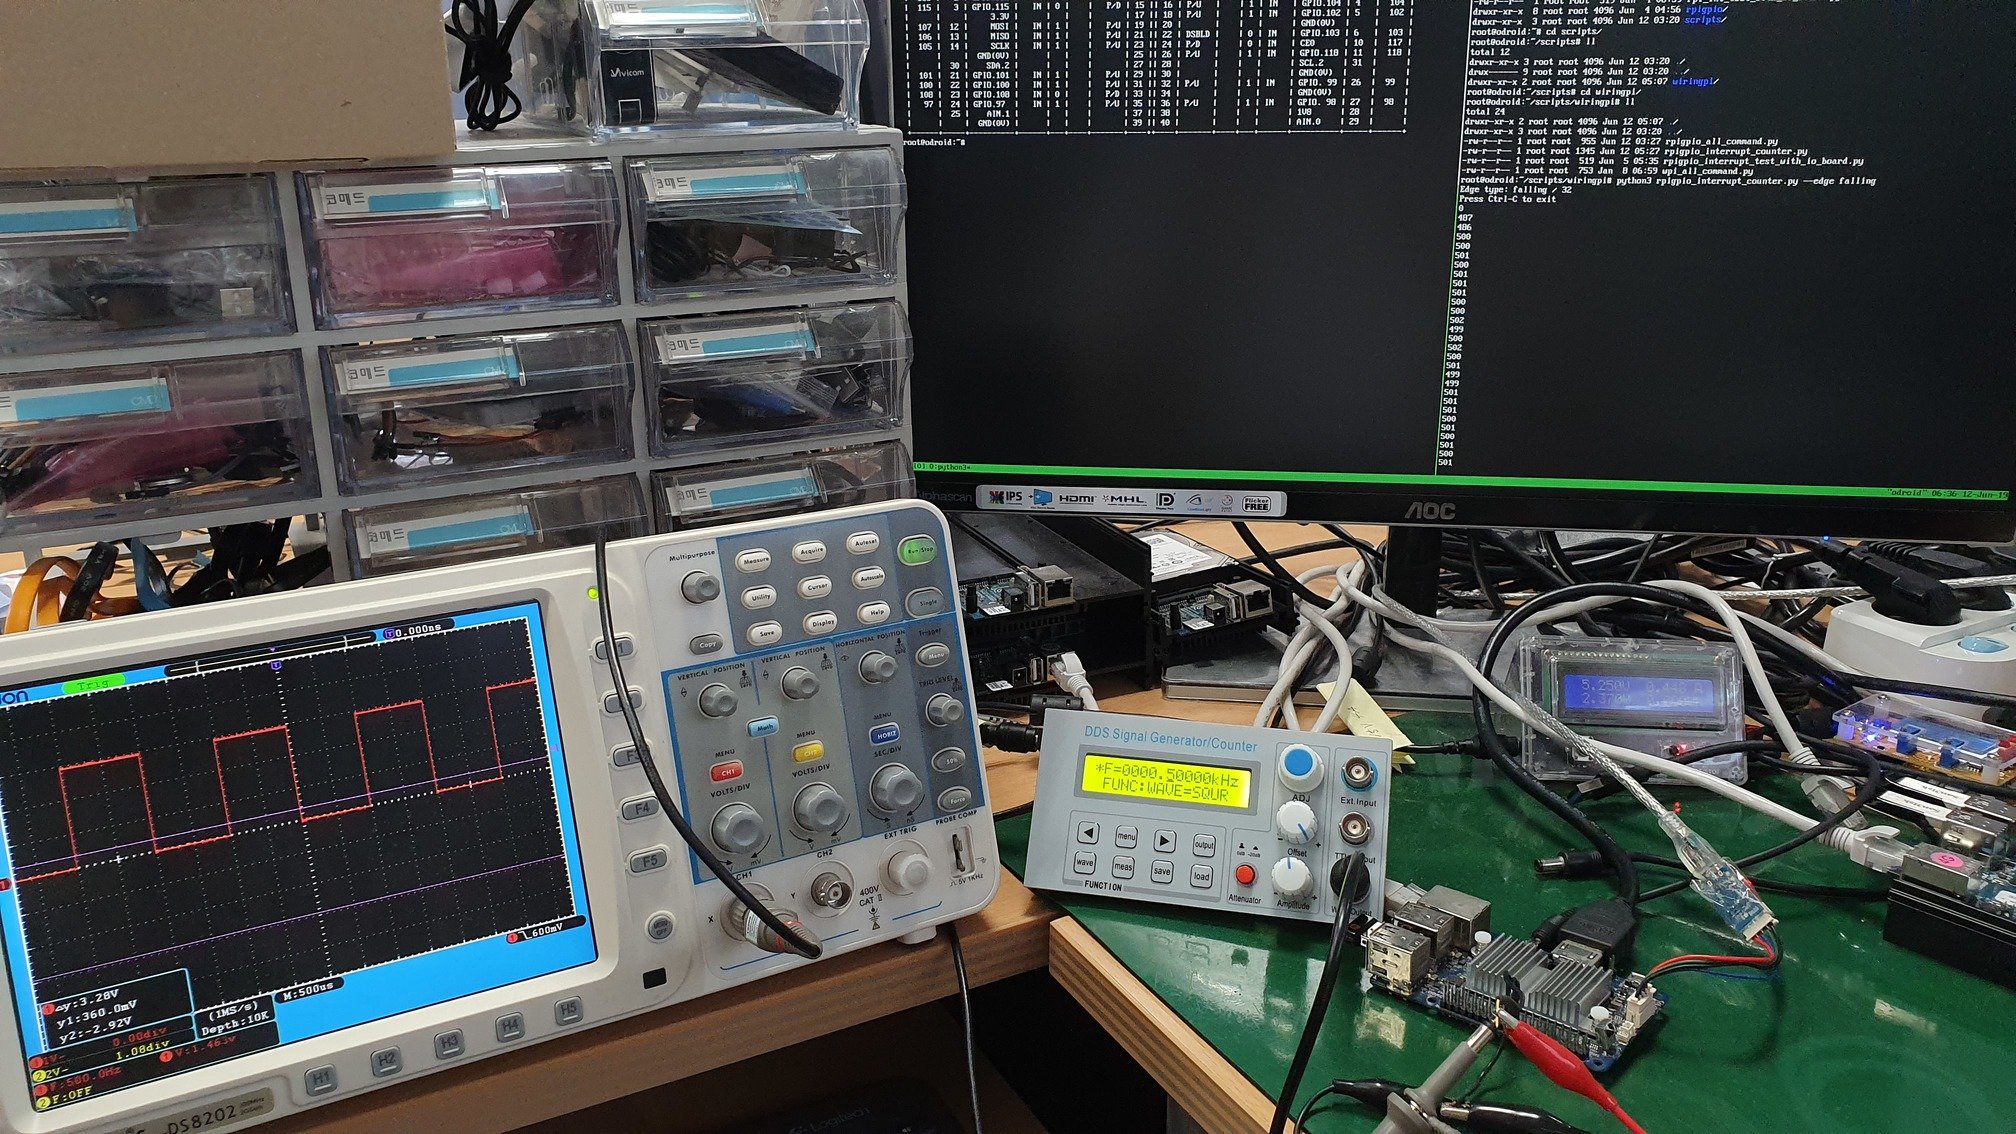
I set the Function generator up to generate a 1 KHz square wave, and checked that wave using an oscilloscope. I changed the amplitude for each target to 1.8V or 3.0V every time I changed the board. I then chose the pins, #22 for the interrupt source and #20 for ground. The physical pin #22 is equivalent to #25 in BCM numbering. All three models have the same form factor on the GPIO header. Finally, I wired the cables as shown in Figure 1.
Figure 1 - C1+ IRQ test setup
Execution
Let's test with the C1+, first. Just run the script without any changes. As the script is, it should show numbers about 1000 every second since it is set to handle falling-edge interrupts and the function generator is set to generate 1 KHz square wave. To make sure, I also checked the current kernel version:
root@odroid:~# uname -a
Linux odroid 3.10.107-13 #2 SMP PREEMPT Wed Jun 19 02:31:43 -03 2019 armv7l armv7l armv7l GNU/Linux
root@odroid:~# python3 test.py
Press Ctrl-C to exit
1000
1003
1000
1000
1000
1001
1001
987
1001
1001
This shows the numbers as we expected. This couldn't be exactly 1000 in every moment, because there are many [un]foreseen factors which affect detecting interrupts. This is the output on the ODROID-C2:
root@odroid:~# uname -a
Linux odroid 3.16.68-41 #1 SMP PREEMPT Tue Jun 18 15:06:16 -03 2019 aarch64 aarch64 aarch64 GNU/Linux
root@odroid:~# python3 test.py
Press Ctrl-C to exit
981
993
993
984
985
996
977
995
1001
981
The following output is from the ODROID-XU4, which uses pin #26 for the interrupt source and #28 for ground:
root@odroid:~# uname -a
Linux odroid 4.14.120-160 #1 SMP PREEMPT Fri May 17 01:18:14 -03 2019 armv7l armv7l armv7l GNU/Linux
root@odroid:~# python3 test.py
Press Ctrl-C to exit
1005
1007
1014
1005
1008
1003
1005
1001
1005
1004
Finally, this is what it looks like on the ODROID-N2
root@odroid:~# uname -a
Linux odroid 4.9.182-31 #1 SMP PREEMPT Tue Jun 18 14:45:56 -03 2019 aarch64 aarch64 aarch64 GNU/Linux
root@odroid:~# python3 test.py
Press Ctrl-C to exit
1000
1002
1002
1003
1000
1000
1000
999
1000
1000
All the models work well on GPIO IRQ handling with RPi.GPIO. Note that the displayed number in the acceptable error range doesn’t matter, since it is continuously changed.
Configure GPIO IRQ Edge Type
We can also change the edge detecting type of the pin. There are three edge types:
Falling
Rising
Both
This can be changed when you set GPIO IRQ handler in the code using GPIO.add_event_detect() function. These are respectively defined as:
GPIO.FALLING
GPIO.RISING
GPIO.BOTH
IUf you want to detect using the both-edge mode, replace existing IRQ_EDGE value in line #9 to the following one:
# From
IRQ_EDGE = GPIO.FALLING

# To
IRQ_EDGE = GPIO.BOTH
Here is a test to check if it works. With C1+, the modified script outputs like this with 1 KHz square wave.
Running Kubernetes On The ODROID-N2: Create A Power-Efficient Container Orchestration System
August 6, 2019By Thomas KruseLinux, Tutorial
Deployment of containerized applications, is the new norm. With it comes the need for automating the deployments, scaling them up to meet increased loads, and managing their lifecycle. Kubernetes (K8s) is one such utility that fills these needs.
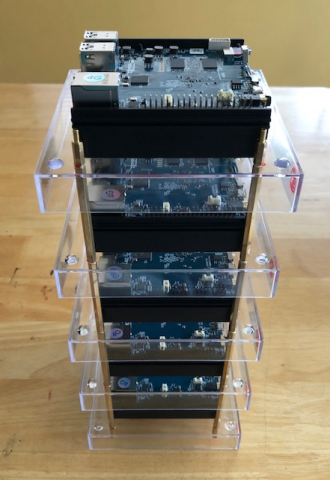
Containers can be deployed on hardware devices of varying capabilities and at a wide range of costs. A fully self-contained Single Board Computer (SBC) is one such device. The ODROID-N2 is a highly capable SBC, and makes for a very cost-effective K8s device. It is available with 4GB RAM, an eMMC card for high speed storage, and a variety of I/O support. Along with power supply it costs less than 100 Euros (~$115). With 4+2 ARM64 CPU cores the ODROID-N2 makes for an interesting platform to operate a small K8s cluster with one of the lowest power footprints. One can even experiment with this low cost K8s deployment, before deploying more expensive solutions.
This article explains how to setup K8s on ODROID-N2 single board computers. Since there are several options for operating systems, as well as K8s distribution and setup methods, this article makes the following assumptions:
Use Arch Linux ARM64 as the base operating system (this is quite lean and kept very much up to date)
Vanilla K8s will be used, compiled and packaged as Arch ARM64 packages on the ODROID-N2
Plain kubeadm will be used to setup the K8s cluster
CRI-O as container runtime (instead of Docker)
Single master node and 4 worker nodes
Unfortunately, there is no mainline Linux Kernel support for the ODROID-N2. However, Hardkernel has promised to work on it. The following features are currently not working as expected:
zram for compressed memory as swap device
Disable GPU memory allocation to make use of the full 2GB/4GB of the ODROID-N2
Previous experiences with Arch Linux ARM 64bit and K8s on Raspberry Pi and ODROID (ODROID-C2 to be precise) can be found here:
Arch Linux is quite easy to set up. General installation instructions can be found here:
https://bit.ly/2JSlahB. In order to ease the setup for multiple nodes, scripting can be used to semi-automate preparing the storage (eMMC or SD card) and extracting the base system. Especially since customization like copying of SSH-keys, setting sudo rights, and hostname configuration should be applied as well, automation really pays off.
After setup the following packages are installed as well
sudo, htop
socat, ethtool, ebtables (for K8s CNI networking)
cpupower (reduces power consumption by allowing CPU throttling during idle periods)
nfs-utils (if NFS storage is to be used with K8s)
To make use of all the 6 CPU cores when compressing Arch Linux packages, the following parameters can be set in /etc/makepkg.conf:
COMPRESSXZ=(xz -T0 -c -z -)
This will Configure multithreaded compression for Arch Linux package creation
Building K8s Arch Linux ARM 64 packages
At first, up to date packages for K8s and supporting services will be built as Arch Linux packages. It is recommended to create a directory for each package to be built and place the PKGBUILD file in each one.
You can find the used PKGBUILD files here:
runc
CNI-Plugins
CRI-O
CRI Tools
Kubernetes, Install File
Building a package is in general performed by issuing the following command in each directory:
$ makepkg -s
At the moment, all packages can be build except the Kubernetes Arch package.
For K8s some special steps need to be taken, since a build of Kubernetes is quite resource intensive: On a 4GB ODROID-N2 a build is possible without additional swap memory, but about 3.5 GB is the minimum. If a 2GB model should be used, a swap file can be added:
In addition to the swap file, two settings need to be performed. The kernel should be allowed to overcommit the available memory instead of eagerly allocating the memory:
$ sudo sysctl -w vm.overcommit_memory=1
and the go build chain must be prevented from performing parallel builds with the number of available cores, leading to increased memory consumption:
export GOFLAGS="-p=1"
Although each build itself will not run in parallel, each part of the Kubernetes package can leverage all cores during its individual build, avoiding major performance reductions. Since Arch uses a tmpfs filesystem for /tmp, it should be unmounted first, otherwise memory will be allocated for temporary build artifacts and possibly resulting in an “out of memory” condition:
$ sudo umount /tmp
After these settings are finished, K8s can be built:
$ makepkg -s
When the build is complete the following packages should be present:
These packages can now be distributed to all ODROID-N2 nodes participating in the cluster. Of course, other machines can be used as well, as long as all are ARM64 hardware platforms.
ODROID-N2 K8s general node setup
Before installing the packages, settings for the correct operation of container networking need to be performed.
The following kernel features need to be present, otherwise K8s networking will not work and might lead to really hard to diagnose errors like the following:
iptables: No chain/target/match by that name
Unexpected command output Device 'eth0' does not exist:
CGROUP_PIDS
NETFILTER_XTABLES, XT_SET
If the kernel has a missing feature, like shown in the output below, the quickest solution is to build a new kernel package that includes the required features.
$ zgrep XT_SET /proc/config.gz
# CONFIG_NETFILTER_XT_SET is not set
$ zgrep CONFIG_NETFILTER_XTABLES /proc/config.gz
CONFIG_NETFILTER_XTABLES=m
Kernel feature verification for K8s CNI
Building is quite easy, since the Arch Linux kernel package can be built using the usual tooling. To speed up the build process it is recommended to edit /etc/makepkg.conf and enable multithreaded compilation using MAKEFLAGS="-j6", reflecting the 6 cores available on the ODROID-N2.
On each node the previously built Arch Linux K8s and container tool packages need to be installed. If a custom kernel package is built, it is to be installed as well.
After installation, the CRI-O container runtime requires configuration. CRI-O honors system wide configuration of trustworthy container registries in /etc/containers/policy.json. In order to be able to pull images from docker.io (and other registries) a default policy can be installed: policy.json
A minimal configuration for CRI-O itself is provided here: crio.conf. It must be placed in /etc/crio/crio.conf. To avoid CRI-O disabling container networking due to no default CNI network configuration, a simple loopback CNI configuration is setup.
On the master node, the cluster setup will be performed using kubeadm. Since even the latest ODROID-N2 with 4GB RAM is quite limited with memory, additional capacity using zram-swap or a swap file comes to mind. In order to run K8s with enabled swap, the setting “--ignore-preflight-errors Swap” must be provided for kubeadm:
Once the kubeadm setup is finished and the join token is shown, the worker nodes can be setup. But first a copy of the cluster configuration is prepared in the home directory of the user, so it can later be retrieved to configure kubectl.
Since the common setup is the same for worker and master nodes--very little is left to do: The kubeadm command will be used to join the cluster, afterwards the K8s worker setup on the node is finished.
If the worker nodes have swap enabled, the parameter “--ignore-preflight-errors Swap” must be provided as well:
Once Weave networking is established, the nodes change to state Ready.
$ kubectl get nodes
NAME       STATUS   ROLES  AGE   VERSION
n2-master0   Ready  master   77m   v1.14.1
n2-worker0   Ready     65m   v1.14.1
n2-worker1   Ready     65m   v1.14.1
n2-worker2   Ready     65m   v1.14.1
n2-worker3   Ready     65m   v1.14.1
To get a web based interface for the cluster the K8s dashboard is installed. Although it is provided as an ARM64 image, the default deployment uses amd64 as platform, so a little substitution with sed is needed:
Multi-booting on ODROID-N2: Add The Ability to Select Multiple Operating Systems From A Single Disk
August 6, 2019By Dongjin KimODROID-N2, Tutorial
The ODROID-N2 is a single board computer (SBC) made by Hardkernel, which was released in February 2019 and that runs with Amlogic’s S922X (4xA73@1.8GHz and 2xA53@1.9GHz). One of the new features on the ODROID-N2 is an 8MB SPI flash memory. Obviously, onboard SPI flash memory is not a new technology at all and some SBC already have it for using with certain purposes. Usually, the SPI flash memory has a bootloader and loads OS image from larger storage like uSD or USB storage
The SPI flash memory on the ODROID-N2 can be bootable and 8MB is a pretty large space for a bootloader which is usually under 1MB. Besides it’s very small for the Linux kernel image which is usually 8~9MB for the compressed image for ODROID-N2. We want to improve the usage of the small storage rather than just install a bootloader.
There have been many demands to manage multiple OS and many SBC users had tried to run multiple OS installed in eMMC, uSD and USB storage and, as such, instructions were introduced with a script or Linux commands, as well. Many users succeeded with it but the instructions are not simple for users who are not familiar with the Linux system. We want to help new users who wish to use two OS but having trouble to set up multiple OS environments.
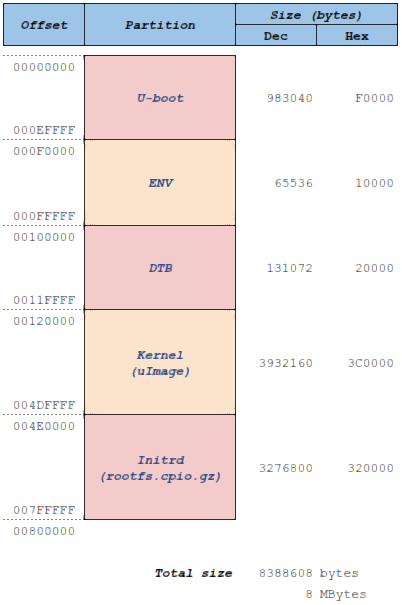
For the two reasons above, my workmate Joy and I started to study the Petitboot which is an operating system bootloader based on Linux kexec. We had to struggle to build a complete image to fit in 8MB, specifically, we had to customize the Linux kernel in order to reduce the size smaller than 3.8MB which is more than half the size of the generic Linux kernel. At the same time, since Petitboot is an application running on Linux userspace, we had to build a tiny root file system that could fit in 3.2MB. Otherwise, we were not able to fit the whole tiny Linux system into 8MB. Here is the memory map of the image to boot Petitboot in 8MB.
Figure 01 - memory map of the image to boot Petitboot in 8MB.
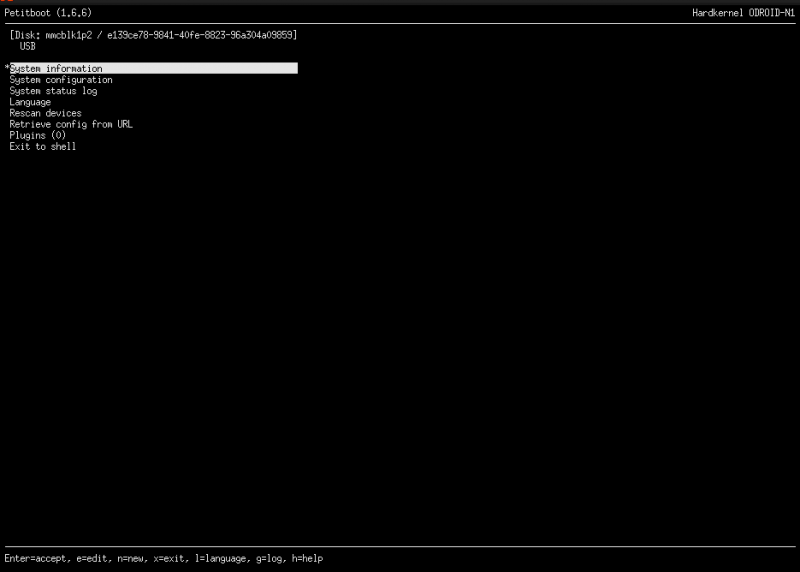
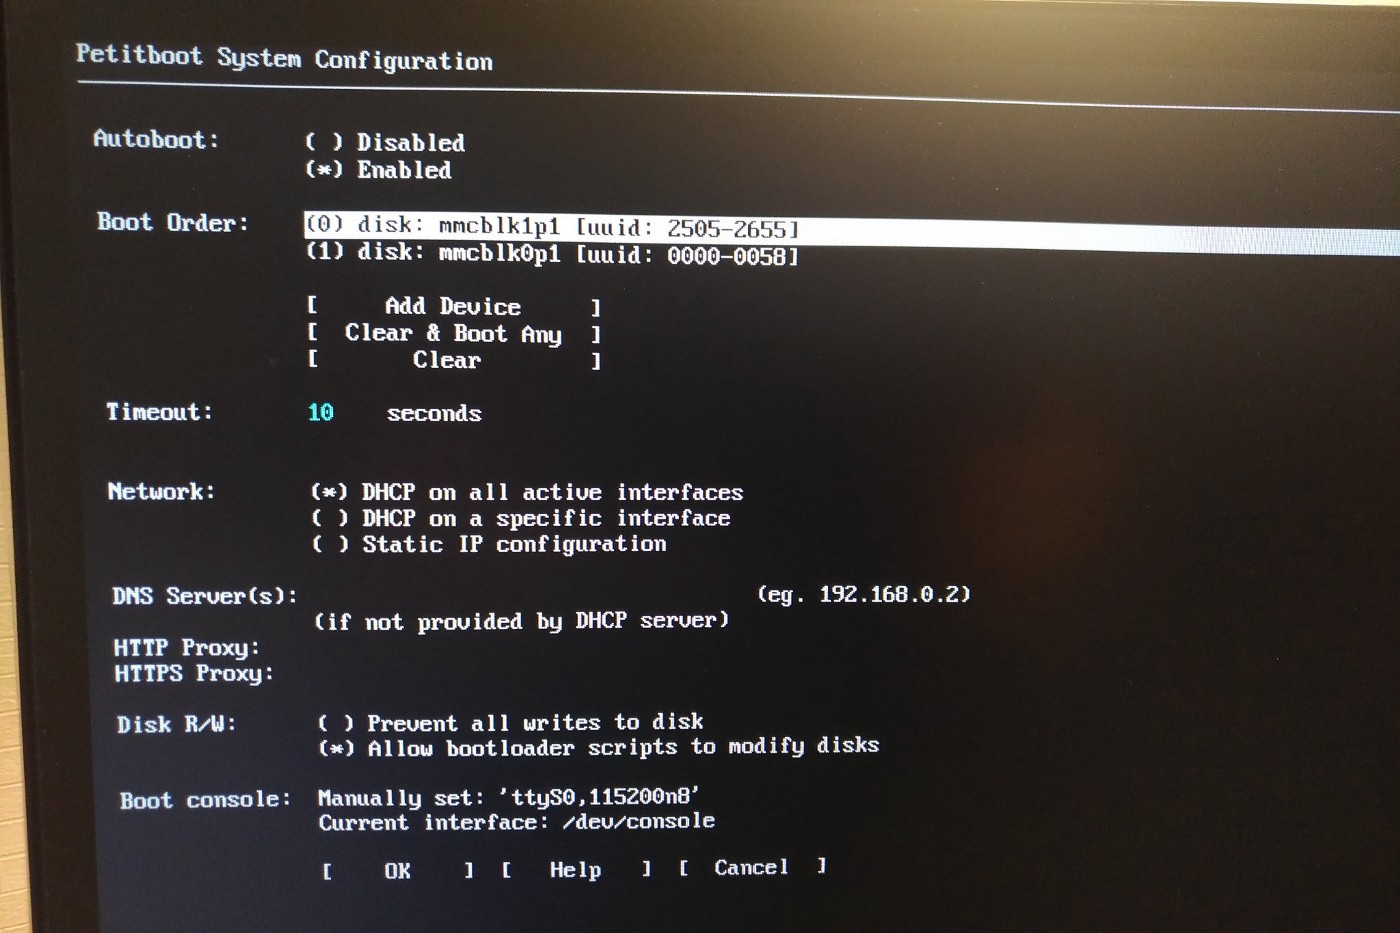
After jumping multiple hurdles, we’ve successfully built the bootable tiny Linux system including U-boot in 8MB and ODROID-N2 can run Petitboot from SPI flash memory. But the first version just displayed the Petitboot menus and boot entry manually configured for an OS since there were boot formats such as Grub or PXE boot which were not supported by the ODROID-N2.
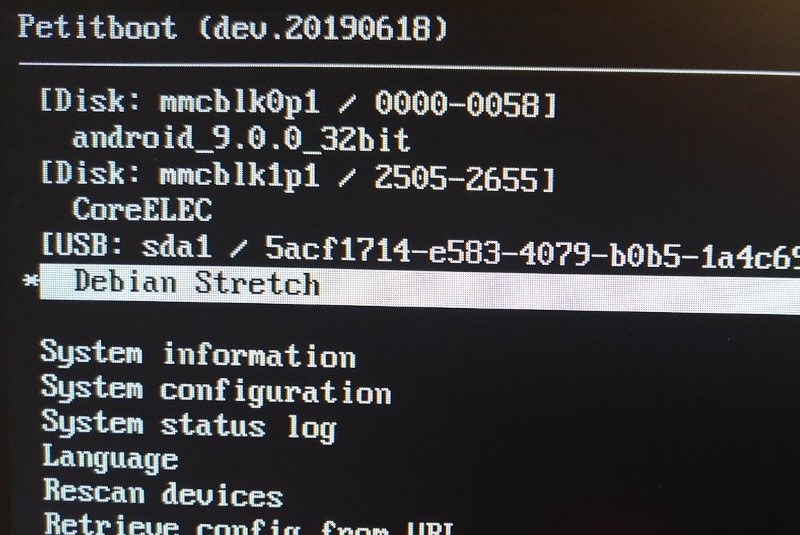
Figure 02 - petitboot menu
Since I wanted to help users to boot an OS without any setting up effort, I had to add a component which can recognize the OS image contributed by the open source community. All OS images for ODROID SBC have a special boot script a.k.a boot.ini that contains the bootloader commands for setting the kernel parameters, which kernel must be loaded, and so on. Otherwise, a user has to learn the new boot config format for the Petitboot and assign the boot files manually.
I’ve written the code to parse the boot.ini file and I was able to make Petitboot read the OS image from the attached storage on the ODROID-N2 and show up on the display such that the user can select a boot entry using an attached USB keyboard or IR remote control. I believe that this is a big achievement and allows the user to easily select an OS installed and attached to ODROID-N2.
I’ve also managed the version of Petitboot for ODROID-N2 throughout June 2019 and, eventually, I was able to fix the major bugs and improved more features which were usually done by U-boot in order to boot an OS. Still, it’s not a perfect solution. Since I am not able to fully occupy myself on this Petitboot task, the current Petitboot is not fully functioning as much as I expected and dreamed but it will be improved and released from time to time.
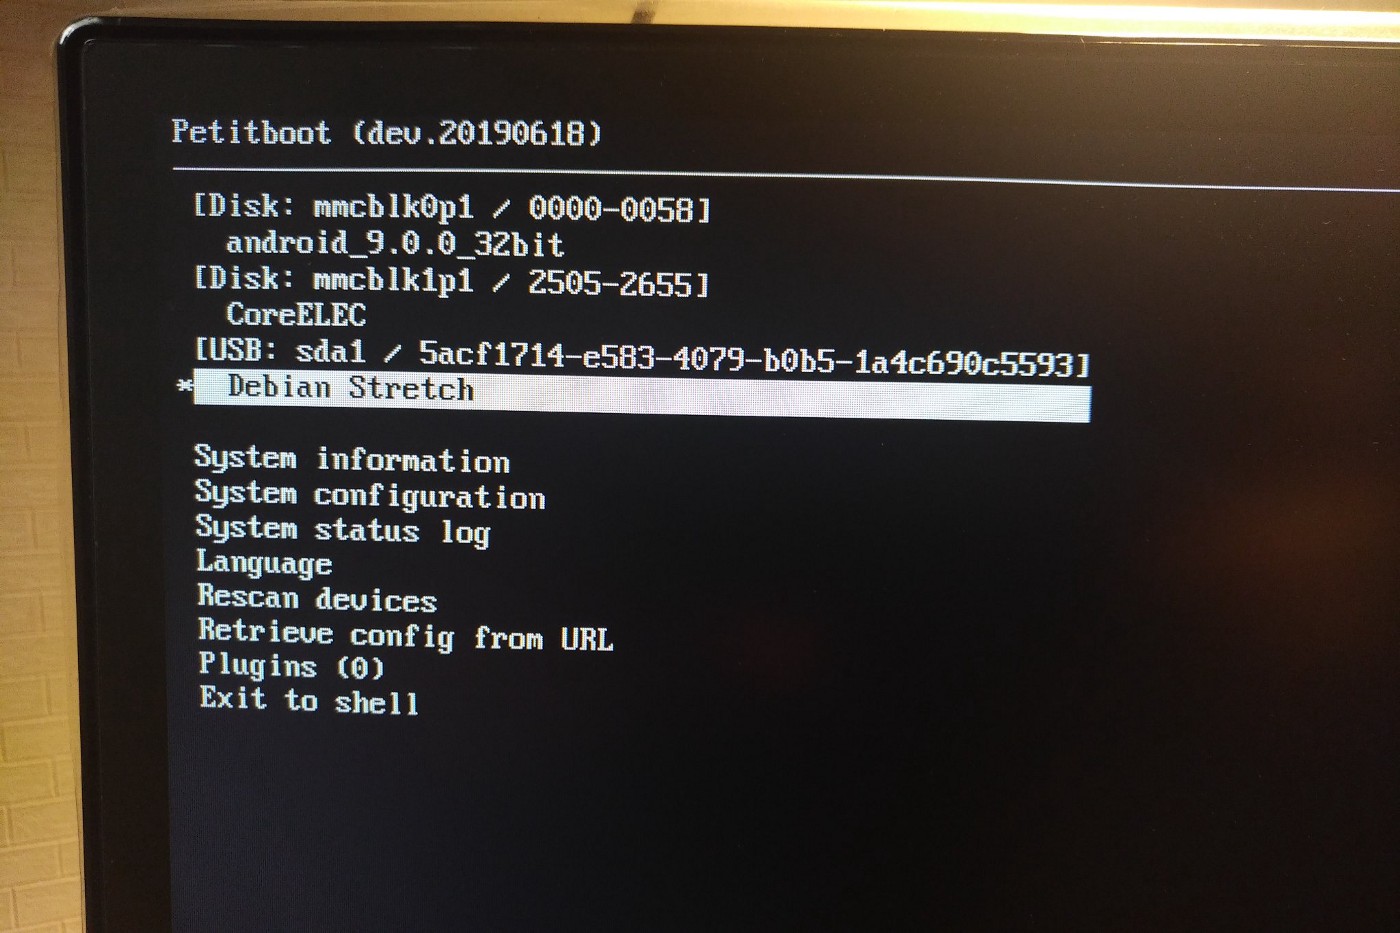
Figure 03 - Petitboot menu
Figure 04 - Petitboot menu
The current version can do the following:
Recognize different OS images from open source community as is, which means ideally you are able to boot the OS image as booted from eMMC or uSD slot without any change. I’ve discovered that Armbian has changed its file system structure, so a bit of change is required.
Easily can boot from USB storage. Many SoC for SBC do not boot from USB storage other than uSD or eMMC and this is the same on ODROID-N2. ODROID-N2 is more capable to boot from USB easily selecting the boot entry of USB storage rather than using a command line.
Boot device order can be set in the menu, you can choose uSD as a first priority boot media or USB.
Boot automatically to the high priority booting media in second unit.
The current version has some limitations:
The boot configuration must be stored into uSD, which is awkward. This is because of the limitation of SoC feature but I’m thinking of a workaround.
Still, this is WIP project and having some issues working in the legacy booting from uSD or eMMC. Because some of the work which was done in U-boot is moving to Petitboot and all features are not moved and compatible.
Boot from network media such as PXE is not supported but have put this into my TODO list.
Not offering fancy UX due to the small capacity of SPI flash memory, 8MB is the edge for storing the mandatory BLOBs, only.
I was happy to see more users are trying to use Petitboot on their ODROID-N2 and many of them are happy with it since they are able to boot an OS for a different purpose. I maintain an ODROID forum thread at https://forum.odroid.com/viewtopic.php?f=182&t=33873, and will keep updating the version whenever I have made corrections and/or improvements. For comments, questions, and suggestions, please visit the original article at https://medium.com/@tobetter/multiple-os-on-odroid-n2-3a5f3a14a726.
Linux Gaming: PC-Engine / TurboGrafx - Part 5
August 1, 2019By Tobias SchaafGaming, Linux
In the previous installment of this series, I was able to play a very good mixture of different genres. I found some shooting games I liked, one of my all time favorite adventure games, and even the one sports game I liked on the Nintendo Entertainment System (NES) ported with better graphics than the TurboGrafx-16 (PCE). Overall it was quite mixed, with lots of good and ok games, but also with a few that I did not particularly like. Let’s see what the next games will be like, as we approach the end of this series.
Games I liked
Pop’n Magic
Figure 1 - Pop’n Magic has very colorful graphics and is also very child-friendly
Figure 2 - Bosses can actually be rather hard to kill in this game
This game is very similar to the Bubble Bobble series with a similar gameplay. You catch enemies by shooting at them, and after that, they are trapped in a colored bubble/energy ball. You can pick the bubble up and throw it at other bubbles to destroy them, which will cause it to drop a lot of bonus items as well as power ups for you, such as stronger weapons and faster walking. For this, you have to throw it onto a bubble with a different color. Throwing it at a bubble with the same color will set the enemy free again.
Instead of throwing the bubbles at each other, you can also shoot the bubbles and destroy them that way as well, but it will give you less points or power ups. The game is very casual, with a nice CD soundtrack as well as anime cut-scenes between worlds (all Japanese though). At the end of each world, you will fight a boss, which are quite hard to beat, but will reward you with several life ups through the points you collect.
R-Type Complete CD
I recently played this game through for the C64 on the ODROID Go which is a somewhat harder than this version, but this version is also no cakewalk. This version has improved graphics, comes with an intro and cut-scenes every couple missions. The soundtrack got beefed up and now is CD-audio, so higher quality but you still recognize the original tunes. Overall I enjoy this game a lot, although there’s also a HuCard version of this game. Actually there are several of them, Japan got R-Type I and R-Type II which is the same game but split over two game cards, not a sequel. North America got an HuCard (TurboChip) port that had both games combined on one card, and when the CD came out Japan finally got a full game as well, including an extra boss fight in level 6. Overall the game is very good and worth playing.
Figure 3 - R-Type actually plays in widescreen on the PC-Engine
Figure 4 - Boss fights always follow a certain pattern
Another specialty is the widescreen graphics for the game. Most games are actually rendered in 256x243, but R-Type runs in 352x243 which only a few games did.
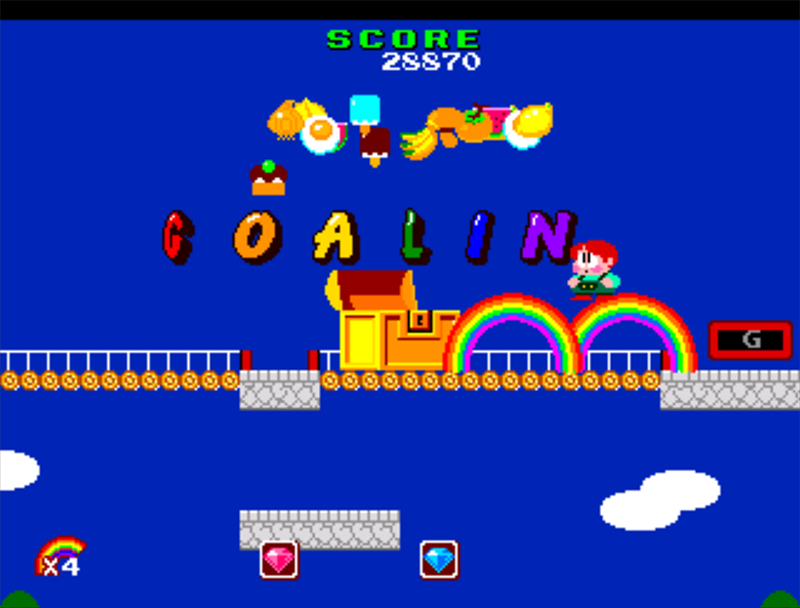
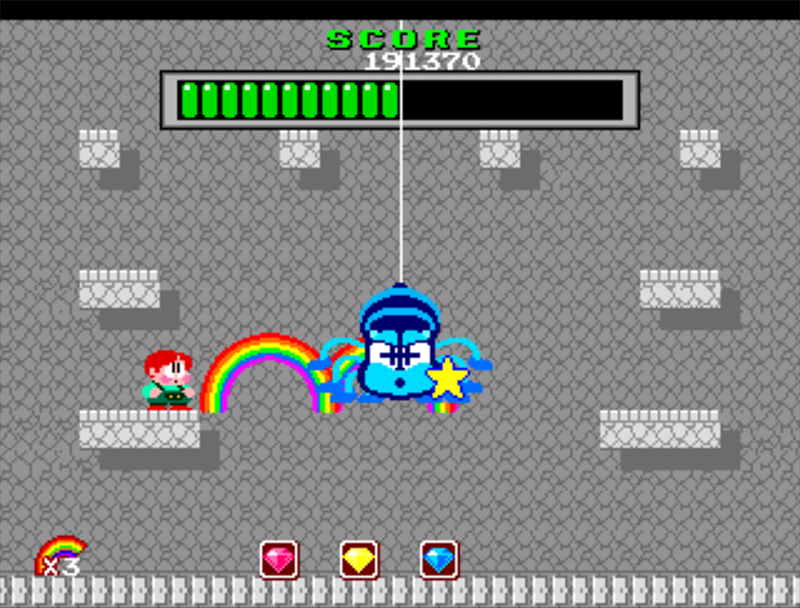
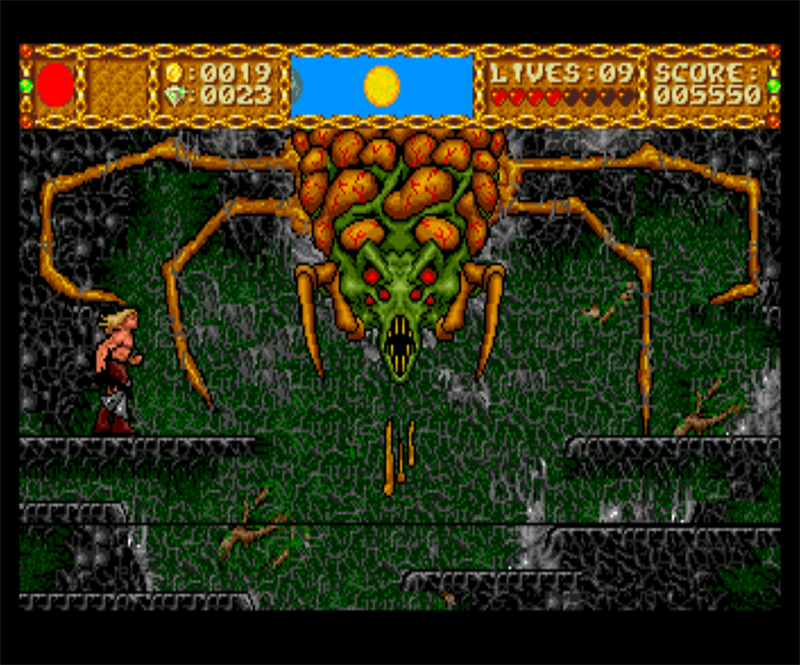
Rainbow Island
Figure 5 - Bubble Bobble 2 – Rainbow Island
Figure 6 - I’ve seldom seen so “cute” bosses, although I really hate spiders!
Rainbow Island is another of the Amiga classics that I played as a child. In this cute game, you literally climb the rainbow. In fact, you can shoot rainbows and walk over them to get on higher platforms or to kill enemies. At the end of each island, you have a boss fight. The entire game is very child friendly and has colorful comic-styled graphics. Music now plays as CD audio, but it’s still the original tunes.
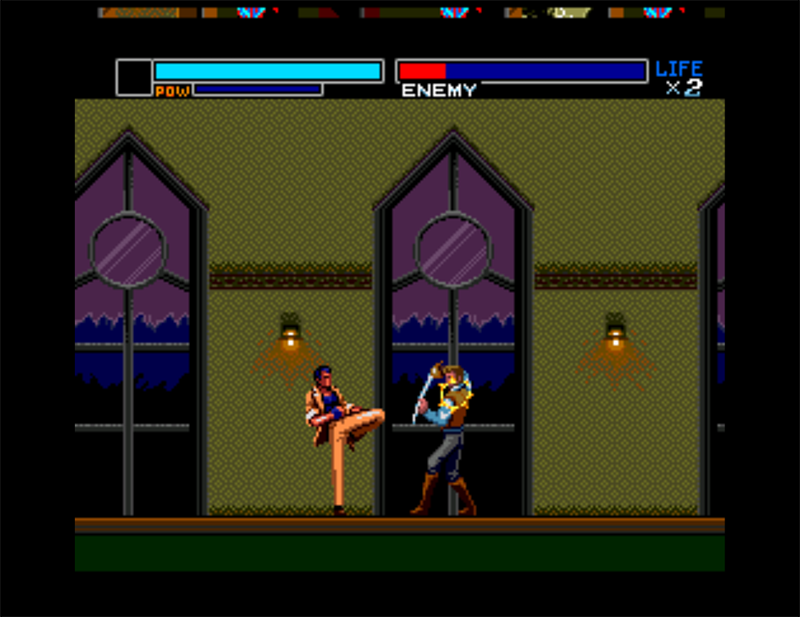
Renny Blaster
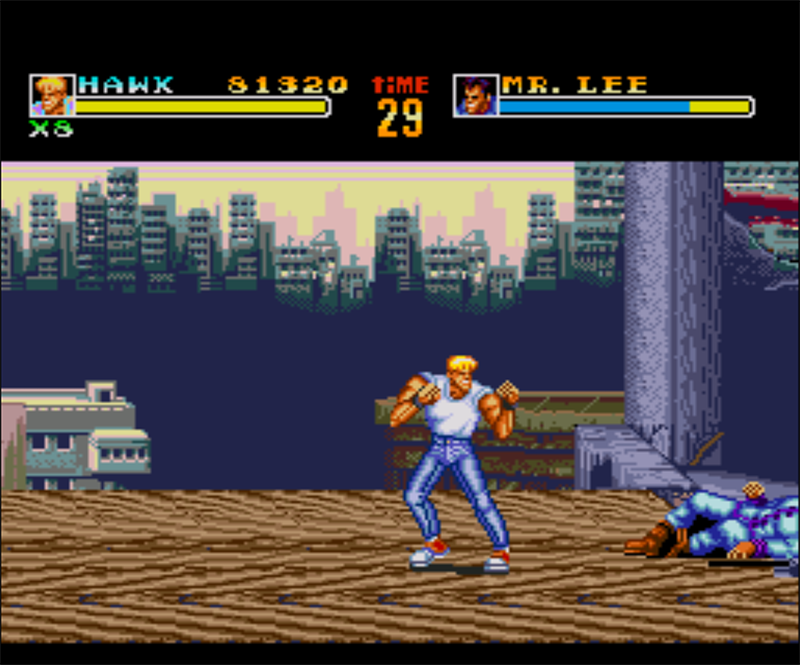
The fact that I finished the game in one sitting should already be reason enough to put it on this list, and I also guess that’s the main reason why it’s here, as the game is in no way “spectacular”. The graphics are mediocre at best, with no parallax scrolling, and cut scenes are just standing pictures with voice acting all over it, which I ended up skipping altogether. This is a fighting game similar to Double Dragon or Streets of Rage. You can choose between two players, and both have completely different fighting styles. One is a martial arts champion and fights with fists and feet, the other is some kind of mystic and fights with magic powers. I personally found kicking and boxing to be far more effective that shooting tiny rays of energy, especially since the latter can’t be done in mid-air, which makes jump attacks impossible.
Figure 7 - Fighting regular enemies varies from very easy to boss like
Figure 8 - Each stage has several bosses to fight off
You also have a charged attack which can be charged up to three stages, and causes three different attacks, all of which I found are rather weak, but sometimes helpful in certain situations. During the levels you find text scrolls, and these scrolls activate new abilities which can then be chosen from before starting a new stage. Although neither the graphics nor sound/music is very impressive, the gameplay is rather nice and you can finish the game in merely half an hour.
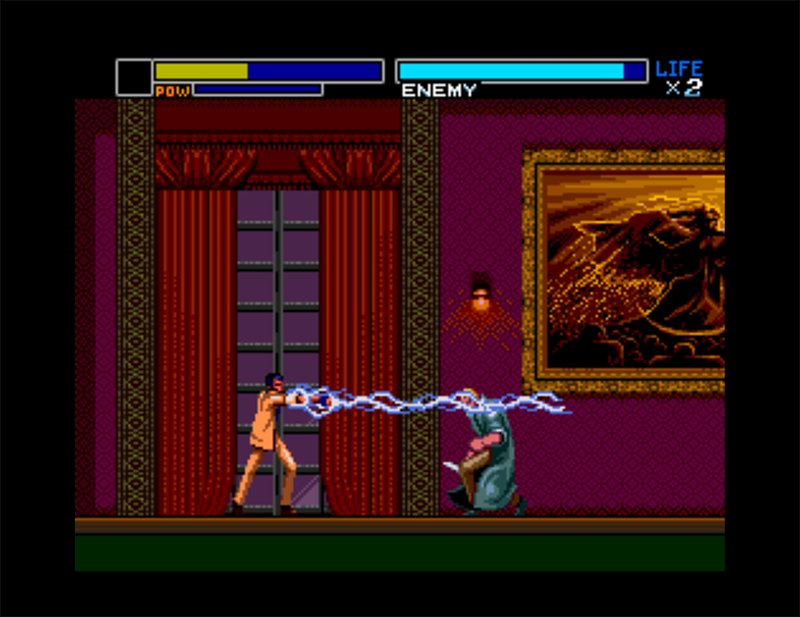
Riot Zone
Figure 9 - beating up bad guys was never so much fun
Figure 10 - At the end of each level, a boss fight awaits you
This is another game like Double Dragon or Streets of Rage and it’s a damn good one. Graphics are great, with some parallax scrolling for the backgrounds. Controls are rather good, and pulling off jump attacks is easy. You can select from two different fighters and then just give them the beating they deserve. I had a lot of fun playing this game and highly recommend it.
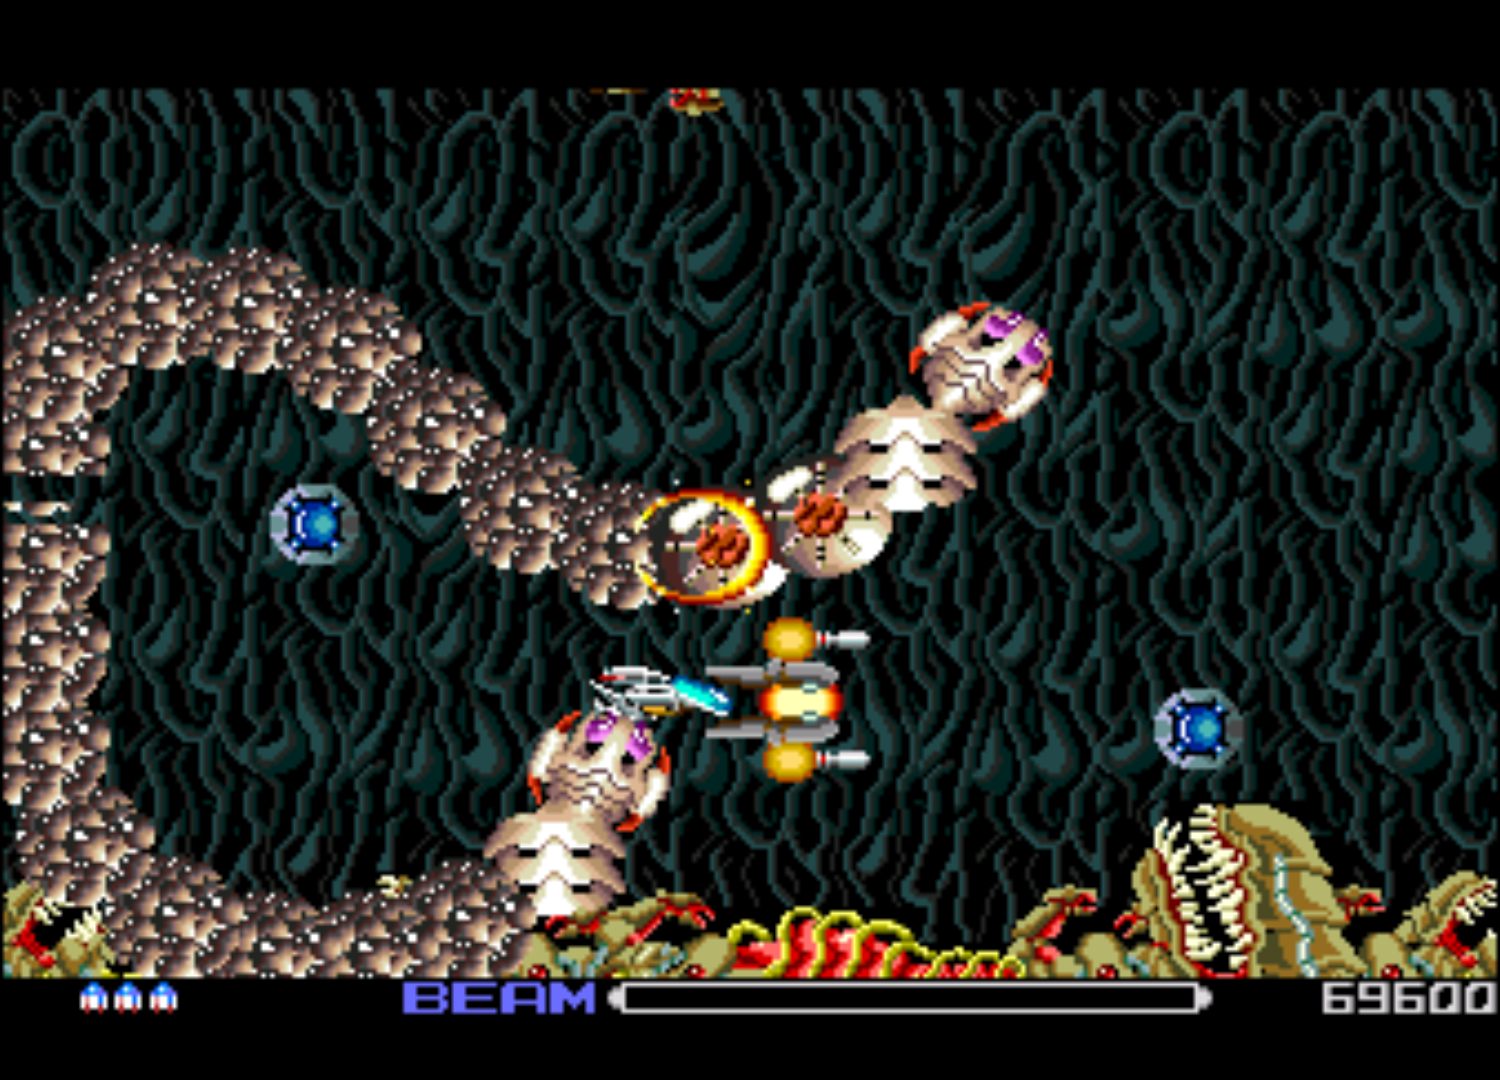
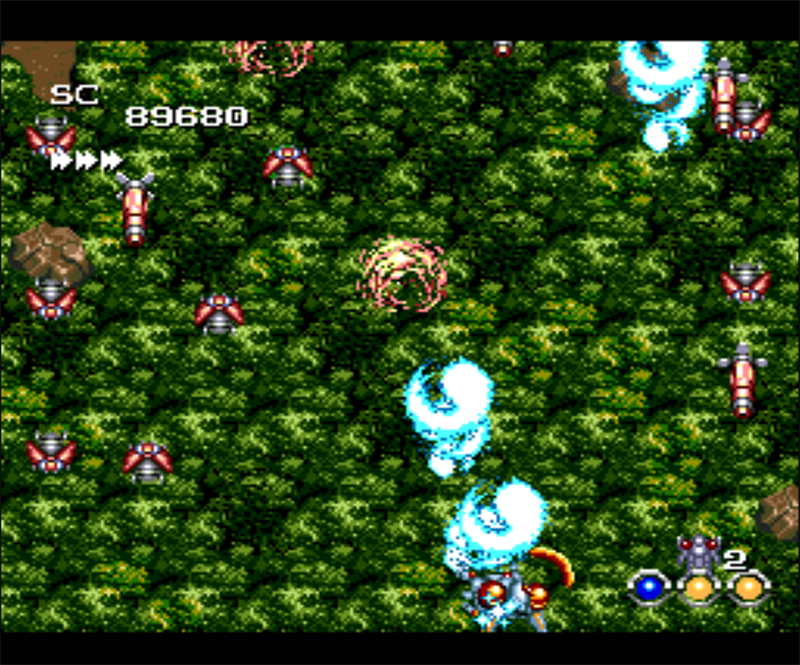
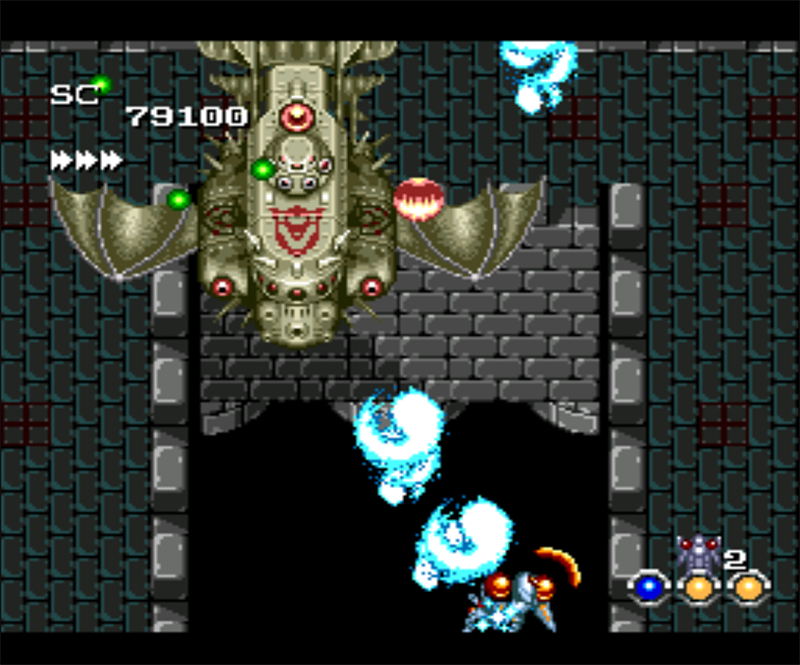
Seirei Senshi Spriggan
This is one of the games I had a hard time turning away from, as it kept me busy and interested in it for so long. This is one of the many shooters for the system, and once you get the hang of it, it’s quite a good one.
Figure 11 - This game can throw tons of enemies at you at once
Figure 12 - Normally you fight two bosses per level
The graphics are rather good, although I didn’t see much parallax scrolling, you still have a constant change of scenery. You also have pulsing lava or waterfalls in the background, which makes up for the lack of parallax scrolling. You can’t upgrade your attack, but you can collect different colored energy bubbles, such as green, blue, yellow and red, which you can combine up to three for different outcomes. Sometimes you simply have all three weapon types firing at the same time, and sometimes you create entirely new attacks. Some attacks are homing and find their targets on their own, while others scatter over the entire screen. It’s very fun to try out different combinations.
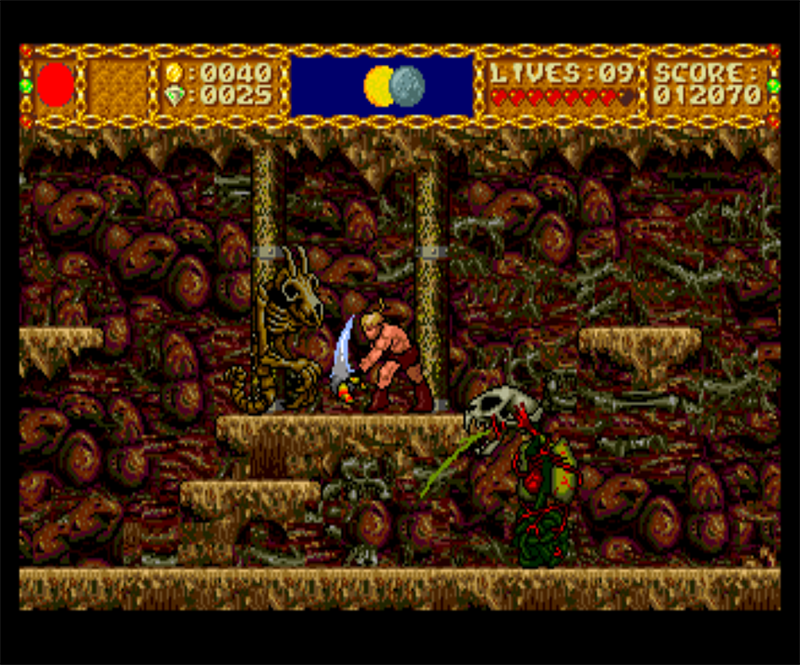
Shape Shifter
Figure 13 - Dungeon can be crawling with enemies
Figure 14 - Bosses are large and require some tactics to get rid of
This action platformer is completely in English. Even the cheesy voice acting is in English, and actually plays as a soundtrack, which this game has nearly 100. Even the shop owners talk to you, which is played from the CD. The game itself is quite fun, although some monsters can be very annoying, especially flying monsters which will fly into you where you can’t hit them, but if you can look past this, the game is quite fun to play.
You can buy a couple of different weapons, an even enhance them with a magic spell. Later on, when you fight some bosses, you will free 5 mages, who grant you the power to transform into other things, like a panther for example, which gives you greater speed and strength but is limited in time. In the top middle of the screen, you can see a sun and a planet, where the planet is circling the sun. Each time the planet is in front of the sun, a lightning strike will come from the sky and hit you, which in return will replenish all of your health. So sometimes it is advantageous to just sit and wait to get healed. Overall this game is very fun, but it needs time to get used to the fighting, as some enemies keep spawning unless you destroy certain objects, and some of them can be hard to kill or reach.
Spriggan Mark II – Re-Terraform
Although completely Japanese and I can’t understand a single word that’s spoken this game, has an amazing introduction and cut-scenes between each level.
Figure 15 - Many different settings and lots of parallax scrolling in the background
Figure 16 - As usual, a boss fight awaits at the end of the level
The graphics are overall rather good, with each level having a little bit of parallax scrolling going on in the background. Lots of different objects and enemies are thrown at you all the time. The first button attacks, and the second turns your mecha around so you can shoot in the other direction. With SELECT, you can cycle through different weapons. There are no power ups or things like that, but when you progress in the game, you get new mechas, and later on you can choose your different side-arms. Speaking of side-arms, one is, for example, a sword which can be really nice for close combat, and if you hold the button you can use it to just fly into enemies and hold it there to do constant damage. I really like this game as one of the many good shooters for the console.
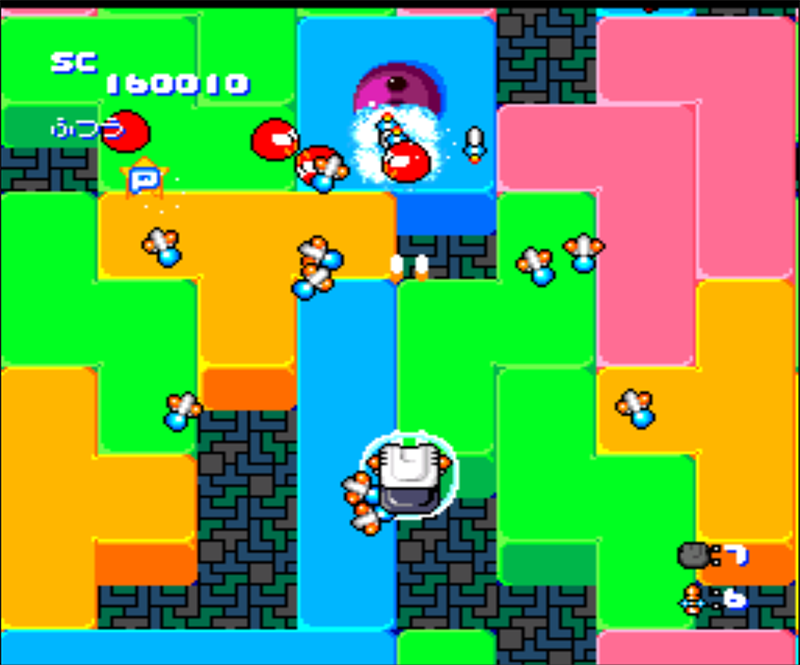
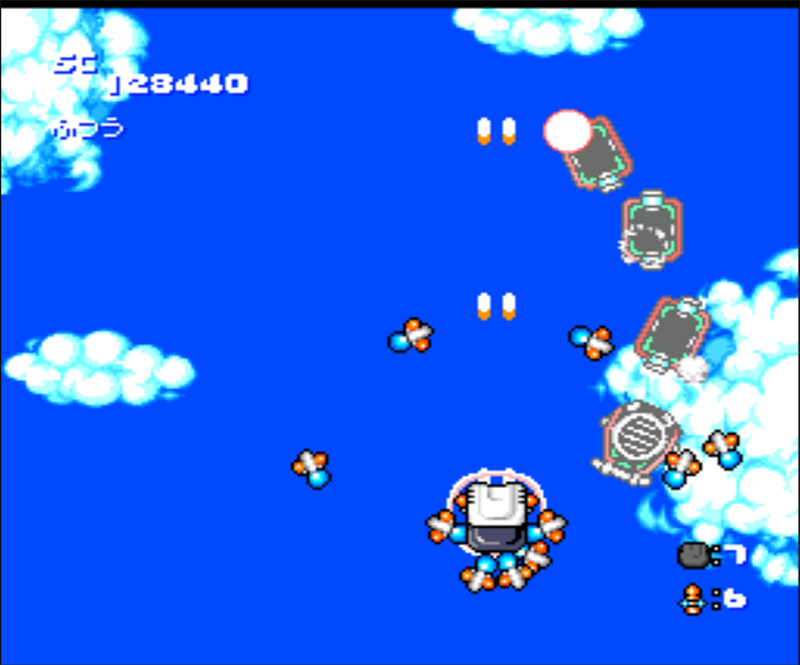
Star Parodia
This is one of these so called cute ‘em ups, and is a really good one, with tons of colorful graphics, good music and sound effects. There are three different characters to choose from, one being Bomberman and one being the PC Engine itself. This game has everything. Power up your weapon by collecting the items representing the weapon that you currently have. Pick up a different weapon to switch to another attack style. It has bombs for large attacks, it has power ups like, shields, and extra bombs. The games comes with good parallax scrolling in some levels, lots of monsters, and boss fights.
It scrolls fast but never slows down. It’s nice for people not so good at shooters, as the difficulty level is not that high. Get hit and you don’t instantly die, but lose a weapon level. Only when you are at the minimum and get hit again do you lose a life. You get plenty of these while fighting from collection points or by collecting 1ups. Overall, this game is very fun to play and I highly recommend it.
Figure 17 - Cute graphics and fluent gameplay in this nice cute ‘em up
Figure 18 - Strange Bosses like roller coaster and origami papers
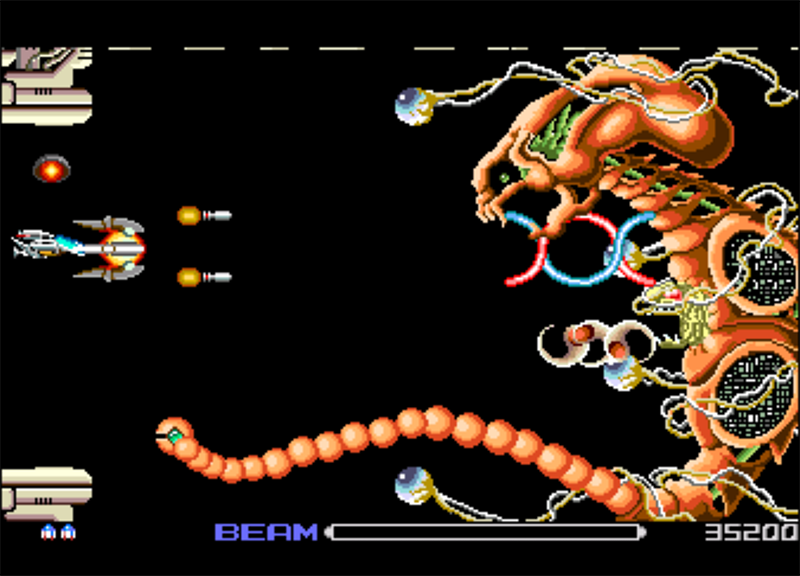
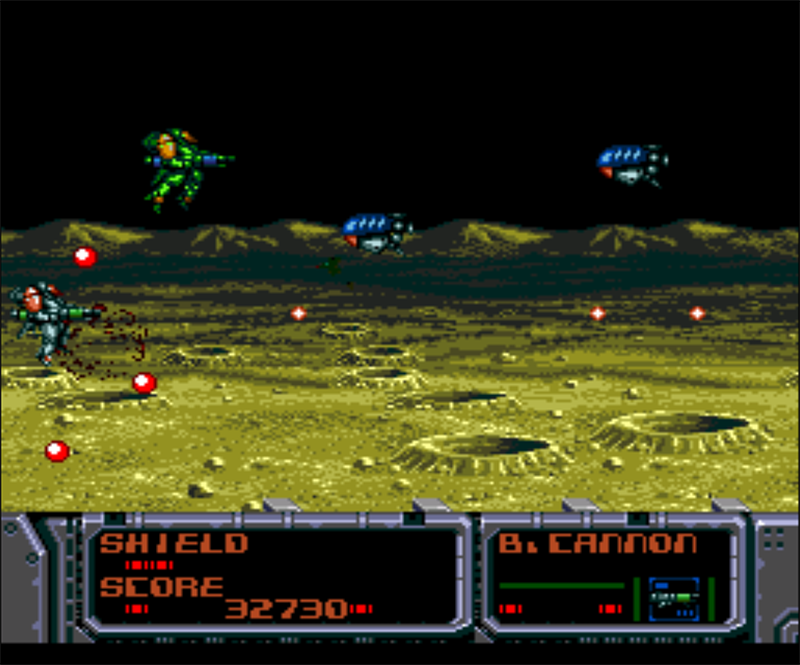
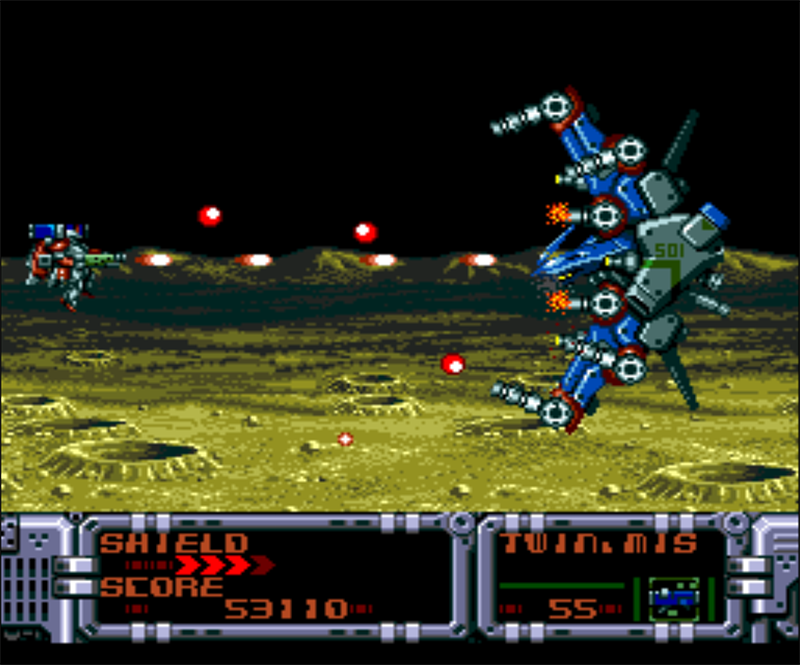
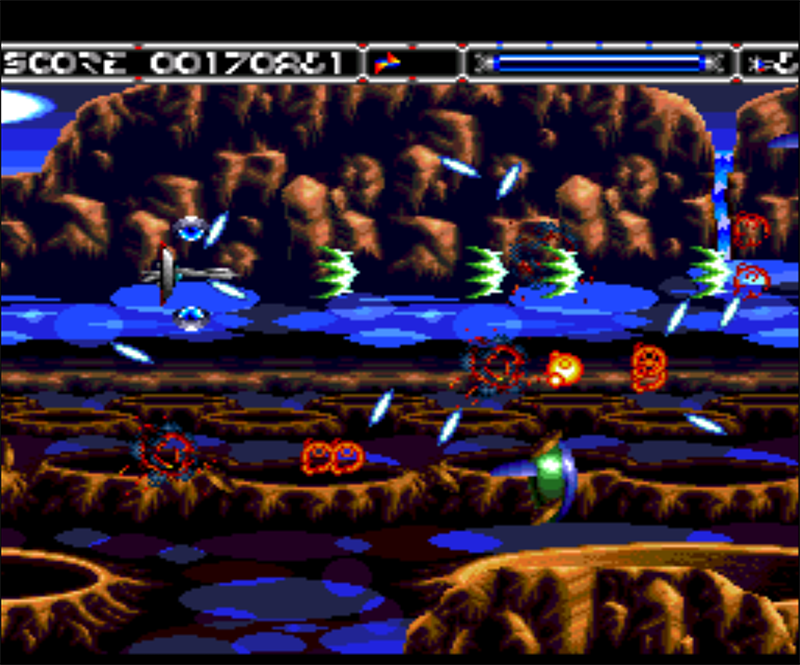
Syd Mead's Terra Forming
This shoot ‘em up is quite nice, with lots of parallax scrolling both in the foreground and background. It’s very beautiful to look at. The action is fast but manageable. Bosses require some tactics as they often can only be attacked from a certain side.
Figure 19 - There is lots of parallax scrolling and organic design in this game
Figure 20 - Bosses often have certain hard-points you need to find and destroy
This is one of those games that you pick up just to try it and end up playing it for hours. You have a main weapon which can be upgraded by collecting blue rectangles with a line in the middle. You can also have one of three different support spheres that have different attacks. These are activated by collecting either yellow, red, or blue bubbles. Yellow is a spread attack which will fire in a straight line in all major directions and allows you to attack enemies from the back and front at the same time. Red is a powerful weapon that only goes straight forward. The blue one is easily my favorite, and is a number of homing bullets. Each bullet goes automatically to every enemy on the screen. The first level can be beaten just by sitting in the middle of the screen and holding the fire button as the bullets aim and destroy everything that is being thrown at you. All weapons can be upgraded a few times to get stronger. If you get hit, you lose a level of your weapon power, and in the end will die.
Games I found ok
Prince of Persia
This version of Prince of Persia is a decent port with improved graphics, slightly updated intro, and a CD soundtrack. The controls are ok for the most part, and you can use either a dedicated jump button or the up button on your controller. The latter can cause some issues if you just try to run straight and suddenly your character jumps, so make sure you have a gamepad with a good d-pad. Overall, the controls could be better, especially in fights, where the controls are sometimes a little sluggish, and I wished they would react faster. Still, the game is great and a nice turn on the story and gameplay from the original, and definitely worth trying out.
Psychic Storm
This shoot ‘em up is somewhat odd. It’s fun for a little while, with 4 different characters and ships to choose from, and different weapon and transformations, where all of them are very different from each other. Still, the game is mediocre at best in all sound, graphics and gameplay. You fight your alien spaceships and monsters with good enough variety, and at the end of each stage there’s a boss that needs some killing.
Your ship can transform into a giant insect-like space craft with quite a bit of firepower for a while, and you can collect energy for that craft which is dropped by different enemies, but they are not dropped often enough to keep this form for long. If you’re in normal form and get hit too often (health nearly empty) you automatically transform to the strong form, to prevent destruction. Which is fine, if you wouldn’t be back to zero health the moment this transformation ends, and the next hit transforms you right back again. After three transformation (either willingly or by near death) it’s over and you can’t use it anymore, which also means instant death after transformation is finished and you are hit once again. You can upgrade your main weapon when you collect blue power ups, and some health by collecting red/blue pills. Both are rare and to increase your weapon power. You have to collect around 5 weapon ups in total, which keeps your weapons rather weak.
Puyo Puyo CD / Puyo Puyo CD Tsuu
Both games are not bad, are nice and colorful, fun to play and overall have good presentation. I just don’t see why they are on a CD: one has nearly 40 audio tracks, and the other has over 80. These tracks are apparently not for music, but contain just for the speech in the game every now and then. Honestly, I don’t see this making it worth the CD format. These games would have been better placed on a HuCard instead. The music doesn’t even seem to be from CD, and the quality is not that good. Both games are nice, and if you are a fan of the Puyo Puyo series, you should definitely try this out.
Pomping World
This is basically a port of the arcade classic Pang, where you shoot bubbles which split in two smaller bubbles until the most tiny bubbles finally disappear. Clear all of the bubbles and you win; get hit and you die and have to start over again. It is not a bad game and pretty much arcade-perfect.
Populous - The Promised Lands
I first played this strategy game on the Amiga, and surprisingly the graphics for the PCEngine are quite good, and maybe even superior to the original Amiga graphics, but it probably looks different due to the comic-styled graphics. Still, the game is the same as on the Amiga, although the controls are much harder due to the fact the game is best played with a mouse, whereas the controller is slow and clunky instead. It works ok, even if it’s a little bit slow. The game is also contains a mixture of English and Japanese.
Ranma Ni Bun no Ichi
The first of a trio of Ranma games that I tried. It follows the story of the early episodes of the game, and is an action platformer with fighting and jumping. The game has very good graphics, and the cut-scenes are actually quite impressive, with lots of details and animation as well as voice acting (using the original cast, I believe). Even with the game being fully in Japanese, that’s not really an issue. What’s an issue are the bad controls which are sadly present throughout the entire game. In some scenes, your punches are not completed and the action just stops in mid punch or kick. The same goes for jumping, which makes the game unnecessarily harder than it should be.
Ranma Ni Bun no Ichi - Datou Ganso Musabetsu Kakutou Ryuu!
This is the second game in the series of the Ranma games that I tried. The graphics, cut-scenes music and everything is still as good as in the first game, but the gameplay has changed a lot. Now, it’s more like a beat ‘em up, and you fight one and one with your enemies. This actually worked out a lot better than the first game and it was actually quite fun beating the first enemies. But soon after, I found that the enemies get rather hard and are in fact quite unfair.
When you get hit, you blink and you are invincible for a short moment. That’s allfine, as this is the case in many games, but in this game the time you are invincible is so short that you get instantly hit with the next attack again. The enemy also attacks you most of the time with ranged attacks, which often fan out as well, so it’s really hard to avoid, while most of the time you have to get in really close. Overall, it gets unfair and hard really quickly, which I did not enjoy, but aside from that, this game is fantastic.
Ranma Ni Bun no Ichi - Toraware no Hanayome
This is the last game in this series of Ranma games that I tried. This one changed a lot. The music is bad as compared to the other two. It’s not bad as in, it doesn’t fit or sounds terrible, but where the first two came with CD audio, this one seems to contain chiptunes only. The game has no “action” at all this time and is in fact a Visual Novel where you simply have to choose what you want to do next. Even if you don’t understand the language (like me), you can still play the game. Just choose every option available multiple times, and in time you will proceed. This also makes the game very long especially if you don’t understand what’s being said. There’s a lot of voice acting throughout the game, with a good amount of animation and character design, but barely any backgrounds. I liked it the least of the three.
Rayxanber II + III
These two shooters are very generic. The graphics are ok, but not very good, with, for example, no parallax scrolling, and without the turbo switch, this game is way too painful to play, as you need that fast shooting power and you can manage that for long by smashing the button.
There is no power up system I’m aware of, and just a couple different weapons you can collect. Depending on the direction of the weapon icon when you collect it, it will shoot in different directions, although front facing turned out for me to be the best, as you need the extra firepower since your ship is quite weak. As said before, you can’t power up the weapon, so collecting multiple times the same icon does nothing for you except allowing you to change the firing direction.
Road Spirits
Road Spirits is a old school racing game similar to the Lotus series on the Amiga or OutRun in the arcades. You always drive straight forward, and can only shift left and right to follow the road and avoid other cars. In this game, you have two shifts Low (up button) and High (down button); the first goes to 170 km/h, and the other goes to 290 km/h. The game has a little bit of parallax scrolling going on in the background, but overall the graphics are not very impressive. The game is also rather easy, unlike OutRun, for example. You don’t have much of a choice where to go and what to do either. Only the music can be chosen before start. There are 10 soundtracks in total to choose from and that’s about it. It’s not bad as a game, but not very good either.
Ryuuko no Ken
This surprisingly good-looking fighting game has many features to offer. Not only is it one of the few games that support the 6-button gamepad existing for the system, it also offers features such as zoom-in fights, which means when you are closer to the enemy the view gets zoomed in, if you are farther away it gets zoomed out. These are cool features, and the game looks very impressive. This Street Fighter-styled game is probably one of the best the console has to offer. I liked it, but found it a little bit too hard, but that could be just my lack of skills.
Shadow of the Beast
This is another classic Amiga game. It won some awards for its graphics and music back in its time, and hearing the music in CD quality on the PC Engine is certainly impressive. The music got remixed and is actually quite different than the original in some cases, but is still probably best of all the console ports. The graphics are rather good as long as you are outside of a dungeon, but inside a dungeon the backgrounds are missing, and you don’t have parallax scrolling which makes it probably the worst of all ports in terms of graphics (at least inside a dungeon), but the impressive music helps this fact, and the game still looks very good. It is not like the SNES version where the graphics looks nice overall but the music is just terrible, and even worse than the Genesis version. A good comparison video of the original game on the Amiga compared to the SNES, Genesis and PC Engine is available at https://www.youtube.com/watch?v=QUT91K4mPlw.
Shanghai II
Normally I’m not a big fan of these kind of puzzle games, but this one has very nice music which makes it very relaxing, and I enjoyed myself playing this for a while. It’s nothing fancy, without videos or cut-scenes, just simple gameplay, which was nice, and I enjoyed my game time.
Slime World
This platformer is actually quite interesting. You run around as a guy in a suit that walks and jumps through levels of green slime, with monsters throwing slime at you and ponds of water where you can clean yourself. If you get too slime covered, you die. You can collect a bunch of different items which I wasn’t able to figure out how or if you can use them. The controls are a little bit off. Jumping is very sluggish and you stick on walls, no matter if you want to or not, which sometimes makes it hard to reach places. Graphically, the game is nice, although it bit nauseating, not because of the slime, but because the screen keeps following you every move, which means that if you turn, go up or down and such, the screen keeps scrolling. Turn left or right and the screen instantly scrolls into the other direction.
Space Fantasy Zone
This game is a Space Harrier meets Fantasy Zone game (hence the name), and it’s exactly what this suggests. Imagine Space Harrier with Fantasy Zone graphics and enemies. It’s actually quite fun, and after you finish a level, you can go to a shop to heal up, buy better weapons and some specials. It’s not the most graphically impressive game, but it’s not bad and has some nice tunes.
Space Invaders - Original Game
You should take the “Original Game” very seriously, since this is a remake of different arcade versions from 1978, and that’s also what you can expect graphics wise. The game comes with a couple of different versions and even has some competitive multiplayer versions, but overall it’s good “old” Space Invaders, and nothing too fancy.
Splash Lake
This puzzle game is quite unique. You play as a bird, and your goal is to kill every enemy on the map, not by attacking them, but by picking the ground underneath their feet, breaking ledges and make them fall into water. For this, you have to learn the different types of tiles which you can break and which you can’t, and what will break apart and how much of it when you pick at it. The game has different stages each containing 10 levels, after which you have somewhat of a boss fight, which is an enemy that can fall into water more than once and some other enemies that spawn later on. The game is quite fun, although not very impressive. The controls are a little bit clunky, as a turn or a walk is a difference between a fraction of a second.
Star Mobile
This puzzle game is rather simple: you have a scale with three places to put “stars” into. Each star represents a different “weight”. Stars fall at random, and your goal is to keep the scale from tipping to one side or the other, and with that stack up the stars. Each level increases the number of stars you need to stack to win the level. You can combine stars of the same color for extra points or you can gain extra stars if you collect your old stars, this can be done when you have stars of a different color between two stars of the same color, the star in the middle will disappear and you get an extra star (which you need in case you make mistakes and loose stars). It’s fun for a little while, but doesn’t have any impressive graphics or gameplay elements.
Steam Heart's
This shooter is a little bit odd for me. The graphics are nice, and the music is ok. You can collect weapon power ups and increase your weapon power nearly infinitely it seems (which is very interesting), but something seems to be missing for me. The game comes with two playable characters, but the fighting styles are completely identical. It seems the game has only two weapons: a spreading vulkan cannon and a beam laser, with the laser being the stronger weapon by far. You get a couple of bonus items, such as missiles that attack straight, or spheres that search for enemies, and shields that can protect you for a while. You rarely get something to replenish your health. Overall it’s nice, but I feel that something is missing.
Super Air Zonk
This game is often referred as a hidden gem on the system, and while the graphics and music are good, the comic style is funny and nice to look at, and overall the game is fun to play, I don’t fully agree with that statement. It’s a nice shooter/cute ‘em up, but for me there’s too much stuff going on on the screen, and I’m never sure if what I’m running into is something I’m supposed to collect, or if it’s enemy or a “bullet”. There’s too much stuff going on, and often the bonuses you’re supposed to collect wobble just outside of your reach, and I’m talking about your standard point bonuses, not weapon powers or whatever. It’s annoying to kill 10 enemies but you’re unable to collect any of the points cause they drift instantly out of your reach. Still, the game is nice and fun to play for a while.
Super Darius I + II
Both of these titles are well known shooters from the arcade, and the overall presentation is very good. The game improved on the sound department over the arcade originals, and the CD soundtrack is simply superb. The graphics are nice, with a good amount of parallax scrolling and pulsing effects going on in the background. The game doesn’t seem to slow down no matter what’s going on on the screen.
Personally though. I don’t like these games very much. The first one is extremely hard, and I ran out of life within a couple of seconds (!) until I got the hang of it. The second game was the easier one, where I could adjust difficulty and lives that I had, which helps a lot, since every time you die, you lose all of your power ups, which makes later levels extremely hard as enemies need more hits and you’re shooting peas at them.
Super Raiden
I really like the Raiden games, and just started to play them on the ODROID Go for Atari Lynx again. This version is of course better in everything compared to the Atari Lynx version with superior graphics, sounds, and music. The gameplay is nice, and when you get a fully powered vulkan cannon with homing missiles to support it, the game is just a walk in the breeze. It’s fun, but it’s missing the last “wow” effect to be a perfect game. Still, I highly recommend this game as it’s really nice and you can pleasantly pass some time with it.
Sylphia
In this shooter game, you play as a fairy and have to shoot lots of different enemies with many different weapons. You can collect different weapon ups in the color, red, green, blue and yellow, which all represent a different weapon type. Collect the same type to increase the power, or collect a different type to switch the weapon. Boss fights can be rather hard and long, and there’s normally a mid-boss as well. Overall the game is fun and nice, and has here and there some nice effects, such as an underwater level, but the graphics are not that impressive, so it’s not one of the really good shooter games available for the system.
Games I disliked
Rom Rom Stadium
This baseball game is one of a few for the system. In fact, it was the only one where I was able to hit the ball at all or score a point. I’m generally not a sports fan, and baseball games on consoles have never had much appeal for me. This one has nice comic-styled graphics, but is completely in Japanese as well, so there are many things here that give me a hard time. I imagine this game can be fun for people who like the genre, but for me it’s not all that great.
Shanghai III - Dragon's Eye
Contrary to Shanghai II, I didn’t like the third title in the series. The music and sound were extremely loud, even though I didn’t change settings. Although the game came out rather late into the console’s lifecycle (1992), the graphics are really not impressive. After I finished the board, I was greeted with a cheaply made graphic of a dragon blowing fire out of its nostrils and kept doing so no matter what button I pressed or how long I waited. I guess that was where I needed to restart the console in order to play again.
Sherlock Holmes Consulting Detective Volume I + II
This game started off very impressive. It comes with videos, which means there’s actually video footage of Sherlock Holmes in this game. The game also dismisses all soundtracks and has voices and music digitized as data on the disc. There are a couple things you can look at before you start the game, and get an introduction where you see the videos and hear voices, which is all very impressive, but then the game starts and the quality gets completely turned around.
You still have videos and such when you go and visit places and try to solve the game, but I didn’t even get that far. The first thing they tell you to do is to check the newspaper, but to be honest, I haven’t had the patience to read 5 different newspapers with 40~50 news entries each with a menu that always puts me back to where you choose the newspaper you want to read before you can select the next article to read. This is a game that takes a very long time, and I didn’t have the time nor the patience to get into it. However, if you like long games, you can check out a review of it at https://www.youtube.com/watch?v=6ShdmWQoLDY.
Sim Earth - The Living Planet
This is also one for patient players. Graphically, I’ve seen better versions, and this one also lags, but has some nice audio commentary here and there. Overall, it takes too long to get somewhere for me, and I don’t have time for something like this. The lags and sometimes unresponsive input is another thing that makes this game a no-go for me.
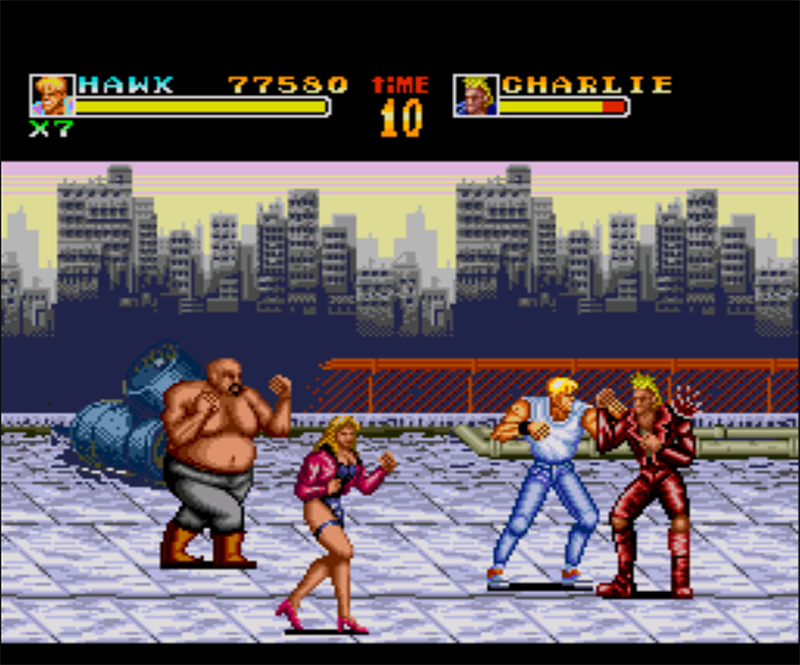
Strider Hiryuu
This is the PC Engine version of Strider, but it’s not a particularly good port in my opinion. It has lots of flashing and missing graphics, and the controls are also not the best, especially when you try to hit enemies that are on the ground. It’s not a terrible game, but I’m sure it could have been better.
Both games are shooters as well, but at best mediocre. The second title has better graphics overall, but the gameplay is not very fun. You die too fast, or you finish the level and the game is over and you’re just hunting for the highest score. I didn’t particularly enjoy these two games, although Summer Carnival ‘93 was overall a lot better.
Using Kernel 5.2 With Armbian: Run WiringPi, HomeAssistant, and More With the Latest Kernel Support
August 6, 2019By @joergLinux, ODROID-C1+, Tutorial
This article addresses the creation of an Armbian image using the mainline linux kernel 5.2.0-rc3, and the setup of the popular home automation software, Home Assistant. This exercise was performed targeting the popular Single Board Computer (SBC) ODROID-C1.
Installation Steps
First, I installed a working Armbian image that comes with a 5.x kernel. Here are the steps to compile and install the mainline kernel:
$ export ARCH=arm
$ export CROSS_COMPILE=arm-linux-gnueabihf-
$ export
  PATH=/path/to/jour/toolchain/gcc-linaro-7.3.1-2018.05-x86_64_arm-linux-gnueabihf/bin:$PATH
$ make odroidc1_defconfig
$ make -j 4 LOADADDR=0x00208000 uImage dtbs modules
$ kver=`make kernelrelease`
$ sudo echo ${kver} > ../kernel.release

#put the sdcard to your host computer
#and copy the needed files to it

$ sudo mkdir /path/to/sdcard/boot/mainline
$ sudo cp arch/arm/boot/uImage arch/arm/boot/dts/meson8b-odroidc1.dtb
  /path/to/sdcard/boot/mainline
$ sudo make modules_install ARCH=arm INSTALL_MOD_PATH=/path/to/sdcard/boot/mainline
$ sudo cp .config /path/to/sdcard/boot/mainline/config-${kver}
$ sudo cp ../kernel.release  /path/to/sdcard/boot/mainline

#this copies all relevant files
#then put the sdcard to the C1 and boot
#on the C1:
$ cd /boot/mainline
$ VERSION=$(cat kernel.release)
$ sudo update-initramfs -c -k ${VERSION}
$ sudo mkimage -A arm -O linux -T ramdisk -a 0x0 -e 0x0 -n ../initrd.img-${VERSION}
  -d ../initrd.img-${VERSION} ../uInitrd-${VERSION}
Note that odroidc1_defconfig does not exist in the mainline kernel. Instead there is the multi_v7_defconFigure However, when I use this, the ODROID-C1 does not boot. I think it is due to the kernel size of about 10Mb. The odroidc1_defconfig is based on the config of @aplu, but there are some more config values that have not been set there before. You can download odroidc1_defconFigurezip from https://bit.ly/2Y9JtQS. Also, the boot.ini must be edited to make the ODROID-C1 boot the new kernel:
I do not know if it is a good idea to put the serialnumber into the devicetree. However, it can be done like so, with the fdtput command:
$ sudo fdtput -t s /boot/mainline/meson8b-odroidc1.dtb / serial-number 1b00000000000002
Then I have some I2C devices running with wiringPi and Home Assistant. However, when I tried, I was surprised that I2C is not yet enabled. It took a while to find the right values for the devicetree. There was still an unsolved problem. After applying the following patch to the devicetree I noticed the /dev/i2c-0 that serve the pins 3 and 5 and the /dev/i2c-1 that serve the pins 27 and 28. With the kernel 3.10.107 this is different, the device numbering of the I2C start with 1 and so the wiringPi is searching the i2c-1 device. I have not found a solution yet. One possible solution would be to modify wiringPi only for ODROID-C1 using mainline kernel, to use the i2c-0 device.
With this working, I installed the latest version of Home Assistant 0.94.3 in a venv environment. I tried Docker also, but I was not able to make it run.
In the upcoming weeks, I will test if the I2C reads and writes are without errors. The background is that on my installed ODROID-C1 with kernel 3.10.107 the I2C from time to time hangs and I have to reboot (every 3 ...4 months).
Figure 02
Forum member @mad_ady was able to install Hass.io through Docker on Armbian. Information there was used to get Home Assistant working in docker. To have my own data path for configuration files I had to give this command:
With this, I realized why Home Assistant always gave an error for the mqtt certification file. With the venv version you give full path to the file, in Docker this is mounted to /ssl. I see that I have to learn more about Docker.
My mqtt section now looks like this:
mqtt:
# this settings for mosquitto:
  broker: 192.168.1.71
  port: 8883
  client_id: home-assistant-test
  certificate: /ssl/ca.crt
  tls_insecure: true
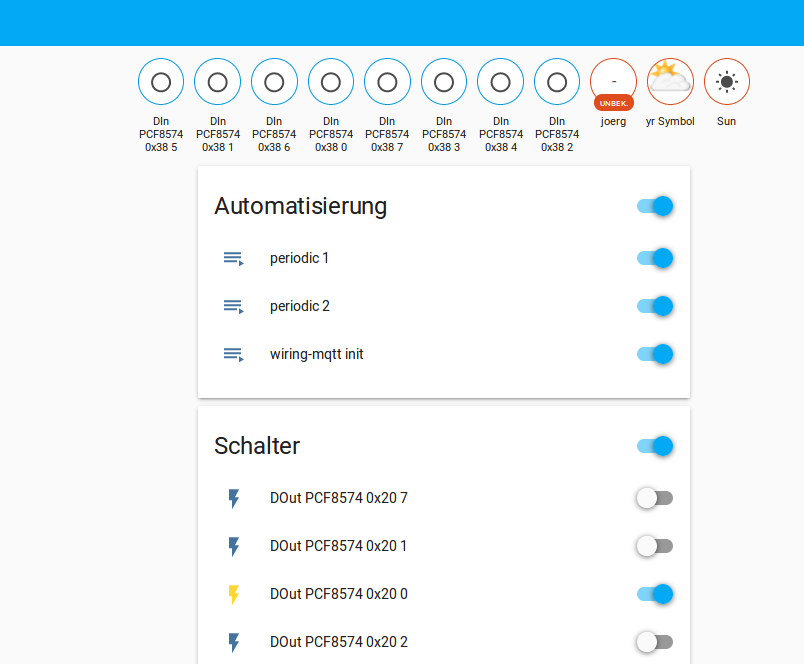
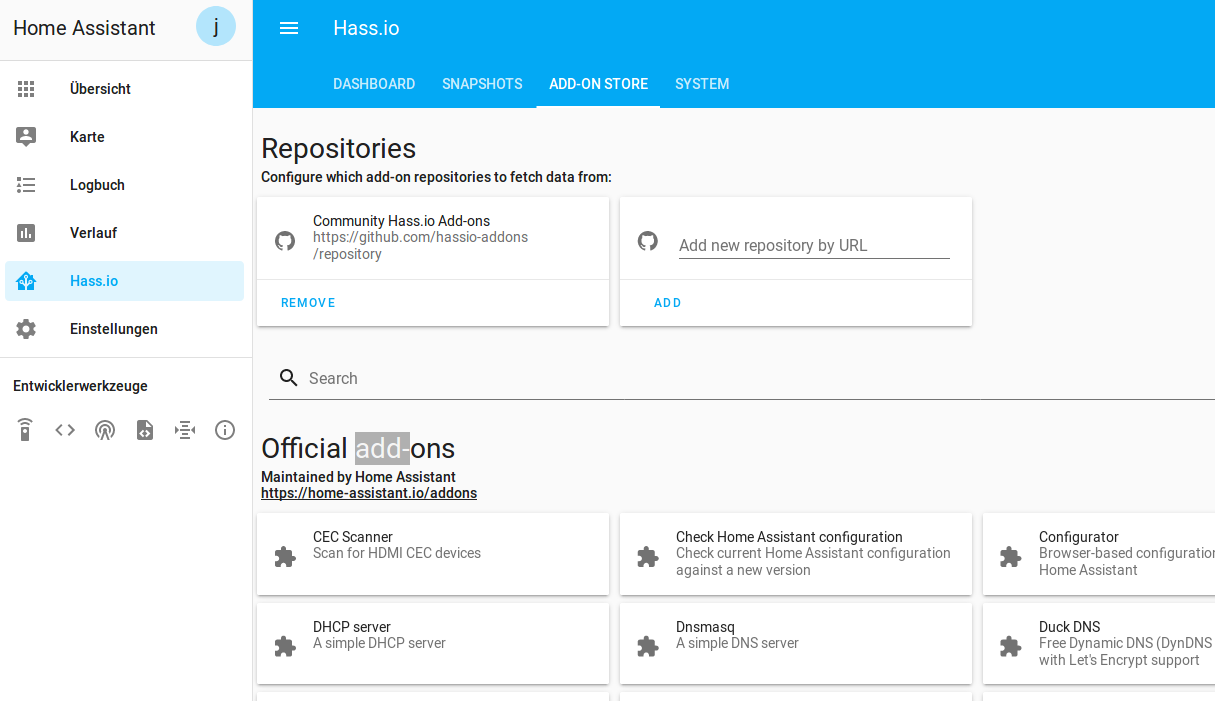
I use the normally installed mosquitto broker, since I was not able to make the Dockerized addon for mosquitto run. When I use my certification files it reports a protocol error. So I switched back to the normal mosquitto installation. Now the difference is that there is a hassio section, which gives the possibility to install addons.
Figure 03
Note that there is no apparmor, as shown below. I had to learn how to enable it and, in the process, I got to learn Docker, too.
$ sudo aa-status
apparmor module is not loaded
Until now I used the ODROID-C1 in a headless configuration with mainline kernel. I can say that I2C is working. I tried my USB Bluetooth adapter, but had no luck. I got it to work only for a moment after enabling bluetooth support with armbian-config, but after reboot, does not matter if power cycle, there is no adapter visible with lsusb. My installation runs on an SD card. Also, I have not yet tried IR and eMMC.
I got Docker running with Home Assistant, but yesterday I got a lot of SD card errors. The heartbeat LED was flashing, but I could not get access anymore. After reboot I checked with fsck and got a lot of errors, but when I made the check with my host pc there were no errors. After that booted normally, I had to uninstall and reinitialize the Home Assistant in Docker. As of now I can say that it is not running stable.
How to Build a Monku Retro Gaming Console - Part 2: Configuring the Software
August 1, 2019By Brian ReeGaming, ODROID-C1+, ODROID-C2
This is a continuation of the Retro Gaming Console article from last month, where we learned how to build a case for a retro gaming console. This installment will show you how to configure the software for the project.
In this article, I will show you in detail how to configure your Monku Retro 1 (ODROID-C1+) or Monku Retro 2 (ODROID-C2) video game console's OS and apps. There will be a few steps involved but I'll outline everything in detail including every command you have to run. If you don't intend to use your device as a retro gaming console it makes a great set top Linux box, you can skip the sections on Retroarch and Antimicro and even the optimization section can probably be ignored. So at the end of this tutorial you'll have a killer retro gaming console of your own making. Well those are our goals, let's jump in and get going. I'll reiterate the features of this device below, these are the same bullet points that are on the hardware section. Note that if at any time you are prompted for a login when working with the terminal use the password, odroid.
Tools Needed
A computer with an SD card reader or a USB port if you have an SD card to USB adapter.
An SD card, recommended 64GB or greater.
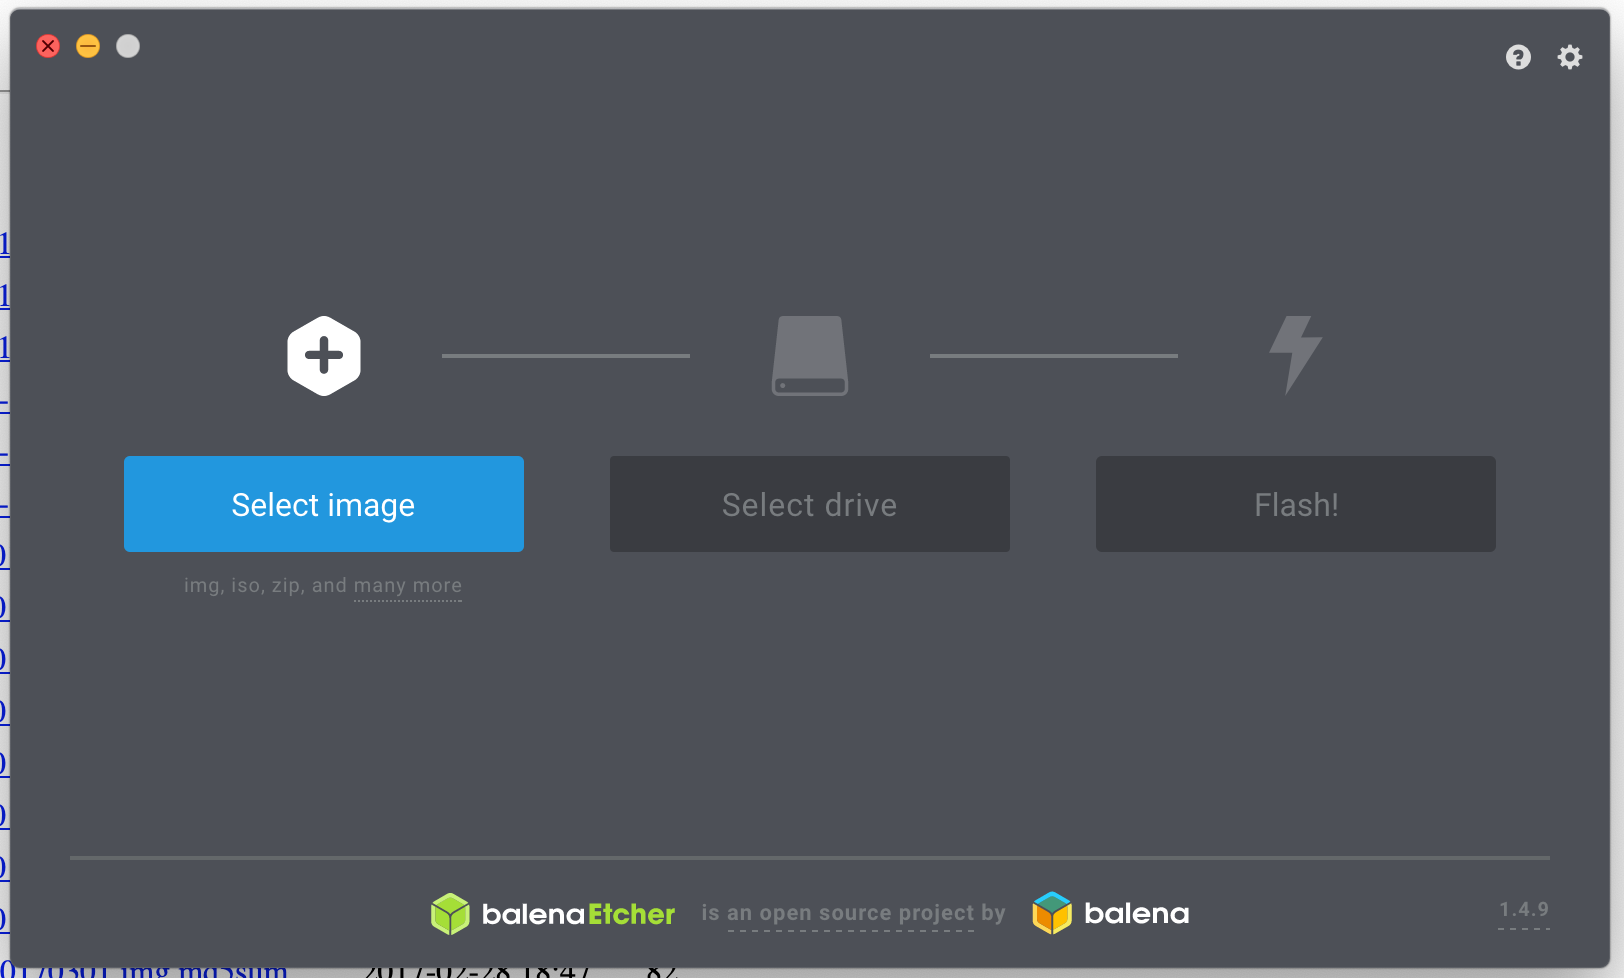
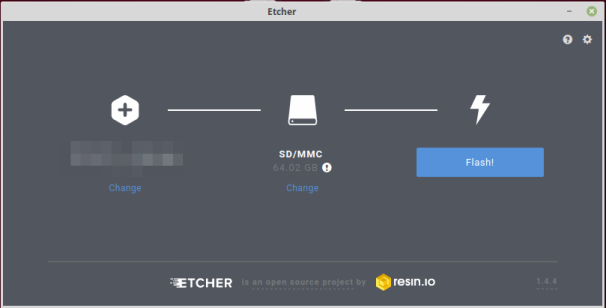
Mac SD card image writing software. I use balenaEtcher, it is free and works great.
Window SD card image writing software. I use Win32 Disk Imager, it is free and works well but can be a bit finicky with very large drives.
An internet connection. If you're reading this you already have this tool, lol.
Parts Needed
64GB Micro SD Card x2: $16.99 (link)
SD Card Reader x1: $11.00 (link)
Linux Friendly Gamepad x1: $17.00 (link)
Since we included the SD cards in the hardware cost we won't count them here. That means the total cost for this part, assuming you have access to a computer of some kind is $0.00 to $28.00 and you can probably find a cheaper SD card reader but I like this one because it has both Micro SD and SD card support in different slots that both work at the same time. Also game controllers you might already have one you might now but I listed the one I use and a link for a good price on it. Sounds great to me let's move on to the next part.
C1 Features
DROID Goodness!
Custom Software Control Button
Custom Hardware Reset
Support for Atari 2600, Atari 7800, ColecoVision, MSX-1, MSX-2, NES, GameBoy, GameBoy Color, Sega SG-1000, Sega Mark III, and Sega Master System configured and ready to go.
Retroarch with XBM, custom scripts to monitor the software button, start Retroarch, maintain Antimicro.
Configured for low memory usage and for use with included controller.
Every ROM tested to see if it loads and properly associated with its emulator.
Full Linux desktop environment when not in game kiosk mode via Antimicro.
C1 Software Button Functions
2-second hold: Software reset
4-second hold: Software shutdown
6-second hold: Turn off game kiosk mode.
8-second hold: Change to 1024 x 768 x 32bpp resolution and reboot.
10-second hold: Change to 720p x 32bpp resolution and reboot.
C2 Features
ODROID Goodness!
Custom Software Control Button
Custom Hardware Reset
Support for Atari 2600, Atari 7800, Atari Lynx, ColecoVision, MSX-1, MSX-2, NES, GameBoy, GameBoy Color, Virtual Boy, SNES, GameBoy Advance, WonderSwan Pocket/Color, NEO GEO Pocket/Color, Sega SG-1000, Sega Mark 3, Sega Master System, Sega Genesis, Sega GameGear, NEC Turbo Graphics 16, and NEC Super Graphics emulators configured and ready to go.
Retroarch with XBM, custom scripts to monitor the software button, start Retroarch, maintain Antimicro.
Configured for low memory usage and for use with included controller.
Full Linux desktop environment when not in game kiosk mode via Antimicro.
R2 / C2 Software Button Functions:
2-second hold: Software reset
4-second hold: Software shutdown
6-second hold: Turn off game kiosk mode.
8-second hold: Set video to auto for VGA mode, possibly alter retroarch.cfg for USB audio if present.
10-second hold: Set video mode to 720p, alter retroarch.cfg for HDMI audio.
Base 16.04 MATE Image and Writing to an SD Card
I spent an inordinate amount of time testing the operating systems images available for the C1+ and C2 and I've found that Ubuntu 16.04 LTS is the best all around image in terms of efficiency, availability of packages, support, etc. Laka was great but I had a ton of trouble with audio. Ubuntu 18.04 LTS was solid too but it definitely used more resources and I didn't find as many emulators as easily with it so I decided on 16.04 LTS.
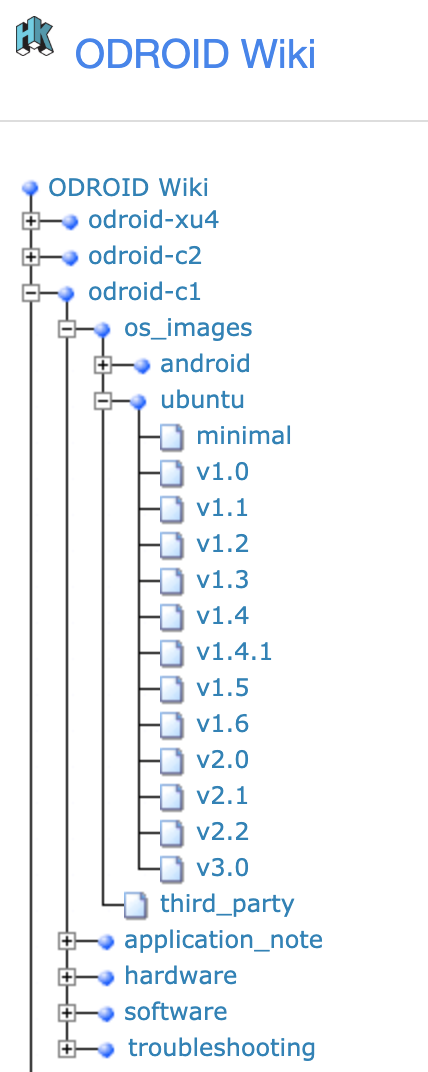
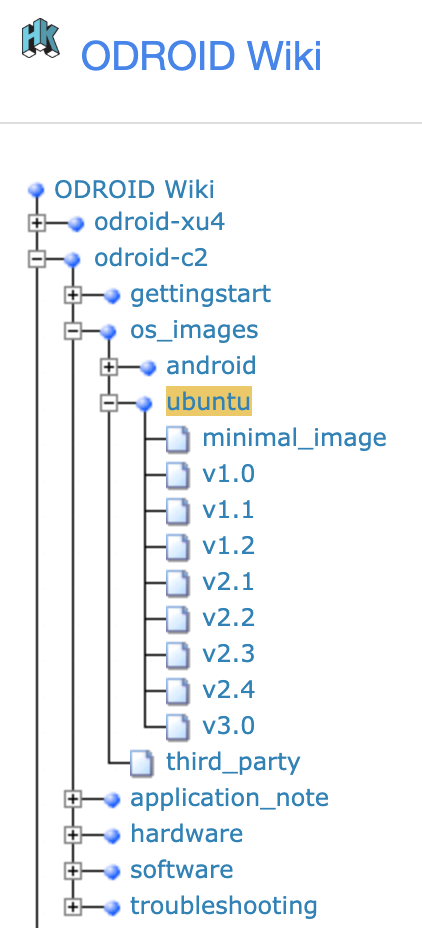
Boot up your Mac or Windows box. Linux users can pretty much follow the Mac instructions I won't provide specific Linux examples though. Open up your browser and go to the ODROID WIKI page https://wiki.odroid.com/start. If you have a C1+ or C2 go to that section. Figures 1 and 2 show the links for each device.
Figure 1 - ODROID Wiki links for the ODROID-C1
Figure 2 - ODROID Wiki links for the ODROID-C2
Select your device, then select the os_images, and finally select ubuntu. A page will load on the right-hand pane. Scroll it down until you see the list of mirror sites. I like to use the South Korean mirror, just seems to work the best. Here are the direct links to the OS images for each device.
I'm providing a little bit more information than is necessary I could have just posted the direct download link but I wanted you to see what options there are out there. For the C1+ I used https://dn.odroid.com/S805/Ubuntu/ubuntu-16.04.2-mate-odroid-c1-20170220.img.xz as my base image. If you cannot unzip a .xz file try using 7 - Zip. It is free and works well on Windows. I didn't have an issue on my Mac it could handle .xz files just fine.
For the C2, I used https://dn.odroid.com/S905/Ubuntu/ubuntu64-16.04.2lts-mate-odroid-c2-20170301.img.xz as my base image. I recommend being on a wired internet connection if you can, WiFi will be a bit slower. Let the images download. You can verify them with the checksum if you want, the file just below the OS image, but I'm not going to cover that here. Now on a Windows box, you're going to want to unzip the image file so that you have a full uncompressed copy of it. Both files will use up about 6GB of hard drive space. You can delete the uncompressed file once you are done with it to save space. On a Mac I recommend doing the same, if you have trouble unzipping the image I would recommend getting The Unarchiver. It's free and works great. By far the best solution for unzipping hundreds of ROMs at once believe me. You will have to navigate to the uncompressed image on the Mac as well.
Make sure to double and triple check your drive letters! You don't want to inadvertently ruin one of your drives or USB keys or whatever you might have plugged into your computer.
Figure 3
Figure 4
Let the image writer do its job. This can take a few minutes, go grab a coffee, or a beer if its 10AM. Note that the OS images are not interchangeable you must use the C1+ base image for your C1+ device and the C2 base image for your C2 device. One thing to note is ignore any prompts to format the SD card from either OSX or Windows. When you're done you should see a drive called "boot" where the original blank SD card was. Eject it properly and pop it into your your C1+ or C2, whichever you are working with.
If you're working with an ODROID-C1+ and you are planning to work on a computer display it may not be able to handle the default HDMI output. It is a good idea to change the video output before we proceed. In that case put the SD card back in your computer and open the boot partition. Find the boot.ini file and make a copy of it called boot.ini.orig.old. Edit the original boot.ini file and make sure that the only uncommented output mode is setenv m "1024x768p60hz", next scroll down a little further until you see the video signal section and make sure that only setenv vout "vga" is uncommented. Make sure you use a text editor that is correct for the job, Pluma, nano, vi on Linux and OSX, you could also try the native OSX text editor. On Windows Word Pad should do the trick. I've also found that Atom works well on my Mac.
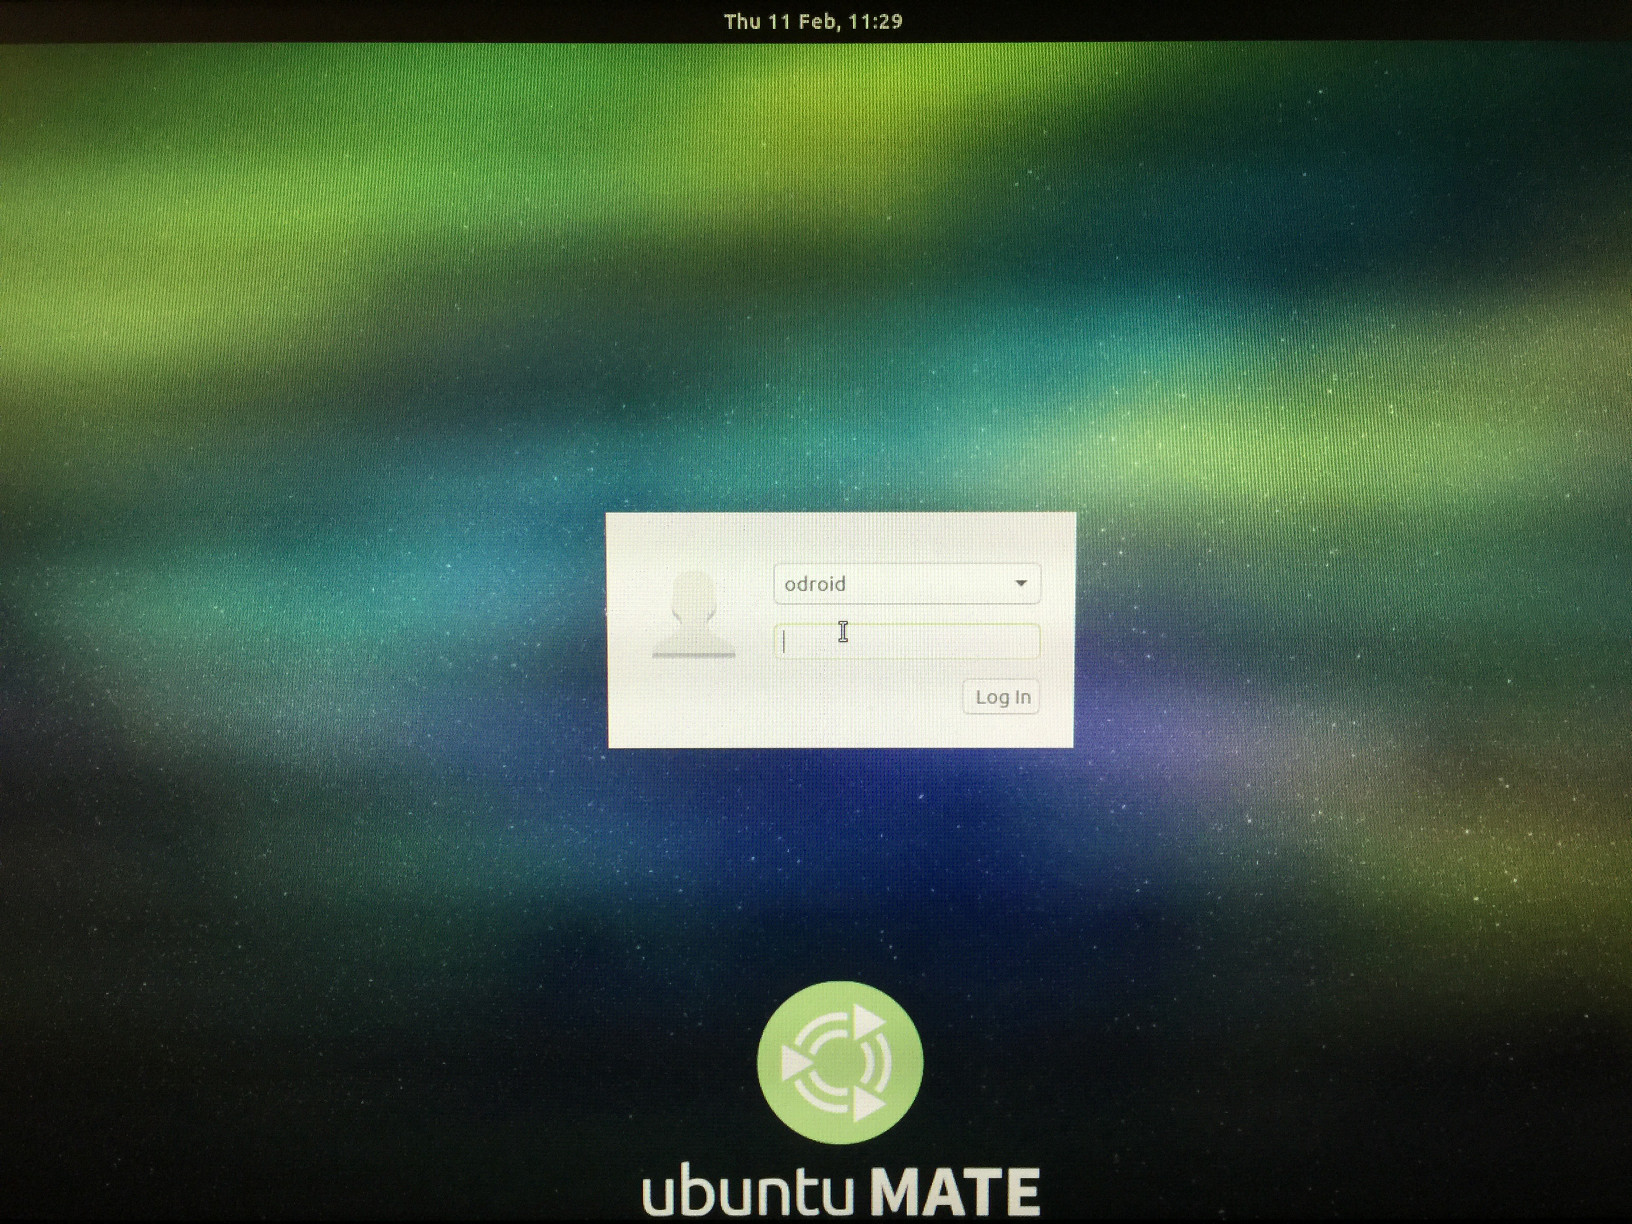
If your hardware is OK, you should see a blue light when the SD card is plugged in and the device is turned on. You should see a login prompt after a few seconds, C1+ times are a bit slower. If not you may have a problem with either the SD card or the hardware. I've worked with at least 6 of these things and soldered them ... poorly ... and they've all booted up no problem. The username and password for your device is odroid. Write it down somewhere in case you forget.
If you don't see anything but a blank screen, or you see a login prompt but after logging in see nothing but a blank screen then restore the original boot.ini, if you are working with a C1+, and prepare to work in front of the TV. Double check your boot.ini is reset back to the original and see if you can get to the MATE desktop using this approach. Note that this device isn't being configured as a secure Linux box. Although you can do that if you want we won't cover it here.
Figure 5
Software Updates, Partition Sizes, and More
First, let's get rid of that pesky login prompt. If your device has USB trouble on boot up just power cycle it. I would say though to use the software control buttons once things are all setup and never use the hardware power button unless you are turning it back on again. For the remainder of the tutorial we expect that you'll have a keyboard and mouse hooked up to the device. If you go to the following menu location Applications -> System Tools -> MATE Terminal it will open up a terminal window for you.
Figure 6
We're going to run a series of commands at the terminal now, listed below.. Some do take a while to run but you may have to sit near the screen in case you're prompted by an install. It stinks coming back to a process you thought would finish by itself and see a dialog popped up asking for your input! What we are doing here is setting up auto login, updating Ubuntu, and installing some packages.
Type this command or copy and paste it into the terminal window.
You'll be prompted for the password, use “odroid”. You will see some text like this in the file:
[Seat:*]
greeter-session=lightdm-gtk-greeter
You're going to add a line at the bottom, autologin-user=odroid, and then save and close the file. Press Crtl+O then hit enter to save the file. Press Ctrl+X then press enter to exit the editor. You won't be prompted to login on the next reboot.
Next up we'll be running updates on the OS packages and installing a few things. This part takes a little while but for the most part it runs by itself. Enter in and run each of these commands in the order shown below from the terminal window.
$ sudo apt-get update -y
If you get a boot.ini prompt for this, command just hit Enter. This command takes a little while.
Now that all of that is done running, the system is starting to shape up a bit. The next thing we want to do is turn off any swap space the OS is using. The conventional wisdom is that swap partitions will degrade the SD card which I think are rated for some number of read/write operations before they begin to fail. So far I've been disabling them without a noticeable performance hit. Run the following command at the terminal.
$ swapon -s
If you see output similar to the following, you have zram enabled. Follow the steps below to turn it off and remove it.
We want to disable these to make sure our SD card lasts as long as it can. Whatever performance increase, or decrease, they cause hasn't been noticeable by me but I don't want the extra read/write operations. So let's run the following command. I believe that the C1+ I does not have a swap partition by default.
$ sudo apt-get remove --purge zram-config -y
If you notice a standard swap partition listed, type the following command to remove standard swap partitions:
$ swapoff -a
This will immediately disable swap on the system. Next remove any swap entries from /etc/fstab by editing the file as root and commenting out any swap partition entries. Reboot the system. If, for some reason, the swap partition is still there open gparted, System -> Administration -> GParted. Locate the partition in the list of active partitions and unmount, then delete the partition.
Next, we're going to run a MATE software update by navigating to System -> Administration -> Software Update in the menu system. Note that if you are asked to perform a partial update then skip this step we'll run with the packages we have installed. I've noticed that in some cases the packages can get a little wonky. I would only proceed with an update if no Partial Update dialog pops up.
If it is not a partial update prompt, click the Update button, wait a little while it slowly turns into a progress bar dialog and perform the updates. At the end of the process you will be prompted to restart the system. Hit Restart.
Figure 7
Notice the no-login prompt when the system started up. Looking more and more like a retro gaming console by the minute. Ok last thing we're going to do is resize the main partition to use all the available space. If you go to System -> Administration -> GParted in the menu system you should see something like what's depicted below. Notice that there is something like 50GB of unused space. If you have little to no unused space but still have room on the SD card you need to resize your root partition.
Figure 8
I'll give you a quick rundown of the process. Note that you may not need to do this, but you should double check anyway. The best way to work with an ext4 file system is on our C1+ or C2. Use the second SD card that comes with the recommended purchase listed on the hardware build. Write the base OS image onto the SD like we did above and install gparted, also like we did above. You don't have to run all the updates and stuff just make sure gparted is installed. Use the SD to USB adapter listed above to mount the SD card that we want to resize partitions for onto the OS. You should see a little drive icon appear, we'll call this SD-USB for SD to USB.
Fire up the bare bones Ubuntu SD card if you haven't already. Start gparted from the menu System -> Administration -> GParted and select the SD-USB card attached not the root file system running Ubuntu.
Figure 9
Select the root file system on the SD-USB card. Right click on it and go to the resize option if you get an error you may need to unmount this partition and then try to resize it. You can visually resize the partition now by dragging the arrow all the way to the right or by setting the fields contained in the form to have 0 free space following. Bam! We're done with this section.
Figure 10
Retroarch and Antimicro Installation
Now, let's get Retroarch and Antimicro installed so we can begin the configuration process. To install Retroarch we need to open a terminal, Applications -> System Tools -> MATE Terminal.
Try the command above on the C1+ and C2, hit enter if prompted, and Y if prompted. If it fails don't worry. I noticed it fails on the C2 but I'm not sure about the C1+ no worries though the *'s in the package lists are the culprit. It's pulling down some packages that have dependency issues and that is then halting the whole command. If it failed try running this command instead.
If one of these packages fail, remove it from the list and try again. The command above is the exact command I use on my C2's. After that's done let's do a little updating and cleaning.
Now you should have this menu option available after the commands are done running, Applications -> Games -> Retroarch. Click on it and you should see something similar to what's depicted below.
Figure 11
We're almost there! Don't mess with Retroarch yet; we'll come back to it. Next we have to get Cntimicro installed so we can control everything with a gamepad when Retroarch isn't running. Go to https://github.com/AntiMicro/antimicro/releases and download the latest release as a zip file. You should see it below the Windows EXE entries. Once it is done downloading open the odroid home folder. There is a link on the desktop for it. Create a new folder called install_zips as depicted below.
Figure 12
Now go to the downloads folder and copy the Antimicro zip file from there and paste into the install_zips folder. Right click on it and select Extract Here. Wait for it to uncompress.
Figure 13
Now open up a terminal, Applications -> System Tools -> MATE Terminal, and run the following commands. If your Antimicro folder, after decompressing the original zip archive, has a different name use that name in the change directory command below.
Once all those packages are installed we can compile Antimicro without any errors:
$ cmake .
$ sudo make
$ sudo make install
You should see something like Figure 14 following during this process. Once that's done let's test Antimicro, run Antimicro at the terminal. If everything is ok you should see something like what is depicted in Figure 15.
Figure 14
Figure 15
Plug in a game controller that is supported by Linux. Hardkernel has the best price I've seen so if you pick up some ODROID-GOs or other hardware grab one of these GameSir Wired Controllers. Fire up Retroarch (Applications -> Games -> RetroArch), and you should see large yellow text flash across the bottom of the screen, look closely. I've had some versions of the controller act a bit weird but I've been working with about 5 of them and for the most part I've had no problems. Close Retroarch, and type into the terminal window the antimicro command. You should see something similar to what's depicted below if the controller is detected properly.
Figure 16
Retroarch and Antimicro Configuration
Let's get Antimicro configured so we can start controlling the desktop environment with the gamepad. Open up a terminal, I'll not list the menu path for it from this point forward. Type Antimicro in the terminal and wait for the app to launch. Connect your Linux-supported controller and make sure that Antimicro recognizes it. If it doesn't, you'll need to try another controller. Click the Controller Mapping button on the bottom left hand corner of the UI. This is where you tell Antimicro about the base functionality of your controller. If you don't have a button for a specific position in the list, for instance Linux seems to ignore the blue central button on the GameSir controllers, use your mouse to click down to the next viable option. Match up the buttons on the gamepad with the controller graphic's green button indicator. Note that some buttons like triggers fire multiple times, and you'll have to use the mouse to back up the position of the mapping and fix the double entry. Click save when you are done and return to the main Antimicro UI.
Figure 17
You will see a new mapping on the main Antimicro UI that contains buttons for all the new mappings you just made. What we are going to do here is setup mouse support so that you can control the desktop environment from the gamepad when Retroarch isn't running. We'll use the left thumbstick for fine, slower, mouse control and the right thumbstick for faster mouse control. The A and B buttons will serve as the left and right mouse buttons. Right click on the left thumbstick area and select mouse normal from the option list.
Figure 18
Click on the left thumbstick buttons again and find the Mouse Settings button at the bottom of the window. The image above shows the button we're looking for. In the mouse settings window set the Horizontal Speed and Vertical Speed to 10 for the left thumbstick as depicted in Figure 19.
Figure 19
Do the same thing for the right thumbstick except now set the Horizontal Speed and Vertical Speed to 30 as shown in Figure 20.
Figure 20
Now let's map the mouse buttons. Close all dialogs and get back to the main Antimicro UI. Find the A button in the button list below the thumbstick and dpad listing. Click on it then click on the Mouse tab. Select the left mouse button. Do the same thing for the B button except choose the right mouse button for that mapping. Below is a screen shot depicting the left mouse button mapping in action.
Figure 21
Figure 22
Take it for a spin while the main Antimicro UI is open. You should see the mouse move around the screen as the button listings in the Antimicro UI turn blue to indicate they are active. See how it feels, adjust the speeds on the mouse controls as you see fit.
Figure 23
When you're all set, go back to the Antimicro main UI and click the Save As button at the top right hand side of the screen. Save the controller configuration as game_sir_wired.xml or whatever you want to name your controller in the odroid home directory as shown below. I'll provide a copy of my XML file here if you are using a GameSir controller, so you can just use it and save some time. If you are using an Easy SMX controller, use this file.
Figure 24
Click on Options -> Settings in the Antimicro menu and make sure only Close To Tray and Launch In Tray are checked. This will ensure Antimicro lives in the app tray and doesn't clutter up our screen. We have one more setting to adjust and then we'll be done with Antimicro and on to Retroarch!
Figure 25
While still on the Antimicro setting window, click on the Auto Profile option on the left. This will determine what profile will automatically be associated with the attached gamepad. You only get one mapping. It would be cool if it had different options for different hardware, but as far as I can tell you're setting it up for the controller you have. Click the Active checkbox at the top of the window. Then select the default (and only) row in the table. Click the Edit button and browse to the controller mapping XML file you saved just a few steps back. Click Ok then quit out of Antimicro, if it appears in the system try click the controller icon in the system tray and quit the app. Now we are done with the Antimicro configuration!
Figure 26
Figure 27
Figure 28
Next up let's get the Retroarch completed. Fire up Retroarch from the menu system. First, let's get the gamepad working in Retroarch. In Retroarch you can use the keyboard arrow keys, enter, and backspace to navigate the menu system without the gamepad. Make sure you have a mouse, keyboard, and game controller connected to your ODROID. Use the arrows on the keyboard to navigate right to the Settings section, then move down to the Input section as shown below.
Figure 29
Adjust the settings on this screen as you see below. I usually set the max number of controllers to 4 since there are 4 USB ports. And I like the "L1 + R1 + Start + Select" Menu Toggle Gamepad Combo setting, let's face it if you're accidentally hitting this combination during game play something isn’t right. Leave the remaining settings and scroll down to the User 1 Binds. You'll have to setup each user input in this way it's not too bad only takes a minute. Tip: Map the A and B buttons by name not position if you are using a GameSir controller that way the colors green and red map to positive/select, negative/back button usage. It's just what I like to do you can map em anyway you like! Or you can set the Menu Swap OK & Cancel Buttons, whatever works.
Figure 30
Figure 31
The next step takes a little while but requires very little work on your part. You just have to click on a few things and wait for them to complete. Navigate back to the Main Menu which is the first section Retroarch starts on. Make sure you are connected to the Internet. Scroll down to the Content Updater and open that section.
Figure 32
I usually run each option in order. Try the Core Updater option first. Tip: You may have to start Retroarch from the terminal like so sudo Retroarch when updating core files. If you run Retroarch with a -v for verbose output and you see an error message during the Core Update command's execution then you should close Retroarch and relaunch it with the sudo command.
Next go to the Thumbnails Updater, this part can take a while, and select each system you plan to load ROMs from one at a time. Resist the urge to click a bunch in a row. I've done that and it can crash the app at the worst and at the least it slows down each individual process as they are all competing for resources. Best to let one blast through then move on. Tip: There are some one-off games you can get thumbnails for here like DOOM Demo, Cave Story, and Dinothawr. You'll be able to load those games from the Content Downloader.
Figure 33
Now, you'll want to back out of the Thumbnail Updater section with the backspace key. Scroll down to the Content Downloader and download any special content you want from the listing. Tip: If you see a screen that has no options wait a minute back out and go into that section again it just didn't finish downloading the index of available options. I usually don't install the one-off games but this is the spot for it. Most of the content I think you can safely ignore but I'll leave that up to you. Run the following list of other updates one at a time, basically everything remaining on the list.
Update Core Info Files
Update Assets
Update Joypad Profiles
Update Cheats
Update Databases
Update Overlays
Update GLSL Shaders
Update Slang Shaders
Close Retroarch when the update steps are complete. Next, let's load some ROMs. I own a copy of Contra for the NES and I have a version of it in ROM form. Open the odroid home folder using the link on the desktop. Right click in the folder and create a new directory, name it ROMS. Open the ROMS folder and create a new folder and name it NES. Obviously you would substitute the NES folder for whatever system you intend to load ROMs for. Not every single system is supported and some emulators have little caveats like bios files that need to be copied in etc. Many of the older systems are well supported and straight forward. The C1+ can probably handle SNES and Genesis but I just like to use it for 8bit games. The C2 certainly has enough power for 16bit systems and I like to use it for 8bit, 16bit, and all of the handheld systems
Figure 34
Once you have all your ROMs placed in the ROMS folder in their own separate folders for each system, this is the best way to do it, we can start telling Retroarch about the files. Fire up Retroarch and scroll to the right until you see the Scan Directory option.
Figure 35
Navigate to the ROMS folder, which should be in the list. Then select one system at a time for scanning. Scanning large ROM sets can take a while. Again resist the urge to start multiple scans things will go smoother if you let an operation complete before starting a new one. In this case we only have one ROM, Contra, so it will complete the scan instantly.
Figure 36
Back out of the Scan Directory section and you should now see a little NES controller on the section listing. Scroll to it and now you should see Contra, or whatever ROMS you were trying to load. Load up a game by selecting it and then selecting a target emulator. Your game should load up just fine in almost all cases.
Figure 37
Figure 38
Figure 39
Retroarch won't recognize every single ROM for every single system. You may also want to try different emulators on troublesome ROMs. That's more advanced stuff and I'll cover that in the next tutorial where we wrap everything up and put a nice bow on it. Congrats you built the hardware and now you configured the software and you can play some games. Take your time loading up ROMs I'll write up the last little bit in tutorial 3 where we really make your game console pop! For comments, questions and suggestions, please visit the original article at http://middlemind.com/tutorials/odroid_go/mr1_build_sw.html.
An Excellent, Low-Cost Web Server: Using the ODROID-N2 For Internet Hosting
August 6, 2019By Robbie FergusonLinux, ODROID-N2, Tutorial
As the developer of NEMS Linux, I’m always eager to try new boards that promise high performance and stability in the server room. Since NEMS is, itself, a headless server distro, I count it as an advantage that I do not need to deal with GPU drivers or desktop performance. What matters to me and my users is a lot different than what matters to an end user hoping for a desktop replacement powered by a single board computer.
It’s a bit of a revelation for me as I endeavor to provide a benchmark-based comparison–https://gigglescore.com/–to allow users to more easily figure out which board is the best value for the money. I had the opportunity to speak with @meveric when the ODROID-N2 was first released, and I must say I don’t envy how he and other desktop distro developers have to configure the graphic stack. They work hard to provide a good out-of-the-box user experience, and it cannot be easy. When I spoke with him, ODROID-N2 development was still at quite an early stage, and the lack of X11 drivers for the Mali-G52 GPU posed an interesting challenge. On the server distros I build I don’t have to deal with any of that, and the ODROID-N2 makes an excellent little solid-state server. Use case really does matter; a board that performs perfectly for NEMS Linux or other server-based distros may not be the same board that makes a great media center or daily driver. That’s why it’s so difficult to base purchase decisions on benchmarks alone and why Giggle Scores don’t always paint the complete picture.
It is within this context that I looked at the ODROID-N2 this month. I’d like to try it in a use-case where I feel it fits quite snugly; as a high-performance SBC web server.
The ODROID-N2 has a total of 6 cores consisting of a quad-core ARM Cortex-A73 and a dual core ARM Cortex-A53. It also features Gigabit Ethernet and up to 4 GB RAM.
Using Category5.TV SBC Benchmark v2.2 from https://github.com/Cat5TV/cat5tv-sbctest and a USD price for the ODROID-N2 of $79, my single test board running my Debian Buster base image reports as follows:
That’s slightly better than the average from https://gigglescore.com which reports the ODROID-N2 with a Ģv2 of 1304 (multithreaded), keeping in mind that a lower Giggle Score means better value (measured by multithreaded performance) for the price. Of course, my test above takes place on a vanilla Debian Buster install, so the numbers are true to an ODROID-N2 that is otherwise doing nothing. But even still, the ODROID-N2 presently demonstrates the best overall performance on GiggleScore.com and as a single board computer-based web server, the ODROID-N2 looks like a prime choice. Let’s build our own, and put it to the test.
First of all, keep in mind I’m starting with the Bald Nerd Base Image. This is Debian Buster, so no hackiness is required to get PHP 7.3 working. Our LAMP stack will include Apache2, PHP 7.3 with some helpful plugins, and ModSecurity 2.
You can login to your ODROID-N2 either with a connected keyboard and TV, or from another computer on your network over SSH. The default login and password for my base image is “baldnerd”.
There are five things we need to do at first boot:
1) Check to ensure your SD card/eMMC (/) resized correctly:
df -h
2) Check your date/time is correct, and fix if not:
date
3) Create a Linux user account with root privileges. Here I’ll create a user called ‘robbie’ and give him sudo access. Just change ‘robbie’ to whatever you’d like your user to be.
4) Logout of your ODROID-N2 and log back in as robbie (or whatever your username is). Do not login as baldnerd anymore.
5) Delete the default user account:
If you’ve installed mariadb-server in the past, you may remember that the installation procedure used to ask for a root password during installation. This has been removed. You must instead run a post-install application to set your root user and grant yourself root access to your MySQL database server.
$ sudo mysql_secure_installation
Hit enter when asked for the existing MySQL root password, since one doesn’t exist yet, and then follow the prompts to add a new root password. Remember what this password is and keep it safe. Be sure to say ‘yes’ to every question you’re asked to help harden your MySQL server by removing some of the sample data and accounts.
Give your user account access to editing the files
Remember to replace ‘robbie’ with your username.
That’s it! Your web server is now running, and you can access it by visiting the IP address of your ODROID-N2 in a browser on any computer on your network. Files for the server are located in /var/www/html and owned by your user, and you already know the MySQL credentials. Access to MySQL is restricted to localhost, so for ease of use I’d recommend either using the mysql command line to create your MySQL users and databases, or adding phpMyAdmin and activating it only when needed, disabling it when you’re not using it. Remember that since SSH is active on the image, you can easily create files in /var/www/html, or use SFTP in Filezilla Client to move files back and forth from your computer.
And now, on with the benchmarks
Your server is ready to go, but benchmarks can be fun in a case like this. Maybe it’s my memories of giant 4U servers from my younger years in IT that have me excited about single board computers in the data center, but whatever it is, I’m impressed to see how well an ODROID-N2 performs in this role. You don’t personally need to perform these tests if you don’t want to–your work is done–but this article wouldn’t be complete without my own results.
My benchmarks below are very task-specific, focused entirely on using the ODROID-N2 as a web server. If you crave more or want a wider picture, check out the June 2019 issue of ODROID Magazine where Michael Larabel from Phoronix.com and Carlos Eduardo both provide their take on ODROID-N2 benchmark performance.
Now that we have Apache up and running, let’s benchmark it with Siege, the HTTP regression testing and benchmarking utility. I haven’t added a web site yet, so really we’re just testing the responsiveness of the static “It Works” page, but the results are still important to me. I recommend you put your site in /var/www/html and run the same benchmark to see how well your site performs. For this benchmark, we’ll do a load test with 50 simultaneous connections.
robbie@debian:/home/robbie# siege -c50 -d10 -t3M http://localhost/
New configuration template added to /root/.siege
Run siege -C to view the current settings in that file
** SIEGE 4.0.4
** Preparing 50 concurrent users for battle.
The server is now under siege...
Lifting the server siege...
Transactions:                   3540 hits
Availability:                 100.00 %
Elapsed time:                 179.16 secs
Data transferred:              14.85 MB
Response time:                  0.01 secs
Transaction rate:              19.76 trans/sec
Throughput:                     0.08 MB/sec
Concurrency:                    0.12
Successful transactions:        3540
Failed transactions:               0
Longest transaction:            0.20
Shortest transaction:           0.00
With every hit seeing a response in an average of 0.01 seconds, I’m really quite thrilled with this result. Most SMBs won’t see 50 simultaneous users on their website. Here, we generated 3,540 hits in 3 minutes.
Test the performance of MariaDB
Our MySQL server (MariaDB) is up and running thanks to the steps taken above. To test the performance of the database, I’ll use sysbench via the helpful mysql-benchmark.sh script that comes as part of my cat5tv-sbctest package on GitHub. I won’t go into how that works here, since those who are interested can look at the source code of the simple bash script. Suffice it to say, it compiles sysbench 1.0.17, creates 1 million MySQL entries, and benchmarks the performance of the database for 1 minute.
Here are my results:
Performing MySQL Benchmark: sysbench 1.0.17 (using bundled LuaJIT 2.1.0-beta2)

Creating table 'sbtest1'...
Inserting 1000000 records into 'sbtest1'
Creating a secondary index on 'sbtest1'...
sysbench 1.0.17 (using bundled LuaJIT 2.1.0-beta2)

Running the test with following options:
Number of threads: 8
Initializing random number generator from current time

Initializing worker threads...

Threads started!

SQL statistics:
    queries performed:
        read:                            35504
        write:                           10144
        other:                           5072
        total:                           50720
    transactions:                        2536   (40.83 per sec.)
    queries:                             50720  (816.58 per sec.)
    ignored errors:                      0      (0.00 per sec.)
    reconnects:                          0      (0.00 per sec.)

General statistics:
    total time:                          62.1083s
    total number of events:              2536

Latency (ms):
         min:                                   11.15
         avg:                                  194.09
         max:                                 4760.50
         95th percentile:                      846.57
         sum:                               492217.74

Threads fairness:
    events (avg/stddev):           317.0000/3.12
    execution time (avg/stddev):   61.5272/0.74
All of my queries were successful, and we performed a rather impressive 816.58 queries per second. This little guy will handle WordPress just fine! Remember, this is a single board computer that uses very little electricity, generates very little heat in the server room, and costs $79 USD. I’m impressed. If you’re looking for an affordable SBC-powered web server, whether for development, testing or production, the ODROID-N2 is ready to go and has enough power to serve your projects.
About the Author
Robbie Ferguson is the host of Category5 Technology TV and author of NEMS Linux. His TV show is found at https://category5.tv/ and his blog is https://baldnerd.com/. Robbie’s project, NEMS Linux is available for the ODROID-N2. Download the ready-to-boot Nagios Enterprise Monitoring Server distro from https://nemslinux.com/
Building an ODROID-N2 Cluster: Affordable High Performance Computing
August 6, 2019By Bhaskar S (www.polarsparc.com)Linux, ODROID-N2, Tutorial
In the article Building an ODROID-XU4 Cluster, we laid out the ingredients to build a 5-node home lab cluster using the powerful 32-bit ODROID-XU4. As was indicated, the ODROID-XU4 sports a powerful octa-core Samsung Exynos5422 ARM CPU with two sets of quad-cores, referred to as the big.LITTLE, with Cortex A15 running at 2 Ghz and Cortex A7 running at 1.4 Ghz. It has enough horsepower to run Linux and serve as a mini-development cluster. However, the ODROID-XU4 is a 32-bit SBC with 2GB of LPDDR3 PoP memory.
In my quest for a true 64-bit quad-core SBC with each core close to 2 Ghz and with at least 4GB of RAM, I came upon this newly released beauty called ODROID-N2 (4GB RAM). It sports a powerful hex-core ARM-based Amlogic 922X CPU with two sets of cores, also referred to as the big.LITTLE, with a quad-core Cortex A73 running at 1.8 Ghz and a dual-core Cortex A53 running at 1.9 Ghz. In addition, it comes with a *HUGE* heatsink mounted on the bottom, where the CPU is located. It is available in two configurations, one with 2GB of DDR4 RAM and the other with 4GB of DDR4 RAM (running at 1320 Mhz). It has 4 USB 3.0 ports and a 1Gb Ethernet port.
The following are the necessary items needed to build a 5-node ODROID-N2 cluster:
Five ODROID-N2 4GB single-board computers
Five 12V/2A power adapters
Five Class 10 64 GB microSDXC cards
Five Ethernet network cables
One pack of M3 60mm male-female brass spacers
One pack of M3 12mm male-female brass spacers
One pack of M3 6mm phillips head steel screws
One Multi-port Ethernet switch (if your home network switch does not have enough available ports). In my case, I did not need one since have a 24-port Ethernet Switch with enough of free ports to use.
One Portable USB card reader, if your desktop does not have a built-in media card reader. In my case, did not need one since my desktop has a built-in media card reader
One Belkin BE112230-08 12-outlet power strip
We need to firmly secure the ODROID-N2 onto a solid, flat platform, which can be stacked on top of one another. In my case, a trip to the local Dollar Tree yielded an interesting option - 12.5 cm x 12.5 cm Square clear plastic artsy tray. For my cluster, I purchased 5 of these.
The next stage is to assemble the items to build the 5-node ODROID-N2 cluster. The ODROID-N2 is a bit unique in its design. Unlike the ODROID-XU4, there are no holes on the SBC to easily stack them up on top of one another. This is due to the heatsink that occupies the entire bottom of the SBC. However, the heatsink has holes to screw the 12mm M3 brass spacers on to the 4 sides as shown in the illustration below.
Figure 1 - Screw locations
Continue this assembly process for the remaining units. We need to drill 4 holes (red circles) to secure each SBC. Ensure the holes align with the four M3 12mm spacers we bolted onto the SBC in Figure 1. In addition, we need another 4 holes (blue circles) on the corners of the plastic tray for stacking the trays on top of one another as shown in the illustration below:
Figure 2 - The 8 Drilled Holes
Continue this process for the remaining units. We need to secure the ODROID-N2 on top of the clear plastic tray using the M3 6mm screws through the 4 holes (red circles) from Figure 2 above as shown in the illustration below:
Figure 3 - ODROID-N2 mounted to plastic board, ‘hello pineapple!’
Again, continue this process for the remaining units. Insert the 12mm M3 brass spacers through the 4 holes (blue circles) from Figure 2 above and screw them on top with the 60mm M3 brass spacers as shown in the illustration below:
Figure 4 - Now with the spacers added
This is for only one of the units that will be at the base of the stack. Stack the next plastic tray with the SBC from Figure 3 on top of the unit from Figure 4 and screw them on top with the 60mm M3 brass spacers as shown in the illustration below:
Figure 5 - two ODROID-N2 stacked together
Do the same for the remaining units. For the topmost tray, secure with the 12mm M3 spacers.
Figure 6 - A final finished cluster rack
Next, download the latest stable release of Ubuntu MATE Linux operating system, based on Ubuntu Bionic 18.04, as shown in the illustration below:
Figure 7 - Download location for Ubuntu for the ODROID-N2
At the time of this writing, the most recent version of Ubuntu MATE was 20190325. Download the latest stable release of Etcher. This tool will be used to burn the operating system image onto each of the microSDXC cards. Insert a microSDXC card into the sd card reader, launch Etcher, select the Ubuntu MATE image. Then press the Flash! button to burn the image onto the microSDXC card as shown in the illustration below:
Figure 8 - Screenshot of setting up Etcher to flash the SD with the OS
Insert each of the flashed microSDXC cards into the ODROID-N2 SD card slot and ensure the toggle switch on the ODROID-N2 is positioned at MMC instead of SPI as shown in the following figure:
Figure 9 - Location of SD slot and setting the boot switch
The final stage is to prepare each of the ODROID-N2 nodes for operation. Note, we want to connect, power-up, and setup each of the ODROID-N2 boards, one at a time. Attach the barrel end of the power adapter to the power slot on ODROID-N2 and plug the other end to the power strip. Similarly, attached one of the Ethernet cables to the RJ45 slot on ODROID-N2 and the other end to the Ethernet Switch as shown in the illustration below:
Figure 10 - Ethernet cables attached to the cluster
Connect an HDMI monitor to the ODROID-N2 using HDMI and power up the power strip. The ODROID-N2 should take a few seconds to boot up and after a few seconds would completely power-off. This is the normal behavior. Turn off the power strip and turn it back on. In a few seconds, we will be presented with the Ubuntu MATE desktop. The default user-id is odroid and the default password is odroid.
Change the default password to a stronger and more secure password by clicking on the Ubuntu menu on the top-left corner and choosing Control Center from the drop-down. On the Control Center screen, click on Users and Groups icon to change the default user password.
Change the default date/time/timezone to the desired value by clicking on the Ubuntu menu on the top-left corner and choosing Control Center from the drop-down. On the Control Center screen, click on Time and Date icon to change the date/time/timezone.
Open a terminal window by clicking on the Ubuntu menu top-left corner and selecting System Tools -> MATE Terminal from the drop-down. In the terminal window, execute the following command:
$ sudo pluma /etc/ssh/sshd_config
Change the value of PermitRootLogin from yes to no. Save the changes and exit the editor.
We need to assign a unique host-name for each of the ODROID-N2 boards in the cluster. In the same terminal window, execute the following command:
$ sudo pluma /etc/hostname
Change the host-name to, say, my-n2-1. Save the changes and exit the editor. For each of the remaining 4 cards we will assign the host-names from my-n2-2 through my-n2-5.
We also need to assign a static IP address to each of the ODROID-N2 boards in the cluster. Click on the Ubuntu menu on the top-left corner and choose Control Center from the drop-down. On the Control Center screen, click on Network Connections icon. Choose Wired connection 1 from the menu list and click on the edit icon at the bottom left corner (gear wheel icon). Select the tab labeled IPv4 Settings. Choose the value of Manual for the Method. Set the ip address to, say, 192.168.1.51, network to 255.255.255.0, and the gateway to 192.168.1.1. Finally, set the value for DNS Servers to 8.8.8.8,8.8.4.4. Save the changes by clicking on the Save button. For each of the remaining 4 cards, we will assign the static IP addresses from 192.168.1.52 through 192.168.1.55.
Finally, we need to perform a system update to ensure we have the latest software updates. Click on the Ubuntu menu on the top-left corner and choose Control Center from the drop-down. On the Control Center screen, click on Software Updater icon to perform the system update.
The last step is to perform a reboot for all of the changes to take effect. In the terminal window, execute the following command:
$ reboot
This will safely reboot the ODROID-N2 device.
Perform the above steps for each of the remaining ODROID-N2 devices. Note that as we reboot each of the remaining ODROID-N2 cards, they each will get a different ip address assigned. At this point, we should have our ODROID-N2 cluster ready for action. For comments, questions and suggestions, please visit the original article at https://www.polarsparc.com/xhtml/N2-Cluster.html.