4U Bayou: Using Your ODROID-GO for Scientific Research
March 1, 2019By Dave ProchnowODROID-GO, Tinkering, Tutorial
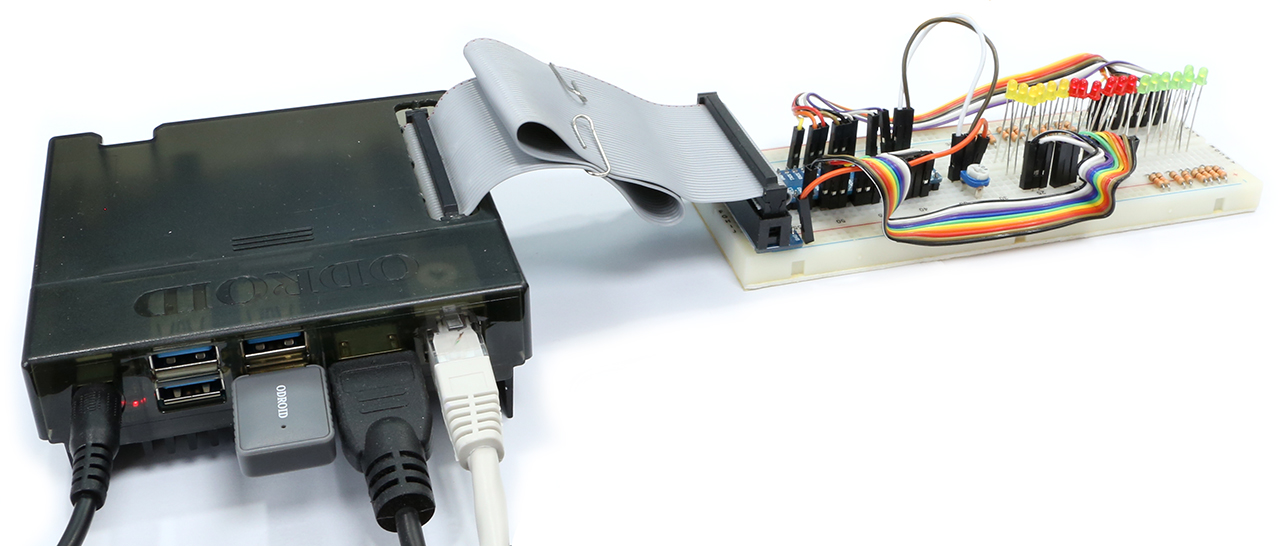
When you’ve finished fraggin’ the DOOM world into pieces, how about saving the real world around you? It’s easy, and you get to use your favorite portable game machine. Yes, that’s right; with just a couple of simple modifications to your beloved ODROID-GO, you can become an environment-saving superhero (see Figure 1).
So, go ahead and build the stock portable gaming handheld kit exactly according to the online assembly instructions in the ODROID Wiki (http://wiki.odroid.com). Then get ready to mod your ODROID-GO and get out there and attack an environmental issue. Don’t worry, you can easily get back to making hamburgers with ColecoVision BurgerTime after you’ve saved the world.
Figure 1 - A logo that you can use for this project
What You’ll Need
ODROID-GO, assembled
ODROID Weather Board 2
6-pin right angle header (www.sparkfun.com #PRT-00553 40-pin break-away male headers–right angle; $1.95)
3 zipper-sealing sandwich bags
1m (3.28’) of wire/cord/rope/twine
Two smart device apps:
Google Science Journal
Vernier Graphical Analysis
A local waterway, like the bayou in Figure 2, to be used for taking your scientific measurements
Figure 2 - This is our project site—a coastal Mississippi bayou
Step-by-Step Instruction
1. Assemble your ODROID-GO by following the ODROID Wiki instructions. You do not have to modify the handheld’s hardware.
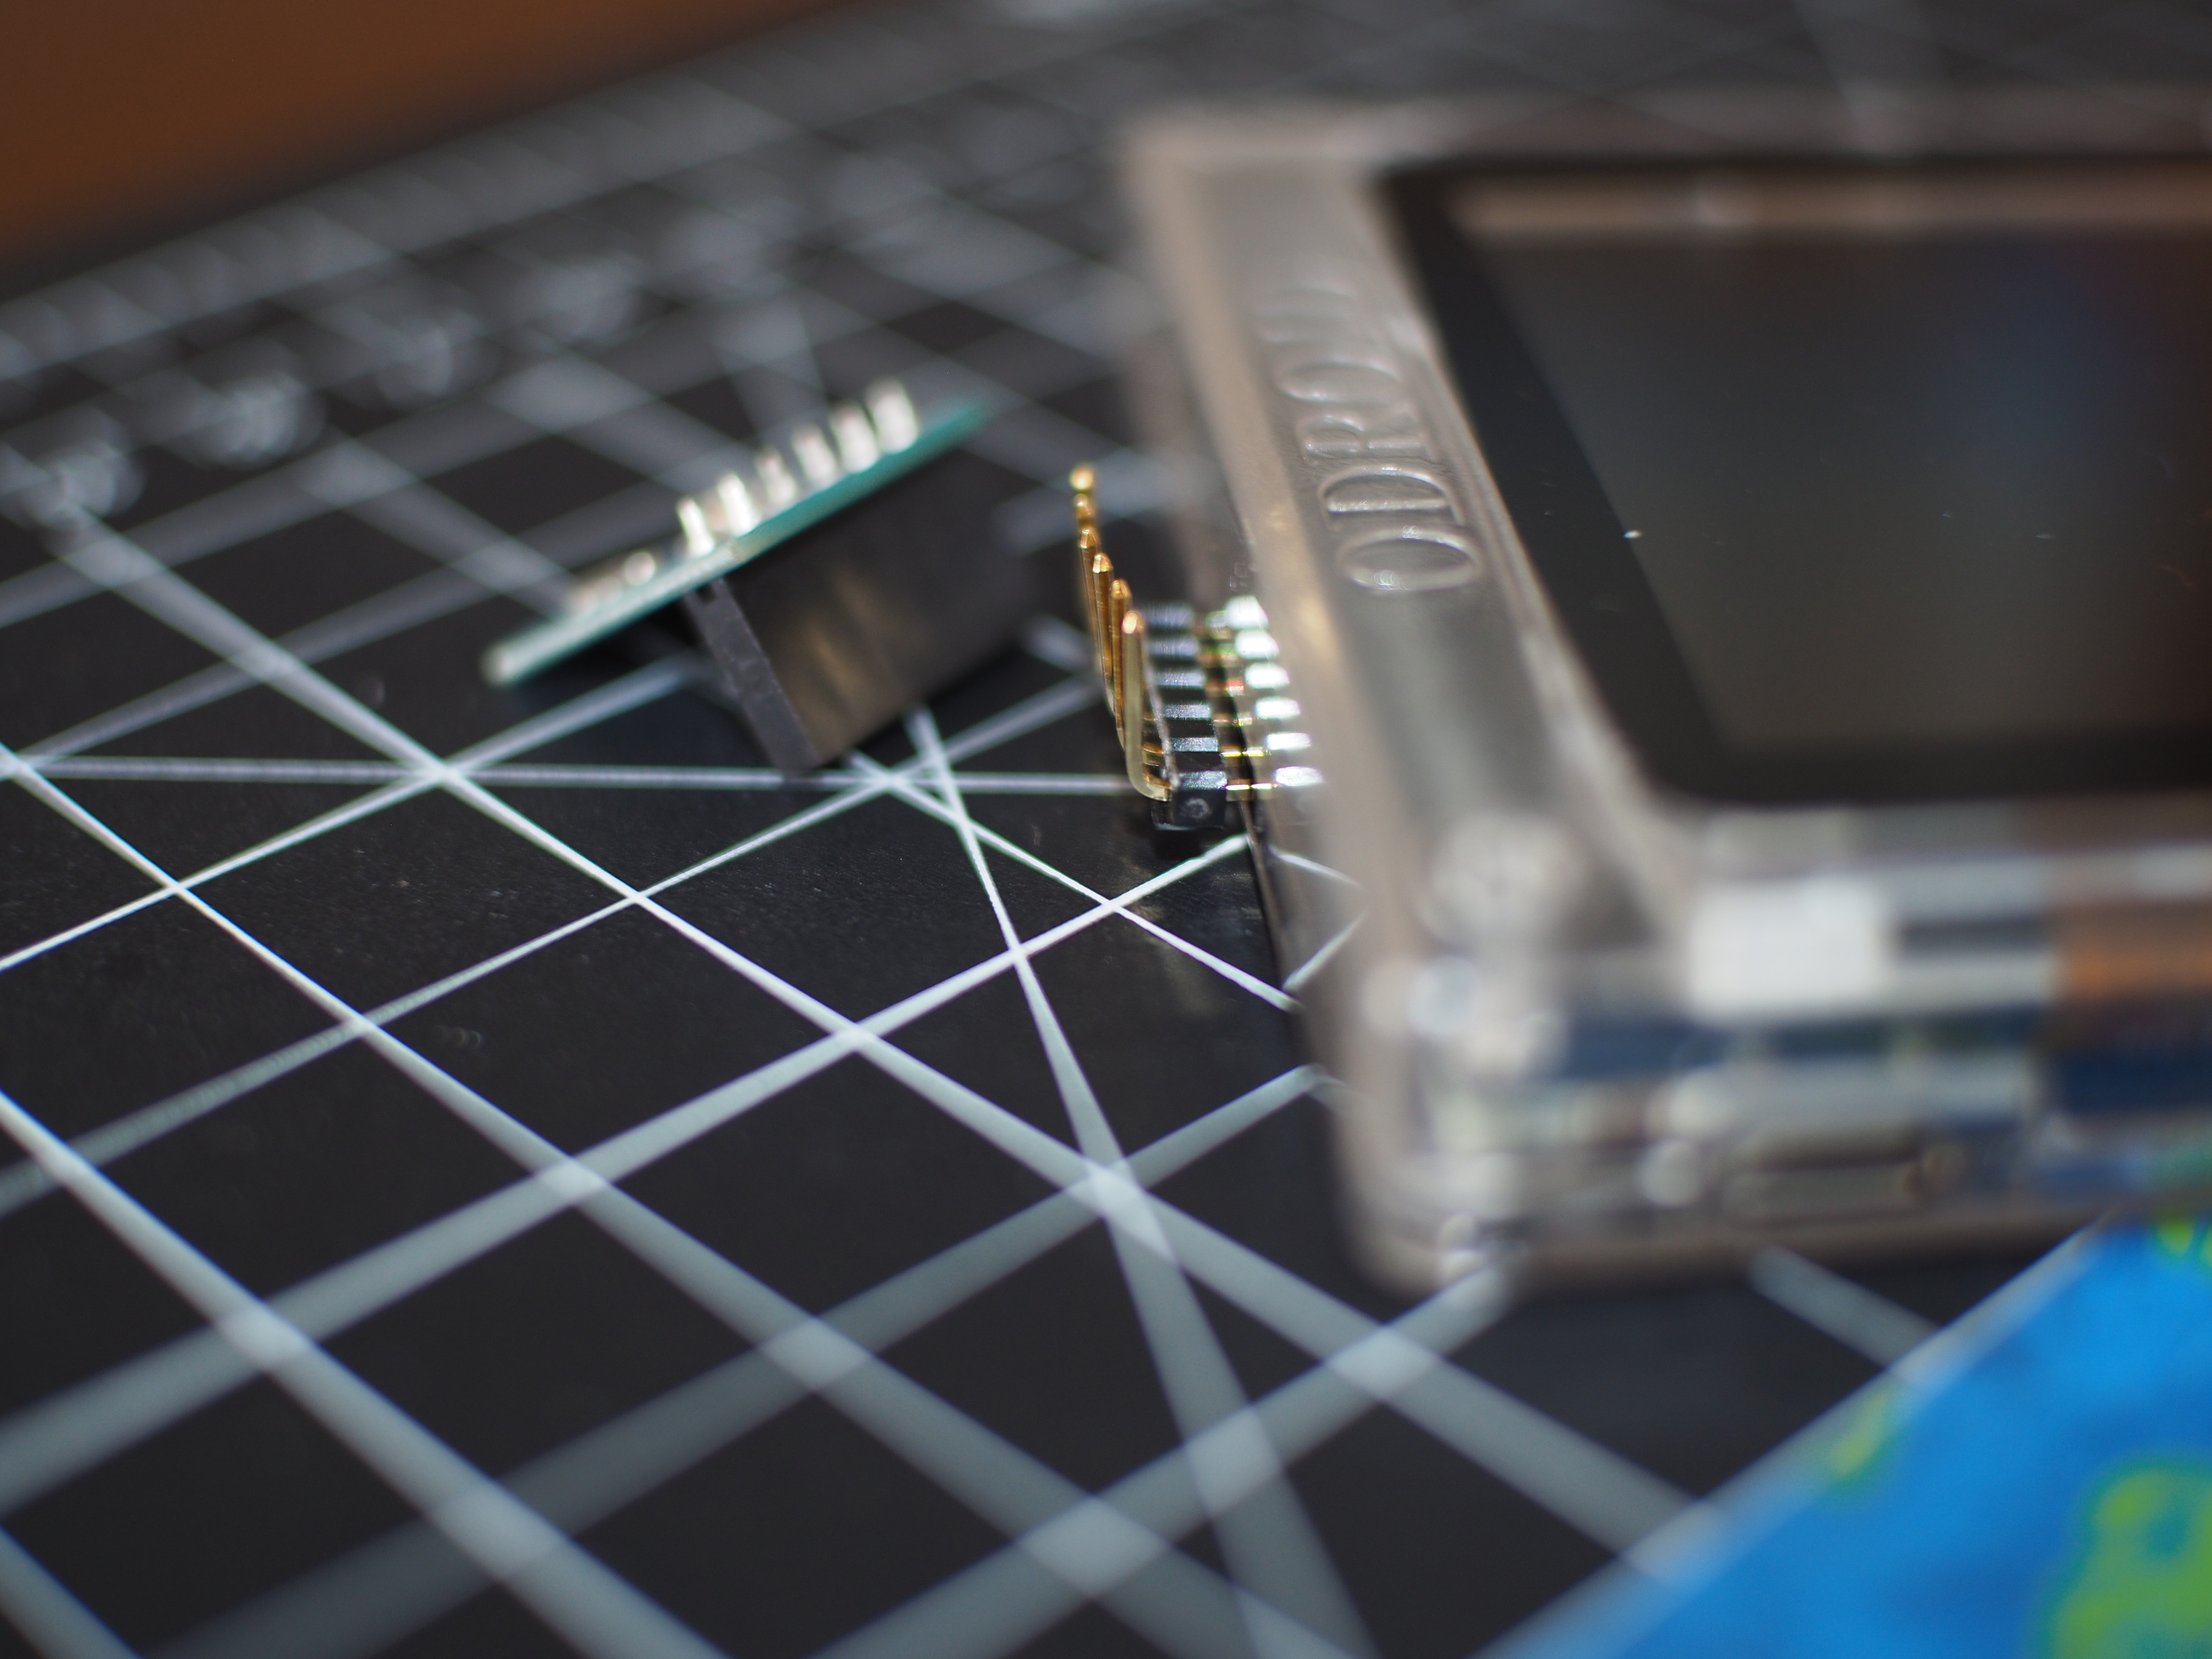
2. Take the 40-pin break-away male header and snap off a six-pin length. Insert this header into the six, furthest right--looking down from the top--general purpose input/output (GPIO) pins (1-6). These pins can be found along the upper edge of the ODROID-GO case. After installation, ensure that the pins are pointing upwards as in Figure 3.
Figure 3 - The proper orientation for the right-angle header
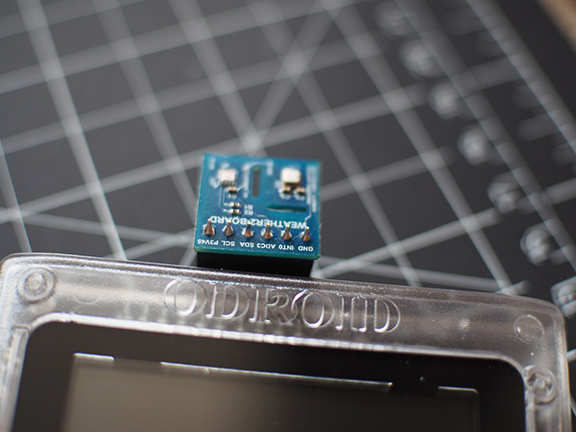
3. Carefully connect the Weather Board 2 to these header pins.
WARNING: Be absolutely certain that the Weather Board 2 is facing upright and pointed AWAY from the ODROID-GO case. When properly inserted you should be able to read the Weather Board 2 pin labels, upside down, from right to left: GND, INT0, ADC3, SDA, SCL, P3V45 (Figure 4).
Figure 4 - The Weather Board 2 must face up for taking environmental readings
4. Explicitly follow the “Arduino for ODROID-GO–Weather Station” online instructions on the ODROID Wiki. A brief summary of these instructions are:
a. Setup the Arduino Integrated Development Environment (IDE) for ESP32 programming.
b. Connect the ODROID-GO to your PC with a micro-USB cable.
c. Setup the ESP32 SPI Flash File System (SPIFFS) tool.
d. Import the Weather Station Arduino example application and compile/upload it to your ODROID-GO.
e. Remove your microSD card. You will not need it for this project.
5. Make these small changes to the Hypertext Markup Language (HTML) file, index.html, inside the Weather Station example application’s Web page data folder:
line 36

<"h1">4U Bayou
<"h2">Format: Temperature C, Pressure hPa, Humidity %, Altitude m, UV Index, Visible lux, IR lux

<"h3" id=”dataLog”>

line 42
6. Continue following the ODROID Wiki instructions and upload the data folder using the ESP32 Sketch Data Upload menu tool.
7. Reboot the ODROID-GO (i.e. cycle the power switch, although this reboot should happen automatically). Environmental sensor data should be displayed on the device’s color liquid crystal display (LCD).
8. Connect to the ODROID-GO WiFi access point (AP): “ODROID_GO_#####” using the password “12345678.”
9. Start your web browser and enter this Internet Protocol (IP) address: http://192.168.4.1. Verify that the sensor data is synchronized between the ODROID-GO and the browser.
10. Turn off the power for the ODROID-GO and disconnect the micro-USB cable from your PC.
Your ODROID-GO environmental scientific research data-gathering device is now ready to be used in the field. The only data sets that we care about in this research project are temperature and visible light. While the remaining data can be retained for future reference, the bulk of it will be nonsensical. Why? Because the recordings will be made from inside three layers of sealed, airtight plastic bags.
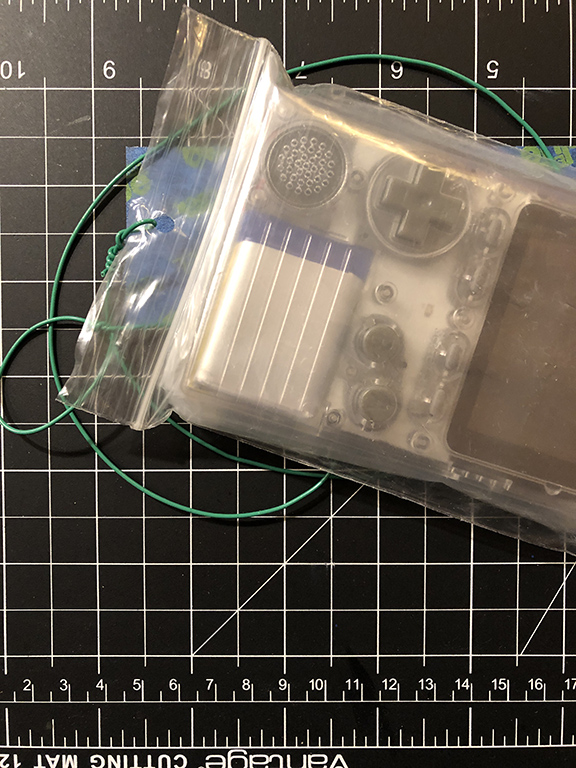
In order to prepare for data gathering, switch on the ODROID-GO and let its readings stabilize. Once the data has settled down, insert the handheld into the first zipper-lock plastic bag. Make sure the seal is tight and then place the bagged gaming device inside the second zipper-lock plastic bag and seal it. Finally, slide your dual-bagged data “sandwich” into the third, and final, zipper-lock plastic bag and zip it shut, as shown in Figure 5.
Figure 5 - All ready to go outside and record data inside three zipper-lock plastic bags
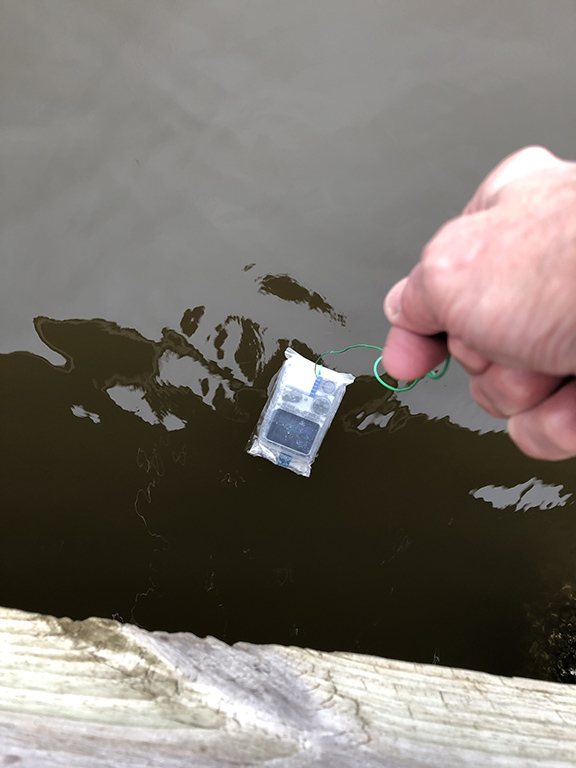
You will have to carefully make a small hole in the surrounding end flap of the third bag. Do NOT puncture ANY of the bags, only cut an opening in the loose flap. Now thread your wire/cord/rope/twin through this hole and secure it with a healthy knot. Your test equipment is now ready.
Log into the ODROID-GO WiFi AP (Hint: there shouldn’t be too many WiFi hotspots in your remote field location) and point your browser to the Weather Board 2 Web page. When you’re satisfied with the data, save a copy of the browser screen. This screen holds the data for the current conditions of the airborne atmosphere at your test site.
Slowly lower the ODROID-GO down into the water that you want to test (Figure 6). Keep an eye on the data that is streaming to your browser. When the readings have stabilized in the water, make another copy of the browser screen. This screen represents the conditions of the water at your site.
At this point, you’re done with your first environmental data collection exercise. This same process should be repeated at regular intervals over an extended period of time. For example, make a data collection every day for one year. If you are crunched for time, try a collection once a week for three months. Just remember that any data collection is better than no data collection.
Figure 6 - Don’t drop it or an alligator could become the next ODROID-GO gamer
What do you do with the data?
You can use the Google and Vernier apps for massaging your data into a pleasant, easily-digested set of graphs, photographs, satellite imagery, and text (Figures 7-9). Then, when your significant other chides you with, “Why don’t you do something productive with the silly game machine?” you can dazzle ‘em with your data while reaching for the BurgerTime ROM.
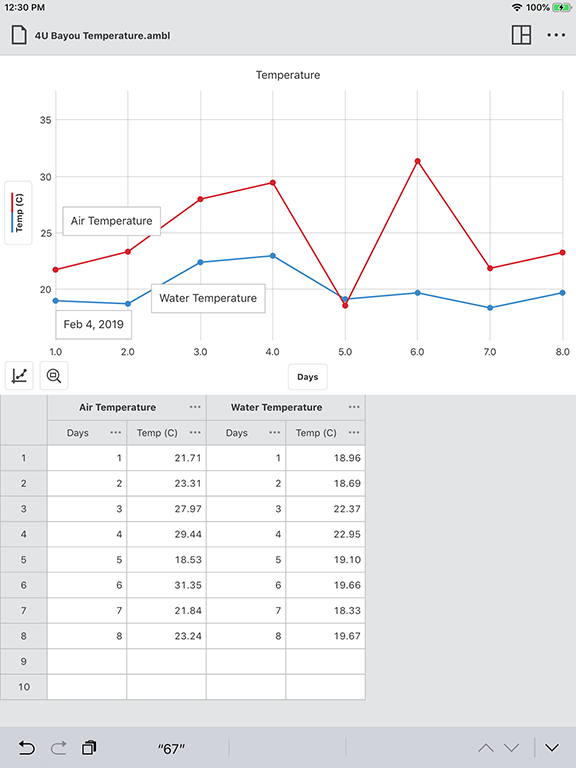
Figure 7 - Use Vernier Graphical Analysis for plotting your temperature data
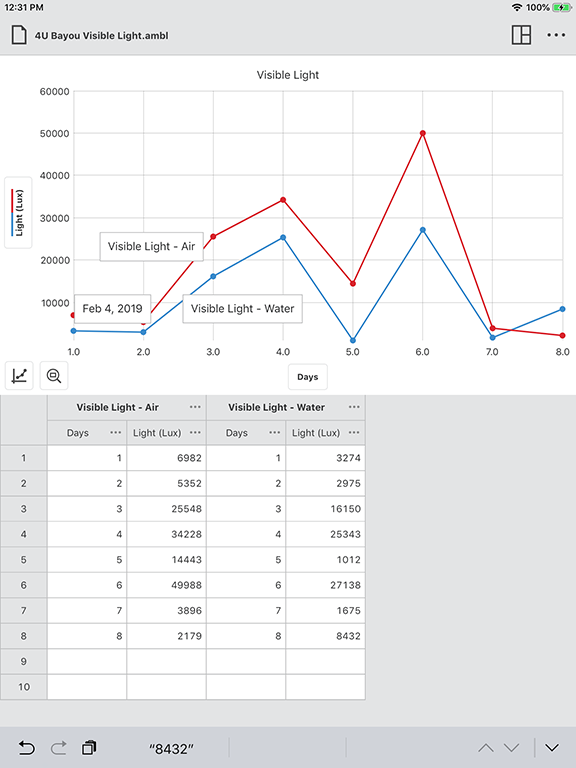
Figure 8 - Record the visible light data on a separate graph
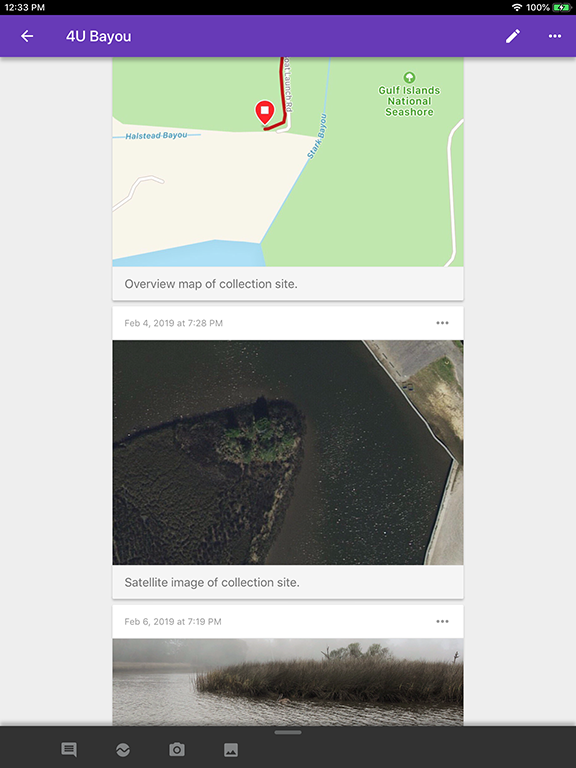
Figure 9 - Fill your Google Science Journal with graphs, photographs, notes, and your recorded environmental data
In order to return your ODROID-GO to its original gaming behavior, you will have to flash the GO-Play image file back onto the ESP32 and reinsert your microSD card containing firmware files, gaming ROMs, and game machine BIOS files.
ODROID Crossgrading: From armhf to arm64
March 1, 2019By Adrian PopaODROID-N2, ODROID-XU4, Tutorial
With the ODROID-N2 inevitably on its way, you may face the same problem I did: you have a complex setup running fine on an XU4 and you want to migrate it to a newer 64-bit platform. In my case, I want to migrate my XU4 NAS (which has too many services and tweaks to reproduce) to an ODROID-N2.
The best way to do it is to go with a clean install, but since this is Linux, you can migrate from 32 to 64 bits with a complex process called crossgrading. The requirement is for the destination system to be able to natively run instructions from the source system (so 64->32 bit won't work).
Before you begin, be forewarned: it's not a process for the faint-hearted, and you must have a backup of your data because it doesn't always go as planned. Having serial access may also be necessary because you'll be uninstalling most of your system in the process.
The 64-bit kernel
You can start off by making a clone of the system you want to crossgrade. You can use a tool like odroid-backup (https://github.com/mad-ady/odroid-backup) or dd. You'll need to prepare a destination sd card or eMMC module with a working image for your target platform (preferably with the same distro version). For example, to crossgrade a Ubuntu 18.04 armhf system you can start with a 18.04 arm64 image. Boot it, perform all kernel, uboot, and boot.ini updates and copy some files to a safe location (preserving permissions):
# uname -a
# apt list --installed | cut -d '/' -f 1 | tee ~odroid/armhf_packages.txt
# tar -cvf ~odroid/modules.tar /lib/modules
# tar -cvf ~odroid/firmware.tar /lib/firmware
# tar -cvf ~odroid/packages.tar /etc/apt
# tar -cvf ~odroid/include.tar /usr/include/linux/
Your arm64 kernel has to have "CONFIG_COMPAT=y" enabled in its config, so that it can run 32 bit code. You can check with:
$ zcat /proc/config.gz | grep CONFIG_COMPAT
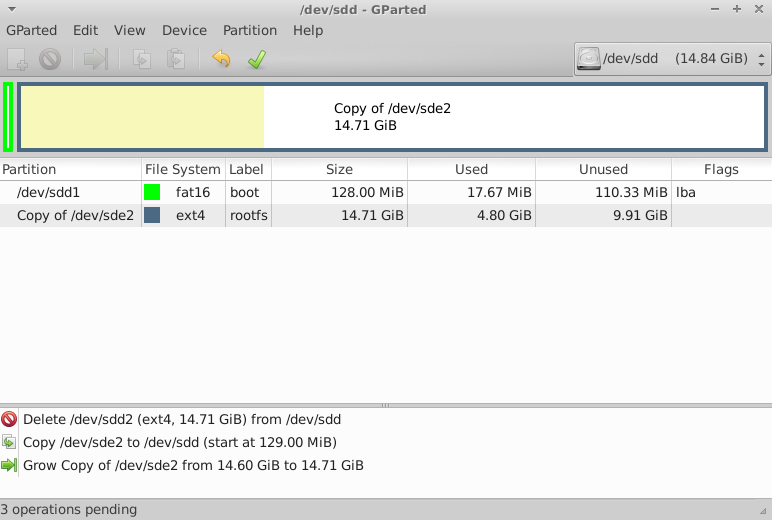
Next, turn off the arm64 system and on a separate PC overwrite the rootfs partition (typically the second partition) with the rootfs of the armhf system (Figure 1). Of course, make sure you save the files you just created before overwriting the partition (not after, like I did).
Figure1 - /dev/sde2 is from the armhf system and replaces the stock arm64 partition
After copying is done, you'll have to unpack the tar files to the target root filesystem so that the 64bit kernel can find its modules when booting:
# cd /path/to/armhf/rootfs
# tar -xvf ~/modules.tar
# tar -xvf ~/firmware.tar
# tar -xvf ~/packages.tar
# tar -xvf ~/include.tar
In case the armhf partition has a different UUID than the arm64 rootfs, you will need to fix this either by overwriting the armhf UUID, or by changing bootargs in boot.ini. In my case, I chose to overwrite UUID with the UUID that the arm64 system expects:
You are now ready to boot into a hybrid system: a 64-bit kernel with a 32-bit user space. It's best to use a serial connection to the box to identify and troubleshoot any problems. It's also best to leave unconnected any peripherals (external disks, etc) at this point. I had to manually disable watchdog before it could boot stably on the new hardware.
Once you boot, check the network settings to make sure you're not duplicating the IP address in your LAN (in case it was static) and we can start converting the packages to 64 bit.
64-bit conversion
Now comes the tricky part: you have to reinstall most packages while the system is running. Thankfully somebody prepared a script that automates most of the job, but it was designed for i386 to amd64 migration. I made a fork and some changes (mostly renaming i386 to armhf and amd64 to arm64) and it can do the job on the ODROID.
Before you begin, you should take a look at /etc/apt/sources.list* and disable specific ODROID repositories for the armhf platform (e.g. http://deb.odroid.in/5422-s for XU4) and enable repositories (if any) for the arm64 board. You should also check that universe, restricted and multiverse components are enabled for ubuntu to get better chances of finding all needed packages.
You can clone the script from here on the target system:
When you run it without arguments, it checks your system and makes some recommendations to help with the migration. For instance, in my case it recommended that I uninstall a long list of X11 packages, that I can reinstall later, which I did.
You're now ready to start the crossgrading process. Make sure the network is connected, that there is plenty of free disk space (a few gigs at least) and that there is nothing that can interrupt the process (run from serial or from within a tmux/screen session).
# ./distrorejuve.sh --to-64bit | tee -a distrorejuve.log
Once it runs, it might still complain that some deb packages are not installed from apt and they're best removed. Some of them might be critical - like kernel packages, so be on the lookout with what you're removing. You can ignore it and run again with IGNORECRUFT=Y.
# IGNORECRUFT=Y ./distrorejuve.sh --to-64bit | tee -a distrorejuve.log
Expect the script to complain some more and ask you to manually uninstall some packages. Make a list of them so that you can install them back again when you're done. The script asked me to remove wpasupplicant (which took down Network Manager), so make sure networking is handled by systemd-networkd or static.
Once the script starts doing its thing, you can watch endless screens of packages being removed, various dependency errors and ultimately packages being installed as arm64 again. This process will take a while depending on how many packages you had installed.
The inevitable failure
The crossgrading process may take a few hours, but in my case it seemed to get stuck while trying to install libclang1-6.0 (it tried to install it over and over again). The error message was:
Unpacking libclang1-6.0:arm64 (1:6.0-1ubuntu2) ...
dpkg: error processing archive /var/cache/apt/archives/libclang1-6.0_1%3a6.0-1ubuntu2_arm64.deb (--unpack):
trying to overwrite shared '/usr/lib/llvm-6.0/lib/libclang-6.0.so.1', which is different from other instances of package libclang1-6.0:arm64
The file in question is a symlink to a armhf library:
I manually removed the file (from a separate shell) and the upgrade process chugged along:
# rm /usr/lib/llvm-6.0/lib/libclang-6.0.so.1
# ls -l /usr/lib/llvm-6.0/lib/libclang-6.0.so.1
lrwxrwxrwx 1 root root 41 Apr 6 2018 /usr/lib/llvm-6.0/lib/libclang-6.0.so.1 -> ../../aarch64-linux-gnu/libclang-6.0.so.1
You might get different problems that you must resolve, so this is not a complete guide.
Once distrorejuve finishes its job, it will likely tell you that you are left with a bunch of armhf packages that you can remove.
Figure 2 - Leftover packages
You should also run the following command to see which configuration files differ from the regular packages.
# bash ./distrorejuve.sh --show-changes
In my case, apt was broken and still had a bunch of broken packages that needed attention. For instance, running the following command resulted in complaints about libcdio-dev which tried to overwrite a shared config file as shown in Figure 3.
# apt-get --fix-broken install
Figure 3 - Symptom of a broken package
The way around this problem was to uninstall the offending packages:
After this, apt managed to configure all the leftover packages. You can also take the time to remove old 32-bit packages:
# ./distrorejuve --remove-cruft
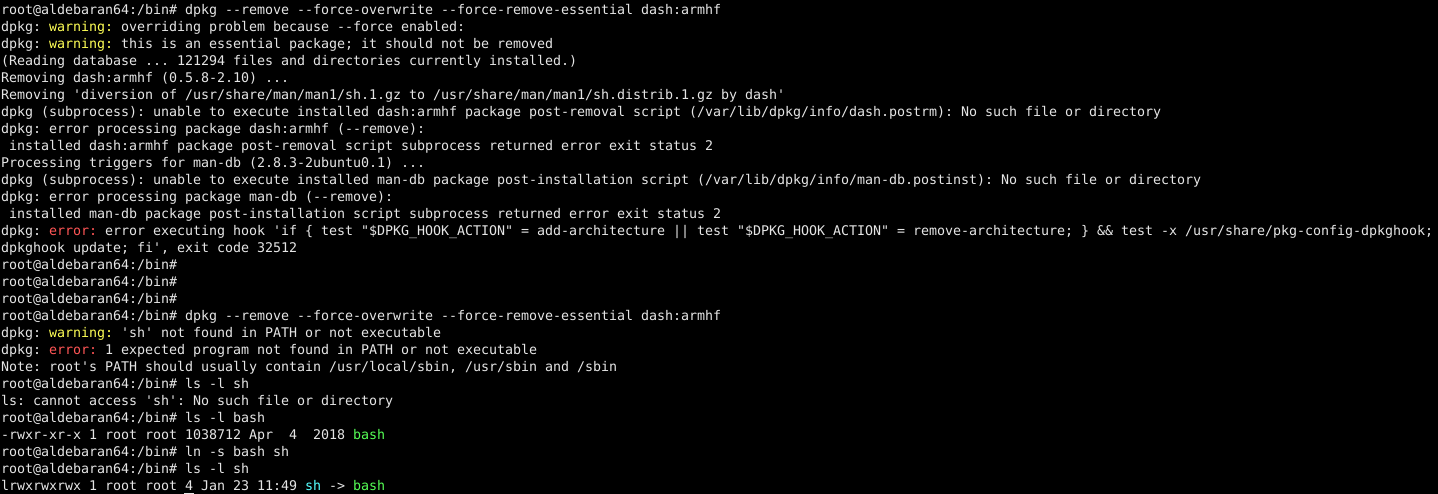
I was having problems removing dash:armhf, so I pointed /bin/sh and /bin/sh.distrib to /bin/bash instead of dash. If there is no valid /bin/sh you're going to have lots strange failures, including with apt.
Figure 4 - Removing dash:armhf
At this point, you may want to do a bit of checking to make sure the system is in a sane state.
You will need to check the following:
You still have basic packages installed (vim, ip, bash, netplan, etc). I was missing vim, so I needed to reinstall it.
Check that the kernel, uboot, bootini packages look fine. In my case I'm on an N1 which has no such packages for Ubuntu, but there's a risk that key components have been removed in the crossgrading process and your board is unbootable. Install any missing packages or restore missing files if needed.
Keep your fingers crossed and reboot.
Service checking & fixes
Presumably your board booted without too many problems. If yes, rejoice! If not, restore the backup and try again looking more carefully at what packages get removed (remember, no refunds!).
But still, the system may not be in such great shape. You'll still need to check critical services and see what's missing or what is not working anymore. In my case:
Apache2 wouldn't start because it was missing libapache2-mod-php7.2 and libapache2-mod-fcgid
Git was missing and needed a reinstall
Samba was missing and needed a reinstall (configuration was fine, though)
Nfs-kernel-server was missing and needed a reinstall
Transmission-daemon was missing
Remember that you made a backup of the installed armhf packages - now is the time to check that list and compare it with what you have now to see if anything important is missing. Notice the grep filter that ignores libraries, because those are usually a dependency of something else. On the arm64 system run:
You should review the list and install the needed packages before you proceed.
32-bit legacy programs
There may be programs that were compiled manually and not installed as deb packages. In this case, you'll need to find them and recompile them for arm64. Assuming that they're somewhere in /usr/local (or in known paths), you can find them with:
The problem with these programs is they won't run because crossgrading has removed the armhf libc (/lib/ld-linux-armhf.so.3) and libraries they depend on. If you try to run one of them you'll get an unhelpful "No such file or directory" error - which refers to the missing loader, not the program itself. If you can't recompile them, you can add armhf as a foreign architecture and install the missing libc6 and library dependencies, but you end up with a partly hybrid system again.
Modules (such as lirc_odroid) and programs that make use of GPIO pins will need to be manually checked because GPIO pin numbers may differ from board to board. Also, if you're using WiringPi you'll need to get and install the correct version for the arm64 board.
Configuration pointing to 32-bit dirs
There are some programs which might fail to run because their configuration points to 32 bit libraries. Lirc may fail to start because it used to point to /usr/lib/arm-linux-gnueabihf/lirc/plugins. You will need to adjust /etc/lirc/lirc_options.conf and change plugindir = /usr/lib/aarch64-linux-gnu/lirc/plugins and restart lirc. KDE may point to 32 bit shared libraries and may result in broken panels as well. (https://wiki.debian.org/CrossGrading#Caveats_and_Known_Problems)
Perl 32-bit libraries
Perl XS libraries that were installed from CPAN might be broken as well. These libraries have some compiled code in them that is architecture dependent. You can find them out with:
# perldoc perllocal | grep XS
Special data types
Other programs may encode their data using structures which depend on the platform's size (or use 32 bit timestamps). One such data type is rrd, which holds round-robin time series data. Tools like munin or cacti generally write to rrd files. The 64-bit rrdtool program can't work with rrd files created on 32-bit systems, so you'll need to export all your rrd data to xml while still running on a 32bit system and recreate the rrd on the 64bit system. You can do this on the armhf system:
# cd /path/to/rrd/files
# find . -type f -name '*.rrd' -exec rrdtool dump {} {}.xml ;
How did the process go for me? Better than expected! Should you try it? If you have time and a backup, I don't see why not. To be fair, I only tried it on a "server" system so far, but with the right packages (and config tweaks in /etc/X11/xorg.conf) it should work for a desktop system as well. More info and help are available in the support thread at https://forum.odroid.com/viewtopic.php?f=55&t=33861.
SBC Model Framework
March 1, 2019By Edward KisielTinkering, Tutorial
For those designing with an SBC or micro-controllers, having a model can be important. I want to share a simple, lightweight and dynamic framework for the generation of SBC and microcontroller models written in OpenSCAD. When I originally created the OpenSCAD XU4 model a couple years back, https://forum.odroid.com/viewtopic.php?f=97&t=26243, it was a hard coded static model and the only SBC I owned. That worked fine at the time but since then I have acquired a few more SBCs and I have had a need for access to different models while working on various projects.
The current project I'm working on crosses multiple SBCs so I decided to pause and develop the models for the other SBCs involved. Creating models for the whole HK line had been on my project list for awhile but never reached a high enough priority to complete.
Instead of hard-coding all of them I decided that it would be better to create a framework which could handle multiple SBCs and micro-controllers. Using this approach allows access to all of them through a single module call while keeping the code small and efficient. This is important to me since large complex assemblies can take a considerable amount of time to compile in OpenSCAD. For comparison I recently examined a similar STEP and DXF model of the HK Odroid H2. The STEP model was 993KB and the DXF file size was 1,273KB. It may not be particularly large for a 3D static model but when several models are involved it can start to become significant. In contrast, all of the code and the SBC data set used in this framework, which represents 8+ SBCs, totals 83KB and the efficiency of this method will only increase as more models are added.
For me, the most important criteria for most of my work is the physical dimensions so that locating and checking can be done quickly and easily as I develop designs. To keep things as accurate as possible, the information for the models was derived from both HK supplied 2D mechanical layout drawings and actual measurements of the SBCs I own. In the cases were I did not own a particular SBC, I also used component data sheets from the manufacturer. When the component manufacturer was not known, I examined data-sheets from multiple manufacturers to generalize a component design.
Aesthetics are not as important to my use as either code size or render speed, so it is secondary in this model framework. With that said, I have spent time developing better component models so they are more complete and do look better then the original XU4 model components. I will be maintaining and adding to this SBC library as needed or as other HK SBC's become available.
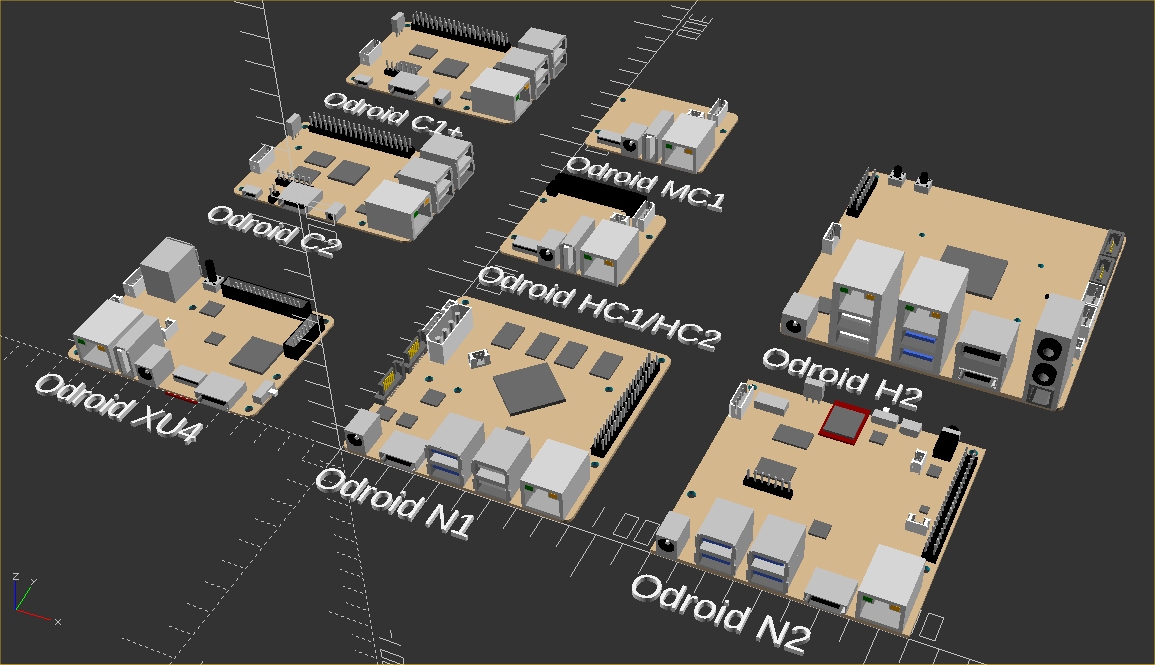
The SBC's currently supported and complete are:
Hardkernel's ODROID-C1+, ODROID-C2, ODROID-XU4, ODROID-N1, ODROID-N2, ODROID-MC1, ODROID-HC1, ODROID-HC2 and ODROID-H2.
Sometimes only board dimensions and hole layout is needed for a particular design and they can be added quickly and easily in this framework by editing an ASCII configuration file. I did this for testing and to illustrate the technique for the following SBCs:
Raspberry Pi Foundation's Model 3B+, 3B, 3A+, 2, 1A+,
Pine64's A64, Rock64, RockPro64.
Using the Framework
Any of the models can be called by passing the requested SBC model in the form of sbc("xu4"). Below is example code that was used to generate the opening picture.
A component of an SBC that is not needed or needs to be disabled temporarily, can be excluded by adding a minus sign to its class entry in the sbc_models.cfg file. One example of this use might be for eMMC's. Both the eMMC and the plug(attached to the PCB) are available. Below is an illustration for the XU4 to disable the display of the eMMC while displaying the eMMC plug.
// Hard Kernel ODROIDs
["xu4",83,59,1,3.5,17,6, // sbc model, pcb size and component height
3.5,3.5,3,3.5,55.5,3, // pcb holes 1 and 2 location and pcb hole size
79.5,3.5,3,79.5,55.5,3, // pcb holes 3 and 4 location and pcb hole size
79.61,22,3,28.39,42,3, // pcb holes 5 and 6 location and pcb hole size
0,0,3.3,0,0,3.3, // pcb holes 7 and 8 location and pcb hole size
0,0,0,0,0,0, // pcb holes 9 and 10 location and pcb hole size
14.5,15.75,1.25,59.7,20.55,0,0,"top", // soc1 size, location, roation and side
0,0,0,0,0,0,0,"", // soc2 size, location, roation and side
0,0,0,0,0,0,0,"", // soc3 size, location, roation and side
0,0,0,0,0,0,0,"", // soc4 size, location, roation and side
47.5,13.7,0,"bottom","memory","emmc_plug", // emmc plug location, rotation, side, class and type
45,0,0,"bottom","-memory","emmc", // emmc location, rotation, side, class and type
45.85,5,0,"top","storage","sdcard", // sdcard location, rotation, side, class and type
79,7.15,0,"top","switch","slide_4x9", // switch location, rotation, side, class and type
25.925,52.925,0,"top","button","momentary_6x6x9", // pwrbutton location, rotation, side, class and type
34.85,-1,0,"top","plug","pwr5.5_7.5x11.5", // pwrplug location, rotation, side, class and type
26,0,0,"top","usb2","single_vert_a", // usb2 location, rotation, side, class and type
7.55,41.6,180,"top","usb3","double_stacked_a", // usb3 location, rotation, side, class and type
7.4,0,0,"top","network","rj45_single", // ethernet location, rotation, side, class and type
60,-1,0,"top","video","hdmi_a", // hdmi location, rotation, side, class and type
0,37.8,90,"top","plug","uart_micro", // uart location, rotation, side, class and type
0,25,270,"top","plug","rtc_micro", // rtc location, rotation, side, class and type
27,22,90,"top","fan","micro", // fan location, rotation, side, class and type
35.4,52.25,0,"top","gpio","encl_header_30", // gpio1 location, rotation, side, class and type
76.25,32.5,270,"top","gpio","encl_header_12", // gpio2 location, rotation, side, class and type
43.8,27.25,0,"top","ic","ic_5.75x5.75", // pmic location, rotation, side, class and type
32.5,40.5,0,"top","ic","ic_7x7", // usbhum 7mm location, rotation, side, class and type
11.7,22.8,0,"top","ic","ic_6x6", // nic location, rotation, side, class and type
0,0,0,"*","*","*"], // end
Modifying and Adding Components
The framework is setup so that both SBCs and components can be easily added or modified and the resulting models can be used regardless of the state of completion. The framework consists of three parts, the SBC data set (sbc_models.cfg), the main module(sbc_models.scad) and a library of components(sbc_library.scad).
sbc_models.cfg is an ASCII file that can be modified with any text editor. It contains a data set for the description of a given SBC. The schema is as follows:
Part of the schema has a fixed length and includes the SBC model, PCB xyz size, corner radius, top and bottom maximum component heights, up to 10 thru holes and up to 4 SOCs. This part of the schema is the same length for all SBC definitions. The number of component entries is unlimited in quantity and I'll discuss that in a minute. I believe the basic PCB data is self explanatory. The physical dimensions(xyz) must be known in order to create a PCB. The top and bottom maximum component Z height can be useful for designs using this library. PCB holes are limited to 10 defined by their xy center location and diameter. The number can be easily expanded if this becomes restrictive.
I choose to accommodate multiple SOCs and not include them as a component for a couple of reasons. There are already SBCs that are specialized and include multiple processing units. I refer to them all in this framework as SOCs, but they could also be micro-controllers, AI processors, or dedicated communication processors on the PCB, to name a few. By defining them separately from components, additional information such as size and height can be included without burdening every component entry with this additional information. Four entries should be sufficient but it too can be easily expanded in the future without significant modification of the program. SOC entries can be rotated and also be placed on either side of the PCB. If a hole or SOC is not needed, leave scalar values as zero and text entries empty.
The last entry in the schema is for components. A component is anything that is attached to the PCB. Any number of components from the library can be placed per SBC. The algorithm will automatically place as many or as few as defined. There are six values per component. The xy component location for the top of the PCB are measured from the lower left corner of the PCB to the lower left corner of the component or opening, with holes measured to the center. Bottom side components are measured from top left corner of PCB to top left corner of component, when the PCB is rotated around the x axis. All measurements are in mm and as a general rule PCB orientation is with the long side of the PCB along the x axis.
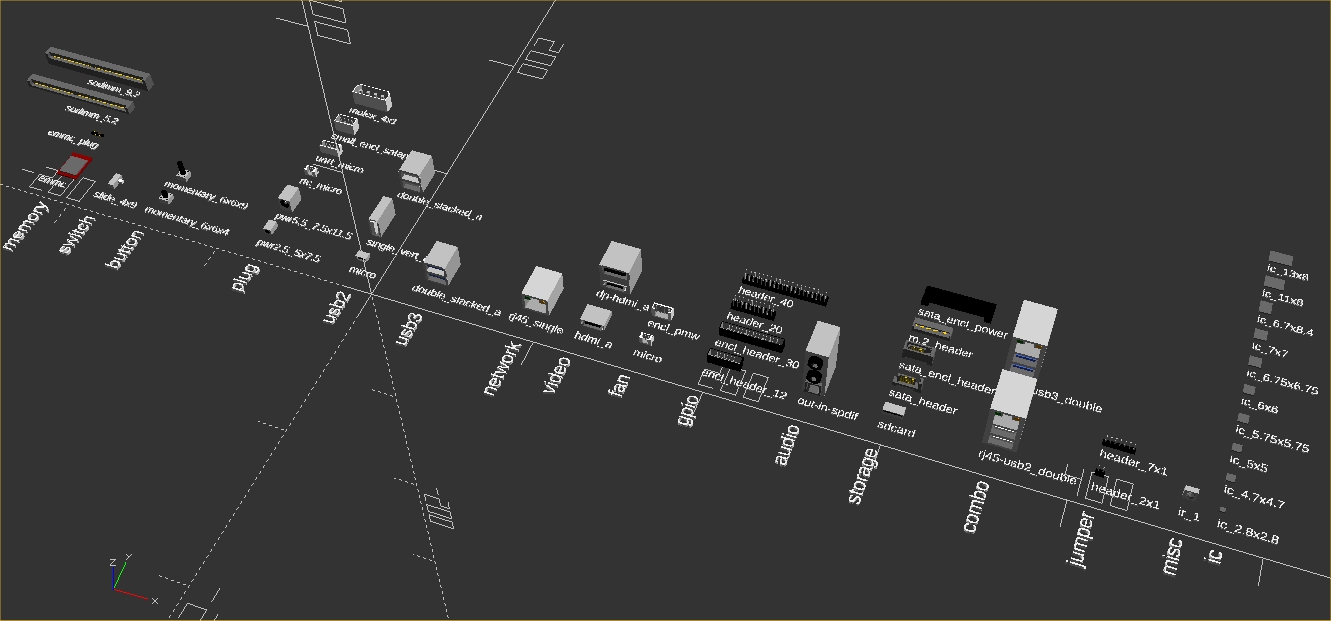
The rotation value does not rotate the component around the xy location. It is a reference to the direction that the component faces and whichever corner of the component is in the lower left after rotation, will assume the xy location specified for the component entry. This allows a uniform means to measure the placement of components regardless of their orientation on the PCB. The schema entry labeled component_side is the side of the PCB the component is to be placed on. So far we covered component_x, component_y, component_rotation and component_side. The last two entries are component_class and component_type. These entries together determine what component is placed. Each component class contains one or more component types. There are currently 17 component classes with corresponding component types:
Simply put, new SBCs are defined in sbc_model.cfg and new components are added to sbc_library.scad. To add an SBC, modify sbc_models.cfg by creating or copying of an existing SBC entry. Update the relative SBC data and components for the new SBC. When a component type needs to be added, simply add code that draws that component type in the class module the component belongs to, located in sbc_library.scad. There is no checking or validation of any kind so in reality any class can contain any component type. The names are simply the ones I choose to impose some structure that makes sense for my use of the library moving forward.
OpenSCAD has the ability to export models in other formats, so thru export and possible translation, other CAD systems can use these models as well. If you have any questions or problems, or would like to contribute SBC data or components to the library, make a post or send me a PM. I will be maintaining this library and announcing any additional SBC's and components in the forum thread. https://forum.odroid.com/viewtopic.php?f=98&t=33823
For those interested in trying out this SBC model framework, I recommend a more recent build of OpenSCAD that's available at their nightly snapshot repository at http://files.openscad.org/snapshots/.
There is even a recent armhf appimage there that I have verified does work on an XU4 running Ubuntu 18.04. Unfortunately it is not hardware accelerated so it is slow for a design of any significant size. I recently tried to compile the source for the XU4. All dependencies could be met but there was an issue with opengl declaration mismatches. In my brief research, this is common and it looks resolvable using glew or another tool. It is a low priority issue for me now, but I would like to get hardware acceleration working for OpenSCAD on Odroids in the future.
ODROID-N2: Run Ubuntu 18.04 and Android Pie with Hardkernel’s Newest Lightning Fast Single Board Computer
March 1, 2019By Justin LeeODROID-N2
The ODROID-N2 is a new generation single board computer (SBC) that is more powerful, more stable, and faster performing than the ODROID-N1. The main CPU of the ODROID-N2 is based on the big.Little architecture, which integrates a quad-core ARM Cortex-A73 CPU cluster and a dual core Cortex-A53 cluster with a new generation Mali-G52 GPU.
Thanks to the modern 12nm silicon technology, the A73 cores runs at 1.8Ghz without thermal throttling using the large, stock metal-housing heatsink, allowing for a robust and quiet computer. The multi-core CPU performance is around 20% faster and the 4GB DDR4 RAM is about 35% faster than the ODROID-N1. The ODROID-N2’s DDR4 RAM is running at 1320Mhz while ODROID-N1’s DDR3 was running at 800Mhz.
The large metal housing heatsink is designed to optimize the CPU and RAM heat dissipation and minimize throttling. The CPU is placed on the bottom side of the PCB to establish great thermal characteristics.
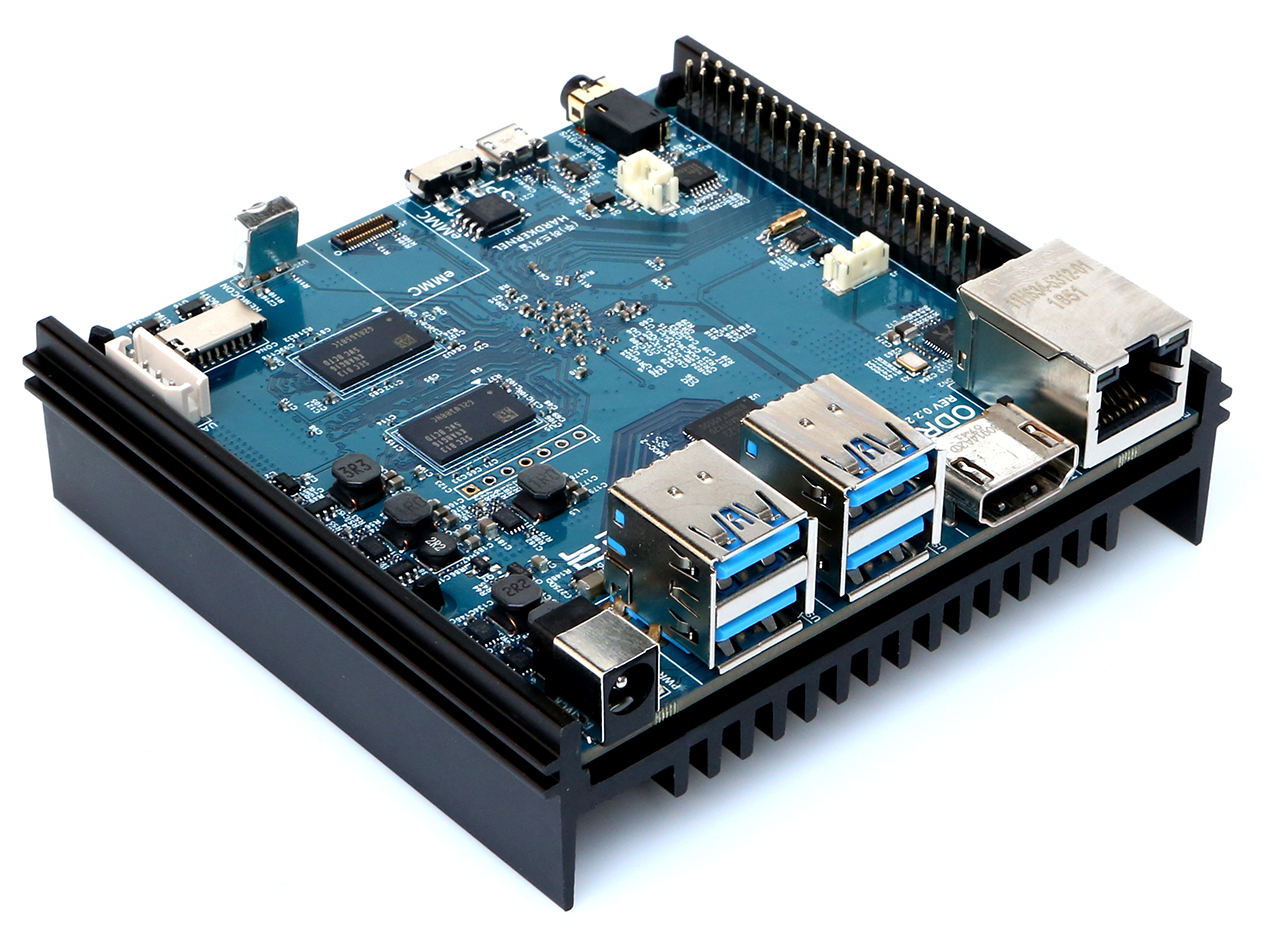
Figure 1 - The New ODROID-N2 Board
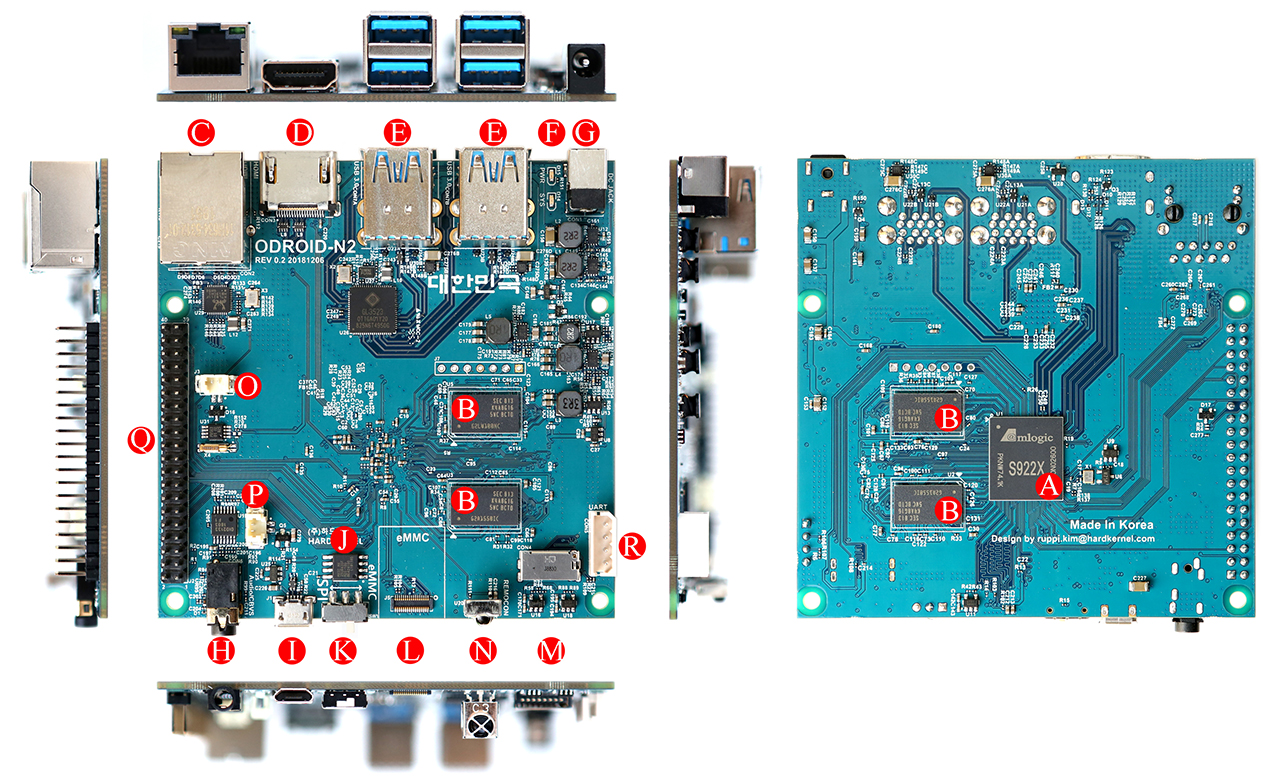
Figure 2 - ODROID-N2 Connector details and components
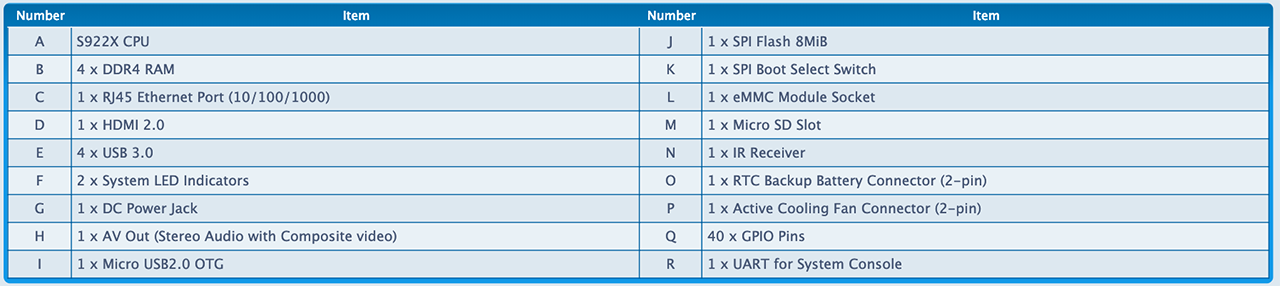
Figure 3 - ODROID-N2 Components table
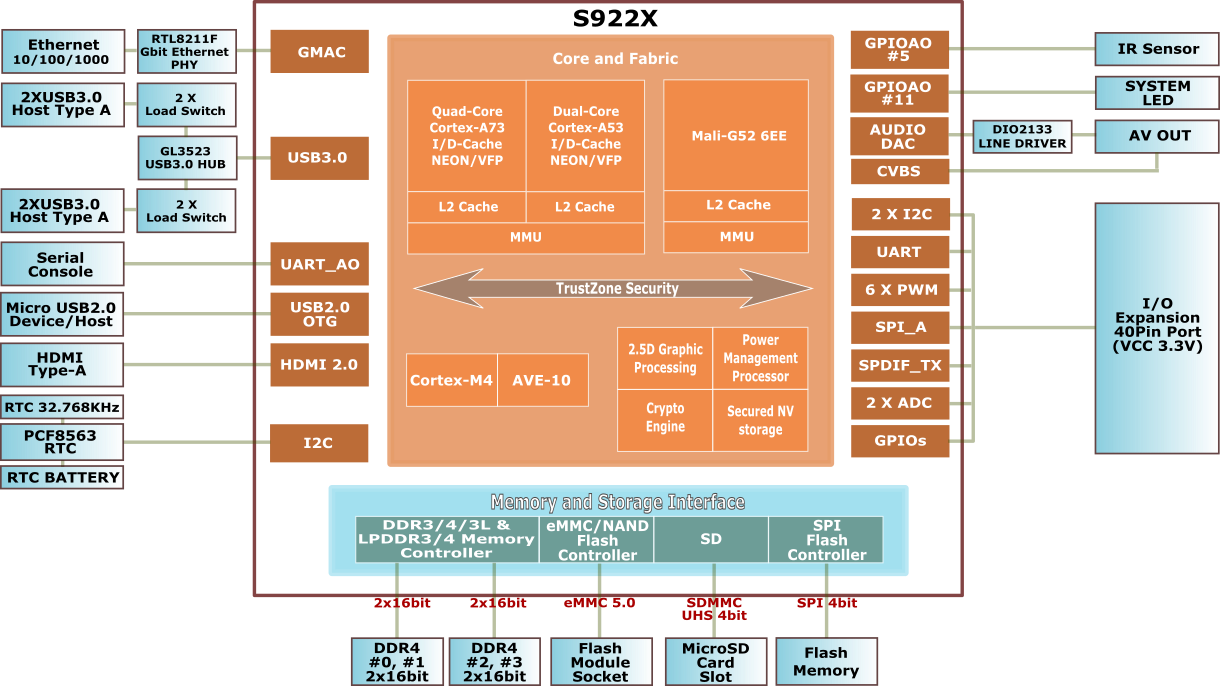
Figure 4 - Block Diagram Table
CPU performance
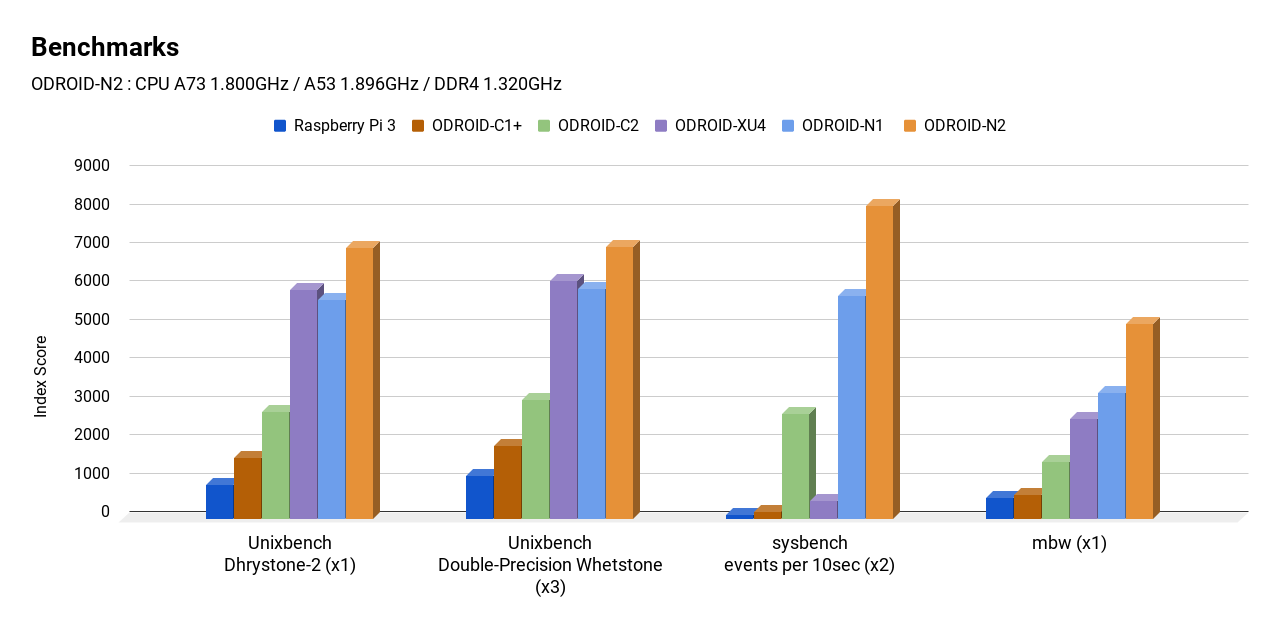
The Dhrystone-2, Double-Precision Whetstone, Sysbench and Memory bandwidth benchmark results below show that the ODROID-N2 system performance comes out ahead of other popular ARM SBCs.
Figure 5 - CPU Benchmarks
GPU performance
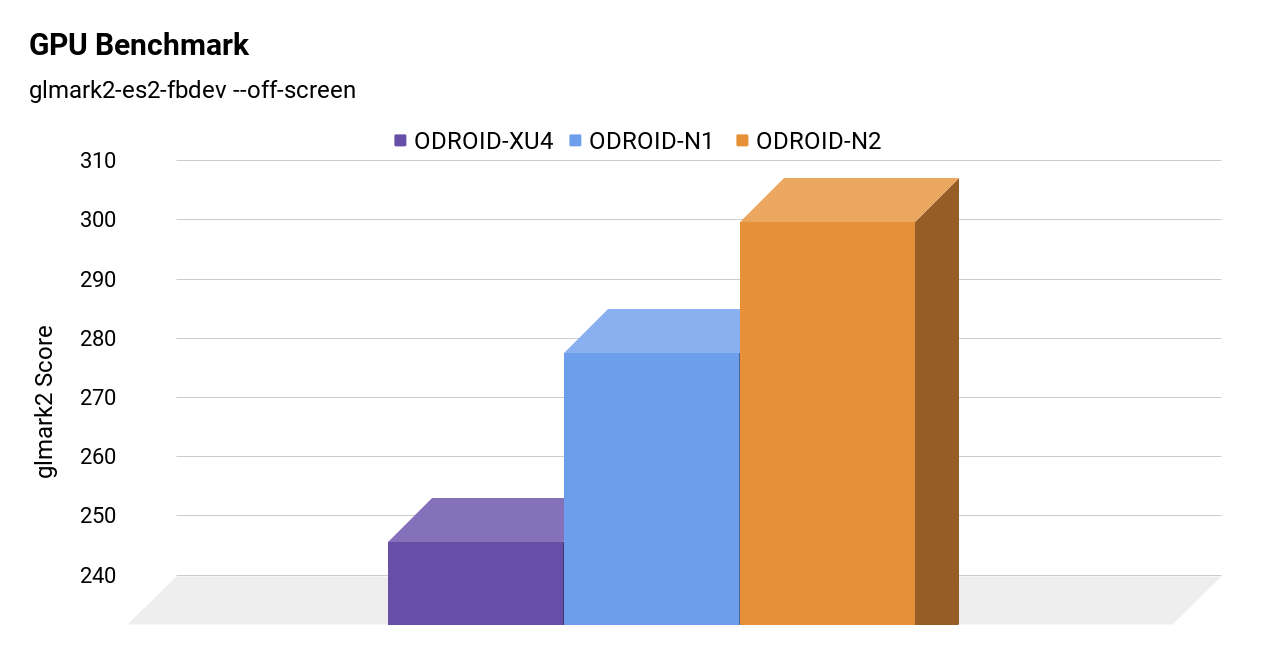
The Mali-G52 runs at 846Mhz and is ~10% faster than Mali-T860MP4 in ODROID-N1. The Mali-G52 is the second Bifrost-based mainstream GPU from Arm. There are two Shader Processors in the GPU and each core has three Execution Engines. This is sometimes referred to as MP6. The GPU performance was measured with glmark2-es2 “--off-screen” option.
Figure 6 - GPU Benchmarks
RAM performance
The following chart reflects why the new generation DDR4 RAM matters. The 1320Mhz-DDR4 is 35% faster than 800Mhz-DDR3. The ODROID-N2’s DDR4 RAM runs at 1320Mhz.
Figure 7 - Memory Benchmarks
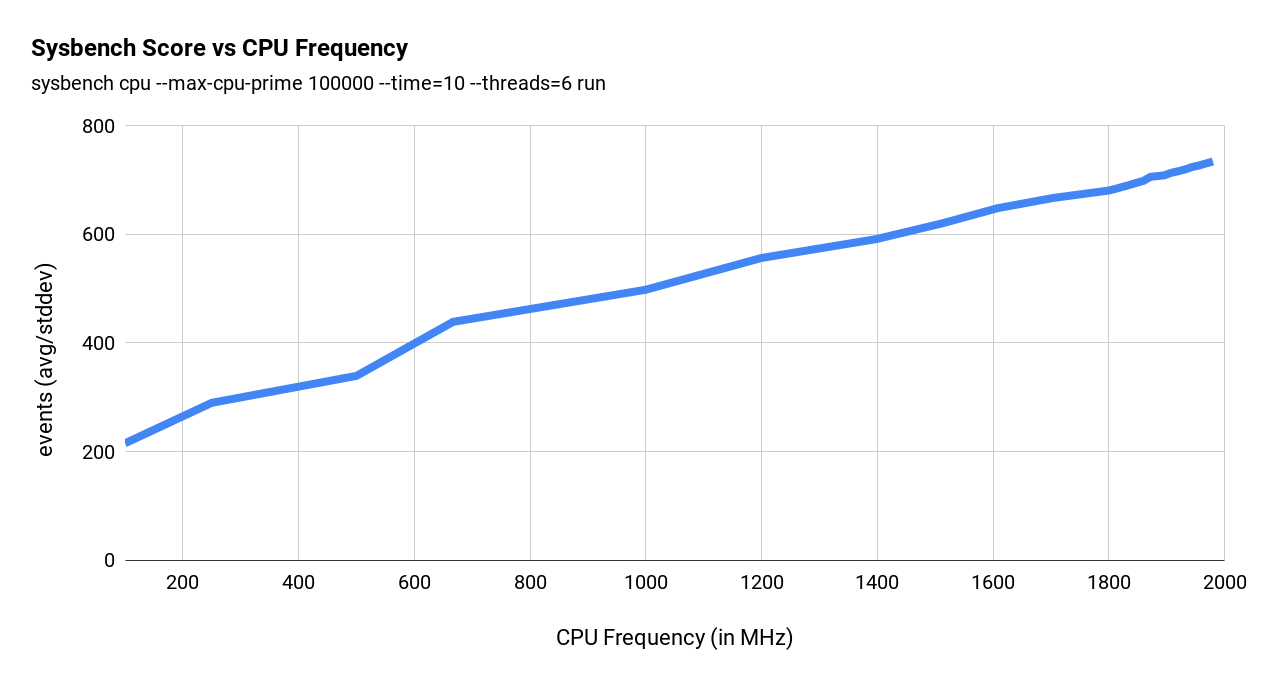
CPU frequency vs performance
Some ODROID users may recall the lower than expected clock speed of the S905 SOC. We ran a test to double check the ratio between CPU clock frequency and performance, using the following command:
$ sysbench cpu --max-cpu-prime=100000 --time=10 --threads=6 run
Figure 8 - Sysbench Score
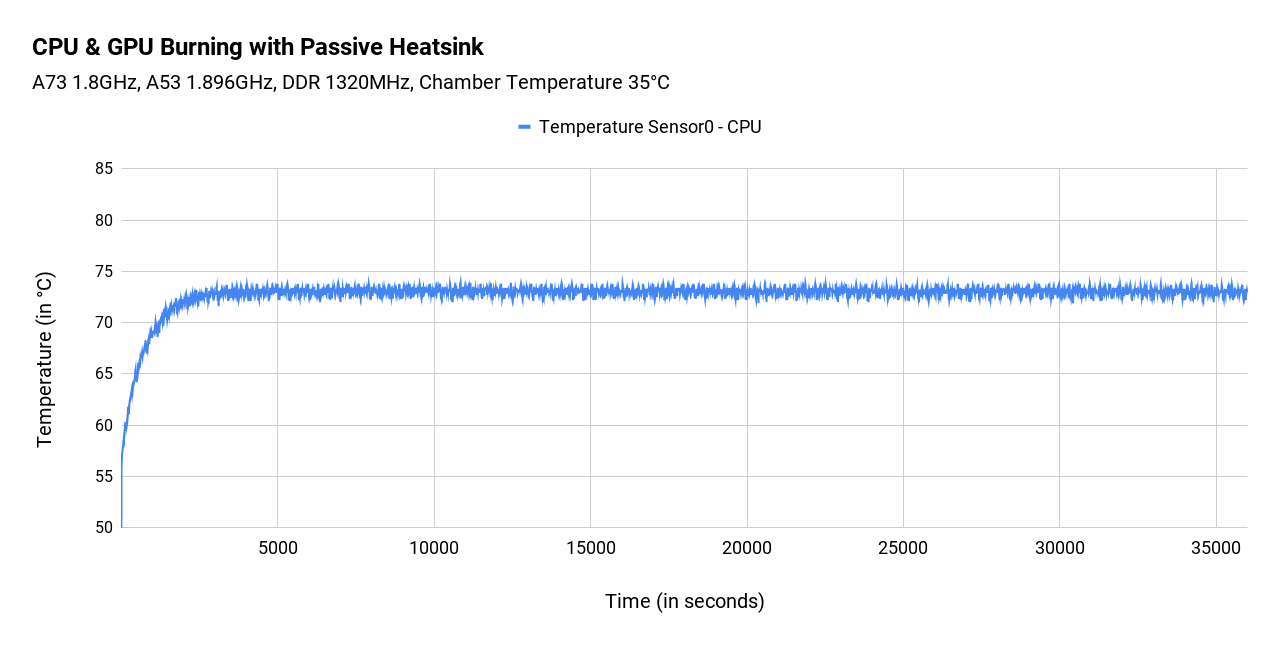
Thermal characteristics
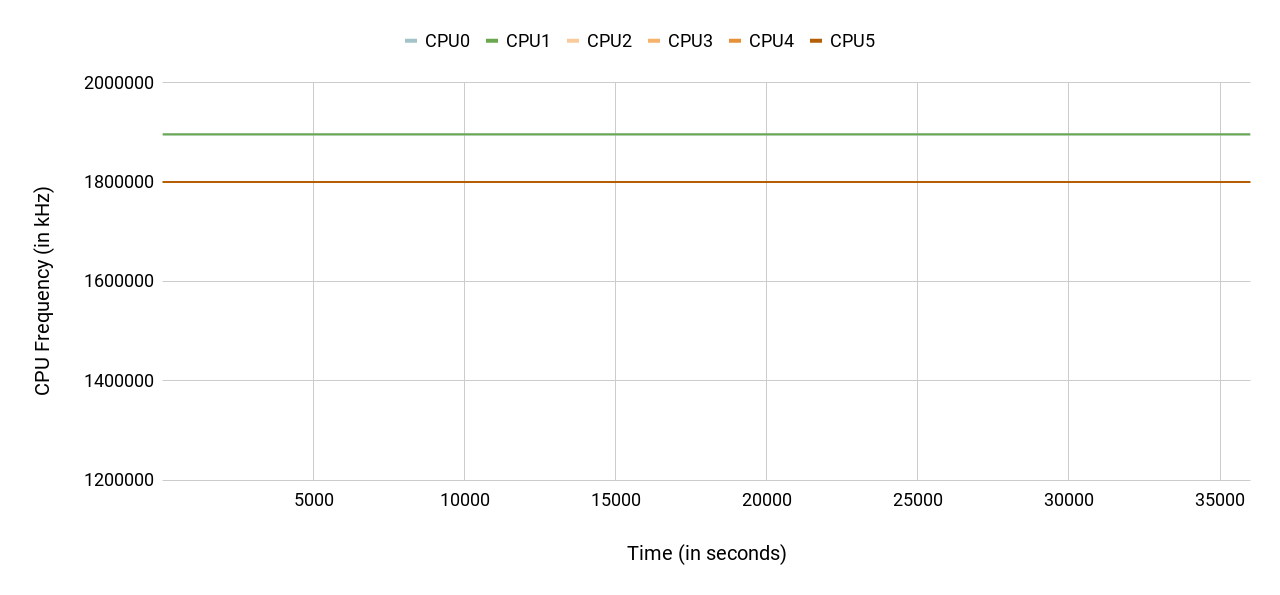
To check the thermal throttling, we ran some heavy CPU and GPU loads together on the SoC and monitored temperature. We ran the test within a chamber that keeps the ambient temperature at 35°C, using the following command:
Figure 10 - CPU Stress test - Frequency versus time
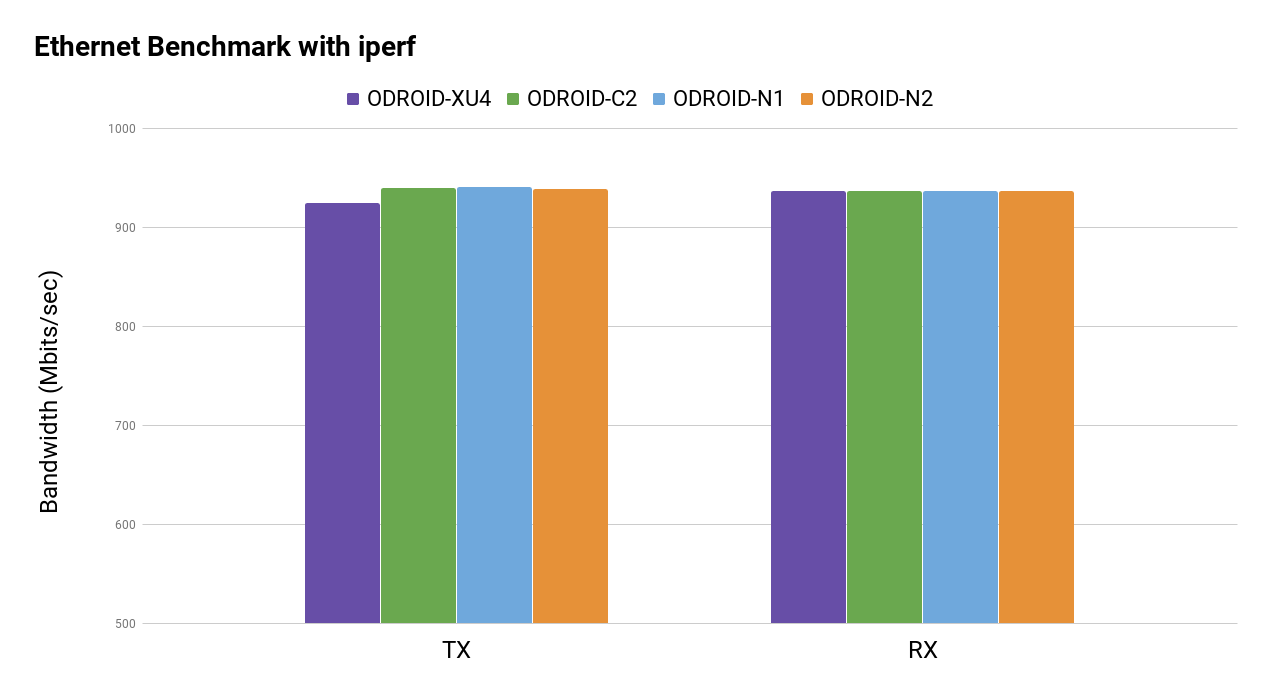
Gigabit Ethernet
According to our iperf test result, the throughput performance was near 1Gbps.
Figure 11 - IfPerf network Benchmark test
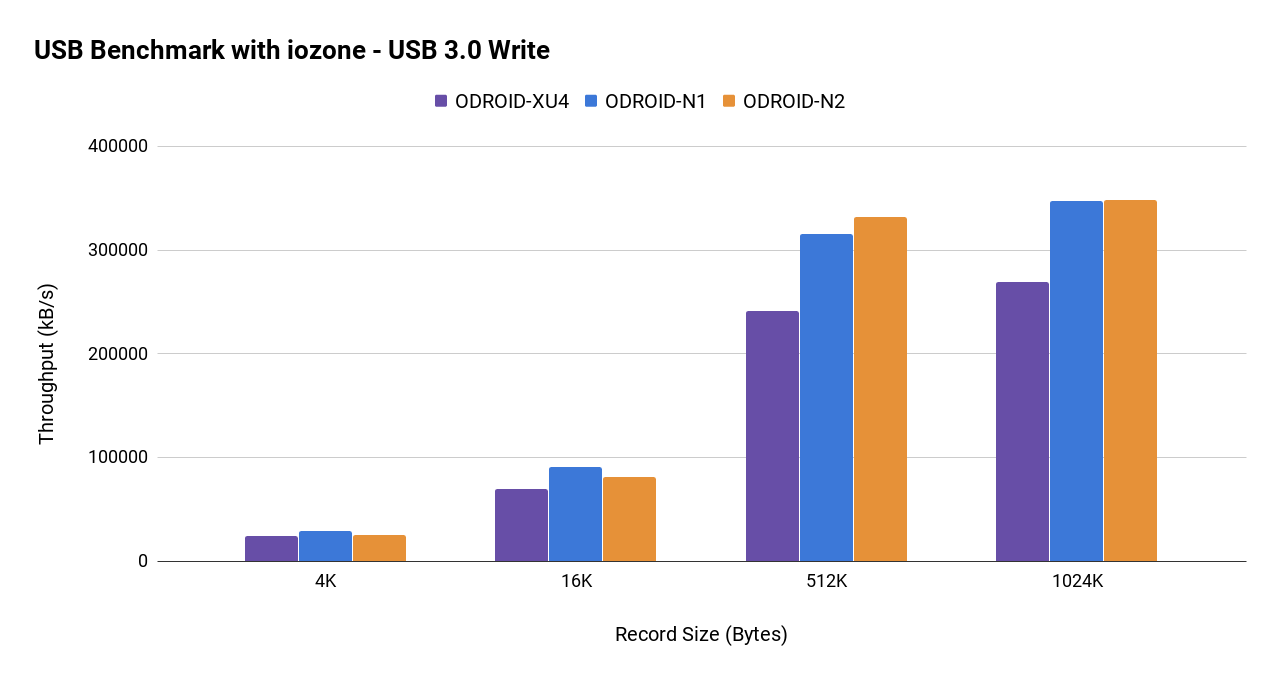
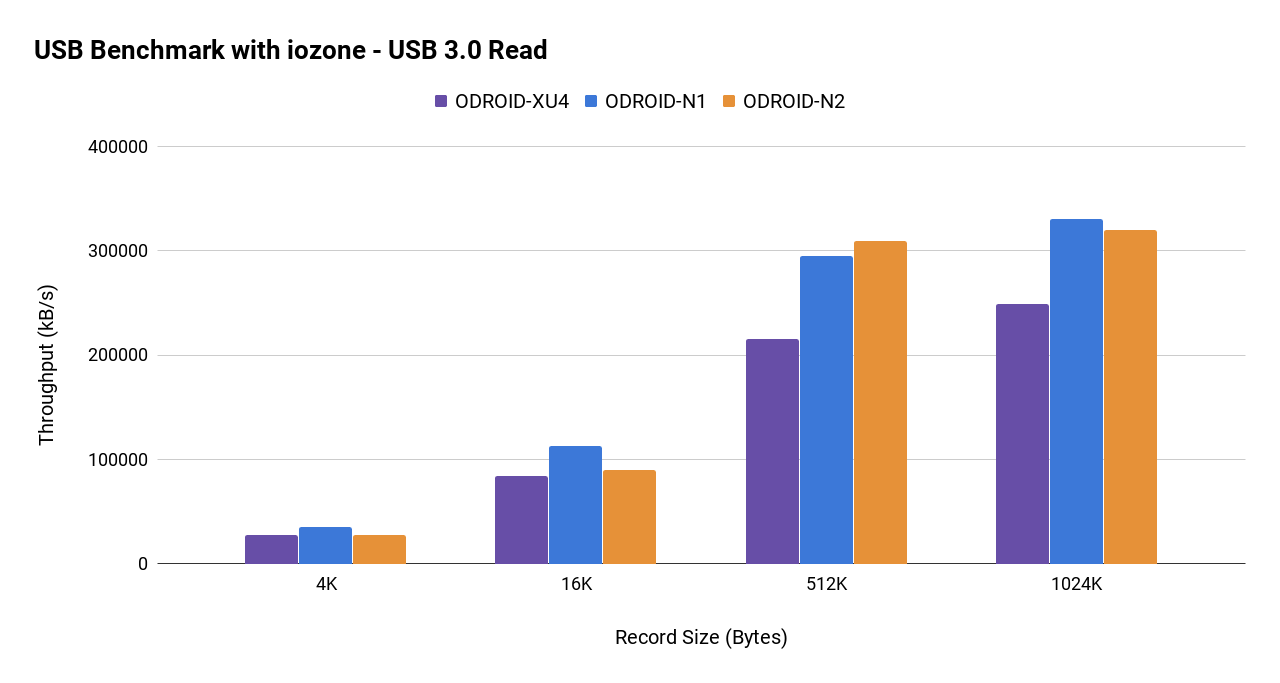
USB 3.0 hosts
We measured the USB3 transfer speed with a UAS capable SSD. The average of ~340MB/s throughput we observed, should be acceptable for many applications. Since four USB3 host ports share a single root hub, the transfer rate will be lower if you use multiple USB devices at the same time.
Figure 12 - USB 3.0 Write test
Figure 13 - USB 3.0 Read test
eMMC storage performance
The sequential read and write speed is over 150MB/s and 125MB/s respectively. The 4K random access performance is reasonably fast too. The iozone test result is as follows:
Figure 14 - eMMC storage performance
Micro-SD UHS performance
Using properly implemented UHS dynamic voltage scaling, the sequential read and write speed is over 70MB/s and 55MB/s respectively.
Figure 15 - Micro-SD UHS performance
The previous S905 SoC could not activate the UHS mode once the system booted from eMMC. However, the S922X can keep using the UHS mode with the eMMC module, simultaneously.
Sound DAC
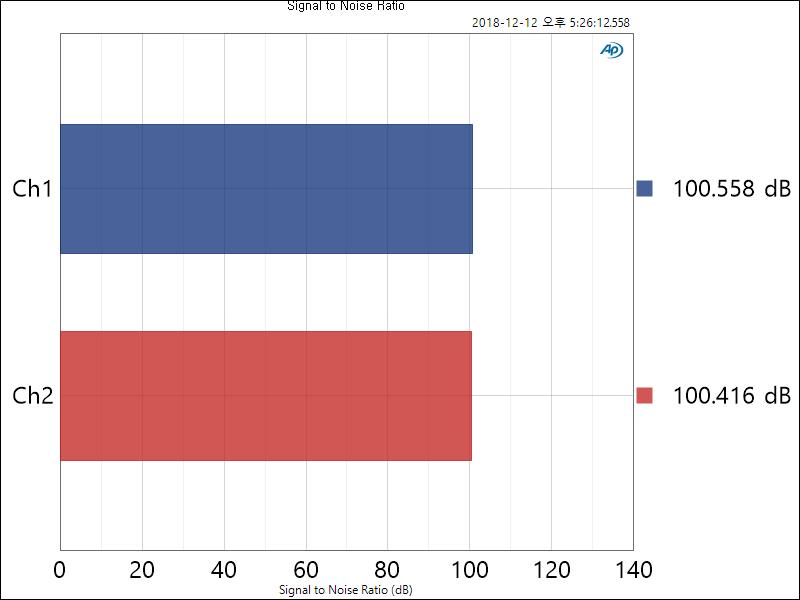
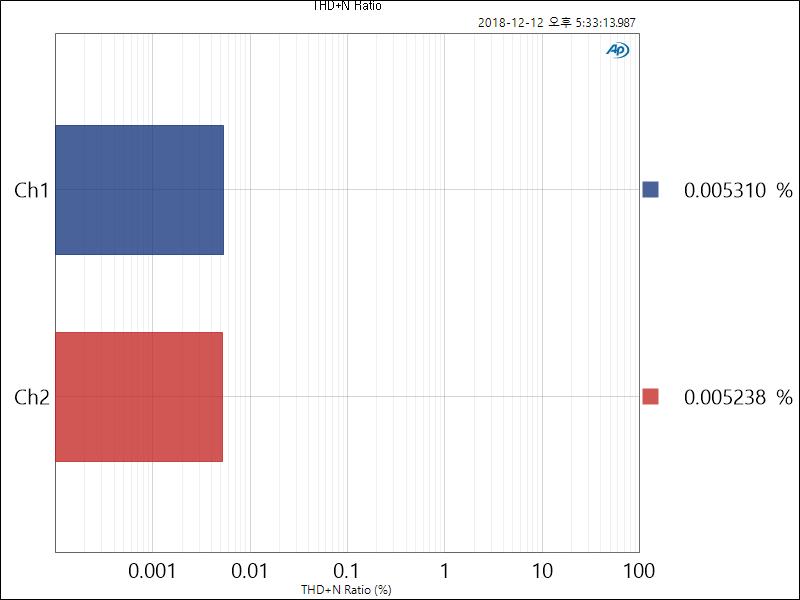
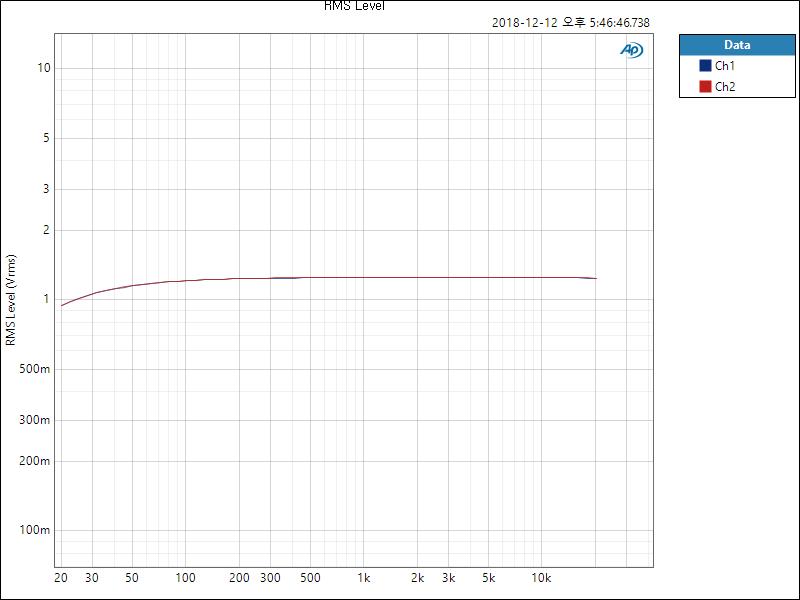
The ODROID-N2 has an on-board high quality 384Khz/32bit stereo audio line output. The dynamic range and SNR is near 100dB and Total-Harmonic-Distortion is lower than 0.006%. One can enjoy Hi-Fi sound quality without an external audio DAC.
Figure 16 - The Signal to Noise Ratio : 1KHz (384KHz, 32bit, 2-ch):
Figure 17 - The THD + N Ratio : 1KHz (384KHz, 32bit, 2-ch):
Figure 18 - The Frequency Response : 20Hz - 20KHz(384KHz, 32bit, 2-ch)
SPI Flash memory boot
The ODROID-N2 can boot from on-board SPI memory instead of uSD memory or eMMC cards. The on-board SPI memory is 8MB in size and can include the bootstrap binaries, U-boot, bare minimum Linux kernel, and a ramdisk that includes “Petitboot”. The “Petitboot” software provides a user friendly interface and allows users to select a boot media.
Unfortunately, since the SPI bus on S922X shares the hardware interface with eMMC, the SPI flash memory on ODROID-N2 is only accessible at boot until the eMMC hardware block is activated. So you have to remove eMMC module and boot from a SD card to update firmware in the SPI flash.
RTC
The ODROID-N2 has an on-board RTC component, NXP PCF8563, interfaced to the I2C bus and can use a backup battery as an alternative power source while the main power source is absent. Since the actually measured power consumption is less than 1uA, the RTC can run for over 10 years with a CR2032 backup battery. Also, this will let your ODROID-N2 wake up at a certain time once you set an alarm time and shutdown it.
Crypto Engine
The ARMv8 architecture of the CPU supports hardware accelerated crypto extensions for building a secure system. As expected, we could see very decent openSSL performance with ODROID-N2, using the following command:
$ openssl speed sha256 (8KByte)
Figure 19 - openSSL performance benchmarks with ODROID-N2
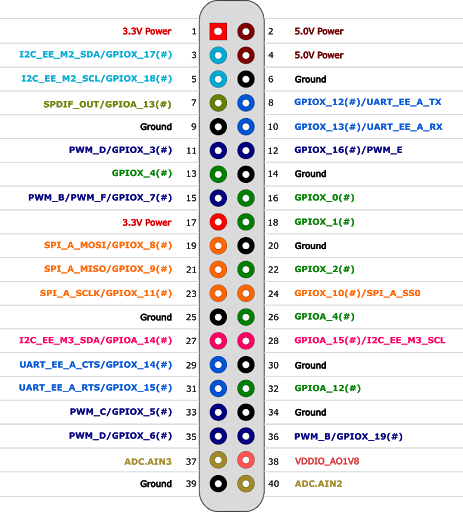
The GPIO (40Pin header)
The ODROID-N2 GPIO interface is similar to that of the ODROID-C2 and fully supports a 3.3Volt interface while ODROID-N1 could only support 2.8Volt IO. This is beneficial for using various peripherals without complicated level shifters.
Another big improvement is a faster SPI bus interface. Its maximum frequency is over 150Mhz, and we will try to implement a DMA driven SPI driver for faster LCD performance.
Power consumption
Idle state: 1.6~1.8 Watt
Heavy load state: 5.2~5.3 Watt (stress-ng --cpu 6 --cpu-method matrixprod)
No cables are attached except DC power input and USB-UART debug console cable.
Software support - Linux
An Ubuntu 18.04 LTS (full 64bit) image is available with Kernel version 4.9.152 LTS at this moment. This kernel version will be officially supported until Jan, 2023.
A hardware accelerated video decoder (VPU) driver is ready. We have c2player and kplayer examples which can play 4K/UHD H.265 60fps videos smoothly on the framebuffer of ODROID-N2 HDMI output.
The Mali G52 GPU Linux driver works only on the framebuffer. We tested the latest PPSSPP emulation and it can handle x3 scaling on a 4K display nicely with well implemented VSYNC.
There will be a Linux Wayland driver a few months later. We are intensively working on it together with Arm and Amlogic. Unfortunately, there is no X11 GPU driver since ARM has no plan to support X11 for Bifrost GPUs anymore. We hope that the Panfrost open source driver can be ported to ODROID-N2 soon.
Software support - Android
The Android 9 Pie is ready and we will release a full source code BSP and pre-built image together. At this moment, Android user-land supports only a 32bit system while the Kernel runs in 64bit mode. We will eventually try to support a 64bit Android system with Vulkan capable GPU driver in a few months.
Availability and price
We will start taking orders in very late March, and the first shipment will start in early April. There is no plan to accept pre-orders. The cost for the ODROID-N2 will be USD$63 for the 2GB, and USD$79 for the 4GB model.
Debugging Party
We have sent some engineering samples to some of our active and friendly community members. The party is well under way!
Specification
Figure 21 - ODROID-N2 Specification Table
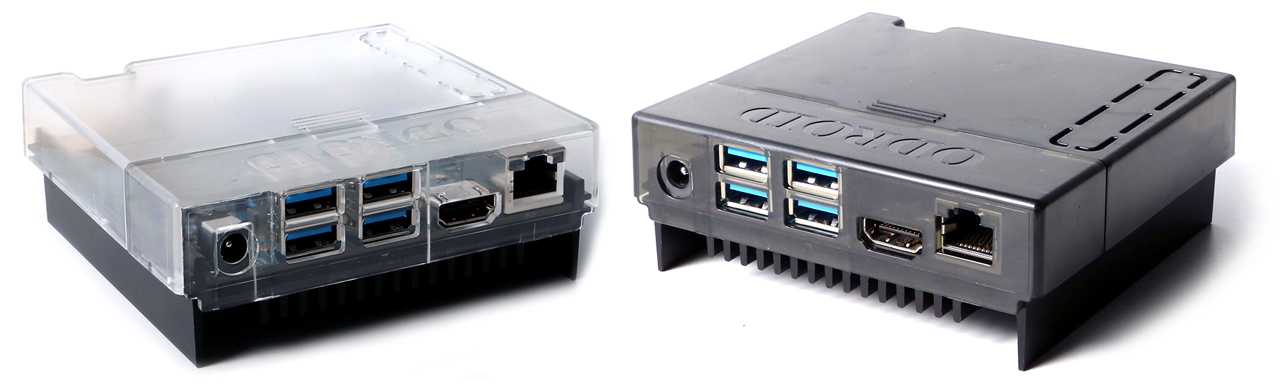
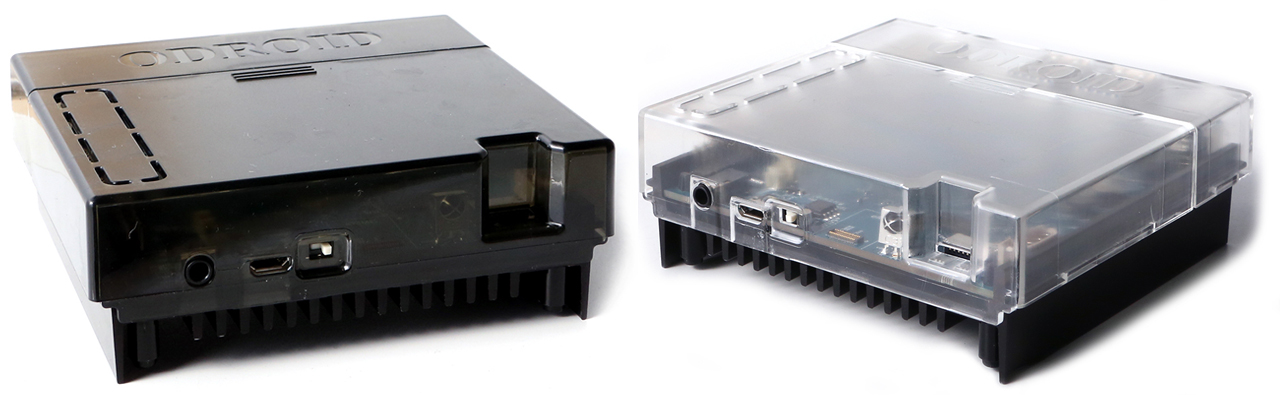
Cases (Plastic Shield)
You can choose between two colors: semi-transparent dark black and clear white. The price will be only $4.
Figure 22 - ODROID N2 Case color options 1
Figure 23 - ODROID N2 Case color options 2
Figure 24 - ODROID N2 Case color options 3
Figure 25 - ODROID N2 Case color options 4
Figure 26 - ODROID N2 Case color options 5
Figure 27 - ODROID N2 Case color options 6
Additional Benchmarks
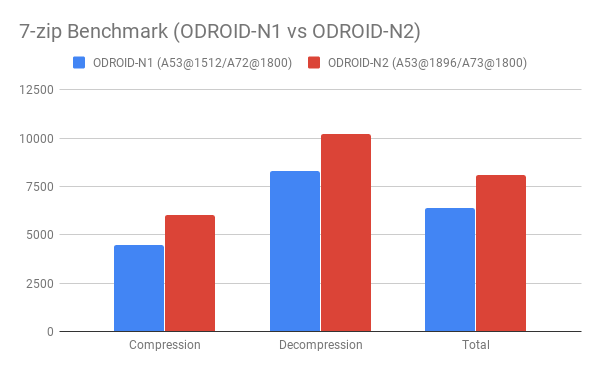
We ran another benchmark test of 7-zip(LZMA) compress/decompress speed with the same GCC 6.3 toolchain on Debian.
Figure 28 - Compression and Decompression using Linux debian
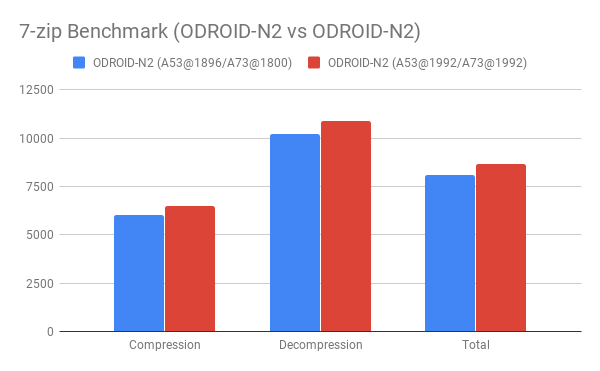
As we can see, N2 is ~20% faster than N1 obviously. If we overclocked the N2, we have additional 7~8% gain.
Figure 29 - Additional Gain overclocking the device
We can say that very old Unixbench is still effective to compare the performance. However, we have to agree we need to run the PTS (Phoronix Test Suite) for modern benchmark tools as well.
We will check the memory performance more carefully in the weeks to come, because the RK3399’s slow memory issue seems to be solved with a couple of patches in the Kernel. We have not tested the ODROID-N1 kernel since we dropped it several months ago. We think the memory bandwidth difference may be negligible, not 35% as seen above, if we apply the patches.
How to Create a Backup Server: Using Clonezilla and PXE - Part 1
March 8, 2019By @lazloLinux, Tutorial
This is a two-part article that was adapted from the ODROID forum. This first half gives an introduction to the benefits of using Clonezilla, an overview of what will be covered, and the steps used to setup a DHCP server. For more information or to see the complete topic in the forum, which consists of several postings by @lazlo, please visit https://forum.odroid.com/viewtopic.php?f=52&t=33529.
Purpose
The goal of this HOWTO is to walk the reader through the creation of a simple and minimal network boot environment that allows any computer that supports PXE to boot Clonezilla over the local subnet for the purpose of creating and restoring disk images. This will require some knowledge of TCP/IP networking and the installation/configuration of software packages on your *nix distribution of choice. This guide will try to be distribution agnostic, hopefully, allowing the reader to use whichever flavor of *nix they like best. This also means that the location and layout of the configuration files on your system may differ from what is listed in this guide. If you get stuck please consult your distribution’s documentation for the given software package. Once you find a solution please leave a reply here to help other readers that come after you.
Why Clonezilla?
Clonezilla is nothing short of an Enterprise Class disk imaging suite. It runs on any x86 (32bit or 64bit) computer that can run Debian, it can both create and restore images of whole disks or individual partitions, it can compress and encrypt disk images, it supports a wide variety of network protocols, and it is truly free software. Read more at https://www.clonezilla.org and while you are there download the .zip file version of the installer and place it on the system you will using as the PXE server. We will need that later.
Why PXE?
For years my monthly backups went something like this:
1. Look for my Clonezilla USB thumb drive
2. Realize I must have accidentally overwritten it in the past month
3. Create a new Clonezilla USB thumb drive
4. A day later find my old Clonezilla USB thumb drive. Monthly backups have been so much simpler and less frustrating since I learned how to setup PXE.
How PXE booting works, in a nutshell, when the Client system is booted via PXE the first thing that happens is the client broadcasts a request for a DHCP Server to tell it not just what the client’s place is on the network but also where to find the files it needs to boot. The Client contacts the TFTP (Trivial File Transfer Protocol) Server it was referred to by the DHCP Server, and begins downloading the files it needs and stores them in RAM. Once this is complete the client then boots up from the files in RAM and is ready to be used.
What does this mean?
This means we will need a DHCP Server, a TFTP Server, a Client to back up, and optionally a File Server to store the backups. The DHCP server can be a home router, or stand alone server like the ISC DHCP server. If the DHCP server is a home router, or if you have some other DHCP server that you can’t reconfigure on your subnet, then we will need to use the dnsmasq package to act as a proxy between the client and the DHCP server. While dnsmasq is able to act as a TFTP, server, tftp-hpa is much more flexible if you ever want to expand your PXE server beyond the scope of this guide. It’s what I use on my home server and it is what I will explain in this guide. The client can be any x86 (32bit or 64bit) computer that supports booting via PXE and can run Debian. UEFI only mode will not work with this guide. I will start working on that soon though. The file server can be almost anything, it just needs a stable, and hopefully fast, network connection and enough disk space to hold the backups. On my home server I use NFS, but you can also use Samba/CIFS, SSH, Amazon AWS S3, and a few others. Finally, the DHCP, TFTP, and File Servers can all be installed in the same OS or they can all three be on different physical servers, VMs, and/or Containers.
What should you do before changing anything on your computers and/or network? You should read this guide from start to finish before doing anything or changing anything. Read the examples and follow the links. If you are not sure about something please remember that asking a question before you take action is better than asking how to fix a broken network. You should make a backup copy of all configuration files before editing them as you follow this guide. If the system(s) you are working with contain data you care about at all you should back that data up before you start. Remember that a backup is only a backup if you can actually restore it.
Part One: DHCP
dnsmaq as a DHCP Proxy
A word of caution before we begin: The dnsmasq package is used in wide variety of software stacks and you may already have it installed and running on your system. If that is the case then it is wise to ensure any changes you make to it’s configuration will not interfere with how it is being used elsewhere on your computer. There are a lot of ways to configure dnsmasq and a lot of documentation for how to use it. If you have never read the example config file for the package you can usually find it located in /usr/share/doc/dnsmasq-something-something-depending-on-your-distro. The file is well documented and educational thanks to its large number of examples and comments. The man page for dnsmasq can be found at http://www.thekelleys.org.uk/dnsmasq/do ... q-man.html
If you do not already have dnsmasq then please install it at this point. The main config file is normally located at /etc/dnsmasq.conf or /etc/dnsmasq/dnsmasq.conf or /etc/dnsmasq.d/some_program_that_uses_dnsmasq.conf depending on your distro.
Here is the config for a bare bones dhcp proxy:
#This option enables some extra logging which might help with troubleshooting:

log-dhcp

#This option disables DNS services.  You should be getting DNS server info from
#elsewhere if you installed dnsmasq just for the DHCP proxy.  If dnsmasq was
#already installed as part of a virtualization stack this might break your VM’s so
#test it early.  You may have to omit it:

port=0

#A bit counter intuitive, this entry actually disables DHCP in dnsmasq and
#tells it act as a proxy for all DHCP requests on the 192.168.0.0/24 subnet.
#The safest option is to use the ip address of this server’s NIC, but any valid IP
#address in your subnet will work:

dhcp-range=192.168.0.151,proxy,255.255.255.0

#This option is mainly for compatibility with older or broken DHCP clients.
#It doesn’t hurt to be careful:

dhcp-no-override

#This option tells the PXE what file it needs to start booting and where to get it.
#The path to the file pxelinux.0 is relative to the root directory for tftpd.
#Since this guide is about simple and minimal we will put it in the root dir.
#The IP address is for the TFTP server, which may or may not be the one running
#our DHCP proxy:

dhcp-boot=pxelinux.0,192.168.0.151

#This option disables multicast and starts the download right away:

dhcp-option=vendor:PXEClient,6,2b
Don’t forget to restart the dnsmasq service after editing its config file.
ISC DHCP Server
The ISC DHCP Server is the standard DHCP server for most versions of Linux and Unix. You will want to use this if you want a powerful yet flexible DHCP server on your subnet. It is very well documented and it’s config is file well commented and that makes it educational as well. It’s home page is at https://www.isc.org/downloads/dhcp/ and a copy of the man pages can be found at https://www.isc.org/dhcp-manual-pages/ so take a bit of time and read over them as well as any distro specific documentation before you install it. The package name can vary from distro to distro but usually it is either “isc-dhcpd-server” or “dhcp” but you might have to search a bit. The main config file for the package is typically found in /etc/dhcp/dhcpd.conf and some distros might have a second file located at /etc/default/dhcp. Below is an excerpt from the dhcpd.conf on my home server with my own comments added:
#Start the subnet definition:
subnet 192.168.123.0 netmask 255.255.255.0 {
#Authoritative means that this is the main DHCP server on this subnet:
        authoritative;
#This is the range of IP addresses given out by dhcpd:
        range 192.168.123.50 192.168.123.150;
#These next lines define the network topology for the subnet and allow
#dhcpd to pass the needed parameters to the dhcp clients:
        option broadcast-address 192.168.123.255;
        option domain-name-servers 192.168.123.1, 192.168.0.1;
#I have my server set up to act as a router so this is the address of the LAN
#side NIC.  Otherwise enter the default gateway for your subnet:
        option routers 192.168.123.1;
#This is name of the file needed to start the PXE boot process. It’s path
#is relative to the TFTP root directory:
        filename "pxelinux.0";
#This is the IP address of the TFTP server that will be sending files to
#our PXE clients:
        next-server 192.168.123.1;
}
After you edit the config to meet your needs restart the dhcpd service.
Those are the first steps to setting up your own home backup server. The next half of this guide will be appearing in next month’s issue of ODROID magazine. If you have any questions, or if you want to read the complete forum posting on the ODROID forum please see the following link: https://forum.odroid.com/viewtopic.php?f=52&t=33529
Installing the Google Play Store on the ODROID-N2
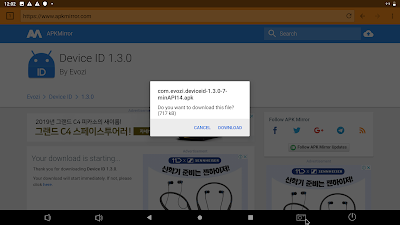
March 1, 2019By @codewalkerAndroid, ODROID-N2, Tutorial
En este artículo se detallan los pasos necesarios para instalar Google Play Store en ODROID-N2 con Android Pie.
Abre el navegador, luego dirígete a https://opengapps.org/ y selecciona ARM / 9.0 / pico.
Descarga el paquete.
Abre ODROID Utility.
Selecciona "Update" y "From download package".
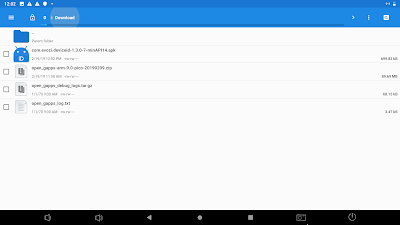
Selecciona "Recent" y "File Manager".
Selecciona "Download" y "open_gapps-arm-9.0-pico-2019xxxx.zip".
Reinicia e instala "Play Store".
Abre el navegador y busca "device id apk".
Descarga el apk.
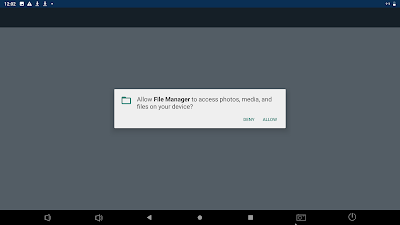
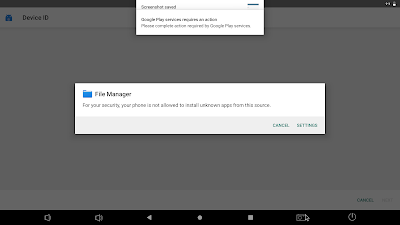
Abre "File Manager" e instala device id apk.
Haz clic en "Google Service Framework (GSF)".
Haz clic en "COPY".
Haz clic en Notification.
Dirígete al sitio de registro.
Inicia sesión en tu cuenta de Google.
Pega el id GSF.
Espere unos 30 minutos, luego reinicia el sistema.
Para comentarios, preguntas y sugerencias, visita el post original en https://goo.gl/Cd3gTx.
Linux Gaming: PC-Engine / TurboGrafx - Part 3
March 1, 2019By Tobias SchaafGaming
Doing the research for the most recent installment of this series was amazing! I knew the system had some really good games, but I was really surprised how many games I enjoyed playing. There were only 3 games that I did not like in the last part, and I wonder if this winning streak will continue this time as well. So far, I really enjoyed my experience with the PC-Engine / TurboGrafx.
Games I liked
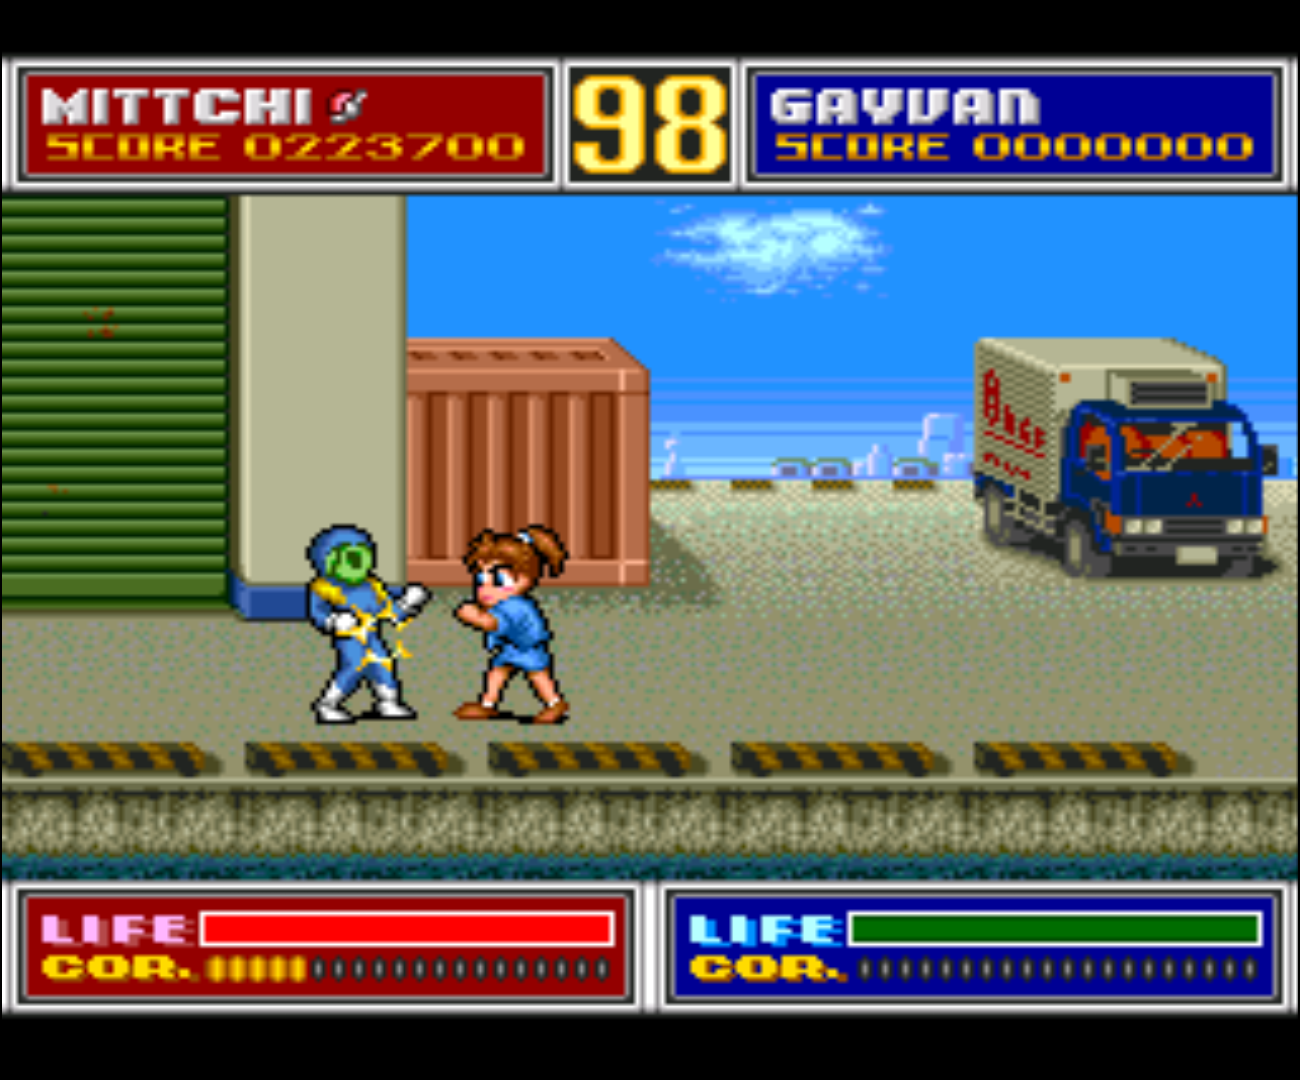
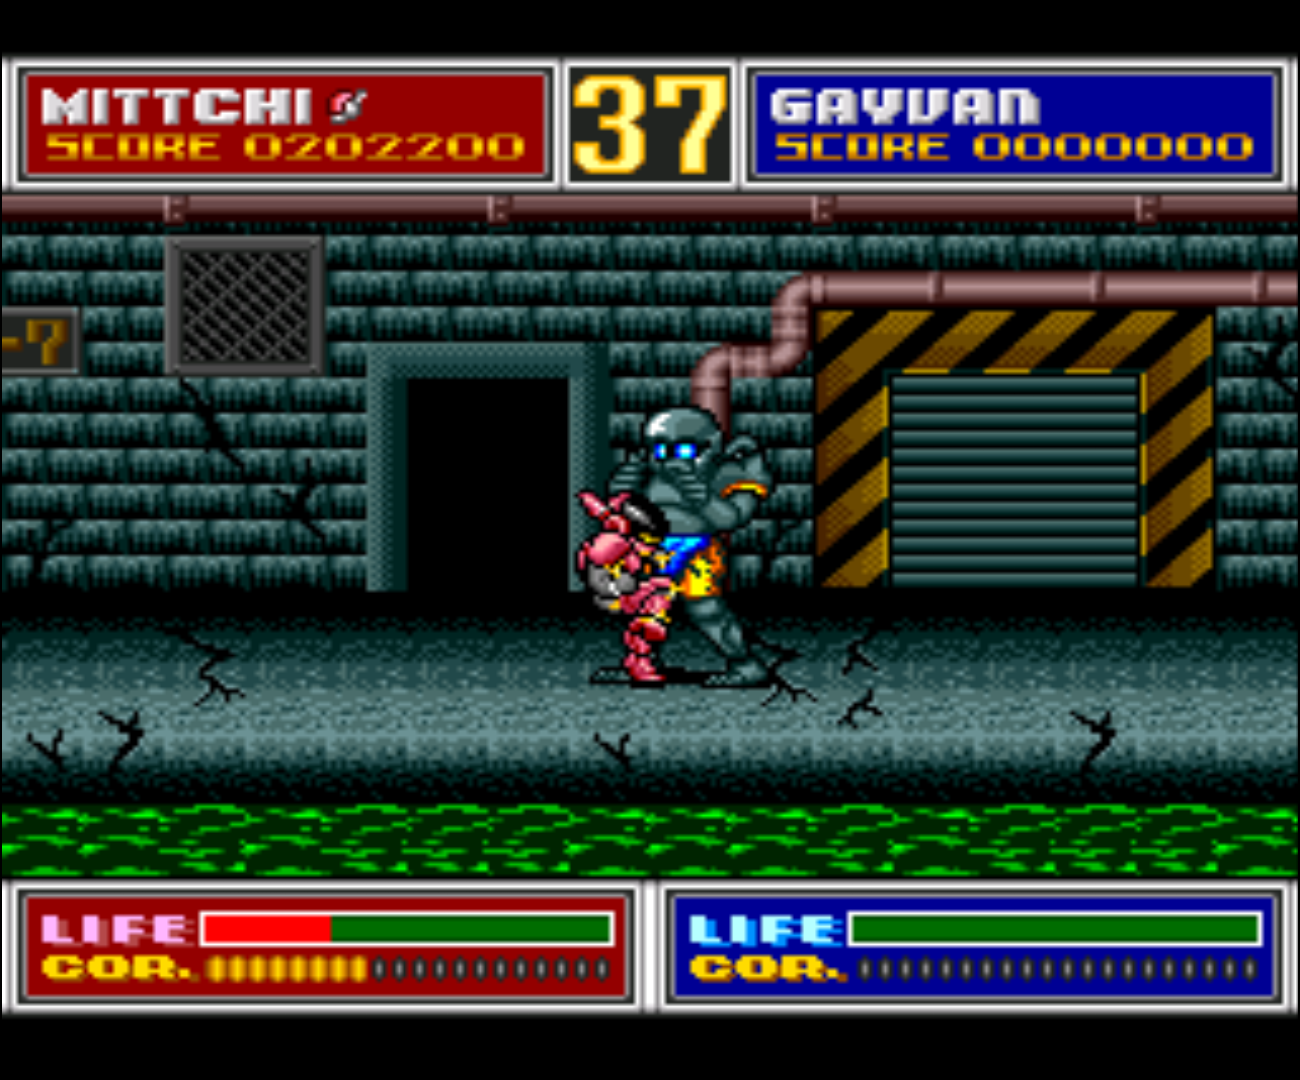
Galaxy Keiji Gayvan
Figure 1 - Fighting off regular enemies in a somewhat cartoon style
Figure 2 - A boss fight at the end of each level as in every good beat ‘em up
I really like this comic styled beat ‘em up which reminds me of Double Dragon or Street of Rage. It’s quite fun and has very nice graphics. If you like these kinds of games you should definitely try this one. Button one is attack, button two is jump. If you press select, your character will transform and wear a battle armor, which increases your speed and the amount of hits you can take. You can switch back and forth between the armor and normal mode any time, but you lose energy (“cor. bar” in the lower left corner) when you are using the armor, which will be replenished either by collecting red spheres, or slowly automatically when you are in “normal” mode.
You can select between two characters one male (Hiro / Gayvan) or fematle (Mittchi). While both are nearly identical, they have a few moves that differ from each other (crouching kick for example).
Hawk F-123
As the name already suggests, in this game you play a F-123 attack fighter and the game itself is a classical side scroller. First I wasn’t really sure if I liked the game, even considering that the graphics are quite good with some level of parallax scrolling, but I did die rather quickly, and couldn’t even finish the first level. It took me a little while, but I didn’t give up, and after a while, I got a lot better and enjoyed the game much more.
There are several different power ups you can collect, from your weapons upgrade (which have different colors for different weapons), speed ups, homing missiles, bouncing balls (instead of missiles), little ship that follow you and provide extra power, shields which render you invincible for a short time, and many types of different special attacks that are great to kill off bosses. Overall, the game has a lot of variety and since graphics, sounds and music are all very good, it’s overall a good experience, and I enjoyed playing the game.
Figure 3 - Love the explosions and multiple level of parallax scrolling
Figure 4 - Hawk also offers the usual boss fights at the end of the level
Iga Ninden Gaiou
This game reminds me a little of Ninja Gaiden, but has its own unique style. At first I wasn’t sure if I would like the game, since the intro and every cutscene is completely in Japanese which is a bummer, as the story seems to be kind of interesting. In this action platformer, you walk through the level wielding your trusty sword and throwing knives, fighting off monsters that have different patterns.
Figure 5 - Very colorful and bright graphics with many different locations
Figure 6 - The usual boss fights at the end of a level
Many of the monsters do respawn after a few seconds, and you can kill them again, which can be helpful to grind for items. There are small hearts which will replenish a little bit of your health, big hearts which replenish a lot of your health (~50%), there are scrolls you can collect for your special attack (lower left corner of the screen), and you can even collect an extra life from monsters, so sometimes grinding can actually save you. If you hold the attack button, you charge the bar for your throwing knives, and once it’s full, you will throw a knife, which is quite inconvenient, as it takes rather long to charge it, and it’s rather weak, while hitting your enemy with the sword does more damage. After you have completed a level and normally defeated a boss of some kind, you meet with your friends I assume (once again everything is in Japanese) and they’ll give you upgrades, new swords, new throwing knives (the second one at least strikes through multiple enemies the first one is really nearly useless), improve your armor, or give you a new scroll for a new “super attack”. This attack can be triggered by pressing Start (Select will bring you in some kind of menu where you can switch your equipment), if you collected a scroll for powering up first. Later, you must collect multiple scrolls to increase the power of your “super attack” or to cycle through the different scrolls you have. There are two jumps: one is performed by just hitting the jump button, and the other requires you to press upwards as well as the jump button. The latter does a big jump which is much higher and farther, and can also be used to jump on buildings or walls. Overall the game is really fun, especially when you figure out the pattern of a boss and are finally able to beat him.
Image Fight II - Operation Deepstriker
This game starts off with a really nice introduction. It has English subtitles for the completely Japanese voiced intro. All other cutscenes are also just Japanese, but lack the subtitles, which is a little bit of a shame as the game has really quality cutscenes which feel more like an anime.
Figure 7 - More shooting action for the PC-Engine
Figure 8 - Bosses require quick reaction and luckily you can adjust your speed
In the game, you have your standard vertical shooter, but it’s very nicely drawn, with colorful, albeit sometimes a little dark, colors. Music and sound are really good and fit the mood of the game. You can collect several different items starting by your “options” that surround your craft and increase your fire power as well as protecting you from enemies and bullets. There are two types of options: blue and red. Blue ones always shoot straight ahead, and red ones turn depending on where you move, where it actually moves to the opposite direction of you. Aside from that, you can “mount” a special gun which will replace your standard “pea shooter” with something different, like a strong laser, rockets, or spreading shoots. There are TONS of these, and it’s interesting to find out what mount does what. The weapon you mount in front of your ship also counts as a one hit shield and explodes instead of you when hit. It’s also a downside as you have to destroy it (by getting shoot or ramming into a wall) to attach a new weapon to your ship. The game is quite fun and has many different level, enemies and bosses, so it comes with a lot variety which is very nice.
Kaizou Choujin Shubibinman 3 - Ikai no Princess
This was one of the first games I ever played for the PC Engine and although it’s entirely in Japanese, I instantly fell in love with it. This action platformer can be played with up to two players, and both of you have a sword and some kind of energy ball attack. The sword is used if you smash the attack button, and the energy ball comes out if you hold the attack button for a few seconds (it’s rather fast but you don’t have an indicator when it’s ready). The energy ball is actually your stronger attack and probably what you rely on when fighting bigger enemies and bosses, or if you want to break something. Press and hold attack after you fire the ball again, and you can now control the direction of the energy ball and even make a 180° turn if you want to. The game has amazing graphics with a little bit of parallax scrolling here and there. The bright colors are very friendly and enemies change often. Some of which are tiny while others are huge. At times, you can mount different vehicles progressing through the level in a mecha suit for example. This makes the game really fun to play and gives a lot of variety. Music is really good as well. I highly recommend this game.
Figure 9 - Fighting off a bunch of enemies using the energy ball to kill all at once
Figure 10 - There are plenty of bosses and mid-bosses in the game
In between levels you have nicely animated cutscenes that look fantastic, but unfortunately they are all in Japanese as usual. You can play this game alone or with a friend, and can select between a guy and a girl as the main character the cut-scenes will change according to your selection.
Kaze Kiri - Ninja Action
Similar to Iga Ninden Gaiou and Kaizou Choujin Shubibinman 3 - Ikai no Princess, this is an action platformer, where it’s closer to Iga Ninden Gaiou or Ninja Gaiden. In short, this game is amazing, and the visuals are impressive with several layers of parallax scrolling which is quite nice for a game like this.
Figure 11 - You have to kill enemies until the bar in the is empty
Figure 12 - Bosses can be thrown just like normal enemies but they are stronger
The fighting is spot on. If you attack from afar you are throwing knives, but when you’re closer you automatically attack with your sword or even grab the enemy and throw him over your shoulder. Enemies are also not completely defenseless; on the contrary, while the first enemies are easy to kill by a knife, most enemies of the second stage will already block your knives, and some enemies will even block your sword slashes, which is why you constantly have to change tactics: jump over them, attack from behind, or slash at them from above. It’s really fun to see that you not only get better while playing, but that also your enemies get stronger, and you need to improve your skills to beat them. Also, they will be able to take more hits, and you might have to fight multiple enemies at once. Bosses are similar, they often even look like you and have similar capabilities and tactics, but they also have special abilities which make them slightly stronger than you. Still, even they can be picked up and thrown over the shoulder which gives them not this “all mighty overpowered” feeling that most bosses in other games have.
Your health bar is constantly recharging, so in worst case you can even sit tight and recover your health. This health bar is also used for your attacks. Throwing a knife will reduce the bar for one point, but it recovers rather quickly. You also have the ability to turn yourself invisible (and with that invincible) for a few seconds, which is great to avoid attacks. Overall, this game looks and plays fantastically, and I highly recommend it.
Games I found ok
Gain Ground SX
This game is a little bit hard to describe. You have a selection of fighters and either have to kill every enemy in the level or bring all your “soldiers” to the exit. The enemy normally attacks rather slow, so you can run away or just avoid their attacks. In some levels you find small miniatures, and if you collect them they follow you and you NEED to go to the exit with them so that you will have them available on the next level. If you instead kill all enemies, you will not get the extra character for the next level.
Some level have multiple miniatures to “collect”, while others have one or none at all. Most of them have different attacks, ranging from spears, to bows, to guns and even rocket launchers. They also often have two different attack modes and actually may have totally different attacks that way (for example pistol + grenade). It’s getting harder quickly though, and you may end up losing your fighters quickly in later levels. I’m not quite sure why it uses the CD format, since it has no voice acting, no cut-scenes that I could see, and the graphics are not that impressive either. I think a HuCard would have been enough for this game.
Garou Densetsu II - Aratanaru Tatakai / Garou Densetsu Special (aka Fatal Fury)
These are actually two games, but I found them both similar, since they are from the same series, with Garou Densetsu Special being the superior game of the two in my opinion, with better graphics and more characters to choose from. Still, I found both games rather hard. It uses SELECT and START as additional action keys, as the PCE only had two action buttons (I and II) but they “solved” this issue by using start and select as additional buttons, and were able to map low kick and punch and high kick and punch depending on your layout over these 4 buttons. There is some voice sampling for the announcement of the character and some nice music, but overall it’s probably easier to play it for the NeoGeo. Still for the PCE, these games are amazing, and if you like fighting games, this might be one for you, if you want to go all out on the PCE.
Ginga Fukei Densetsu – Sapphire
This is one of the many shooter games that this system is so famous for. You can select one out of 4 anime girls, which all have different aircraft and can collect a few power ups, which are limited to either an extra bomb or to one of the power ups for your weapon. Each weapon can be upgraded multiple times, and you can switch to another weapon if you wait for the power up to change color (red, blue, or green). Each of the 4 ships handles the weapons and power ups slightly differently, so you have a total of 12 different weapons with multiple power levels. Aside from that, there’s not much to say about this game. There are tons of enemies and bullets on the screen and you have several mid bosses and an end boss at each stage. It is fun game for blowing stuff up, but not very unique. At least the music is rather good.
GöTzenDiener
Despite its somewhat German name, the game is completely in Japanese and, as usual, I don’t understand a thing. It starts off with Japanese text, and if you press start here, you skip the rest of the introduction.
In the intro, you see a young woman abducted by evil forces and monsters, then a group of soldiers head out to defeat the monsters, and all but one got killed. The game start with a very short show off between the one sole survivor and a huge demon (probably the evil overlord or something?). They both kill each other, and the girl that was at this moment hanging from chains in the background when they were fighting is suddenly free. She picks up the sword of the fallen soldier, and this is where the game starts.
Now the small girl, with a sword from a soldier, heads out to get home (I guess), trying to pull of what an entire army couldn’t do. Confusing, right? Anyway, the game is played in isometric 3rd person perspective, and has TERRIBLE controls. You walk around, climb up and down stairs and ladders, kill an enemy every now and then, you can push object, pick a few objects up (like a giant sledge hammer to smash stones), and just aimlessly roam around the tower that you’re in. The graphics are OK, but not very impressive, but the sound is good, although you have very little aside from some ambient sounds (like ringing bells) and some sword swings and the like. When you kill an enemy, there’s a nice effect where it dissolves in all its pixels and disappears which is cool to look at, but aside from that, there isn’t much to the game. It has no map, no goal, and you have no clue what to do, except for trying to find a path you haven’t already walked ten times already. Not sure if I dislike it or just don’t much care about it, but I think this could have been a lot better.
God Panic - Shijou Saikyou Gundan
This is a kind of a cute ‘em up but has very little variety. There is only one ship and several level of power ups for your weapon, but no different weapons. The graphics are nice, and the music is ok. It’s overall an OK game, but nothing special.
Golden Axe
Well, what can you say about it: it’s a rather good port of Golden Axe with added CD music and some intros for the three characters you can choose from. Graphics are a little bit darker than on other ports, but aside from that, it looks good enough. If you’re a fan of Golden Axe, you won’t be disappointed.
Gradius II - Gofer no Yabou
Once again, if you know Grandia 2, you know this game. It’s a really nice arcade port, with good quality of sounds and music, and a very nice animated intro. It’s a very hard game, which is one of the main downsides for me, and since this review is based on my personal opinion, I rank it on the “it’s ok” side. The fact that you only have 3 lives and no continue makes the game very hard for me, and I started it over and over again. Maybe with more practice I would enjoy it more, but it’s a little too hard for my taste.
Hellfire S - The Another Story
This is another of the many side scrolling shoot ‘em ups for the system. It has a very nicely animated intro and overall rather good graphics. This game also allows the use of the “Turbo Switch” (L2) to work properly. You have a couple of different power ups like speed and weapon powers but no special “bombs”. By pressing the second button you switch the direction of your weapon. You can fire forward, backward, up and down, and diagonal in all 4 directions. This is required as enemies come from all directions and some can only be hit if you fire backwards or straight up and down, especially bosses with which you need to use this often. Switching through all the weapons is “different” but not always helpful. Overall the game is really not bad, but is also quite hard.
Hihou Densetsu - Chris no Bouken
Once again this is a game fully in Japanese. Even worse, the introduction is only shown in pictures (with no animation whatsoever) and explained in voice acting, which is rather good quality but completely in Japanese, with no subtitles of any kind. The game looks rather nice overall and is an action platformer. Since the main character is a female, apparently going after her father exploring ancient temples, you might guess what I was thinking when I first played it, and it has some topics that are shared with Tomb Raider: you collect ancient coins when defeating enemies, and there are a lot of jumping puzzles which require timing and precision. In fact, timing is very critical, as you only have a limited amount of time for each level. You also wield a sword/dagger that you can use to break objects or kill enemies. This dagger by itself is rather short in reach and most enemies will take more than one hit, but it can be powered up by different orbs that you can collect, and apparently the combination of two different orb colors define what type of weapon upgrade you will get. Some of which are close range (or extensions of that), while others even allow you to shoot at enemies. Overall, the default weapon is very weak, and enemies often have a greater reach than you have, so upgrading that weapon is essential. Still, I found the game very hard, as you are limited in time and have to rush through the levels and often get hit in the process, which will lead to an early demise. At the end of each level, you fight a boss monster, and each level has two stages it seems. After each level, you have another cutscene progressing the story. As I said, the graphics are quite nice and the music is very good. I probably would enjoy it much more if it wasn’t that hard and you wouldn’t have that short time limit per stage.
Horror Story
This is another action platformer in which your hero is heavily armed and fights off all kinds of monsters (probably all from Chinese Horror Stories). The graphics are ok, although not impressive, and the background is constantly scrolling, continually pressing you to go forward. It’s not too hard though; once you figure out that you have a double jump, your life becomes a lot easier, as your double jump is probably 3 to 4 times as high and far as the regular jump, and without it you would have a very hard time. You can collect a few power ups: “P”, for example, will give you a “Shield” if you collect 3 of them, which is basically a armor that can take one extra hit before you die (normally you die if anything touches you). Others will give you different weapons, from lasers, three-way-shooters, flame throws and the like. It can be played alone or with a friend. It’s fun for a little while with good music, but nothing that kept me interested for long.
Human Sports Festival
This is a combination of three sports games on one disc: golf, soccer and tennis. All three games are solid and look good for their time. Controls are fine, music is good. I’m just not a big sports fan, especially not of the early titles, and once again it’s available in Japanese only.
Hyper Dyne SideArms Special
This game has two different options at the start screen: “Standard” and “Before Christ”. Both seem to have the same level layout but are controlled slightly differently, with different types of weapons and slightly changed graphics. In “Standard”, you get power ups quite often, and you can shoot them to change into other weapons types, and can pause the game to switch through the different types of weapons you selected. In “Before Christ”, the weapon ups are quite rare and change automatically from one option to the next, which means you have to time when you pick it up in order to increase the weapon you want, or to get the weapon you want. There is no option to switch through weapons here. Button I will shoot to the right, and button II will turn your character to the left and shoot to the left. The graphics are good, but not impressive, and the music is rather nice and fits the game perfectly.
It Came From The Desert
This game is an interactive adventure with some action scenes in a run and gun setting. It’s actually quite impressive as it’s the first time I have really sees full motion videos on the PC Engine. The color pallete is greatly reduced though, which makes it kinda hard to look at, since there’s maybe 8 colors at a time that you can see in the video. Also, the videos are very grainy. Some of the graphics in the game also look like digitized photos, which are have a little bit better quality but are nothing compared to the cartoon graphics normally on the system. Most part of the games are just talking to people and visiting places. With everything being FMV, this feels more like an interactive movie than a game which is quite unique. The game is also completely in English, so you can sit back and enjoy the show for the most part.
J League Tremendous Soccer '94
This soccer game has really good graphics, in fact it has the widest screen resolution I’ve seen on all the games I’ve tested so far. The graphics are colorful, the action is fast paced, and the voices are in English, but the menu is in Japanese only. I also found the game very hard, but that could be just me being bad at it. Overall, it’s a very nice game, and if you like soccer, you should try it.
J. B. Harold Murder Club
In this detective game you try to solve a murder. You visit different places in order to ask people what they were doing and what they know by interrogating them and so on. It plays similar to the Snatcher game on the Sega CD, but uses mostly photos of people and places, which makes it look more grainy. You have the option to have narration either in English or Japanese, but this will significantly slow down the game as you have to wait until they are done speaking. Overall it’s a very interesting game, yet alone I don’t have the time to play it or else I’d probably enjoy it more.
Jim Power - In Mutant Planet
I recognize this game from the Amiga, and the version of the PC Engine is very close to the Amiga experience, but also has some improvements. For example, there was an intro added which explains what you’re doing, which is very cheesy but OK. One big upgrade is probably the CD quality soundtrack. Although you don’t have many different music tracks, the ones that exist are rather nice and fit the setting. With the cartoony graphics and bright color, this game is a really looker, similar to the Amiga version.
Similar to the Amiga version, pressing the “up” button causes the character to jump, which means if your D-Pad is not working correctly, you might jump more often than you want to. You still have a secondary button to jump as well. As with most European platformers, hitting anything (even a drop of water) means instant death. Still, the game is quite amazing, and if you like action platformers, you should give this one a try.
Juuouki (aka Altered Beast)
I know this game from many platforms and this one is actually a rather good port, but I had a very big issue with it. Whenever I collected the 3rd sphere and transformed into a beast, the game stopped progressing. You were able to kill all enemies in one section of the game, but after that the game just stopped. You could walk, jump, attack, whatever, but the game would no longer scroll and you were stuck on the scene you’re on. This was really annoying. Maybe it’s my version that had this issue, but it made the game a lot harder than it should have been.
Kaze no Densetsu Xanadu / Kaze no Densetsu Xanadu 2
These games are similar to the first Ys games and are part of the Dragon Slayers series. The intro of the first part is very impressive. You can check out the very lengthy introduction at https://www.youtube.com/watch?v=XXXxiyn4aWY). As usual, the game is completely in Japanese, which is the biggest downside. The first game’s “in-game-graphics” are not as impressive and not even nearly as good as the stunning intro. In fact, they are rather bland. The second game improved the “in-game-graphics” and gameplay A LOT and I like it much better. Still, since the game is completely in Japanese, I have no clue on what to do and where to go to. It was easier to figure some stuff out in the second game, but it’s still a big let-down for me.
The fighting style is like in the early Ys series, which means you run into the enemy, and if you hit them head-on, you damage them, but if you are not aligned correctly, or an enemy hits you from behind or from the side, you take damage. There is no attack button involved and you just run into the enemy. I think if I could understand what’s going on, the second game in the series would keep me busy for hours to come.
Kiaidan 00
This nice mecha-styled shooter game comes with a nice introduction and a big variety of weapons. You can cycle through all weapons by pressing the second button, and the first button will attack. Stop attacking, and it automatically will charge a special attack depending on what weapon you have selected. The graphics are really good, and the sounds and music are good as well. The game is a little hard as you fight enemies from all directions, and only one or two weapons can actually attack enemies behind you, so switching between weapons is required and can be difficult in the heat of battle. Overall, the game is quite fun and probably even deserves to be ranked under games I like, but I couldn’t play it as long as I would have wanted to decide this.
Kick Boxing
I can’t say much about this, except that it’s quite decent. It has good graphics and a good number of frames for the animations. It also has training camps to improve your character and so on. It even supports more than just two buttons. It’s not my favorite type of game, but for what it’s worth, it works quite well, and if you like these kinds
of games you should definitely check this one out.
Kuusou Kagaku Sekai - Gulliver Boy
When I first saw the FMV in “It Came From The Dessert”, I was already impressed that this was possible, but this game here surprised me even more. The videos in this game are anime, and aside from a little bit of graininess, the videos look perfect. They are really high quality and there are actually several minutes of uninterrupted movie shown. This, and the overall presentation of the game (graphics, sounds, and music) show that it’s a very late title in the systems lifetime (1995), and the developers by then really knew how to get the most out of the system. To be honest, if I could understand what’s going on (as usual, everything is Japanese only), I wouldn’t stop playing the game until it’s completed. This feels more like a Sega Saturn game from the quality rather than something like the PC Engine. Unfortunately, since I don’t understand what’s going on, I can only poke around in the game. It’s really a shame though.
Games I disliked
Genocide
This mecha-like fighting game was really nothing that I enjoyed. You can’t even skip the all Japanese text-only introduction which is rather annoying. After that, it has a nice rendering introduction with good graphics, and the game looks like it could be fun. Once you’re in the game, however, this changes. The graphics are still ok, but the gameplay is really bad. You control a mecha that can only hit with his sword or jump, and have to kill enemies which are insanely fast and constantly hit you, which means you lose health on nearly every enemy. The fighting is dull, with nothing interesting and no variety except for the monsters itself. You can die quickly, and I didn’t find much fun in the game.
Godzilla
Granted, Godzilla might not be a bad game, since the music and graphics are nice. The cut scenes actually look quite good, but this fighting game in Street Fighter 2 style is simply not my type of game. The characters are slow, and even on the first level, the enemies easily beat me and I couldn’t do much about it. I could pull of a few special moves, but when your special move is barely longer than a regular hit with your arm, and the enemy can shoot you all over the screen, that seems a little bit unfair for me.
Gulclight TDF 2
This round-based tactics strategy game is somewhat hard to understand, and I don’t mean because it’s completely in Japanese, although this doesn’t help much either. In this game, you can move around your units plan attacks and switch between weapons. It’s similar to games like Fire Emblem or Shining Force, but also somewhat different. In fact, if you try to attack an enemy, you’ll probably end up losing rather quickly, while the strategy of digging in and waiting for the enemy to attack will probably get you through the level, so you’re really in disadvantage if you’re attacking, which is very odd for such a game. Aside from that fact, the game just throws you into seemingly random battles. You don’t know why you’re fighting there or what the goal is, so it’s frustrating and I didn’t like it.
Implode
This is a compilation of 3 homebrew games made in the early 2000s. Implode is a rather well-known game where you click on a block, and all blocks of the same color that are connected to the block you clicked on will disappear, and you try to get the lowest number of remaining blocks. The second game on the list was similar to blobby volley for those who know the game. It’s a volleyball “simulation” with some extra twists, like moving the net left or right and making it higher or lower. The PC is extremely good and very hard to beat. The last one is a racing game of some kind where you try to avoid hitting the other players car which is basically impossible. None of the above are really fun in my opinion, but it shows that there are still people out there creating games for the system.
Jack Nicklaus Turbo Golf / Jack Nicklaus World Tour Golf
There isn’t much I can say about this: golf simulations are normally not my thing, and neither are these. It has some voice acting explaining what course you play on, but as I said, it’s a golf simulator. If you like these kinds of games, try it.
John Madden Duo CD Football
I’m not really a fan of football or football simulation games. This one is rather good from what I can tell, and it also uses some FMV when showing coin throws and comments. The gameplay itself seems to be fine as well, but as I said, I’m not a huge fan of that genre, so I really don’t know how to rate this game. It just does nothing for me.
Kakutou Haou Densetsu Algunos
This fighting game looks rather good and has a lot of different characters to choose from. In battle mode, you fight against another human player, while in story mode you fight against the PC. Although the game seems to have support for up to 6 buttons, I couldn’t use more than two. The characters are also sized very differently, and size matters. If you have a tiny character with a reach of about 1-2 inches on the screen, imagine how you handle yourself against a character that has a reach over 1/3 of the screen where you can’t even get close before you hit them. The enemy is constantly blocking your attack while you will probably receive one hit after another. Maybe it’s just me, and I’m terrible at this type of game. The graphics are very good and music is also rather nice. The sound could have been a bit better, but I guess it’s fine. Overall, I don’t like the game due to the unbalanced gameplay.
The G Spot: Your Go-To Destination for all Things Android Gaming: Aargh, Plunder, Me Hearties
March 1, 2019By Dave ProchnowAndroid, Gaming
As you read this article in March 2019, the release of the much anticipated and equally delayed Plunder Kings from Goodnight Games should have already happened in late February. You’ll recall that Goodnight Games initially promised this wild flying shoot-em-up in February 2018, so you may be tempted to take this revised release date with a grain of salt. That is, until you watch the most recent trailer from Goodnight Games at https://m.youtube.com/watch?v=H1aWXAn57tA.
There it is at the end of the video, a new release date of February 26, 2019! So, seeing might be believing, eh? At any rate, Plunder Kings is an incredibly powerful, gorgeous top-view scroller that features ships, baddies, and weapons galore (Figure 1). There’s a twist, though. During the game you can take your loot at the end of a level, or you can slug it out and keep on playing, risking death and the loss of your ill-gotten loot.
Figure 1 - Thar she blows! Plunder Kings mayhem
But it gets even better than that, folks.
Prior to the launch of every mission, you can make a wager on how many waves you can vanquish. If you win this wager, you can cash in on a king’s wealth of booty, boosts, and pirate plunder. Alas, if you lose, you truly lose...everything. Is it worth the gamble? Hey, it’s Vegas, baby and you’re a pirate, so go for it (Figure 2).
Figure 2 - Intra-game communication in Plunder Kings
It’s Your Tale and You’re Free to Rewrite It
Another highly anticipated title release is already racking up the rave reviews. Revolve8 from SEGA is a real-time strategy game with “episodic”--that’s a SEGA term--dueling posed inside a fairy tale. This game is free to download and play, and includes in-app purchases. As we’ve come to expect from SEGA games, Revolve8 sports beautiful graphics, realistic game play, and a captivating soundtrack (Figure 3). Better than that, the credits for this game read like a who’s who of landmark computer gaming: the senior producer is Masayoshi Kikuchi, character designer is Koji Igarashi, with Ryota-H as the character artist, and Shunsuke Tsuchiya and Yasunori Mitsuda as sound producers. This legendary role call equates to classic titles like Yakuzza, Jet Set Radio, Castlevania, and Xenoblade Chronicles 2. WOW!
So grab your card deck, smack down your opponents, and escape into your own world.
Figure 3 - Revolve8 from SEGA will take your ODROID gaming skills to the limit
Looking for a little gaming distraction while waiting for these new releases to arrive? Okay, how about some part-time work? Better yet, a Part Time UFO (Figure 4). It sounds totally whack, but driving this blocky UFO around and picking stuff up with its extendible/retractable claw can be therapeutic. Created by HAL Laboratory, Inc. in early 2018, Part Time UFO retails for $3.99 and can become addictive. Consider yourself forewarned, former Flappy Bird addicts.
Figure 4 - Blocky fun that will grab you in Part Time UFO
The faster you can grab and deliver stuff, the bigger the bonuses you will bag. Along the way, you can pick up extra work--like that vase that’s hiding by the building, just go ahead and grab it. Bingo, you just scored an extra bonus because you piled your vase on top of other stuff. These bonus piles don’t last too long, so scoot your little UFO around pronto before your bonuses are outta this world. Cue the video: https://m.youtube.com/watch?v=2Nb718u4XMU.
Get Your Android ON–ODROID Magazine’s February Top Ten
Alto’s Odyssey - FREE
Asphalt 9: Legends - FREE
Minecraft - $6.99 USD
The War of Mine - $14.99 USD / developer expansion pack $1.99 USD
Vainglory - FREE
Fire Emblem Heroes - FREE
Monument Valley 2 - $4.99 USD
Shadowgun Legends - FREE (If you love RPG shooters, download this game!)
Crashlands - $4.99 USD
PUBG Mobile – FREE (Ten million plus downloads can’t be wrong, right?)
STOP THE PRESSES!
Good golly, Miss Molly. It seems like an eternity--two and a half years IS an eternity in the Android gaming industry--since we last heard about Oceanhorn 2: Knights of the Lost Realm. Announced by the developer Cornfox & Bros. as a successor to their hit title Oceanhorn, development was proceeding at a torrid pace until Epic Games got involved. However, this involvement was totally expected, since Oceanhorn 2 is being coded with Epic Games’ Unreal Engine 4.
Ironically, it’s because of Epic Games’ involvement that we have this surprise, press-stopping announcement. At a gaming event in Helsinki, Finland that was hosted by Epic Games, an advanced release of Oceanhorn 2 was available for attendees to play. While the video is kinda dodgy, you can catch some glimpses of the game in action. Featuring a 2nd-person perspective game play, Oceanhorn 2 looks great and should be welcomed by all Zelda aficionados. The video is available at https://m.youtube.com/watch?v=DY6qotqTEbQ.
Introducing NEMS Linux - Part 5
March 1, 2019By Robbie FergusonLinux, ODROID-XU4, Tutorial
In the January issue of ODROID Magazine, I introduced you to some of the new features of NEMS Linux 1.5 and how to upgrade from 1.4.1 to 1.5 using the NEMS Migrator tool. NEMS Linux 1.5 has since been gaining momentum on the XU4 platform. This little single board computer from Hardkernel has proven itself as a stable platform for a Nagios Enterprise Monitoring Server. It is responsive, supports eMMC (which is markedly more reliable than SD cards), and obviously has a form factor that fits within every sized network, from the home user looking to know if their Internet connection is running slow, to the grand-scale enterprise that needs to monitor the status of hundreds of connected endpoints.
Figure 1 - Monitor your internet speed in NEMS 1.5
There have been some notable infrastructure updates for the NEMS Linux distribution system and website. Our website is now hosted on its own EC2 instance, giving me optimal scalability as NEMS Linux continues to grow in popularity. This move is also in preparation for many of the new features of NEMS Cloud Services, which provide optional cloud-based features to make Nagios monitoring even easier for system admins. NEMS Linux 1.5 downloads are available via BitTorrent. This distribution method has proven to be a great way to reduce cost while simultaneously improving the overall download speed for end users. I have also begun providing the IMG files in a ZIP file, significantly dropping them down in size. Since balenaEtcher and other tools can flash your SD card or eMMC without having to unzip the file, it makes sense to distribute IMG files as ZIP now. So, fire up your Transmission client and head on over to our website to download NEMS Linux for ODROID-XU4.
Figure 2 - NEMS First screen before initialization
NEMS Linux is free to download and use, but there are some additional features that are available as perks for Patrons. One such feature is NEMS CheckIn. I developed this feature to address concerns that if a NEMS server was to go offline, the admin would stop receiving notifications and may not realize this for some time. This led to some users setting up multiple NEMS servers--NEMS servers to monitor NEMS servers. NEMS CheckIn is the answer to this.
Figure 3 - Receive notifications if your NEMS server goes offline
NEMS CheckIn is very easy to set up and, if enabled, will simply send a ping to the NEMS Cloud Services server every 15 minutes. Should the server not hear from your NEMS Linux server within a set time frame, an email will be sent to the email address you specified alerting you that your NEMS server has failed to check in. It is a simple but highly effective solution. NEMS CheckIn can be enabled within NEMS System Settings Tool under NEMS Cloud Services. It is disabled by default.
Figure 4 - A sample NEMS CheckIn notification
Webmin has been removed and replaced in NEMS Linux 1.5 by Cockpit, a web-based system interface by Red Hat Enterprises. In previous versions of NEMS, Webmin was included to provide a browser-based Linux terminal along with the ability to see system overviews. In the early days it was also used to configure networking, but since that has been buggy for a long time with little hope of seeing an upstream fix any time soon, I polled the community and made the decision to remove Webmin. One excellent feature of Cockpit, in direct contrast to Webmin, is that it uses no system resources when not in active use. Where Webmin has an active daemon that uses a lot of system resources--particularly noticeable on lesser boards such as the Raspberry Pi--Cockpit unloads itself and instead sets up a port listener. Once the port is accessed, the Cockpit system wakes up again. This is highly useful for a distro so focused on single board computer deployment.
Cockpit is, in appearance at least, much more simple than Webmin. One could say less cluttered. Cockpit feels a little like a simplified iDRAC interface for NEMS Linux, with no additional controller necessary. It has a few performance graphs that are visible right away: the ability to safely reboot or shutdown your NEMS server from within the browser (just be sure to check the box marked “Reuse my password for privileged tasks”), and perhaps most importantly, a usable terminal window that lets you administer your NEMS Linux server at the terminal level, without SSH. At present, it doesn’t allow copy and paste operations, but for general use it does a good job. You can even run your nems-init task directly within your browser. For advanced users willing to read the documentation over at RHEL, you’ll find you can also use Cockpit to administer multiple servers from within one console.
Figure 5 - Cockpit brings the Linux terminal to the browser
In addition to the technical aspects of NEMS Linux, the aesthetics are also important. One of my aims with NEMS Linux is to provide the most beautiful out-of-the-box Nagios experience available. While not a technically important feature, a number of NEMS users requested the ability to customize the various dashboards to suit their server room environment. In particular, they wanted to change the background from the traditional NEMS server room background to a background of their own choosing. I relished the opportunity to work on this feature, as it gave me a bit of a break from the more technical enhancements of NEMS Linux 1.5, allowing me to focus on the NEMS Dashboard UX for a short time. The result of this “break from the everyday” in my development to-do list is that NEMS 1.5 includes the ability to upload your own background which will be scaled and compressed automatically. In addition, I added the ability to choose a background color instead of image, and wrote a new API feature that loads a “photo of the day” every day from a CC0 repository created just for that purpose. This has become the new default, so every day you will be greeted with a different, hand-selected background image. In addition, the new background feature allows you to add a blur effect, giving some really great customization options to each user.
Figure 6 - NEMS Linux 1.5 dashboard with a user-uploaded background
There are more technical walkthroughs on their way, but as NEMS Linux 1.5 is brand new, I felt it was important to bring some of the new enhancements to the forefront before diving right back into the depths of this advanced network monitoring tool for the ODROID-XU4. If you’re new to NEMS Linux, I’d encourage you to go back and read the first four articles introducing NEMS Linux to the ODROID community in the October 2018, November 2018, December 2018, and January 2019 issues of ODROID Magazine. While the first three were written about NEMS Linux 1.4.1, the processes have not changed and the information is still true for NEMS Linux 1.5.
Learn More
NEMS has an active Community Forum. I check in quite regularly to provide free support to users. I also offer one-on-one priority support to Patrons needing a higher level of support. NEMS Linux is free to download and use. Its source code is available on GitHub. Download NEMS Linux for ODROID at https://nemslinux.com/
You can also follow @NEMSLinux on Twitter or join us on Discord. I’ve also launched a YouTube channel specifically for NEMS where I will be posting screencasts and tutorials about NEMS Linux. While the content is still to come, I’d really appreciate if you’d subscribe! You’ll find the channel here.
Productivity is key. One of the reasons people work on the command line with BASH, despite all the fancy graphic options even for SBCs like our ODROIDs, is that you can get your task done faster, and with options for automation.
Productivity with BASH
Miscellaneous BASH stuff
Ctrl-t for typos swaps the letter under the cursor with the one before and moves cursor forward if possible, or uses the two previous characters if at the end of the line.
We have already learned a lot of shortcuts during the last parts. One more important help, besides the well-known sudo !! to prefix the last command with sudo, is to use !$ as argument to pull in the last command’s argument.
Let’s assume we want to list a certain file to look at the size:
$ ls -l /path/to/filewithlongname/suspiciousbigfile
If you decide that you want to get rid of the file, you don’t need to retype everything, you can just use !$ in combination with rm:
$rm !$
If you use Alt-. instead of !$, you can even select which arguments from the last command you want to reuse by typing it multiple times. It cycles through the last arguments of previous commands similar to Ctrl-R when you search your BASH history - you stop at the entry you want to use.
While we are on the subject of the BASH history: The next one, Alt-#, is a shortcut for “abandon this line but keep it in history”. It adds a # to the start of the line, turning it into a comment. Easy to find with the Ctrl-r reverse search, since you don’t use # often in the terminal.
You can also make a note of something while you are in a shell. Just type it in and Alt-#, and it is in your history. This is also great for making an explanation for a very complicated command.
Start a complex command and save it temporarily with Alt-#, then stop halfway, maybe look something up. Then retrieve the line from history with the UP key or Ctrl-r and finish the command by jumping to the beginning with Ctrl-a, followed by Del.
One small downside is that command completion does not work on lines starting with a # (unless it is part of a pipe - anything after | works as expected) - Path and filename completion however do work.
Saving a custom BASH history file
Now, after having learned so much about BASH, there are surely things which stand out for you, and after trying certain one-liners, you want to make sure that they are permanently kept in your reference files.
But when working on something, you want to stay focused and not switch over to a text editor to save the highlights of your work. To complete the method for having your own BASH snippets saved in annotated form, open your ~/.bashrc file with your preferred text editor and add a function at the end of it:
Append last history entry to file
function hsave() { history -p '!!' >> ~/bak/savedbashlines ; }
Now you can run a complex command, and afterwards enter hsave to save it in your file in ~/bak/savedbashlines. Write an explanation for it in the command line, do Alt-t hsave to save it, run hsave again.
For example, consider a command like the following:
$ du -a /path/to/directory | sort -n -r | head -n 25 | awk '{$1=""}1' | $ awk '{$1=$1}1' | sed '1d' | sed 's/^.\{1,\}$/"&"/'
It gives you a list of the 25 biggest directories in this path, encapsulated in quotes, and it is very convenient not to have to reinvent the wheel every time, or think about what this does.
Backup to remote system / working with spaces in paths
What is the use of a list of the biggest directories? One could direct this list into a file with > biggies.txt appended to the command and copy the directories to another storage place with less limitations than a single-board computer.
For full backups, there’s the excellent Odroid-Backup tool, but very often, we want only part of the system backed up. The usual tool for this is rsync. In a nutshell, you can use the following command to make a backup of a directory and its contents to a remote computer:
Be careful, though, because the addition of a “/” after the directory name with a slash after directory backs up only the contents of directory, not the directory itself:
So far, this is common knowledge. But in real-life applications, the details can be tricky: When your paths contain spaces or brackets, you need to supply quotes for rsync to work. But just one pair of quotes on the local system is not enough! Since you need to prevent the BASH shell from expanding these characters twice, one time on the local and one time on the remote system, it can be very annoying to work around and lead to a lot of hair-tearing if you are in a hurry.
But there is an option which is almost never talked about: Instead of using rsync -avr, use rsync -avrs to make sure that rsync takes care of special characters itself. So, whenever you are working with files with funny names, like audio or video files, you should use the -s switch for rsync to make sure that your names are kept intact. When I found out about this, I was amazed at how much less of a headache it was to avoid issues with spaces on local and remote system.
Plotting in the terminal
Last chapter, we used the script templogger.sh to record temperatures of our system over some time, and log out and back in to the system in the meantime. Wouldn’t it be nice to have an option to watch the temperatures in real time? There’s gnuplot, but this is too complicated for a quick-and-easy plot. I have grown fond of ttyplot, a recent program which didn’t find its way into the distributions yet. The project page is on GitHub.
Download the appropriate version for your system, which in most cases will be ttyplot-arm-linux:
and run it parallel to a demanding task from a second ssh session (Example on XU4, modify for the non-Exynos systems):
$ { while true; do echo `cat /sys/devices/virtual/thermal/thermal_zone0/temp`/1000 |
bc; sleep 1; done } | ttyplot -t "XU4 CPU temp" -u "°C" -s 105
For testing your system, you can use stress-ng from the normal distribution. The matrix stressor with 0 as modifier is going to stress all 8 CPU cores with high load:
$ sleep 5; stress-ng --matrix 0 -t 1m --times
On my system, the plot looks like this:
Figure 1 - XU4 temperature ttyplot
I also ran, as root, cpufreq can not be read otherwise!
$ { while true; do echo `cat /sys/devices/system/cpu/cpufreq/policy0/cpuinfo_cur_freq`/`cat
/sys/devices/system/cpu/cpufreq/policy0/cpuinfo_max_freq`*100 | bc; sleep 1; done } |
ttyplot -t "XU4 CPU freq [%max]" -u "%" -s 105
to make sure that the CPU freq doesn’t drop below 100% of the maximum frequency:
Figure 2- XU4 cpu frequency ttyplot
That’s a real-world example; it proves that my XU4 with Cloudshell and modified with a Noctua NF-A4x10 5V fan is sufficient to keep the system cool under load, even with the very small stock cooler.
Figure 3 - XU4 cloudshell with Noctua cooler
This is a modification I can recommend to all XU4 owners, since the stock fan sounds like an angry bee in a paper bag. Preview of the next part, the quest for productivity and useful one liners continues. Will there ever be an end to it? Let’s find out!
Hello, my name is Joshua Yang, and my Korean name is Yang Deokgyu. I live in South Korea and I work for Hardkernel. I majored in Computer Science, and love IT stuff such as smartphones, computer hardware, software and programming, especially trendy technologies. I built my own NAS system using CloudShell2, and migrated to an ODROID-H2 with a powerful Intel CPU. I have a blog at https://awesometic.tistory.com that deals with IT, programming, and some tips for NAS, Linux, and OSX.
At Hardkernel, I'm in charge of development of libraries and simple programs not only for individual users, but also for our manufacturing use. I test a lot of things related to our boards, including our accessories. I'm also working on our wiki pages where you may look up information when using our products, and reply to forum questions.
Figure 1 - Haneul Park, Fall, 2017 (which means sky in Korean). Luckily this was some of the best weather I've seen
Where do you live?
I live in Suwon, in South Korea, the city where I was born and raised. Actually, where I'm living is still not that far from the place where I was born. Suwon is a small but heavily populated city that has various cultural and historical monuments and infrastructures. You can get anywhere with the convenient transportation system, so even though there are many other good cities in Korea, there's no reason for me to leave.
What is your educational background?
I've loved computing since I was about to graduate from elementary school. At that time, I enjoyed playing computer games, especially racing games like Need for Speed. But my computer wasn't able to run that at that time. So I began learning about computer hardware when I was about 10, and I remember asking my father to change the graphics card to a Geforce 4. I was also interested in IT devices such as MP3 players, Portable Media Players (PMPs), and earphones. I bought and sold often to always have a new device, especially the first generation of iPods that had not been released in Korea. All of these experiences led me to major in Computer Science. I still have a lot of interests in IT devices and software.
My parents work, and my older sister is studying nursing skills. My family has a Shih Tzu puppy whose name is Dalbong. Everyone in my family sometimes calls him Yang Dalbong to include our family name. I think that pronunciation is easier to say.
How did you get started with computers?
When I was young, I just used computers for gaming, and played many online and offline games. When I was 18 years old, I studied with a tutor, who started me on how computer programs were developed, which prompted my interest in computer programming. I bought a C language book, which was one of the best sellers for computer programming introduction, and I studied until just before the most difficult chapter at that time, which was pointers.
What kind of projects do you work on at Hardkernel?
Recently, I developed the ODROID-GO Arduino examples and MicroPython library, and I uploaded its guides to our wiki. I also developed a WordPress plugin for our new websites to make its admin panel more easy to use for our management departments. I'm currently maintaining the WiringPi library, which helps us use GPIO peripherals more easily on ODROID boards.
How do you use your personal ODROIDs?
I'm using my ODROID as a NAS. I got my first ODROID-XU4 about 4 years ago. It runs perfectly for my personal use, so I wrote many articles, guides, and tips about it on my blog. I changed it to use an ODROID-H2, since the new one is an x86-64 system and it supports native SATA 3, and also supports NVMe storage, which is extremely fast. I built my NAS with some of the useful and handy Docker images available. It has been running about 3 months and is very stable. The main usage of my NAS is for syncing my personal projects, documents and photos, as well as streaming videos with my devices.
Figure 2 - Sunset at Draisine in Uiwang-si, which is the best time to ride
Which ODROID is your favorite and why?
The ODROID-XU4 is my favorite. Although it's been a few years since it came out, I still think it is one of the best SBCs that carries a reasonable price. Recently I've started to like ODROID-H2. I think H2 fits perfectly into Mini-PC or NAS use. It's not too expensive but offers outstanding performance and a rich I/O port. In addition, it is always quiet and maintains low power consumption.
What innovations would you like to see in future Hardkernel products?
I would like to see smartphones for developers, like an ODROID-A4. But unlike the previous A series devices, I hope that it will not be just for limited purposes. It would offer the use of various platforms, such as Android and Linux and Windows. It would have many GPIO pins available so that users can use their peripherals, with stereo speakers for listening to media or playing games. It would be like an upgrade of the ODROID-GO.
Figure 3 - A newly built new H2 server working 24/7
What hobbies and interests do you have apart from computers?
I like watching movies and TV programs, listening to music, and singing songs. Also, I like to go around looking for delicious restaurants. Recently, I went to a Vietnamese restaurant with my friends. I tried Tom Yum Goong there, and I was surprised because it was more delicious than I thought.
What advice do you have for someone wanting to learn more about programming?
I think it's a good idea to start learning C or C++ first. In fact, there are a lot of people who don't think so these days. But I do recommend learning C/C++ first, because almost every other language is influenced by the C language. So if you know C/C++, then you can learn another language very easily, then jump into your favorite platform. If you like Android, develop an Android application with Kotlin. Don't forget to always use open source projects and contribute back to them someday.