

I purchased my ODROID-XU4 with the intent of converting it into a NAS. However, I did not want to settle on a specialized NAS distro like OpenMediaVault because I wanted my ODROID-XU4 to do much more than being a plain old NAS. For instance, I plan on transcoding TV shows recorded from my TV to the H264 standard, using the ODROID-XU4's hardware encoder (as described in http://bit.ly/2jnv4Za), and also make use of the GPIO pins later on. One more issue I had with OpenMediaVault is that it runs on top of Debian, and I wanted to keep using Ubuntu in order to benefit from newer packages.
I would be losing much of the convenience of using a specialized distro and consequently have to discover alternate ways of doing things in a simple and user-friendly way. This presents an opportunity to gain new knowledge.
These are the steps we will need to take:
- Install Webmin (http://bit.ly/J5WtfI) for easier management
- Mount the disks
- Set up network shares (Samba/NFS)
- Install Owncloud
- Secure and optimize the OS
These instructions presume that you have medium or higher level system expertise.
Webmin
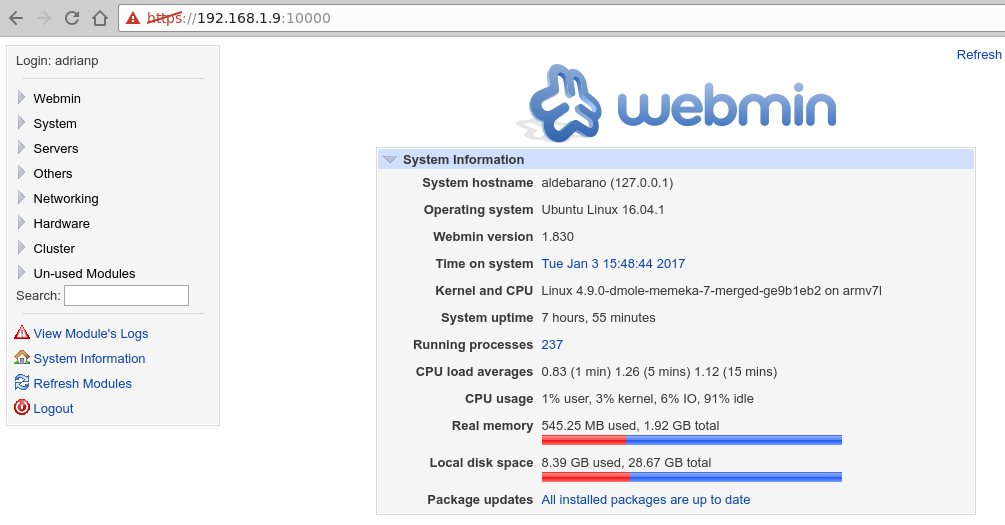
Every NAS needs a nice web GUI. Unfortunately, OpenMediaVault's GUI is not an option, and after searching for a long while for alternatives I settled on using Webmin. Webmin has been around since 1997 and has solid support for general server maintenance tasks. It has the advantage that even inexperienced users can find their way around and with the integrated help in order to set set up and manage all kinds of servers like Apache, MySQL, Mail, DNS, and more. It has solid support for RAID and LVM management, and also supports Samba and NFS file sharing. Unfortunately, it lacks support for newer services like Transmission or Owncloud, but I can always configure them manually.
To install it, follow the steps below:
$ echo "deb http://download.webmin.com/download/repository sarge contrib" | sudo tee /etc/apt/sources.list.d/webmin.list
$ wget http://www.webmin.com/jcameron-key.asc
$ sudo apt-key add jcameron-key.asc
$ rm jcameron-key.asc
$ sudo apt-get update
$ sudo apt-get install libapt-pkg-perl libnet-ssleay-perl libauthen-pam-perl libio-pty-perl apt-show-versions apt-transport-https
$ sudo apt-get install webmin
$ sudo systemctl enable webmin
$ sudo systemctl start webmin
You can login to your device's IP address on port 10000 to use the web interface: https://odroid-ip:10000. However after you log-in (with any system user with sudo access) you will likely be unimpressed by the default interface. It looks like it is out of the 1990’s.
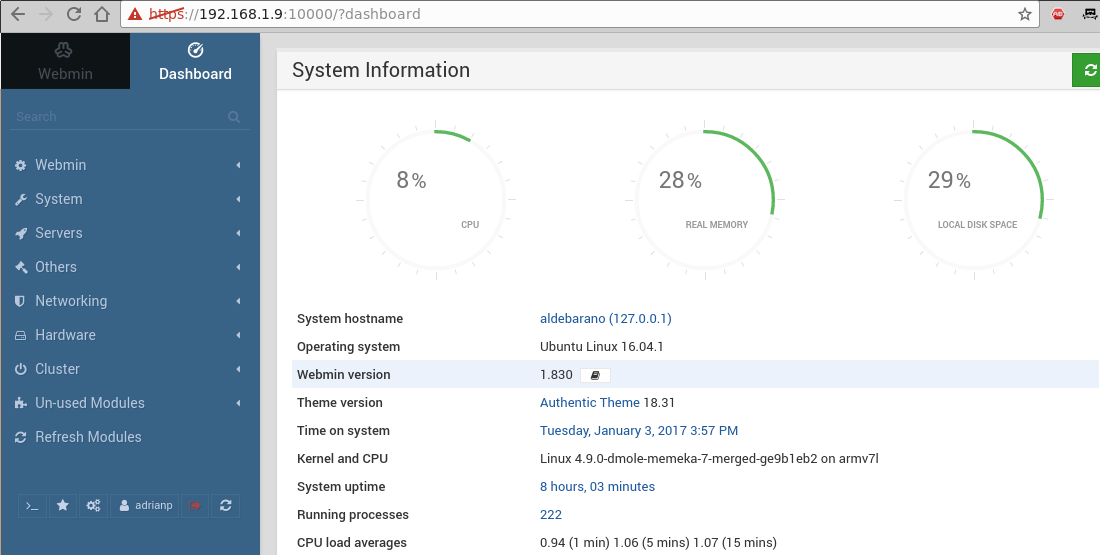
The first thing we must do is beautify it via a theme. The best-looking theme is called "Authentic Theme", which brings in a lot of features, including being mobile-friendly. You can get the latest version from http://bit.ly/2jf468e and install it using the following command:
$ wget https://github.com/qooob/authentic-theme/releases/download/19.12/authentic-theme-19.12.wbt.gzNavigate inside Webmin to “Webmin Configuration -> Webmin Themes -> Install themes -> From uploaded file” and select the newly downloaded theme. After a short wait and refresh later, you will be presented with the following page:
You can explore Webmin's features by using the search tool in the interface. Note that you can install third-party modules available from http://bit.ly/2jf6KLd.
Mounting disks
First, you will need to decide if you are going to use RAID or LVM with your disks, and which filesystem you would use. I will not go into details about setting RAID/LVM because the subject has been discussed in previous articles. However, even without having a lot of expertise, you can use Webmin to do the heavy lifting for you and use the built-in help to learn more. Webmin will prompt you to install any missing dependencies. Once you have your partitions ready, you can start mounting them.
The traditional method of mounting is to use /etc/fstab (and Webmin has a comprehensive module to handle that as well), but you may run into problems if you start your system with the disk not attached (systemd likes to wait around for the disk). I prefer to use autofs, which mounts disks (local or network-based) on demand and unmounts them when not in use. Unfortunately, it's not managed by webmin, so you will need to use the shell:
$ sudo apt-get install autofsYou will need to edit /etc/auto.master and add a mount entry for your disk, specifying the base directory and its configuration file:
$ sudo vi /etc/auto.master
# add at the end your mountpoint
/media/yourdisk /etc/auto.yourdisk --timeout 20
In the command above, replace your disk with the path you want to use. Next, edit this configuration file and add your partitions and their mount parameters, using the command “blkid” to find the correct UUID for the disk:
$ sudo blkid
$ sudo vi /etc/auto.yourdisk
xfs-partition   -fstype=xfs,dev,exec,suid,noatime       :UUID=9d2d675d-cb08-45b2-b222-c981a8d00c06
Restart autofs, and when you access /media/yourdisk/xfs-partition your partition will be mounted automatically:
$ sudo service autofs restartYou will need to take care of the mount parameters because each filesystem has their own parameters and they might impact performance. For instance, without activating the parameter big_writes on NTFS, you will get very poor performance. If in doubt, you can cheat and use Webmin to create entries in /etc/fstab, test them to ensure the parameters are ok, and migrate them to autofs's layout later (that's what I used). To force automounted disks to be unmounted, you can simply restart the autofs service.
Set up file shares
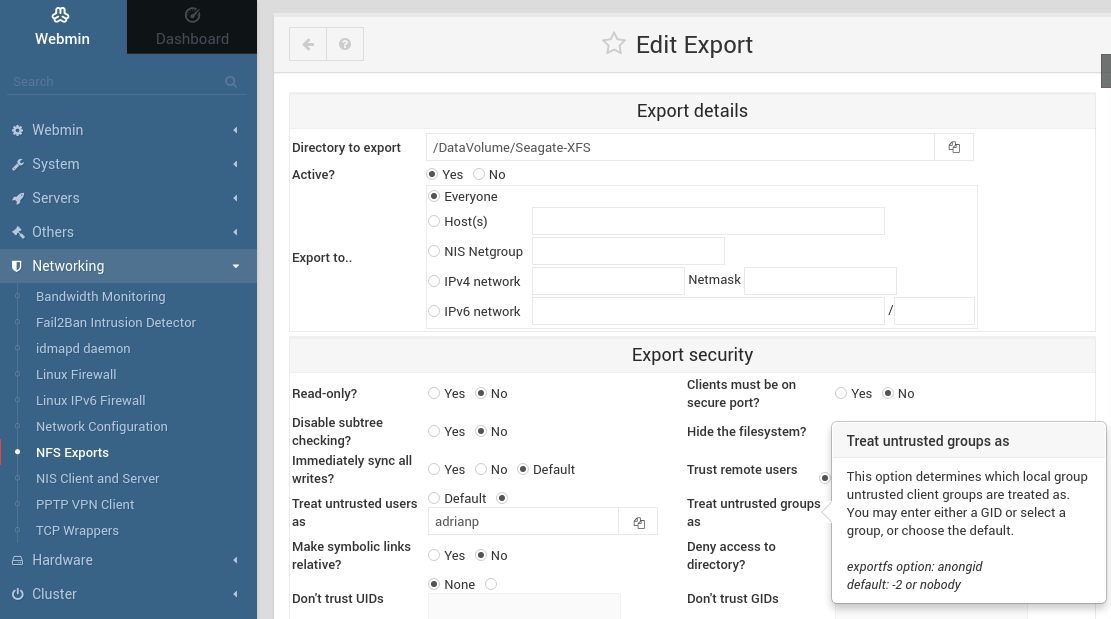
To set up Samba shares (and also install Transmission for torrent downloading) you can follow the guide "Designing your own seedbox" featured in Odroid Magazine http://bit.ly/2j3xpaK. You also can also experiment with Webmin's interface and easily create shares and users with a few clicks. For example, Figure 3 shows the "Create NFS share" dialog. Clicking on the form items shows a contextual help menu that explains well, what that item does. This can help you with things you might not be familiar with.
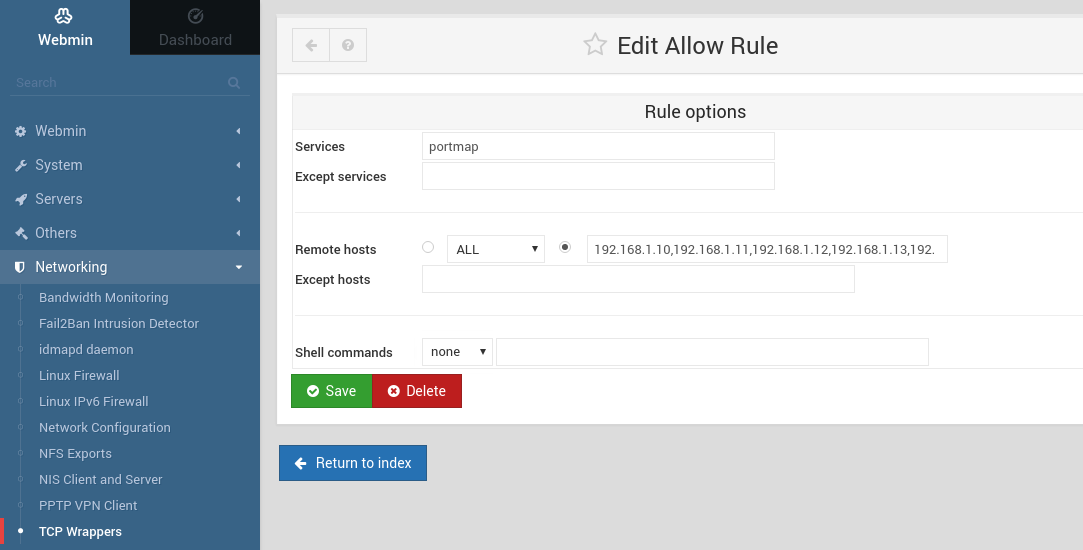
When creating Samba/NFS shares, take security into consideration from the start. Samba authenticates by userid and password, but NFS authenticates users only by IP. If you know which hosts in your network may have access to specific shares, specify it in the configuration. For example, an NFS share might be exported to "Everyone", but access can still be limited with iptables or /etc/hosts.allow and /etc/hosts.deny (which are used by TCP Wrappers Webmin module).
Used with its default configuration, Samba will give decent performance, but with the tweaks below, extracted from the ODROID forums, you should get fewer "pauses" in large file transfers. Add the lines below to the [global] section of your /etc/samba/smb.conf:
write cache size = 524288
getwd cache = yes
use sendfile = yes
min receivefile size = 16384
Install Owncloud
Owncloud is a personal "cloud" service that lets you share files with people over the Internet. I am not going to go into installation details, because they have been discussed in a previous Magazine article http://bit.ly/2kgVZpn, but there are some things I would like to point out.
First of all, the installation is quite simple on Ubuntu 16.04. I used the guide at http://do.co/2bzxhxG and was up and running in 10 minutes. If you have a DNS name (e.g. dynamic DNS for your home) you should take the time to get a valid SSL certificate from Let's Encrypt (http://bit.ly/1qmIXIY) using steps listed at http://do.co/2bQpv4M.
You basically need to install the following prerequisites before installing OwnCloud:
$ sudo apt-get install php \
  libapache2-mod-php php-mcrypt \
  php-mysql php-bz2 php-curl \
  php-gd php-imagick php-intl \
  php-mbstring php-xml php-zip \
  mysql-server apache2
Next you install the OwnCloud repository for Ubuntu and refresh the available packages:
$ sudo curl https://download.owncloud.org/download/\
repositories/stable/Ubuntu_16.04/Release.key \
| sudo apt-key add -
$ echo 'deb https://download.owncloud.org/download/\
repositories/stable/Ubuntu_16.04/ /' \
| sudo tee /etc/apt/sources.list.d/owncloud.list
$ sudo apt-get update
Finally, you can install OwnCloud:
$ sudo apt-get install owncloud
$ sudo systemctl reload apache2
You will also need to create a database user for OwnCloud:
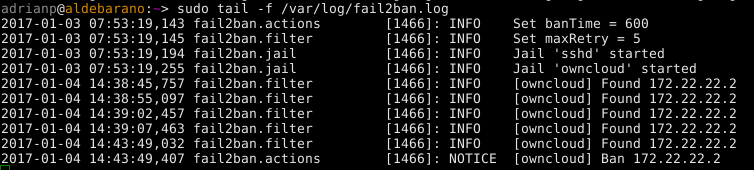
$ sudo mysql -u root
> CREATE DATABASE owncloud;
> GRANT ALL ON owncloud.* to 'owncloud'@'localhost' IDENTIFIED BY 'databasePassword';
> FLUSH PRIVILEGES;
> exit
After all this work, you can login through the web interface at https:///owncloud and finish the installation. Since the point of OwnCloud is to be accessible to the Internet, you should take some time to harden your installation, as described at http://bit.ly/2jOTe1F. In my case, I want to run the OwnCloud service on a different port (so that external users don't have access to my internal sites), to set iptables rules to allow access only from my country (based on geo-ip data), and set up fail2ban to protect me against automated password guesses.
In order to run the OwnCloud virtual host on a different port you need to make a few adjustments to your apache config:
$ sudo cp /etc/apache2/sites-available/default-ssl.conf \
  /etc/apache2/sites-available/owncloud.conf
$ cd /etc/apache2/sites-available
$ sudo ln -s ../sites-available/owncloud.conf \
  020-owncloud.conf
Next, edit /etc/apache2/sites-available/owncloud.conf and make the following changes:
Add "Listen 8443" as the first row Change the VirtualHost definition to use port 8443 instead of 443 () Change DocumentRoot to point to your owncloud installation "DocumentRoot /var/www/owncloud"
When done, you can restart the Apache daemon, and you should be able to access only your OwnCloud instance on https://:8443/.
To get started with GeoIP firewall rules, you'll need to have the kernel sources (or kernel headers) available. Next, you can install the extra iptables modules with the following command:
$ sudo apt-get install \
  xtables-addons-dkms \
  xtables-addons-common \
  xtables-addons-source
The dkms package may fail to install cleanly because some of the modules fail to compile against kernel 4.9/4.14. You can disable the failed modules and recompile the rest by setting the following settings to "n" instead of "m" in the file /var/lib/dkms/xtables-addons/2.10/build/mconfig:
$ sudo vi /var/lib/dkms/xtables-addons/2.10/build/mconfig
build_ACCOUNT=n
build_LOGMARK=n
build_SYSRQ=n
build_pknock=n
build_psd=n
Next you will need to manually compile the rest:
$ cd /var/lib/dkms/xtables-addons/2.10/build/
$ sudo autoconf
$ sudo ./configure
$ sudo make
$ sudo make install
Before using the geoip module, you will need to initialize the geoip database (the prefix to country mapping). You may need to repeat this step from time to time to benefit from the latest data:
$ sudo apt-get install libtext-csv-xs-perl
$ sudo mkdir /usr/share/xt_geoip
$ sudo /usr/lib/xtables-addons/xt_geoip_dl
$ sudo /usr/lib/xtables-addons/xt_geoip_build -D /usr/share/xt_geoip /root/GeoIPCountryWhois.csv
All that is left to do now is to create and test the iptables rules to allow only traffic that you want to reach your owncloud setup. An example rule looks like this:
$ sudo iptables -N geo-owncloud
$ sudo iptables -A INPUT -p tcp -m tcp --dport 8443 -j geo-owncloud
$ sudo iptables -A geo-owncloud -s 192.168.1.0/24 -j ACCEPT
$ sudo iptables -A geo-owncloud -m geoip ! --src-cc RO -j DROP
Do not forget to save your rules and apply them at startup (either with iptables-save or with webmin). More details about geoip can be found at http://bit.ly/2jnwUJD.
Configuring fail2ban is not very complicated once you follow the tutorial at http://bit.ly/2kipXxn. Remember to install fail2ban first (and test it with some false credentials):
$ sudo apt-get install fail2ban
Since we have added a special port for owncloud, we will need to tweak fail2ban's configuration to account for that. Edit /etc/fail2ban/jail.local and append “port 8443” to the port line and restart fail2ban:
$ sudo vi /etc/fail2ban/jail.local
port = http,https,8443
$ sudo service fail2ban restart
To manually lift the ban for a blacklisted IP address you can run the following command:
$ sudo fail2ban-client set owncloud unbanip 172.22.22.2
Assign tasks to specific CPUs
The ODROID-XU4 comes with two types of CPU cores: 4 little cores that are low power and are best suited for background tasks and 4 big cores which are designated for more powerful tasks. The official kernel comes with a "magic" scheduler from Samsung which knows the processor's true power, and can switch tasks from the little cores to the big cores when load is high. There may be special cases where you want to run specific tasks exclusively on the big or little cores, either to maximize performance, or to minimize temperature. We can use use cgroups as noted in http://bit.ly/2jP6KlU.
“cgroups” is a feature of modern kernels that allows allocation of resources for various processes. In our case we will need the "cpuset" cgroup to create a "littlecores" and a "bigcores" group. Each group will force processes to run on specific cores by setting the affinity. So, littlecores will have cpus 0-3 and bigcores 4-7. Fortunately, creating the cgroups is easy:
# mkdir -p /sys/fs/cgroup/cpuset/littlecores \
  /sys/fs/cgroup/cpuset/bigcores
# echo "0-3" > /sys/fs/cgroup/cpuset/\
littlecores/cpuset.cpus
# echo "0"> /sys/fs/cgroup/cpuset/\
littlecores/cpuset.mems
# chmod -R 777 /sys/fs/cgroup/cpuset/\
littlecores
# echo "4-7"> /sys/fs/cgroup/cpuset/\
bigcores/cpuset.cpus
# echo "0"> /sys/fs/cgroup/cpuset/\
bigcores/cpuset.mems
# chmod -R 777 /sys/fs/cgroup/cpuset/\
bigcores
Unfortunately, the commands will only last until the next reboot. So, let us create a service to set them as early as possible on boot:
$ sudo wget -O /etc/systemd/system/cpuset.service https://raw.githubusercontent.com/mad-ady/\
odroid-ODROID-XU4-optimizations/master/cpuset.service
$ sudo systemctl enable cpuset
$ sudo systemctl start cpuset
At this point, the cgroups are created, but they are not actively used by anyone. To manually start a process in a specific cgroup, you can use cgexec:
$ sudo apt-get install cgroup-tools
$ cgexec -g cpuset:bigcores sysbench --test=cpu \
--cpu-max-prime=100000 --num-threads=8 run

We are only halfway there. We will need to tell specific processes to run on the little cores and the others to run on the big cores. This is where you need to make a list and decide what you want. Start with a list of active services from webmin (System -> Bootup and Shutdown) and disable anything you will not be using. In my case I have disabled the following services: ModemManager, NetworkManager-wait-online, NetworkManager, accounts-daemon, alsa-restore, alsa-state, apport, apport-forward.socket, bluetooth, cups-browsed, cups.path, cups.service, cups.socket, lightdm, lxc-net, lxc, lxcfs, plymouth*, rsync, saned, speech-dispatcher and whoopsie.
You will need to edit the startup scripts for the services you want and have them add their PID to the correct cgroup. Once the main process (and its children) are part of the correct cgroup, any new children will inherit the cgroup. My plan was to add things like MySQL, Apache, Samba, NFS and even Webmin to the big group and things like SSH (and all my shell activity), cron, Munin, and Transmission to the little group. This allows processes that are involved in the NAS functionality to be snappy, while other tasks can happily run on the little cores. If you are also using the X11 GUI, you might want to add lightdm to the “bigcores” group as well.
There are two types of startup scripts - systemd native scripts and legacy sys-v (/etc/init.d/). When editing a systemd script (for example nfs-mountd.service) you will need to add something like this to the [Service] section:
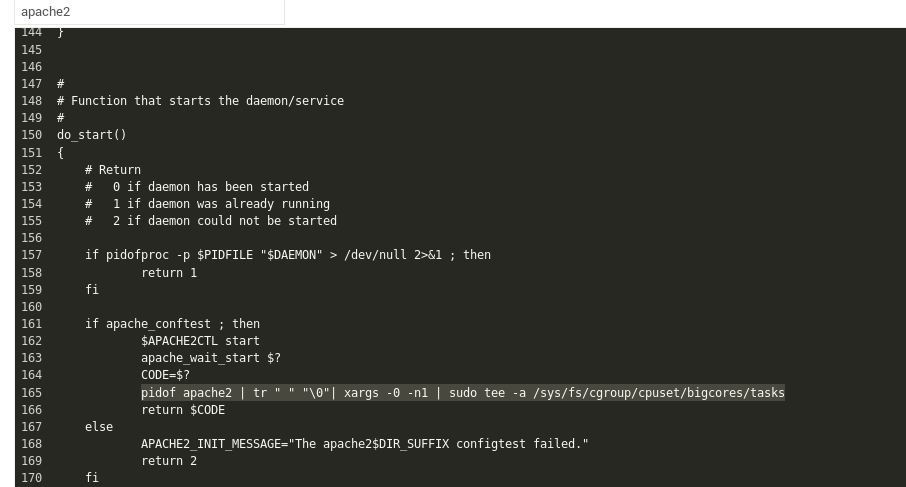
ExecStartPost=-/bin/sh -c 'echo $MAINPID | tee -a /sys/fs/cgroup/cpuset/bigcores/tasks'When editing an older sys-v script, it is trickier. You will need to find the start function, extract the PID(s) of the newly started process and add it to the tasks list. Below is an example for changing the apache startup script:
pidof apache2 | tr " " "\0"| xargs -0 -n1 | sudo tee -a /sys/fs/cgroup/cpuset/bigcores/tasks
Take care to restart each service after changing it and make sure to check that the process PID is in the correct cpuset tasks file. Do a full system reboot and check again after restart. If this sounds too complicated and mostly want to run tasks on the big cores, there is a way to cheat. You can simply set systemd's affinity, and all of its children processes will inherit it. The affinity can be controlled by the CPUAffinity parameter in /etc/systemd/system.conf, but keep in mind you'll be wasting CPU cores.
Disk longevity
In order to prolong the life of your disk(s), you may want to spin them down after a period of inactivity. If you are using SSDs, you can skip this section because it only applies to old mechanical disks. Disks may receive a "stop" command to spin down either from an internal controller, from the USB-SATA bridge or directly from the operating system. However, sometimes the controllers are not tuned correctly and a stop command never arrives. This causes the disk to keep spinning which generates a lot of heat and can cause the drive to fail sooner than normal.
The normal way to handle this is to tell the disk to spin down after a period of inactivity, which can be done with hdparm:
$ sudo apt-get install sdparm hdparmTo manually set the disk to sleep after 10 minutes of inactivity, you can run the following command:
$ sudo hdparm -S 120 /dev/sdaIf you get errors (like "bad/missing sense data"), hdparm might not help you for that disk.
To handle disk mobility, it would be better to let udev run the command after a disk has been plugged in. Since different disks might have different roles, and you may want different sleep timers (e.g. one disk is for backups and should sleep sooner, other is active and should sleep later), I decided on setting the UDEV rule based on the disk's serial number. You can get this serial number by looking in dmesg when plugging in a disk:
[1885221.800435] usb 4-1.3: Product: My Passport 0730
[1885221.800436] usb 4-1.3: Manufacturer: Western Digital
[1885221.800437] usb 4-1.3: SerialNumber: 575844314141305636323937
To set up the rule, create a file like this and reload udev:
$ sudo vi /etc/udev/rules.d/90-disk.rules
ACTION=="add", ENV{DEVNAME}=="/dev/sd?", SUBSYSTEM=="block", ENV{ID_SERIAL_SHORT}=="575844314141305636323937", RUN+="/sbin/hdparm -S 120 $env{DEVNAME}"
$ sudo udevadm control -R
If the hdparm cannot put your disk to sleep, then try other alternatives like sdparm, which can send a SCSI command to your disk, like ordering it to shut down in that instant:
$ sudo sdparm -C stop /dev/sdaThere are tools like hd-idle (http://bit.ly/2j3zWSk) or periodic scripts you can run to put your disk to sleep. In my case they did not work, but make sure to try them manually before settling on a solution. Here is a manual script which checks a disk (identified by a partition's UUID) for activity in a 10s window, and if there was no disk activity (data transferred), it uses sdparm to stop the disk. You can run it via cron:
$ sudo wget -O /usr/local/bin/hdd-idle.sh http://bit.ly/2k6LK7Y
$ sudo chmod a+x /usr/local/bin/hdd-idle.sh
$ sudo /usr/local/bin/hdd-idle.sh "4283-E975"
You must be aware that there are tools and services which will wake up your disk periodically, even if no data is transferred. Such tools include smartctl (from smartmontools) and smartd. The smartd service periodically checks disk health, and if not correctly configured, it may keep your disk up needlessly. You can consult the thread at http://bit.ly/2kh6b17 in case you do not know what is keeping your disk awake. You should be able to infer the disk's state by running this command: $ sudo smartctl -d sat -n standby -a /dev/sda
If it exits with an error, your disk is still in standby and should have been spun-down.
Flash disk performance
One more thing to keep in mind when using flash storage (eMMC or SSD) is that they need periodic trimming to maintain their speed. Basically, in order to write to a storage block, you need to erase it first and this takes longer than writing to it. Normal filesystems do not do this erase when deleting data, so after a while disk performance drops significantly. To "revive" the disk, the trim operation informs the disk controller to erase all empty blocks, thus restoring write speeds. The trim operation must be supported by the filesystem and the disk controller. Again, using cron once a week to run fstrim can save you from slowdowns in the long term:
$ sudo crontab -e
#trim the eMMC once a week
15 0 0 * *      /sbin/fstrim / >/dev/null 2>&1
Governor
Performance and heat are also directly dependent on what governor you are using for the CPU. Keeping "performance" on gets you top performance, but also generates a lot of heat. In my tests, the best combination was a modified "ondemand" governor based on the recommandations at http://bit.ly/2jfaDjw. To enable it, make sure you select governor = ondemand in /media/boot/boot.ini, and set the rest of the parameters inside /etc/rc.local (test out the commands before). The commands below work for a 4.9/4.14 kernel and may differ for the 3.10 kernel:
$ sudo vi /etc/rc.local
echo 1 > /sys/devices/system/cpu/cpufreq/ondemand/io_is_busy
echo 10 > /sys/devices/system/cpu/cpufreq/ondemand/sampling_down_factor
echo 80 > /sys/devices/system/cpu/cpufreq/ondemand/up_threshold
With the setting above, the CPU will ramp up frequency sooner and will consider IO usage as CPU, making IO intensive tasks influence the CPU frequency. This allows you to have great performance when needed and low heat when idle. In my usage, the little cores idle around 300MHz while the big cores idle at 200MHz.
Network performance - MTU
If you have a Gigabit network with proper cables, you can increase the MTU (Maximum Transmission Unit) on the ODROID-XU4’s onboard network. This will allow it to send larger packets which have less overhead and generate fewer interrupts on the receiving end. However, to benefit from it, you will need to have network devices (switches/routers) and end devices which support Jumbo frames. Ideally, Jumbo frames would need to be enabled on all network devices in your LAN, otherwise you might see dropped traffic or even devices unable to send large traffic to each other. For example, SSH works because it uses small packets, but getting a web page or transferring a file stalls the connection. If you do decide to enable jumbo frames, the ODROID-XU4's magic MTU value is 6975 (http://bit.ly/2jP9zDl). You can enable it on the ODROID-XU4 inside /etc/rc.local:
$ sudo vi /etc/rc.local
#MTU
/sbin/ifconfig eth0 mtu 6975 up
Fastest transfers over sshfs/scp/sftp
Since SSH is a very flexible protocol and supports tunnelling and file transfer, it would be wise to use it at full speed. If you attempt a secure copy (scp) transfer on an ODROID-XU4 with the sshd process tied to the little cores, you will get about 15MB/s top speed. If you tie the sshd process to the big cores you get 40MB/s. If you are feeling adventurous and do not mind sacrificing some security, you can squeeze 50MB/s by lowering the encryption algorithm used. I did that by starting a different sshd instance (on port 2222) with different settings:
$ sudo wget -O /etc/systemd/system/ssh-big.service \
https://raw.githubusercontent.com/mad-ady/\
odroid-xu4-optimizations/master/ssh-big.service
$ sudo wget -O /etc/ssh/sshd_config_big \
https://raw.githubusercontent.com/mad-ady/\
odroid-xu4-optimizations/master/sshd_config_big
$ sudo systemctl enable ssh-big
$ sudo systemctl start ssh-big
To mount or transfer a file using this new ssh service you will need to specifically specify the cipher (since it is disabled by default because it is considered weak). You can do so in an entry in ~/.ssh/config on the client:
Host odroid-big
Hostname odroid-ip
Port 2222
Ciphers arcfour
Compression no
To transfer files you can simply use the following command:
$ scp bigfile odroid-big:/remote/path
Tune systemd timeouts
It can be irritating to wait around for systemd to finish waiting for something that will never finish. You can tweak systemd's timeouts by modifying the global timeout settings in /etc/systemd/system.conf:
DefaultTimeoutStartSec=20s
DefaultTimeoutStopSec=10s
Note that some services (like networking) set explicit timeouts and you'll need to change those as well:
$ sudo vi /etc/systemd/system/network-online.target.wants/\
networking.service
TimeoutStartSec=30sec
Performance
Here are some performance metrics you can expect with the tweaks above and a Gigabit network. The client is an ODROID-C2 running Ubuntu 16.04, while the server is the ODROID-XU4. The download and upload directions are relative to the ODROID-XU4. The disk attached to the ODROID-XU4 has a write speed of 110MB/s. File transfers transferred an 8GB file filled with zeros (dd if=/dev/zero of=zero bs=1M count=8000 conv=fsync). Please note that part of the performance depends on your client as well. I was able to get better performance with a Linux PC than with the ODROID-C2 as a client.
Be the first to comment