

Docker introduced swarm mode in version 1.12.x to enable the deployment of containers on multiple docker hosts. Swarm mode provides cluster management and service orchestration capabilities including service discovery and service scaling, among other things, using overlay networks and an in-built load balancer respectively. These are mandatory features for the enterprise as there is a limit to the number of containers one can deploy on a single docker host. For a high level architectural description of swarm mode, please read my previous article published in the November 2016 issue of ODROID Magazine at http://bit.ly/2wiTVXM.
Several months ago, I was experimenting with Docker’s swarm mode on my five board ODROID-C2 cluster. I was able to start multiple Docker containers on multiple docker hosts but neither overlay network, routing mesh, nor load balancing were working in swarm mode. I tried using different versions of docker (1.12.x and 1.13.x) compiled on my ODROID-C2 to no avail. I also tried running Kubernetes on my ODROID-C2 cluster. Again the networking part of Kubernetes did not work. I suspected that the kernel was missing certain modules needed for Docker and Kubernetes networking. Due to this, I stopped my experimentation until now. What rekindled my passion to get Docker swarm mode working was seeing my hardware not being used: an ODROID VU7 multi-touch screen and a VuShell for VU7.
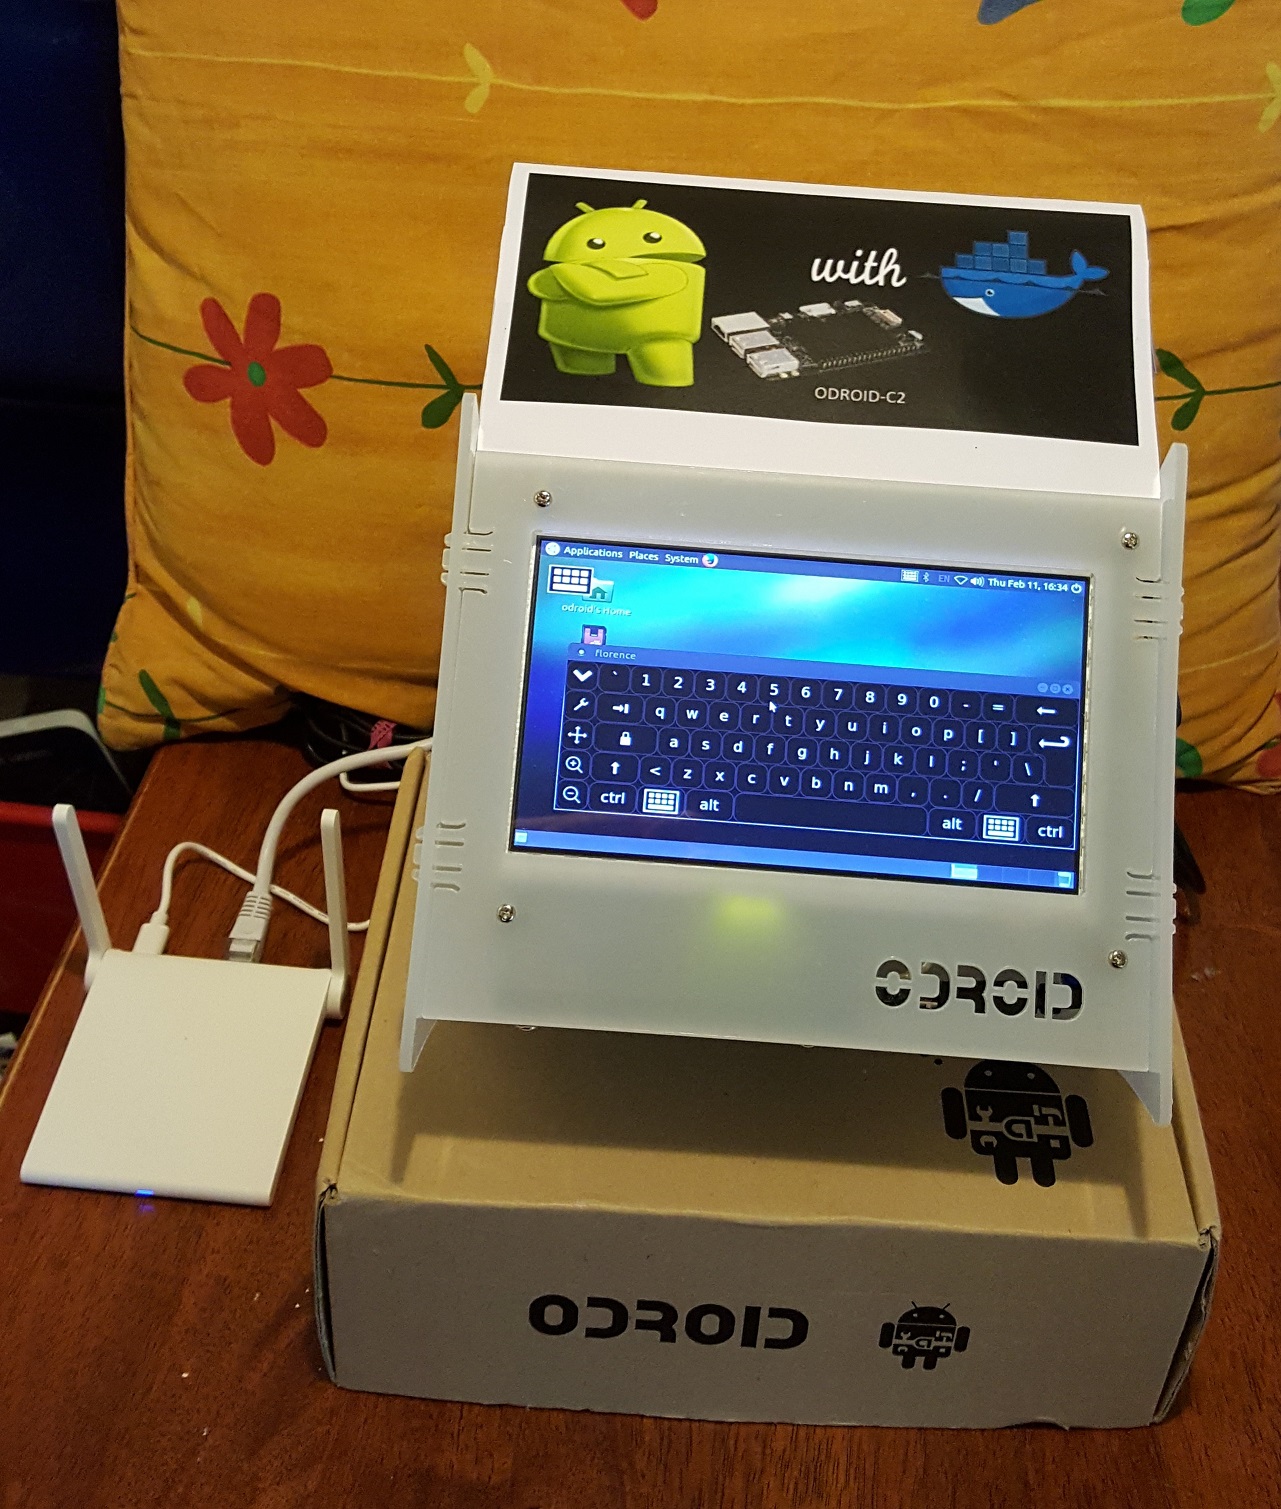
I assembled the VU7 screen and an ODROID-C1+ with the VuShell enclosure. Then I thought to myself, why not put my ODROID-C2 cluster there as well? You can see the screen displaying a soft keyboard in the Figure 1. All ODROID single board computers are connected together with an 8-port gigabit Ethernet switch, and an SSD is also put inside the VuShell enclosure. The ODROID cardboard box houses the power supply. The tiny wireless router uses Wireless Distribution System, WDS, to connect to my main router to provide Ethernet Internet access for all the ODROIDs housed in the VuShell, because they don't have built-in WiFi.
Hardkernel’s Ubuntu 16.04 OS
I had the suspicion that the cause for Docker’s swarm mode not working in previous attempts was due to some missing or incompatible kernel modules in the OS. So, I decided to switch to another OS. I noticed that Hardkernel recently released Ubuntu 16.04 (v2.3) for the ODROID-C2 so I gave it a try. The earlier version of Hardkernel's Ubuntu OS that I tried months earlier was unstable, but the current release worked without any issues. I was happy and told myself that this time it might work!
To make things easier, I installed and configured the following packages:
- parallel-ssh on the docker manager to allow me to issue commands once from the docker manager to be executed on all nodes
- nfs-kernel-server on the manager and nfs-common on all nodes
- curl on the manager for testing
- dnsutils on all nodes
I also generated SSH keys for the “odroid” and “root” users on all members of the cluster, so that they can SSH into each other without a password.
Docker Swarm Mode Reboot
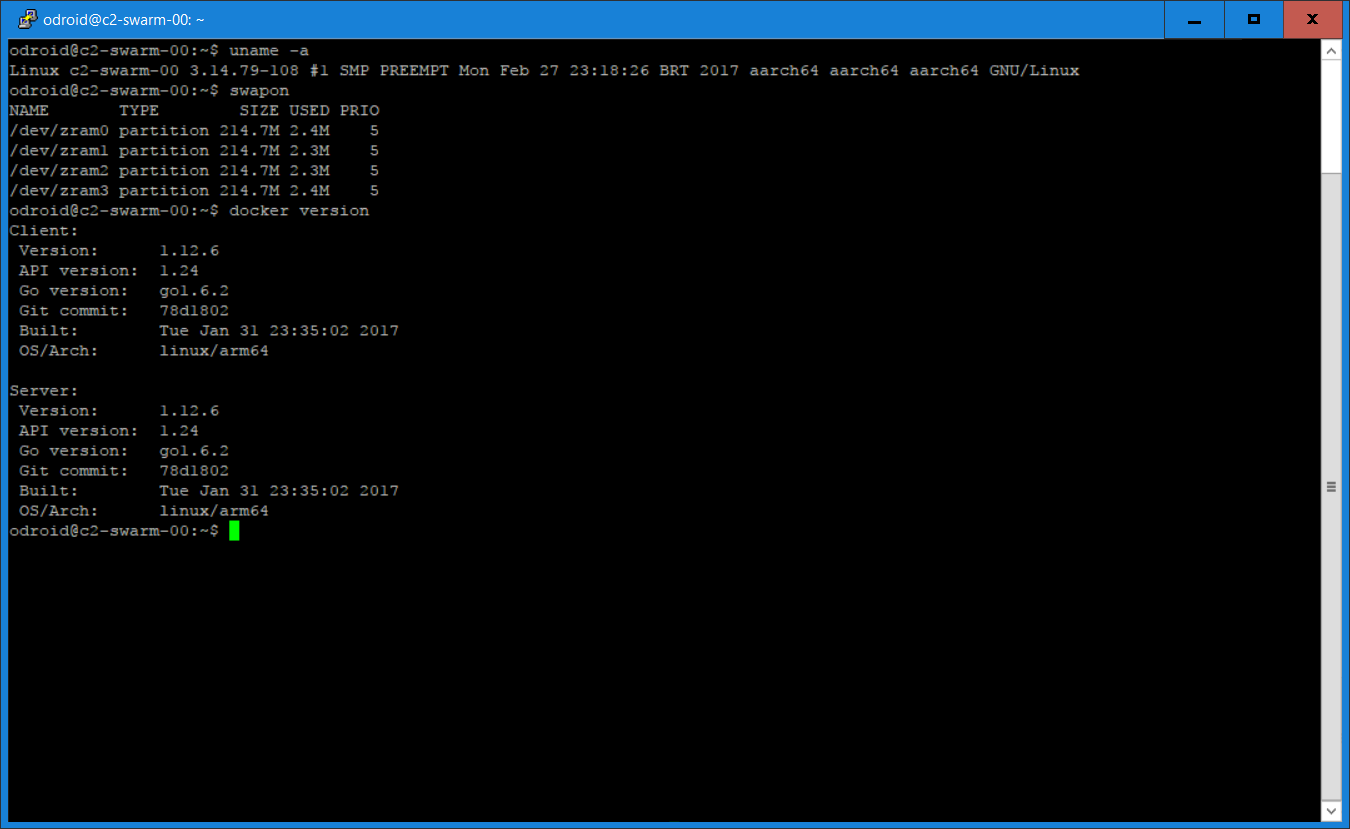
I installed docker.io using apt-get and did a quick “docker run” test using my httpd image, and it worked. I wanted to try out the swarm mode next to see if it will work with the new OS. Here is a screenshot of the versions of software being used. It is interesting to note that Hardkernel’s Ubuntu distribution came with zram pre-installed for swap, which is handy.
Creating a Swarm
The host names and static IP addresses for my swarm hosts are:
- c2-swarm-00 - 192.168.1.100 (manager)
- c2-swarm-01 - 192.168.1.101 (node 1)
- c2-swarm-02 - 192.168.1.102 (node 2)
- c2-swarm-03 - 192.168.1.103 (node 3)
- c2-swarm-04 - 192.168.1.104 (node 4)
Only c2-swarm-00 has a SSD drive connected, but the file system is shared using NFS.
A node is a docker host participating in a swarm. A manager node is where you submit a service definition and it schedules the service to run as tasks on worker nodes. Worker nodes receive and execute tasks scheduled by a manager node. A manager node, by default, is also a worker node unless explicitly configured not to execute tasks. Multiple master and worker nodes can be set up in a swarm to provide High Availability (HA). To bring up swarm mode, issue the following command on the manager:
$ docker swarm init --advertise-addr 192.168.1.100
which returns:
swarm initialized: current mode
(8jw6y313hmt3vfa1me1dinro) is now a manager
To add a worker to this swarm, run the following command on each node:
$ docker swarm join --token SWMTKN-1-2gvqzfx48uw8zcokwl5033iwdel2rl9n96lc0wj1qso7lrztub-aokk5xcm5v7c4usmeswsgg1k 192.168.1.100:2377
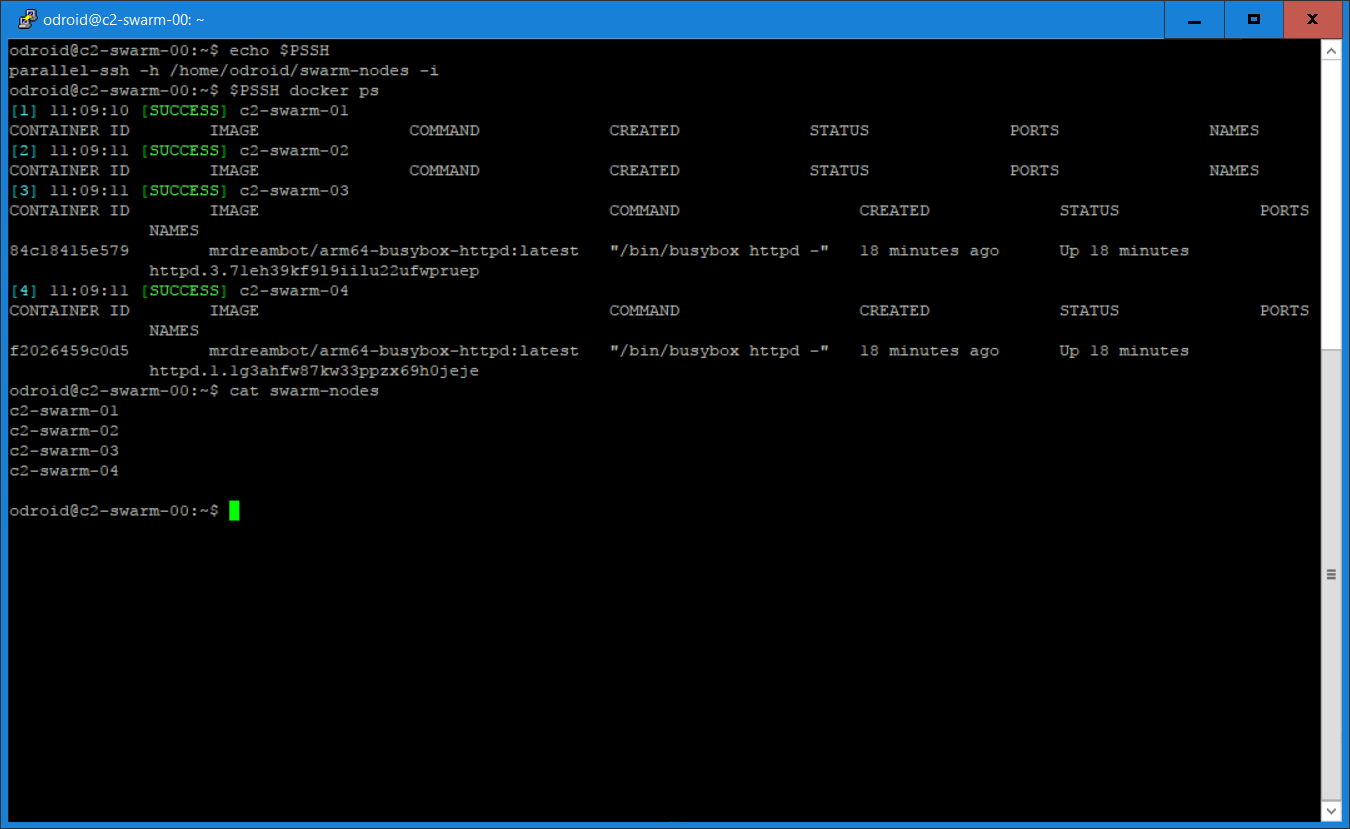
To make the other nodes join the cluster, issue the previous “docker swarm join” command on each node. This can be done using parallel-ssh to issue the command once from the manager, which is then executed on each node. The image below shows a screenshot after running the “docker ps” command using parallel-ssh, which signifies that the Docker swarm is up and running.
One annoyance of Docker swarm I found is that after you shut-down all nodes and power them up again, all nodes will be "Active" but "Down". This is seen when you use the “docker node ls” to find out the status of your nodes. Since the nodes are down, all services will be running on the manager. The fix is to run “systemctl restart docker” on every node. This will change their status from “Down” to “Ready”, and everything is fine again. The tool parallel-ssh is a convenient way to do this, since all you have to do is issue the command once from your manager.
Running Docker Swarm Visualizer and HTTPD Services
To help visualize what is going on in the swarm, I built the “Docker Swarm Visualizer” image based on Docker Samples on Github. I've pushed it to docker hub at http://dockr.ly/2ipXzcL, so that anyone can use it. The image's name is “mrdreambot/arm64-docker-swarm-visualizer”, available at http://bit.ly/2xqSaV4. I then deployed it as a service by issuing the following command from the manager:
$ docker service create --name=dsv --publish=8080:8080/tcp --constraint=node.role==manager --mount=type=bind,src=/var/run/docker.sock,dst=/var/run/docker.sock mrdreambot/arm64-docker-swarm-visualizer
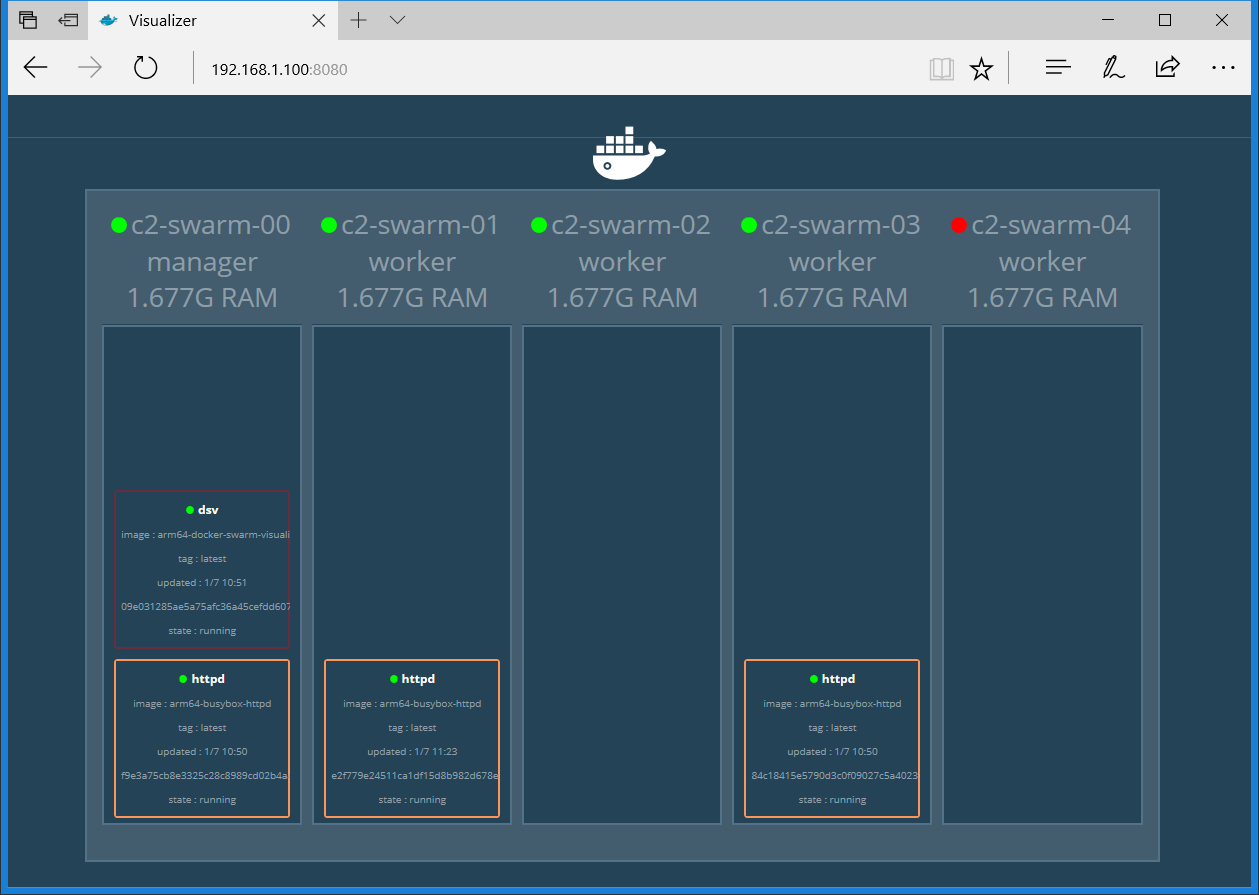
I then pointed the browser at the master node at http://192.168.1.100:8080, but it also works when you point your browser to any of the nodes in the swarm. The changes reported by the visualizer when deploying the httpd service can then be observed:
$ docker network create --driver overlay home-net
$ docker service create --replicas 3 --network home-net --name httpd -p 80:80 mrdreambot/arm64-busy-box-httpd
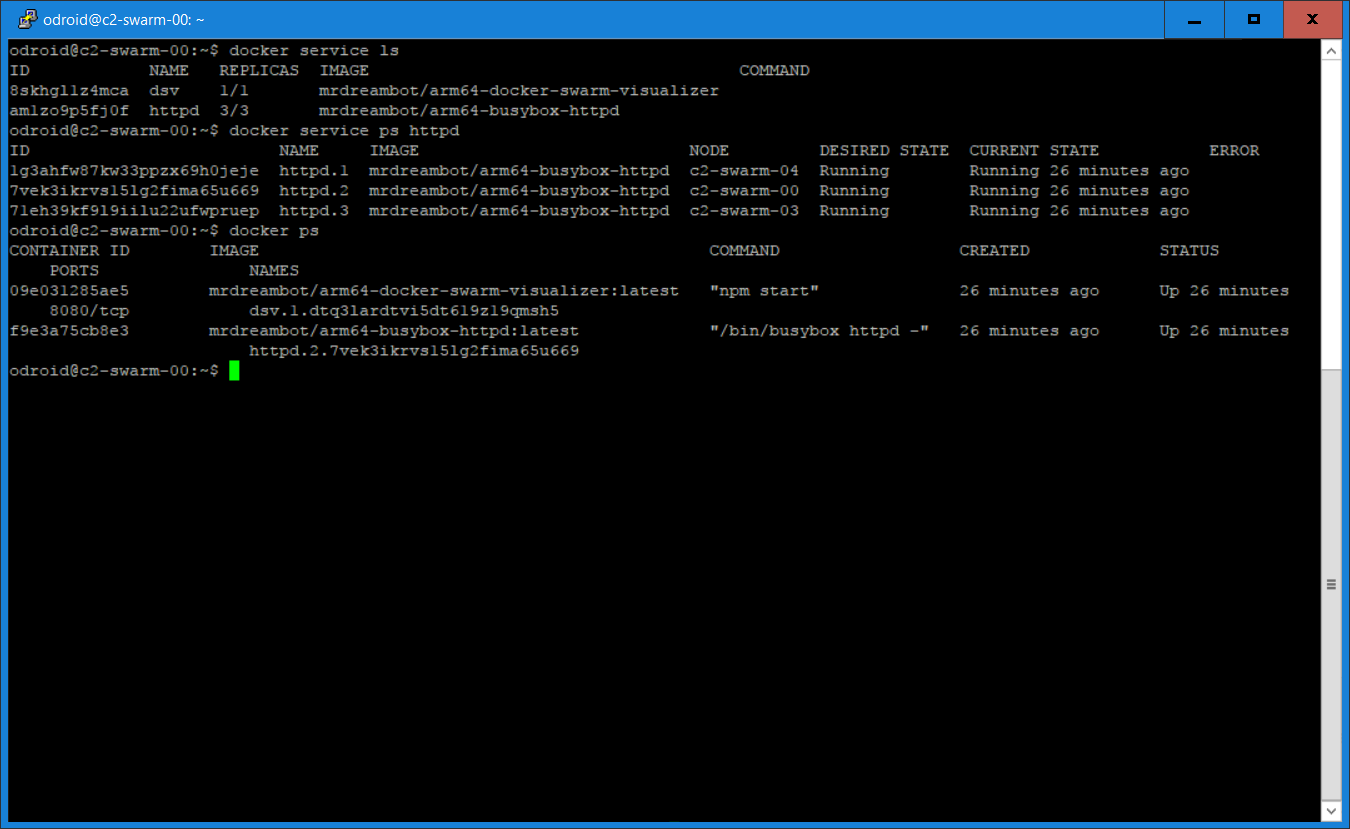
The command line output for listing the services is shown in Figure 4. Figure 5 is a Docker Swarm Visualizer screenshot showing the nodes on which the service replicas are run, which illustrates the declarative service model used by swarm mode.

Routing Mesh, Load Balancing and Self-healing
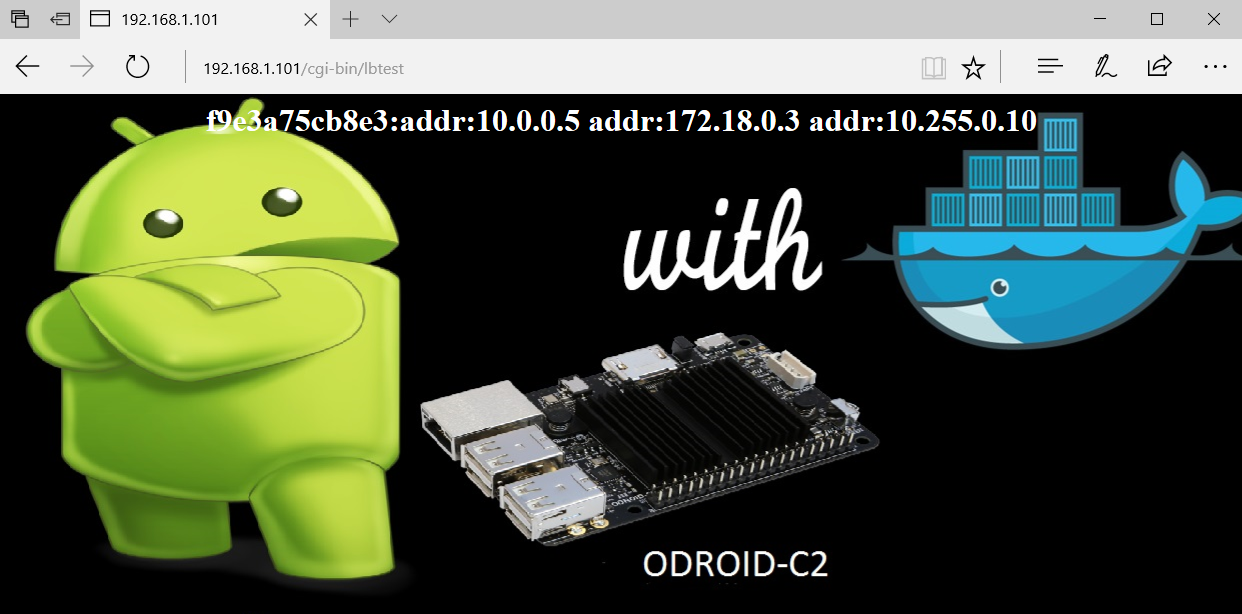
The routing mesh in the swarm allows a request to reach a service even when the service is not running on the node where the request has been received. This means that although the httpd service is running on c2-swarm-00, c2-swarm-03 and c2-swarm-04, one can point the browser at any one of the 5 nodes and still get a response with the ODROID-Docker image. This was the behaviour that I observed.

In addition to providing a routing mesh, the swarm also performs load balancing. To test the load balancing feature, I connected to the manager multiple time using my browser, at the httpd service using the address http://192.168.1.100/cgi-bin/lbtest. Notice that the hostnames (container Id) and IP addresses are different in the two screenshots.
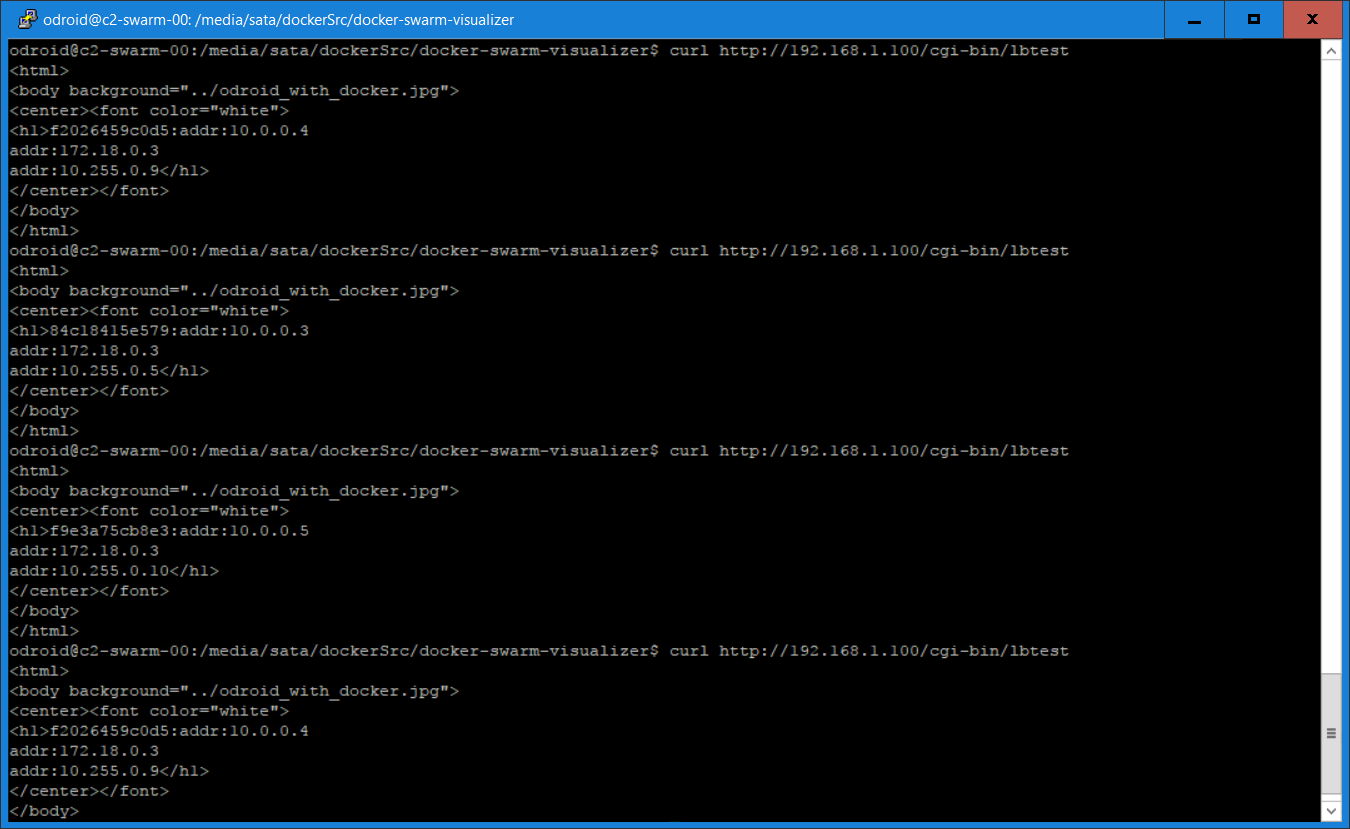
The tests were repeated using the curl command:
$ curl http://192.168.1.100/cgi-bin/lbtest
Here is a screenshot of the curl commands output which confirmed, again, that each request has been directed to a different node:
As for a demo on self-healing, I shut down c2-swarm-04, and you can see from the visualizer as well as the command line that another httpd container was spun up on c2-swarm-02 to replace the one on c2-swarm-04. This is because when we started the service, we specified “replica=3”. This means the Docker swarm will maintain the desired number of replicas, here it is 3. This is called desired state reconciliation.

I then shut down the rest of the nodes and left only the manager running and the Visualizer showed the output in Figure 11.
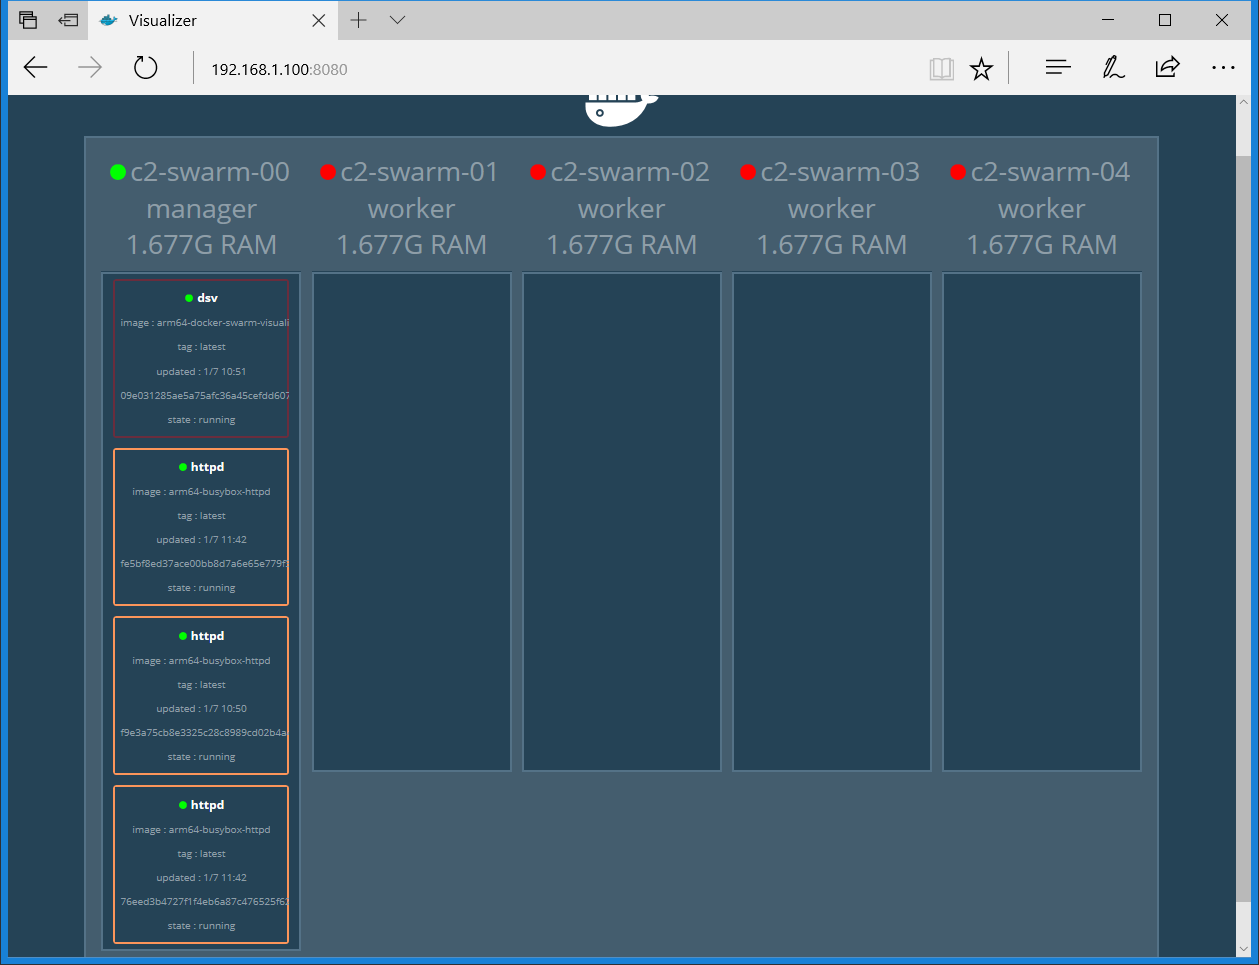
Everything worked as expected!
Conclusion
Hardkernel’s new Ubuntu 16.04 release really made a difference. The Docker swarm mode is now fully working on my ODROID-C2 cluster. In the next installment, I will upgrade Docker to 1.13.x to experiment with the “docker stack deploy” feature new to v.1.13.x. A stack is a collection of services that make up an application. It automatically deploys multiple services that are linked to each other, removing the need to define each one separately. In other words, it is docker-compose in swarm mode which manages service orchestration. The use of an overlay network for service discovery will also be described.
Be the first to comment