

In Part 1, I deployed services in my ODROID-C2 cluster using the Docker command line. It works, but there must be a better way to do deployment, especially when an application requires multiple components working together. Docker 1.13.x introduced the new Docker stack deployment feature to allow deployment of a complete application stack to the Docker swarm. A stack is a collection of services that make up an application. This new feature automatically deploys multiple services that are linked to each other obviating the need to define each one separately. In other words, this is docker-compose in swarm mode. To do this, I have to upgrade my Docker Engine from V1.12.6 that I installed using apt-get from the Ubuntu software repository to V1.13.x. Having already built V1.13.1 on my ODROID-C2 when I was experimenting unsuccessfully with swarm mode months ago, as documented in my previous article, it is just a matter of upgrading all my ODROID-C2 nodes to V1.13.1 and I am in business.
The httpd-visualizer stack
The first thing I did was to deploy the same applications (httpd and Visualizer) as in my previous article using 'docker stack deploy'. To do this, I need to create a yaml file. This is actually docker-compose yaml file version "3". This is relative easy to do as data persistence is not required. Here is the yaml file:
version: "3"
services:
 httpd:
   # simple httpd demo
   image: mrdreambot/arm64-busybox-httpd
   deploy:
     replicas: 3
     restart_policy:
       condition: on-failure
     resources:
       limits:
         cpus: "0.1"
         memory: 20M
   ports:
     - "80:80"
   networks:
     - httpd-net
 visualizer:
   image: mrdreambot/arm64-docker-swarm-visualizer
   ports:
     - "8080:8080"
   volumes:
     - "/var/run/docker.sock:/var/run/docker.sock"
   deploy:
     placement:
       constraints: [node.role == manager]
   networks:
     - httpd-net
networks:
 httpd-net:
Note that the use of “Networks” in the yaml file is not strictly necessary. If omitted, dDocker will create a default overlay network as you will see in a later section. The 2 applications, in this case, do not need to talk to each other anyway! To deploy it, just change to the directory where the yaml file is located and issue the command:
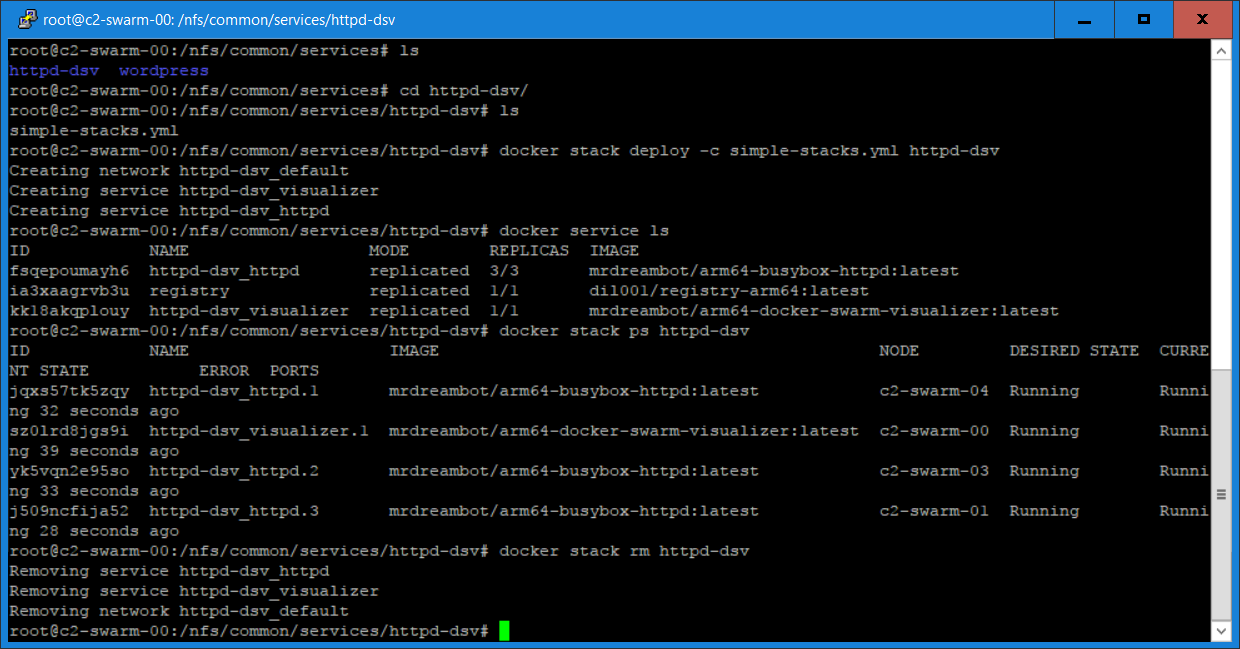
$ docker stack deploy -c simple-stacks.yml httpd-dsvThis creates a stack named httpd-dsv. You can find out regarding the state of the stack by issuing a number of stack commands as shown in Figure 1.
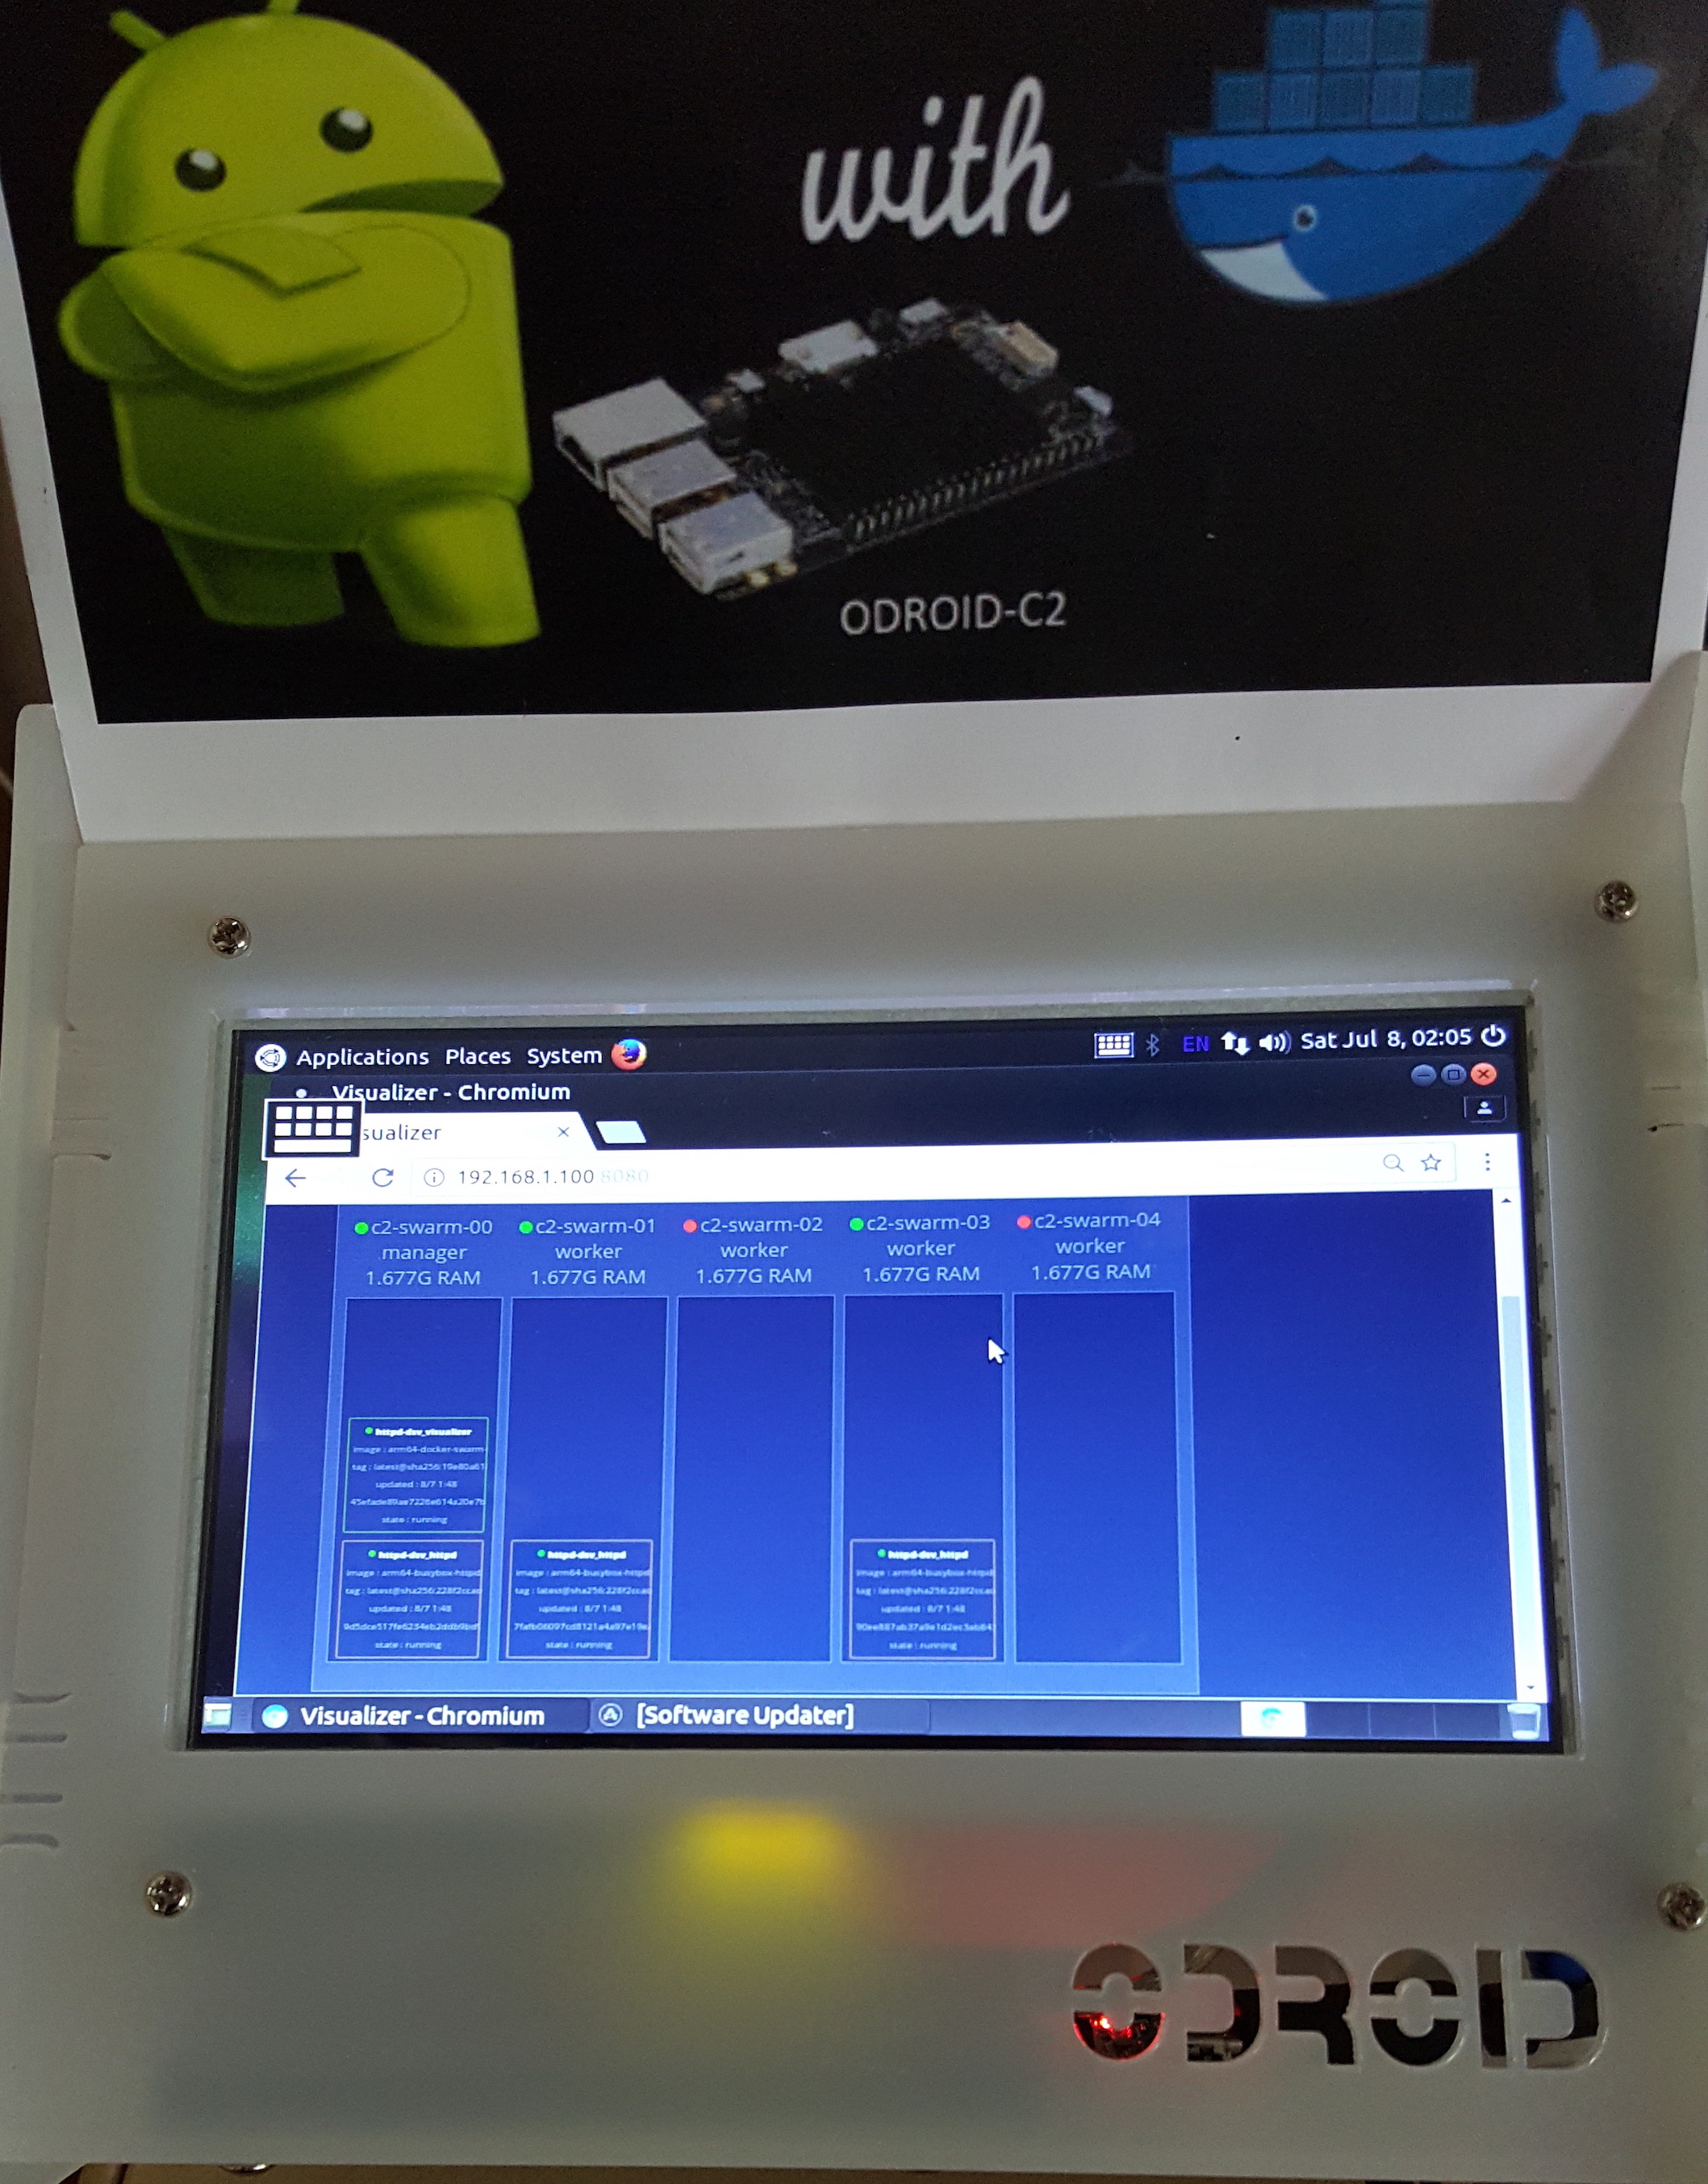
You can point your browser to the Docker swarm manager or any swarm node at port 8080 to visualize the deployment using the Visualizer. Figure 2 shows a screenshot of the VuShell display for visualization taken from a previous stack deployment:
To undeploy the stack, issue the following command:
$ docker stack rm httpd-dsv
Migrating my WordPress blog to the swarm
To illustrate a more realistic stack deployment, I decided that a good test is to migrate my blog to the swarm. This is useful to me as it enables me to bring up my blog easily to another environment when disaster strikes. To do this, I have to do some preparation work:
- Create a dump of the WordPress database using mysqldump to create: mysql.dmp.
- Use a text editor to replace all references of my domain name (mrdreambot.ddns.net) in the .dmp file with the swarm manager's IP address which is 192.168.1.100.
- Tar up /var/www/html directory which contains scripts and uploaded assets
- Pick the docker images to use: mrdreambot/arm64-mysql and arm64v8/wordpress.
- Armed with the above, I can proceed to create a docker stack deployment for my WordPress blog.
State persistence using bind-mount volumes
The first approach I took was to use host directories as data volumes (also called bind-mount volumes) for data persistence. The yaml file is shown below:
version: '3'
services:
  db:
    image: mrdreambot/arm64-mysql
    volumes:
      - /nfs/common/services/wordpress/db_data:/u01/my3306/data
      - /nfs/common/services/wordpress/db_root:/root
    environment:
      MYSQL_ROOT_PASSWORD: Password456
      MYSQL_DATABASE: wordpress
      MYSQL_USER: wordpressuser
      MYSQL_PASSWORD: Password456
    deploy:
      restart_policy:
        condition: on-failure
      placement:
        constraints: [node.role == manager]
  wordpress:
    depends_on:
      - db
    image: arm64v8/wordpress
    volumes:
      - /nfs/common/services/wordpress/www_src/html:/usr/src/wordpress
      - /nfs/common/services/wordpress/www_data:/var/www/html
    ports:
      - 80:80
    environment:
      WORDPRESS_DB_HOST: db:3306
      WORDPRESS_DB_USER: wordpressuser
      WORDPRESS_DB_PASSWORD: Password456
      WORDPRESS_DB_NAME: wordpress
    deploy:
      replicas: 3
      restart_policy:
        condition: on-failure
             placement:
        constraints: [node.role == manager]
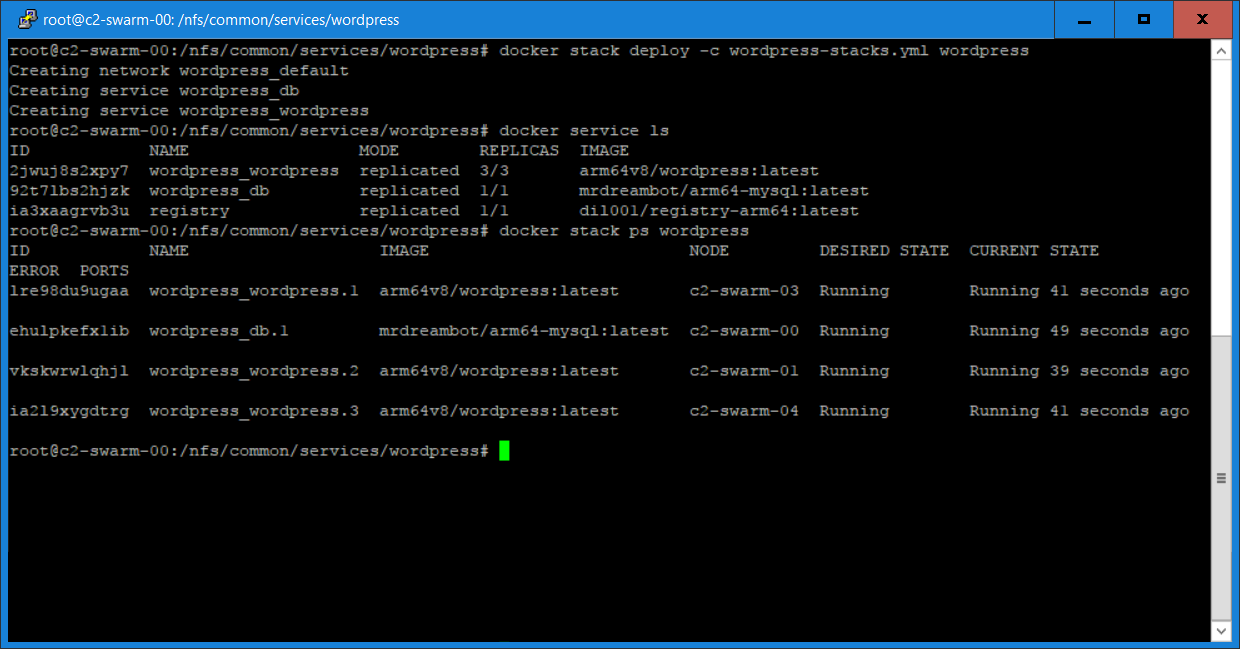
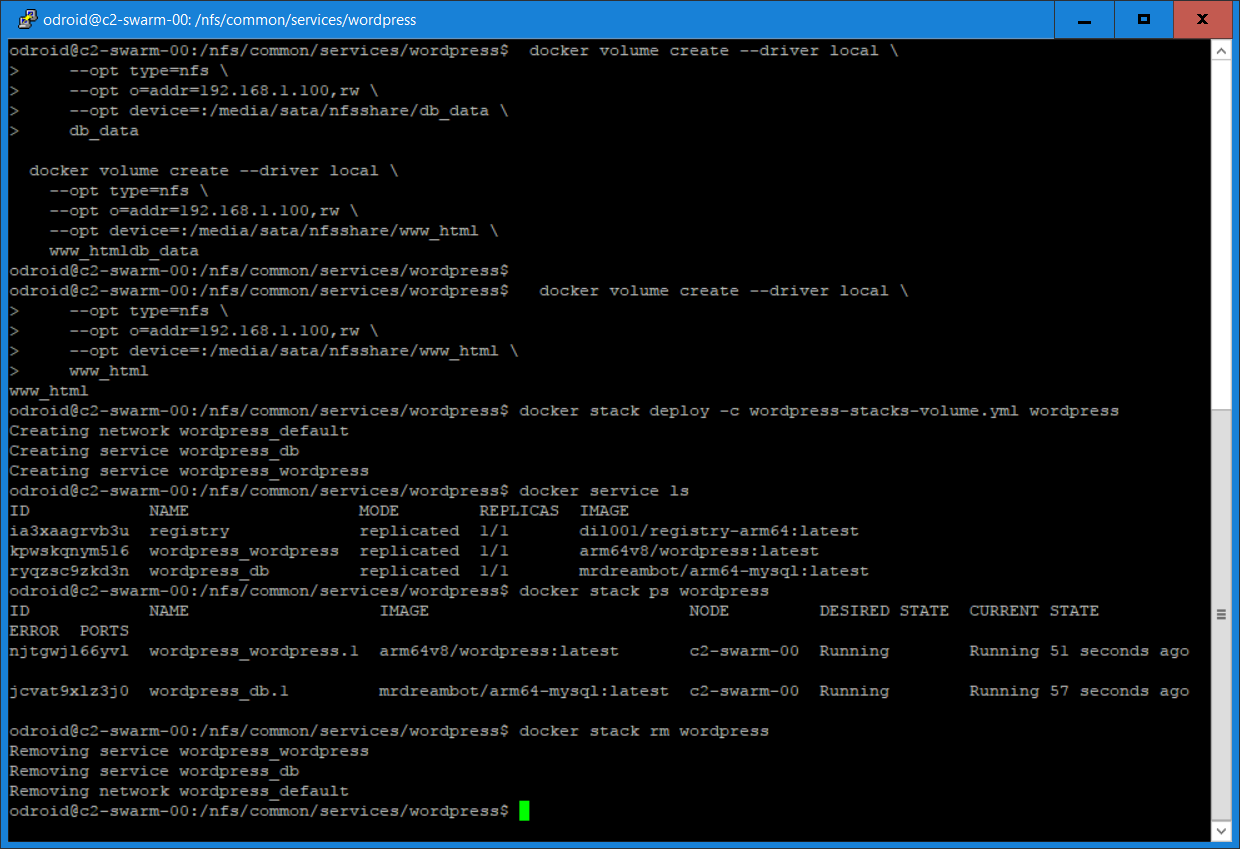
Figures 3 and 4 show the screenshots for the stack deployment.
You have probably noticed that the WordPress site has lost some of its customized look as the arm64v8/wordpress docker image does not provide any PHP customization or libraries. As mentioned earlier, if you do not define Networks in your yaml file, docker creates a ‘wordpress_default’ overlay network for the deployment automatically. The overlay network is required such that WordPress can reference the MySQL database using its name “db” as defined in the yaml file:
WORDPRESS_DB_HOST: db: 3306The data volumes warrant some explanation. First thing to note is that all the host directories used as data volumes are NFS mounted and accessible to all swarm nodes.
/nfs/common/services/wordpress/db_data:/u01/my3306/data
The host directory /nfs/common/services/wordpress/db_data is an empty directory. It is mapped to the container's /u01/my3306/data directory where the MySQL database is located. How its content is created will be described next.
/nfs/common/services/wordpress/db_root:/root
I pre-populated the host directory /nfs/common/services/wordpress/db_root with 2 files:
- run.sh - the MySQL startup script which replaces the one located in the container's /root directory. This script is the entry point to the MySQL container. I changed the script to look for the mysql.dmp file located also in /root. If it is there, import the dump file into MySQL which will populate the /u01/my3306/data directory with data. If there is no mysql.dmp file, it will do nothing in additional to the usual processing.
- mysql.dmp - the dump file of my Blog's MySQL database
The changes in the run.sh file compared to the one that comes with the MySQL docker image are shown below:
...
DMP_FILE=/root/mysql.dmp
...
if [ "$MYSQL_DATABASE" ]; then
   mysql -uroot -e "CREATE DATABASE IF NOT EXISTS \`$MYSQL_DATABASE\`"
   if [ -f "$DMP_FILE" ]; then
      mysql -uroot $MYSQL_DATABASE < $DMP_FILE
   fi
fi
...
Note that this is required only when you run the container for the first time. Subsequent deployment will not require this volume mapping as the database will have been set up during the first run. This means that you can comment out this line in the yaml file after successfully deploying this stack once:
# - /nfs/common/services/wordpress/db_root:/root
/nfs/common/services/wordpress/www_src/html:/usr/src/wordpress
arm64v8/wordpress initializes WordPress by copying the contents in its /usr/src/wordpress directory to its /var/www/html directory on startup if /var/www/html has no content. By pre-populating the host directory /nfs/common/services/wordpress/www_src/html with the content from the tar file created earlier, arm64v8/wordpress will initialize WordPress with my Blog's content. This is required only when you run the container for the first time. This means that you can comment out this line in the yaml file after successfully deploying this stack once:
# - /nfs/common/services/wordpress/www_src/html:/usr/src/wordpress
/nfs/common/services/wordpress/www_data:/var/www/html
The host directory /nfs/common/services/wordpress/www_data is an empty directory whose content will be initialized by the arm64v8/wordpress script as described above.
Why not use docker-compose?
You may be wondering why I did not use docker-compose to run the yaml file, for example, using once-off commands as the docker documentation suggests? The reason for it is that the docker-compose I installed using apt-get is version 1.8.0 which does not understand docker-compose yaml file version 3 which is required for “docker stack deploy”! I tried to build the latest version of docker-compose from source without success. This is the reason I am not using docker-compose.
State Persistence Using Shared-storage Volumes
Using bind-mount volumes is host-dependent. Use of shared volumes has the benefit of being host-independent. A shared volume can be made available on any host that a container is started on as long as it has access to the shared storage backend, and has the proper volume plugin (driver) installed that allow you to use different storage backends such as: Amazon EC2, GCE, Isilon, ScaleIO, Glusterfs, just to name a few. There are lots of volume plugins or drivers available such as Flocker, Rex-Ray, etc. Unfortunately, no binaries for those plugins are available for ARM64 machines such as ODROID-C2. Fortunately, the inbuilt 'local' driver supports NFS. And it is the driver I am using for shared volume deployment. The yaml file for this is shown below:
version: '3'
services:
  db:
    image: mrdreambot/arm64-mysql
    volumes:
      - db_data:/u01/my3306/data
#       - /nfs/common/services/wordpress/db_root:/root
    environment:
      MYSQL_ROOT_PASSWORD: Password456
      MYSQL_DATABASE: wordpress
      MYSQL_USER: wordpressuser
      MYSQL_PASSWORD: Password456
    deploy:
      placement:
        constraints: [node.role == manager]
      replicas: 1
      restart_policy:
        condition: on-failure
  wordpress:
    depends_on:
      - db
    image: arm64v8/wordpress
    volumes:
#       - /nfs/common/services/wordpress/www_src/html:/usr/src/wordpress
      - www_html:/var/www/html
    ports:
      - "80:80"
    environment:
      WORDPRESS_DB_HOST: db:3306
      WORDPRESS_DB_USER: wordpressuser
      WORDPRESS_DB_PASSWORD: Password456
      WORDPRESS_DB_NAME: wordpress
    deploy:
#       placement:
#         constraints: [node.role == manager]
      replicas: 3
      restart_policy:
        condition: on-failure
volumes:
    db_data:
      external:
        name: db_data
    www_html:
      external:
        name: www_html
Again, the volumes warrant some explanation:
/nfs/common/services/wordpress/db_root:/root
It serves the same purpose as in the bind-mount volume section. It is needed only when you run the stack for the first time to initialize the MySQL database.
/nfs/common/services/wordpress/www_src/html:/usr/src/wordpress
It serves the same purpose as in the bind-mount volume section. It is needed only when you run the stack for the first time to initialize the WordPress content.
db_data:/u01/my3306/data
db_data is a shared volume created outside of the stack deployment meaning it is created before the yaml file is deployed. It is used to store the MySQL database content and is uninitialized on creation.
www_html:/var/www/html
www_html is a shared volume created outside of the stack deployment meaning it is created before the yaml file is deployed. It is used to store the WordPress content and is uninitialized on creation.
Creating the shared volumes
You have probably noticed the section in the yaml file that reads:
volumes:
    db_data:
      external:
        name: db_data
    www_html:
      external:
        name: www_html
The db_data and www_html shared volumes are created using the following commands:
docker volume create --driver local \
    --opt type=nfs \
    --opt o=addr=192.168.1.100,rw \
    --opt device=:/media/sata/nfsshare/www_html \
    www_html
docker volume create --driver local \
    --opt type=nfs \
    --opt o=addr=192.168.1.100,rw \
    --opt device=:/media/sata/nfsshare/db_data \
    db_data
The directories /media/sata/nfsshare/db_data and /media/sata/nfsshare/www_htm must exist before you create the volumes. My /etc/exports file has an entry:
/media/sata/nfsshare 192.168.1.0/255.255.255.0(rw,sync,no_root_squash,no_subtree_check,fsid=0)To prove that the shared volumes work, I initially deployed only 1 mySQL and 1 WordPress replica on the Docker manager and let them initialize the shared volumes.
Then I commented out the 2 lines for WordPress placement:
#       placement:
#         constraints: [node.role == manager]
and the 2 bind-mount volumes:
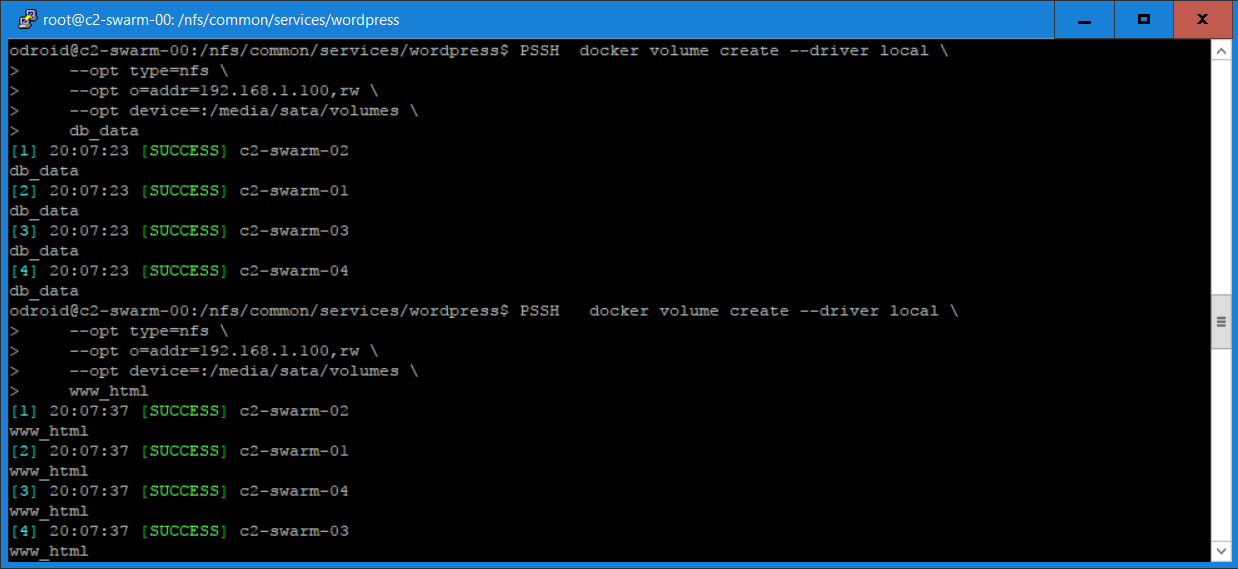
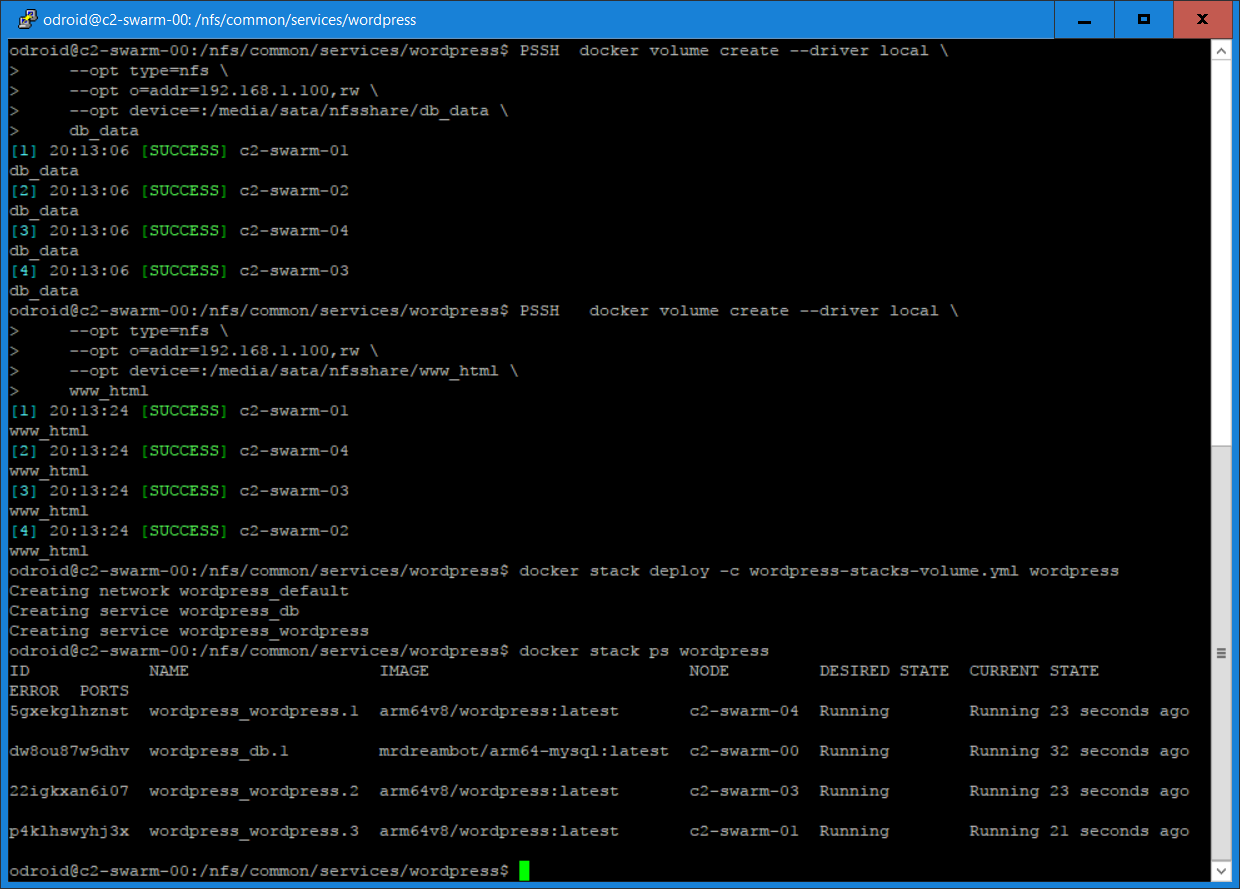
#       - /nfs/common/services/wordpress/db_root:/root
#       - /nfs/common/services/wordpress/www_src/html:/usr/src/wordpress
Next, I want to deploy 3 replicas of WordPress on multiple nodes. Since we are using the “local” driver, we have to create the volumes on each node. As shown in Figure 5, I used "parallel ssh" to create them on all nodes using just 2 commands. Figure 5 shows the volume and the stack deployment:
I checked that all replicas are using the shared volumes by using “docker exec -it” to get into the WordPress containers on the nodes they were running on and examining the content in the /var/www/html directory to verify that everything was working. Under the covers, both approaches use NFS for sharing among the nodes. However, shared volumes provide a higher-level host-independent abstraction than bind-mount volumes. Potentially, you can recreate the shared volumes using storage backends other than NFS such as AWS EC2 and Glusterfs. Bind-mount, on the other hand, is tied to your host file system which may be difficult to migrate to another environment.
Conclusion
I learned something new exploring the use of “docker stack deploy”. I hope you'll find this article useful and informative. There are still many features such as rolling updates, Continuous Integration/Continuous Deployment (CI/CD), blue/green and A/B deployments, just to name a few, that I am yet to explore using my ODROID-C2 Swarm cluster. And there are other service orchestration frameworks such as Kubernetes and Openshift that are more prevalent in the Enterprise environment than Docker Swarm Mode. I shall explore additional Docker Swarm Mode use cases and Swarm Mode alternatives and report my findings in the future when the opportunity arises.
Be the first to comment