

This guide will walk you through setting up a NAS (Network Attached Storage) on the ODROID-HC2 single-board computer. There is no reason why it wouldn’t work for the HC1 or XU4, however the XU4 uses USB3 instead of SATA. The guide is written for those with no Linux experience and minimal computer building experience. I’m writing it because I had minimal Linux experience and it was a pain to figure out how to set it up, and involved reading a few dozen guides.
Parts List
- ODROID-HC2 : Home Cloud Two
- 12V/2A Power Supply Unit US Plug for ODROID-HC2
- ODROID-USB-UART Module Kit
- SanDisk 32GB Ultra Class 10 SDHC UHS-I Memory Card, up to 80MB, Grey/Black (SDSDUNC-032G-GN6IN)
- AmazonBasics RJ45 Cat-6 Ethernet Patch Cable – 3 Feet (0.9 Meters)
- ODROID-HC2 Cases (Black)
- WD Red 2TB NAS Hard Disk Drive – 5400 RPM Class SATA 6 Gb/s 64MB Cache 3.5 Inch – WD20EFRX
The HC2 is superior to the Raspberry Pi 3 in that it has gigabit ethernet, a SATA hard drive connection, a faster 2 Ghz CPU and 2 GB of memory. It is purposely built to be a network attached storage device or light weight server. The Raspberry Pi 3 is superior in the amount of support available from manufacturers and the community. I opted for the HC2 over the HC1 because high capacity 3.5-inch drives are cheaper than 2.5-inch drives. The HC1 is more energy efficient, if that is a concern. The HC2 does not have an HDMI output so everything must be set up before the image is burned to the MicroSD card, over a VNC remote connection or over a serial connection via Command Line. This guide will cover setup with a serial connection but it is worth setting up a VNC server later, as Linux is easier to use with a GUI if you don’t know console commands very well.
The HC2 needs a 12 volt/2 amp power supply, a MicroSD Card, and a 3.5 inch SATA hard drive. I used a 3TB Toshiba hard drive I had laying around. The HC2 with the lid only supports hard drives up to 27mm tall.
Additionally, if the included screws are too short, you may need screws to attach the hard drive to the aluminum HC2 fixture.
You will also need an ethernet cable to connect to your router and the internet. You will also need an ODROID-USB-UART to connect to the serial port on the HC2.
Pick up a HC2 case for $5 to close everything up when you are done.
Assembly
Assembly is extremely simple. Place the hard drive on the bottom of the HC2 and slide it into the SATA port. Supporting the hard drive and the aluminum body, flip the two pieces over ensuring the hard drive does not put weight on the SATA connector. Once you have it upside down, use screws to attach the bottom of the hard drive to the HC2. Flip it back over and connect the ethernet cable from the HC2 to your router. Connect the USB-UART to the serial port on the HC2. Plug the USB end into your computer. Do not connect the power supply yet.
Software
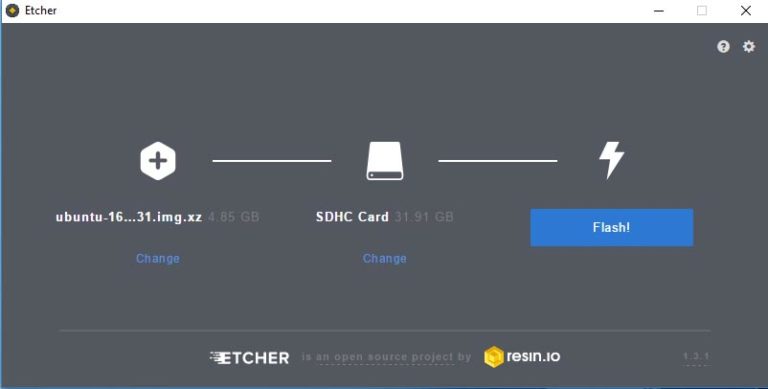
Download ODROID’s ubuntu-16.04.3-4.9-mate-odroid-xu4-20171025.img.xz release at https://odroid.in/ubuntu_16.04lts. Ubuntu is a Linux distribution that is free and stable. While that is downloading, download Etcher: https://etcher.io/. Etcher is software that will flash the Ubuntu image onto your MicroSD card. Put your MicroSD card into your computer’s MicroSD adapter and start Etcher. Select the Ubuntu image and the MicroSD card then click “Flash.” It will take a few minutes to run. When it finishes, Windows will pop up a message about formatting a drive before using it. Click “Cancel.”
Take your flashed MicroSD card and insert it into the HC2’s MicroSD slot.
Download drivers for the USB-UART from here: https://goo.gl/opafDn
Extract and install the drivers. Once the drivers are installed, you will find it listed as a COM port in the device manager.
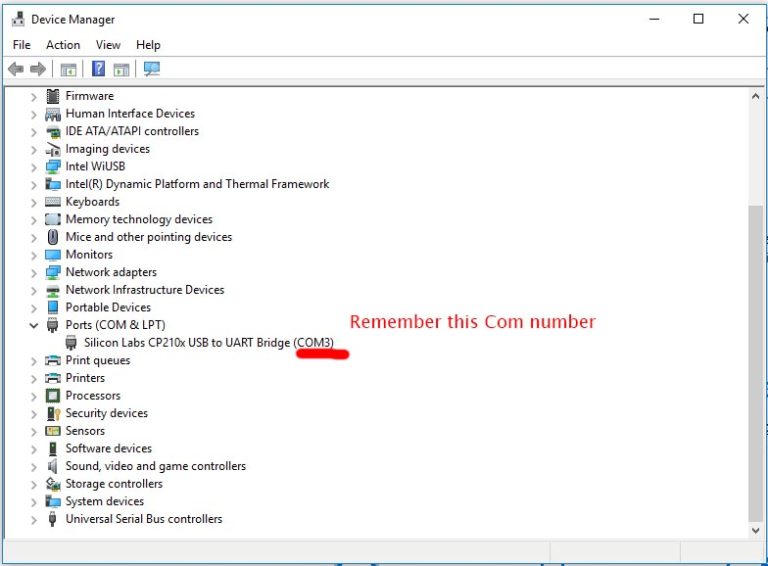
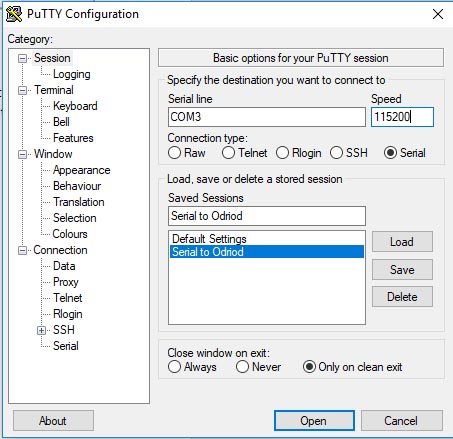
Next, download and install PuTTY from http://the.earth.li/~sgtatham/putty/latest/x86/putty.exe. PuTTY is a free serial console program we will be using to send commands to the HC2. PuTTY will prompt you for connection setting. Type the COM number from the device manager 115200 for the speed and check serial for the connection type. Save your configuration in case you need to use it in the future.
Configuration
Click “Open” in PuTTY and connect power to the HC2. The console window will show all the boot-up messages and eventually give you a login prompt. The default login info is:
User: odroid Password: odroid
Root Access credentials:
User: root Password: odroid
We are going to login and install updates first. The sudo command is “Super User Do” command to run commands as Admin or Root. Type the following commands:
$ odroid login: odroid
$ Password: odroid

$ sudo apt update
$ sudo apt upgrade
$ sudo apt dist-upgrade
$ sudo apt install linux-image-xu3
When you install the linux-image-xu3, it will throw out a prompt telling you that updating the kernel is dangerous. Do you want to abort the update? Select “NO.” Sometimes it will throw errors about files being in use on your first boot. If it does, enter the following command, and pick up where you left off:
$ sudo reboot
Partition the Hard Drive
Log back in and type:
$ sudo apt-get install lshw
$ sudo lshw -C disk
This will list all attached storage.
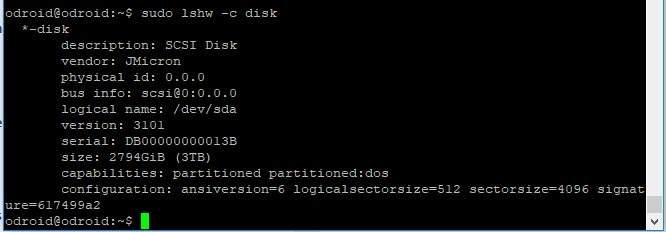
You’ll want the logical name for the hard drive in this case “/dev/sda”. Next, we will partition the disk:
$ sudo fdisk /dev/sdaCreate a new partition type by pressing “n” for a new partition, “p” for primary partition, then “1”. For the partition start and end hit enter twice to use the defaults of the entire drive, then type “w” to write the partition table and exit fdisk.
Format the hard drive
In this guide, we are going to format the hard drive as ext4. If you ever have to recover the data on the drive, ext4 is not natively supported by Windows. This is not major issue since Ubuntu/Nextcloud will be handling all of the read/write operations. If you need the drive to be directly compatible with Windows or Mac, format it as vfat(fat32). Be aware that vfat can only handle files up to 4GB and partitions up to 2TB. Make multiple partitions to work around the partition size limit.
Type the following command to format the drive:
$ sudo mkfs -t ext4 /dev/sda1When it finishes formatting, we are going to set up the hard drive to mount on boot. We are going to create a directory in Ubuntu to mount the hard drive to. I am naming mine “SATAHD” but you can use any name you want:
$ sudo mkdir /media/SATAHDNext, we need the UUID of the hard drive. When a hard drive is partitioned, a UUID is generated and assigned to the partition. Our hard drive is physically identified as “/dev/sda1” with “sda” being the drive and “1” being the first partition. If the hard drive was swapped, /dev/sda1 would be the first partition of the new drive. However the UUID of the partition is unique to only that partition. If you want Ubuntu to automatically mount whatever drive you put in it as SATAHD you may use /dev/sda1 instead of the UUID:
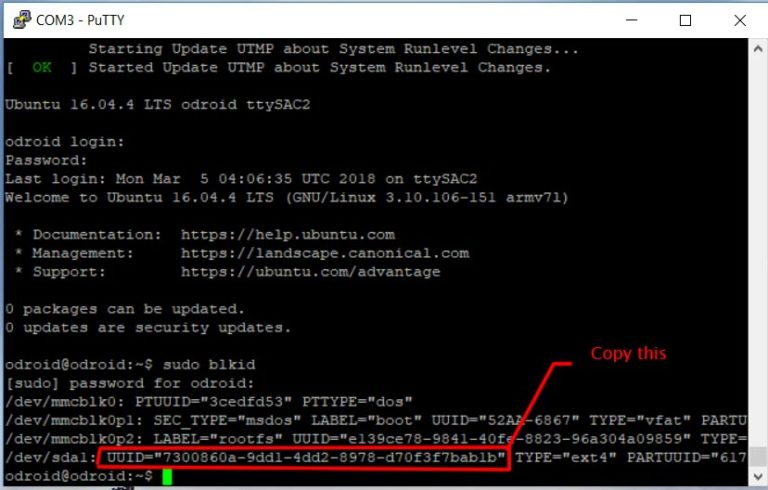
$ sudo blkidSearch the results for “/dev/sda1 uuid=”, then copy the UUID to notepad or scratch paper.
Next, we are going to set the drive to automatically mount on boot. The “sudo nano” command is a terminal based text editor:
$ sudo nano -Bw /etc/fstabUse your arrow keys to go down to the bottom of the file and add the following line:
UUID=7300860a-9dd1-4dd2-8978-d70f3f7bab1b /media/SATAHD EXT4 defaults 0 2Use the UUID you copied in the last step instead of the one I used. “/media/SATAHD” is the mount point and the directory we created earlier. ext4 is the file system we used in formatting the drive. If you used something other than ext4, substitute the correct file system.
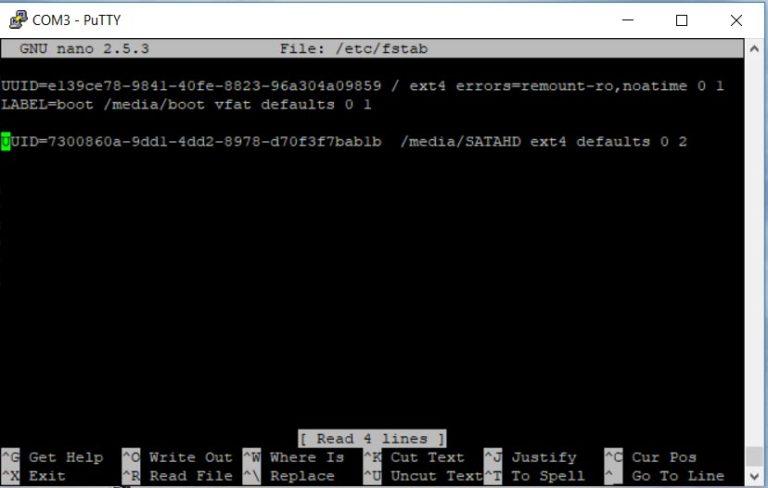
Hold CTRL+X to exit. Press “Y” to save changes and Enter to save over the old file, then reboot the computer:
$ sudo reboot
Installing Nextcloud
We are going to install Nextcloud with a snap package. If you want to manually install and configure Nextcloud, the documentation is available at http://goo.gl/DS5ZjY. Type the following command to install it:
$ sudo snap install nextcloudNextcloud has a list of authorized domains or addresses. By default, the first IP address you access Nextcloud from will be added to that list. After that you must manually add addresses. I prefer to have my router automatically give the same IP address to the HC2 using the MAC address. You can set your IP address to be static self-assigned instead of DHCP if your router doesn’t support assigning IP addresses this way.
To list the eth0 IP address of your HC2, type the following command:
$ ifconfig -aOpen your web browser and type in the IP address of your HC2. You will be greeted with a “Make a new admin account” screen. Enter your choice of username and password. On the next screen, close the “Welcome to Nextcloud” pop up. Click the gear in the top right corner. Select “apps.” Scroll down the list of apps until you find “External storage support.” On the right side, click the Enable button.
Click the gear in the top right corner again. Select “Admin.” On the left side bar select “External Storage.” Click the “Add Storage” drop down box and select “Local.” Fill in the location as “/media/SATAHD” and hit the check box on the right to save the changes.

Your hard drive will now appear on the home screen as “Local.” If you need to change the server’s config.php file, type:
$ sudo nano /var/snap/nextcloud/current/nextcloud/config/config.phpThe setting you will most likely have to mess with is the trusted domains, should your IP address change. As a good security practice you should change your password for the ODROID account and root. Type:
$ sudo passwd
$ and
$ passwd
You can enable HTTPS, but web browsers won’t like self-signed certificates. Do it right and use Let’s Encrypt. You can also set up your Nextcloud to be accessible through a Dynamic DNS but that will be another tutorial. For comments, questions, and suggestions, please visit the original article at http://autonomousdev.net/index.php/2018/03/06/odroid-hc1-2-ubuntu-nas-with-nextcloud-setup-guide/.
Further reading
https://help.nextcloud.com/t/adding-a-new-trusted-domain/26 https://github.com/nextcloud/nextcloud-snap https://docs.nextcloud.com/server/13/admin_manual/
Be the first to comment