
Overview
Kubernetes (or k8s for short) is an extensible open source container orchestration platform designed for managing containerized workloads and services at scale. It helps in automated deployment, scaling, and management of container centric application workloads across a cluster of nodes (bare-metal, virtual, or cloud) by orchestrating compute, network, and storage infrastructure on behalf of those user workloads.
The two main types of nodes in a Kubernetes cluster are:
Master: this node acts as the Control Plane for the cluster. It is responsible for all application workload deployment, scheduling, and placement decisions as well as detecting and managing changes to the state of deployed applications. It is comprised of a Key-Value Store, an API Server, a Scheduler, and a Controller Manager.
Worker Node(s): node(s) that actually run the application containers. They are also on occasions referred to as Minion(s). The Master is also a node, but is not targeted for application deployment. It is comprised of an agent called kubelet, a network proxy called kube-proxy, and a Container Engine.
The following Figure-1 illustrates the high-level architectural overview of Kubernetes:
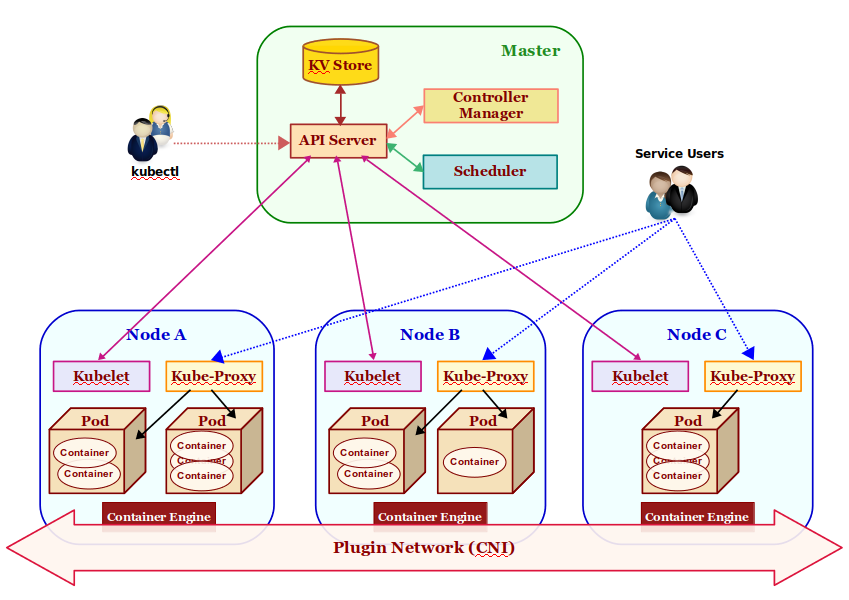
The core components that make a Kubernetes cluster are described as follows:
KV Store: a highly reliable, distributed, and consistent key-value data store used for persisting and maintaining state information about the various components of the Kubernetes cluster. By default, Kubernetes uses etcd as the key-value store.
API Server: acts as the entry point for the Control Plane by exposing an API endpoint for all interactions with and within the Kubernetes cluster. It is through the API Server that requests are made for deployment, administration, management, and operation of container based applications. It uses the key-value store to persist and maintain state information about all the components of the Kubernetes cluster.
Pod(s): it is the smallest unit of deployment in Kubernetes . One or more containers run inside it. Think of it as a logical host with shared network and storage. Application pods are scheduled to run on different worker nodes of the Kubernetes cluster based on the resource needs and application constraints. Every pod within the cluster gets its own unique ip-address. The application containers within a pod communicate with each other using localhost. Pod(s) are also the smallest unit of scaling in Kubernetes. In addition, Pod(s) are ephemeral - they can come and go at any time.
Scheduler: responsible for scheduling application pod(s) to run on the selected worker node(s) of the Kubernetes cluster based on the application resource requirements as well as application specific affinity constraints.
Service: provides a stable, logical networking endpoint for a group of pod(s) (based on a label related to an application pod) running on the wor2ker node(s) of the Kubernetes cluster. They enable access to an application via service-discovery and spread the requests through simple load-balancing. To access an application, each service is assigned a cluster-wide internal ip-address:port.
Controller Manager: manages different types of controllers that are responsible for monitoring and detecting changes to the state of the Kubernetes cluster (via the API server) and ensuring that the cluster is moved to the desired state. The different types of controllers are:
- Node Controller => responsible for monitoring and detecting the state & health (up or down) of the worker node(s) in the Kubernetes cluster.
- ReplicaSet => previously referred to as the Replication Controller and is responsible for maintaining the desired number of pod replicas in the cluster.
- Endpoints Controller => responsible for detecting and managing changes to the application service access endpoints (list of ip-address:port).
Plugin Network: acts as the bridge (overlay network) that enables communication between the pod(s) running on different worker node(s) of the cluster. There are different implementations of this component by various 3rd-parties such as calico, flannel, weave-net, etc. They all need to adhere to a common specification called the Container Network Interface or CNI for short.
kubelet: an agent that runs on every worker node of the Kubernetes cluster. It is responsible for creating and starting an application pod on the worker node and making sure all the application containers are up and running within the pod. In addition, it is also responsible for reporting the state and health of the worker node, as well as all the running pods to the master via the API server.
kube-proxy: a network proxy that runs on each of the worker node (s) of the Kubernetes cluster and acts as an entry point for access to the various application service endpoints. It routes requests to the appropriate pod (s) in the cluster.
Container Engine: a container runtime that runs on each of the worker node(s) to manage the lifecycle of containers such as getting the images, starting and stopping containers, etc. The commonly used container engine is Docker.
kubectl: command line tool used for interfacing with the API Server. Used by administrators (or operators) for deployment and scaling of applications, as well as for the management of the Kubernetes cluster.
Installation and System Setup
The installation will be on a 5-node ODROID-N2 Cluster running Armbian Ubuntu Linux.
The following Figure-2 illustrates the 5-node ODROID-N2 cluster in operation:
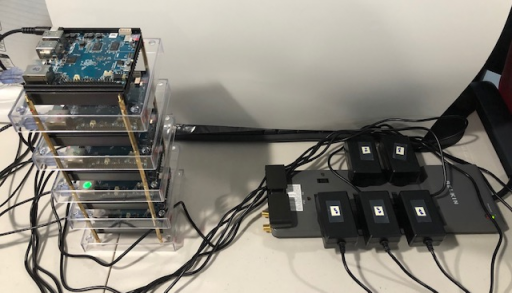
For this tutorial, let us assume the 5-nodes in the cluster to have the following host names and ip addresses: Host name IP Address
my-n2-1 192.168.1.51
my-n2-2 192.168.1.52
my-n2-3 192.168.1.53
my-n2-4 192.168.1.54
my-n2-5 192.168.1.55
Open a Terminal window and open a tab for each of the 5 nodes my-n2-1 thru my-n2-5. In each of the Terminal tabs, ssh into the corresponding node.
Each of the nodes my-n2-1 thru my-n2-5 need to have a unique identifier for the cluster to operate without any collisions. The unique node identifier is located in the file /etc/machine-id and we see all the nodes my-n2-1 thru my-n2-5 having the same value. This needs to be * FIXED*. On each of the nodes my-n2-1 thru my-n2-5, execute the following commands:
$ sudo rm -f /etc/machine-id
$ sudo dbus-uuidgen --ensure=/etc/machine-id
$ sudo rm /var/lib/dbus/machine-id
$ sudo dbus-uuidgen --ensure
$ sudo reboot now
Once again, in each of the Terminal tabs, ssh into the corresponding node.
Next, we need to setup the package repository for Docker. On each of the nodes my-n2-1 thru my-n2-5, execute the following commands:
$ sudo apt-get update
$ sudo apt-get install apt-transport-https ca-certificates curl \
software-properties-common -y
$ curl -fsSL https://download.docker.com/linux/ubuntu/gpg | sudo \
apt-key add -
$ sudo apt-get update
$ sudo add-apt-repository "deb [arch=arm64] \
-https://download.docker.com/linux/ubuntu xenial stable"
$ sudo apt-get update
For version 1.16 of Kubernetes (the version at the time of this article), the recommended Docker version is 18.09.
ATTENTION: For Docker CE 19.xx (and above) Ensure the version of Docker installed is *18.09*. Else will encounter the following error: [ERROR SystemVerification]: unsupported docker version: 19.xx
We need to check for the latest package of Docker 18.09 in the repository. On any of the nodes (we will pick my-n2-1), execute the following command:
$ apt-cache madison docker-ceThe following would be a typical output:
<span style="font-weight: 400;">Output.1</span>

<span style="font-weight: 400;">docker-ce | 5:19.03.5~3-0~ubuntu-xenial | https://download.docker.com/linux/ubuntu xenial/stable arm64 Packages</span>

<span style="font-weight: 400;">docker-ce | 5:19.03.4~3-0~ubuntu-xenial | https://download.docker.com/linux/ubuntu xenial/stable arm64 Packages</span>

<span style="font-weight: 400;">docker-ce | 5:19.03.3~3-0~ubuntu-xenial | https://download.docker.com/linux/ubuntu xenial/stable arm64 Packages</span>

<span style="font-weight: 400;">docker-ce | 5:19.03.2~3-0~ubuntu-xenial | https://download.docker.com/linux/ubuntu xenial/stable arm64 Packages</span>

<span style="font-weight: 400;">docker-ce | 5:19.03.1~3-0~ubuntu-xenial | https://download.docker.com/linux/ubuntu xenial/stable arm64 Packages</span>

<span style="font-weight: 400;">docker-ce | 5:19.03.0~3-0~ubuntu-xenial | https://download.docker.com/linux/ubuntu xenial/stable arm64 Packages</span>

<span style="font-weight: 400;">docker-ce | 5:18.09.9~3-0~ubuntu-xenial | https://download.docker.com/linux/ubuntu xenial/stable arm64 Packages</span>

<span style="font-weight: 400;">docker-ce | 5:18.09.8~3-0~ubuntu-xenial | https://download.docker.com/linux/ubuntu xenial/stable arm64 Packages</span>

<span style="font-weight: 400;">docker-ce | 5:18.09.7~3-0~ubuntu-xenial | https://download.docker.com/linux/ubuntu xenial/stable arm64 Packages</span>

<span style="font-weight: 400;">docker-ce | 5:18.09.6~3-0~ubuntu-xenial | https://download.docker.com/linux/ubuntu xenial/stable arm64 Packages</span>

<span style="font-weight: 400;">docker-ce | 5:18.09.5~3-0~ubuntu-xenial | https://download.docker.com/linux/ubuntu xenial/stable arm64 Packages</span>

<span style="font-weight: 400;">docker-ce | 5:18.09.4~3-0~ubuntu-xenial | https://download.docker.com/linux/ubuntu xenial/stable arm64 Packages</span>

<span style="font-weight: 400;">docker-ce | 5:18.09.3~3-0~ubuntu-xenial | https://download.docker.com/linux/ubuntu xenial/stable arm64 Packages</span>

<span style="font-weight: 400;">docker-ce | 5:18.09.2~3-0~ubuntu-xenial | https://download.docker.com/linux/ubuntu xenial/stable arm64 Packages</span>

<span style="font-weight: 400;">docker-ce | 5:18.09.1~3-0~ubuntu-xenial | https://download.docker.com/linux/ubuntu xenial/stable arm64 Packages</span>

<span style="font-weight: 400;">docker-ce | 5:18.09.0~3-0~ubuntu-xenial | https://download.docker.com/linux/ubuntu xenial/stable arm64 Packages</span>

<span style="font-weight: 400;">docker-ce | 18.06.3~ce~3-0~ubuntu | https://download.docker.com/linux/ubuntu xenial/stable arm64 Packages</span>

<span style="font-weight: 400;">docker-ce | 18.06.2~ce~3-0~ubuntu | https://download.docker.com/linux/ubuntu xenial/stable arm64 Packages</span>

<span style="font-weight: 400;">docker-ce | 18.06.1~ce~3-0~ubuntu | https://download.docker.com/linux/ubuntu xenial/stable arm64 Packages</span>

<span style="font-weight: 400;">docker-ce | 18.06.0~ce~3-0~ubuntu | https://download.docker.com/linux/ubuntu xenial/stable arm64 Packages</span>

<span style="font-weight: 400;">docker-ce | 18.03.1~ce-0~ubuntu | https://download.docker.com/linux/ubuntu xenial/stable arm64 Packages</span>

<span style="font-weight: 400;">docker-ce | 18.03.0~ce-0~ubuntu | https://download.docker.com/linux/ubuntu xenial/stable arm64 Packages</span>

<span style="font-weight: 400;">docker-ce | 17.12.1~ce-0~ubuntu | https://download.docker.com/linux/ubuntu xenial/stable arm64 Packages</span>

<span style="font-weight: 400;">docker-ce | 17.12.0~ce-0~ubuntu | https://download.docker.com/linux/ubuntu xenial/stable arm64 Packages</span>

<span style="font-weight: 400;">docker-ce | 17.09.1~ce-0~ubuntu | https://download.docker.com/linux/ubuntu xenial/stable arm64 Packages</span>

<span style="font-weight: 400;">docker-ce | 17.09.0~ce-0~ubuntu | https://download.docker.com/linux/ubuntu xenial/stable arm64 Packages</span>
From the Output.1 above, we see the latest package for Docker 18.09 is 5:18.09.9~3-0~ubuntu-xenial.
Next, we need to install the chosen version of Docker. On each of the nodes my-n2-1 thru my-n2-5, execute the following command:
$ sudo apt-get install docker-ce=5:18.09.9~3-0~ubuntu-xenial -yThe following would be a typical output:
Output.2
Reading package lists... Done
Building dependency tree
Reading state information... Done
The following additional packages will be installed:
aufs-tools cgroupfs-mount containerd.io docker-ce-cli git git-man liberror-perl pigz
Suggested packages:
git-daemon-run | git-daemon-sysvinit git-doc git-el git-email git-gui gitk gitweb git-cvs git-mediawiki git-svn
The following NEW packages will be installed:
aufs-tools cgroupfs-mount containerd.io docker-ce docker-ce-cli git git-man liberror-perl pigz
0 upgraded, 9 newly installed, 0 to remove and 0 not upgraded.
Need to get 61.3 MB of archives.
After this operation, 325 MB of additional disk space will be used.
Get:1 https://download.docker.com/linux/ubuntu xenial/stable arm64 containerd.io arm64 1.2.10-3 [14.5 MB]
Get:2 http://ports.ubuntu.com/ubuntu-ports bionic/universe arm64 pigz arm64 2.4-1 [47.8 kB]
Get:3 http://ports.ubuntu.com/ubuntu-ports bionic/universe arm64 aufs-tools arm64 1:4.9+20170918-1ubuntu1 [101 kB]
Get:4 http://ports.ubuntu.com/ubuntu-ports bionic/universe arm64 cgroupfs-mount all 1.4 [6320 B]
Get:5 http://ports.ubuntu.com/ubuntu-ports bionic/main arm64 liberror-perl all 0.17025-1 [22.8 kB]
Get:6 http://ports.ubuntu.com/ubuntu-ports bionic-updates/main arm64 git-man all 1:2.17.1-1ubuntu0.4 [803 kB]
Get:7 http://ports.ubuntu.com/ubuntu-ports bionic-updates/main arm64 git arm64 1:2.17.1-1ubuntu0.4 [2941 kB]
Get:8 https://download.docker.com/linux/ubuntu xenial/stable arm64 docker-ce-cli arm64 5:19.03.5~3-0~ubuntu-xenial [29.6 MB]
Get:9 https://download.docker.com/linux/ubuntu xenial/stable arm64 docker-ce arm64 5:18.09.9~3-0~ubuntu-xenial [13.3 MB]
Fetched 61.3 MB in 5s (11.6 MB/s)
Selecting previously unselected package pigz.
(Reading database ... 156190 files and directories currently installed.)
Preparing to unpack .../0-pigz_2.4-1_arm64.deb ...
Unpacking pigz (2.4-1) ...
Selecting previously unselected package aufs-tools.
Preparing to unpack .../1-aufs-tools_1%3a4.9+20170918-1ubuntu1_arm64.deb ...
Unpacking aufs-tools (1:4.9+20170918-1ubuntu1) ...
Selecting previously unselected package cgroupfs-mount.
Preparing to unpack .../2-cgroupfs-mount_1.4_all.deb ...
Unpacking cgroupfs-mount (1.4) ...
Selecting previously unselected package containerd.io.
Preparing to unpack .../3-containerd.io_1.2.10-3_arm64.deb ...
Unpacking containerd.io (1.2.10-3) ...
Selecting previously unselected package docker-ce-cli.
Preparing to unpack .../4-docker-ce-cli_5%3a19.03.5~3-0~ubuntu-xenial_arm64.deb ...
Unpacking docker-ce-cli (5:19.03.5~3-0~ubuntu-xenial) ...
Selecting previously unselected package docker-ce.
Preparing to unpack .../5-docker-ce_5%3a18.09.9~3-0~ubuntu-xenial_arm64.deb ...
Unpacking docker-ce (5:18.09.9~3-0~ubuntu-xenial) ...
Selecting previously unselected package liberror-perl.
Preparing to unpack .../6-liberror-perl_0.17025-1_all.deb ...
Unpacking liberror-perl (0.17025-1) ...
Selecting previously unselected package git-man.
Preparing to unpack .../7-git-man_1%3a2.17.1-1ubuntu0.4_all.deb ...
Unpacking git-man (1:2.17.1-1ubuntu0.4) ...
Selecting previously unselected package git.
Preparing to unpack .../8-git_1%3a2.17.1-1ubuntu0.4_arm64.deb ...
Unpacking git (1:2.17.1-1ubuntu0.4) ...
Setting up aufs-tools (1:4.9+20170918-1ubuntu1) ...
Setting up git-man (1:2.17.1-1ubuntu0.4) ...
Setting up containerd.io (1.2.10-3) ...
Created symlink /etc/systemd/system/multi-user.target.wants/containerd.service → /lib/systemd/system/containerd.service.
Setting up liberror-perl (0.17025-1) ...
Setting up cgroupfs-mount (1.4) ...
Setting up docker-ce-cli (5:19.03.5~3-0~ubuntu-xenial) ...
Setting up pigz (2.4-1) ...
Setting up git (1:2.17.1-1ubuntu0.4) ...
Setting up docker-ce (5:18.09.9~3-0~ubuntu-xenial) ...
update-alternatives: using /usr/bin/dockerd-ce to provide /usr/bin/dockerd (dockerd) in auto mode
Created symlink /etc/systemd/system/multi-user.target.wants/docker.service → /lib/systemd/system/docker.service.
Created symlink /etc/systemd/system/sockets.target.wants/docker.socket → /lib/systemd/system/docker.socket.
Processing triggers for systemd (237-3ubuntu10.33) ...
Processing triggers for man-db (2.8.3-2ubuntu0.1) ...
Processing triggers for libc-bin (2.27-3ubuntu1) ...
Next, we need to ensure we are able to execute the Docker commands as the logged in user without the need for sudo. On each of the nodes my-n2-1 thru my-n2-5, execute the following commands:
$ sudo usermod -aG docker $USER
$ sudo reboot now
Once again, in each of the Terminal tabs, ssh into the corresponding node.
To verify the Docker installation, on each of the nodes my-n2-1 thru my-n2-5, execute the following command:
$ docker infoThe following would be a typical output:
Output.3
Client:
Debug Mode: false

Server:
Containers: 0
Running: 0
Paused: 0
Stopped: 0
Images: 0
Server Version: 18.09.9
Storage Driver: overlay2
Backing Filesystem: extfs
Supports d_type: true
Native Overlay Diff: true
Logging Driver: json-file
Cgroup Driver: cgroupfs
Plugins:
Volume: local
Network: bridge host macvlan null overlay
Log: awslogs fluentd gcplogs gelf journald json-file local logentries splunk syslog
Swarm: inactive
Runtimes: runc
Default Runtime: runc
Init Binary: docker-init
containerd version: b34a5c8af56e510852c35414db4c1f4fa6172339
runc version: 3e425f80a8c931f88e6d94a8c831b9d5aa481657
init version: fec3683
Security Options:
seccomp
Profile: default
Kernel Version: 4.9.196-meson64
Operating System: Ubuntu 18.04.3 LTS
OSType: linux
Architecture: aarch64
CPUs: 6
Total Memory: 3.623GiB
Name: my-n2-1
ID: QF32:QDZN:IQDM:34HX:NK3C:O3AP:Y6JZ:74DV:XXXL:KCBL:7K5D:36B4
Docker Root Dir: /var/lib/docker
Debug Mode: false
Registry: https://index.docker.io/v1/
Labels:
Experimental: false
Insecure Registries:
127.0.0.0/8
Live Restore Enabled: false
Product License: Community Engine
Next, we need to setup the package repository for Kubernetes. On each of the nodes my-n2-1 thru my-n2-5, execute the following commands:
$ curl -s https://packages.cloud.google.com/apt/doc/apt-key.gpg | sudo apt-key add -
$ echo "deb http://apt.kubernetes.io/ kubernetes-xenial main" | sudo tee /etc/apt/sources.list.d/kubernetes.list
$ sudo apt-get update
Next, we need to install Kubernetes. On each of the nodes my-n2-1 thru my-n2-5, execute the following command:
$ sudo apt-get install -y kubeadmThe following would be a typical output:
Output.4
Reading package lists... Done
Building dependency tree
Reading state information... Done
The following additional packages will be installed:
conntrack cri-tools ebtables kubectl kubelet kubernetes-cni socat
The following NEW packages will be installed:
conntrack cri-tools ebtables kubeadm kubectl kubelet kubernetes-cni socat
0 upgraded, 8 newly installed, 0 to remove and 1 not upgraded.
Need to get 48.3 MB of archives.
After this operation, 280 MB of additional disk space will be used.
Get:2 http://ports.ubuntu.com/ubuntu-ports bionic/main arm64 conntrack arm64 1:1.4.4+snapshot20161117-6ubuntu2 [27.3 kB]
Get:7 http://ports.ubuntu.com/ubuntu-ports bionic-updates/main arm64 ebtables arm64 2.0.10.4-3.5ubuntu2.18.04.3 [74.2 kB]
Get:8 http://ports.ubuntu.com/ubuntu-ports bionic/main arm64 socat arm64 1.7.3.2-2ubuntu2 [322 kB]
Get:1 https://packages.cloud.google.com/apt kubernetes-xenial/main arm64 cri-tools arm64 1.13.0-00 [7965 kB]
Get:3 https://packages.cloud.google.com/apt kubernetes-xenial/main arm64 kubernetes-cni arm64 0.7.5-00 [5808 kB]
Get:4 https://packages.cloud.google.com/apt kubernetes-xenial/main arm64 kubelet arm64 1.16.3-00 [18.5 MB]
Get:5 https://packages.cloud.google.com/apt kubernetes-xenial/main arm64 kubectl arm64 1.16.3-00 [8025 kB]
Get:6 https://packages.cloud.google.com/apt kubernetes-xenial/main arm64 kubeadm arm64 1.16.3-00 [7652 kB]
Fetched 48.3 MB in 5s (9383 kB/s)
Selecting previously unselected package conntrack.
(Reading database ... 157399 files and directories currently installed.)
Preparing to unpack .../0-conntrack_1%3a1.4.4+snapshot20161117-6ubuntu2_arm64.deb ...
Unpacking conntrack (1:1.4.4+snapshot20161117-6ubuntu2) ...
Selecting previously unselected package cri-tools.
Preparing to unpack .../1-cri-tools_1.13.0-00_arm64.deb ...
Unpacking cri-tools (1.13.0-00) ...
Selecting previously unselected package ebtables.
Preparing to unpack .../2-ebtables_2.0.10.4-3.5ubuntu2.18.04.3_arm64.deb ...
Unpacking ebtables (2.0.10.4-3.5ubuntu2.18.04.3) ...
Selecting previously unselected package kubernetes-cni.
Preparing to unpack .../3-kubernetes-cni_0.7.5-00_arm64.deb ...
Unpacking kubernetes-cni (0.7.5-00) ...
Selecting previously unselected package socat.
Preparing to unpack .../4-socat_1.7.3.2-2ubuntu2_arm64.deb ...
Unpacking socat (1.7.3.2-2ubuntu2) ...
Selecting previously unselected package kubelet.
Preparing to unpack .../5-kubelet_1.16.3-00_arm64.deb ...
Unpacking kubelet (1.16.3-00) ...
Selecting previously unselected package kubectl.
Preparing to unpack .../6-kubectl_1.16.3-00_arm64.deb ...
Unpacking kubectl (1.16.3-00) ...
Selecting previously unselected package kubeadm.
Preparing to unpack .../7-kubeadm_1.16.3-00_arm64.deb ...
Unpacking kubeadm (1.16.3-00) ...
Setting up conntrack (1:1.4.4+snapshot20161117-6ubuntu2) ...
Setting up kubernetes-cni (0.7.5-00) ...
Setting up cri-tools (1.13.0-00) ...
Setting up socat (1.7.3.2-2ubuntu2) ...
Setting up ebtables (2.0.10.4-3.5ubuntu2.18.04.3) ...
Created symlink /etc/systemd/system/multi-user.target.wants/ebtables.service → /lib/systemd/system/ebtables.service.
update-rc.d: warning: start and stop actions are no longer supported; falling back to defaults
Setting up kubectl (1.16.3-00) ...
Setting up kubelet (1.16.3-00) ...
Created symlink /etc/systemd/system/multi-user.target.wants/kubelet.service → /lib/systemd/system/kubelet.service.
Setting up kubeadm (1.16.3-00) ...
Processing triggers for man-db (2.8.3-2ubuntu0.1) ...
Processing triggers for systemd (237-3ubuntu10.33) ...
We need to reboot all the nodes. On each of the nodes my-n2-1 thru my-n2-5, execute the following command:
$ sudo reboot nowOnce again, in each of the Terminal tabs, ssh into the corresponding node.
To verify the Kubernetes installation, on each of the nodes my-n2-1 thru my-n2-5, execute the following command:
$ kubeadm versionThe following would be a typical output:
Output.5
kubeadm version: &version.Info{Major:"1", Minor:"16", GitVersion:"v1.16.3", GitCommit:"b3cbbae08ec52a7fc73d334838e18d17e8512749", GitTreeState:"clean", BuildDate:"2019-11-13T11:20:25Z", GoVersion:"go1.12.12", Compiler:"gc", Platform:"linux/arm64"}
Next, we need to ensure the packages for Docker and Kubernetes are not updated in the future by the software update process. On each of the nodes my-n2-1 thru my-n2-5, execute the following command:
$ sudo apt-mark hold kubelet kubeadm kubectl docker-ceThe following would be a typical output:
Output.6
kubelet set on hold.
kubeadm set on hold.
kubectl set on hold.
docker-ce set on hold.
By default, Docker uses cgroupfs as the cgroup driver. Kubernetes prefers systemd as the cgroup driver. We need to modify the Docker daemon configuration by specifying options in a JSON file called /etc/docker/daemon.json. On each of the nodes my-n2-1 thru my-n2-5, create the configuration file /etc/docker/daemon.json with the following contents:
/etc/docker/daemon.json
{
"exec-opts": ["native.cgroupdriver=systemd"],
"log-driver": "json-file",
"log-opts": {
"max-size": "100m"
},
"storage-driver": "overlay2"
}
Next, we need to restart the Docker daemon for the configuration to take effect. On each of the nodes my-n2-1 thru my-n2-5, execute the following commands:
$ sudo mkdir -p /etc/systemd/system/docker.service.d
$ sudo systemctl daemon-reload
$ sudo systemctl restart docker
Note: Not using the systemd cgroup driver will cause the following error: [preflight] Running pre-flight checks [WARNING IsDockerSystemdCheck]: detected "cgroupfs" as the Docker cgroup driver. The recommended driver is "systemd". Please follow the guide at https://kubernetes.io/docs/setup/cri/
To verify the Docker daemon started ok, on each of the nodes my-n2-1 thru my-n2-5, execute the following command:
$ journalctl -u dockerThe following would be a typical output:
Output.7
-- Logs begin at Sat 2019-12-14 21:14:19 EST, end at Sat 2019-12-14 21:49:26 EST. --
Dec 14 21:14:26 my-n2-1 systemd[1]: Starting Docker Application Container Engine...
Dec 14 21:14:27 my-n2-1 dockerd[3347]: time="2019-12-14T21:14:27.806496732-05:00" level=info msg="systemd-resolved is running, so using resolvconf: /run/systemd/res
Dec 14 21:14:27 my-n2-1 dockerd[3347]: time="2019-12-14T21:14:27.821800611-05:00" level=info msg="parsed scheme: \"unix\"" module=grpc
Dec 14 21:14:27 my-n2-1 dockerd[3347]: time="2019-12-14T21:14:27.822661404-05:00" level=info msg="scheme \"unix\" not registered, fallback to default scheme" module
Dec 14 21:14:27 my-n2-1 dockerd[3347]: time="2019-12-14T21:14:27.824226106-05:00" level=info msg="parsed scheme: \"unix\"" module=grpc
Dec 14 21:14:27 my-n2-1 dockerd[3347]: time="2019-12-14T21:14:27.824838344-05:00" level=info msg="scheme \"unix\" not registered, fallback to default scheme" module
Dec 14 21:14:27 my-n2-1 dockerd[3347]: time="2019-12-14T21:14:27.828116839-05:00" level=info msg="ccResolverWrapper: sending new addresses to cc: [{unix:///run/cont
Dec 14 21:14:27 my-n2-1 dockerd[3347]: time="2019-12-14T21:14:27.828945714-05:00" level=info msg="ClientConn switching balancer to \"pick_first\"" module=grpc
Dec 14 21:14:27 my-n2-1 dockerd[3347]: time="2019-12-14T21:14:27.828101672-05:00" level=info msg="ccResolverWrapper: sending new addresses to cc: [{unix:///run/cont
Dec 14 21:14:27 my-n2-1 dockerd[3347]: time="2019-12-14T21:14:27.830093104-05:00" level=info msg="ClientConn switching balancer to \"pick_first\"" module=grpc
Dec 14 21:14:27 my-n2-1 dockerd[3347]: time="2019-12-14T21:14:27.832076285-05:00" level=info msg="pickfirstBalancer: HandleSubConnStateChange: 0x400014e610, CONNECT
Dec 14 21:14:27 my-n2-1 dockerd[3347]: time="2019-12-14T21:14:27.844251802-05:00" level=info msg="pickfirstBalancer: HandleSubConnStateChange: 0x40001343a0, CONNECT
Dec 14 21:14:27 my-n2-1 dockerd[3347]: time="2019-12-14T21:14:27.846949059-05:00" level=info msg="pickfirstBalancer: HandleSubConnStateChange: 0x40001343a0, READY"
Dec 14 21:14:27 my-n2-1 dockerd[3347]: time="2019-12-14T21:14:27.851896887-05:00" level=info msg="pickfirstBalancer: HandleSubConnStateChange: 0x400014e610, READY"
Dec 14 21:14:27 my-n2-1 dockerd[3347]: time="2019-12-14T21:14:27.857097768-05:00" level=info msg="[graphdriver] using prior storage driver: overlay2"
Dec 14 21:14:27 my-n2-1 dockerd[3347]: time="2019-12-14T21:14:27.886090322-05:00" level=info msg="Graph migration to content-addressability took 0.00 seconds"
Dec 14 21:14:27 my-n2-1 dockerd[3347]: time="2019-12-14T21:14:27.893602818-05:00" level=info msg="Loading containers: start."
Dec 14 21:14:28 my-n2-1 dockerd[3347]: time="2019-12-14T21:14:28.821256841-05:00" level=info msg="Default bridge (docker0) is assigned with an IP address 172.17.0.0
Dec 14 21:14:29 my-n2-1 dockerd[3347]: time="2019-12-14T21:14:29.134364234-05:00" level=info msg="Loading containers: done."
Dec 14 21:14:29 my-n2-1 dockerd[3347]: time="2019-12-14T21:14:29.374311397-05:00" level=info msg="Docker daemon" commit=039a7df graphdriver(s)=overlay2 version=18.0
Dec 14 21:14:29 my-n2-1 dockerd[3347]: time="2019-12-14T21:14:29.376444960-05:00" level=info msg="Daemon has completed initialization"
Dec 14 21:14:29 my-n2-1 systemd[1]: Started Docker Application Container Engine.
Dec 14 21:14:29 my-n2-1 dockerd[3347]: time="2019-12-14T21:14:29.444607195-05:00" level=info msg="API listen on /var/run/docker.sock"
Dec 14 21:49:11 my-n2-1 dockerd[3347]: time="2019-12-14T21:49:11.323542665-05:00" level=info msg="Processing signal 'terminated'"
Dec 14 21:49:11 my-n2-1 dockerd[3347]: time="2019-12-14T21:49:11.328379659-05:00" level=info msg="stopping event stream following graceful shutdown" error="" m
Dec 14 21:49:11 my-n2-1 systemd[1]: Stopping Docker Application Container Engine...
Dec 14 21:49:11 my-n2-1 systemd[1]: Stopped Docker Application Container Engine.
Dec 14 21:49:11 my-n2-1 systemd[1]: Starting Docker Application Container Engine...
Dec 14 21:49:11 my-n2-1 dockerd[9629]: time="2019-12-14T21:49:11.499488062-05:00" level=info msg="systemd-resolved is running, so using resolvconf: /run/systemd/res
Dec 14 21:49:11 my-n2-1 dockerd[9629]: time="2019-12-14T21:49:11.502141612-05:00" level=info msg="parsed scheme: \"unix\"" module=grpc
Dec 14 21:49:11 my-n2-1 dockerd[9629]: time="2019-12-14T21:49:11.502209240-05:00" level=info msg="scheme \"unix\" not registered, fallback to default scheme" module
Dec 14 21:49:11 my-n2-1 dockerd[9629]: time="2019-12-14T21:49:11.502278577-05:00" level=info msg="parsed scheme: \"unix\"" module=grpc
Dec 14 21:49:11 my-n2-1 dockerd[9629]: time="2019-12-14T21:49:11.502295786-05:00" level=info msg="scheme \"unix\" not registered, fallback to default scheme" module
Dec 14 21:49:11 my-n2-1 dockerd[9629]: time="2019-12-14T21:49:11.505887217-05:00" level=info msg="ccResolverWrapper: sending new addresses to cc: [{unix:///run/cont
Dec 14 21:49:11 my-n2-1 dockerd[9629]: time="2019-12-14T21:49:11.506035600-05:00" level=info msg="ClientConn switching balancer to \"pick_first\"" module=grpc
Dec 14 21:49:11 my-n2-1 dockerd[9629]: time="2019-12-14T21:49:11.506181190-05:00" level=info msg="ccResolverWrapper: sending new addresses to cc: [{unix:///run/cont
Dec 14 21:49:11 my-n2-1 dockerd[9629]: time="2019-12-14T21:49:11.506446245-05:00" level=info msg="ClientConn switching balancer to \"pick_first\"" module=grpc
Dec 14 21:49:11 my-n2-1 dockerd[9629]: time="2019-12-14T21:49:11.506671465-05:00" level=info msg="pickfirstBalancer: HandleSubConnStateChange: 0x40007a2230, CONNECT
Dec 14 21:49:11 my-n2-1 dockerd[9629]: time="2019-12-14T21:49:11.506255319-05:00" level=info msg="pickfirstBalancer: HandleSubConnStateChange: 0x40008b0710, CONNECT
Dec 14 21:49:11 my-n2-1 dockerd[9629]: time="2019-12-14T21:49:11.509814706-05:00" level=info msg="pickfirstBalancer: HandleSubConnStateChange: 0x40008b0710, READY"
Dec 14 21:49:11 my-n2-1 dockerd[9629]: time="2019-12-14T21:49:11.511738887-05:00" level=info msg="pickfirstBalancer: HandleSubConnStateChange: 0x40007a2230, READY"
Dec 14 21:49:11 my-n2-1 dockerd[9629]: time="2019-12-14T21:49:11.525913142-05:00" level=info msg="Graph migration to content-addressability took 0.00 seconds"
Dec 14 21:49:11 my-n2-1 dockerd[9629]: time="2019-12-14T21:49:11.529808838-05:00" level=info msg="Loading containers: start."
Dec 14 21:49:12 my-n2-1 dockerd[9629]: time="2019-12-14T21:49:12.258591473-05:00" level=info msg="Default bridge (docker0) is assigned with an IP address 172.17.0.0
Dec 14 21:49:12 my-n2-1 dockerd[9629]: time="2019-12-14T21:49:12.540886055-05:00" level=info msg="Loading containers: done."
Dec 14 21:49:12 my-n2-1 dockerd[9629]: time="2019-12-14T21:49:12.614462758-05:00" level=info msg="Docker daemon" commit=039a7df graphdriver(s)=overlay2 version=18.0
Dec 14 21:49:12 my-n2-1 dockerd[9629]: time="2019-12-14T21:49:12.614718313-05:00" level=info msg="Daemon has completed initialization"
Dec 14 21:49:12 my-n2-1 dockerd[9629]: time="2019-12-14T21:49:12.640530153-05:00" level=info msg="API listen on /var/run/docker.sock"
Dec 14 21:49:12 my-n2-1 systemd[1]: Started Docker Application Container Engine.
Next, we need to disable disk based swap. For that we need to perform two actions.
First action, on each of the nodes my-n2-1 thru my-n2-5, edit the file /etc/default/armbian-zram-config and change the line ENABLED=true to ENABLED=false.
Second action, on each of the nodes my-n2-1 thru my-n2-5, execute the following commands:
$ sudo systemctl disable armbian-zram-config
$ sudo reboot now
Once again, in each of the Terminal tabs, ssh into the corresponding node.
This completes the installation and system setup of the cluster nodes. Next stop - Kubernetes setup.
Kubernetes Setup
To get started, we will designate the node my-n2-1 as the master node and setup the control plane. To do that, execute the following command on my-n2-1:
$ sudo kubeadm initThe following would be a typical output:
Output.8
[init] Using Kubernetes version: v1.16.3
[preflight] Running pre-flight checks
[preflight] Pulling images required for setting up a Kubernetes cluster
[preflight] This might take a minute or two, depending on the speed of your internet connection
[preflight] You can also perform this action in beforehand using 'kubeadm config images pull'
[kubelet-start] Writing kubelet environment file with flags to file "/var/lib/kubelet/kubeadm-flags.env"
[kubelet-start] Writing kubelet configuration to file "/var/lib/kubelet/config.yaml"
[kubelet-start] Starting the kubelet
[certs] Using certificateDir folder "/etc/kubernetes/pki"
[certs] Generating "ca" certificate and key
[certs] Generating "apiserver" certificate and key
[certs] apiserver serving cert is signed for DNS names [my-n2-1 kubernetes kubernetes.default kubernetes.default.svc kubernetes.default.svc.cluster.local] and IPs [10.96.0.1 192.168.1.51]
[certs] Generating "apiserver-kubelet-client" certificate and key
[certs] Generating "front-proxy-ca" certificate and key
[certs] Generating "front-proxy-client" certificate and key
[certs] Generating "etcd/ca" certificate and key
[certs] Generating "etcd/server" certificate and key
[certs] etcd/server serving cert is signed for DNS names [my-n2-1 localhost] and IPs [192.168.1.51 127.0.0.1 ::1]
[certs] Generating "etcd/peer" certificate and key
[certs] etcd/peer serving cert is signed for DNS names [my-n2-1 localhost] and IPs [192.168.1.51 127.0.0.1 ::1]
[certs] Generating "etcd/healthcheck-client" certificate and key
[certs] Generating "apiserver-etcd-client" certificate and key
[certs] Generating "sa" key and public key
[kubeconfig] Using kubeconfig folder "/etc/kubernetes"
[kubeconfig] Writing "admin.conf" kubeconfig file
[kubeconfig] Writing "kubelet.conf" kubeconfig file
[kubeconfig] Writing "controller-manager.conf" kubeconfig file
[kubeconfig] Writing "scheduler.conf" kubeconfig file
[control-plane] Using manifest folder "/etc/kubernetes/manifests"
[control-plane] Creating static Pod manifest for "kube-apiserver"
[control-plane] Creating static Pod manifest for "kube-controller-manager"
W1215 11:58:08.359442 4811 manifests.go:214] the default kube-apiserver authorization-mode is "Node,RBAC"; using "Node,RBAC"
[control-plane] Creating static Pod manifest for "kube-scheduler"
W1215 11:58:08.366477 4811 manifests.go:214] the default kube-apiserver authorization-mode is "Node,RBAC"; using "Node,RBAC"
[etcd] Creating static Pod manifest for local etcd in "/etc/kubernetes/manifests"
[wait-control-plane] Waiting for the kubelet to boot up the control plane as static Pods from directory "/etc/kubernetes/manifests". This can take up to 4m0s
[apiclient] All control plane components are healthy after 25.513764 seconds
[upload-config] Storing the configuration used in ConfigMap "kubeadm-config" in the "kube-system" Namespace
[kubelet] Creating a ConfigMap "kubelet-config-1.17" in namespace kube-system with the configuration for the kubelets in the cluster
[upload-certs] Skipping phase. Please see --upload-certs
[mark-control-plane] Marking the node my-n2-1 as control-plane by adding the label "node-role.kubernetes.io/master=''"
[mark-control-plane] Marking the node my-n2-1 as control-plane by adding the taints [node-role.kubernetes.io/master:NoSchedule]
[bootstrap-token] Using token: zcp5a6.w03lcuhx068wvkqv
[bootstrap-token] Configuring bootstrap tokens, cluster-info ConfigMap, RBAC Roles
[bootstrap-token] configured RBAC rules to allow Node Bootstrap tokens to post CSRs in order for nodes to get long term certificate credentials
[bootstrap-token] configured RBAC rules to allow the csrapprover controller automatically approve CSRs from a Node Bootstrap Token
[bootstrap-token] configured RBAC rules to allow certificate rotation for all node client certificates in the cluster
[bootstrap-token] Creating the "cluster-info" ConfigMap in the "kube-public" namespace
[kubelet-finalize] Updating "/etc/kubernetes/kubelet.conf" to point to a rotatable kubelet client certificate and key
[addons] Applied essential addon: CoreDNS
[addons] Applied essential addon: kube-proxy
Your Kubernetes control-plane has initialized successfully!
To start using your cluster, you need to run the following as a regular user:
mkdir -p $HOME/.kube
sudo cp -i /etc/kubernetes/admin.conf $HOME/.kube/config
sudo chown $(id -u):$(id -g) $HOME/.kube/config
You should now deploy a pod network to the cluster. Run "kubectl apply -f [podnetwork].yaml" with one of the options listed at: https://kubernetes.io/docs/concepts/cluster-administration/addons/
Then you can join any number of worker nodes by running the following on each as root:
kubeadm join 192.168.1.51:6443 --token zcp5a6.w03lcuhx068wvkqv \ --discovery-token-ca-cert-hash sha256:d2e38957f46a9eb089671924bca78ac4e02cdcc8db27e89677a014fe587b67c6
In order to use the kubectl command-line tool as a non-root user on the master node (my-n2-1), execute the following commands on my-n2-1:
$ mkdir -p $HOME/.kube
$ sudo cp -i /etc/kubernetes/admin.conf $HOME/.kube/config
$ sudo chown $(id -u):$(id -g) $HOME/.kube/config
To list all the node(s) in Kubernetes cluster, execute the following command on the master node (my-n2-1):
$ kubectl get nodesThe following would be a typical output:
Output.9
NAME STATUS ROLES AGE VERSION
My-n2-1 NotReady master 2m37s v1.16.3
To verify the Kubernetes cluster started ok, execute the following command on the master node (my-n2-1):
$ kubectl get pods -n kube-system -o wideThe following would be a typical output (This one for example, Rob. A lot of "none"s that get edited out):
Output.10
NAME READY STATUS RESTARTS AGE IP NODE NOMINATED NODE READINESS GATES
coredns-6955765f44-4gk4f 1/1 Running 0 40m 10.32.0.3 my-n2-1
coredns-6955765f44-wskl4 1/1 Running 0 40m 10.32.0.2 my-n2-1
etcd-my-n2-1 1/1 Running 0 40m 192.168.1.51 my-n2-1
kube-apiserver-my-n2-1 1/1 Running 0 40m 192.168.1.51 my-n2-1
kube-controller-manager-my-n2-1 1/1 Running 0 40m 192.168.1.51 my-n2-1
kube-proxy-tklp7 1/1 Running 0 40m 192.168.1.51 my-n2-1
kube-scheduler-my-n2-1 1/1 Running 0 40m 192.168.1.51 my-n2-1
From the Output.10 above, we can see all the core components (api server, controller manager, etcd, and scheduler) are all up and running.
Now, we need to install an overlay Plugin Network for inter-pod communication. For our cluster, we will choose the weave-net implementation. To install the overlay network on the master node (my-n2-1), execute the following command:
$ kubectl apply -f "https://cloud.weave.works/k8s/net?k8s-version=$(kubectl version | base64 | tr -d '\n')"The following would be a typical output:
Output.11
serviceaccount/weave-net created
clusterrole.rbac.authorization.k8s.io/weave-net created
clusterrolebinding.rbac.authorization.k8s.io/weave-net created
role.rbac.authorization.k8s.io/weave-net created
rolebinding.rbac.authorization.k8s.io/weave-net created
daemonset.apps/weave-net created
To verify the Weave overlay network started ok, execute the following command on the master node (my-n2-1):
$ kubectl get pods -n kube-system -l name=weave-net -o wideThe following would be a typical output:
Output.12
NAME READY STATUS RESTARTS AGE IP NODE NOMINATED NODE READINESS GATES
weave-net-2sjh4 2/2 Running 0 10m 192.168.1.51 my-n2-1
Additionally, to check the logs for the Weave overlay network, execute the following command on the master node (my-n2-1):
$ kubectl logs -n kube-system weave-net-ktjnv weaveThe following would be a typical output:
Output.13
INFO: 2019/12/08 17:07:12.422554 Command line options: map[conn-limit:200 datapath:datapath db-prefix:/weavedb/weave-net docker-api: expect-npc:true host-root:/host http-addr:127.0.0.1:6784 ipalloc-init:consensus=0 ipalloc-range:10.32.0.0/12 metrics-addr:0.0.0.0:6782 name:9a:59:d0:9a:83:f0 nickname:my-n2-1 no-dns:true port:6783]
INFO: 2019/12/08 17:07:12.422876 weave 2.6.0
INFO: 2019/12/08 17:07:12.780249 Bridge type is bridged_fastdp
INFO: 2019/12/08 17:07:12.780350 Communication between peers is unencrypted.
INFO: 2019/12/08 17:07:12.804023 Our name is 9a:59:d0:9a:83:f0(my-n2-1)
INFO: 2019/12/08 17:07:12.804267 Launch detected - using supplied peer list: []
INFO: 2019/12/08 17:07:12.844222 Unable to fetch ConfigMap kube-system/weave-net to infer unique cluster ID
INFO: 2019/12/08 17:07:12.844324 Checking for pre-existing addresses on weave bridge
INFO: 2019/12/08 17:07:12.853900 [allocator 9a:59:d0:9a:83:f0] No valid persisted data
INFO: 2019/12/08 17:07:12.866497 [allocator 9a:59:d0:9a:83:f0] Initialising via deferred consensus
INFO: 2019/12/08 17:07:12.866684 Sniffing traffic on datapath (via ODP)
INFO: 2019/12/08 17:07:12.872570 Listening for HTTP control messages on 127.0.0.1:6784
INFO: 2019/12/08 17:07:12.873074 Listening for metrics requests on 0.0.0.0:6782
INFO: 2019/12/08 17:07:13.540248 [kube-peers] Added myself to peer list &{[{9a:59:d0:9a:83:f0 my-n2-1}]}
DEBU: 2019/12/08 17:07:13.558983 [kube-peers] Nodes that have disappeared: map[]
INFO: 2019/12/08 17:07:13.661165 Assuming quorum size of 1
10.32.0.1
DEBU: 2019/12/08 17:07:13.911144 registering for updates for node delete events
For this tutorial, we designate that nodes my-n2-2 thru my-n2-5 to be the worker nodes of this Kubernetes cluster. From Output.8 above, we can determine the kubeadm join command to use on each worker node . For each of the nodes my-n2-2 thru my-n2-5 (in their respective Terminal tab), execute the following command:
$ sudo kubeadm join 192.168.1.51:6443 --token zcp5a6.w03lcuhx068wvkqv --discovery-token-ca-cert-hash sha256:d2e38957f46a9eb089671924bca78ac4e02cdcc8db27e89677a014fe587b67c6The following would be a typical output:
Output.14
[preflight] Running pre-flight checks
[preflight] Reading configuration from the cluster...
[preflight] FYI: You can look at this config file with 'kubectl -n kube-system get cm kubeadm-config -oyaml'
[kubelet-start] Downloading configuration for the kubelet from the "kubelet-config-1.17" ConfigMap in the kube-system namespace
[kubelet-start] Writing kubelet configuration to file "/var/lib/kubelet/config.yaml"
[kubelet-start] Writing kubelet environment file with flags to file "/var/lib/kubelet/kubeadm-flags.env"
[kubelet-start] Starting the kubelet
[kubelet-start] Waiting for the kubelet to perform the TLS Bootstrap...
This node has joined the cluster: * Certificate signing request was sent to apiserver and a response was received. * The Kubelet was informed of the new secure connection details.
Run 'kubectl get nodes' on the control-plane to see this node join the cluster.
To list all the active nodes in this Kubernetes cluster, execute the following command on the master node (my-n2-1) (after waiting for about 30 secs ):
$ kubectl get nodes -o wideThe following would be a typical output:
Output.15
NAME STATUS ROLES AGE VERSION INTERNAL-IP EXTERNAL-IP OS-IMAGE KERNEL-VERSION CONTAINER-RUNTIME
my-n2-1 Ready master 51m v1.17.0 192.168.1.51  Ubuntu 18.04.3 LTS 4.9.196-meson64 docker://18.9.9
my-n2-2 Ready  2m58s v1.17.0 192.168.1.52  Ubuntu 18.04.3 LTS 4.9.196-meson64 docker://18.9.9
my-n2-3 Ready  2m38s v1.17.0 192.168.1.53  Ubuntu 18.04.3 LTS 4.9.196-meson64 docker://18.9.9
my-n2-4 Ready  2m35s v1.17.0 192.168.1.54  Ubuntu 18.04.3 LTS 4.9.196-meson64 docker://18.9.9
my-n2-5 Ready  2m21s v1.17.0 192.168.1.55  Ubuntu 18.04.3 LTS 4.9.196-meson64 docker://18.9.9
That is it! This completes all the necessary setup for this Kubernetes cluster.
Hands-on with Kubernetes
To list all the pod(s) running in Kubernetes cluster (including the system pods), execute the following command on the master node (my-n2-1):
$ kubectl get pods --all-namespaces -o wideThe following would be a typical output:
Output.16
NAMESPACE NAME READY STATUS RESTARTS AGE IP NODE NOMINATED NODE READINESS GATES
kube-system coredns-6955765f44-4gk4f 1/1 Running 0 52m 10.32.0.3 my-n2-1
kube-system coredns-6955765f44-wskl4 1/1 Running 0 52m 10.32.0.2 my-n2-1
kube-system etcd-my-n2-1 1/1 Running 0 52m 192.168.1.51 my-n2-1
kube-system kube-apiserver-my-n2-1 1/1 Running 0 52m 192.168.1.51 my-n2-1
kube-system kube-controller-manager-my-n2-1 1/1 Running 0 52m 192.168.1.51 my-n2-1
kube-system kube-proxy-9zxfj 1/1 Running 0 3m36s 192.168.1.55 my-n2-5
kube-system kube-proxy-c7mns 1/1 Running 0 3m53s 192.168.1.53 my-n2-3
kube-system kube-proxy-dv52p 1/1 Running 0 4m13s 192.168.1.52 my-n2-2
kube-system kube-proxy-mpwkb 1/1 Running 0 3m50s 192.168.1.54 my-n2-4
kube-system kube-proxy-tklp7 1/1 Running 0 52m 192.168.1.51 my-n2-1
kube-system kube-scheduler-my-n2-1 1/1 Running 0 52m 192.168.1.51 my-n2-1
kube-system weave-net-2sjh4 2/2 Running 0 21m 192.168.1.51 my-n2-1
kube-system weave-net-68lcd 2/2 Running 0 3m50s 192.168.1.54 my-n2-4
kube-system weave-net-7fh98 2/2 Running 1 4m13s 192.168.1.52 my-n2-2
kube-system weave-net-krdtz 2/2 Running 1 3m36s 192.168.1.55 my-n2-5
kube-system weave-net-ljm6k 2/2 Running 0 3m53s 192.168.1.53 my-n2-3
As is evident from Output.16 above, we see an instance for API Server, etcd, Controller Manager, Scheduler, and Plugin Network (weave-net) all up and running.
To display detailed information about any pod (say the Controller Manager) in the Kubernetes cluster, execute the following command on the master node (my-n2-1):
$ kubectl describe pod kube-controller-manager-my-n2-1 -n kube-systemThe following would be a typical output (Rob, I first noticed output seventeen missing "none"):
Output.17
Name: kube-controller-manager-my-n2-1
Namespace: kube-system
Priority: 2000000000
Priority Class Name: system-cluster-critical
Node: my-n2-1/192.168.1.51
Start Time: Sun, 15 Dec 2019 11:58:39 -0500
Labels: component=kube-controller-manager
tier=control-plane
Annotations: kubernetes.io/config.hash: 536dc7132dfd0d2ca1d968c9ede1e024
kubernetes.io/config.mirror: 536dc7132dfd0d2ca1d968c9ede1e024
kubernetes.io/config.seen: 2019-12-15T11:58:35.86446527-05:00
kubernetes.io/config.source: file
Status: Running
IP: 192.168.1.51
IPs:
IP: 192.168.1.51
Controlled By: Node/my-n2-1
Containers:
kube-controller-manager:
Container ID: docker://63b0d105457f52849afa38d2e914b53e68b7e21786fc41cda322bb21bc5b86a4
Image: k8s.gcr.io/kube-controller-manager:v1.17.0
Image ID: docker-pullable://k8s.gcr.io/kube-controller-manager@sha256:0438efb5098a2ca634ea8c6b0d804742b733d0d13fd53cf62c73e32c659a3c39
Port:
Host Port:
Command:
kube-controller-manager
--authentication-kubeconfig=/etc/kubernetes/controller-manager.conf
--authorization-kubeconfig=/etc/kubernetes/controller-manager.conf
--bind-address=127.0.0.1
--client-ca-file=/etc/kubernetes/pki/ca.crt
--cluster-signing-cert-file=/etc/kubernetes/pki/ca.crt
--cluster-signing-key-file=/etc/kubernetes/pki/ca.key
--controllers=*,bootstrapsigner,tokencleaner
--kubeconfig=/etc/kubernetes/controller-manager.conf
--leader-elect=true
--requestheader-client-ca-file=/etc/kubernetes/pki/front-proxy-ca.crt
--root-ca-file=/etc/kubernetes/pki/ca.crt
--service-account-private-key-file=/etc/kubernetes/pki/sa.key
--use-service-account-credentials=true
State: Running
Started: Sun, 15 Dec 2019 11:58:22 -0500
Ready: True
Restart Count: 0
Requests:
cpu: 200m
Liveness: http-get https://127.0.0.1:10257/healthz delay=15s timeout=15s period=10s #success=1 #failure=8
Environment:
Mounts:
/etc/ca-certificates from etc-ca-certificates (ro)
/etc/kubernetes/controller-manager.conf from kubeconfig (ro)
/etc/kubernetes/pki from k8s-certs (ro)
/etc/ssl/certs from ca-certs (ro)
/usr/libexec/kubernetes/kubelet-plugins/volume/exec from flexvolume-dir (rw)
/usr/local/share/ca-certificates from usr-local-share-ca-certificates (ro)
/usr/share/ca-certificates from usr-share-ca-certificates (ro)
Conditions:
Type Status
Initialized True
Ready True
ContainersReady True
PodScheduled True
Volumes:
ca-certs:
Type: HostPath (bare host directory volume)
Path: /etc/ssl/certs
HostPathType: DirectoryOrCreate
etc-ca-certificates:
Type: HostPath (bare host directory volume)
Path: /etc/ca-certificates
HostPathType: DirectoryOrCreate
flexvolume-dir:
Type: HostPath (bare host directory volume)
Path: /usr/libexec/kubernetes/kubelet-plugins/volume/exec
HostPathType: DirectoryOrCreate
k8s-certs:
Type: HostPath (bare host directory volume)
Path: /etc/kubernetes/pki
HostPathType: DirectoryOrCreate
kubeconfig:
Type: HostPath (bare host directory volume)
Path: /etc/kubernetes/controller-manager.conf
HostPathType: FileOrCreate
usr-local-share-ca-certificates:
Type: HostPath (bare host directory volume)
Path: /usr/local/share/ca-certificates
HostPathType: DirectoryOrCreate
usr-share-ca-certificates:
Type: HostPath (bare host directory volume)
Path: /usr/share/ca-certificates
HostPathType: DirectoryOrCreate
QoS Class: Burstable
Node-Selectors: < none >
Tolerations: :NoExecute
Events: < none >
To list all the application pod(s) running in Kubernetes cluster, execute the following command on the master node (my-n2-1):
$ kubectl get podsThe following would be a typical output:
Output.18
No resources found in default namespace.
To list all the service(s) running in Kubernetes cluster, execute the following command on the master node (my-n2-1):
$ kubectl get servicesThe following would be a typical output:
Output.19
NAME TYPE CLUSTER-IP EXTERNAL-IP PORT(S) AGE
kubernetes ClusterIP 10.96.0.1  443/TCP 64m
We will create a simple Python web application to display the host name as well as the ip-address when invoked via HTTP. The following are the contents of the simple Python web application stored under the /tmp directory on the master node (my-n2-1):
web-echo.py
from flask import Flask
import socket

app = Flask(__name__)

@app.route("/")
def index():
host_name = socket.gethostname()
host_ip = socket.gethostbyname(host_name)
return 'Hello from container -> ' + host_name + ' [' + host_ip + ']'

if __name__ == "__main__":
app.run(host='0.0.0.0', port=8888)
The following are the contents of the Dockerfile to create a Docker image for the the simple Python web application stored under the /tmp directory on the master node (my-n2-1):
Dockerfile
FROM python:3.7.5-alpine3.9
RUN pip install flask
ADD web-echo.py /web-echo.py
CMD ["python", "/web-echo.py"]
To build a Docker image called py-web-echo with the tag v1.0, execute the following commands on the master node ( my-n2-1):
cd /tmp
docker build -t "py-web-echo:v1.0" .
The following would be a typical output:
Output.20
Sending build context to Docker daemon 3.072kB
Step 1/4: FROM python:3.7.5-alpine3.9
3.7.5-alpine3.9: Pulling from library/python
0362ad1dd800: Pull complete
9b941924aae3: Pull complete
fd7b3613915d: Pull complete
078d60b9b97e: Pull complete
7059e1dd9bc4: Pull complete
Digest: sha256:064d9ce3e91a59535c528bc3c38888023791d9fc78ba9e5070f5064833f326ff
Status: Downloaded newer image for python:3.7.5-alpine3.9
---> 578ec6233872
Step 2/4: RUN pip install flask
---> Running in d248e23dd161
Collecting flask
Downloading https://files.pythonhosted.org/packages/9b/93/628509b8d5dc749656a9641f4caf13540e2cdec85276964ff8f43bbb1d3b/Flask-1.1.1-py2.py3-none-any.whl (94kB)
Collecting Jinja2>=2.10.1
Downloading https://files.pythonhosted.org/packages/65/e0/eb35e762802015cab1ccee04e8a277b03f1d8e53da3ec3106882ec42558b/Jinja2-2.10.3-py2.py3-none-any.whl (125kB)
Collecting Werkzeug>=0.15
Downloading https://files.pythonhosted.org/packages/ce/42/3aeda98f96e85fd26180534d36570e4d18108d62ae36f87694b476b83d6f/Werkzeug-0.16.0-py2.py3-none-any.whl (327kB)
Collecting itsdangerous>=0.24
Downloading https://files.pythonhosted.org/packages/76/ae/44b03b253d6fade317f32c24d100b3b35c2239807046a4c953c7b89fa49e/itsdangerous-1.1.0-py2.py3-none-any.whl
Collecting click>=5.1
Downloading https://files.pythonhosted.org/packages/fa/37/45185cb5abbc30d7257104c434fe0b07e5a195a6847506c074527aa599ec/Click-7.0-py2.py3-none-any.whl (81kB)
Collecting MarkupSafe>=0.23
Downloading https://files.pythonhosted.org/packages/b9/2e/64db92e53b86efccfaea71321f597fa2e1b2bd3853d8ce658568f7a13094/MarkupSafe-1.1.1.tar.gz
Building wheels for collected packages: MarkupSafe
Building wheel for MarkupSafe (setup.py): started
Building wheel for MarkupSafe (setup.py): finished with status 'done'
Created wheel for MarkupSafe: filename=MarkupSafe-1.1.1-cp37-none-any.whl size=12629 sha256=8a200864ca113d03b4de2d951ae4a1d0806a3ff84128349770dfe3fb018a6458
Stored in directory: /root/.cache/pip/wheels/f2/aa/04/0edf07a1b8a5f5f1aed7580fffb69ce8972edc16a505916a77
Successfully built MarkupSafe
Installing collected packages: MarkupSafe, Jinja2, Werkzeug, itsdangerous, click, flask
Successfully installed Jinja2-2.10.3 MarkupSafe-1.1.1 Werkzeug-0.16.0 click-7.0 flask-1.1.1 itsdangerous-1.1.0
Removing intermediate container d248e23dd161
---> 4ee40e66a655
Step 3/4: ADD web-echo.py /web-echo.py
---> 31a0341bf9d7
Step 4/4: CMD ["python", "/web-echo.py"]
---> Running in 1ee52ea10ad3
Removing intermediate container 1ee52ea10ad3
---> 7cd037d24ef7
Successfully built 7cd037d24ef7
Successfully tagged py-web-echo:v1.0
To list all the Docker images on the master node (my-n2-1), execute the following command on the master node (my-n2-1):
$ docker imagesThe following would be a typical output:
Output.21
REPOSITORY TAG IMAGE ID CREATED SIZE
py-web-echo v1.0 7cd037d24ef7 3 minutes ago 119MB
k8s.gcr.io/kube-proxy v1.17.0 ac19e9cffff5 7 days ago 114MB
k8s.gcr.io/kube-apiserver v1.17.0 aca151bf3e90 7 days ago 166MB
k8s.gcr.io/kube-controller-manager v1.17.0 7045158f92f8 7 days ago 156MB
k8s.gcr.io/kube-scheduler v1.17.0 0d5c120f87f3 7 days ago 93.7MB
python 3.7.5-alpine3.9 578ec6233872 4 weeks ago 109MB
weaveworks/weave-npc 2.6.0 1c672c2f5870 5 weeks ago 36.6MB
weaveworks/weave-kube 2.6.0 81393394d17d 5 weeks ago 111MB
k8s.gcr.io/coredns 1.6.5 f96217e2532b 5 weeks ago 39.3MB
k8s.gcr.io/etcd 3.4.3-0 ab707b0a0ea3 7 weeks ago 363MB
k8s.gcr.io/pause 3.1 6cf7c80fe444 24 months ago 525kB
Note that we built the Docker image on the master node (my-n2-1). Since the pod(s) will be deployed on the worker node(s), we need to ensure the requisite docker images are present in the worker node(s).
For each of the worker nodes my-n2-2 thru my-n2-5 (in their respective Terminal tab), execute the following command:
$ docker pull python:3.7.5-alpine3.9For each of the worker nodes my-n2-2 thru my-n2-5, execute the following command on the master node (my-n2-1):
$ docker save py-web-echo:v1.0 | bzip2 | ssh polarsparc@192.168.1.52 'bunzip2 | docker load'
$ docker save py-web-echo:v1.0 | bzip2 | ssh polarsparc@192.168.1.53 'bunzip2 | docker load'
$ docker save py-web-echo:v1.0 | bzip2 | ssh polarsparc@192.168.1.54 'bunzip2 | docker load'
$ docker save py-web-echo:v1.0 | bzip2 | ssh polarsparc@192.168.1.55 'bunzip2 | docker load'
!!! WARNING !!!
Not having the Docker images in the worker node(s) will cause the pod(s) to be stuck in the ContainerCreating status
In Kubernetes, a pod is what encapsulates Docker container(s). To deploy our web application Docker image py-web-echo:v1.0 in our Kubernetes cluster, we need a pod manifest file in YAML format .
The following are the contents of the pod manifest file called web-echo-pod.yaml stored under the /tmp directory on the master node (my-n2-1):
web-echo-pod.yaml
---
apiVersion: v1
kind: Pod
metadata:
name: web-echo-pod
labels:
app: web-echo
spec:
containers:
- name: web-echo
image: py-web-echo:v1.0
imagePullPolicy: Never
ports:
- containerPort: 8888
The following section explains the elements of the web-echo-pod.yaml manifest file:
- apiVersion: specifies the version of the API (v1 in this example)
- kind: specifies the type of Kubernetes object to deploy (Pod in this example)
- metadata: associates a name ( web-echo-pod in this example) with the type of Kubernetes object. Also, allows one to tag some labels, which are simple key-value pairs, with the Kubernetes
- object. In this example, we have one label with the key app that has a value of web-echo
- spec: specifies what is in the pod. In this example, we want to deploy the Docker image py-web-echo:v1.0 which is exposed via the network port 8888
- imagePullPolicy: indicates to Kubernetes not to pull the container image
To deploy the pod to our Kubernetes cluster, execute the following command on the master node (my-n2-1):
$ kubectl apply -f /tmp/web-echo-pod.yamlThe following would be a typical output:
Output.22
pod/web-echo-pod created
To list all the application pod(s) running in Kubernetes cluster, execute the following command on the master node (my-n2-1):
$ kubectl get pods -o wideThe following would be a typical output:
Output.23
1
From Output.23, we see that our application pod have been deployed on the node my-n2-2 of our Kubernetes cluster.
To display detailed information about the deployed application pod web-echo-pod, execute the following command on the master node (my-n2-1):
$ kubectl describe pods web-echo-podThe following would be a typical output:
Output.24
Name: web-echo-pod
Namespace: default
Priority: 0
Node: my-n2-2/192.168.1.52
Start Time: Sun, 15 Dec 2019 14:58:21 -0500
Labels: app=web-echo
Annotations: kubectl.kubernetes.io/last-applied-configuration:
{"apiVersion":"v1","kind":"Pod","metadata":{"annotations":{},"labels":{"app":"web-echo"},"name":"web-echo-pod","namespace":"default"},"spe...
Status: Running
IP: 10.44.0.1
IPs:
IP: 10.44.0.1
Containers:
web-echo:
Container ID: docker://0af2c99fd074b5ee3c0b9876eb9ad44ca446400c2190b4af6fa1a18543bff723
Image: py-web-echo:v1.0
Image ID: docker://sha256:7cd037d24ef7c842ffe005cfcb548a802fc13661c08c8bb4635c365f77e5a3aa
Port: 8888/TCP
Host Port: 0/TCP
State: Running
Started: Sun, 15 Dec 2019 14:58:23 -0500
Ready: True
Restart Count: 0
Environment:
Mounts:
/var/run/secrets/kubernetes.io/serviceaccount from default-token-tvl5x (ro)
Conditions:
Type Status
Initialized True
Ready True
ContainersReady True
PodScheduled True
Volumes:
default-token-tvl5x:
Type: Secret (a volume populated by a Secret)
SecretName: default-token-tvl5x
Optional: false
QoS Class: BestEffort
Node-Selectors:
Tolerations: node.kubernetes.io/not-ready:NoExecute for 300s
node.kubernetes.io/unreachable:NoExecute for 300s
Events:
Type Reason Age From Message
---- ------ ---- ---- -------
Normal Scheduled 7m39s default-scheduler Successfully assigned default/web-echo-pod to my-n2-2
Normal Pulled 7m38s kubelet, my-n2-2 Container image "py-web-echo:v1.0" already present on machine
Normal Created 7m38s kubelet, my-n2-2 Created container web-echo
Normal Started 7m37s kubelet, my-n2-2 Started container web-echo
From the Output.23 (as well as Output.24) above, we see the ip-address of the deployed web application to be 10.44.0.1.
To test the deployed web application using the curl command, execute the following command on any of the nodes my-n2-1 through my-n2-5:
$ curl http://10.44.0.1:8888The following would be a typical output:
Output.25
Hello from container -> web-echo-pod [10.44.0.1]
To display the logs of the deployed web application web-echo-pod, execute the following command on the master node (my-n2-1):
$ kubectl logs web-echo-podThe following would be a typical output:
Output.26
* Serving Flask app "web-echo" (lazy loading)
* Environment: production
WARNING: This is a development server. Do not use it in a production deployment.
Use a production WSGI server instead.
* Debug mode: off
* Running on http://0.0.0.0:8888/ (Press CTRL+C to quit)
10.32.0.1 - - [15/Dec/2019 20:11:33] "GET / HTTP/1.1" 200 -
10.36.0.0 - - [15/Dec/2019 20:11:58] "GET / HTTP/1.1" 200 -
To delete the deployed web application web-echo-pod, execute the following command on the master node (my-n2-1):
$ kubectl delete pod web-echo-podThe following would be a typical output:
Output.27
pod "web-echo-pod" deleted
It is *NOT* that common to deploy a single Pod. It is more common to deploy a higher level Kubernetes object called a ReplicaSet . A ReplicaSet defines how many replicas of a Pod need to be deployed and maintained in the Kubernetes cluster.
The following are the contents of the ReplicaSet manifest file called web-echo-rs.yaml stored under the /tmp directory on the master node (my-n2-1):
web-echo-rs.yaml
---
apiVersion: apps/v1
kind: ReplicaSet
metadata:
name: web-echo-rs
spec:
replicas: 3
selector:
matchLabels:
app: web-echo
template:
metadata:
labels:
app: web-echo
spec:
containers:
- name: web-echo
image: py-web-echo:v1.0
imagePullPolicy: Never
ports:
- containerPort: 8888
The following section explains some of the elements of the web-echo-rs.yaml manifest file:
apiVersion: specifies the version of the API (apps/v1 in this example) replicas: indicates the desired instances of the Pod to be running in the Kubernetes cluster selector: identifies and selects a group of Kubernetes objects with the same key-value label (key app and value web-echo in this example) template: is the embedded specification for a Pod
To deploy the ReplicaSet to our Kubernetes cluster, execute the following command on the master node (my-n2-1):
$ kubectl apply -f /tmp/web-echo-rs.yamlThe following would be a typical output:
Output.28
replicaset.apps/web-echo-rs created
To list all the deployed ReplicaSet(s) running in Kubernetes cluster, execute the following command on the master node (my-n2-1 ):
$ kubectl get replicasets -o wideThe following would be a typical output:
Output.29
NAME DESIRED CURRENT READY AGE CONTAINERS IMAGES SELECTOR
web-echo-rs 3 3 3 7m web-echo py-web-echo:v1.0 app=web-echo
To display detailed information about the deployed ReplicaSet named web-echo-rs, execute the following command on the master node ( my-n2-1):
$ kubectl describe replicasets web-echo-rsThe following would be a typical output:
Output.30
Name: web-echo-rs
Namespace: default
Selector: app=web-echo
Labels:
Annotations: kubectl.kubernetes.io/last-applied-configuration:
{"apiVersion":"apps/v1","kind":"ReplicaSet","metadata":{"annotations":{},"name":"web-echo-rs","namespace":"default"},"spec":{"replicas":3,...
Replicas: 3 current / 3 desired
Pods Status: 3 Running / 0 Waiting / 0 Succeeded / 0 Failed
Pod Template:
Labels: app=web-echo
Containers:
web-echo:
Image: py-web-echo:v1.0
Port: 8888/TCP
Host Port: 0/TCP
Environment:
Mounts:
Volumes:
Events:
Type Reason Age From Message
---- ------ ---- ---- -------
Normal SuccessfulCreate 14m replicaset-controller Created pod: web-echo-rs-xn94l
Normal SuccessfulCreate 14m replicaset-controller Created pod: web-echo-rs-9x9b9
Normal SuccessfulCreate 14m replicaset-controller Created pod: web-echo-rs-tbd49
To list all the application pod(s) running in Kubernetes cluster, execute the following command on the master node (my-n2-1):
$ kubectl get pods -o wideThe following would be a typical output:
Output.31
NAME READY STATUS RESTARTS AGE IP NODE NOMINATED NODE READINESS GATES
web-echo-rs-9x9b9 1/1 Running 0 63s 10.42.0.1 my-n2-4
web-echo-rs-tbd49 1/1 Running 0 63s 10.44.0.1 my-n2-2
web-echo-rs-xn94l 1/1 Running 0 63s 10.36.0.1 my-n2-3
From Output.31, we see that our application pod(s) have been deployed on the 3 nodes my-n2-2, my-n2-3, and my-n2-4 with unique ip-addresses of 10.44.0.1, 10.36.0.1, and 10.42.0.1 respectively.
As indicated early on, application pod(s) are ephemeral. They can come up and go at any time. This means their ip-address(es) can change any time. We need a higher level abstraction that provides a stable ip-address for other application pod(s) to use. This is where a Service object comes in handy. It provides a single stable ip-address for other applications to use and distributes the load across the different backend application pod(s) it is fronting.
There are 3 types of Service(s) in Kubernetes:
- ClusterIP: exposes the Service on an ip-address that is internal to the Kubernetes cluster. This means the Service is accessible from *ONLY* within the Kubernetes cluster. This is the default type
- NodePort: exposes the Service on each worker node's ip-address at a high port in the range 30000 to 32767. Applications external to the Kubernetes cluster are be able to access the Service at the worker node's ip-address and the assigned node port
- LoadBalancer: 1exposes the Service externally using a cloud providers Load Balancer such as AWS, Azure, or Google Cloud
The following are the contents of the ClusterIP based Service manifest file called web-echo-svc-cip.yaml stored under the /tmp directory on the master node (my-n2-1):
web-echo-svc-cip.yaml
---
apiVersion: v1
kind: Service
metadata:
name: web-echo-svc-cip
spec:
selector:
app: web-echo
ports:
- name: http
protocol: TCP
port: 8888
To deploy the Service to our Kubernetes cluster, execute the following command on the master node (my-n2-1):
$ kubectl apply -f /tmp/web-echo-svc-cip.yamlThe following would be a typical output:
Output.32
service/web-echo-svc created
To list all the Service(s) running in Kubernetes cluster, execute the following command on the master node (my-n2-1):
$ kubectl get services -o wideThe following would be a typical output:
Output.33
NAME TYPE CLUSTER-IP EXTERNAL-IP PORT(S) AGE SELECTOR
kubernetes ClusterIP 10.96.0.1  443/TCP 9h
web-echo-svc ClusterIP 10.96.238.16  8888/TCP 105s app=web-echo
From the Output.33 above, we see the application web-echo can be accessed from anywhere in the cluster via the ip-address 10.96.238.16 and port 8888.
To test the deployed Service endpoint using the curl command, execute the following command 5 times on any of the nodes my-n2-1 through my-n2-5:
$ curl http://10.96.238.16:8888The following would be a typical output:
Output.34
Hello from container -> web-echo-rs-xn94l [10.36.0.1]
Hello from container -> web-echo-rs-9x9b9 [10.42.0.1]
Hello from container -> web-echo-rs-tbd49 [10.44.0.1]
Hello from container -> web-echo-rs-9x9b9 [10.42.0.1]
Hello from container -> web-echo-rs-tbd49 [10.44.0.1]
To display detailed information about the Service endpoint labeled web-echo-svc, execute the following command on the master node ( my-n2-1):
$ kubectl describe service web-echo-svcThe following would be a typical output:
Output.35
Name: web-echo-svc
Namespace: default
Labels:
Annotations: kubectl.kubernetes.io/last-applied-configuration:
{"apiVersion":"v1","kind":"Service","metadata":{"annotations":{},"name":"web-echo-svc","namespace":"default"},"spec":{"ports":[{"name":"ht...
Selector: app=web-echo
Type: ClusterIP
IP: 10.96.238.16
Port: http 8888/TCP
TargetPort: 8888/TCP
Endpoints: 10.36.0.1:8888,10.42.0.1:8888,10.44.0.1:8888
Session Affinity: None
Events:
To delete the deployed web-echo-svc object, execute the following command on the master node (my-n2-1):
$ kubectl delete service web-echo-svcThe following would be a typical output:
Output.36
service "web-echo-svc" deleted
The following are the contents of the NodePort based Service manifest file called web-echo-svc-nop.yaml stored under the /tmp directory on the master node (my-n2-1):
web-echo-svc-nop.yaml
---
apiVersion: v1
kind: Service
metadata:
name: web-echo-svc
spec:
type: NodePort
selector:
app: web-echo
ports:
- name: http
protocol: TCP
port: 8888
To deploy the Service to our Kubernetes cluster, execute the following command on the master node (my-n2-1):
$ kubectl apply -f /tmp/web-echo-svc-nop.yamlThe following would be a typical output:
Output.37
service/web-echo-svc created
To list all the Service(s) running in Kubernetes cluster, execute the following command on the master node (my-n2-1):
$ kubectl get services -o wideThe following would be a typical output:
Output.38
NAME TYPE CLUSTER-IP EXTERNAL-IP PORT(S) AGE SELECTOR
kubernetes ClusterIP 10.96.0.1  443/TCP 9h
web-echo-svc NodePort 10.96.144.75  8888:32546/TCP 38m app=web-echo
To display detailed information about the Service endpoint labeled web-echo-svc, execute the following command on the master node ( my-n2-1):
$ kubectl describe service web-echo-svcThe following would be a typical output:
Output.39
Name: web-echo-svc
Namespace: default
Labels:
Annotations: kubectl.kubernetes.io/last-applied-configuration:
{"apiVersion":"v1","kind":"Service","metadata":{"annotations":{},"name":"web-echo-svc","namespace":"default"},"spec":{"ports":[{"name":"ht...
Selector: app=web-echo
Type: NodePort
IP: 10.96.144.75
Port: http 8888/TCP
TargetPort: 8888/TCP
NodePort: http 32546/TCP
Endpoints: 10.36.0.1:8888,10.42.0.1:8888,10.44.0.1:8888
Session Affinity: None
External Traffic Policy: Cluster
Events:
From the Output.39 above, we see the deployed Service node port is 32546.
Open a browser and access the url http://192.168.1.53:32546. The following illustration in Figure-3 below would be a typical browser display:

BINGO - it works as expected!
And this concludes the basic exercises we performed on our Kubernetes cluster.
References
https://kubernetes.io/docs/home/?path=browse https://www.weave.works/docs/net/latest/overview/ https://docs.docker.com/ https://www.polarsparc.com/xhtml/Practical-K8S-N2.html
Be the first to comment