
This is the third part in an introductory series to NEMS Linux: the Nagios Enterprise Monitoring Server for ODROID devices. If you haven’t read the first two parts (October and November issues of ODROID Magazine), please start there as the lessons build upon each other. My intention with these articles has been to introduce you to NEMS Linux in such a way as to arm you with useful knowledge that gets you up and running immediately. These aren’t intended to appear as documentation, but rather a technical article that gives you ideas as to how NEMS Linux can be used in your environment. This month, however, we’ll be geeking out together as I provide two key exercises that you may find useful in monitoring your network assets with NEMS Linux.
In this month’s exercises, you’ll learn the skills needed to configure NEMS Linux to perform the following:
- Tell if your web site is up, and notify you if it has been down for more than 10 minutes: monitor your own, your customers’ or any http/https web site for uptime or slow response time.
- Monitor the state of a specific TCP/UDP port on a network connected device, and notify you if it stops responding: tell if your local blockchain node has stopped responding on port 8333, Apache2 has stopped responding on port 443, or monitor the state of openssh running on your server on port 22. These are just examples. The options are limitless.
Understanding Notification Definitions
Before we get into our exercises, a quick glossary will help you understand what the single-character notification options mean. Refer back to this list during the exercises to understand what we’re actually doing when we specify, for example, w,u,c,r,f.
When you see w,u,c,r,f,n, these are the definitions:
- w Notify if in warning state,
- u Notify if in unknown state,
- c Notify if in critical state,
- r Notify if recovered from a previously bad state,
- f Notify if the service is flapping (on and off and on and off)
- n Never notify.
When you see d,u,r,f,s,n, these are the definitions:
- d Notify if host is down,
- u Notify if host is unreachable (eg. Internet down),
- r Notify upon recovery,
- f Notify if the host is flapping,
- s Notify if a scheduled service downtime begins or ends,
- n Never notify.
Exercise 1: Monitor Your Web Site with check_http
Your web site is the face of your business. If it ever goes down for any reason, or becomes sluggish, it’s important to be proactive in remedying the situation. The only thing worse than having a customer contact you to let you know your web site is down is realizing it might have been down for a week and the customers during that time didn’t let you know. They just went elsewhere. Having your web site become sluggish or unresponsive can also damage your organic SEO standings.
NEMS Linux can keep a close eye on your web site and send you an alert by email, Telegram or Pushover if your site goes offline, or becomes unresponsive or sluggish. This also makes NEMS Linux a fantastic tool for web designers and hosts who want to ensure their customer sites are always up so the customer doesn’t notice any downtime. If your site is hosted over SSL, NEMS can even notify you if your certificate has expired – or is about to expire. There are just so many options since NEMS Linux has been built to monitor everything.
In our first exercise this month, we’ll use the built-in check_http command. For my example, I’ll use https://nemslinux.com/ – I would suggest you do the same for the sake of the lesson, and then try changing the Host to your own domain once you understand how everything is connected. Remember, I’m expecting you’ve already completed the previous two articles in ODROID Magazine’s October and November 2018 issues. If not, go back and read those first. If you’re ready, let’s get right into it! It may appear onerous as you glance over the following 6 steps, but keep in mind once you create your config, you can reuse it for as many web site hosts as you like by simply assigning your host to the web_site_ssl hostgroup, which you’ll learn to create below.
Open NEMS NConf and follow these steps:
1. In preparation, we need to make sure our check command is ready for our use case. While the default is changing in NEMS 1.5, if you’re on NEMS 1.4.1 you will need to change the check command to use hostname checks rather than IP address checks.
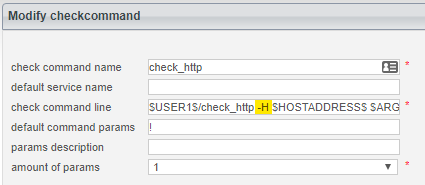
- Show your checkcommands list.
- Edit check_http
- Currently the command line uses -I %HOSTNAME%, with -I meaning “IP Address”. Change that to -H (hostname) so it now reads … -H %HOSTNAME% … Now we can use our web site’s hostname or an IP address for the check_http command.
- Save your change.
2. Next up, we need to setup our check-host-alive command, which is used to ping hosts to determine if they are up or down. My web site hostname will only respond on IPv4, though the default check-host-alive command in NEMS 1.4.1 uses IPv6. Rather than editing the sample command, let’s add a new one based upon it, but this one will only use IPv4. That way, we can still use the old command if we need IPv6 for a different device.
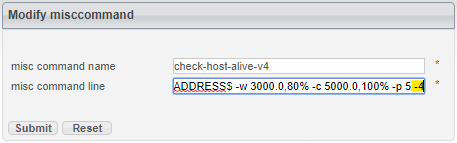
- Show the misccommands list.
- Edit check-host-alive
- Highlight and copy the entire command line to your clipboard.
- Click Add next to misccommands to add a new command.
- Name your new command check-host-alive-ipv4
- Paste the command line from your clipboard.
- At the very end of the command line, simply add a space, followed by -4 to tell it to use IPv4 for this check.
- Save the new command.
3. Our commands are ready for us, so now it’s time to setup our hostpreset. We want to create one for IPv4 Web Sites. That way, we can reuse the preset for every web site we want to monitor with NEMS Linux.
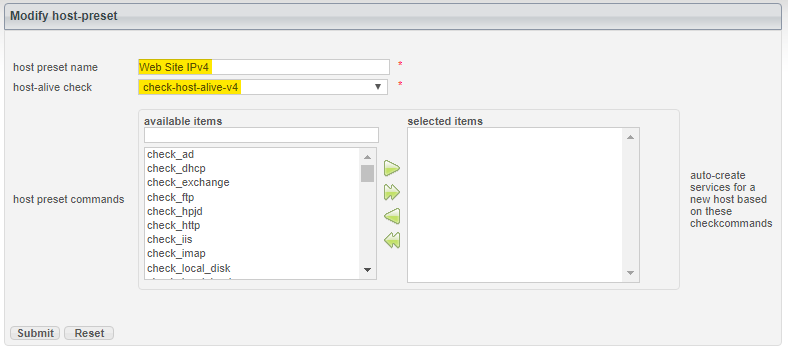
- Add a new host preset.
- Name your preset Web Site IPv4
- Set the host alive check to the new command you created in Step 2: check-host-alive-ipv4
- Save your host preset.
4. So far, everything we’ve done can be reused for any web site whose hostname resolves to an IPv4 address. From here forward however, we’ll be setting up our host group specifically for a secure (SSL) web site.
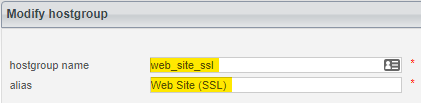
- Add a new hostgroup.
- Call this web_site_ssl
- Leave everything else as is and save your new hostgroup.
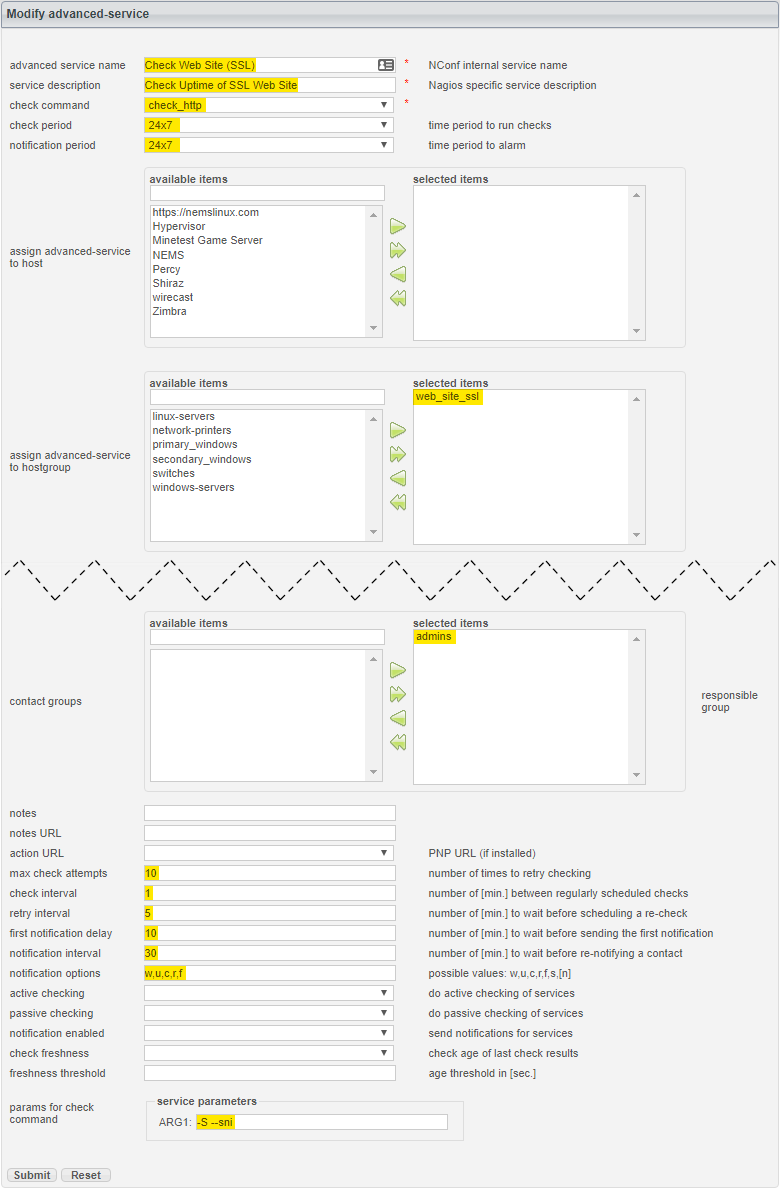
5. Why would we create a new hostgroup if it has no settings beyond a name? Well, this is where the magic happens. We now have a check command, a check host alive command, a host preset and a hostgroup. Now, we can link them all together, starting with an Advanced Service. Remember, the idea here is that everything we do can be assigned to as many hosts as we like. No having to redo all this for the next web site.
- Click Add next to Advanced Services.
- Name your service: Web Site (SSL)
- Give it an alias: Uptime of SSL Web Site
- Set the check period and notification period to 24x7
- In assign advanced-service to hostgroup, highlight the hostgroup we created web_site_ssl and press the green arrow to add it to the selected items list.
- Under contact groups be sure to add admins as well. Otherwise, you won’t receive notifications.
- Set your notifications as follows: max check attempts: 10 ; check interval: 1 ; retry interval: 5 ; first notification delay: 10 ; notification interval: 30 ; notification options: w,u,c,r,f
- Finally, set your service parameters to: -S --sni
- Save your advanced service.
Tip: The -S tells check_http that this site is using SSL, and the --sni enables SNI (Server Name Indication) since I use CloudFlare for SSL on nemslinux.com, and therefore my resolving IP address is associated with more than one domain name. For your site, if you have any trouble, try removing SNI by simply omitting --sni. For the full documentation surrounding the check_http command, visit the NEMS Linux documentation wiki page at https://docs.nemslinux.com/check_commands/check_http
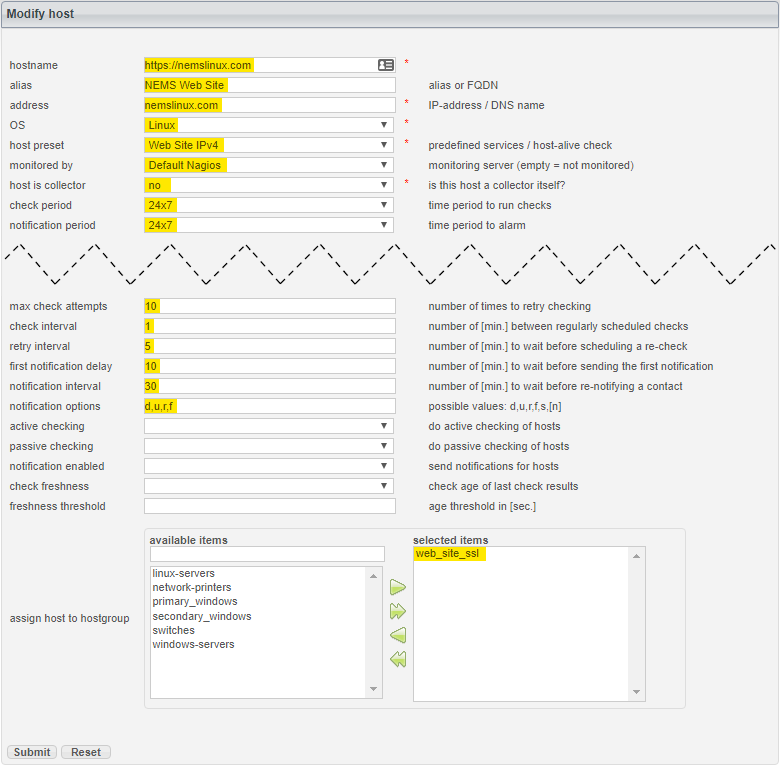
6. Finally, let’s add our web site host. From now on, this is the only step you have to take to add more sites to your NEMS Linux server.
- Add a new host.
- Set the following:
- hostname: https://nemslinux.com
- alias: NEMS Web Site
- address: nemslinux.com
- OS: Linux
- host preset: Web Site IPv4 (See what we did there?)
- monitored by: Default Nagios
- host is collector: no
- check period: 24x7
- notification period: 24x7
- max check attempts: 10
- check interval: 1
- retry interval: 5
- first notification delay: 10
- notification interval: 30
- notification options: d,u,r,f
- assign host to hostgroup (are you ready for this?): web_site_ssl
- Save.
7. Generate your config.
If you followed the steps correctly and my web site is up, Adagios should report all is well. To test what would happen if it were to start failing, change the hostname in the Host to nemslinux.com1 (which obviously will not respond), and then generate your config again. Once you feel ready, change the Host to your own web site. If your site is SSL, you should only need to change the hostname, alias and address of the host (Step 6). If it’s not SSL, repeat Step 4, but this time create a new hostgroup called web_site_no_ssl, and then repeat Step 5, this time, creating a new Advanced Service called Web Site (Non-SSL), assign it (5.e) to Web Site (Non-SSL) and leave off the SSL parameters in 5.h.

Exercise 2: Monitor A Non-Standard Port with check_tcp
Here’s a bonus exercise which will help you monitor the uptime of any TCP/UDP port. NEMS Linux includes a dummy port listener running on port 9590. The port listener is cleverly called 9590, and does nothing other than reply that it is up. This can be used to simulate a port on another device. Let's setup a service monitor on the NEMS host to warn us if port 9590 ever goes offline.
- On the left menu of NConf, you'll see “Services”. Click “Add”.
- Set the Service Name to: 9590
- Leave Service Enabled set to: Yes
- Set the Check Command to: check_tcp
- Set Assigned to Host to: NEMS (this host comes pre-installed)
- Leave Check Period set to: 24×7
- Set Notification Period to: 24x7
- Leave Service Templates as is, none selected.
- Under Contact Groups highlight the 'admins' group and press the arrow pointed right to move it to Selected Items.
- Leave Notes, Notes URL and Action URL blank.
- Set Max Check Attempts to: 30
- Set Check Interval to: 1
- Set Retry Interval to: 1
- Set First Notification Delay to: 5
- Set Notification Interval to: 15
- Set Notification Options to: w,u,c,r,f,s
- Leave Active Checking, Passive Checking, Notification Enabled, Check Freshness and Freshness Threshold blank.
- Leave Assign Service to servicegroup as is, none selected.
- Set Params for check command to the port number: 9590
- Press Submit
- Press Generate Nagios Config, followed by pressing the Generate button on the next screen to deploy and activate your new configuration.
Once the new config is running, try failing the service by opening Monit Service Manager under System on the NEMS Dashboard. Click on the Process named 9590, and then click “Stop service”. You'll notice in around 1 minute the status of 9590 will show as a problem in all status views (Eg., NEMS TV Dashboard, NEMS Adagios, Nagios Core), and after roughly 5 minutes you will receive a notification (assuming your notifications settings are configured). Once you have received a notification, visit NEMS Adagios to Acknowledge the outage. Then, return to Monit, open the 9590 Process, and click “Enable Monitoring”. This will re-load 9590 and you'll soon see it change to a Recovered state. Once complete, try setting up a new service to monitor a real host on your network. Simply change the name of the service to something appropriate, the host in step 5 (you already know how to add new hosts if you don’t already have it configured), and the port number in step 19.
Learn More
NEMS has an active Community Forum. I check in quite regularly to provide free support to users. I also offer commercial one-on-one priority support for those needing a higher level of support. NEMS Linux is free to download and use. Its source code is available on GitHub. Download NEMS Linux for ODROID at https://nemslinux.com/
You can also follow @NEMSLinux on Twitter or join us on Discord.
Be sure to read my article in next month’s edition of ODROID Magazine as I unveil the incredible enhancements of NEMS Linux 1.5 and show you how to upgrade from NEMS 1.4.1.
About the Author
Robbie Ferguson is the host of Category5 Technology TV and author of NEMS Linux. His TV show is found at https://category5.tv/ and his blog is https://baldnerd.com/.
Be the first to comment