

In this article, we will delve deeper still into Home Assistant customization, creating our own scripts to collect data from remote sensors and other control devices. We will also look into various ways to communicate with the remote sensors.
Getting remote temperature data
Let's assume you have this problem: you have several temperature sensors such as the DS1820 around your house connected to various ODROIDs and you want to send the data to Home Assistant, which runs on a single device. You’ll need to decide on a data transport protocol and write some script to collect the temperature readings and pass it to Home Assistant.
Let's analyze some approaches:
- Polling over HTTP
- Pushing over Home Assistant API
- Pushing over MQTT
Polling over HTTP
If you're used to web development, you're probably used to CGI (Common Gateway Interface), the oldest way to generate dynamic content using a web server ( http://bit.ly/2jNVkjT). Basically, you upload a script on the server, regardless of language, which is called by the web server, serving the script’s output back to the client. Obviously, you first need to install an HTTP server on your remote host and activate CGI support. We'll use Apache 2.4:
$ sudo apt-get install apache2
$ sudo a2enmod cgi
The default configuration maps the /cgi-bin/ URL to /usr/lib/cgi-bin on your file system. Any executable scripts you place here can be called by the web server. Let's assume that you can get the temperature data on the remote host with these shell commands:
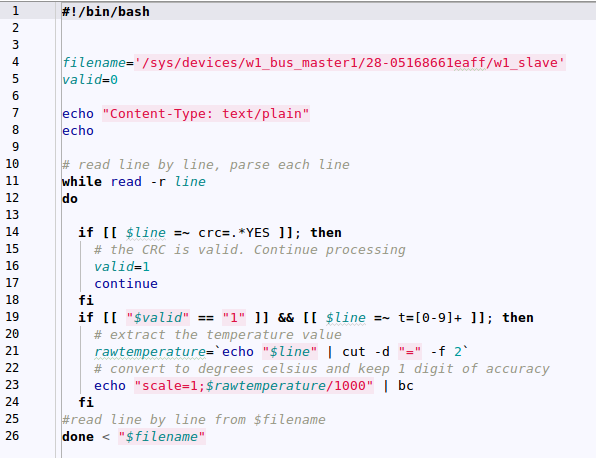
$ cat /sys/devices/w1_bus_master1/28-05168661eaff/w1_slave
c6 01 4b 46 7f ff 0c 10 bd : crc=bd YES
c6 01 4b 46 7f ff 0c 10 bd t=28375
In the output above, the first line validates the reading of the value (if the CRC matches), and the second line returns the value in milli-celsius. We will create two scripts (don't forget to mark them as executable) to illustrate the code in two different languages: BASH and Python. The files will be stored in /usr/lib/cgi-bin/temperature.sh and /usr/lib/cgi-bin/temperature.py.
#!/bin/bash

filename='/sys/devices/w1_bus_master1/28-05168661eaff/w1_slave'
valid=0

echo "Content-Type: text/plain"
echo

# read line by line, parse each line
while read -r line
do
    if [[ $line =~ crc=.*YES ]]; then
        # the CRC is valid. Continue processing
        valid=1
        continue
    fi
    if [[ "$valid" == "1" ]] && [[ $line =~ t=[0-9]+ ]]; then
        # extract the temperature value
        rawtemperature=`echo "$line" | cut -d "=" -f 2`
        # convert to degrees celsius and keep 1 digit of accuracy
        echo "scale=1;$rawtemperature/1000" | bc
    fi
#read line by line from $filename
done < "$filename"
#!/usr/bin/python
import re

filename = '/sys/devices/w1_bus_master1/28-05168661eaff/w1_slave'
valid = False

print "Content-Type: text/plain"
print ""

# execute the command and parse each line of output
with open(filename) as f:
    for line in f:

        if re.search('crc=.*YES', line):
            # the CRC is valid. Continue processing
            valid = True
            continue

        if valid and re.search('t=[0-9]+', line):
            # extract the temperature value
            temperature = re.search('t=([0-9]+)', line)
            # convert to degrees celsius and keep 1 digit of accuracy
            output = "%.1f" % (float(temperature.group(1))/1000.0)
            print output
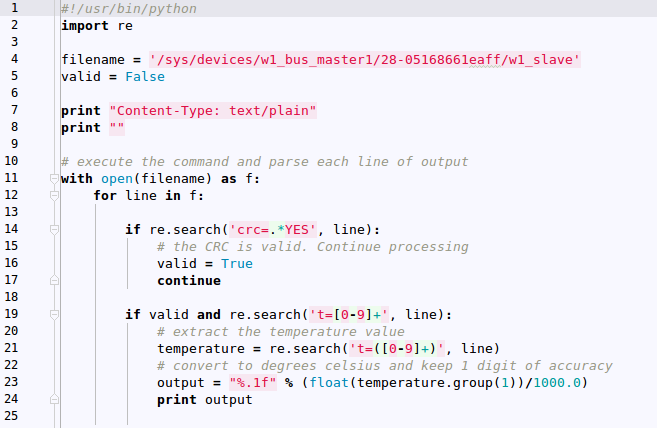
Let's analyze the scripts a bit. Both scripts start with a shebang line which tells the caller which interpreter to use to run the script (line 1). Next, we define two variables to point to the file to be read (line 4) and a variable to remember if the reading is valid or not (line 5). On lines 7 and 8 we print the HTTP headers. The CGI script has to return HTTP headers on the first lines, separated by a blank line from the rest of the output. The web server needs at least the Content-Type header to process the request. If you omit this, you will get an HTTP 500 error. On line 11 we begin reading the lines from the file in order to parse each one. We look for a valid CRC with a regular expression on line 14, and if it is correct, we set valid to true. On line 19, if the CRC is true and the line contains a temperature, we extract the raw temperature (line 21) and convert it to celsius, with one digit of accuracy (line 23), and print it to standard output. In order to access the data, you could use any HTTP client, like wget, as shown in Figure 2.
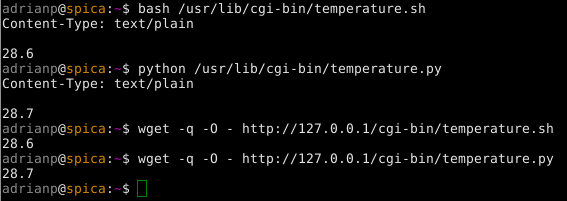
There might be slight differences in the output returned because of different rounding methods used, or by variations in the time the query is made, which can cause the sensor data to fluctuate.
For security purposes, you can enable HTTP Basic Authentication in your server's config. You'll need SSL/HTTPS with valid certificates in order to protect yourself from somebody sniffing your traffic, but that goes beyond the scope of this article. You can read more about those here and here.
In order to add the sensor to Home Assistant we can use the REST sensor inside configuration.yaml :
sensor:
 ...
 - platform: rest
   resource: http://192.168.1.13/cgi-bin/temperature.sh
   name: Temperature REST Bash
   unit_of_measurement: C
 - platform: rest
   resource: http://192.168.1.13/cgi-bin/temperature.py
   name: Temperature REST Python
  unit_of_measurement: C
You can get the code here and here.
Pros for this method:
- It's easy to implement if you've done web development
- On Home Assistant restart new data is polled
Cons for this method:
- Using a web server exposes you to possible vulnerabilities
- The web server may use a lot of resources in comparison to what it needs to do
Pushing over HA API
A different approach that doesn't involve a web server is to push sensor data to Home Assistant from the remote system. We can use a Template Sensor to hold and present the data. In order to do this, you can have the script in Figure 3 called periodically with cron on the remote system.
#!/bin/bash

filename='/sys/devices/w1_bus_master1/28-05168661eaff/w1_slave'
homeassistantip='192.168.1.9'
haport=8123
api_password='odroid'
sensor_name='sensor.temperature_via_api'
valid=0

# read line by line, parse each line
while read -r line
do

    if [[ $line =~ crc=.*YES ]]; then
        # the CRC is valid. Continue processing
        valid=1
        continue
    fi
    if [[ "$valid" == "1" ]] && [[ $line =~ t=[0-9]+ ]]; then
        # extract the temperature value
        rawtemperature=`echo "$line" | cut -d "=" -f 2`
        # convert to degrees celsius and keep 1 digit of accuracy
        temperature=`echo "scale=1;$rawtemperature/1000" | bc`
        # push the data to the Home Assistant entity via the API
        curl -X POST -H "x-ha-access: $api_password" -H "Content-Type: application/json" \
        --data "{\"state\": \"$temperature\"}" http://$homeassistantip:$haport/api/states/$sensor_name
    fi
#read line by line from $filename
done < "$filename"
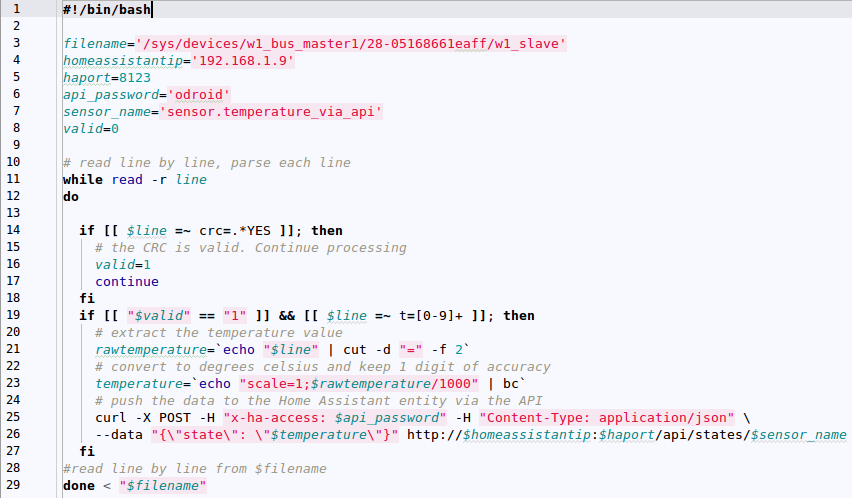
As you can see, the code is similar to the previous example, except that at line 25 it uses Home Assistant REST API to submit the temperature reading. The REST API requires you to send the Home Assistant API Key inside of a HTTP header, and the data you want changed needs to be in a JSON payload in the POST request. The URL you post to is your Home Assistant instance /api/states/sensor.name. To enable this and submit data every 5 minutes, add the following cron entry:
$ crontab -e
*/5 * * * * /bin/bash /path/to/script/temperature-HA-API.sh > /dev/null 2>&1
The Home Assistant configuration looks like this:
sensor:
…
- platform: template
   sensors:
     temperature_via_api:
       value_template: '{{ states.sensor.temperature_via_api.state }}'
       friendly_name: Temperature via API
       unit_of_measurement: C
The template sensor is usually used to extract data from other Home Assistant entities, and in this case we use it to extract data from itself. This trick prevents it from deleting the state data after an external update. Before you set the temperature, the sensor state will be blank. After cron executes the script the first time, you will get temperature data. You can get the code from here
Pros for this method:
- You control when data is pushed
- Resource use is very low
Cons for this method:
- Your script needs to have your Home Assistant secret password in clear
- When Home Assistant is restarted, the sensor will not have any value until the first update
Pushing over MQTT
The MQTT protocol is a machine to machine protocol designed for efficiency (and low power environments) and has been discussed already in previous ODROID Magazine articles. The way it works is that a central server called a broker relays messages for clients that subscribe to a common topic. Think of a topic as something like an IRC channel where clients connect and send each other specific messages. Home Assistant has a built-in MQTT Broker, but in my tests I found it unreliable, so I used a dedicated broker called Mosquitto. It can be installed on the same system as Home Assistant, or on a different system. To install it, follow these steps:
$ sudo apt-get install mosquitto mosquitto-clients
$ sudo systemctl enable mosquitto
MQTT version 3.11 supports authentication, so you should set up a username and password that is shared by broker and clients and, optionally, SSL encryption. In my setup I used user-password authentication, and added an 'ODROID' user:
$ sudo mosquitto_passwd -c /etc/mosquitto/passwd ODROID
$ sudo vi /etc/mosquitto/conf.d/default.conf
allow_anonymous false
password_file /etc/mosquitto/passwd
You can enable general MQTT support in Home Assistant by adding a MQTT platform in configuration.yaml (remember that the mqtt_password parameter is defined in secrets.yaml instead):
mqtt:
  broker: 127.0.0.1
  port: 1883
  client_id: home-assistant
  keepalive: 60
  username: ODROID
  password: !secret mqtt_password
In order to push temperature data to Home Assistant our script will need the Paho-MQTT Python library. In order to parse configuration data we'll need the python-yaml library as well:
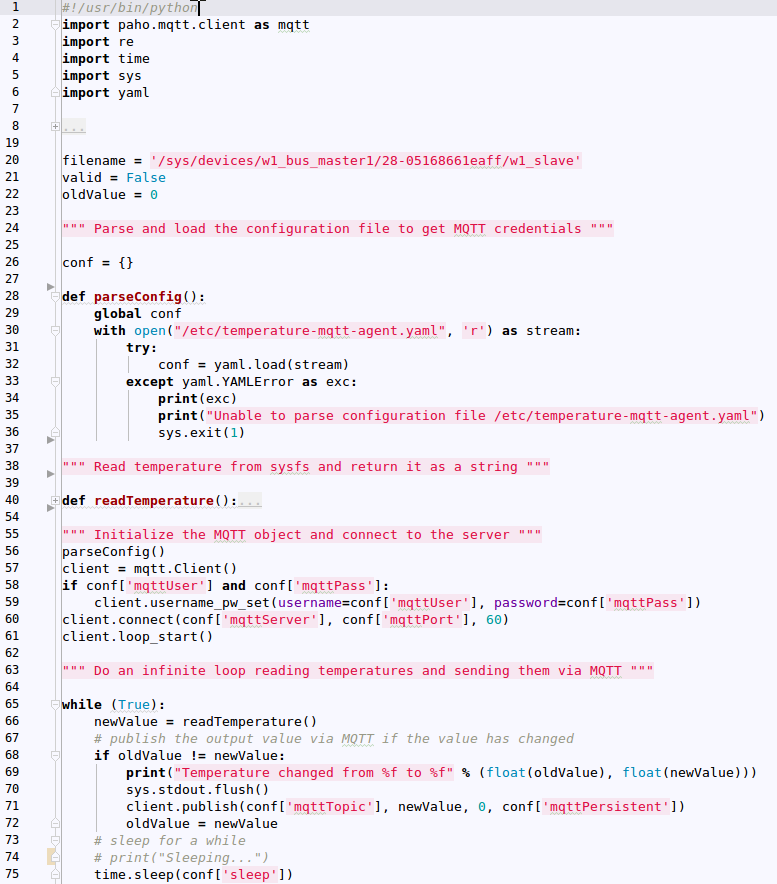
$ sudo apt-get install python-pip python-yaml
$ sudo pip install paho-mqtt
The script runs as a daemon, performing periodic temperature readings in the background and sending changes via MQTT. The code which reads the actual temperature (line 40) is the same as in Figure 1b and is not shown in Figure 4 for brevity. The only change is that instead of printing the temperature, it returns it as a string.
The code begins by importing a few helper modules, defining functions to parse the YAML configuration into a dictionary. Reading the temperature and execution begins at line 57. A new MQTT client object is defined and initialized with the necessary details to access the MQTT broker. On line 61, there is a background thread started by the loop_start() call which ensures that the client remains connected to the MQTT broker. Without it, the connection would time out and you would need to reconnect manually. More information about the MQTT API in Python is available here. On line 65, there is a loop that reads temperature data, compares it with the last temperature read, and if there is a change, publishes an MQTT message to the broker with the new temperature. Then the code sleeps for a while before the next reading. When publishing data to the broker (on line 71), you need to specify the MQTT topic, the value being sent, and also if this data should be persistent or not. Persistent data is convenient, because you can get the last temperature reading from MQTT when you start Home Assistant and read the temperature for the first time. You can get the full code from here.
#!/usr/bin/python
import paho.mqtt.client as mqtt
import re
import time
import sys
import yaml

# Prerequisites:
# * pip: sudo apt-get install python-pip
# * paho-mqtt: pip install paho-mqtt
# * python-yaml: sudo apt-get install python-yaml

# Configuration file goes in /etc/temperature-mqtt-agent.yaml and should contain your mqtt broker details

# For startup copy temperature-mqtt-agent.service to /etc/systemd/system/
# Startup is done via systemd with
#  sudo systemctl enable temperature-mqtt-agent
#  sudo systemctl start temperature-mqtt-agent

filename = '/sys/devices/w1_bus_master1/28-05168661eaff/w1_slave'
valid = False
oldValue = 0

""" Parse and load the configuration file to get MQTT credentials """

conf = {}

def parseConfig():
    global conf
    with open("/etc/temperature-mqtt-agent.yaml", 'r') as stream:
        try:
            conf = yaml.load(stream)
        except yaml.YAMLError as exc:
            print(exc)
            print("Unable to parse configuration file /etc/temperature-mqtt-agent.yaml")
            sys.exit(1)

""" Read temperature from sysfs and return it as a string """

    def readTemperature():
        with open(filename) as f:
            for line in f:
                if re.search('crc=.*YES', line):
                    # the CRC is valid. Continue processing
                    valid = True
                    continue
                if valid and re.search('t=[0-9]+', line):
                    # extract the temperature value
                    temperature = re.search('t=([0-9]+)', line)
                    # convert to degrees celsius and keep 1 digit of accuracy
                    output = "%.1f" % (float(temperature.group(1)) / 1000.0)
                    # print("Temperature is "+str(output))
                    return output

""" Initialize the MQTT object and connect to the server """
parseConfig()
client = mqtt.Client()
if conf['mqttUser'] and conf['mqttPass']:
    client.username_pw_set(username=conf['mqttUser'], password=conf['mqttPass'])
    client.connect(conf['mqttServer'], conf['mqttPort'], 60)
    client.loop_start()

""" Do an infinite loop reading temperatures and sending them via MQTT """

    while (True):
        newValue = readTemperature()
        # publish the output value via MQTT if the value has changed
        if oldValue != newValue:
            print("Temperature changed from %f to %f" % (float(oldValue), float(newValue)))
            sys.stdout.flush()
            client.publish(conf['mqttTopic'], newValue, 0, conf['mqttPersistent'])
            oldValue = newValue
        # sleep for a while
        # print("Sleeping...")
        time.sleep(conf['sleep'])
The script will also need a configuration file where it keeps MQTT credentials, located at /etc/temperature-mqtt-agent.yaml:
mqttServer: 192.168.1.9
mqttPort: 1883
mqttUser: ODROID
mqttPass: ODROID
mqttTopic: ha/kids_room/temperature
mqttPersistent: True
sleep: 10
There's also a systemd startup script to start your script on every boot. Copy it to /etc/systemd/system:
$ cat /etc/systemd/system/temperature-mqtt-agent.service
[Unit]
Description=Temperature MQTT Agent
After=network.target
[Service]
ExecStart=/usr/local/bin/temperature-mqtt-agent.py
Type=simple
Restart=always
RestartSec=5<
[Install]
WantedBy=multi-user.target
To enable it at startup, run the following commands:
$ sudo systemctl enable temperature-mqtt-agent.service
$ sudo systemctl start temperature-mqtt-agent.service
On the Home Assistant side of things, we need to define an MQTT sensor with the following configuration:
sensor:
...
 - platform: mqtt
    state_topic: 'ha/kids_room/temperature'
    name: 'Temperature via MQTT'
    unit_of_measurement: C
Pros for this method:
- Resource use is low
- Standard API with low overhead designed for machine-to-machine communication
Cons for this method:
- The remote system needs to have the MQTT password in the clear
- When Home Assistant is restarted, the sensor will not have any value until the first update unless the MQTT Persistence option is used
Now that you've seen several examples of getting data into Home Assistant, you will have to choose what is best for your setup. From now on I will go with MQTT because, even if it seems more difficult in the beginning, it scales better with more complex tasks.
Controlling a Smart TV with a custom component
Here's a new problem that we want to solve. Let's collect the current channel number, program name, and TV state from a Samsung TV running SamyGO firmware. The TV exposes this information via a REST API which can be installed on the TV from here. The API sends back information in JSON format about the current state of the TV. It can inject remote control codes and can also send back screenshots with what's currently on. The call and results for the current information look like this:
$ wget -O - "http://tv-ip:1080/cgi-bin/samygo-web-api.cgi?challenge=oyd4uIz5WWAkWPo5MzfxBFraI05C3FDorSPE7xiMLCVAQ40a&action=CHANNELINFO"{"source":"TV (0)", "pvr_status":"NONE", "powerstate":"Normal", "tv_mode":"Cable (1)", "volume":"9", "channel_number":"45", "channel_name":"Nat Geo HD", "program_name":"Disaster planet", "resolution":"1920x1080", "error":false}
In theory, we could configure REST sensors to make the query above and use templating to preserve only the desired information, like this:
sensor:
...
  - platform: rest
  resource: http://tv-ip:1080/cgi-bin/samygo-web-api.cgi?challenge=oyd4uIz5WWAkWPo5MzfxBFraI05C3FDorSPE7xiMLCVAQ40a&action=CHANNELINFO
  method: GET
  value_template: '{{ value_json.channel_name }}'
  name: TV Channel Name
But the problem is that, in order to get all the information in different sensors, you need to make the same query, discard a lot of data, and keep only what you need for that particular sensor. This is inefficient, and in this case, it won't work because, in order to obtain and expose this information, the web API running on the TV injects various libraries into running processes on the TV to hijack some function calls and obtain the data here. The injection step is critical, and doing multiple injections at the same time could cause the process to crash, which would lock up your TV. This is why the web API serializes the queries and won't respond to a query before the previous one is done, but this could result in timeouts.
What is needed in this case is for the sensor component to store all of the JSON data and have template sensors to extract the needed data and present it. In order to do this, we need a custom component, derived from the REST sensor which acts just like the REST sensor, but when it receives JSON data it stores that data as attributes of the entity instead of discarding them.
Custom components live in the ~homeassistant/.homeassistant/custom_components directory and preserve the structure of regular components (meaning our sensor would live in the sensor subdirectory). They are loaded at Home Assistant startup before configuration is parsed. Figure 5 shows the differences between the REST sensor and the new custom JsonRest sensor.
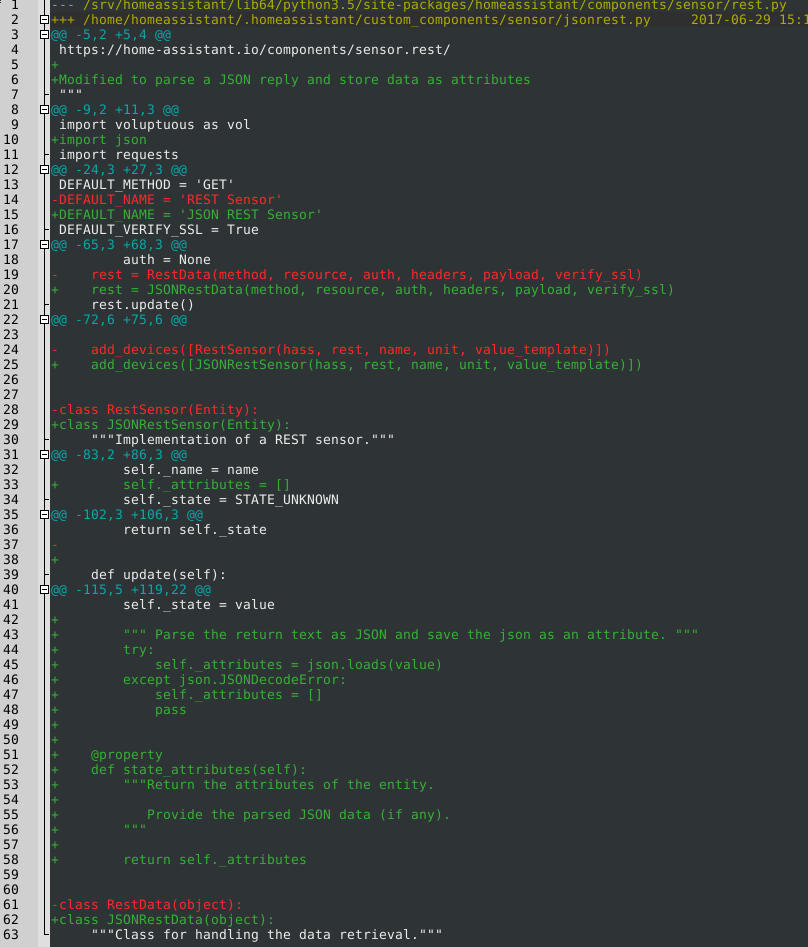
In order to understand the changes made, you should follow the custom components guide http://bit.ly/2fvc1PT. The code makes some name changes in the module's classes to prevent collisions with the REST component, and initializes and manages a list of attributes that are parsed from the JSON input. These will show up as attributes in the States view. The new component name is JsonRest, the same as the filename.
To install the JsonRest component, you can follow these steps:
mkdir -p ~homeassistant/.homeassistant/custom_components/sensor/
wget -O ~homeassistant/.homeassistant/custom_components/sensor/jsonrest.py https://raw.githubusercontent.com/mad-ady/home-assistant-customizations/master/custom_components/sensor/jsonrest.py
To configure the new component, once it's stored in the custom_components/sensor directory, we can use this configuration to poll the TV every 5 minutes:
sensor:
…
 - platform: jsonrest
    resource: http://tv-ip:1080/cgi-bin/samygo-web-api.cgi?challenge=oyd4uIz5WWAkWPo5MzfxBFraI05C3FDorSPE7xiMLCVAQ40a&action=CHANNELINFO
    method: GET
    name: TV Living ChannelInfo
    scan_interval: '00:05'
 - platform: template
    sensors:
     tv_living_powerstate:
        value_template: '{{ states.sensor.tv_living_channelinfo.attributes.power_state }}'
        friendly_name: TV Living Power
     tv_living_channel_number:
        value_template: '{{ states.sensor.tv_living_channelinfo.attributes.channel_number }}'
        friendly_name: TV Living Channel Number
      tv_living_channel_name:
        value_template: '{{ states.sensor.tv_living_channelinfo.attributes.channel_name }}'
        friendly_name: TV Living Channel Name
      tv_living_program_name:
        value_template: '{{ states.sensor.tv_living_channelinfo.attributes.program_name }}'
        friendly_name: TV Living Program Name
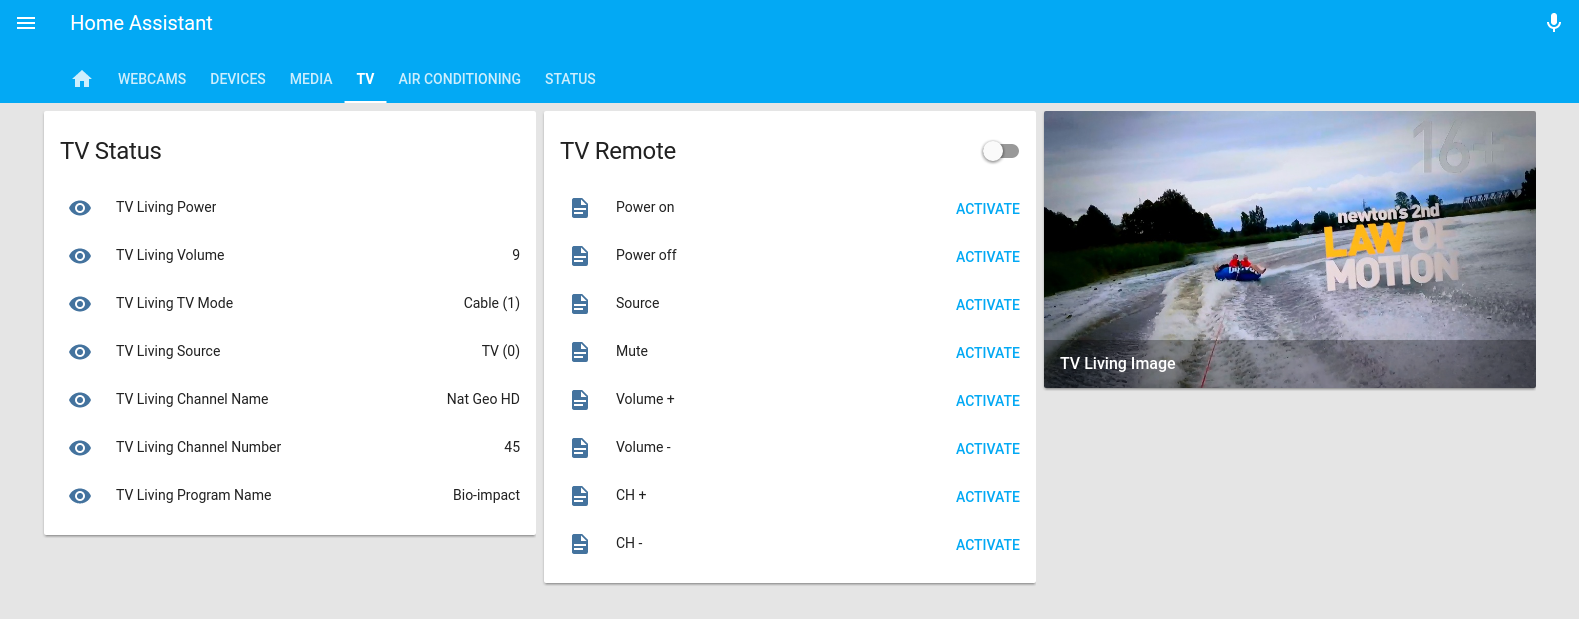
Now only the JsonRest component will poll the TV for information, and the template sensors extract the needed data from the attributes, reducing the load on the TV.
Since the TV web API allows the capture of screenshots, let's add that to Home Assistant as well (to keep an eye on what the kids are watching). The API returns a JPEG image each time you ask with URL parameter action=SNAPSHOT. You can use a Generic IP Camera component:
camera 2:
  platform: generic
  name: TV Living Image
  still_image_url: http://tv-ip:1080/cgi-bin/samygo-web-api.cgi?challenge=oyd4uIz5WWAkWPo5MzfxBFraI05C3FDorSPE7xiMLCVAQ40a&action=SNAPSHOT
The TV web API also allows you to send remote control actions, which can be modelled through the Restful Command component:
rest_command:
  tv_living_power_on:
    url: !secret samygo_tv_living_power_on
  tv_living_power_off:
    url: !secret samygo_tv_living_power_off
After a bit of grouping, the polished end result may be viewed here. A link to the configuration is available here, and an example for the secrets file is here. You can find the code and configuration on the GitHub page.
Be the first to comment