

In the July 2017 issue of ODROID Magazine, I introduced you to Home Assistant (http://bit.ly/2hlOPOE), which is an open-source home automation platform. Based on the examples listed in that article, this article will discuss advanced topics related to Home Assistant (HA) using in-depth steps. This will allow you to maximize the use of HA, and also help with experimentation.
Working with HA Developer Tools
When accessed, the HA webui looks similar to the one shown in Figure 1a. In the previous article, I mentioned the Developer Tools inside HA. You can access them by going to the left panel (bottom) in the web interface and hovering over the buttons.

The following tools are available to the developer:
Services
This lets you make calls to a variety of services exposed by your components. You can do things like trigger an automation, hide or show groups, reload HA configuration, control a media player object (play/pause/load playlist), and so on. The available services can change based on what components you have active in your configuration. It is a good place to test some action before adding it to an automation.
States
This lets you override the state of any entity. It also lists all entities, with their current state and attributes. You can use this list to find out an entity name, either to know how to reference it in the configuration (e.g., the entities visible in a view) or to use it in a template.
Events
This lets you generate an event on the event bus. There are several events available, but in practice you may not need to generate some of these events.
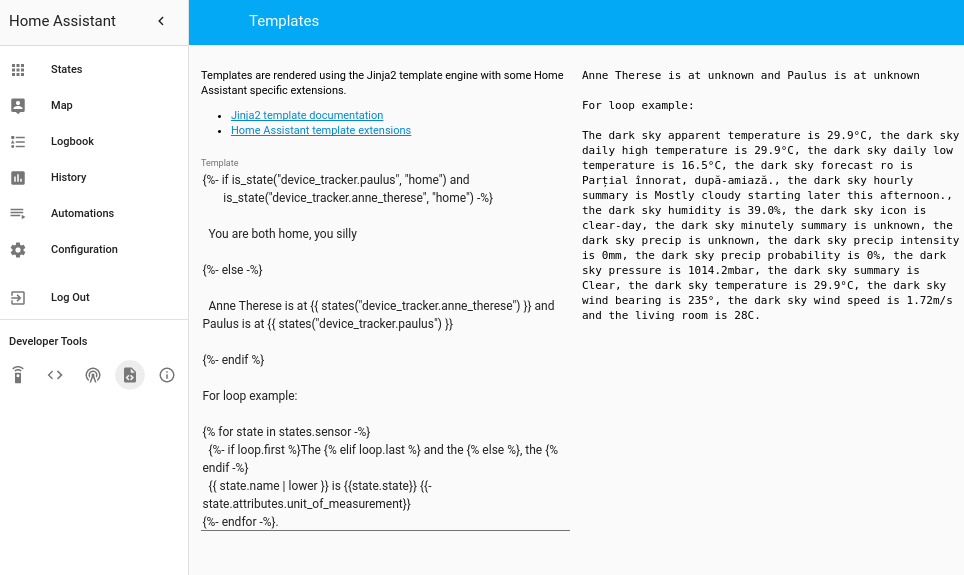
Templates
The HA templating engine uses Jinja2 templating syntax (http://bit.ly/2vd497l) with the addition of exposing some internal variables. The templating syntax is more like a programming language, so take your time to read the documentation (http://bit.ly/2vOK7no). The point of templates is to process input or output data, and to format it in a different way. The Templates view gives you a workspace where you can experiment and test the syntax before writing it to the configuration file. When you first load the page, it will have a sample syntax, which among other things, iterates through all your sensors and shows you their current values. For example, this can teach you that you can access a sensor state by calling {{ states.sensor.sensor_name.state }}.
Info
Shows you the current version as well as any errors that have been logged.
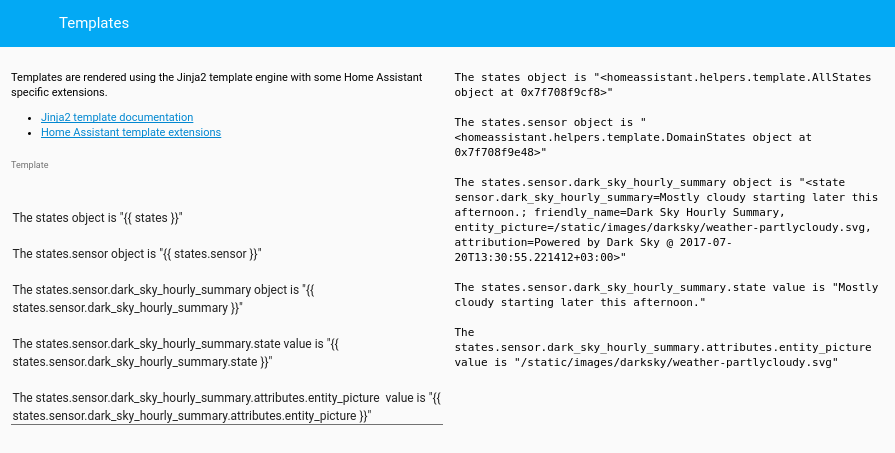
In order to better understand the relationship between an entity name and how to use it in a template, let us try an experiment. Let us assume that we need to get the icon of Dark Sky (https://darksky.net) weather forecast. First of all, we need to use the States tool to get the correct entity name. If you search there for the name shown in the web interface "Dark Sky Hourly Summary", then you will find an entity called "sensor.dark_sky_hourly_summary". Most HA entities have a state and may have one or more attributes and those should already be visible in the States view. Now we can switch to the Templates tool and add our own template at the end of the template dialog.
Let us try the following templates and let's see what the output is:
The states object is "{{ states }}"

The states.sensor object is "{{ states.sensor }}"

The states.sensor.dark_sky_hourly_summary object is "{{ states.sensor.dark_sky_hourly_summary }}"

The states.sensor.dark_sky_hourly_summary.state value is "{{ states.sensor.dark_sky_hourly_summary.state }}"

The states.sensor.dark_sky_hourly_summary.attributes.entity_picture  value is "{{ states.sensor.dark_sky_hourly_summary.attributes.entity_picture }}"
The output you receive can be viewed in Figure 2. Some of the data points to Python objects, and some others (like, state and attributes) return string values which you can use. With this information, you are prepared to start writing templates and automations.
Notification interface and HA API
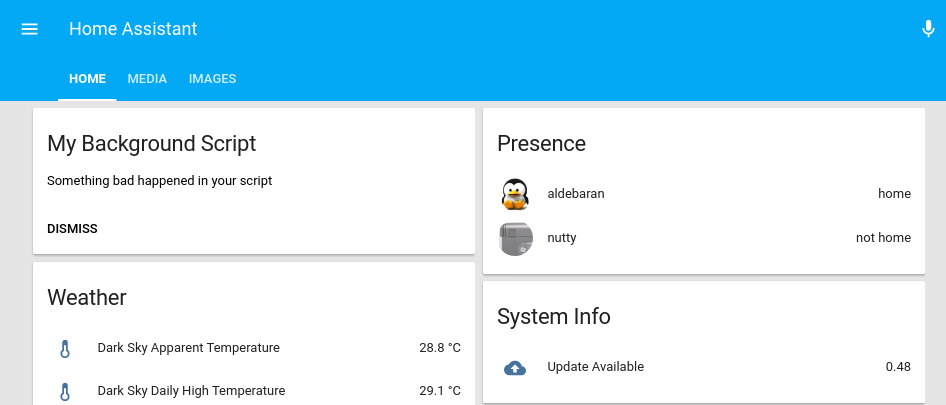
If you have scripts which run in the background (started by say, cron) you may want to be notified when things go wrong and the script fails for whatever reason. Most tutorials online will show you how to send a notification email or SMS, but for problems which are not too critical, maybe you would not like checking email or being woken up at 3 AM. For this, you can push messages to Home Assistant using curl and its API, so that you can get notifications from your scripts whenever you log into Home Assistant. This way, you get to know what happened if you regularly log into the web interface. A similar approach can be taken to change the states of Home Assistant entities by using external triggers, or you can use the API to query entities from external scripts.
To set this up, you only need to run a shell command from your script when handling an error:
$ /usr/bin/curl -X POST -H "x-ha-access: api_password" -H "Content-Type: application/json" --data "{\"message\": \"Something bad happened in your script\", \"title\": "My background script\"}" http://odroid-ip:8123/api/services/persistent_notification/create
The command above uses the persistent notification action (http://bit.ly/2wkVRiW) called via Home Assistant API. To use it, you will need to provide the “api_password” value and send a json (http://www.json.org/) object containing the message and title. Note that JSON mandates that you use the quote mark ("), and not apostrophe (') for quoting. The nice thing is that the notification will be displayed on all views/tabs, so you would not miss it. The result will look like Figure 3.
Running external scripts on state change
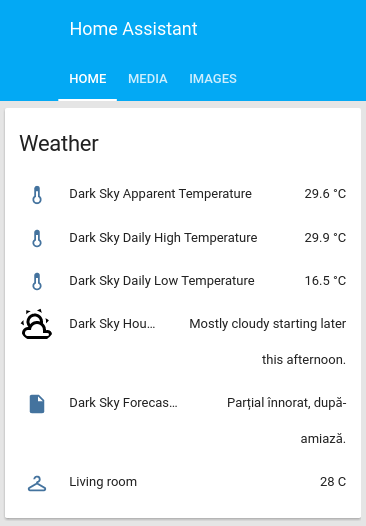
Suppose, for example, that I wish to get the weather forecast from Dark Sky in Romanian so that it is useful for some non-English speakers. Since Dark Sky does not support Romanian yet, I need to do it myself, which is not a problem, since we can do it with Home Assistant using the technique outlined below.
1. Install a translation program on the ODROID system that can use various online translation services and output the desired language. I used trans (http://bit.ly/2vcLJDU):
$ sudo wget -O /usr/local/bin/trans git.io/trans
$ sudo chmod a+x /usr/local/bin/trans
Test the program to make sure it works as desired:
$ trans -b :ro "My name is my password"2. Set up a new shell command component in Home Assistant (http://bit.ly/2vOFnhe) to call the command-line script. The shell component can execute a command and take the output of a template as parameter for the command. When a template is used as a parameter, the command execution is more strict and you are not allowed to use pipes or redirection to file. Should you need to use more complex command lines with pipes and templates, you could add them to a shell script and call the script instead. Fortunately, the trans command supports writing output directly to a file. Make the following changes to configuration.yaml:
shell_command:
  translate_weather: '/usr/local/bin/trans -b :ro "{{ states.sensor.dark_sky_hourly_summary.state }}" -o /tmp/ha-weather-forecast.txt'
The command takes the state of the Dark Sky Hourly Summary sensor and passes it to trans for translation. Practice getting the right state by playing in the Template tool, as we have done before. It outputs the translated text into /tmp/ha-weather-forecast.txt. To run this command manually, log into the Home Assistant web interface, navigate to Developer Tools in the left panel and click on the Services icon. You can call the “shell_command” domain with the translate_weather service and without other parameters. If you check the temporary file, you should see your translated weather forecast.
3. Import the translation back into Home Assistant by configuring a file sensor (http://bit.ly/2x2nmuw). The file sensor monitors a file for changes and imports the last line into Home Assistant. Make the following changes to your configuration.yaml:
sensor:
…
 - platform: file
    file_path: /tmp/ha-weather-forecast.txt
    name: Dark Sky Forecast Ro
You should also import this new entity in any views where you wish to use it:
group:
…
  weather:
    entities:
…
      - sensor.dark_sky_forecast_ro
If you restart Home Assistant, you should see the new item in the Weather group. However, there is still a problem: this entity will never update. We still need to add a trigger so that when the English forecast changes, the translated forecast should change as well. For this, we need to use automation.
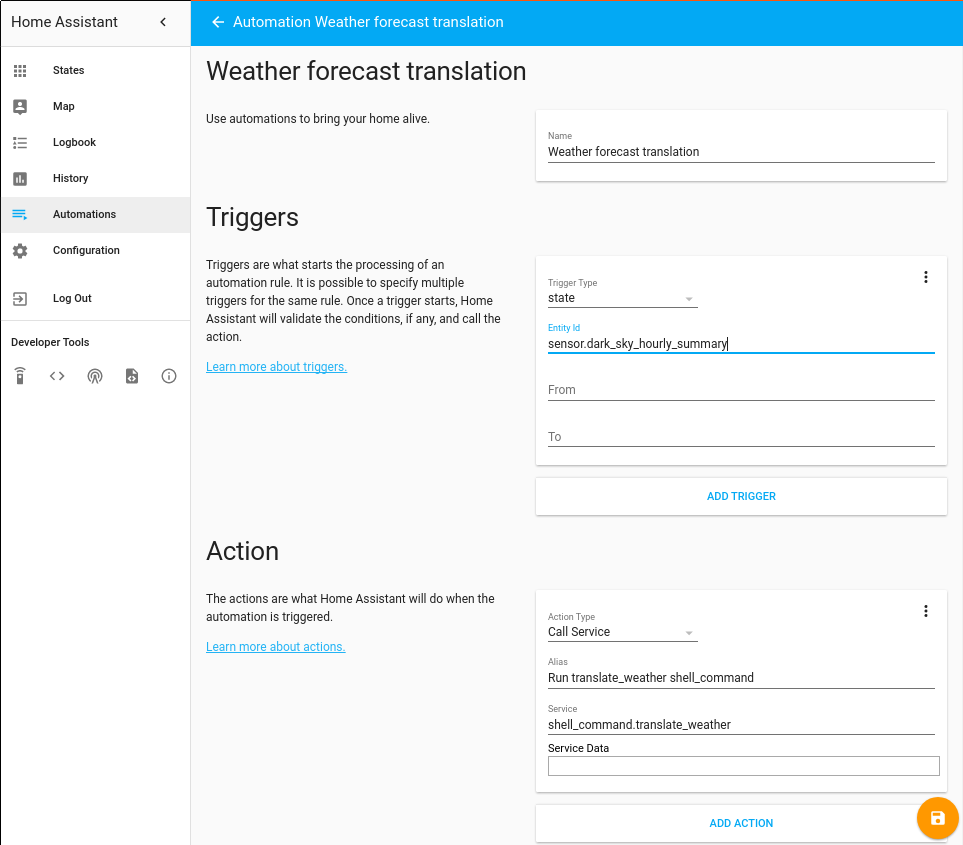
4. Create an automation by going to the Automation link in the side panel. Note that you currently need to use the Chrome browser for this step, since other browsers are not supported. Use the "+" button to add an automation, and give it a suggestive name like "Weather forecast translation". The trigger should be "state" and the entity id should match the desired "source" entity, which is, in our case, called "sensor.dark_sky_hourly_summary". Note that we are using the sensor name as it can be found in the States tool. You can leave the "From" and "To" fields blank, since we want it to trigger on any value change.
Next, we need to specify an action or a sequence of actions to be performed when triggered. We need "Call Service" as an action type. The Alias is just a descriptive name for our action and we can call it "Run translate_weather shell_command". The Service field is composed from the whole service call, meaning domain and service name are the same as those used in the Services tool, so in our case it will be "shell_command.translate_weather". The Service Data field can be left blank in our case, since the component does not need additional parameters. You can now click the Save icon and save your automation.
Now, when the weather forecast changes, it will trigger the automation and cause the forecast to be translated and saved in a different entity, except there is still a problem. When you restart Home Assistant, the weather state might not change for a long time and your translation might return "unknown" until the first transition. To fix this, we will run a second automation on Home Assistant startup to update the translation. This time the trigger will be platform homeassistant with event start. The action will be the same as the previous automation. Unfortunately, the web UI does not yet support this platform, so we will have to edit the file manually.
All automations are saved in ~/homeassistant/.homeassistant/automations.yaml. In this case, you would need to add the following to it:
- action:
  - alias: Run translate_weather shell_command
    service: shell_command.translate_weather
  alias: Update weather translation on startup
  id: '1502097058891'
  trigger:
    platform: homeassistant
    event: start
If you look at the automation you've already added through the user interface, you'll see a very similar syntax. The only thing new is the id. This is simply the current UNIX timestamp, and needs to be unique for your system (you can get a new one with date +%s). Once this is configured, after you restart Home Assistant, you will get the translated state shortly. Starting with Home Assistant version 0.51, there is a simpler, but less efficient, way of doing the same thing. You could have a command-line sensor (http://bit.ly/2uUIQw3) with a templated parameter, like this:
sensor:
…
  - platform: command_line
    command:  /usr/local/bin/trans -b :ro "{{ states.sensor.dark_sky_hourly_summary.state }}"
    friendly_name: Dark Sky Forecast Romanian
The reason why this is less efficient than the first solution is that the sensor is polled frequently, and is translated every time. So, in this particular case, you may run into quota problems with the translation providers.
Toggling a system service from Home Assistant
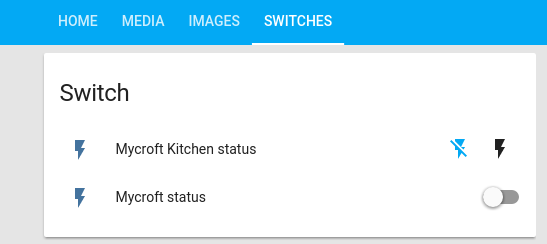
Let’s explore a new use-case. Suppose you have a system service running on your ODROID that you want to turn on/off from Home Assistant. In my case, such a service would be Mycroft (https://mycroft.ai), because it uses some resources when idle and can get confused by ambient sounds when I am watching a movie. There are more details about Mycroft at http://bit.ly/2tt3crC. The point is that you can use commands such as service mycroft start to control the service. You are not limited to services; you could toggle anything on or off.
To control it from Home Assistant we can use the command line switch component (http://bit.ly/2wdVGW5). Add the following to your configuration.yaml:
switch:
  - platform: command_line
    switches:
      mycroft:
        command_on: sudo /usr/sbin/service mycroft start
        command_off: sudo /usr/sbin/service mycroft stop
        command_state: /usr/sbin/service mycroft status >/dev/null 2>&1
        friendly_name: "Mycroft status"
You can also add it to a separate view:
group:
…
 switches:
    name: Switches
    view: yes
    entities:
    - switch.mycroft
There is one more thing you need to add for this to work. The sudo command will ask for a password by default, so we need to tell sudo that the user homeassistant can run the service command as root without a password. We can do this by running sudo visudo and adding the following line at the end of the file:
homeassistant ALL=NOPASSWD: /usr/sbin/serviceLet us expand this example a little. Suppose you want to be able to toggle a service running on a different device. The most secure way to do this would be through ssh. In order to do this, we will need to setup keys for ssh, so that homeassistant user can run commands through ssh without being prompted for a password (note that for security's sake you will need to protect your keys). You will need to run the following steps with the homeassistant user:
1. Create a new ssh key for homeassistant with no password:
$ sudo su -s /bin/bash homeassistant
$ cd ~homeassistant
$ ssh-keygen -t rsa
Accept the default values (key stored in /home/homeassistant/.ssh/id_rsa, and no passphrase). You can use this key to control many devices (including using it to login on routers for presence detection), so there is no need to create multiple keys.
2. Copy the key to the remote system. Make sure that you input the correct password for the account you are connecting as (I am using root on the remote device):
$ ssh-copy-id root@other-device-ip3. Test the connection manually:
$ ssh root@other-device-ip hostnameYou should receive one line with the other device's hostname, without being prompted for a password. If you get this, it means it is working. If not, you can find an awesome troubleshooting guide at http://bit.ly/2vTQYdA.
4. Configure it in Home Assistant by adding a new switch entry in configuration.yaml:
switch:
  - platform: command_line
    switches:
…
      mycroft_kitchen:
        command_on: ssh root@kitchen /usr/sbin/service mycroft start
        command_off: ssh root@kitchen /usr/sbin/service mycroft stop
        friendly_name: "Mycroft Kitchen status"
If you do not want the constant polling from Home Assistant for the state, you can omit the “command_state” line and in this case Home Assistant will assume it is off and will keep track only of the changes you make in the user interface. Also, the interface will change from a slider to two icons to activate/deactivate.
Toggling a switch based on media playback or presence information
Now that we can manually turn Mycroft on/off (or any switch for that matter), let us make things interesting. I would like to have Mycroft running when I am at home (my phone is connected to the router and detected by the presence detection we have implemented in the previous article) and Kodi is not playing. However, that can be ambiguous. So, let us define what we really want:
- User transitions from “not_home” to “home” and Kodi is idle => turn on Mycroft
- User transitions from “home” to “not_home” => turn off Mycroft
- User is “home” and Kodi transitions from anything to playing => turn off Mycroft
- User is “home” and Kodi transitions from anything to idle => turn on Mycroft
For this, we will create a few automations. What is different from the previous automations will be the use of conditions (http://bit.ly/2x2FDYz). Triggers indicate when an action should happen, while conditions are used as filters and say if that action should happen.
So, let us take the first step. My user is tracked by the device called “nutty”. Since the web interface does not support conditions (note: conditions are only supported starting with version 0.51), we will have to do it manually, in the config file automations.yaml:
- action:
  - alias: Turn on Mycroft
    service: switch.turn_on
    entity_id:
      - switch.mycroft
  alias: Turn on Mycroft when Nutty arrives home and Kodi is idle
  id: '1502097058892'
  trigger:
    platform: state
    entity_id: device_tracker.nutty
    to: 'home'
  condition:
    condition: and
    conditions:
      - condition: state
        entity_id: 'media_player.kodi_livingroom'
        state: 'idle'
The automation is triggered and evaluated each time the entity “device_tracker.nutty” changes state. When it is triggered, the condition is evaluated as well and if “media_player.kodi_livingroom” is idle at that time, then the action is executed and the switch is turned on. I could have also tested that Mycroft is off, but turning on an already-on switch has no negative side effects.
If that is difficult to follow, here is the pseudo-code:
onStateChange(device_tracker.nutty):
  if states.device_tracker.nutty.state == 'home':
    if states.media_player.kodi_livingroom.state == 'idle':
      switch.turn_on(switch.mycroft)
The off automation looks similar, but is simpler since it does not have an extra condition:
- action:
  - alias: Turn off Mycroft
    service: switch.turn_off
    entity_id:
      - switch.mycroft
  alias: Turn off Mycroft when Nutty leaves home
  id: '1502097058893'
  trigger:
    platform: state
    entity_id: device_tracker.nutty
    to: 'not_home'
The last two automations should be triggered by Kodi state changes and use conditions to test if the user is home or not.
- action:
  - alias: Turn off Mycroft
    service: switch.turn_off
    entity_id:
      - switch.mycroft
  alias: Turn off Mycroft when Kodi is playing and Nutty is home
  id: '1502097058894'
  trigger:
    platform: state
    entity_id: media_player.kodi_livingroom
    to: 'playing'
  condition:
    condition: and
    conditions:
      - condition: state
        entity_id: 'device_tracker.nutty'
        state: 'home'
And the last one should be:
- action:
  - alias: Turn on Mycroft
    service: switch.turn_on
    entity_id:
      - switch.mycroft
  alias: Turn on Mycroft when Kodi is idle and Nutty is home
  id: '1502097058895'
  trigger:
    platform: state
    entity_id: media_player.kodi_livingroom
    to: 'idle'
  condition:
    condition: and
    conditions:
      - condition: state
        entity_id: 'device_tracker.nutty'
        state: 'home'
Once you are done editing automations.yaml, you can reload the automations directly from Home Assistant by going to the “Configuration” view and selecting “Reload Automation”.
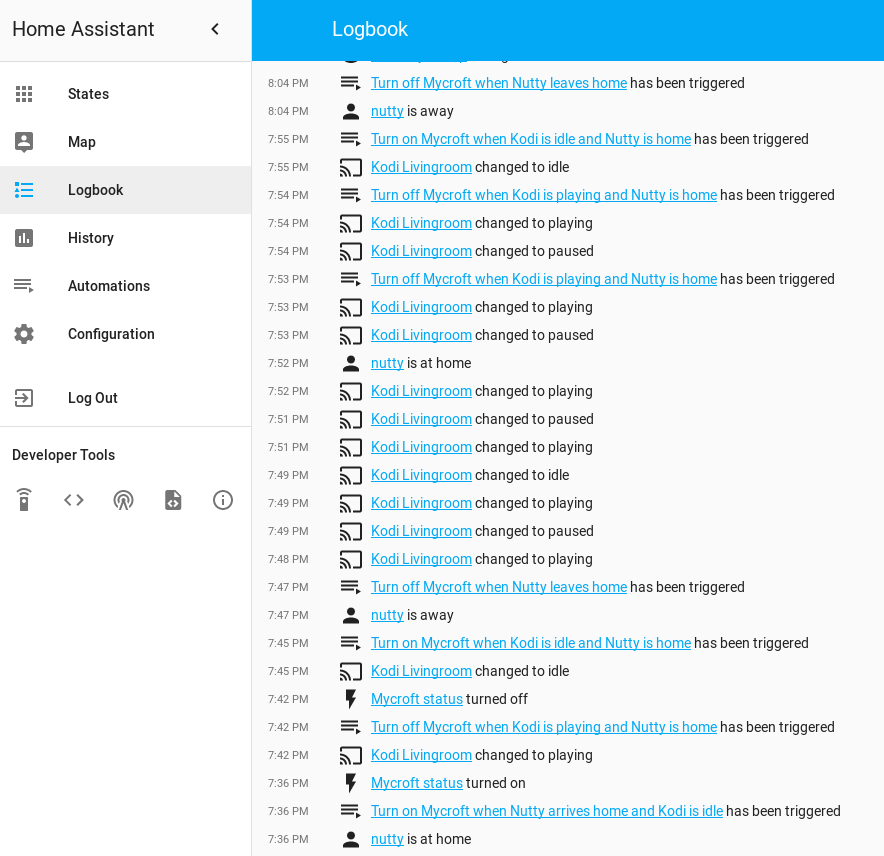
You should now test the automations by triggering them and checking the result in all the cases to rule out any bugs. You can use the Logbook view to see when automations have been triggered.
Customize the names and icons
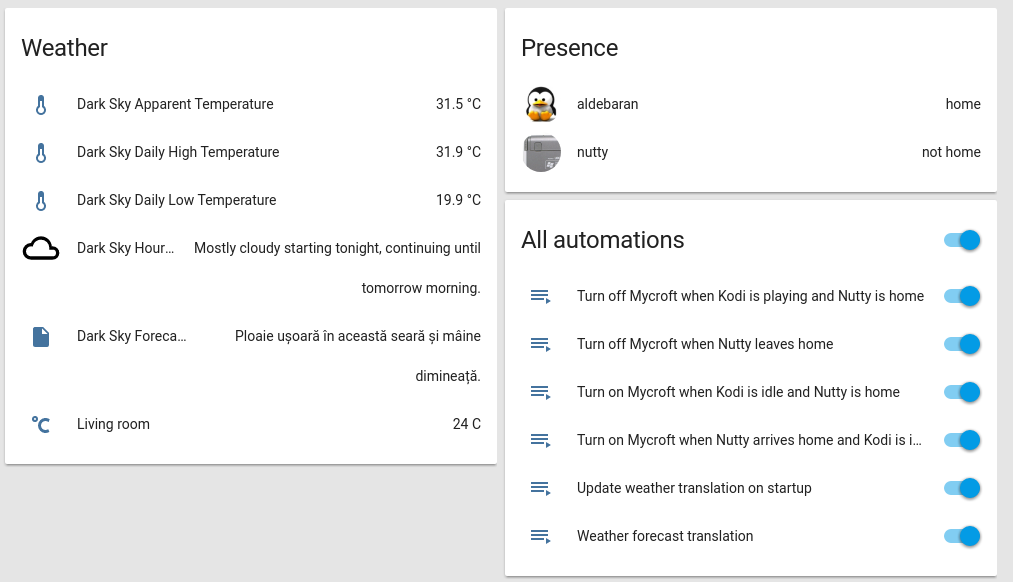
Let us address one more issue. By default, all switches have the "lightning" icon, and maybe you want to use something more appropriate. Also, you may later want to change the friendly name of an entity, and that would change its id and break the automations it is in. There are also some built-in groups - like all the devices managed by a “device_tracker” or all the automations which allows you to enable/disable/manually trigger an automation, but they are hidden by default. In order to make all these changes, we will need to add a Customize section in the beginning of the configuration file, under the homeassistant label, indented by two spaces (http://bit.ly/2x2q6bv).
Let us do the following: display the automations group and change the icons for the switches with something more appropriate. You can use icons from Material Design (http://bit.ly/2wleenC) or your own images. We will make changes to configuration.yaml:
homeassistant:
…
  customize:
    group.all_automations:
      hidden: false
      friendly_name: All automations
    switch.mycroft:
      friendly_name: Mycroft living room
      icon: mdi:assistant
    switch.mycroft_kitchen:
      icon: mdi:assistant
    sensor.living_room:
      icon: mdi:temperature-celsius
…
group:
  default_view:
    entities:
…
    - group.all_automations
More examples
The Home Assistant community has numerous examples in their cookbook at http://bit.ly/2xfAr2V. There are additional great examples in their forums at http://bit.ly/2v34WbL. For example, an alarm clock sample is available at http://bit.ly/2vOCv48. For further discussions, consult the original thread http://bit.ly/2fVogVu.
Be the first to comment