

This article will instruct you on how to build a 6-Bay NAS server with ODROID-H2. A few weeks ago, a small project to build a 6-Bay NAS server was started with the ODROID-H2 (Rev.B) when it was released in June. Many users have asked if ODROID-H2 can run more than 2 drives using PCI-e to SATA expansion card and a couple of users have tried.
Case
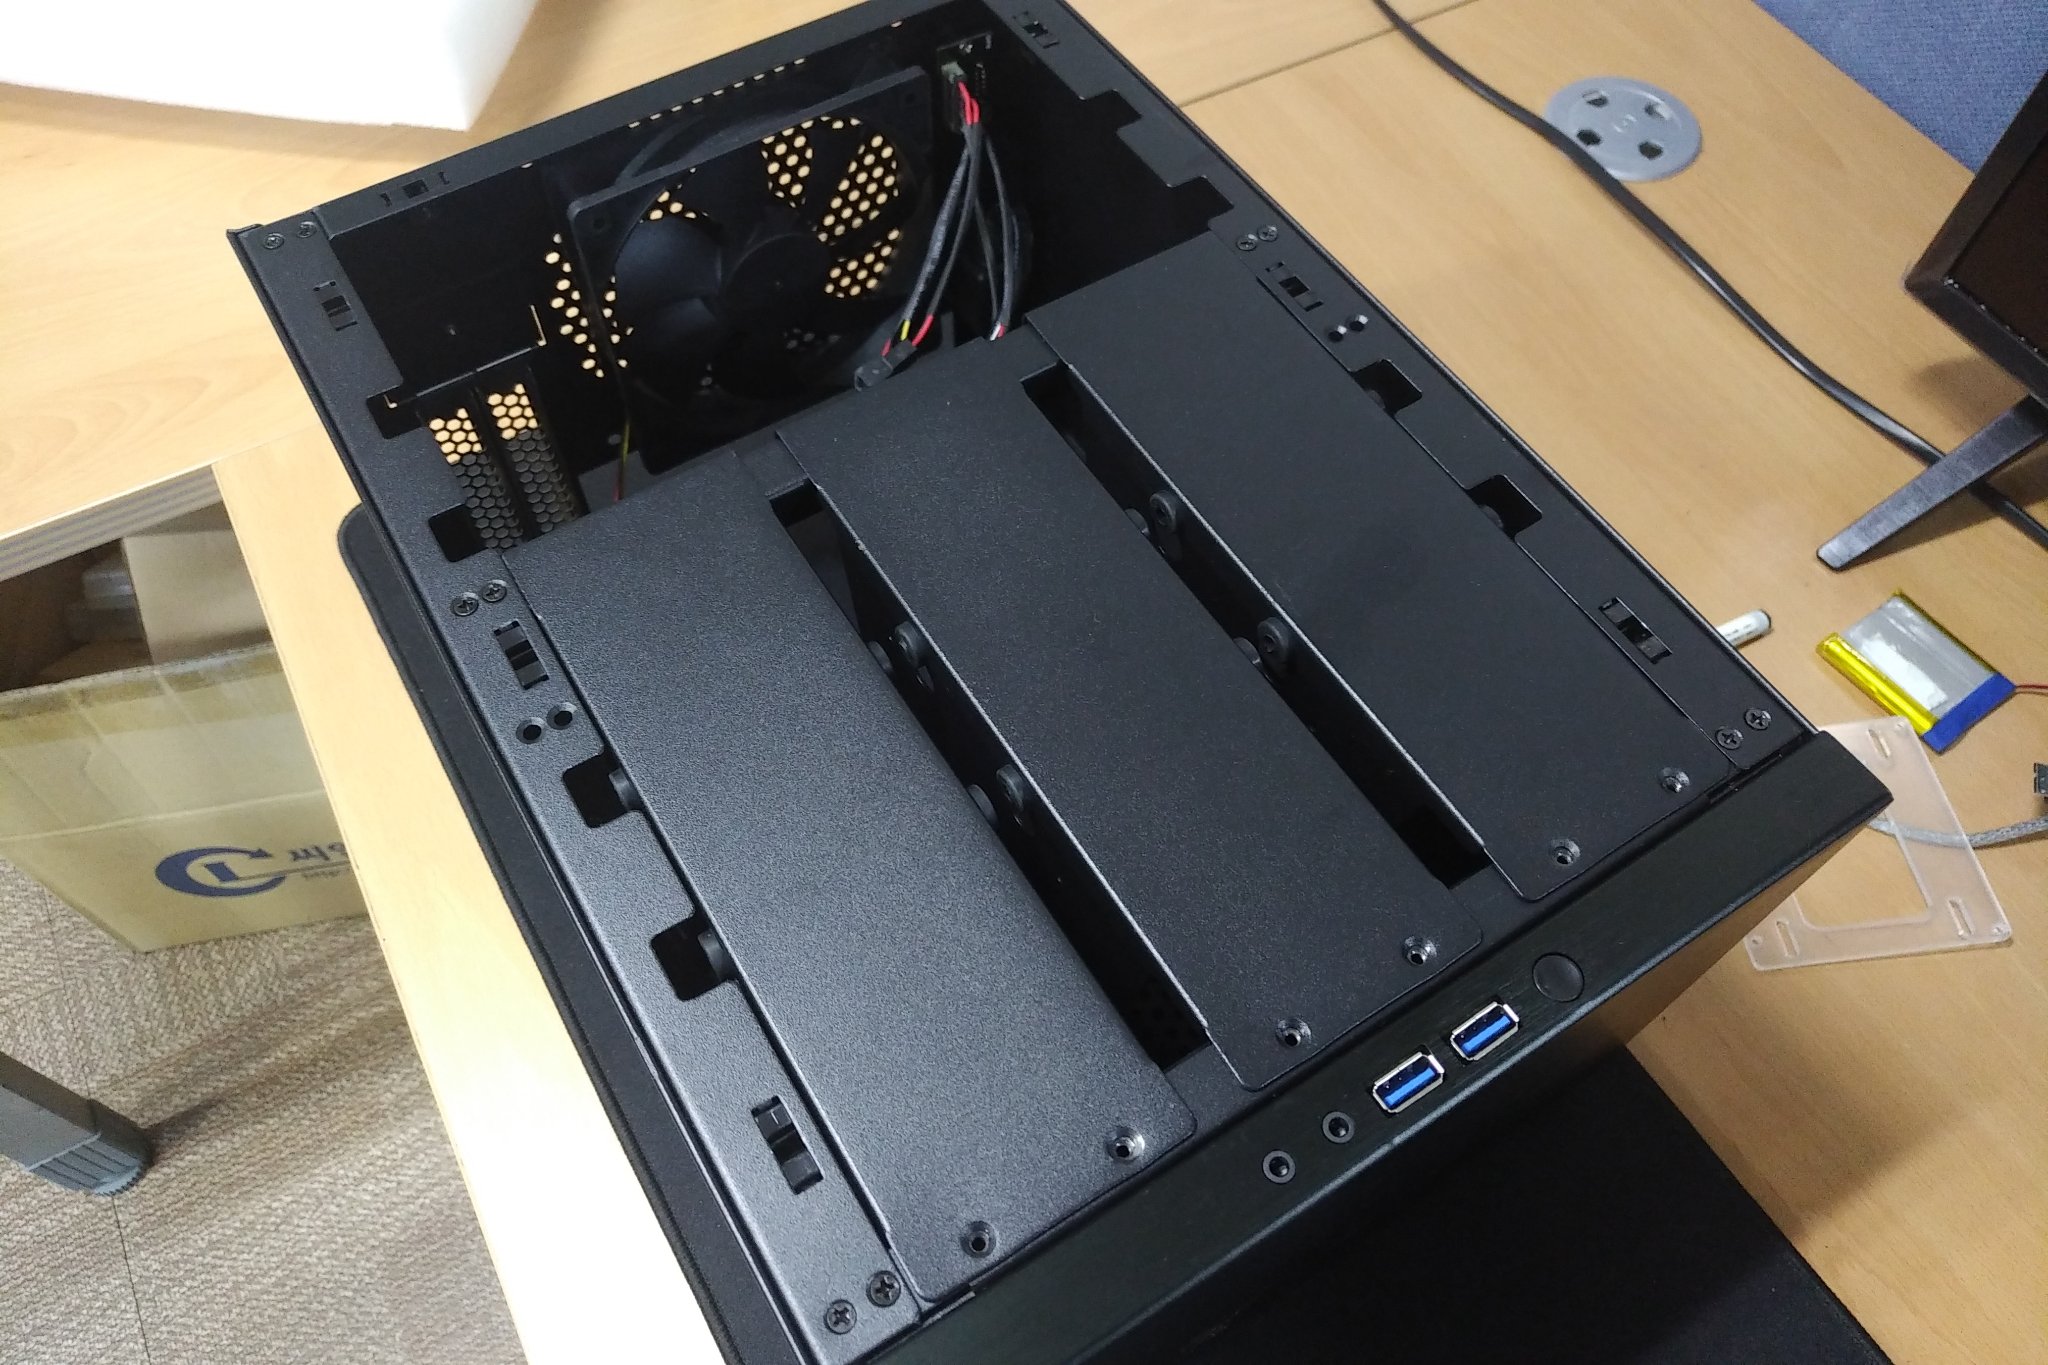
I have tried to look for a decent case that has enough space in order to fit 6x 3.5" disk drives and the ODROID-H2. There are many NAS or HTPC cases that can fit the mini-ATX board, but the challenge was their height is either too low or the volume is not enough to install six HDD drives. The fancy cases with 4-6 hot-swap bays were too expensive or they only supported 2.5" drives. For enough installation space and a decent budget, the NAS case from https://bit.ly/2X82Qtr was chosen.
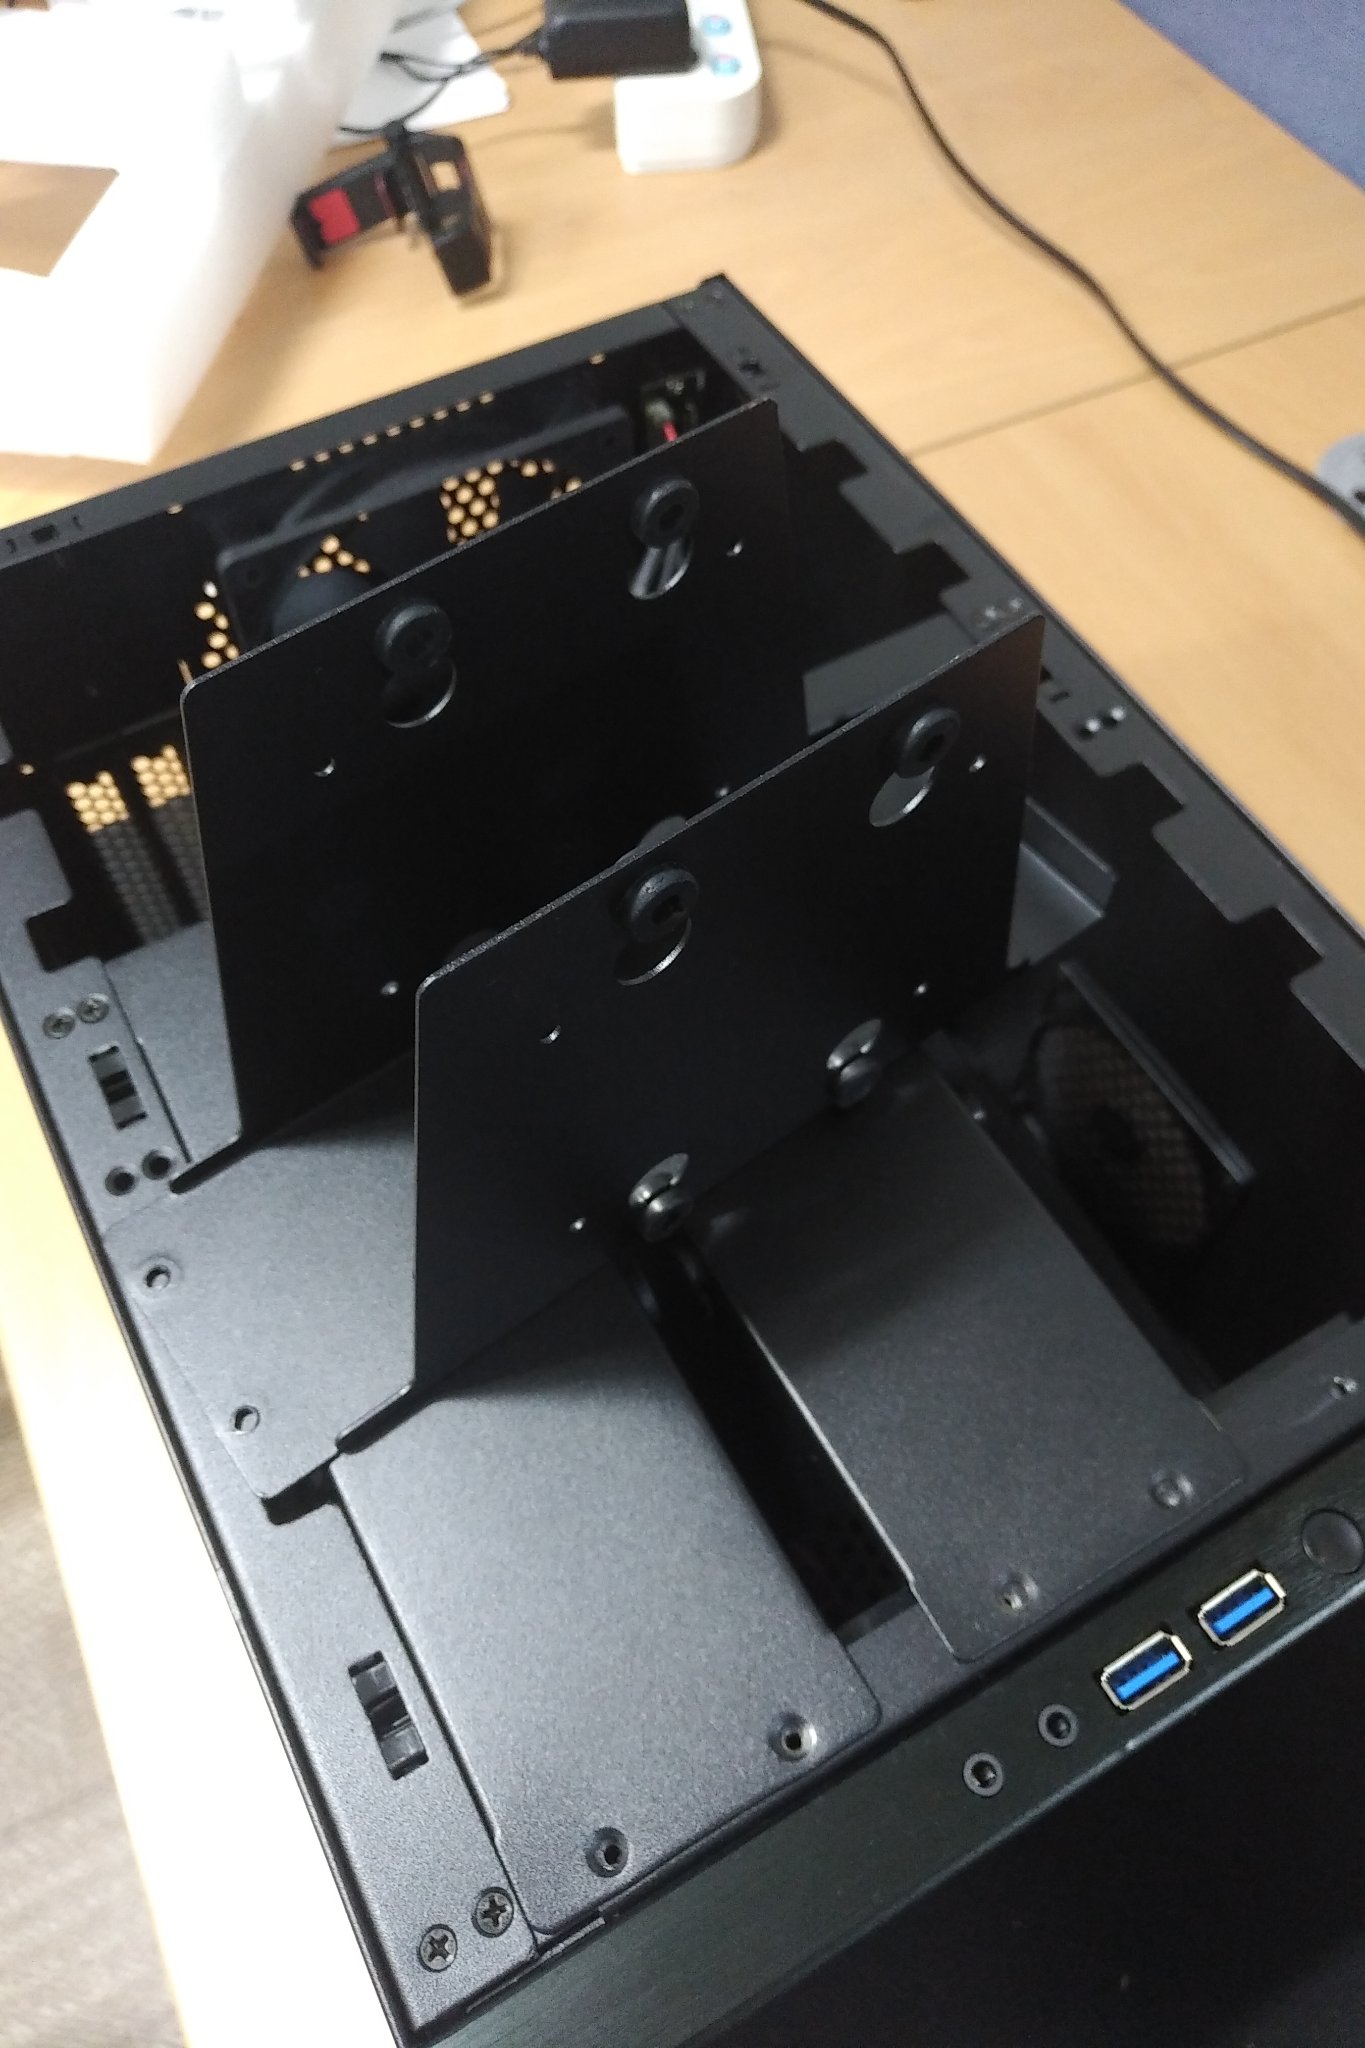
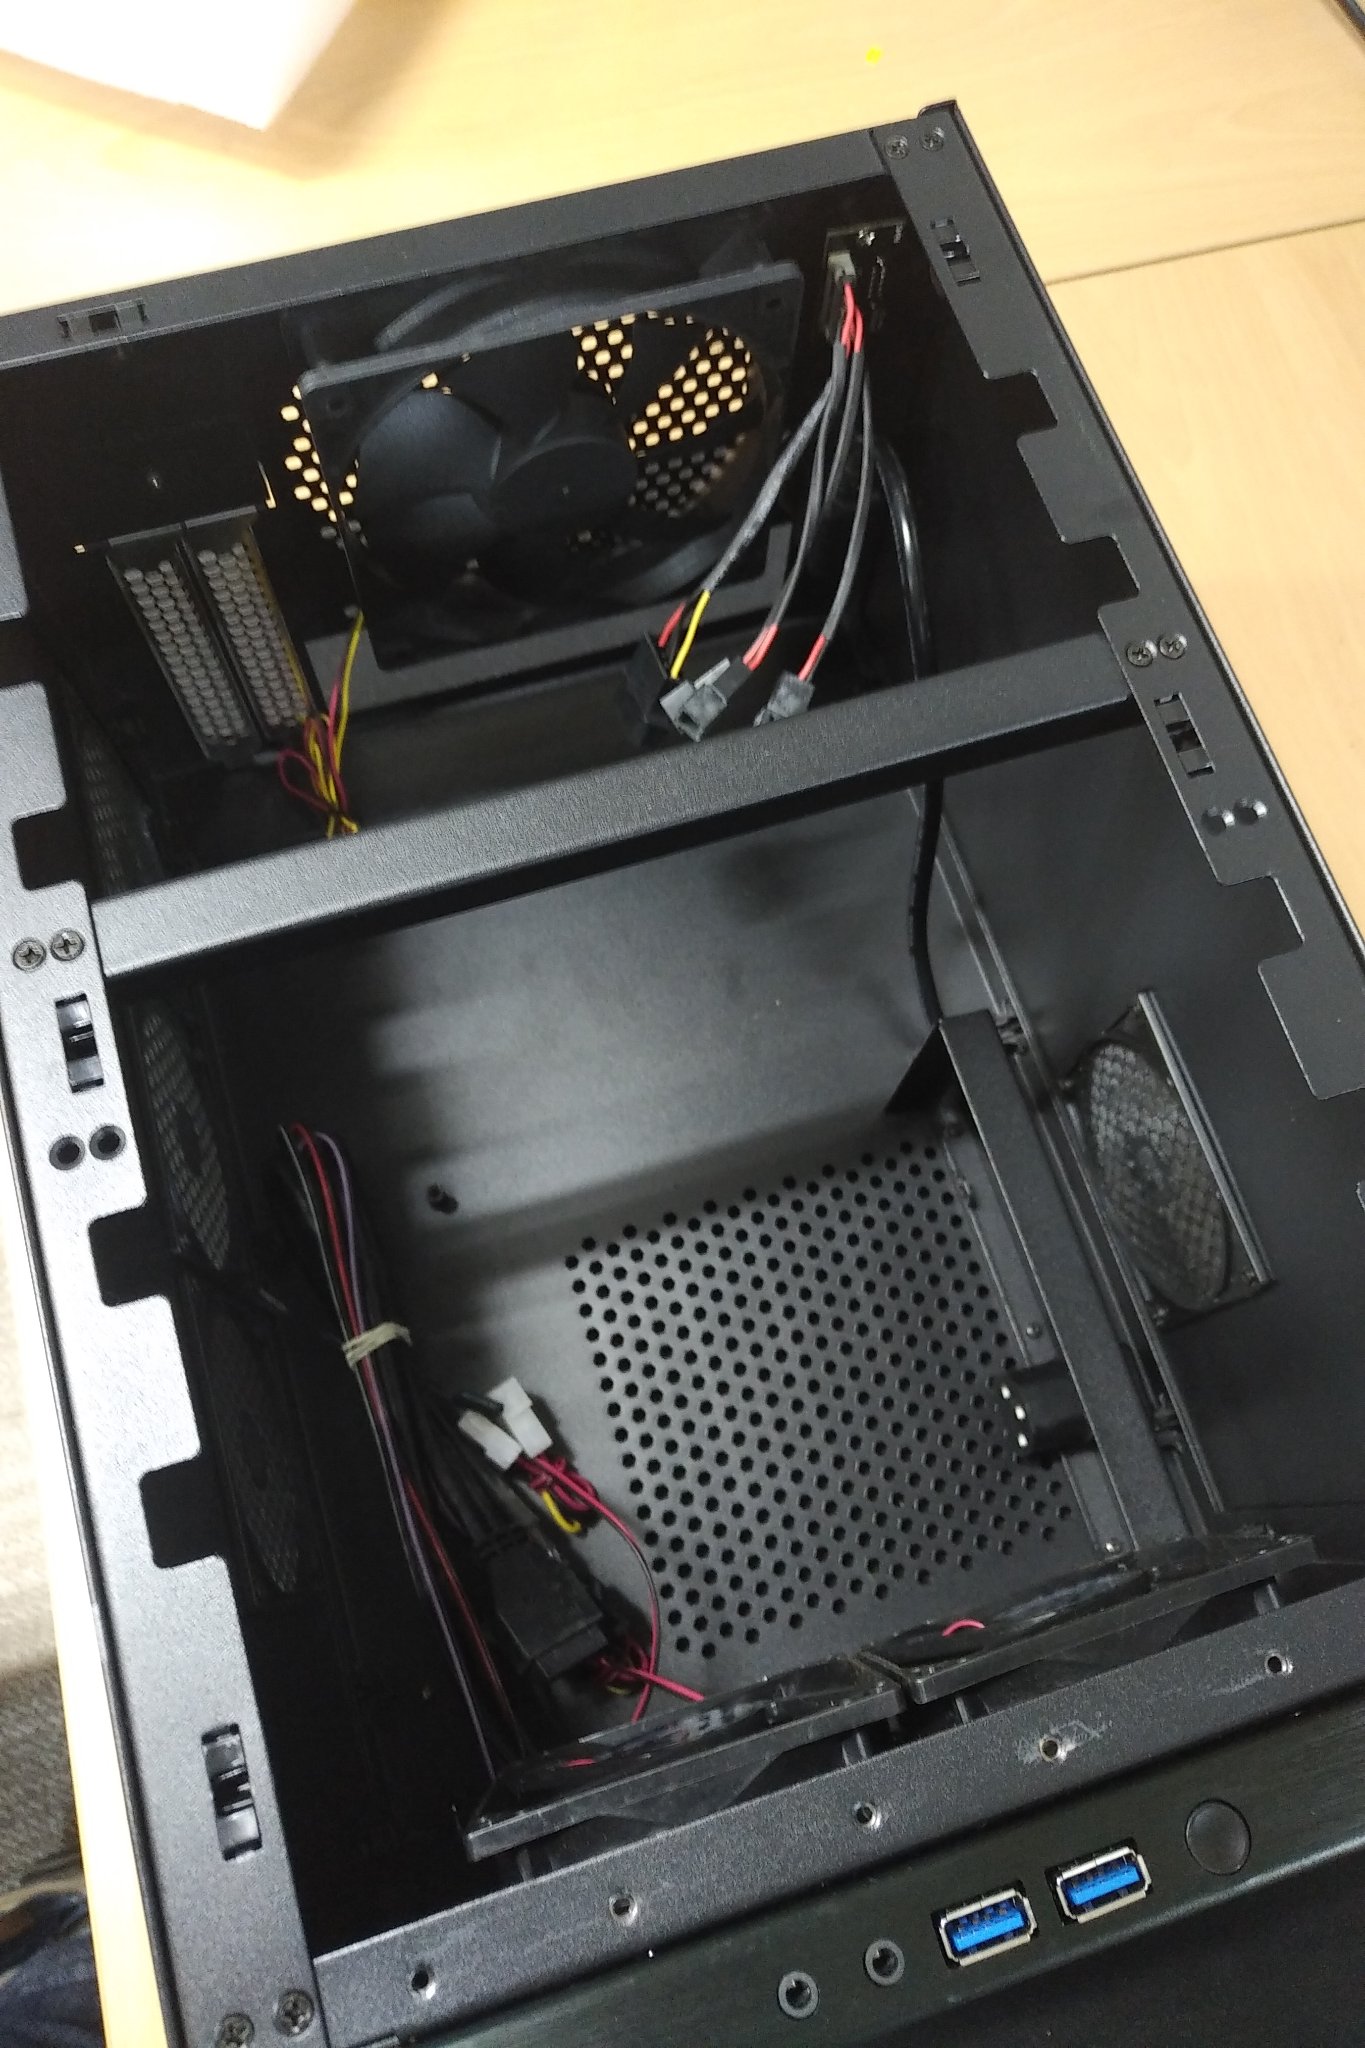
It has 3 brackets that can hold 2 x 3.5" drives each, and a standard ATX power can be located under the drive bays. It also has 4 PCB mounts on the bottom but their dimensions are for a standard ATX form factor in which ODROID-H2 will not fit, so a mount adaptor for ODROID-H2 is required.
Board mounting
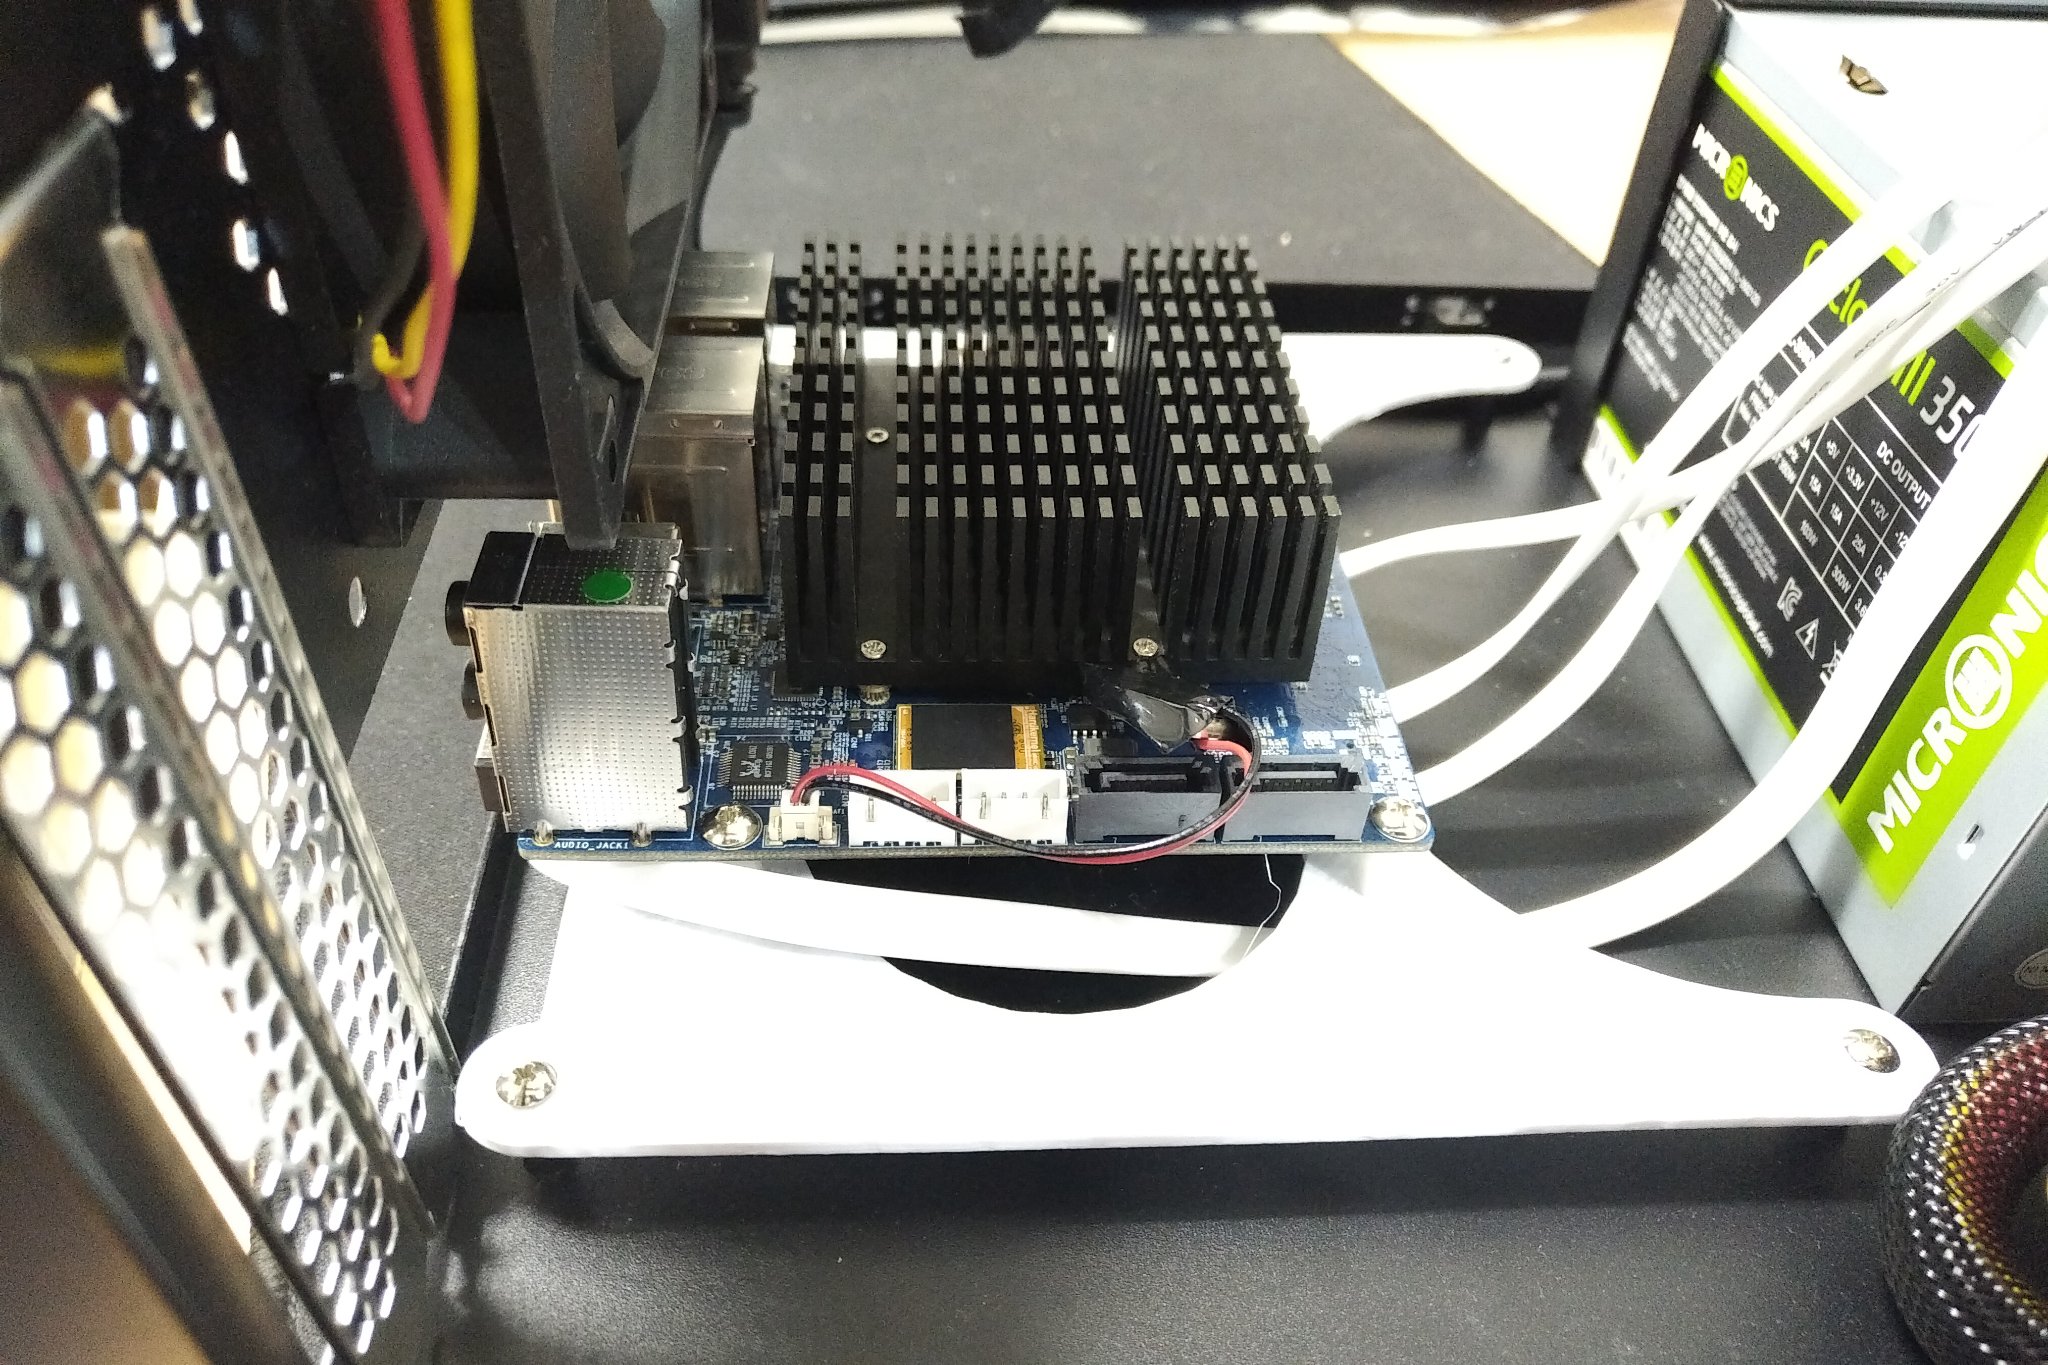
Many of you have already noticed that the form factor of OROID-H2 is not compatible with any ATX specifications, and this causes some difficulty in mounting it in a standard PC case or HTPC case. The case that we purchased is also designed for a mini ATX board which is still big for ODROID-H2; therefore, a mounting adaptor board is necessary. In the beginning, an acrylic panel was considered as a material for the mounting adaptor board. However, it is too weak and I have to order a new razor cutting whenever I change the design. Eventually, I decided to build it with a 3D printer.
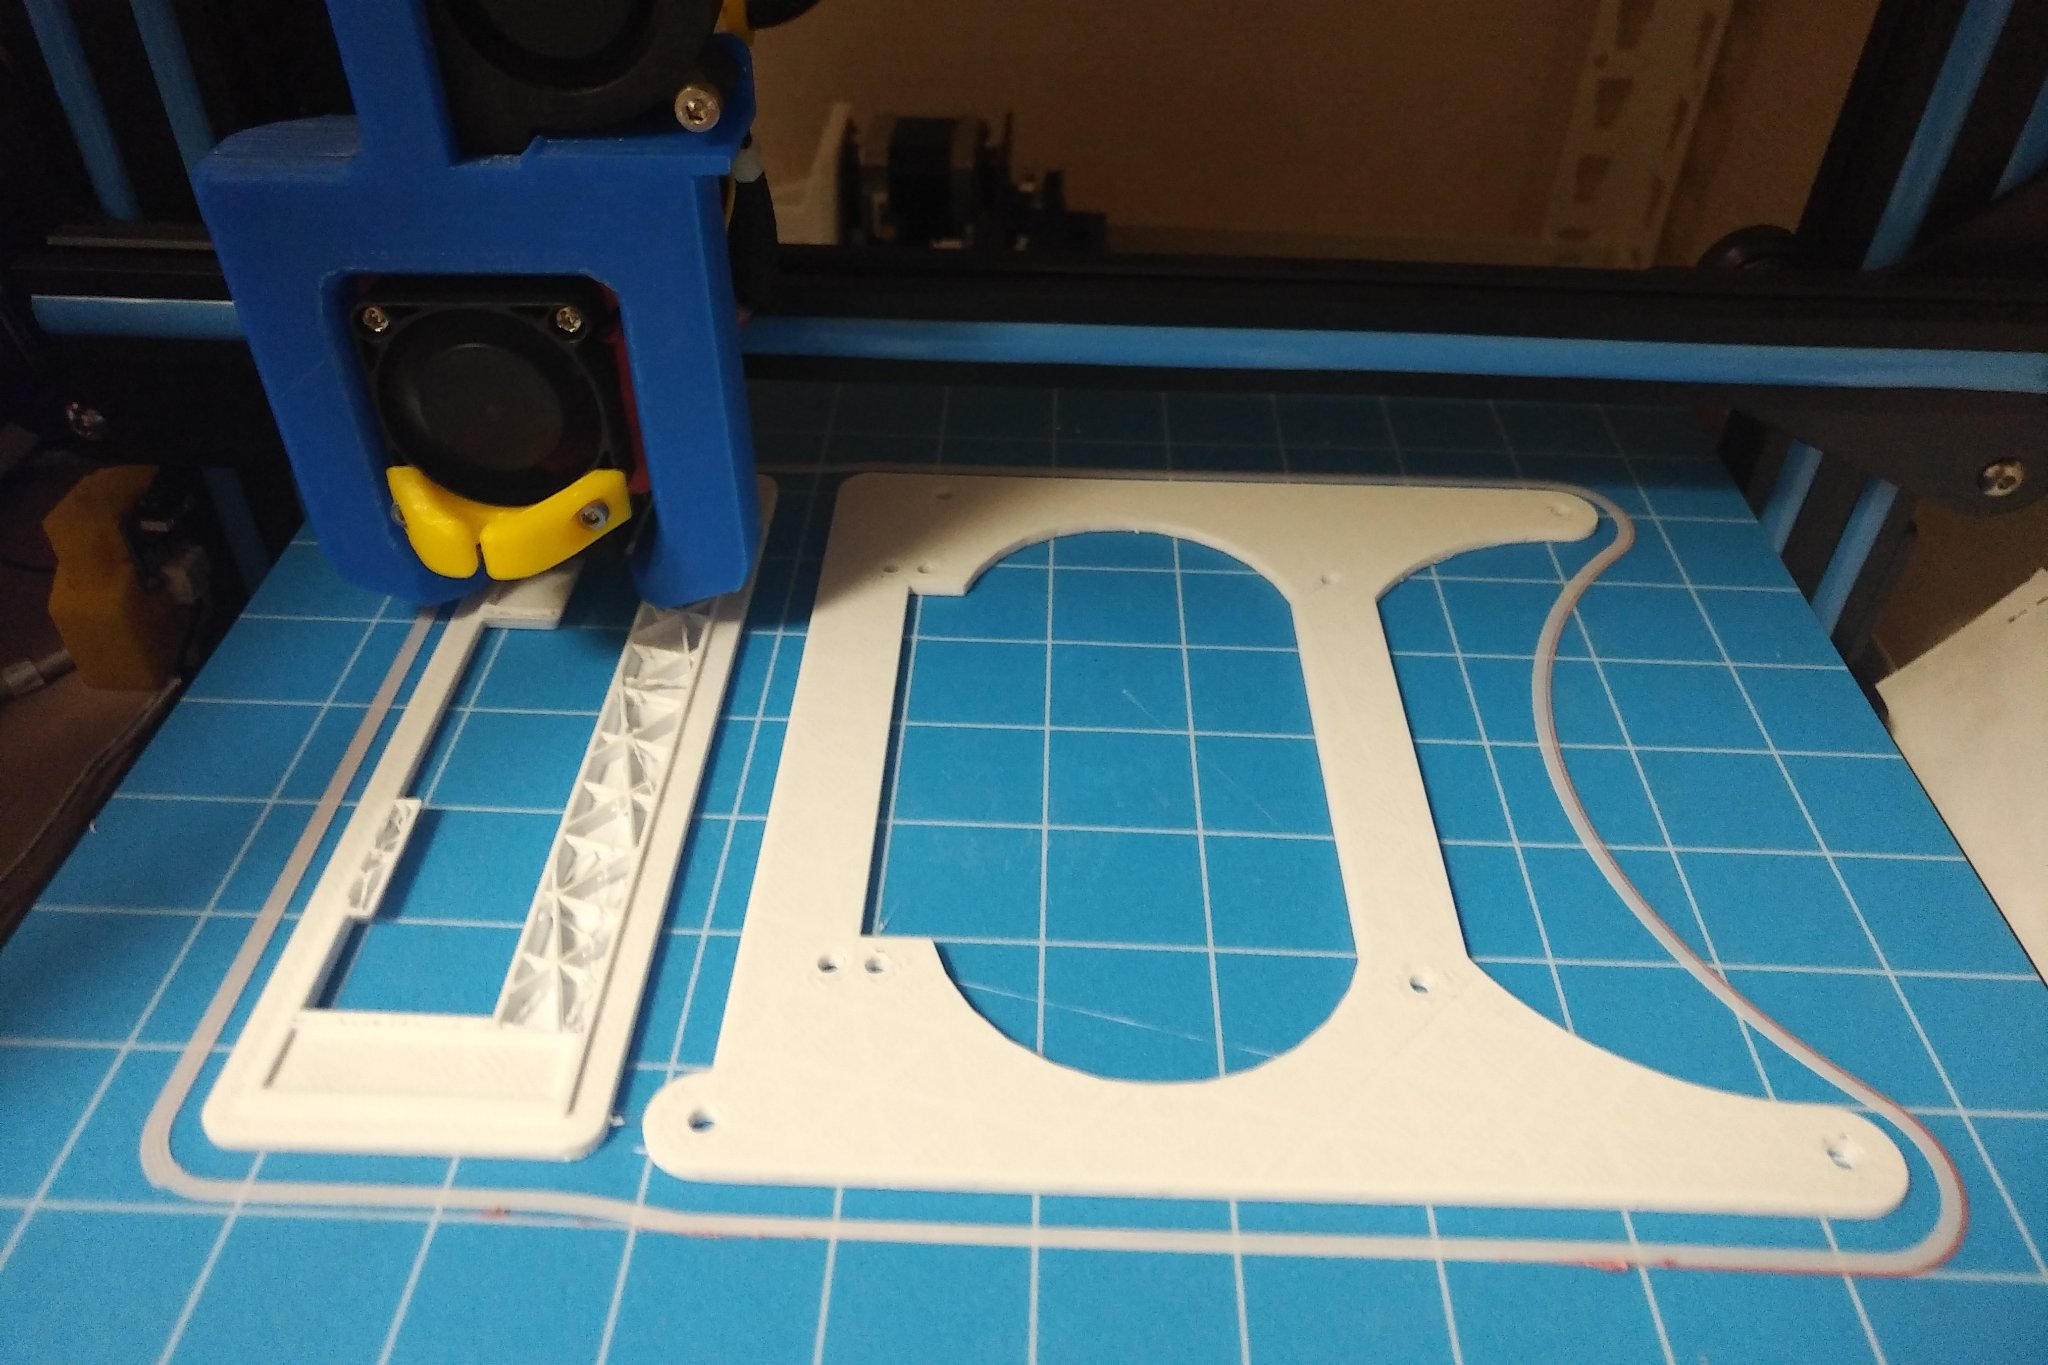
The panel has been attached to ODROD-H2 using the 10mm height PCB support. The height of 10mm is just enough in order to put ODROID-H2 on the top surface; otherwise, the memory socket will interfere with the mount. Since the height of the printed mounting panel is 3mm, ODROID-H2 is mounted at 13mm higher than other ATX boards and this causes an issue with the back panel.
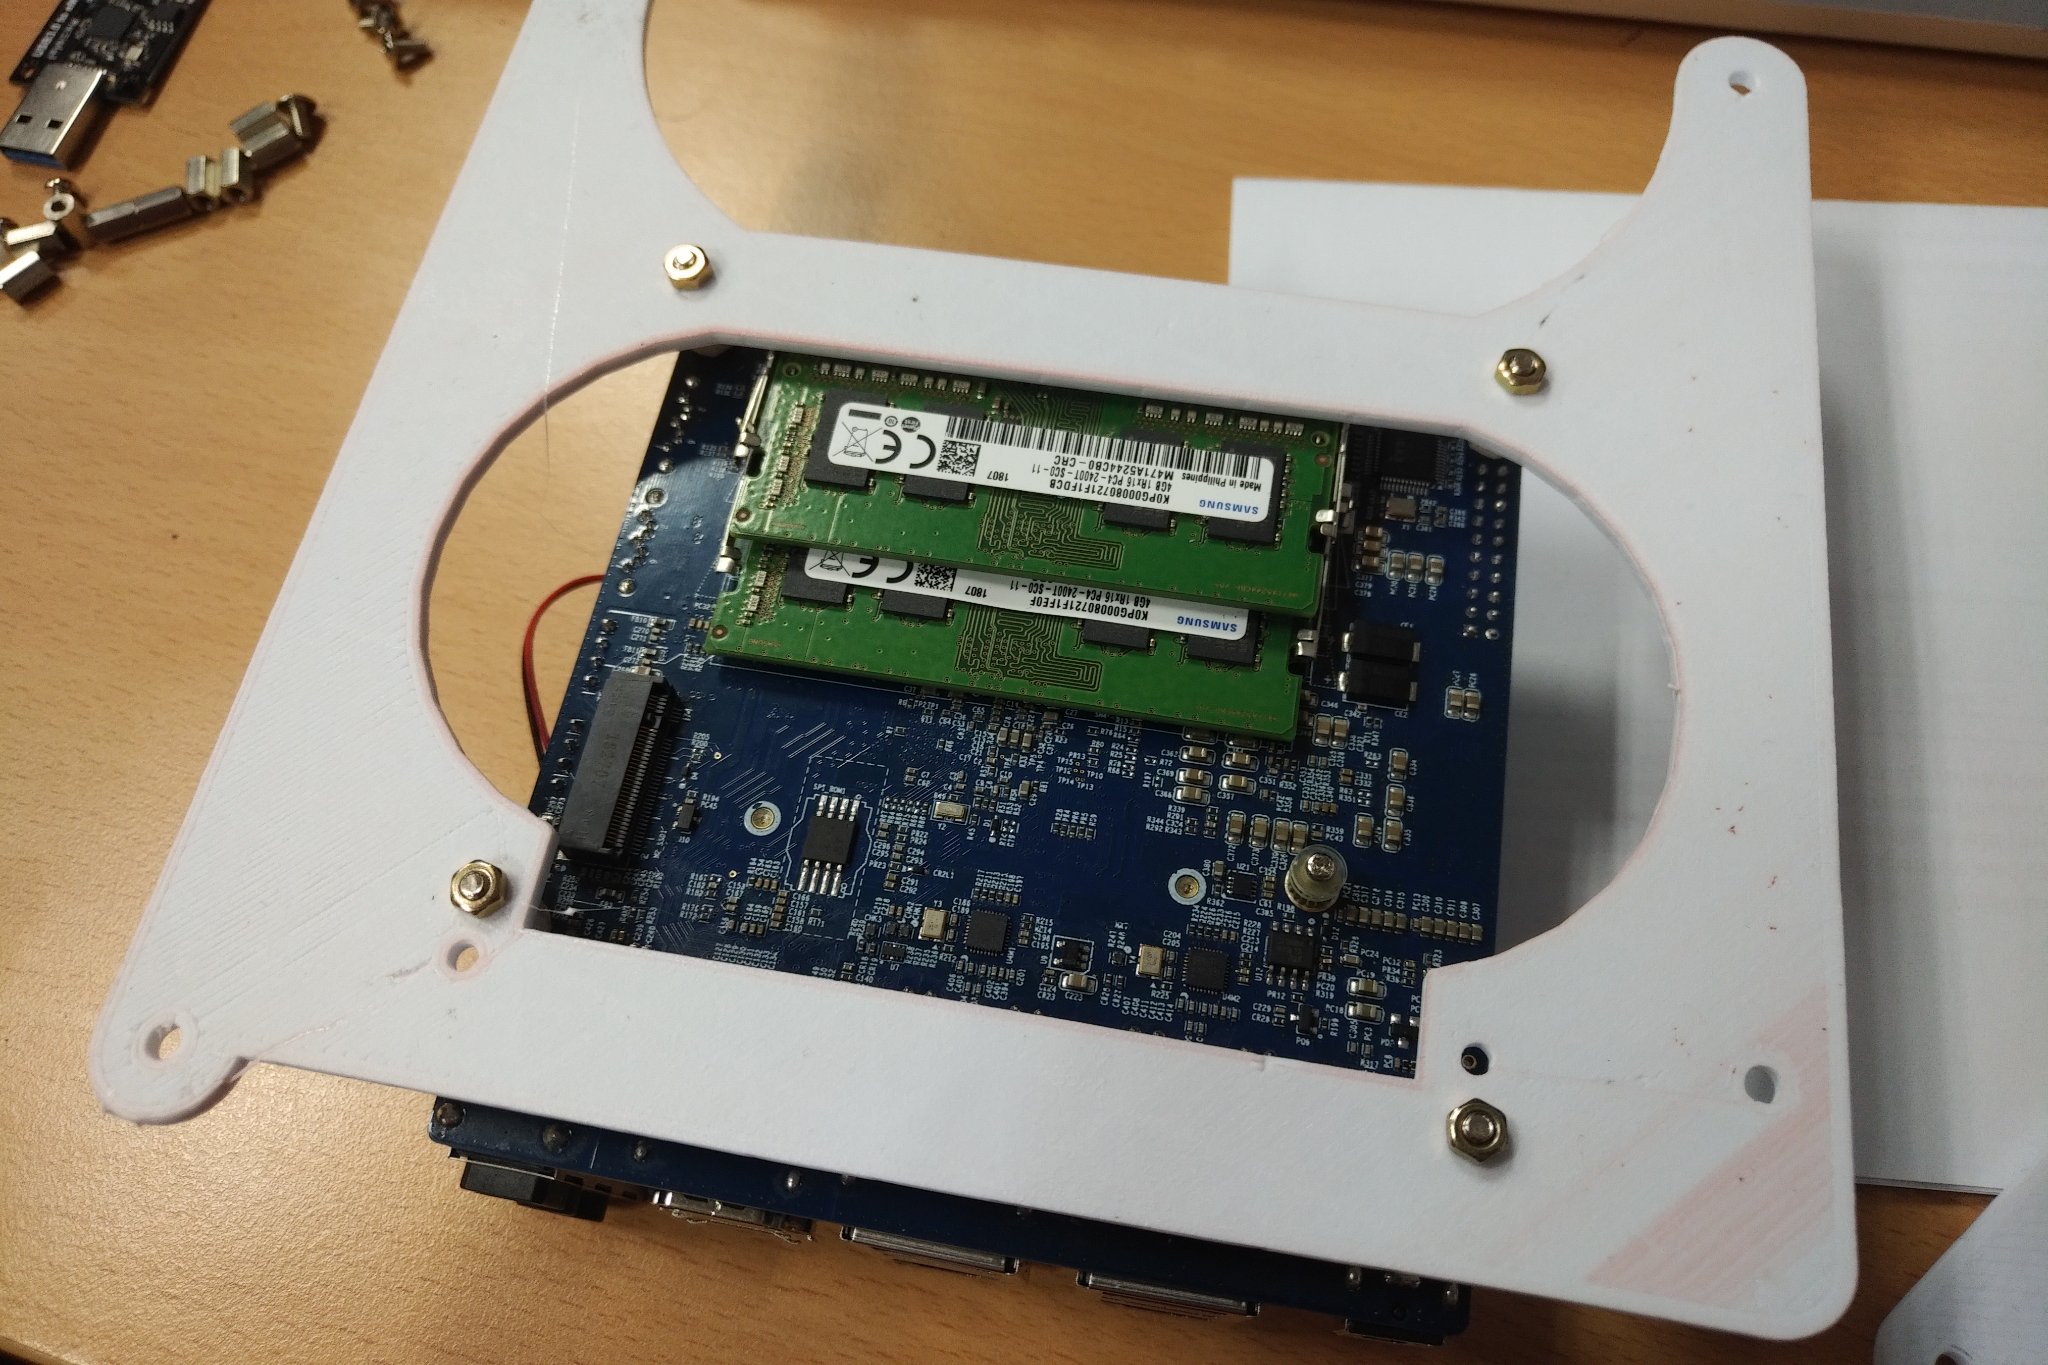
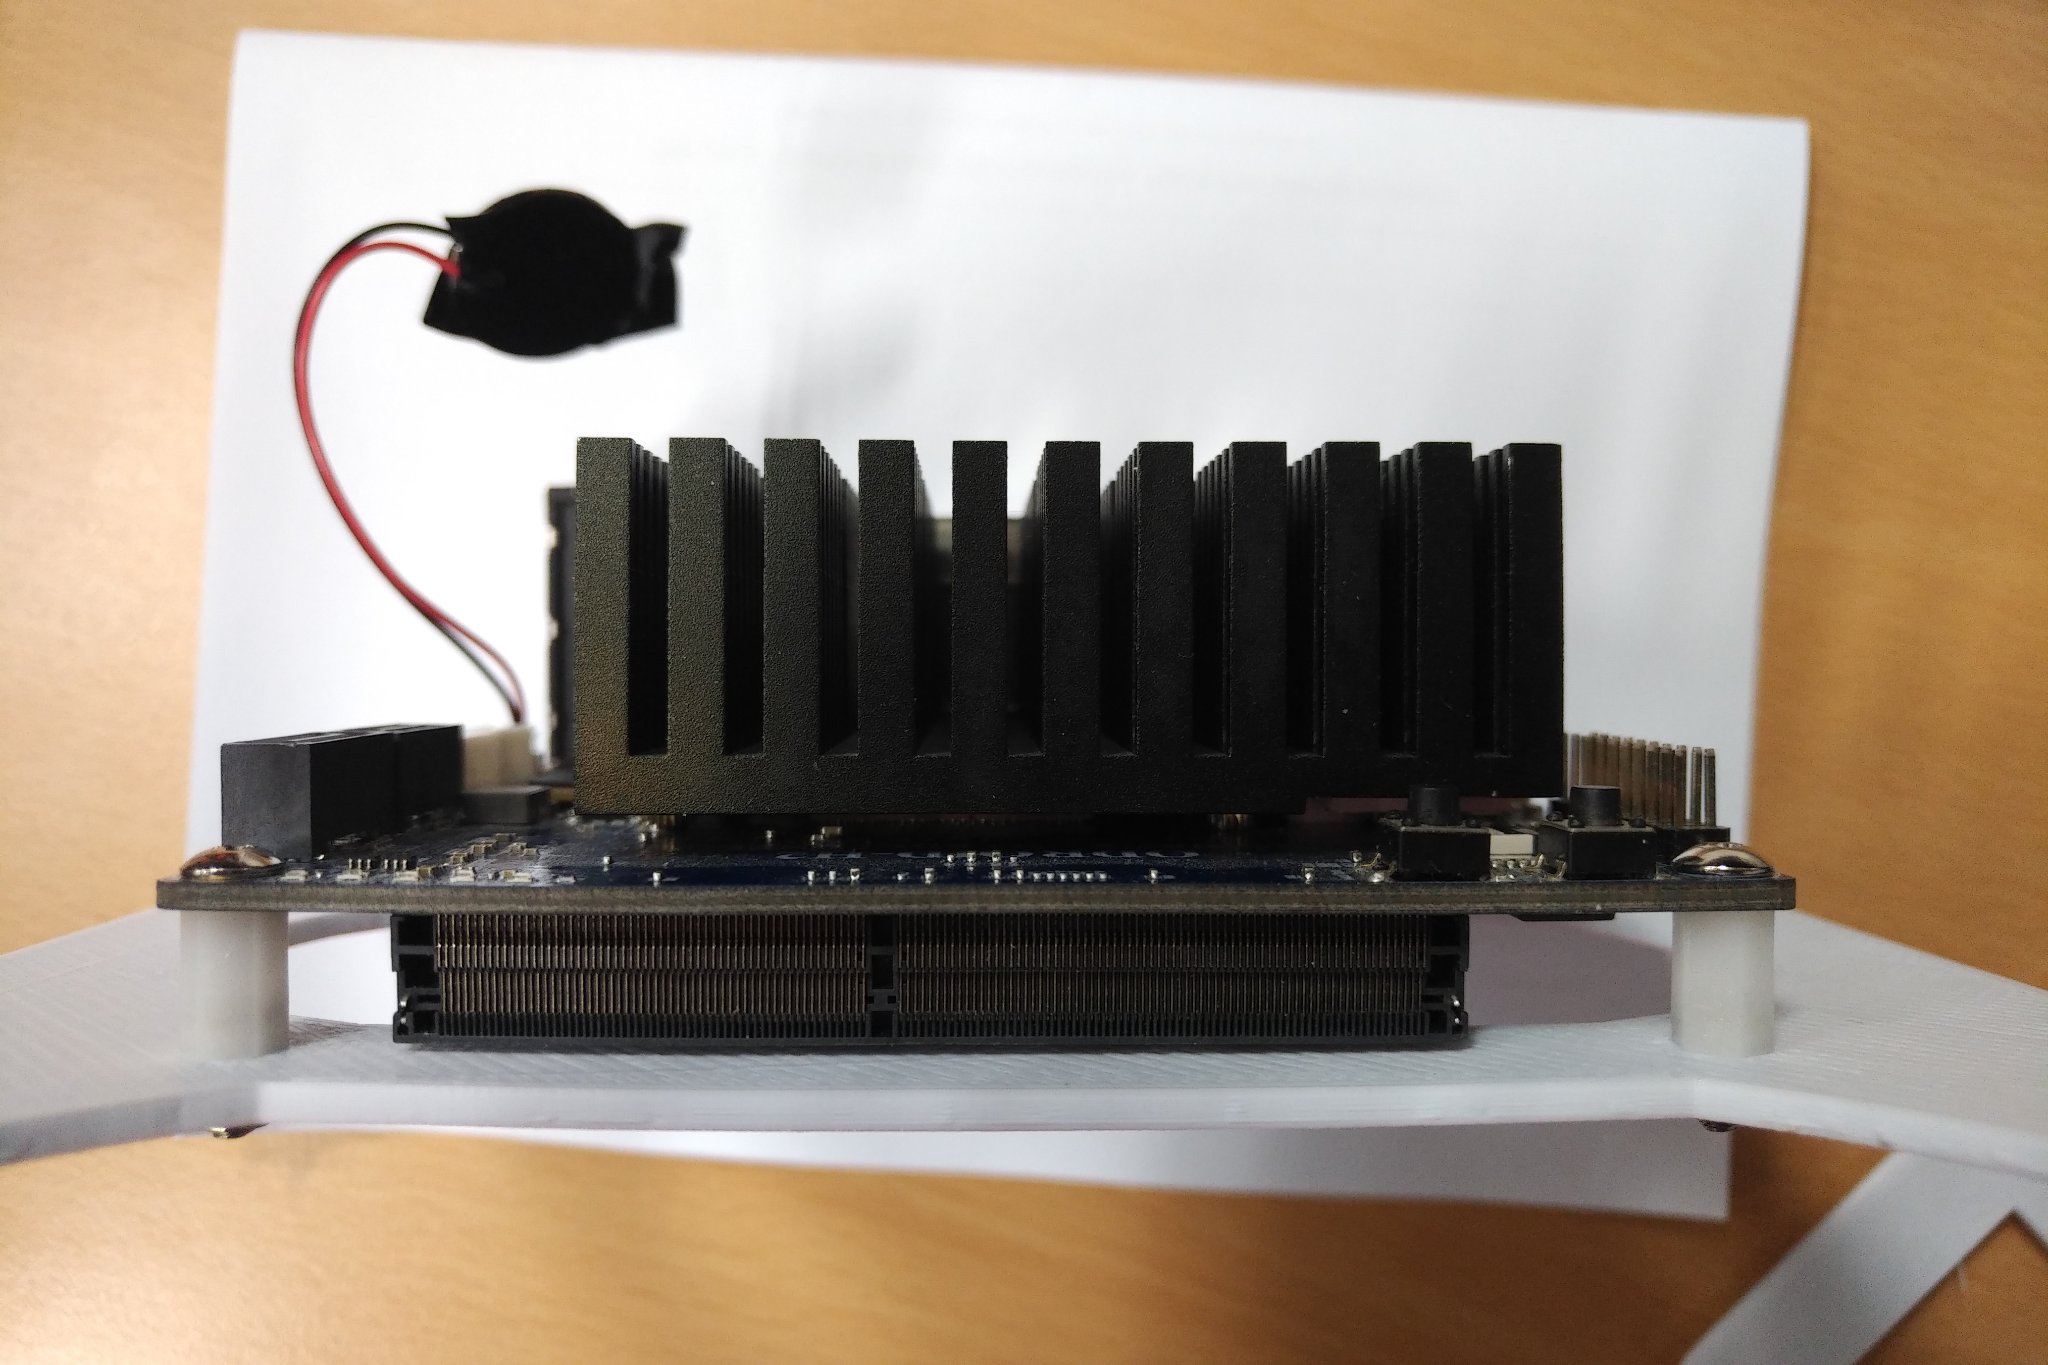
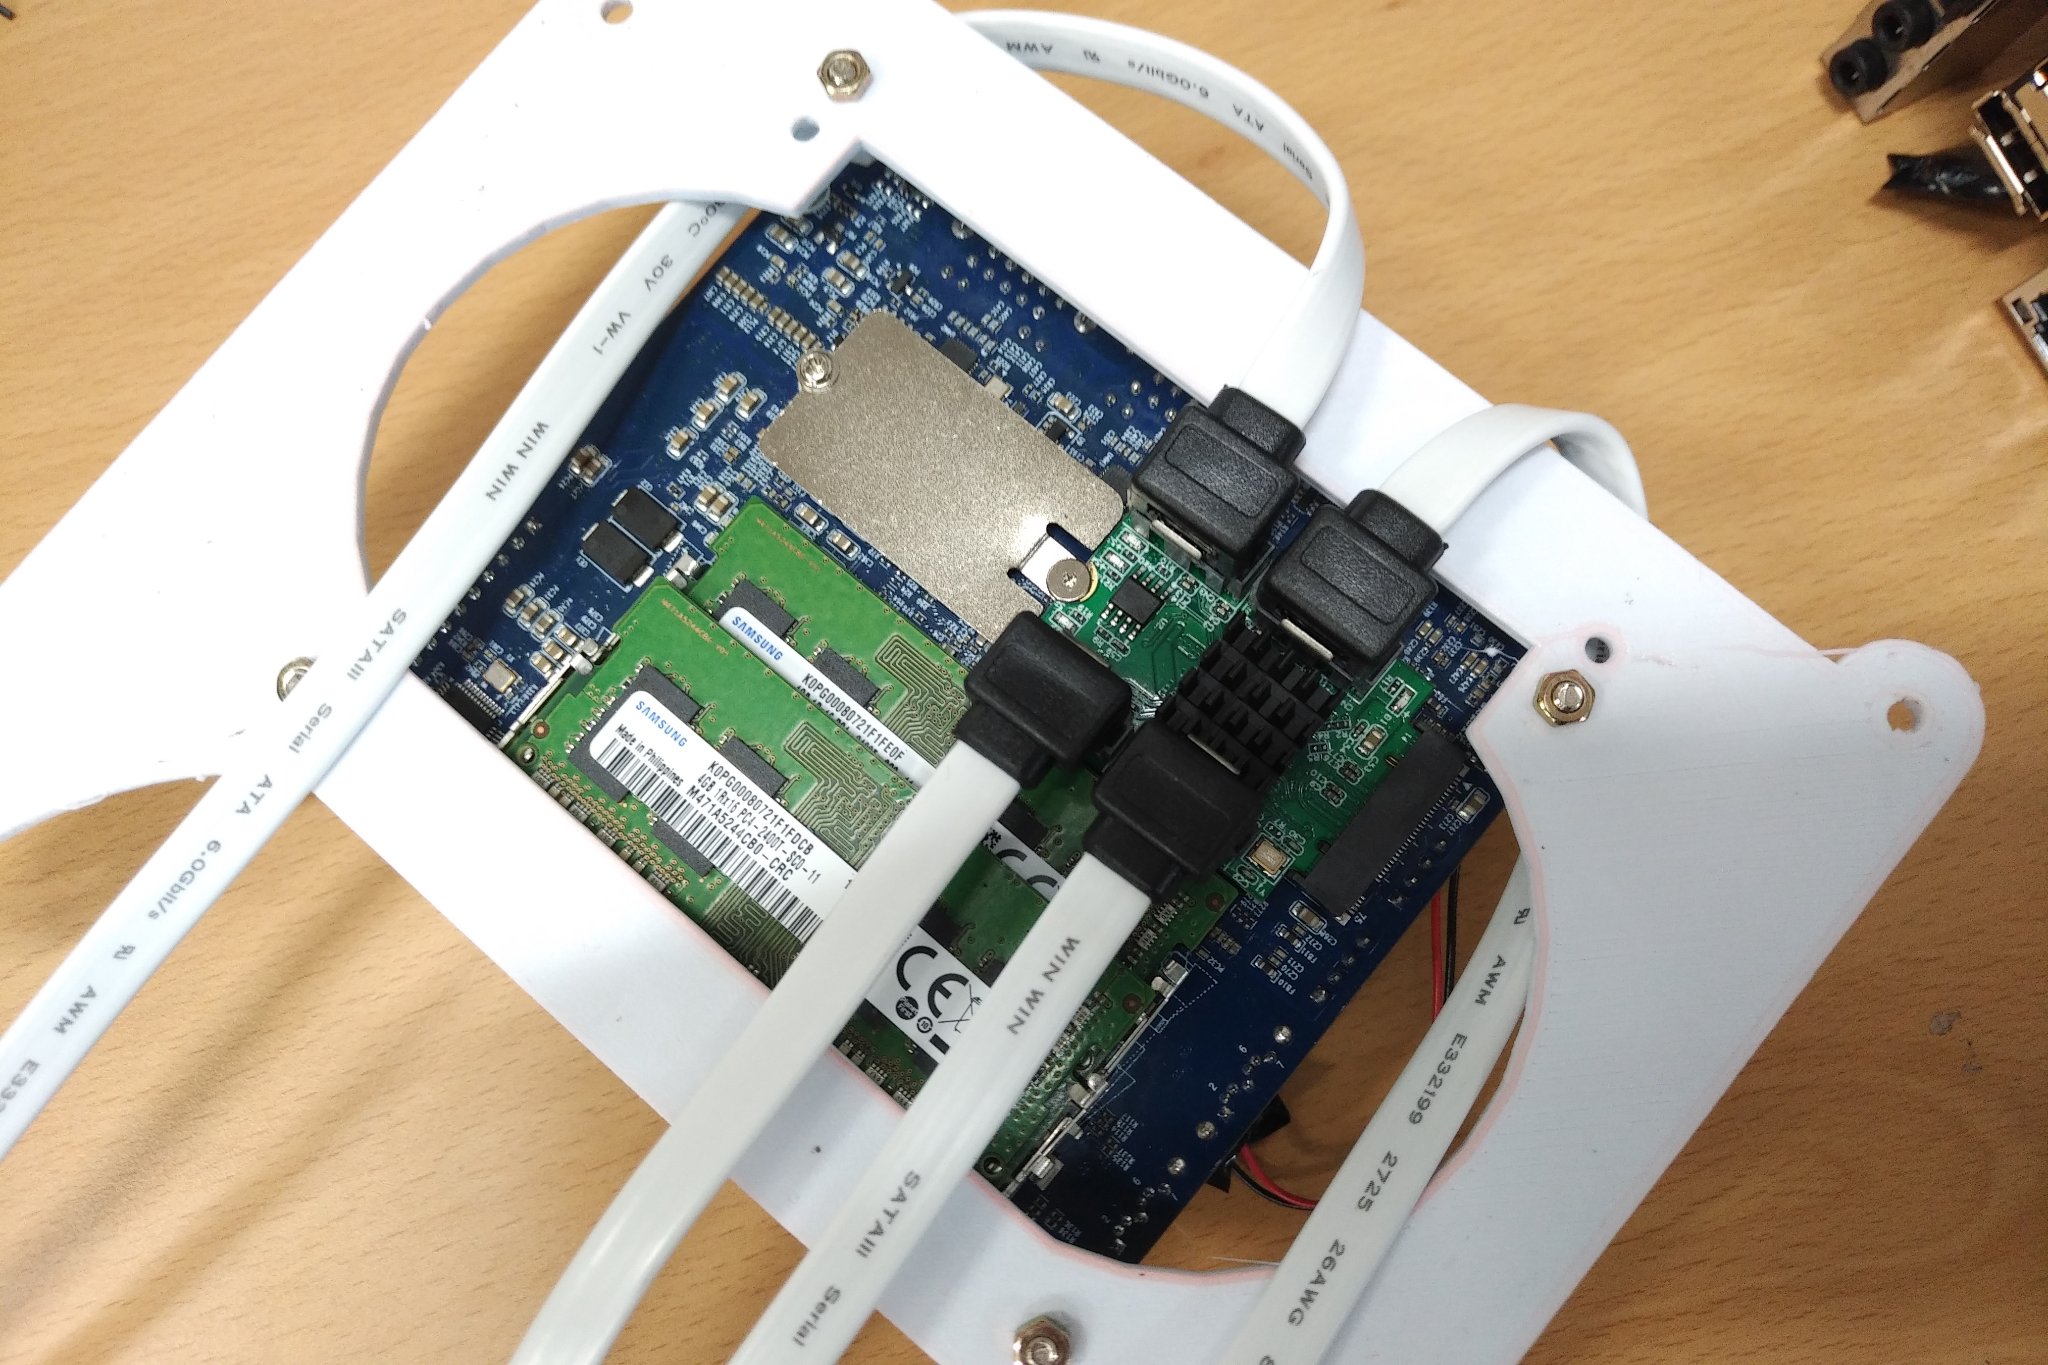
As we have planned to run 6 drives with ODROID-H2, the SATA expansion card supports 4 additional SATA connectors for the M.2 slot which are apart from the 2 SATA slots from ODROID-H2. Attaching the SATA cables to the adaptor requires more space underneath the ODROID-H2, the right-angle type cable helps to save this space. However, using the cable still requires approximately 25mm from the bottom surface of ODROID-H2. Since we already have 13mm from the mounting panel, we had to gain the remaining 12mm from the case. Fortunately, the height of PCB mount holes is 12mm, which matches our requirements and the ODROID-H2 can be safely placed in the case.
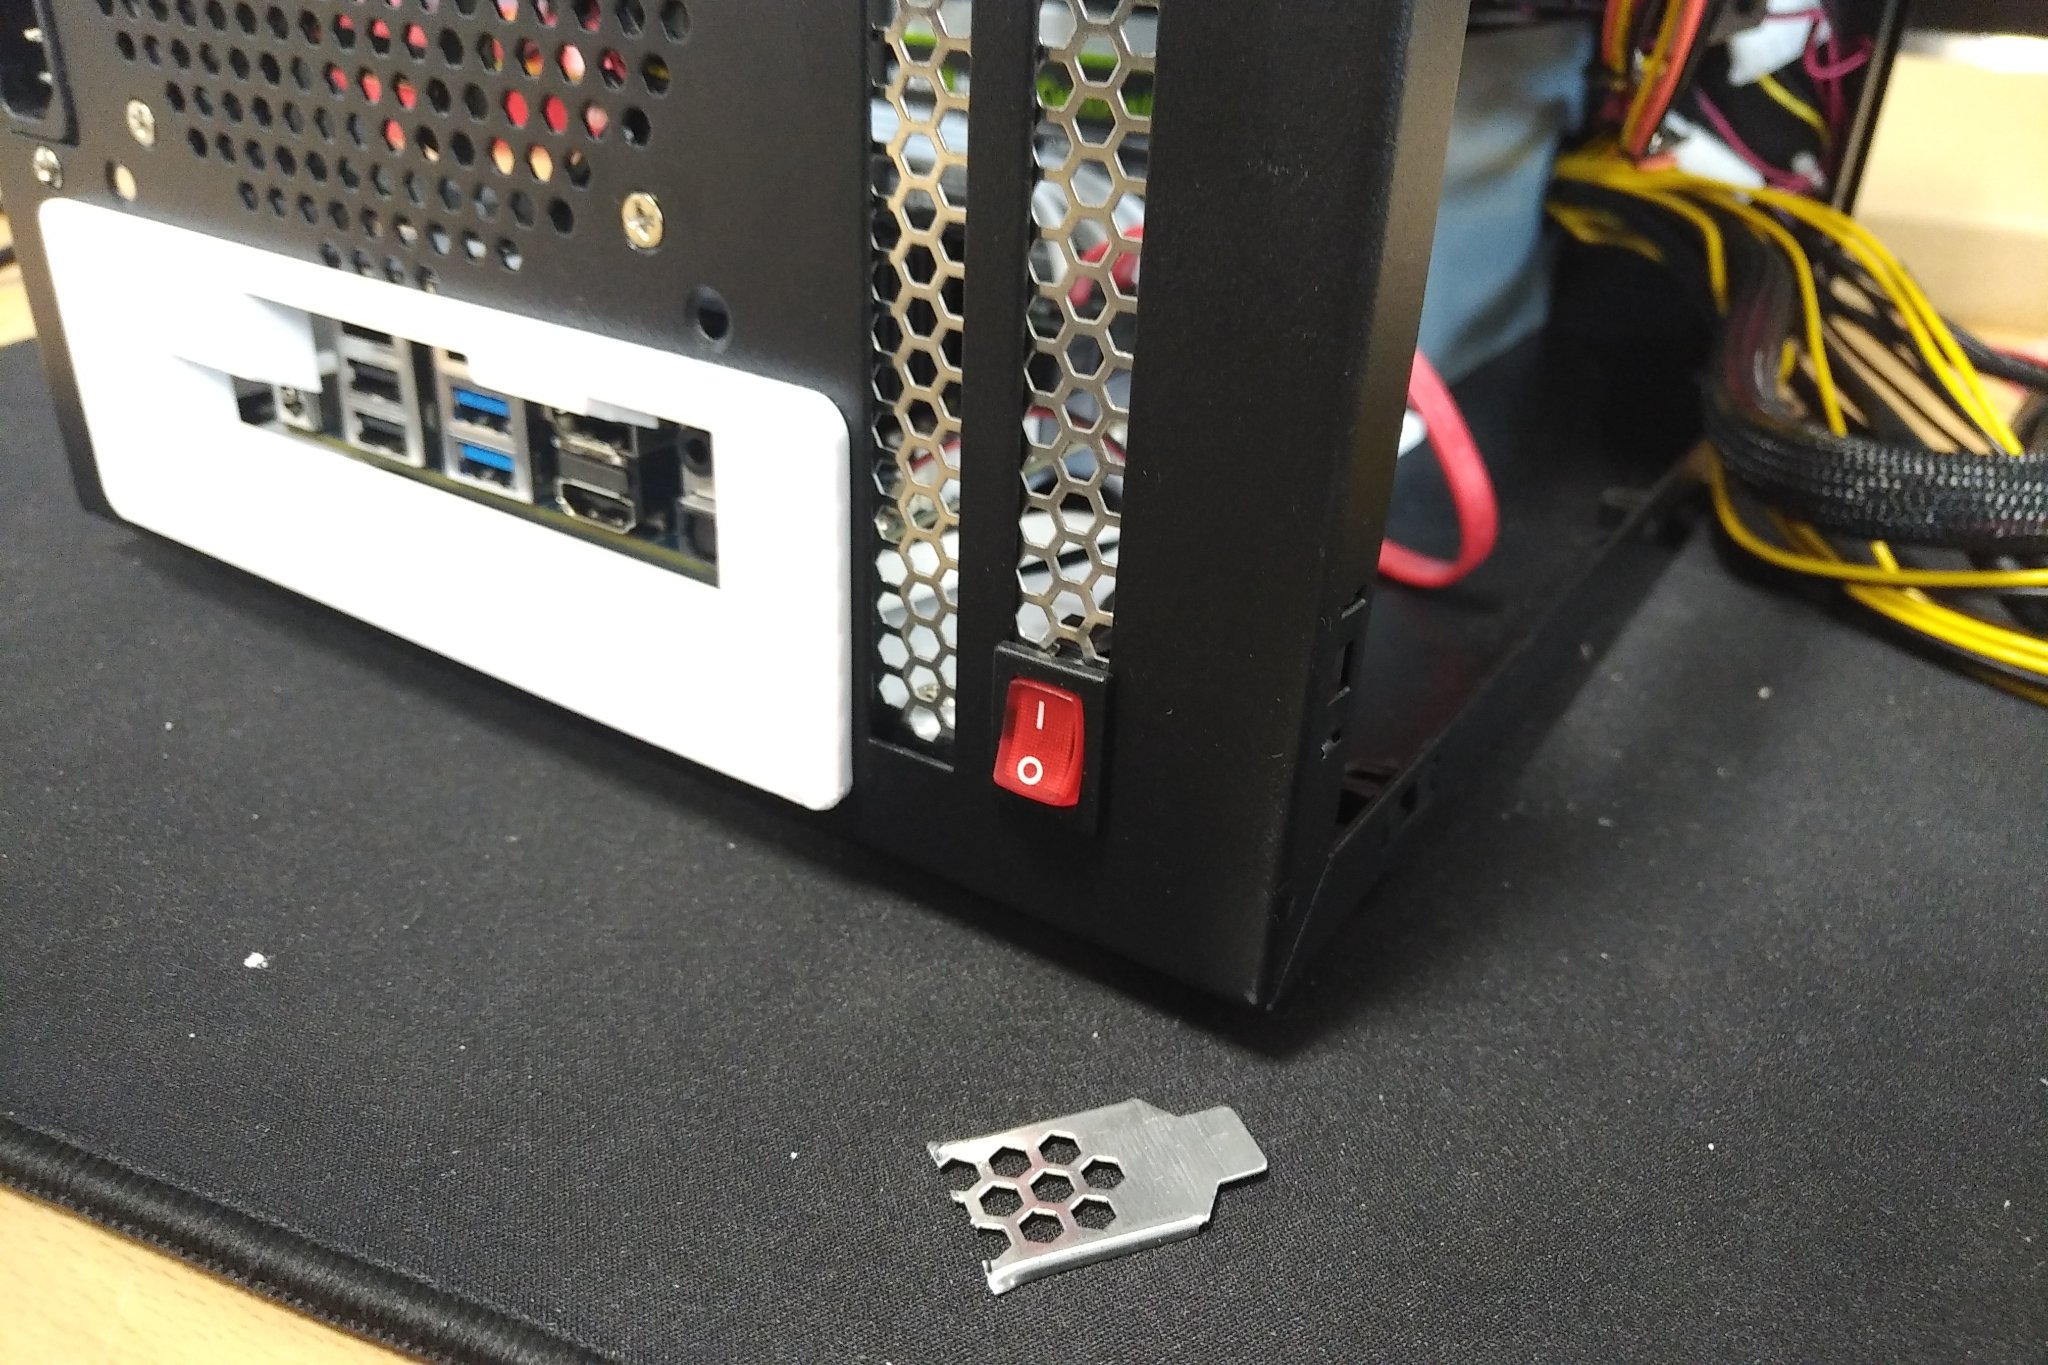
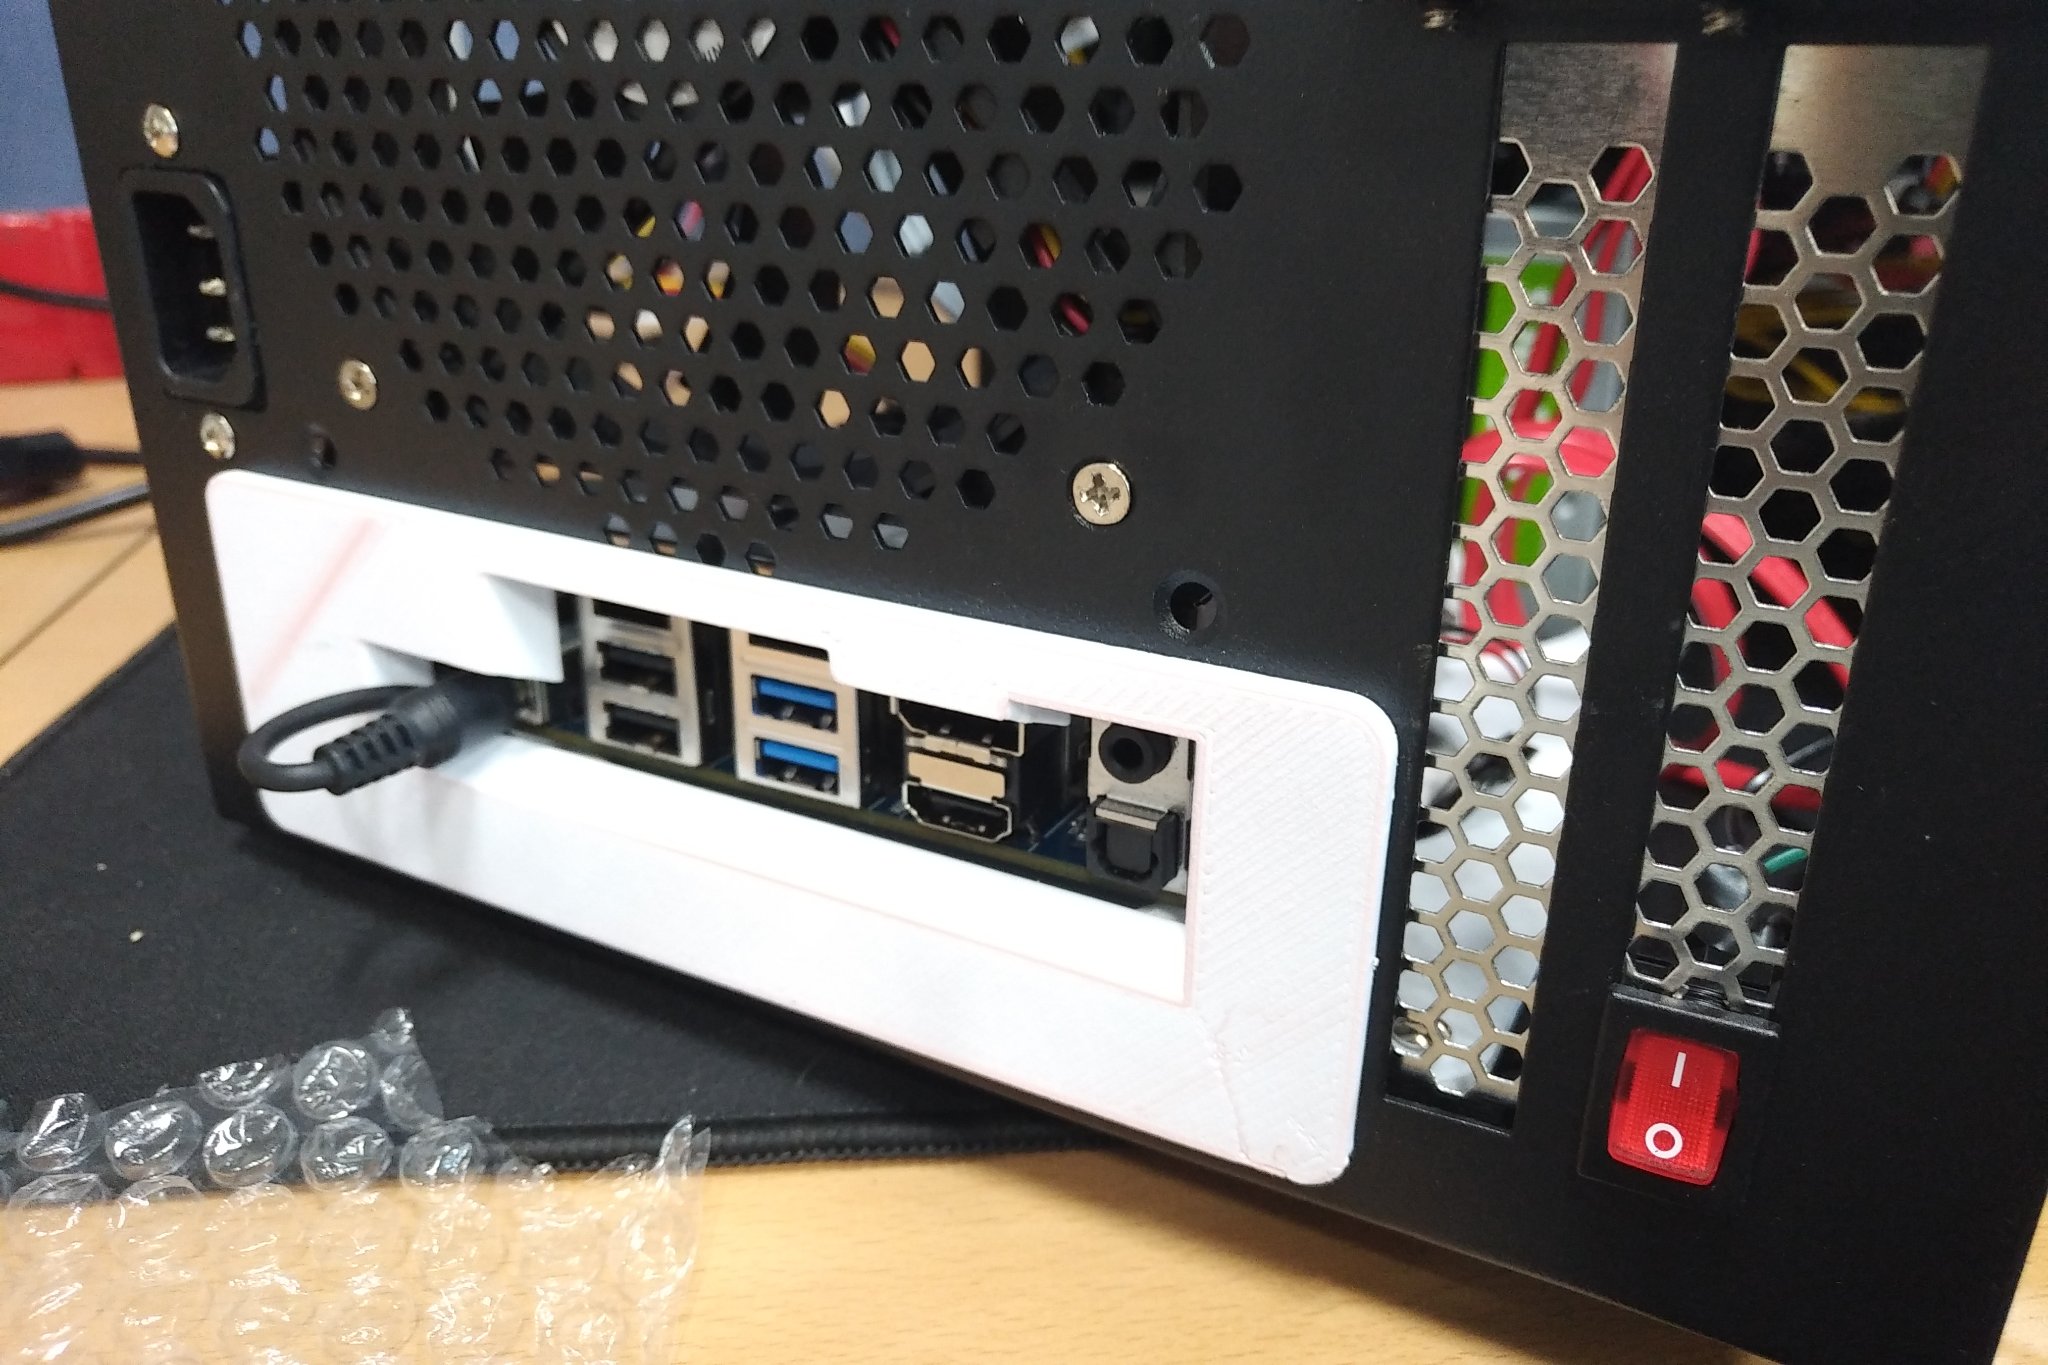
Next, I had to address the problem with the back panel. Everything is higher than a regular PC board, since we mounted the ODROID-H2 using the standard ATX mount holes and made space for SATA cables on the underside. This means NAS users will have to give up using an audio connector. The Ethernet connectors, on the other hand, might be an issue. After attaching the back panel cover printed with the mounting panel, it is not quite aligned to the connectors of ODROID-H2 but is acceptable for our use.
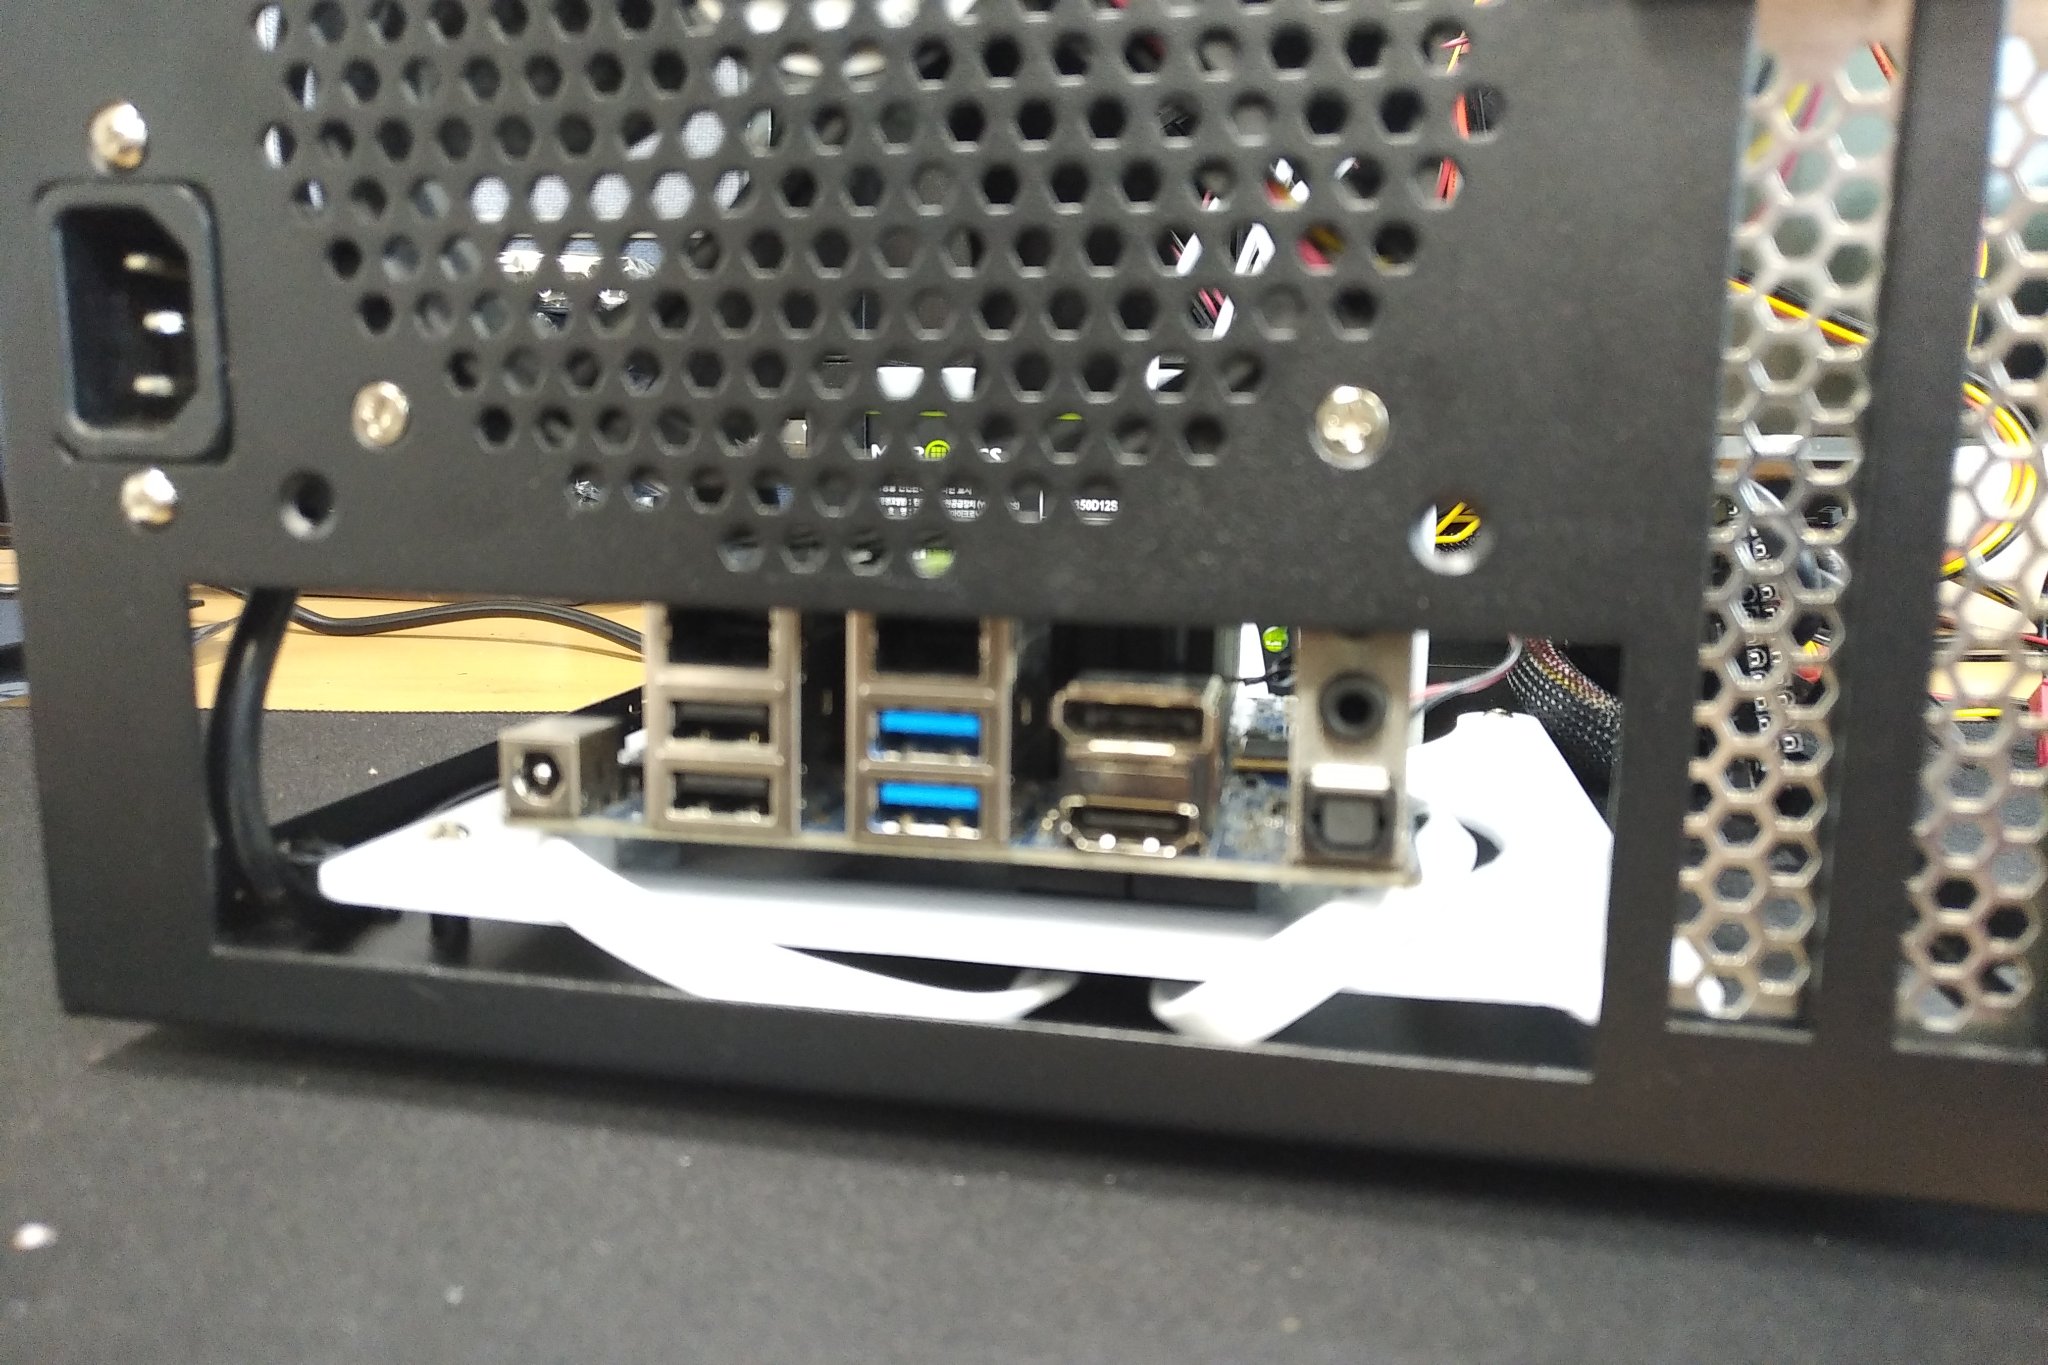
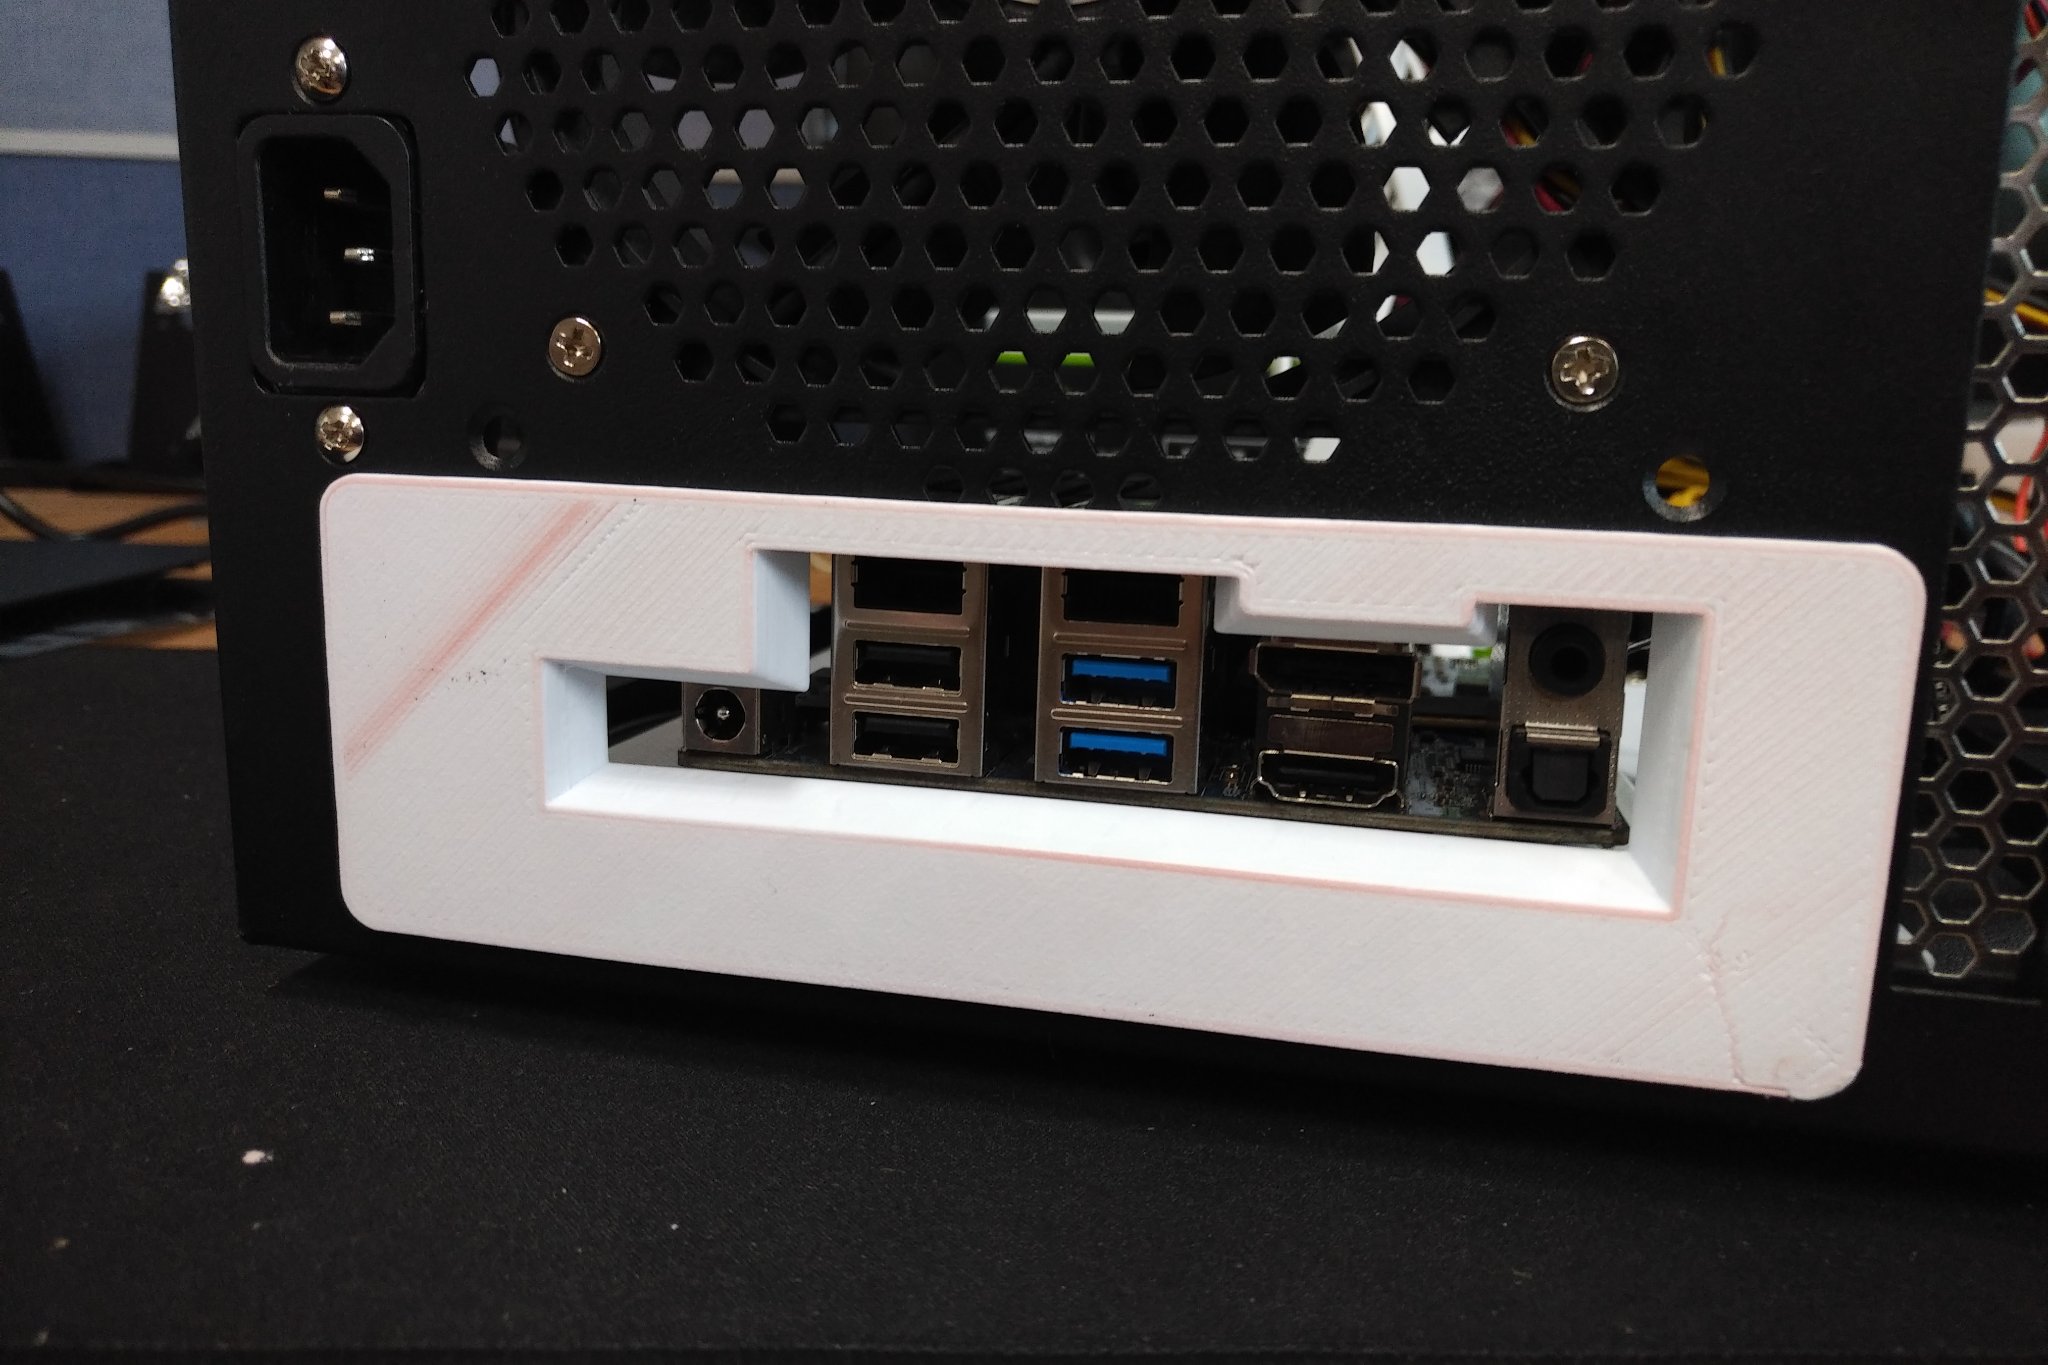
I have another picture of attaching the Ethernet cables to ODROID-H2 while it is mounted in the case. It just barely fits for plugging in the cable to ODROID-H2 without any interference from the case. So I believe that attaching the Ethernet cable to ODROID-H2 is not a big problem at all, however, it is not not detachable once it has been attached.
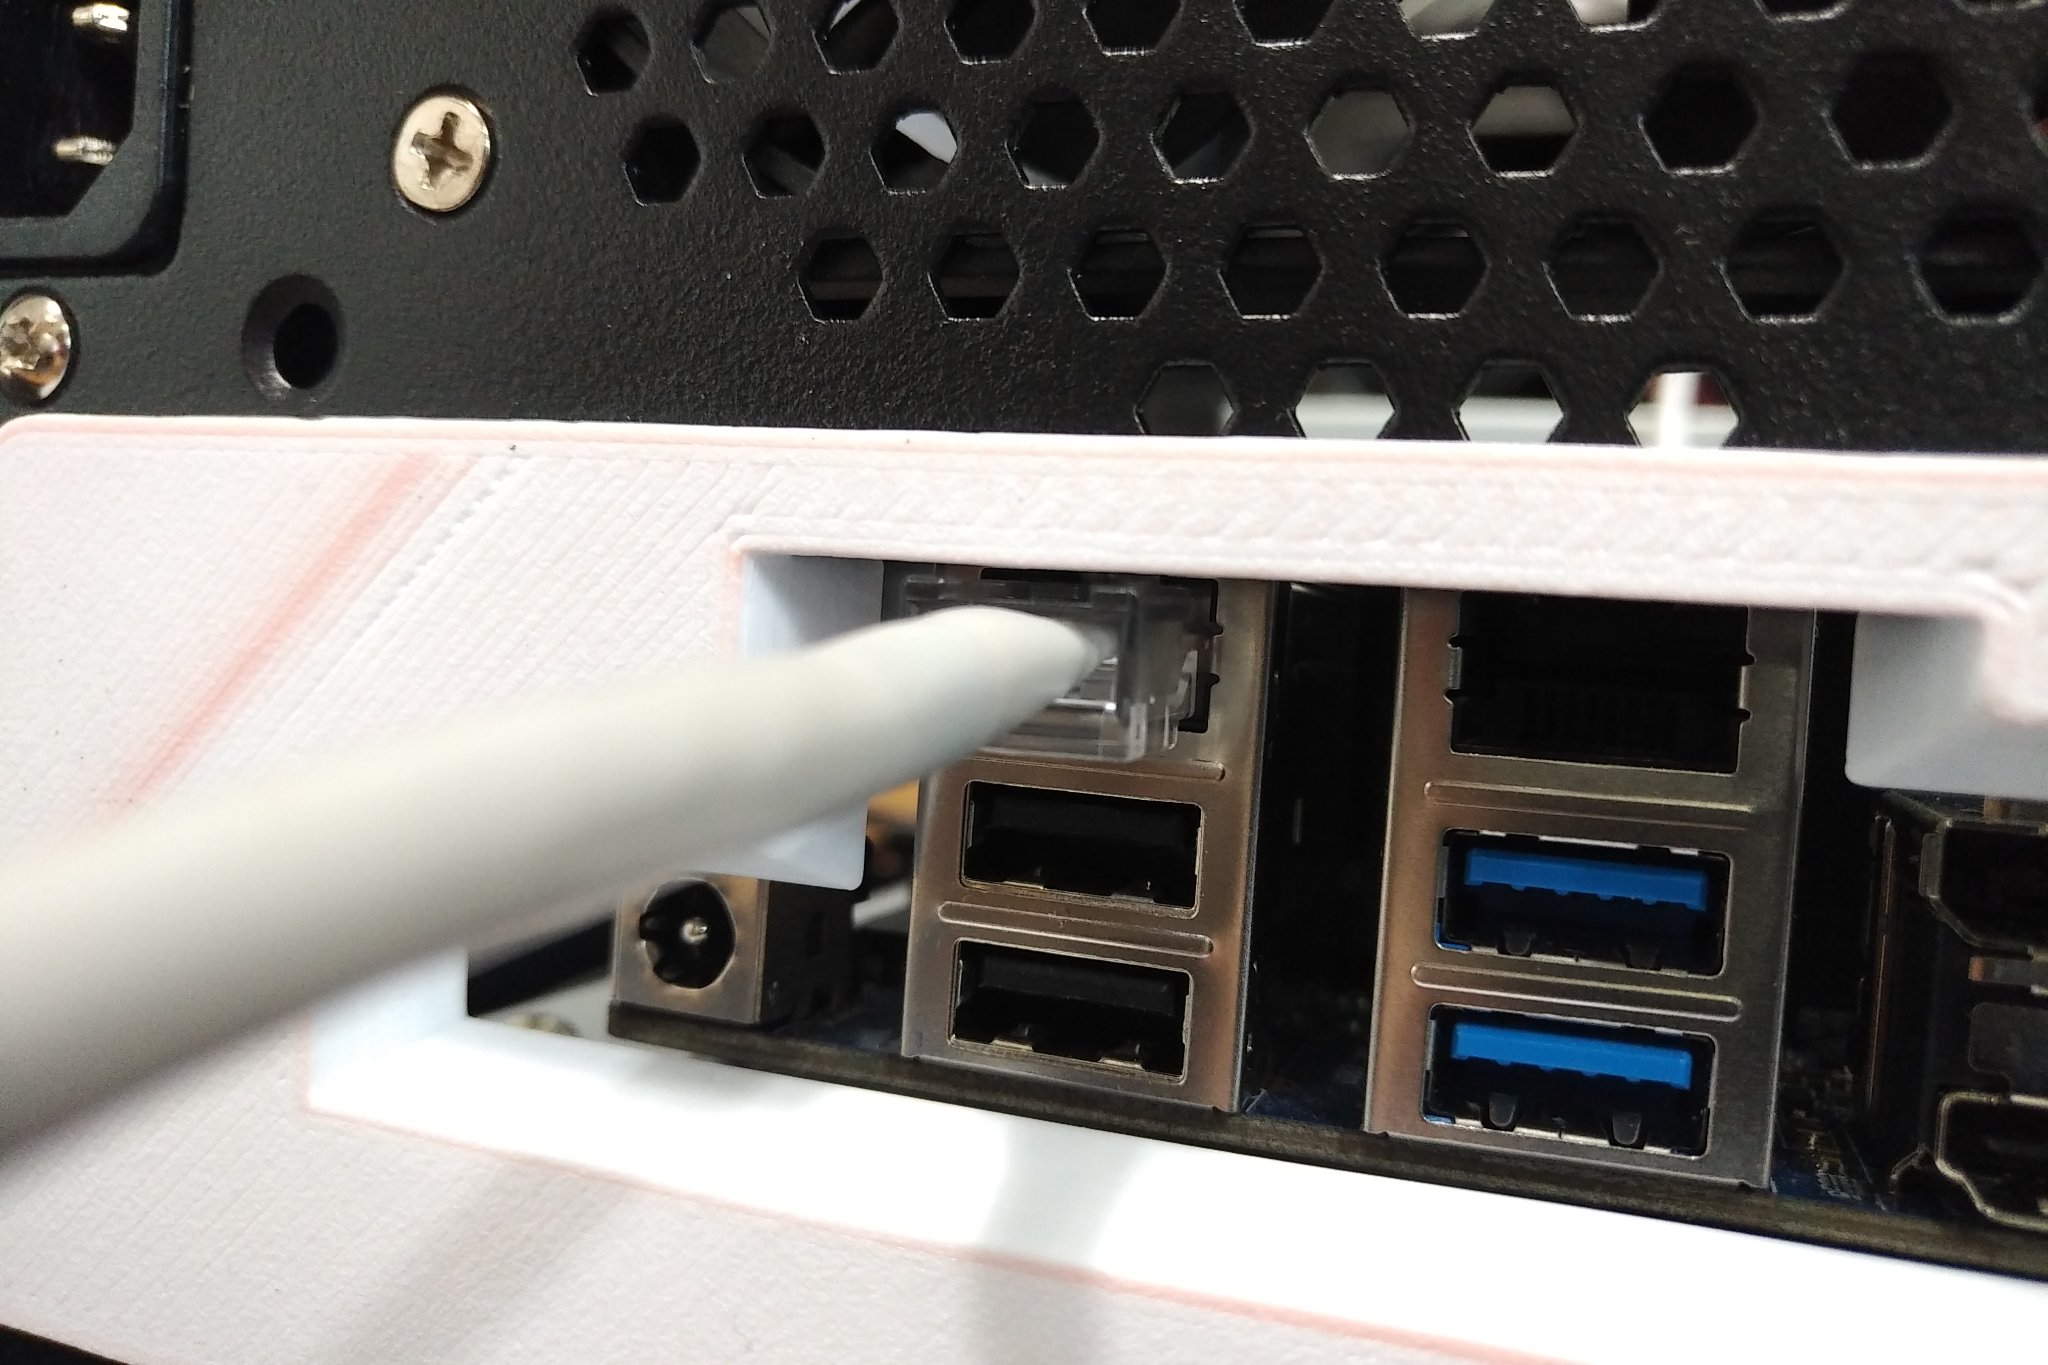
We are planning to keep moving forward even though we have discovered the problems of the back panel and the tight Ethernet cable. Our NAS will run 24/7, therefore, the network cable will be fixed or the cable connection can be mounted on the other side of the case.
Power supply
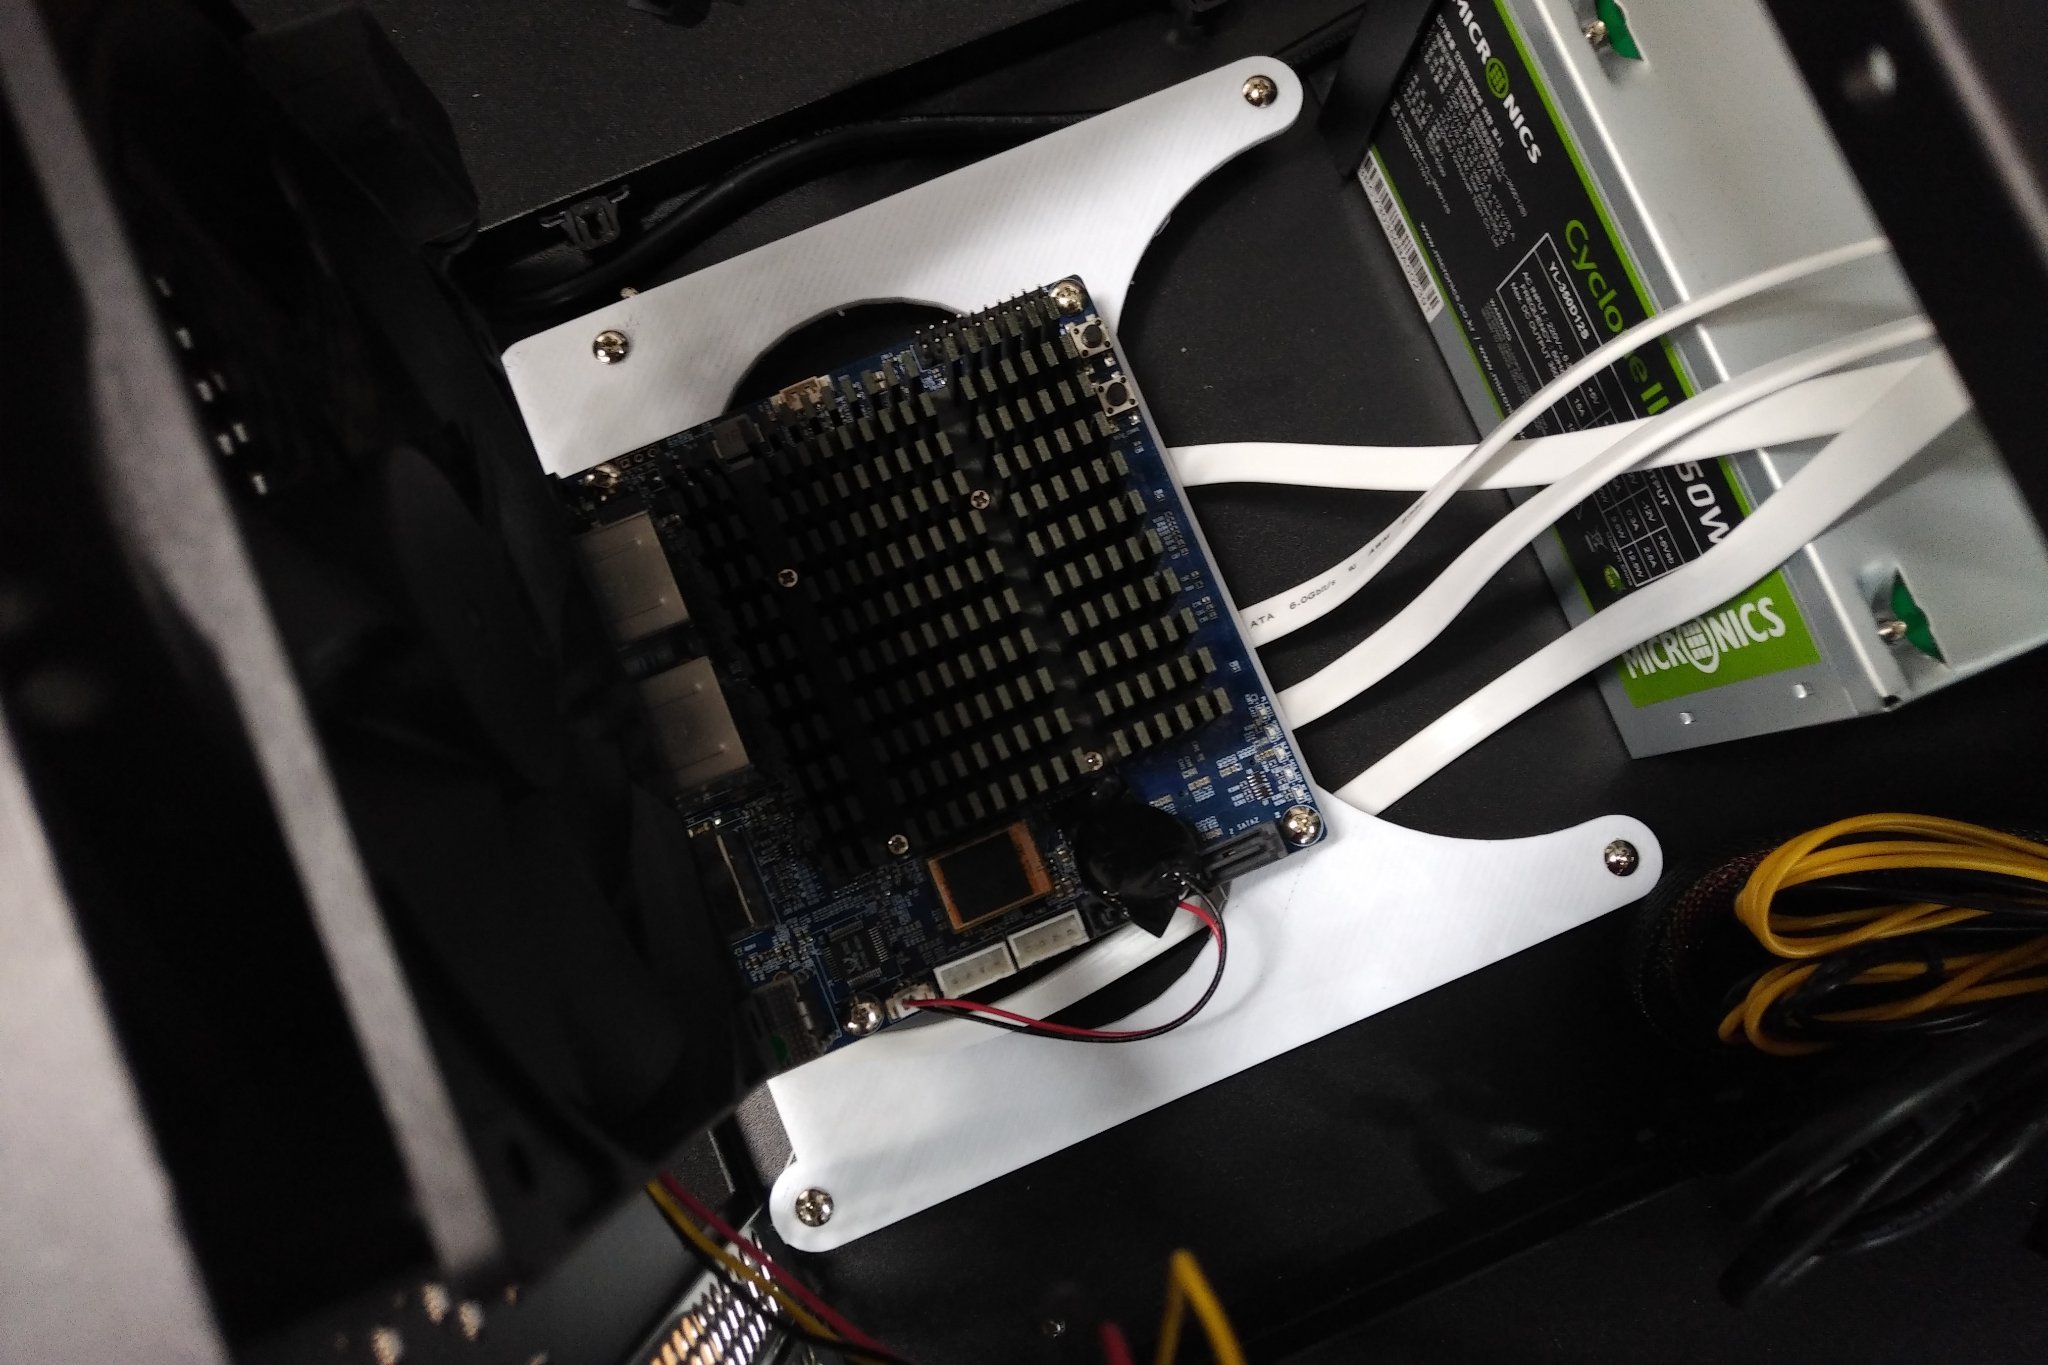
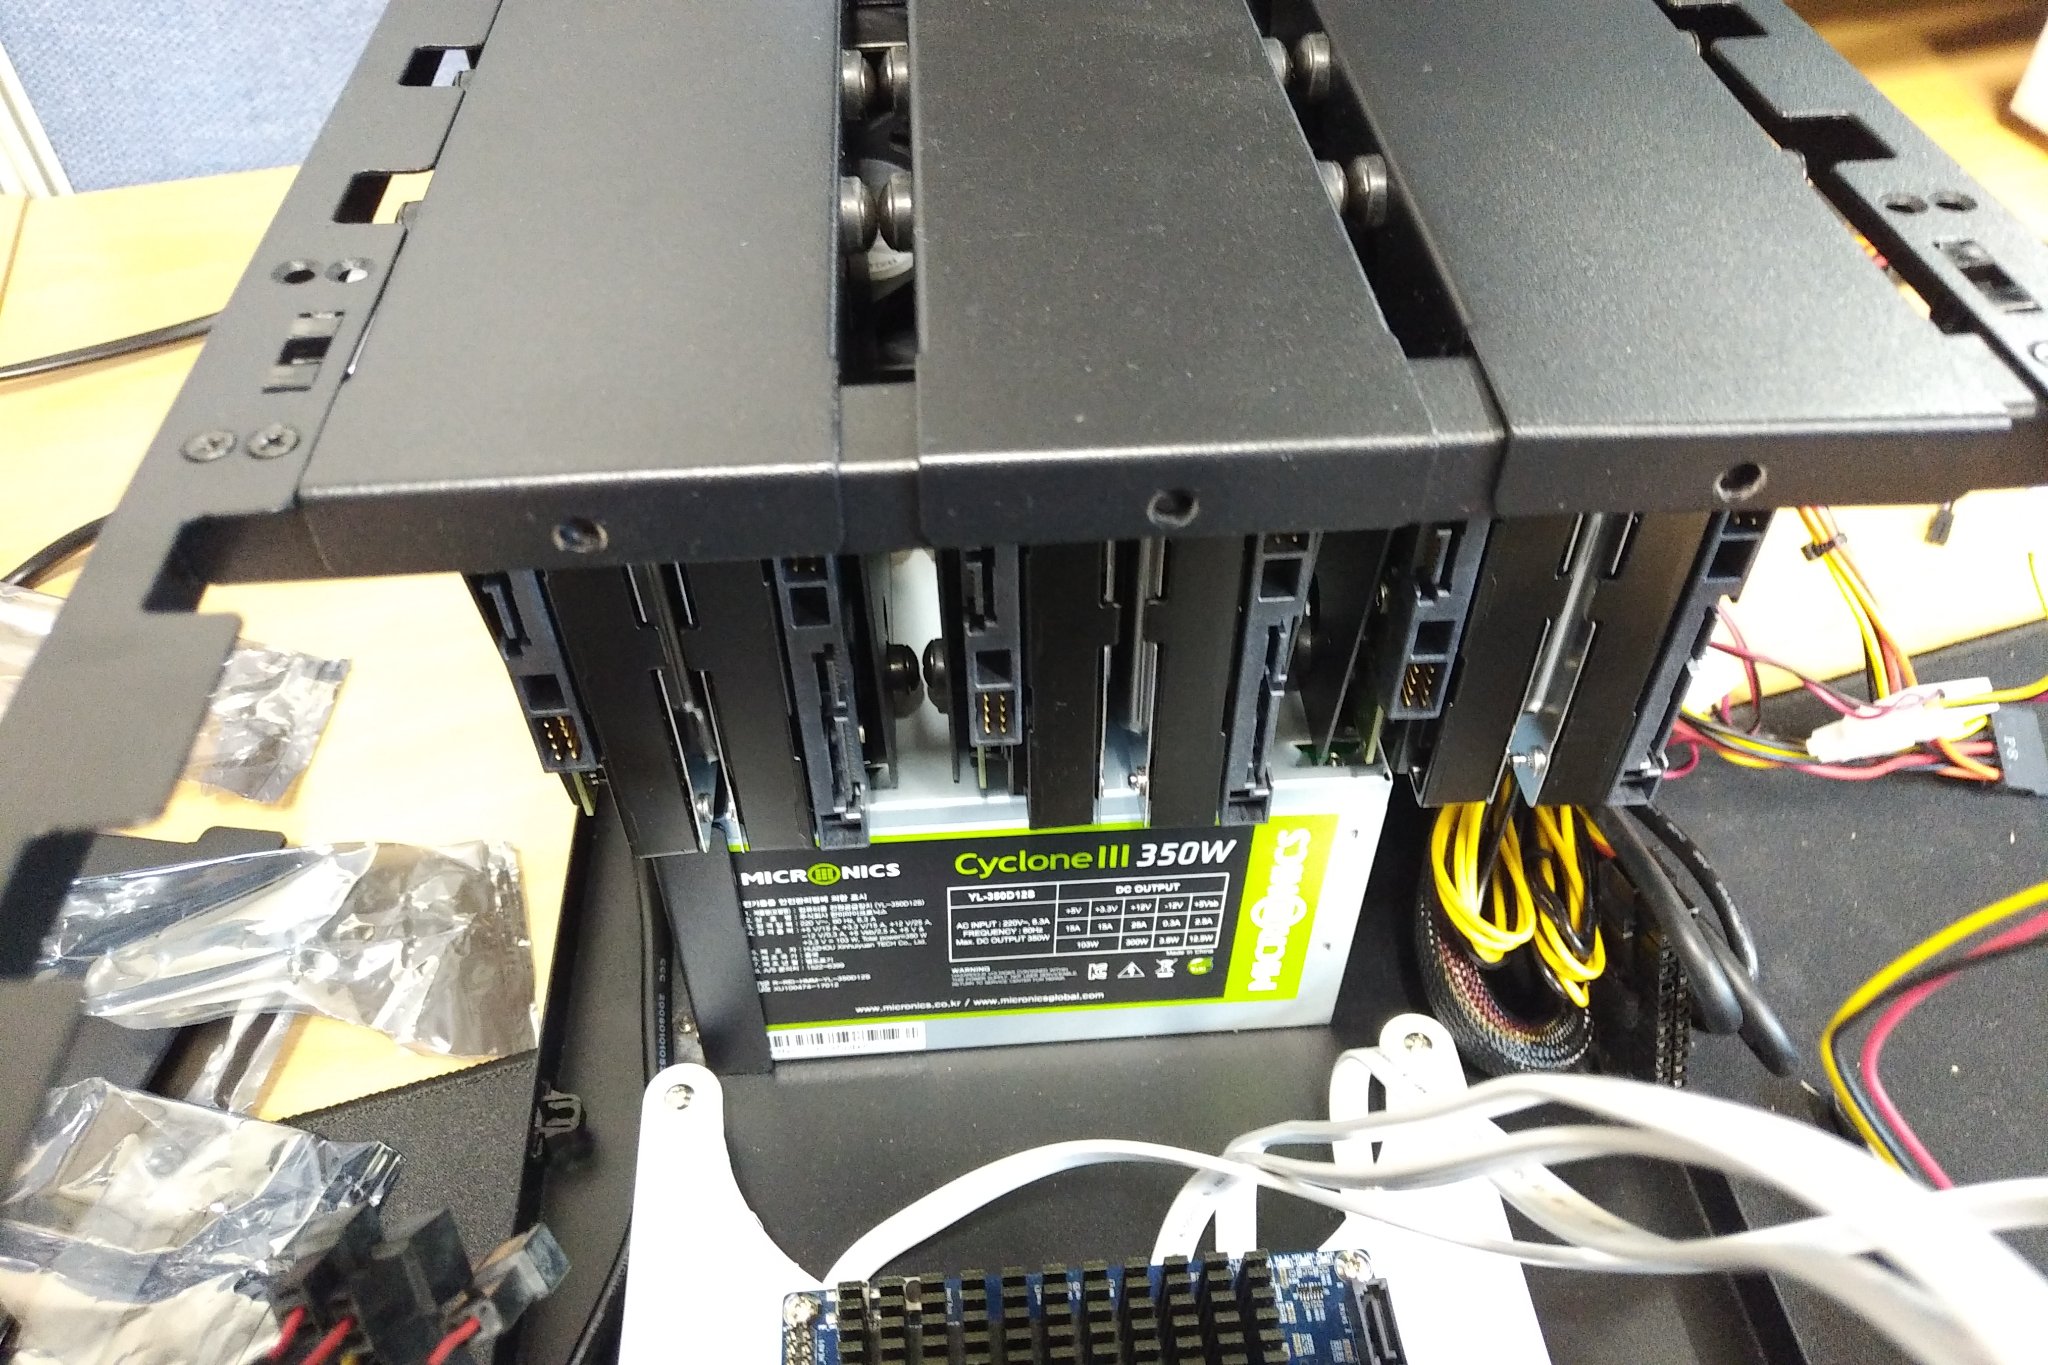
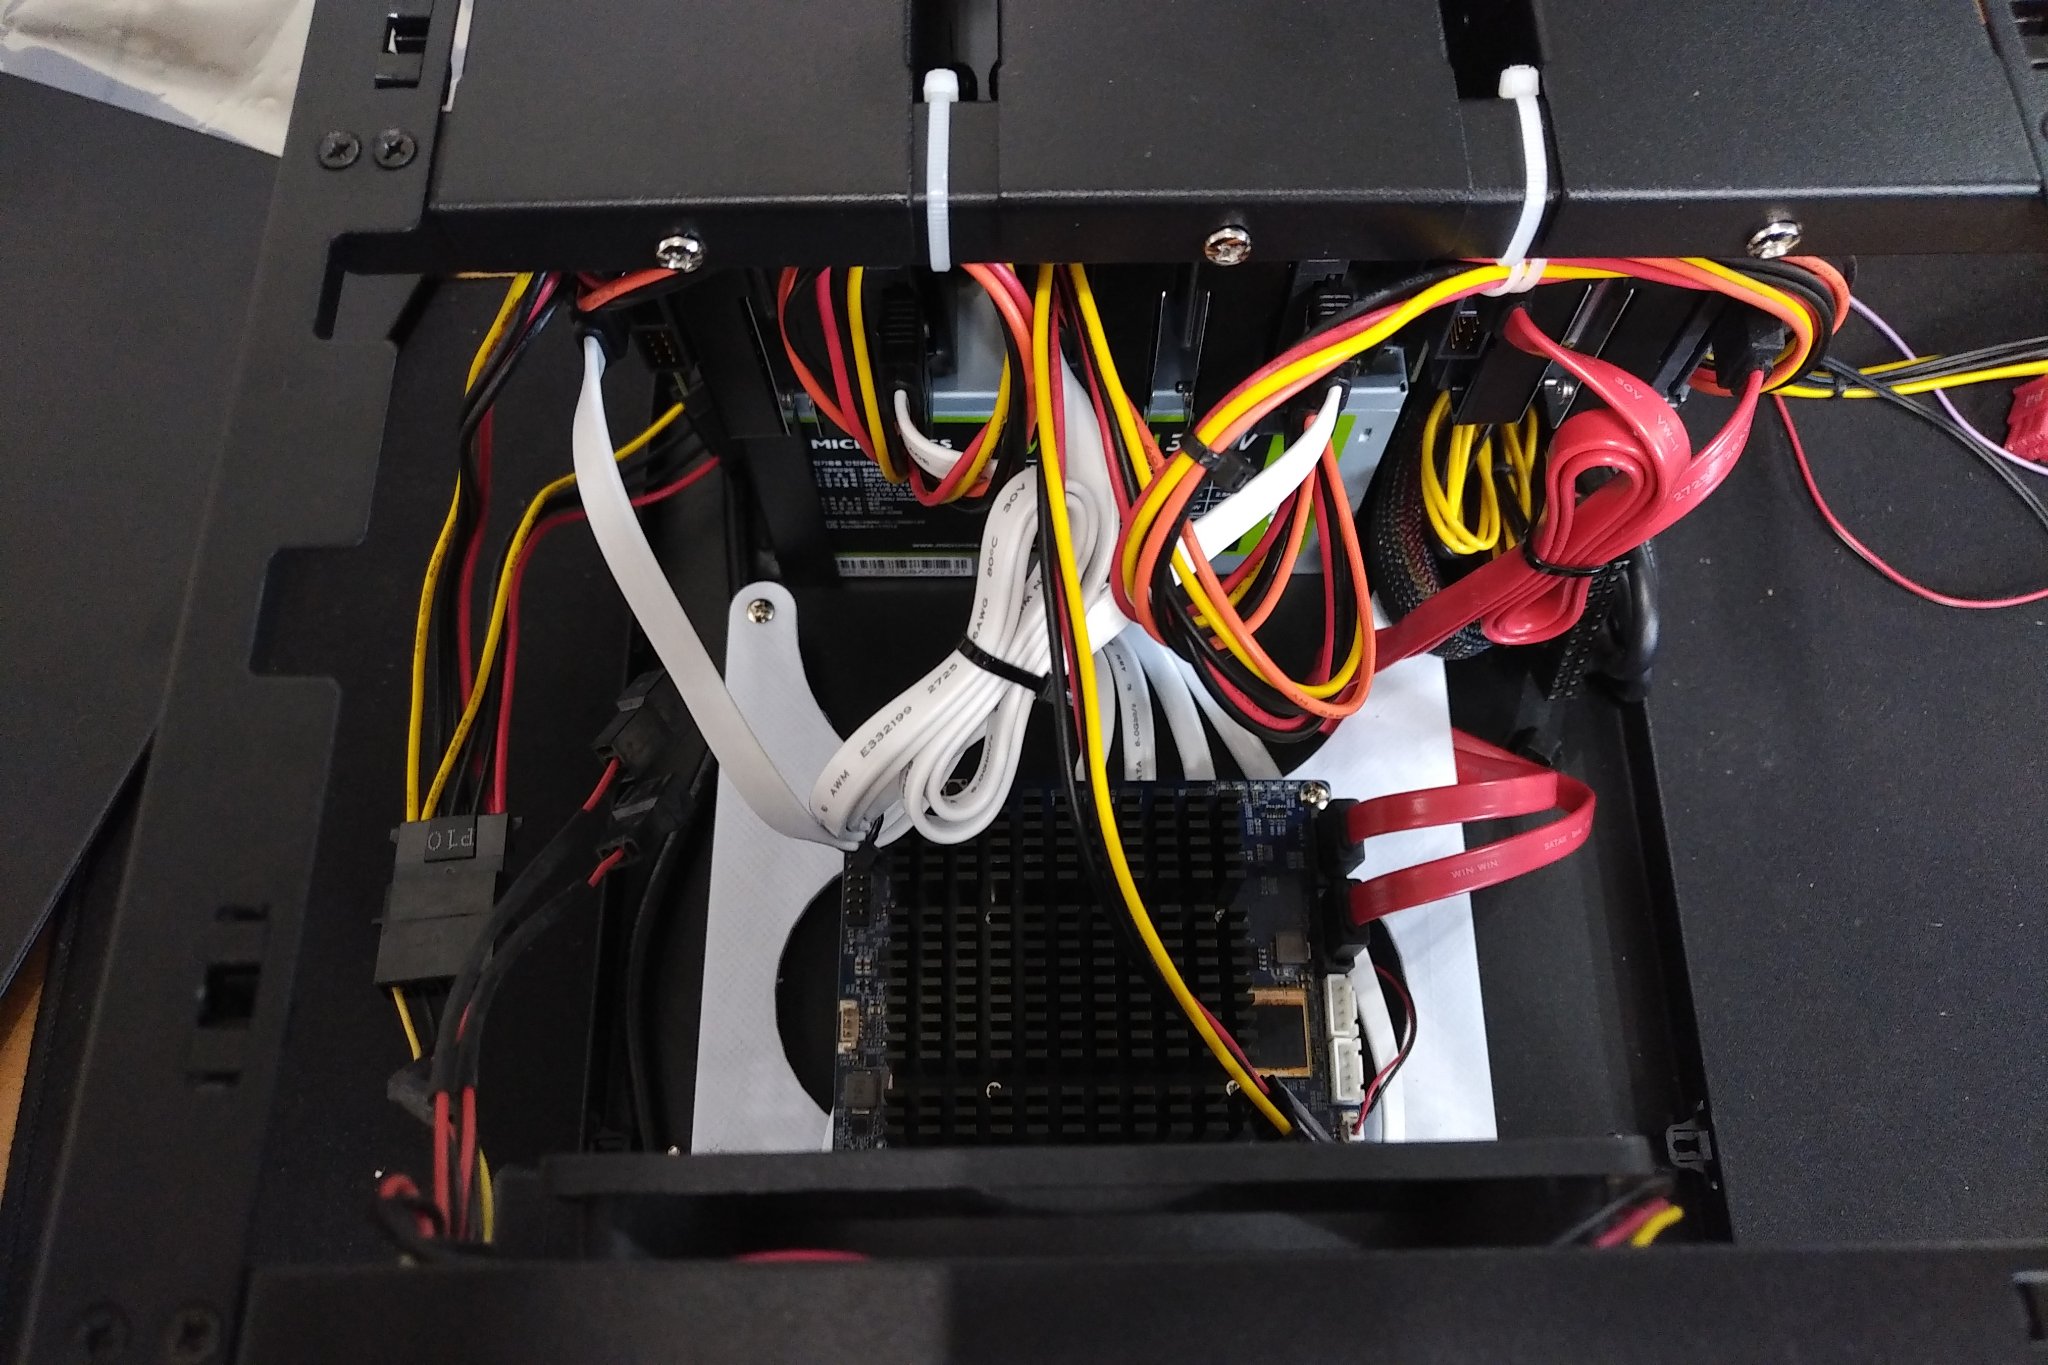
We have purchased a 350W standard ATX power supply which fits perfectly inside the case. While 350W might seem like a higher wattage for running 6 HDD and the ODROID-H2, the price of such ATX power is not very high, so this power supply is acceptable. Other than the power supply rating, what we had to consider was if the PSU has enough SATA connectors. Since most PSUs under 500W has up to 4 SATA power connectors, one extra SATA extension cable had to be added for the remaining 2 HDD drives.
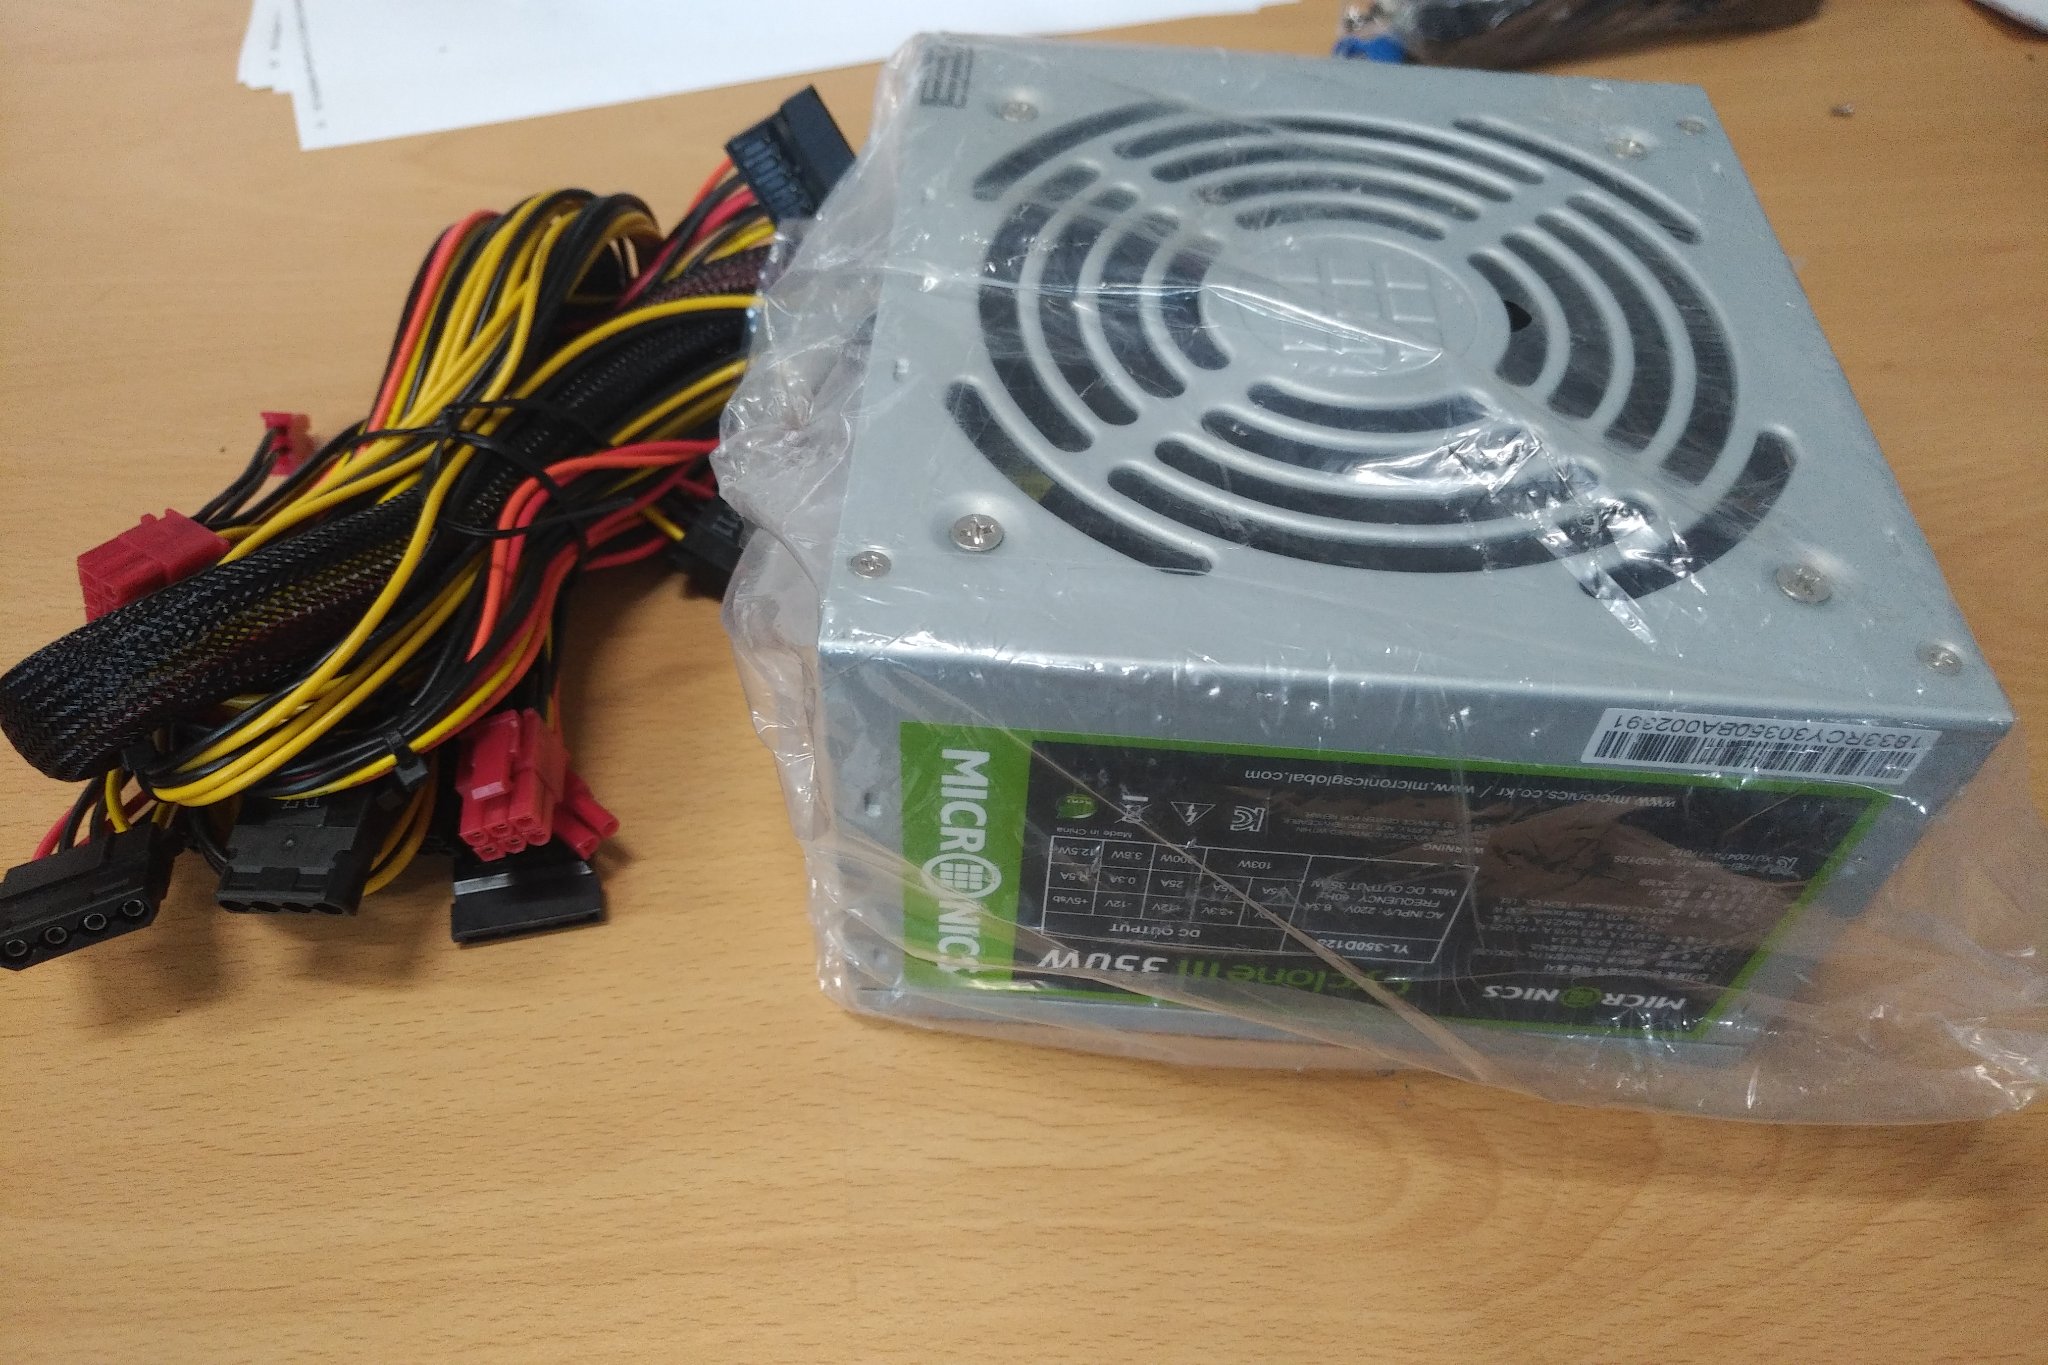
Supplying power to ODROID-H2 and 6 HDD is a challenge, but, more importantly, was the question of whether or not the system could be controlled via a single switch. This is because the standard ATX power is not only turned “on” when the power signal on the ATX power connector is triggered. Instead, we will need to monitor another signal which indicates whether the power state is good or not. Eventually it was decided to use the signal Power “on” with an ordinary switch module. This was the simplest way to control the PSU with the switch on it. A small switch has been purchased and it fits well in the extension card slot. The card slot bracket has to be cut as much as the length of the switch.
The wire color of Power-on signal on the PSU is green. This signal must be shorted to the ground in order to turn on the PSU. Since we have decided to use a toggle switch the green wire and a black wire have to be soldered to the switch.

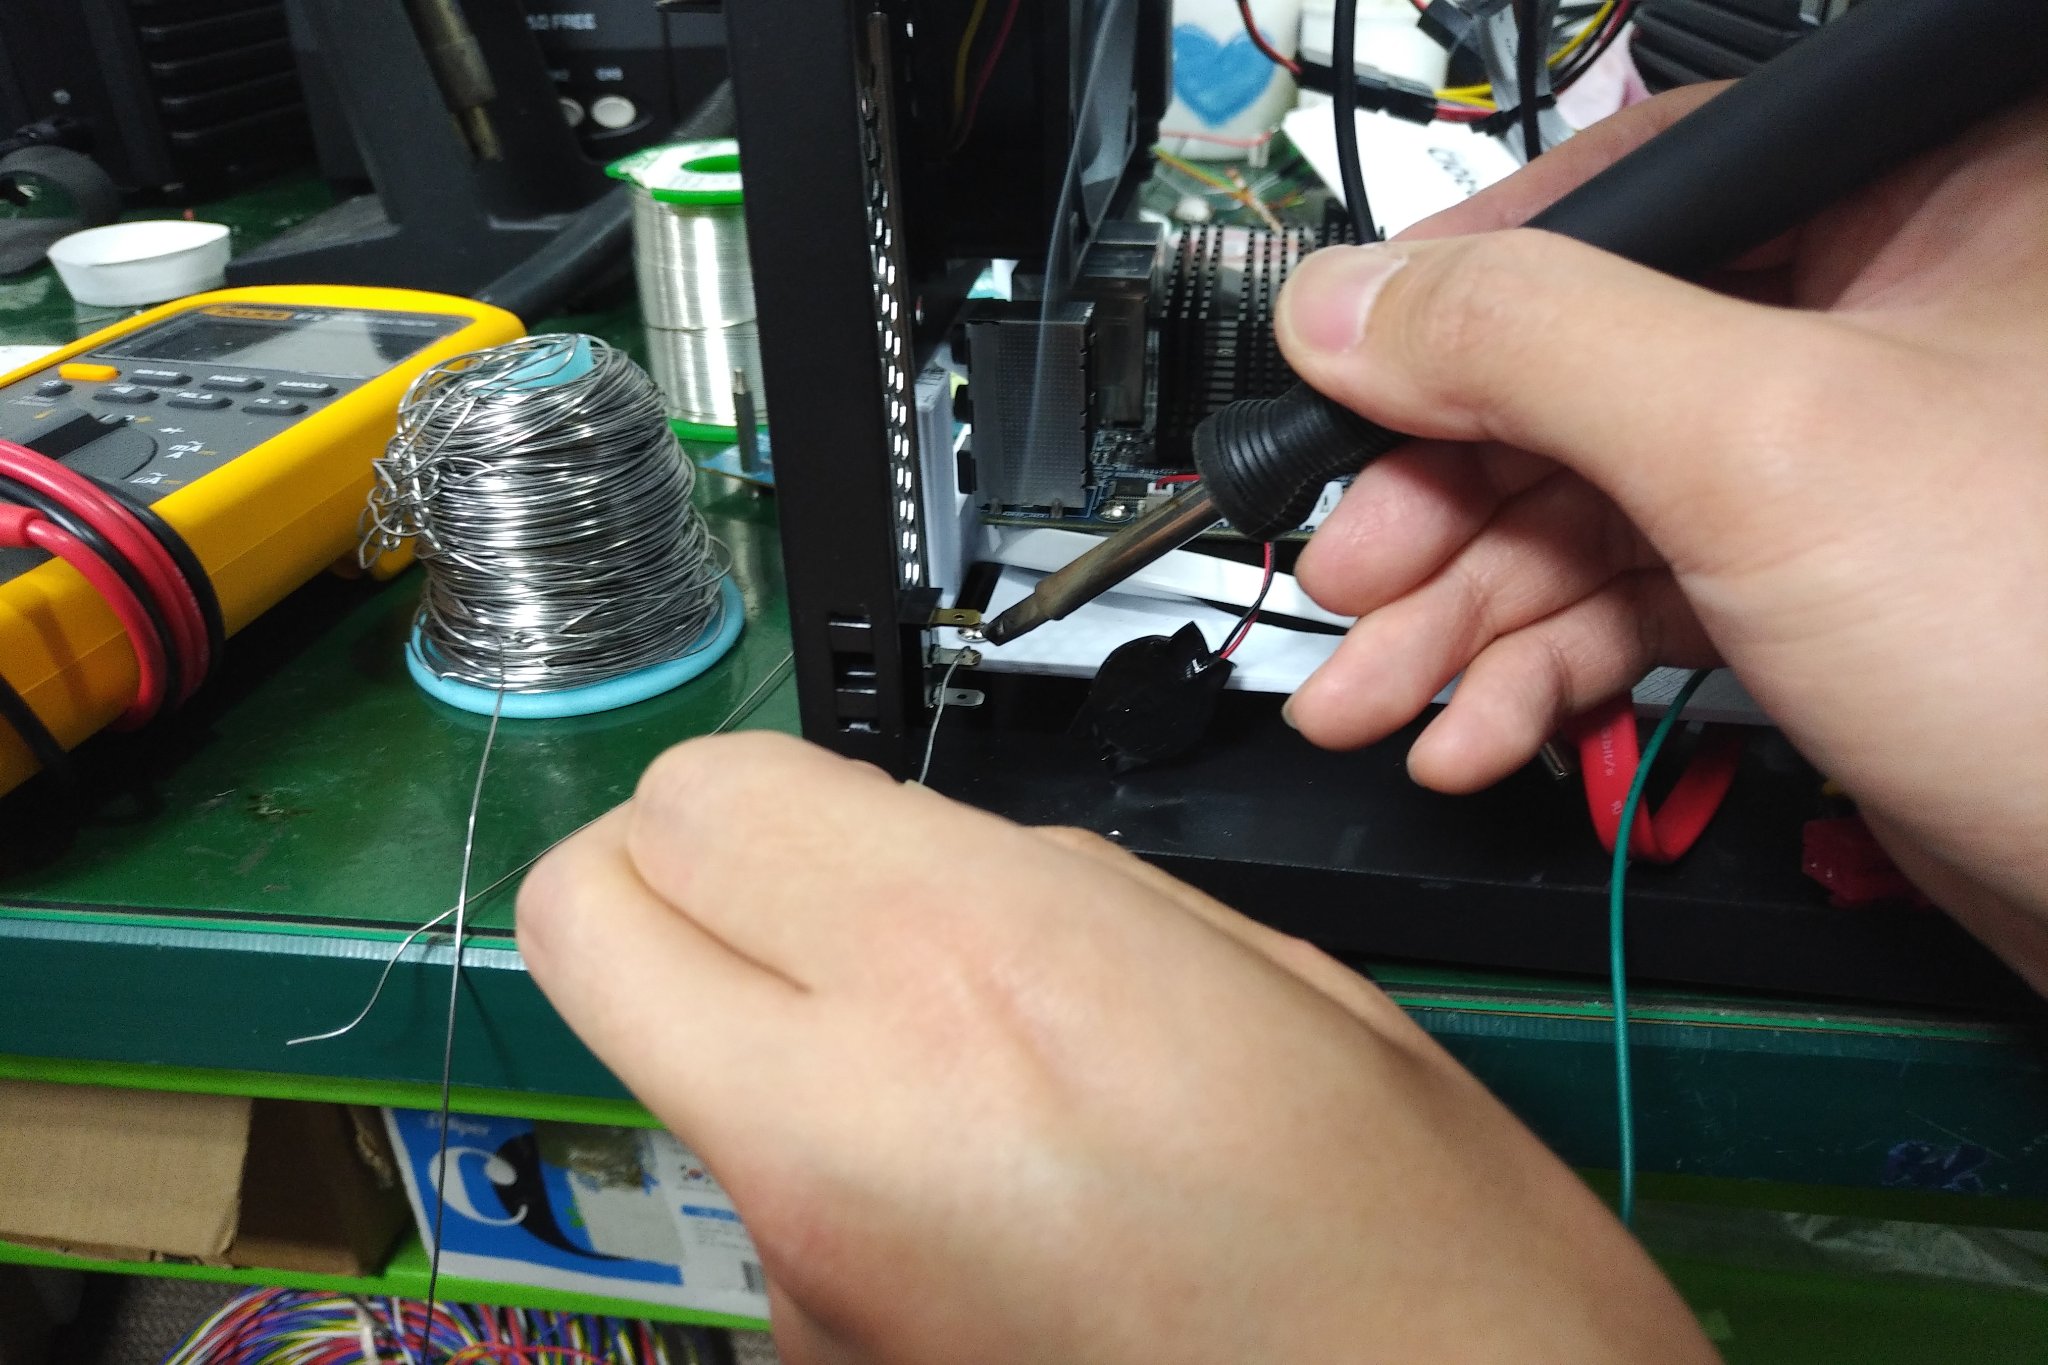
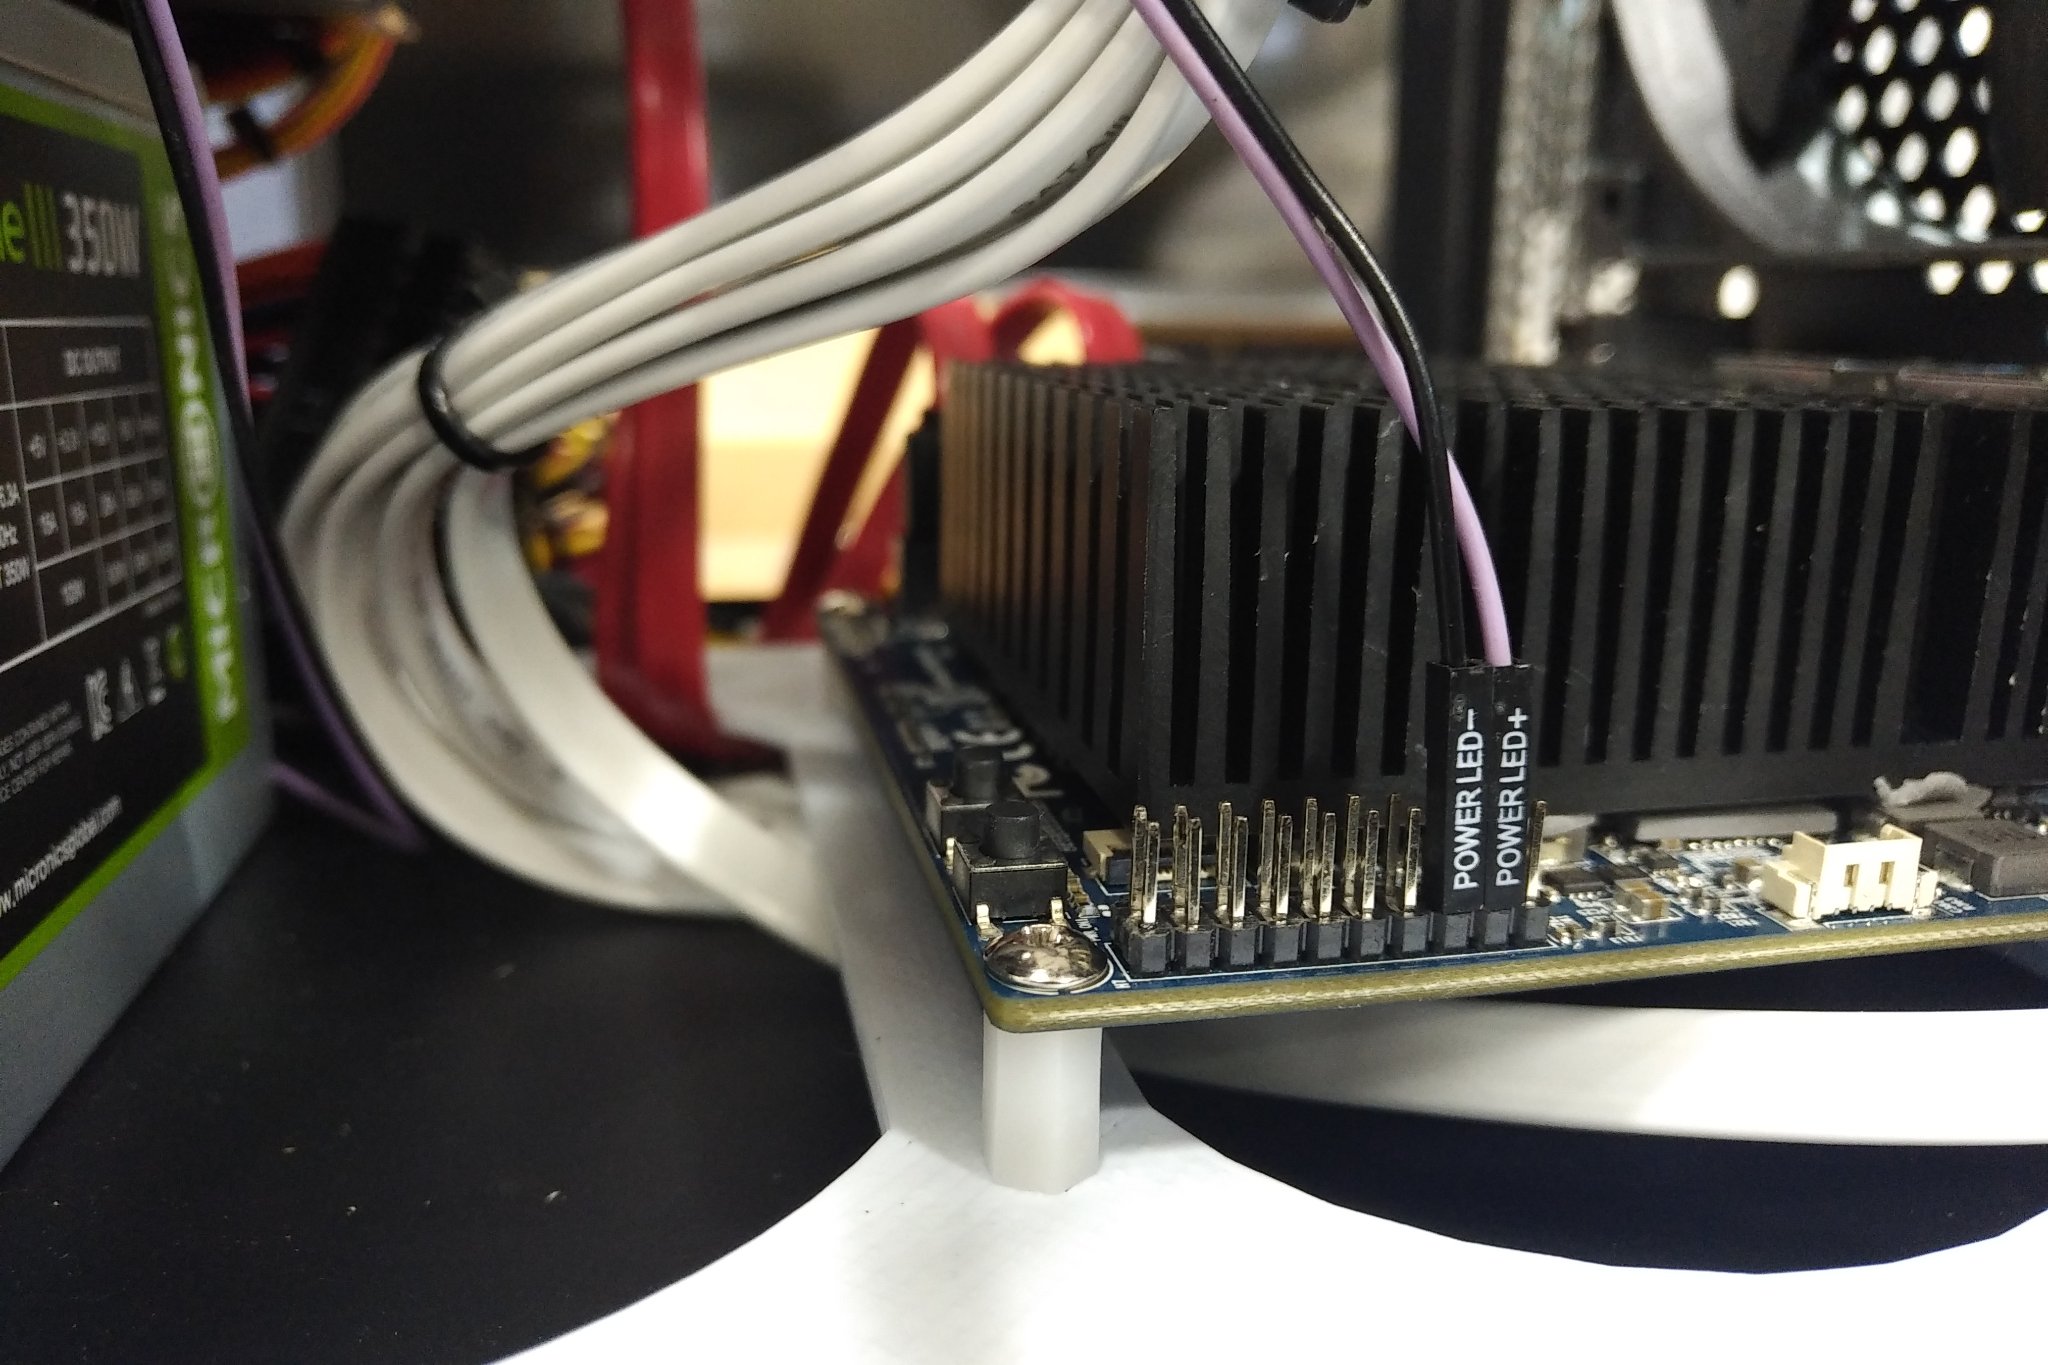
The ODROID-H2 does not have standard PC-type pinouts for LED indicators or buttons. Therefore, in order to light the power LED, the wire should be connected to the voltage out on the expansion pinout. The DC 3.3V and the ground pins can be connected as shown below.
HDD installation and wiring
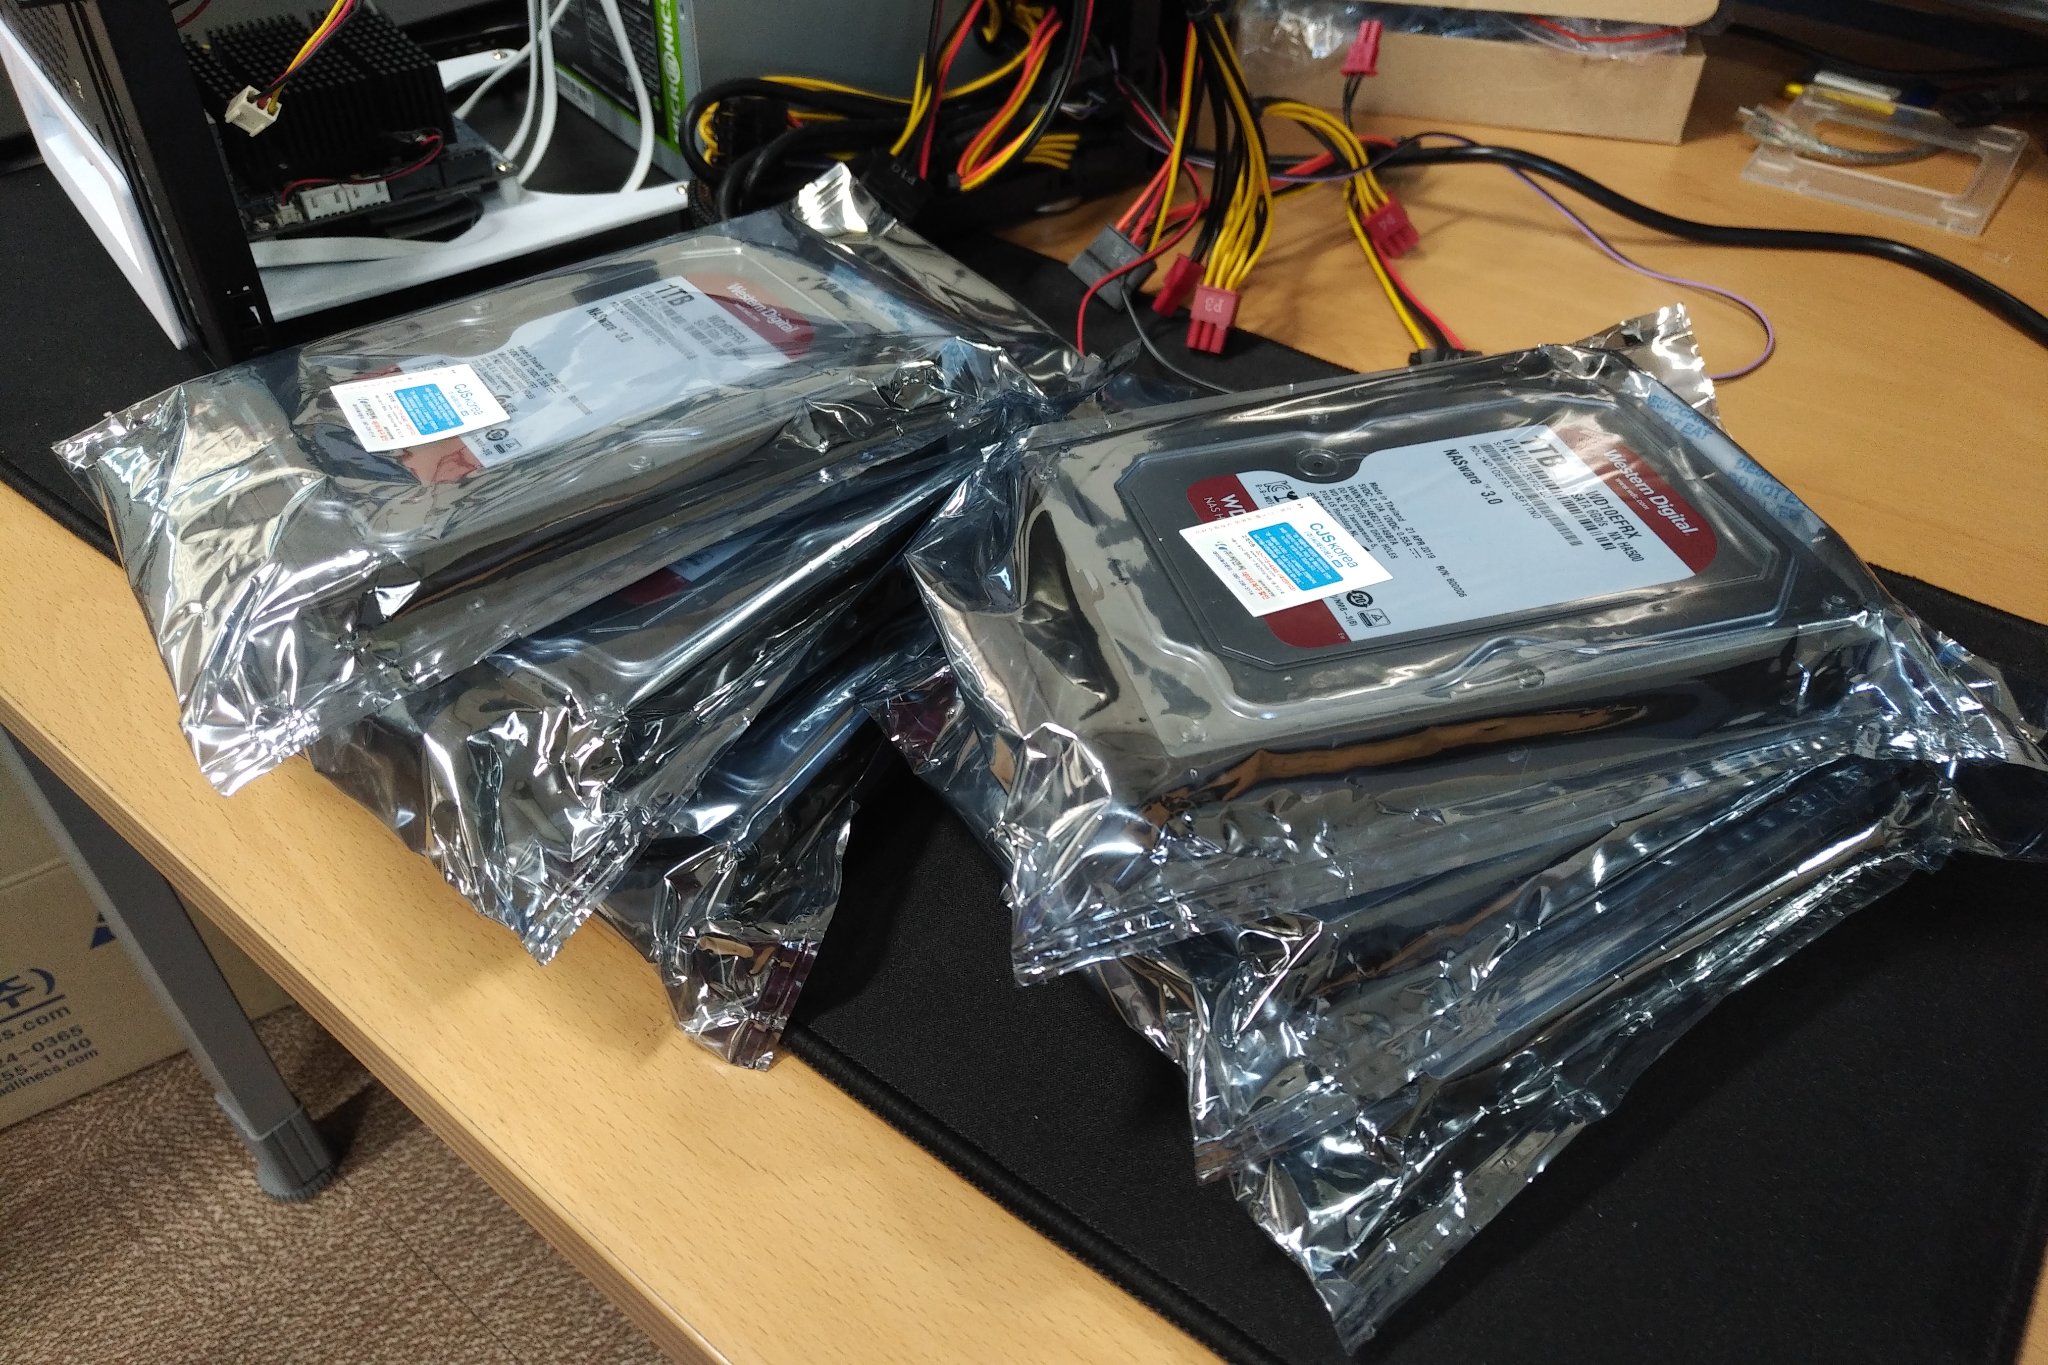
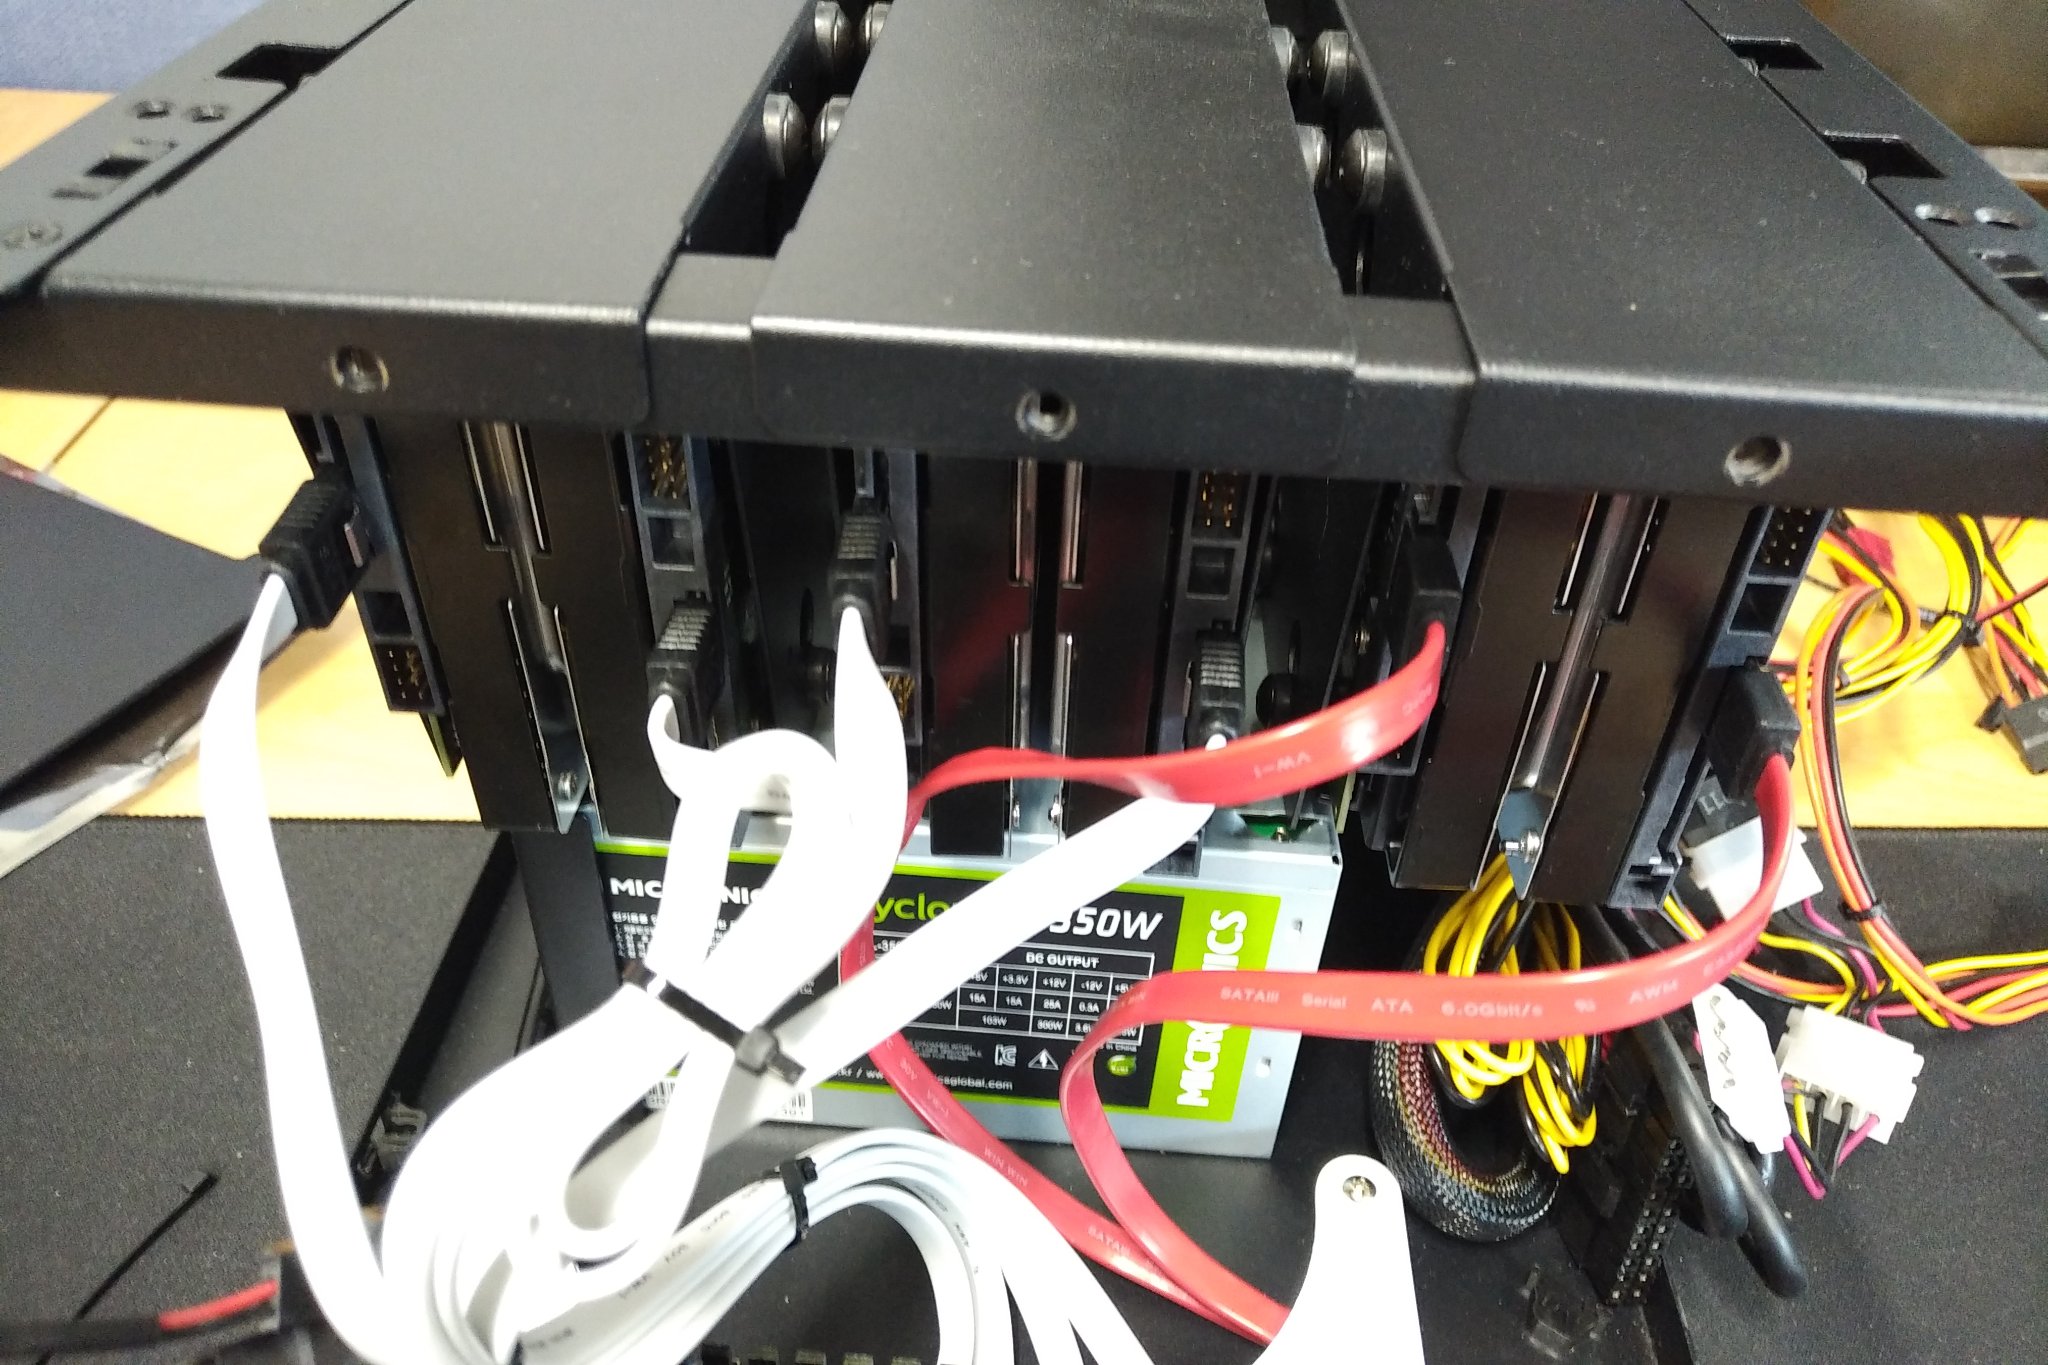
For this project, 6x Western Digital 1TB HDD were purchased and mounted to the bracket in the case.
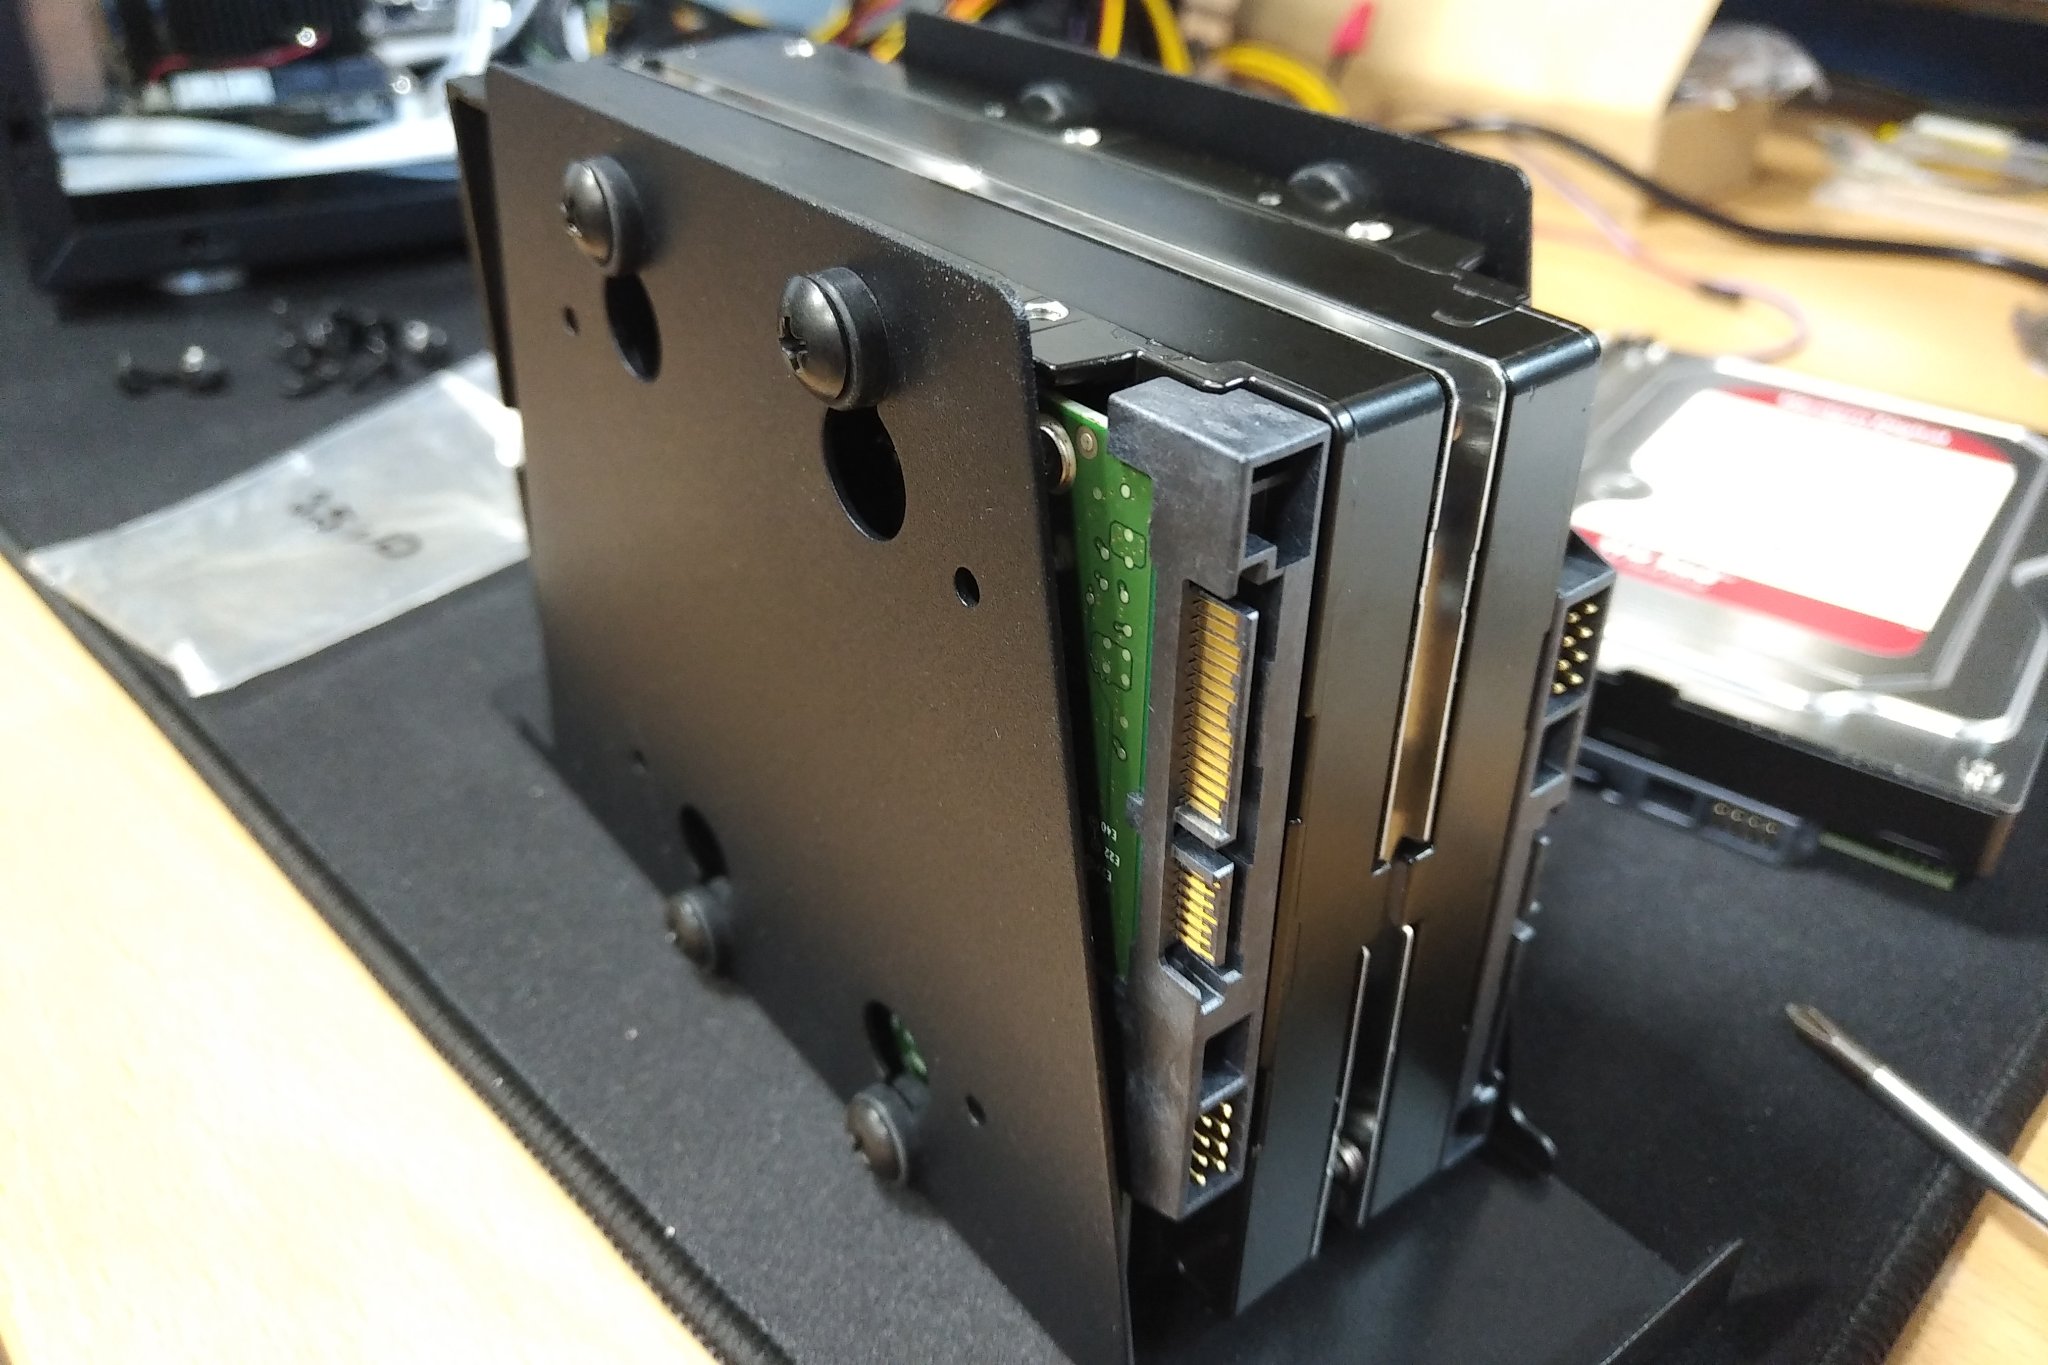
The case comes with 3 brackets by default. Two HDDs can be mounted on each bracket.
Four HDDs with white cables will be connected through the M.2 SATA expansion board and the other two with red cables will be routed via onboard SATA connections. The power cables for the HDD drives will be connected using the SATA connectors on the PSU. However, we still need another "Y" cable which converts the single IDE connector to two SATA cables.
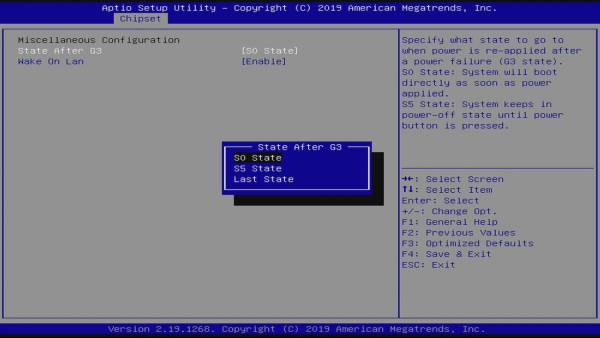
Setup BIOS
With its default setup, SATA adapter on M.2 slot will not work. To use properly, we have to configure BIOS settings. Enter BIOS by pressing the Delete key just after the power button is pushed. Then, you should see the screen shown in Figure 24.
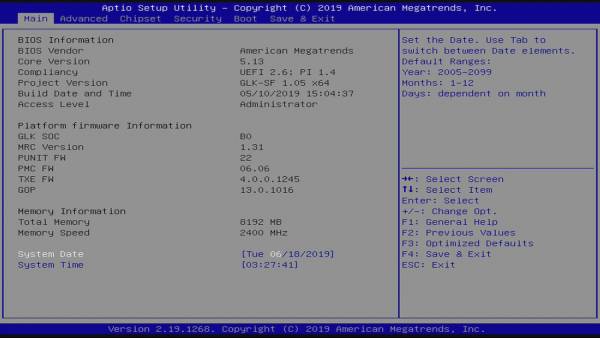
You have to set 2 options:
- Chipset - South Cluster Configuration - Miscellaneous Configuration - State After G3 to “S0 State” to make it turn on automatically when the power plugged.
- Chipset - South Cluster Configuration - PCI Express Configuration - PCI Express Clock Gating to “Disabled” to make the M.2 to SATA adapter work properly.
Move using the arrow keys on the keyboard to them and set each option.

Installing Ubuntu
To its host operating system, we've decided to install Ubuntu 19.04. Download the latest OS image from Ubuntu download page (https://ubuntu.com/download), and flash that image into a USB stick using Etcher. Etcher is a multi-platform flashing tool. Plug the USB memory stick to H2 and power on. Then press F7 to enter choosing boot media screen. If the screen shows up, select the inserted USB boot media.
Continue installing Ubuntu per your preferences. Just be aware of selecting a hard drive when you select a root media during installation. Keeping the system up-to-date is highly recommended in any case of application use, in most cases.
To check whether the hard drives were installed properly, you can look into the output of dmesg:
$ dmesg | grep scsi
[    2.067831] scsi host0: ahci
[    2.068684] scsi host1: ahci
[    2.080796] scsi host2: ahci
[    2.080964] scsi host3: ahci
[    2.084816] scsi host4: ahci
[    2.084976] scsi host5: ahci
[    2.548364] scsi 0:0:0:0: Direct-Access     ATA      WDC WD10EFRX-68F 0A82 PQ: 0 ANSI: 5
[    2.549029] sd 0:0:0:0: Attached scsi generic sg0 type 0
[    2.549321] scsi 1:0:0:0: Direct-Access     ATA      WDC WD10EFRX-68F 0A82 PQ: 0 ANSI: 5
[    2.549627] sd 1:0:0:0: Attached scsi generic sg1 type 0
[    2.563013] scsi 2:0:0:0: Direct-Access     ATA      WDC WD10EFRX-68F 0A82 PQ: 0 ANSI: 5
[    2.563292] sd 2:0:0:0: Attached scsi generic sg2 type 0
[    2.563497] scsi 3:0:0:0: Direct-Access     ATA      WDC WD10EFRX-68F 0A82 PQ: 0 ANSI: 5
[    2.563693] sd 3:0:0:0: Attached scsi generic sg3 type 0
[    2.563875] scsi 4:0:0:0: Direct-Access     ATA      WDC WD10EFRX-68F 0A82 PQ: 0 ANSI: 5
[    2.564070] sd 4:0:0:0: Attached scsi generic sg4 type 0
[    2.564268] scsi 5:0:0:0: Direct-Access     ATA      WDC WD10EFRX-68F 0A82 PQ: 0 ANSI: 5
[    2.564444] sd 5:0:0:0: Attached scsi generic sg5 type 0
This shows that those 6 drives are recognized normally. If yours aren’t, you should check the hardware connection or BIOS settings.
Partition Hard Drives
Check the installed hard drives using the following commands.
$ sudo fdisk -l | grep sd
Disk /dev/sda: 931.5 GiB, 1000204886016 bytes, 1953525168 sectors
Disk /dev/sdb: 931.5 GiB, 1000204886016 bytes, 1953525168 sectors
Disk /dev/sdc: 931.5 GiB, 1000204886016 bytes, 1953525168 sectors
Disk /dev/sdd: 931.5 GiB, 1000204886016 bytes, 1953525168 sectors
Disk /dev/sde: 931.5 GiB, 1000204886016 bytes, 1953525168 sectors
Disk /dev/sdf: 931.5 GiB, 1000204886016 bytes, 1953525168 sectors
Next, create a partition using the parted tool. You can use fdisk to partition them but GPT partition table should be created in order to use more than 2TB hard drive. Partition the disks respectively referring to the following procedures:
$ sudo parted /dev/sda
GNU Parted 3.2
Using /dev/sda
Welcome to GNU Parted! Type 'help' to view a list of commands.
(parted) mklabel gpt
(parted) print free
Model: ATA WDC WD10EFRX-68F (scsi)
Disk /dev/sda: 1000GB
Sector size (logical/physical): 512B/4096B
Partition Table: gpt
Disk Flags:

Number  Start   End     Size    File system  Name  Flags
        17.4kB  1000GB  1000GB  Free Space

(parted) mkpart primary 1M 1000GB
(parted) p
Model: ATA WDC WD10EFRX-68F (scsi)
Disk /dev/sda: 1000GB
Sector size (logical/physical): 512B/4096B
Partition Table: gpt
Disk Flags:

Number  Start   End     Size    File system  Name     Flags
 1      1049kB  1000GB  1000GB               primary

(parted) q
Information: You may need to update /etc/fstab.
Check the changes applied.
$ lsblk | grep sd
sda            8:0    0 931.5G  0 disk
└─sda1         8:1    0 931.5G  0 part
sdb            8:16   0 931.5G  0 disk
└─sdb1         8:17   0 931.5G  0 part
sdc            8:32   1 931.5G  0 disk
└─sdc1         8:33   1 931.5G  0 part
sdd            8:48   1 931.5G  0 disk
└─sdd1         8:49   1 931.5G  0 part
sde            8:64   1 931.5G  0 disk
└─sde1         8:65   1 931.5G  0 part
sdf            8:80   1 931.5G  0 disk
└─sdf1         8:81   1 931.5G  0 part
We can see each all hard drive has one partition. After partitioning all of the drives, now it's time to set RAID 6 up on our NAS.
Configure RAID 6
Here are two main reasons for using RAID level 6:
- It is more robust than RAID 5, because it uses one more disk for parity.
- There will be no data loss even after 2 disk fails. We can rebuild it after replacing the failed disk.
However, it also has some overhead: double parity can verify its stability, but it also comes with poor writing performance. A minimum of 4 disks are required to build with RAID 6. Since we have 6 hard drives which have 1TB capacity each, we can build using RAID 6 and there will be 4TB capacity that we can use.
To setup RAID without a physical RAID controller on Linux system, we have to use mdadm tool. It is provided by package manager on each Linux distros:
$ sudo apt install mdadmWe already know that those 6 drives are allocated as /dev/sda to /dev/sdf. Create an array using the following command:
$ sudo mdadm --create /dev/md0 --level=6 --raid-devices=6 /dev/sda1 /dev/sdb1 /dev/sdc1 /dev/sdd1 /dev/sde1 /dev/sdf1
mdadm: Defaulting to version 1.2 metadata
mdadm: array /dev/md0 started.
The /dev/md0 device file will be created. You should use that device like a single hard drive partition, so if you want to mount that array to a directory, you can just mount with that device file. Format that partition and mount to the /media/storage:
$ sudo mkfs.ext4 /dev/md0
mke2fs 1.44.6 (5-Mar-2019)
Creating filesystem with 976628736 4k blocks and 244162560 inodes
Filesystem UUID: 100a470d-96f1-47d2-8cf0-a211c010e8b9
Superblock backups stored on blocks:
  32768, 98304, 163840, 229376, 294912, 819200, 884736, 1605632, 2654208,
  4096000, 7962624, 11239424, 20480000, 23887872, 71663616, 78675968,
  102400000, 214990848, 512000000, 550731776, 644972544

Allocating group tables: done
Writing inode tables: done
Creating journal (262144 blocks): done
Writing superblocks and filesystem accounting information: done

$ sudo mkdir /media/storage
$ sudo mount /dev/md0 /media/storage/
Check if it mounted properly.
$ cat /proc/mounts | grep md0
/dev/md0 /media/storage ext4 rw,relatime,stripe=512 0 0
You also can see the RAID configurations:
$ sudo mdadm --detail /dev/md0
/dev/md0:
           Version : 1.2
     Creation Time : Mon Jun 17 18:08:26 2019
        Raid Level : raid6
        Array Size : 3906514944 (3725.54 GiB 4000.27 GB)
     Used Dev Size : 976628736 (931.39 GiB 1000.07 GB)
      Raid Devices : 6
     Total Devices : 6
       Persistence : Superblock is persistent

     Intent Bitmap : Internal

       Update Time : Mon Jun 17 18:27:08 2019
             State : active, resyncing
    Active Devices : 6
   Working Devices : 6
    Failed Devices : 0
     Spare Devices : 0

            Layout : left-symmetric
        Chunk Size : 512K

Consistency Policy : bitmap

     Resync Status : 8% complete

              Name : ODROID-H2:0  (local to host ODROID-H2)
              UUID : d4759dbb:65fd2b07:d5f4f9c3:0fba55cc
            Events : 253

    Number   Major   Minor   RaidDevice State
       0       8        1        0      active sync   /dev/sda1
       1       8       17        1      active sync   /dev/sdb1
       2       8       33        2      active sync   /dev/sdc1
       3       8       49        3      active sync   /dev/sdd1
       4       8       65        4      active sync   /dev/sde1
       5       8       81        5      active sync   /dev/sdf1
Since this RAID array was just created, a resync process to synchronize with the other devices needs to be performed. You can see the status of the resync process with the following command:
$ cat /proc/mdstat
Personalities : [linear] [multipath] [raid0] [raid1] [raid6] [raid5] [raid4] [raid10]
md0 : active raid6 sdf1[5] sde1[4] sdd1[3] sdc1[2] sdb1[1] sda1[0]
      3906514944 blocks super 1.2 level 6, 512k chunk, algorithm 2 [6/6] [UUUUUU]
      [=>...................]  resync =  9.6% (93909272/976628736) finish=120.2min speed=122360K/sec
      bitmap: 8/8 pages [32KB], 65536KB chunk

unused devices:
Once the rsync process completes, you can see a message via dmesg:
$ dmesg | grep resync
[  199.311304] md: resync of RAID array md0
[10093.988694] md: md0: resync done.
You also would set your system environment by adding an entry to /etc/fstab and configuring the SAMBA or SFTP server to share your data by using that RAID-ed hard drives. There are many management guides for further use of RAID built system including adding spare drives or dealing with failed devices, but this guide will not go into those details.
Benchmarks
I ran iozone3 to evaluate its performance of the H2 with RAID level 6 on 6 hard drives, after making sure that the resync process had completed:
$ sudo iozone -e -I -a -s 100M -r 4k -r 16384k -i 0 -i 1 -i 2
  Iozone: Performance Test of File I/O
          Version $Revision: 3.429 $
    Compiled for 64 bit mode.
    Build: linux-AMD64

  Contributors:William Norcott, Don Capps, Isom Crawford, Kirby Collins
               Al Slater, Scott Rhine, Mike Wisner, Ken Goss
               Steve Landherr, Brad Smith, Mark Kelly, Dr. Alain CYR,
               Randy Dunlap, Mark Montague, Dan Million, Gavin Brebner,
               Jean-Marc Zucconi, Jeff Blomberg, Benny Halevy, Dave Boone,
               Erik Habbinga, Kris Strecker, Walter Wong, Joshua Root,
               Fabrice Bacchella, Zhenghua Xue, Qin Li, Darren Sawyer,
               Vangel Bojaxhi, Ben England, Vikentsi Lapa.

  Run began: Tue Jun 18 10:03:49 2019

  Include fsync in write timing
  O_DIRECT feature enabled
  Auto Mode
  File size set to 102400 kB
  Record Size 4 kB
  Record Size 16384 kB
  Command line used: iozone -e -I -a -s 100M -r 4k -r 16384k -i 0 -i 1 -i 2
  Output is in kBytes/sec
  Time Resolution = 0.000001 seconds.
  Processor cache size set to 1024 kBytes.
  Processor cache line size set to 32 bytes.
  File stride size set to 17 * record size.
                                                              random    random     bkwd    record    stride
              kB  reclen    write  rewrite    read    reread    read     write     read   rewrite      read   fwrite frewrite    fread  freread
          102400       4     9241    14364    27027    29648    15326     4404
          102400   16384   208414   209245   521260   669540   731096   177565

iozone test complete.
Since the 6 hard drives are linked to each other, its performance is far better than from the results with the only 1 hard drive.
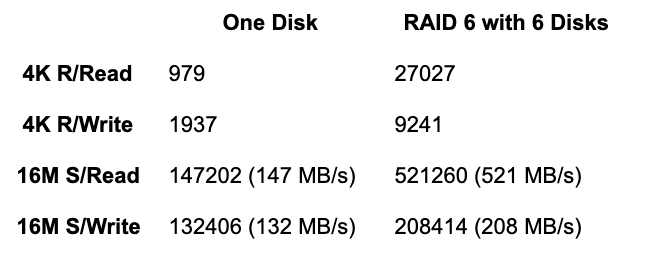
RAID 6 uses double parity, but 6 hard drives perform like a kind of multiprocessing in CPU literally, so the overall speed can be greatly increased. If using RAID level 5, the performance would be a little bit better than this since RAID 5 uses single parity. Therefore, there's no reason not to use RAID 6 when you have more than 4 hard drives, especially, since the H2 is a powerful host hardware for NAS use at a reasonable price, with 2 Gigabit LAN ports as an added bonus for connectivity. We will address Software Installation in an upcoming article.
References
https://forum.odroid.com/viewtopic.php?f=172&t=35309https://www.tecmint.com/create-raid-6-in-linux/ https://askubuntu.com/questions/350266/how-can-i-create-a-raid-array-with-2tb-disks
Be the first to comment