

For this article, we will learn how to read the status of the buttons with Arduino. A simple output will be shown on the LCD. Before getting started, make sure you've followed these guides:
Refer to the Arduino official documents. These provide useful common functions and great, detailed instructions. You can also refer to the ESP32 official programming guide. Most ESP32-specific functions are introduced here.
Get the status of the buttons
The ODROID-GO has 10 buttons available:
- 4 for direction pad
- 2 for an action
- 4 functional buttons
Thanks to the GO library, we can get the status of each buttons easily. Firstl, initialize the LCD with the “GO.begin()” function. Set text size to 2 since the default text size will too small to read.
#include

$ void setup() {
// put your setup code here, to run once:
GO.begin();
GO.lcd.setTextSize(2);
}

$ void loop() {
// put your main code here, to run repeatedly:
}
Add an independent function to display the status, and name it “displayButtons()”. This function has two steps:
- “GO.lcd.clear()” to clear any LCD content previously shown.
- “GO.lcd.setCursor()” to set the start point to print a string. The two parameters (0, 0) means top, left.
#include

$ void setup() {
// put your setup code here, to run once:
GO.begin();
GO.lcd.setTextSize(2);
}

$ void displayButtons() {
GO.lcd.clear();
GO.lcd.setCursor(0, 0);
}

$ void loop() {
// put your main code here, to run repeatedly:
}
Fill “displayButtons()” out with the code below. This will display whether any buttons are pressed or not. When a button is pressed, then a “Pressed” string will appear beside the element that corresponds to the button.
All of the available buttons for the ODROID-GO are available as instances of the Button class. The Button class has some helpful functions to let us know the button's status. Thus, we use “isAxisPressed()” and “isPressed()” functions to know if a button is currently pressed or not.
If the button is pressed, that functions returns not 0.
- The “isAxisPressed()” function is only for the direction pad. If the button is pressed, it returns 1 or 2 to distinguish the direction.
- “isPressed()” function is for the other buttons. If the button is pressed, it returns 1.
Lastly, we have to fill the “loop()” function out to show the status on the LCD. There are three functions to add:
- “GO.update()” to update the buttons' states so that the “isPressed()” functions works well.
- “displayButtons()” to add result strings to the LCD.
- “delay(1000)” to prevent the LCD from blinking too fast when “GO.lcd.clean()” function acts.
#include

$ void setup() {
// put your setup code here, to run once:
GO.begin();
GO.lcd.setTextSize(2);
}

$ void displayButtons() {
GO.lcd.clear();
GO.lcd.setCursor(0, 0);

GO.lcd.println("/* Direction pad */");
GO.lcd.printf("Joy-Y-Up: %s \n", (GO.JOY_Y.isAxisPressed() == 2) ? "Pressed" : " ");
GO.lcd.printf("Joy-Y-Down: %s \n", (GO.JOY_Y.isAxisPressed() == 1) ? "Pressed" : " ");
GO.lcd.printf("Joy-X-Left: %s \n", (GO.JOY_X.isAxisPressed() == 2) ? "Pressed" : " ");
GO.lcd.printf("Joy-X-Right: %s \n", (GO.JOY_X.isAxisPressed() == 1) ? "Pressed" : " ");
GO.lcd.println("");
GO.lcd.println("/* Function key */");
GO.lcd.printf("Menu: %s \n", (GO.BtnMenu.isPressed() == 1) ? "Pressed" : " ");
GO.lcd.printf("Volume: %s \n", (GO.BtnVolume.isPressed() == 1) ? "Pressed" : " ");
GO.lcd.printf("Select: %s \n", (GO.BtnSelect.isPressed() == 1) ? "Pressed" : " ");
GO.lcd.printf("Start: %s \n", (GO.BtnStart.isPressed() == 1) ? "Pressed" : " ");
GO.lcd.println("");
GO.lcd.println("/* Actions */");
GO.lcd.printf("B: %s \n", (GO.BtnB.isPressed() == 1) ? "Pressed" : " ");
GO.lcd.printf("A: %s \n", (GO.BtnA.isPressed() == 1) ? "Pressed" : " ");
}

$ void loop() {
// put your main code here, to run repeatedly:
GO.update();
displayButtons();
delay(1000);
}
Press CTRL-U to compile and upload the sketch. Then, press any button to show the “Pressed” string besides that button. As you may have noticed, you will need to keep pressing it until the LCD is updated due to the “delay(1000)” function.
A completed example
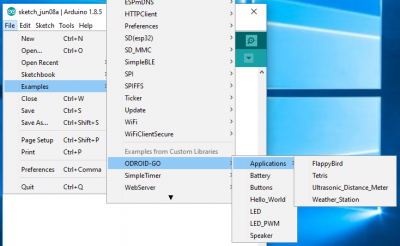
The complete example is available by clicking the Files → Examples → ODROID-GO → Buttons menu to import and press CTRL-U to compile/upload.
Be the first to comment