

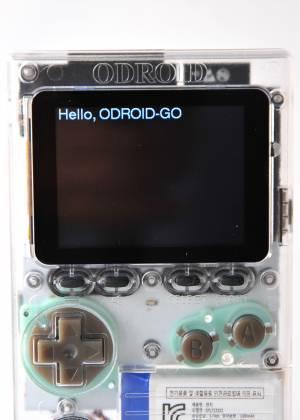
In this article, you will learn how to display a string, change colors, and change font size. By following this guide, you will be able to write code to display “Hello, ODROID-GO” on your ODROID-GO.
Basic code structure for Arduino When you first run the Arduino IDE, you will see a screen similar to the one shown in Figure 1.
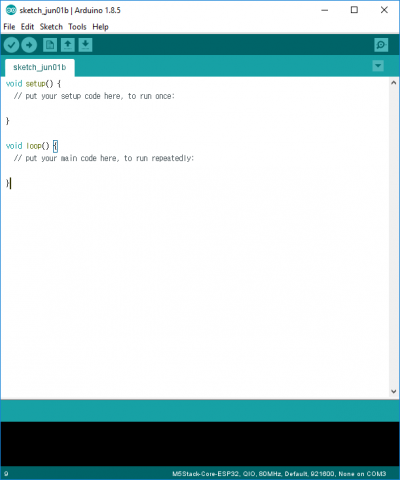
That editor is called Sketch, and it is your playground. The default source code is:
void setup() {
  // put your setup code here, to run once:

}

void loop() {
  // put your main code here, to run repeatedly:

}
There are two functions with some comments that let you know what each function performs in the code. We will use this simple structure.
Arduino for ODROID-GO We will provide the library for Arduino development: odroid_go.h. The library helps you to control components on the board such as LCD, buttons, speaker, etc. This library should be included first.
To prepare the board for use, it should be initialized. To initialize the board, use the GO.begin() function. If you want to control the buttons or the speaker on the board, you have to use the GO.update() function to apply the changes from the code.
The GO.update() function isn't used in this guide since we will only need to use the LCD to display a simple string.
#include

void setup() {
  // put your setup code here, to run once:
  GO.begin();
}

void loop() {
  // put your main code here, to run repeatedly:

}
The GO.begin() function has to be included in the setup() function since it is called only once. The GO instance has not only the two core functions, but also a lot of helper functions that let you control the components on the board. Now, let's use the GO.lcd functions to show “Hello, ODROID-GO”.
Hello World We will use the GO.lcd.print function to show a string:
#include

void setup() {
  // put your setup code here, to run once:
  GO.begin();

  GO.lcd.print("Hello, ODROID-GO");
}

void loop() {
  // put your main code here, to run repeatedly:

}
The sketch looks fine, but the text on the LCD will be too small to see. Let's increase the font size to 2 by using the GO.lcd.setTextSize() function.
#include

void setup() {
  // put your setup code here, to run once:
  GO.begin();

  GO.lcd.setTextSize(2);
  GO.lcd.print("Hello, ODROID-GO");
}

void loop() {
  // put your main code here, to run repeatedly:

}
You can also change the text color with GO.lcd.setTextColor(). Change the text to green.
#include

void setup() {
  // put your setup code here, to run once:
  GO.begin();

  GO.lcd.setTextSize(2);
  GO.lcd.setTextColor(GREEN);
  GO.lcd.print("Hello, ODROID-GO");
}

void loop() {
  // put your main code here, to run repeatedly:

}
As an advanced feature, we've also added a function called displayGO() which includes several effects. New functions introduced include:
- GO.lcd.setRotation(): rotates output screen. The rotation parameter can be 0 to 7.
- GO.lcd.clearDisplay(): resets all texts on the screen.
- GO.lcd.setTextFont(): sets font style after calling this. A given font name is specified by a number.
#include

uint8_t idx;
uint8_t rotate;

void setup() {
  // put your setup code here, to run once:
  GO.begin();

  GO.lcd.println("Hello, ODROID-GO");
  delay(1000);
}

void displayGO() {
  GO.lcd.clearDisplay();
  GO.lcd.setRotation(rotate + 4);
  GO.lcd.setCursor(30, 40);

  if (idx) {
    GO.lcd.setTextSize(1);
    GO.lcd.setTextFont(4);
    GO.lcd.setTextColor(MAGENTA);
  } else {
    GO.lcd.setTextSize(2);
    GO.lcd.setTextFont(1);
    GO.lcd.setTextColor(GREEN);
  }
  GO.lcd.print("Hello, ODROID-GO");

  idx = !idx;
  rotate++;
  rotate %= 4;

  delay(1000);
}

void loop() {
  // put your main code here, to run repeatedly:
  displayGO();
}
You can verify, compile, or upload a sketch from the toolbar or Sketch menu. Here are some helpful shortcuts you can use:
- CTRL-R: Verify and compile.
- CTRL-U: Upload.
Before uploading the binary, you have to select the proper port at the Tools - Port menu. If the procedure goes well, you can see “Hello, ODROID-GO” on your device.
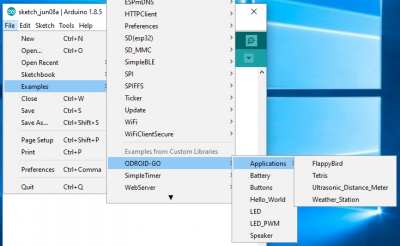
A completed example The complete example is available by clicking the Files → Examples → ODROID-GO → Hello_World menu to import and pressing CTRL-U to compile/upload.
For comments, questions, and suggestions, please visit the original article at https://wiki.odroid.com/odroid_go/arduino/02_hello_world.
Be the first to comment