

In the article Building an ODROID-XU4 Cluster, we laid out the ingredients to build a 5-node home lab cluster using the powerful 32-bit ODROID-XU4. As was indicated, the ODROID-XU4 sports a powerful octa-core Samsung Exynos5422 ARM CPU with two sets of quad-cores, referred to as the big.LITTLE, with Cortex A15 running at 2 Ghz and Cortex A7 running at 1.4 Ghz. It has enough horsepower to run Linux and serve as a mini-development cluster. However, the ODROID-XU4 is a 32-bit SBC with 2GB of LPDDR3 PoP memory.
In my quest for a true 64-bit quad-core SBC with each core close to 2 Ghz and with at least 4GB of RAM, I came upon this newly released beauty called ODROID-N2 (4GB RAM). It sports a powerful hex-core ARM-based Amlogic 922X CPU with two sets of cores, also referred to as the big.LITTLE, with a quad-core Cortex A73 running at 1.8 Ghz and a dual-core Cortex A53 running at 1.9 Ghz. In addition, it comes with a *HUGE* heatsink mounted on the bottom, where the CPU is located. It is available in two configurations, one with 2GB of DDR4 RAM and the other with 4GB of DDR4 RAM (running at 1320 Mhz). It has 4 USB 3.0 ports and a 1Gb Ethernet port.
The following are the necessary items needed to build a 5-node ODROID-N2 cluster:
- Five ODROID-N2 4GB single-board computers
- Five 12V/2A power adapters
- Five Class 10 64 GB microSDXC cards
- Five Ethernet network cables
- One pack of M3 60mm male-female brass spacers
- One pack of M3 12mm male-female brass spacers
- One pack of M3 6mm phillips head steel screws
- One Multi-port Ethernet switch (if your home network switch does not have enough available ports). In my case, I did not need one since have a 24-port Ethernet Switch with enough of free ports to use.
- One Portable USB card reader, if your desktop does not have a built-in media card reader. In my case, did not need one since my desktop has a built-in media card reader
- One Belkin BE112230-08 12-outlet power strip
- We need to firmly secure the ODROID-N2 onto a solid, flat platform, which can be stacked on top of one another. In my case, a trip to the local Dollar Tree yielded an interesting option - 12.5 cm x 12.5 cm Square clear plastic artsy tray. For my cluster, I purchased 5 of these.
The next stage is to assemble the items to build the 5-node ODROID-N2 cluster. The ODROID-N2 is a bit unique in its design. Unlike the ODROID-XU4, there are no holes on the SBC to easily stack them up on top of one another. This is due to the heatsink that occupies the entire bottom of the SBC. However, the heatsink has holes to screw the 12mm M3 brass spacers on to the 4 sides as shown in the illustration below.

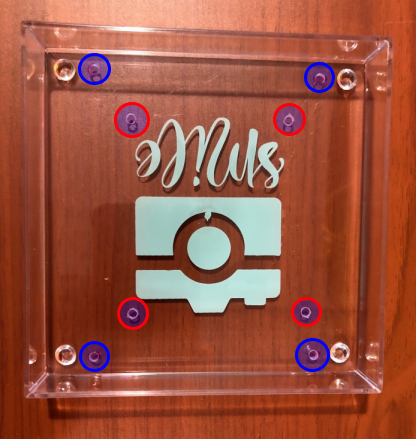
Continue this assembly process for the remaining units. We need to drill 4 holes (red circles) to secure each SBC. Ensure the holes align with the four M3 12mm spacers we bolted onto the SBC in Figure 1. In addition, we need another 4 holes (blue circles) on the corners of the plastic tray for stacking the trays on top of one another as shown in the illustration below:
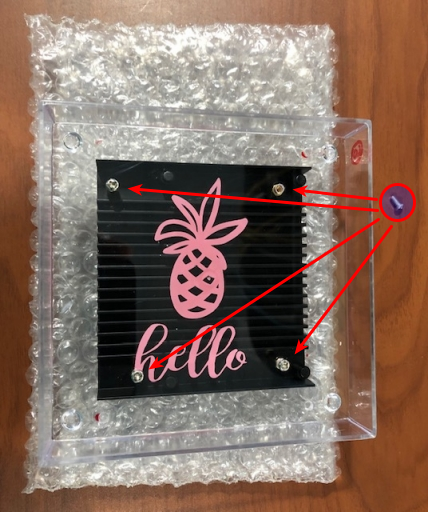
Continue this process for the remaining units. We need to secure the ODROID-N2 on top of the clear plastic tray using the M3 6mm screws through the 4 holes (red circles) from Figure 2 above as shown in the illustration below:
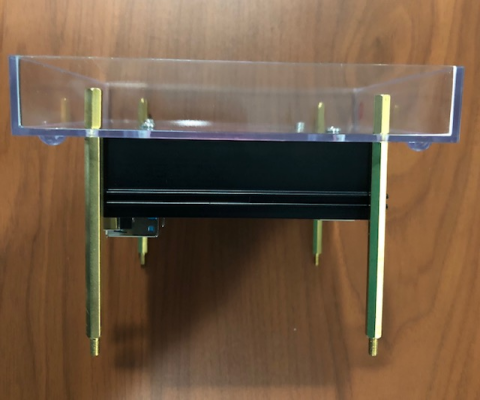
Again, continue this process for the remaining units. Insert the 12mm M3 brass spacers through the 4 holes (blue circles) from Figure 2 above and screw them on top with the 60mm M3 brass spacers as shown in the illustration below:
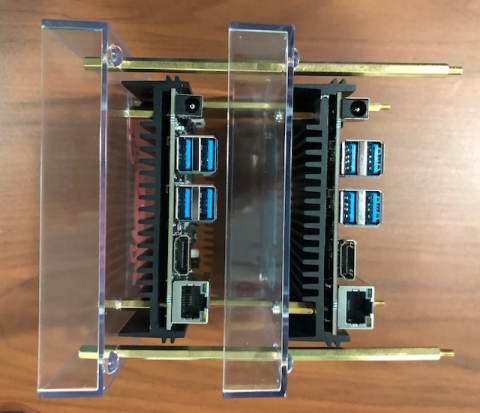
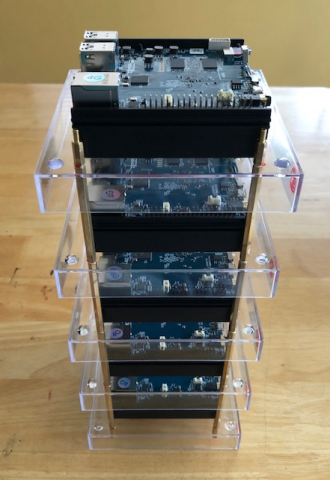
This is for only one of the units that will be at the base of the stack. Stack the next plastic tray with the SBC from Figure 3 on top of the unit from Figure 4 and screw them on top with the 60mm M3 brass spacers as shown in the illustration below:
Do the same for the remaining units. For the topmost tray, secure with the 12mm M3 spacers.
Next, download the latest stable release of Ubuntu MATE Linux operating system, based on Ubuntu Bionic 18.04, as shown in the illustration below:

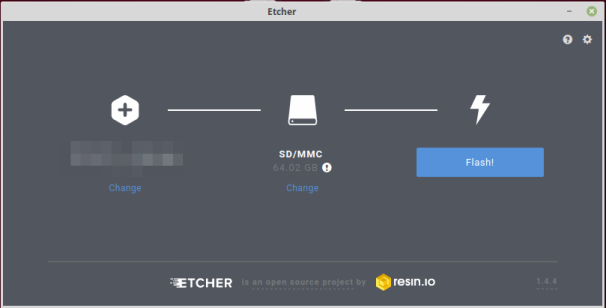
At the time of this writing, the most recent version of Ubuntu MATE was 20190325. Download the latest stable release of Etcher. This tool will be used to burn the operating system image onto each of the microSDXC cards. Insert a microSDXC card into the sd card reader, launch Etcher, select the Ubuntu MATE image. Then press the Flash! button to burn the image onto the microSDXC card as shown in the illustration below:
Insert each of the flashed microSDXC cards into the ODROID-N2 SD card slot and ensure the toggle switch on the ODROID-N2 is positioned at MMC instead of SPI as shown in the following figure:

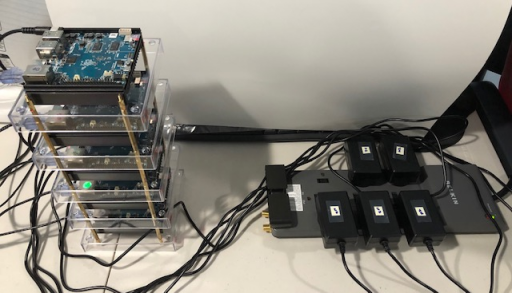
The final stage is to prepare each of the ODROID-N2 nodes for operation. Note, we want to connect, power-up, and setup each of the ODROID-N2 boards, one at a time. Attach the barrel end of the power adapter to the power slot on ODROID-N2 and plug the other end to the power strip. Similarly, attached one of the Ethernet cables to the RJ45 slot on ODROID-N2 and the other end to the Ethernet Switch as shown in the illustration below:
Connect an HDMI monitor to the ODROID-N2 using HDMI and power up the power strip. The ODROID-N2 should take a few seconds to boot up and after a few seconds would completely power-off. This is the normal behavior. Turn off the power strip and turn it back on. In a few seconds, we will be presented with the Ubuntu MATE desktop. The default user-id is odroid and the default password is odroid.
Change the default password to a stronger and more secure password by clicking on the Ubuntu menu on the top-left corner and choosing Control Center from the drop-down. On the Control Center screen, click on Users and Groups icon to change the default user password.
Change the default date/time/timezone to the desired value by clicking on the Ubuntu menu on the top-left corner and choosing Control Center from the drop-down. On the Control Center screen, click on Time and Date icon to change the date/time/timezone.
Open a terminal window by clicking on the Ubuntu menu top-left corner and selecting System Tools -> MATE Terminal from the drop-down. In the terminal window, execute the following command:
$ sudo pluma /etc/ssh/sshd_configChange the value of PermitRootLogin from yes to no. Save the changes and exit the editor.
We need to assign a unique host-name for each of the ODROID-N2 boards in the cluster. In the same terminal window, execute the following command:
$ sudo pluma /etc/hostnameChange the host-name to, say, my-n2-1. Save the changes and exit the editor. For each of the remaining 4 cards we will assign the host-names from my-n2-2 through my-n2-5.
We also need to assign a static IP address to each of the ODROID-N2 boards in the cluster. Click on the Ubuntu menu on the top-left corner and choose Control Center from the drop-down. On the Control Center screen, click on Network Connections icon. Choose Wired connection 1 from the menu list and click on the edit icon at the bottom left corner (gear wheel icon). Select the tab labeled IPv4 Settings. Choose the value of Manual for the Method. Set the ip address to, say, 192.168.1.51, network to 255.255.255.0, and the gateway to 192.168.1.1. Finally, set the value for DNS Servers to 8.8.8.8,8.8.4.4. Save the changes by clicking on the Save button. For each of the remaining 4 cards, we will assign the static IP addresses from 192.168.1.52 through 192.168.1.55.
Finally, we need to perform a system update to ensure we have the latest software updates. Click on the Ubuntu menu on the top-left corner and choose Control Center from the drop-down. On the Control Center screen, click on Software Updater icon to perform the system update.
The last step is to perform a reboot for all of the changes to take effect. In the terminal window, execute the following command:
$ rebootThis will safely reboot the ODROID-N2 device.
Perform the above steps for each of the remaining ODROID-N2 devices. Note that as we reboot each of the remaining ODROID-N2 cards, they each will get a different ip address assigned. At this point, we should have our ODROID-N2 cluster ready for action. For comments, questions and suggestions, please visit the original article at https://www.polarsparc.com/xhtml/N2-Cluster.html.
Be the first to comment