

BitTorrent provides a means of crowd-sharing files; peer-to-peer via “torrent” files. At its heart, BitTorrent allows distributed hosting and sharing of files in such a way that the original uploader doesn’t have to provide all the bandwidth or storage space for people to be able to download the file. This is particularly helpful for open source developers because it allows them to distribute rather large project files with very little overhead--both in server resources and monetary cost. BitTorrent also has the effect of providing end users with faster downloads (once there are a number of seeds), since they will receive multiple pieces--chunks--from several sources simultaneously. These chunks are then reassembled into the original file on the user’s BitTorrent client. But BitTorrent has been given a bad rap: because it is a wonderful technology for distributing large files, it didn’t take long for software and video pirates to begin using it for the illegal distribution of copyrighted material.
Mainstream media tends to misreport on technology: the Internet just turned 30 years old* by the way. Misconception stems from a misrepresentation of technology when people who don’t really understand it are the ones explaining it. Think of the way Bitcoin or Blockchain are handled by network newscasts, or perhaps how Kodi has been blacklisted on some devices as a result of poor wording in journalism. In the eyes of the well-meaning readers and viewers, Bitcoin becomes a tool of ransomware attackers, the Blockchain; a mysterious digital realm where hackers of the future will do their bidding. Kodi is seen as an illegal streaming video platform and BitTorrent is where you’ll find illegal downloads. These wonderful tools get painted in a bad light making the average person afraid to use them. So BitTorrent itself has taken on an aura of being illicit to users who do not understand how it works.
When you download a file with BitTorrent, such as a Linux distro IMG or ISO, you can choose to leave it in your BitTorrent server. This makes your copy of the file a “seed,” which means other people can download chunks of the file from you with their own BitTorrent client for as long as you decide to seed the file. A file with many seeds will download very quickly and distribute the bandwidth usage across the network. It’s a subtle, but meaningful way to anonymously give back to a beloved Linux distribution because you are in essence donating download bandwidth to future downloaders. Ubuntu is officially available via BitTorrent, as are many other Linux distros including my own project, NEMS Linux. BitTorrent is beneficial all around: For me as the downloader wanting to get my IMG files quickly, and to the next user wanting to do the same. BitTorrent reduces the cost of distribution to the distro developer and gives me a small way to “give back” by providing a seed. It also ensures optimal uptime for downloads since if one seed goes offline, the others will pick up the slack seamlessly.
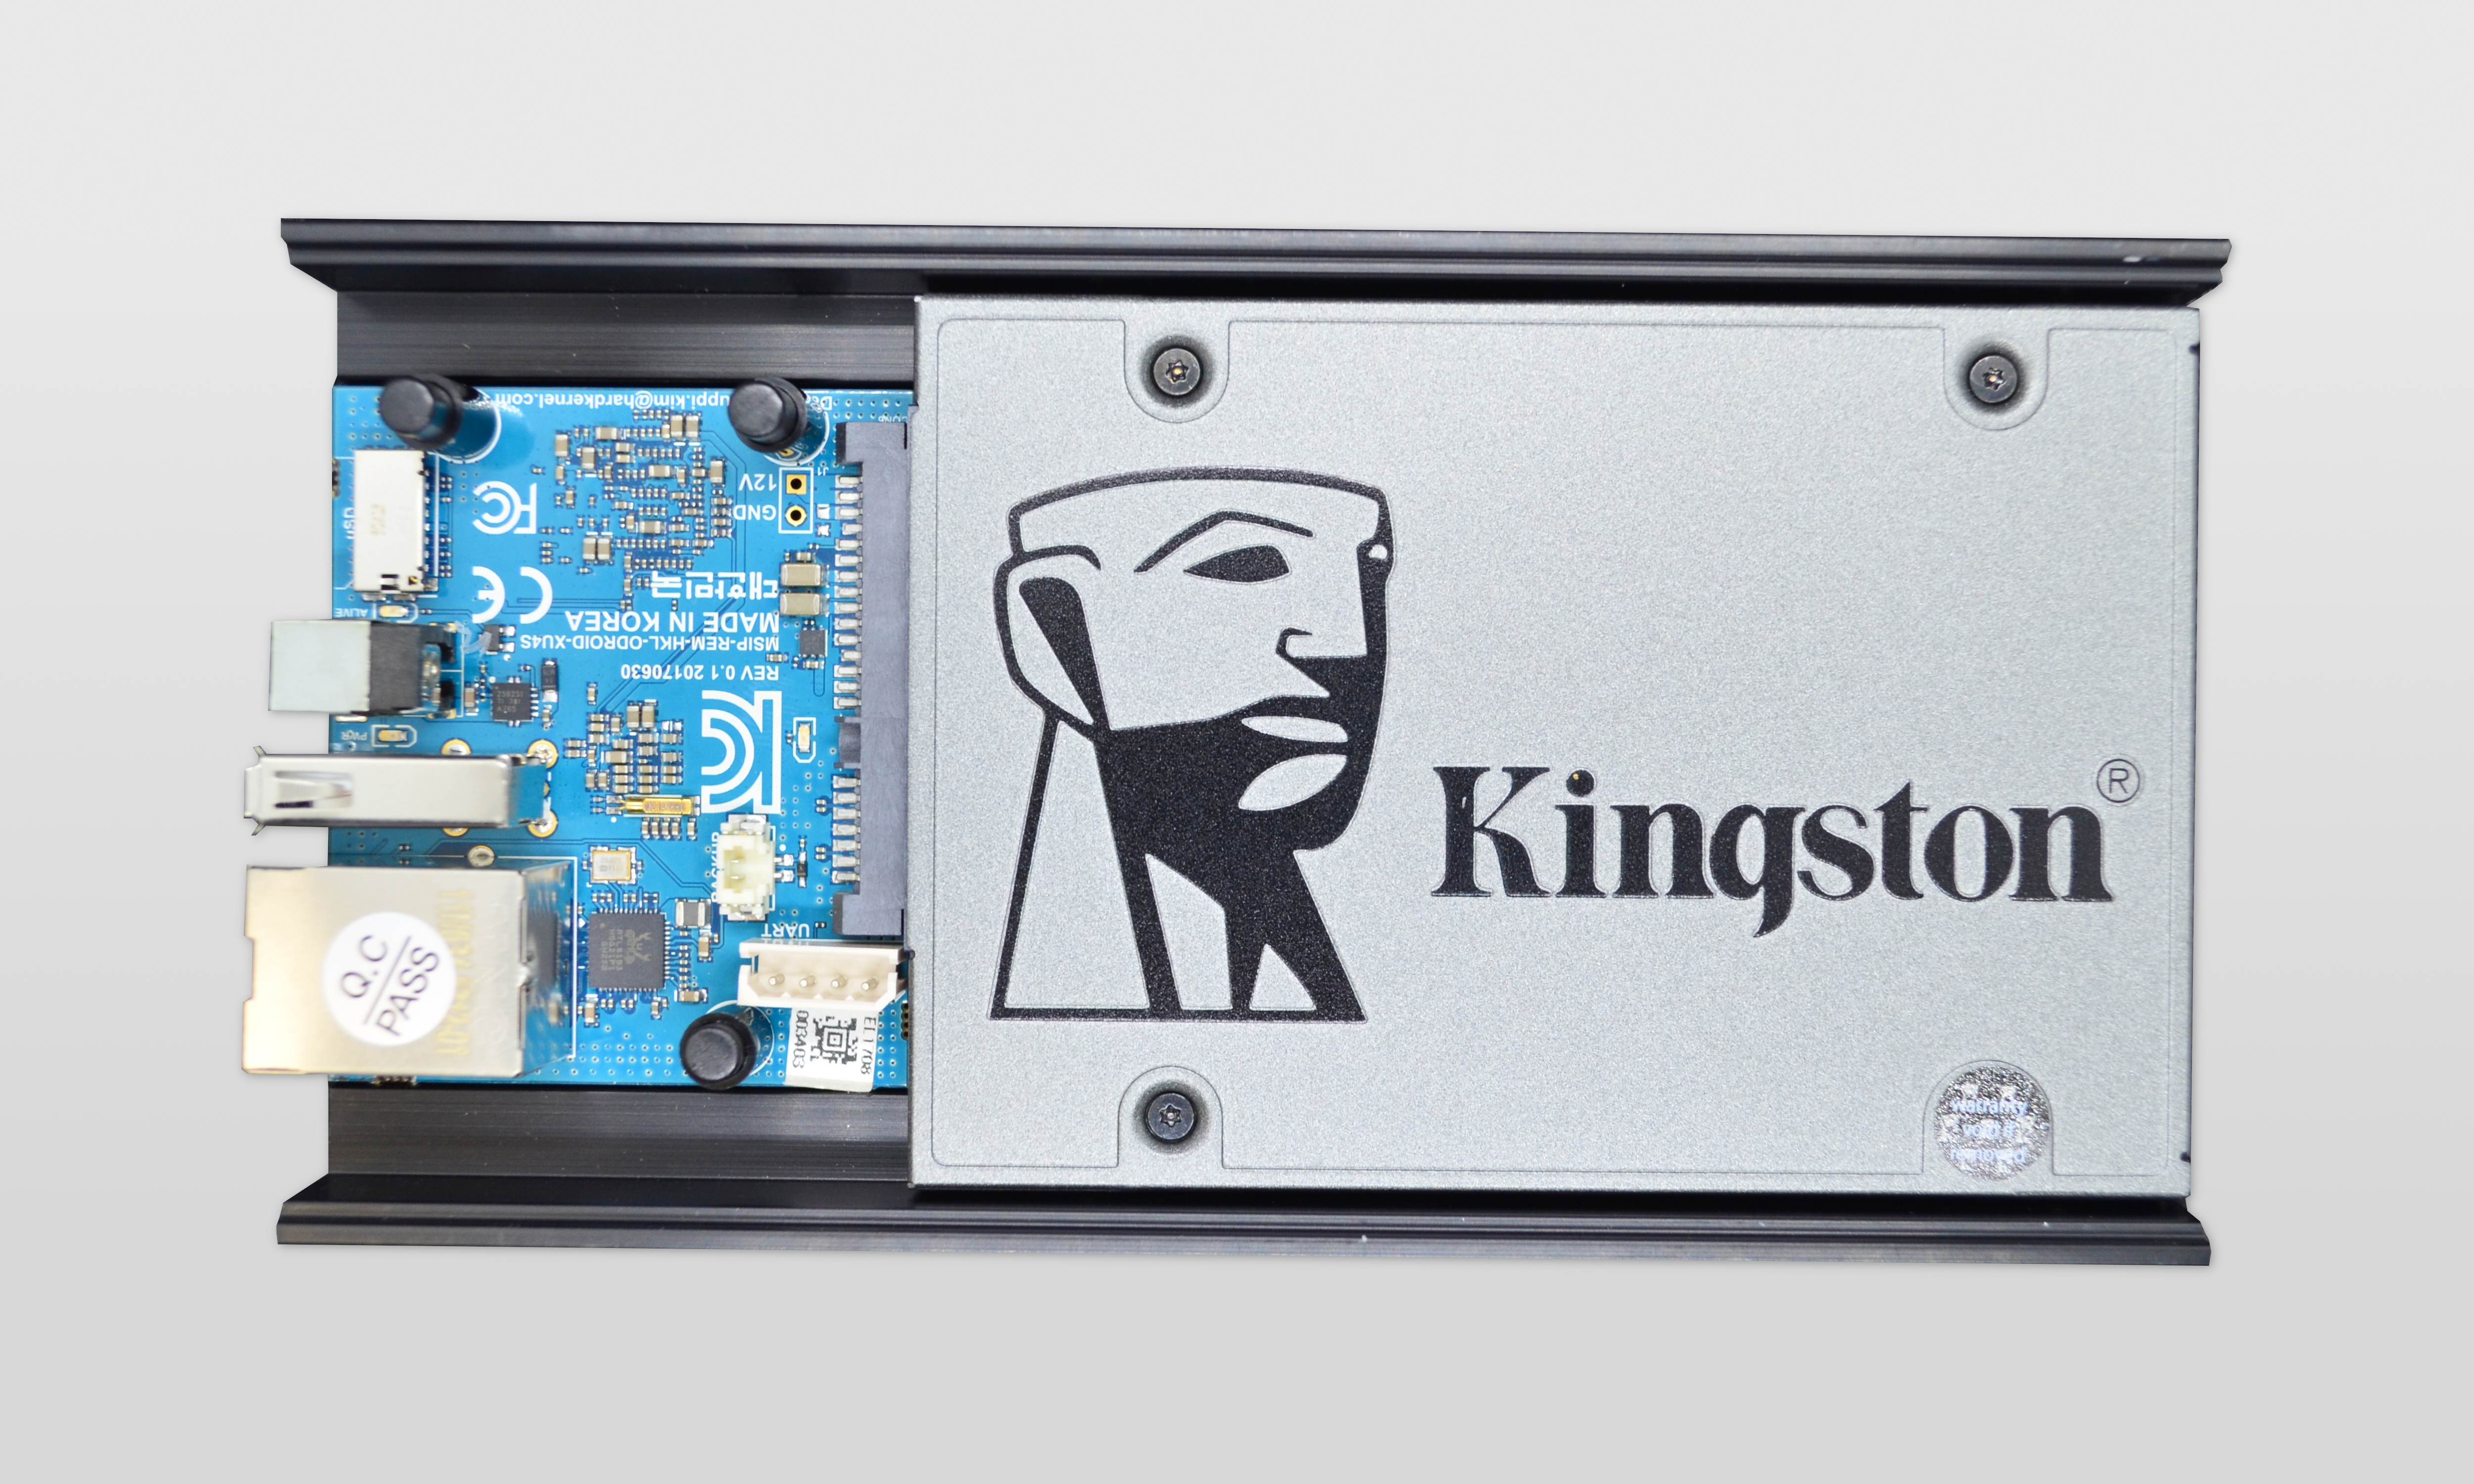
While you may install a BitTorrent client such as Transmission or Deluge on your computer, in order to remain seeding torrents you would need to keep that software running at all times. If you’re like me, you’d prefer a dedicated solution; something that doesn’t use a lot of electricity, but has the storage space and power to do a great job of downloading and seeding torrents 24/7 without having to leave anything running on the computer. This is where the ODROID-HC1 or ODROID-HC2 come in. These two offerings from Hardkernel are essentially an ODROID-XU4 SOC built into a nice home NAS box. You can think of them like a Linux-powered 8-core dedicated computer with 2 GB RAM and a single hard drive. There’s no video output, so it’s ideal for an always-on headless Debian server. Personally, I’ll be using an ODROID-HC1 because I want to use a SSD and make this tiny server entirely solid-state. If you’d prefer to use a 3.5” spinning drive you can opt for the ODROID-HC2, and follow the same directions below. Choose which model you’d like to go with based on the type of storage you’ll be using.
What you’ll need:
- ODROID-HC1
- Appropriate power Supply (e.g., 5V 4A barrel plug for HC1)
- Case for ODROID-HC1
- MicroSD Card for Operating System and Software
- 2.5” SSD Drive for Torrent Storage
- Optional: RTC Battery
Step 1: Download my Debian Buster base image and flash it to your MicroSD card. You’ll find this at https://baldnerd.com/sbc-build-base/
Step 2: Install your SSD into the HC1 chassis and add the case. Insert the MicroSD card and Ethernet cable and boot it up.
Step 3: Find the IP address of your device by checking your network’s DHCP pool. SSH to it using the default username/password: baldnerd/baldnerd Become root by typing: sudo su
Step 4: Check your date/time with the date command. If your date/time are incorrect, certificates will be rejected, which will mean apt will not work, and you’ll have all kinds of problems. So, first things first: you must check to ensure your date and time are correct. If incorrect, set it using the command generated by this helpful tool: https://baldnerd.com/nerdgasms/linuxdate/
And since the ODROID-HC1 has a realtime clock, I’d suggest adding a RTC battery. This will prevent hiccups if your HC1 is ever without power for an extended time, which would reset the system clock to November 2016.
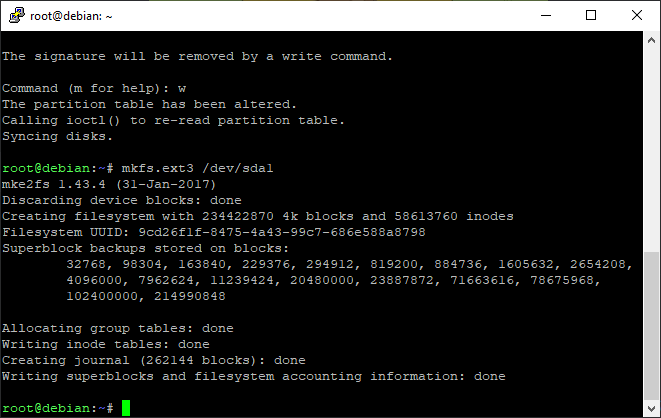
Step 5: Your SSD is located at /dev/sda. I recommend you partition the drive first so it is just one partition using the whole drive. To do this, type the following commands to remove the existing partition(s) and create a new one, keeping in mind this will wipe the drive contents, so if this is not a new drive, please backup your files first:
fdisk /dev/sda
d [enter] If there is more than one partition, delete each
n [enter x 5]
If asked “Do you want to remove the signature?” answer: y [enter]
w [enter]
Step 6: Format your new partition: mkfs.ext3 /dev/sda1
Step 7: Create a new Linux user. For this example I will create “robbie” - replace robbie with your own username:
useradd -m robbie
usermod -aG sudo robbie
passwd robbie
Step 8: Create a folder where we’ll mount the SSD within that user’s home folder and make it immutable. I’ll call it “ssd”: mkdir /home/robbie/ssd && chattr +i /home/robbie/ssd
Step 9: You could have noted this in Step 6 after formatting the partition, but for good measure we’ll find the UUID with this command: blkid /dev/sda1

D)
Step 10: Make the SSD automatically mount on boot:
nano /etc/fstab [enter]
Add this line to the end of the file, replacing 3333… with your actual UUID from Step 9 and robbie with your actual username from Step 7:
UUID=33333-33333-33333-33333 /home/robbie/ssd ext3 errors=remount-ro,noatime,discard 0 1
Press CTRL-O, [Enter] to save.
Press CTRL-X to exit.
Step 11: Test to make sure the SSD drive mounts successfully:
mount -a [enter]
mount | grep sda1 [enter]
If the drive has successfully mounted, you should see something like this:
root@debian-stretch:~# mount | grep sda1
/dev/sda1 on /home/robbie/ssd type ext3 (rw,noatime,discard,errors=remount-ro,stripe=8191,data=ordered)

If it was not successful, be sure to fix or remove the line from /etc/fstab before you next reboot, otherwise you may not be able to boot the system.
Step 12: Now we are ready to setup the BitTorrent server. I’ll use the headless Transmission Daemon, which is available in the repositories:
apt update && apt install transmission-daemonStep 13: Create a folder on the SSD to store downloads and give it the correct permissions:
mkdir /home/robbie/ssd/torrents
chown -R debian-transmission:debian-transmission /home/robbie/ssd/torrents/
Step 14: It’s time to stop Transmission so we can edit the config. If you forget to stop the daemon, your changes will not save: systemctl stop transmission-daemon
Step 15: Modify the configuration file.
Open the config file for editing: nano /etc/transmission-daemon/settings.json
Change the value of download-dir to /home/robbie/ssd/torrents
Since our BitTorrent server will be accessible on our LAN only (not opening it up for remote access), we can turn off IP whitelisting. Change rpc-whitelist-enabled to false
Save your config by pressing CTRL-O [Enter], followed by CTRL-X to exit.
Step 16: Start Transmission once again: systemctl start transmission-daemon
Step 17: Reboot your new server by simply typing: reboot
![]()
That’s it! We’re up and running. If all went well, you’ll be able to open the web interface by visiting http://ip:9091 from your computer, where ip is the actual IP of your new BitTorrent server. The default web interface username is transmission, and the password is also transmission. You can change this by stopping the daemon as you did in Step 14, editing the values within the config file before restarting the daemon.
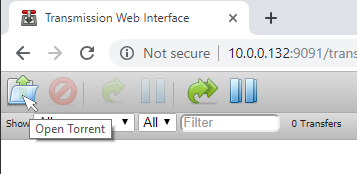
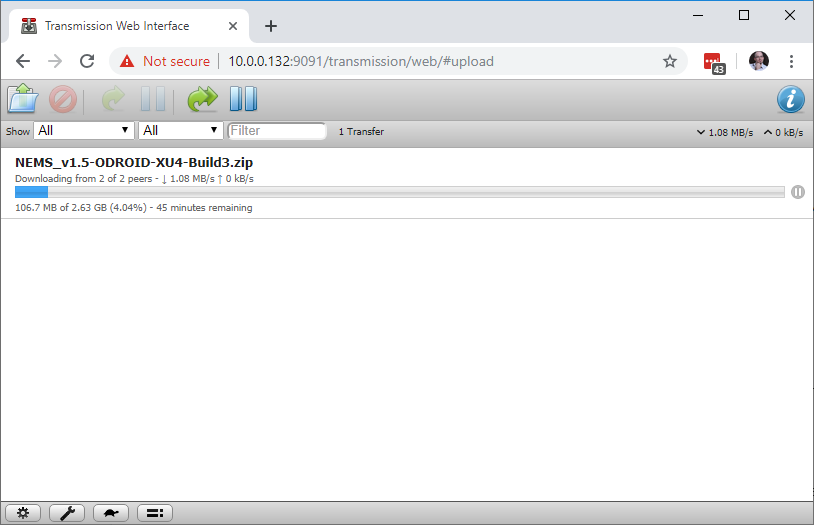
You can begin using your new ODROID-HC1 BitTorrent Seed Server. Within the web interface, press the “Open Torrent” icon in the top left.
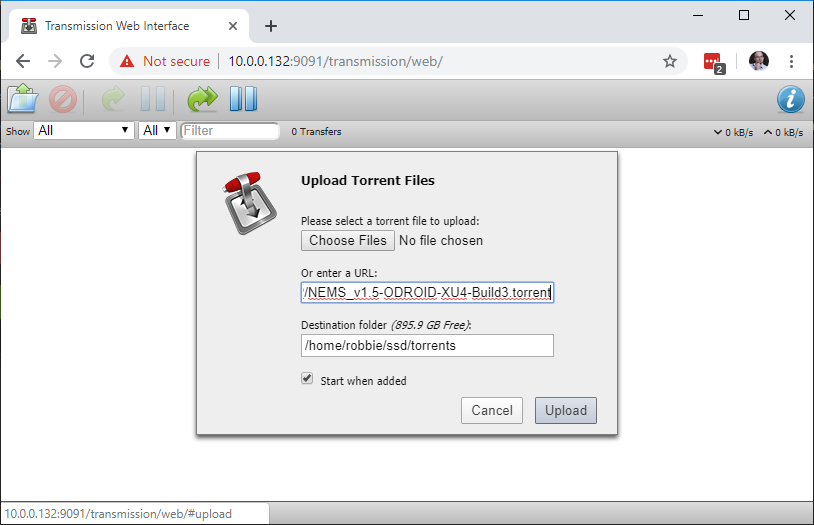
Add the URL to the torrent file you wish to upload, or upload the .torrent file if you have it stored locally. If you’d like to test with the NEMS Linux torrent, please visit https://nemslinux.com/download/nagios-for-odroid.php and copy the link to any of the .torrent files. When the torrent begins downloading, it will be saved to /home/robbie/ssd/torrents, which is your /dev/sda1 partition on your SSD / HDD.
One final thought: Even though your new ODROID-HC1 BitTorrent Seed Server will only be visible to your internal LAN devices, it is never a good idea to have a system online using the default passwords. Reboot your server, and then login over SSH using the username and password you created in Step 7. If you’re able to login okay, delete the default user: userdel -f -r baldnerd
In next month’s issue of ODROID Magazine, we’ll take the next step together and learn to add and configure network file sharing so we can open our downloaded files directly from a computer on our network.
Footnote
* The Internet is 50 years old, having been invented 1969. It is the World Wide Web however which recently celebrated its 30th birthday. Some mainstream news outlets are reported to have confused the Internet with the World Wide Web, claiming the Internet is just 30 years old. To their credit, the word “Internet” has mistakenly been used synonymously with “World Wide Web” in modern vernacular. However they are two distinct services.
About the Author
Robbie Ferguson is the host of Category5 Technology TV and creator of NEMS Linux. His TV show is found at https://category5.tv/ and his blog is https://baldnerd.com/
Be the first to comment