

Productivity is key. One of the reasons people work on the command line with BASH, despite all the fancy graphic options even for SBCs like our ODROIDs, is that you can get your task done faster, and with options for automation.
Productivity with BASH
Miscellaneous BASH stuff
Ctrl-t for typos swaps the letter under the cursor with the one before and moves cursor forward if possible, or uses the two previous characters if at the end of the line. We have already learned a lot of shortcuts during the last parts. One more important help, besides the well-known sudo !! to prefix the last command with sudo, is to use !$ as argument to pull in the last command’s argument. Let’s assume we want to list a certain file to look at the size:
$ ls -l /path/to/filewithlongname/suspiciousbigfileIf you decide that you want to get rid of the file, you don’t need to retype everything, you can just use !$ in combination with rm:
$rm !$If you use Alt-. instead of !$, you can even select which arguments from the last command you want to reuse by typing it multiple times. It cycles through the last arguments of previous commands similar to Ctrl-R when you search your BASH history - you stop at the entry you want to use.
While we are on the subject of the BASH history: The next one, Alt-#, is a shortcut for “abandon this line but keep it in history”. It adds a # to the start of the line, turning it into a comment. Easy to find with the Ctrl-r reverse search, since you don’t use # often in the terminal. You can also make a note of something while you are in a shell. Just type it in and Alt-#, and it is in your history. This is also great for making an explanation for a very complicated command. Start a complex command and save it temporarily with Alt-#, then stop halfway, maybe look something up. Then retrieve the line from history with the UP key or Ctrl-r and finish the command by jumping to the beginning with Ctrl-a, followed by Del.
One small downside is that command completion does not work on lines starting with a # (unless it is part of a pipe - anything after | works as expected) - Path and filename completion however do work.
Saving a custom BASH history fileNow, after having learned so much about BASH, there are surely things which stand out for you, and after trying certain one-liners, you want to make sure that they are permanently kept in your reference files.
But when working on something, you want to stay focused and not switch over to a text editor to save the highlights of your work. To complete the method for having your own BASH snippets saved in annotated form, open your ~/.bashrc file with your preferred text editor and add a function at the end of it:
Append last history entry to filefunction hsave() { history -p '!!' >> ~/bak/savedbashlines ; } Now you can run a complex command, and afterwards enter hsave to save it in your file in ~/bak/savedbashlines. Write an explanation for it in the command line, do Alt-t hsave to save it, run hsave again.
For example, consider a command like the following:
$ du -a /path/to/directory | sort -n -r | head -n 25 | awk '{$1=""}1' | $ awk '{$1=$1}1' | sed '1d' | sed 's/^.\{1,\}$/"&"/'
It gives you a list of the 25 biggest directories in this path, encapsulated in quotes, and it is very convenient not to have to reinvent the wheel every time, or think about what this does.
Backup to remote system / working with spaces in pathsWhat is the use of a list of the biggest directories? One could direct this list into a file with > biggies.txt appended to the command and copy the directories to another storage place with less limitations than a single-board computer.
For full backups, there’s the excellent Odroid-Backup tool, but very often, we want only part of the system backed up. The usual tool for this is rsync. In a nutshell, you can use the following command to make a backup of a directory and its contents to a remote computer:
`rsync -avr /path/to/local/directory user@remotepc.lan:/path/to/backup`Be careful, though, because the addition of a “/” after the directory name with a slash after directory backs up only the contents of directory, not the directory itself:
`rsync -avr /path/to/local/directory/ user@remotepc.lan:/path/to/backup`So far, this is common knowledge. But in real-life applications, the details can be tricky: When your paths contain spaces or brackets, you need to supply quotes for rsync to work. But just one pair of quotes on the local system is not enough! Since you need to prevent the BASH shell from expanding these characters twice, one time on the local and one time on the remote system, it can be very annoying to work around and lead to a lot of hair-tearing if you are in a hurry.
But there is an option which is almost never talked about: Instead of using rsync -avr, use rsync -avrs to make sure that rsync takes care of special characters itself. So, whenever you are working with files with funny names, like audio or video files, you should use the -s switch for rsync to make sure that your names are kept intact. When I found out about this, I was amazed at how much less of a headache it was to avoid issues with spaces on local and remote system.
Plotting in the terminal
Last chapter, we used the script templogger.sh to record temperatures of our system over some time, and log out and back in to the system in the meantime. Wouldn’t it be nice to have an option to watch the temperatures in real time? There’s gnuplot, but this is too complicated for a quick-and-easy plot. I have grown fond of ttyplot, a recent program which didn’t find its way into the distributions yet. The project page is on GitHub.
Download the appropriate version for your system, which in most cases will be ttyplot-arm-linux:
$ wget https://github.com/tenox7/ttyplot/releases/download/1.1/ttyplot-arm-linux
$ sudo mv ttyplot-arm-linux /usr/local/bin/ttyplot
and run it parallel to a demanding task from a second ssh session (Example on XU4, modify for the non-Exynos systems):
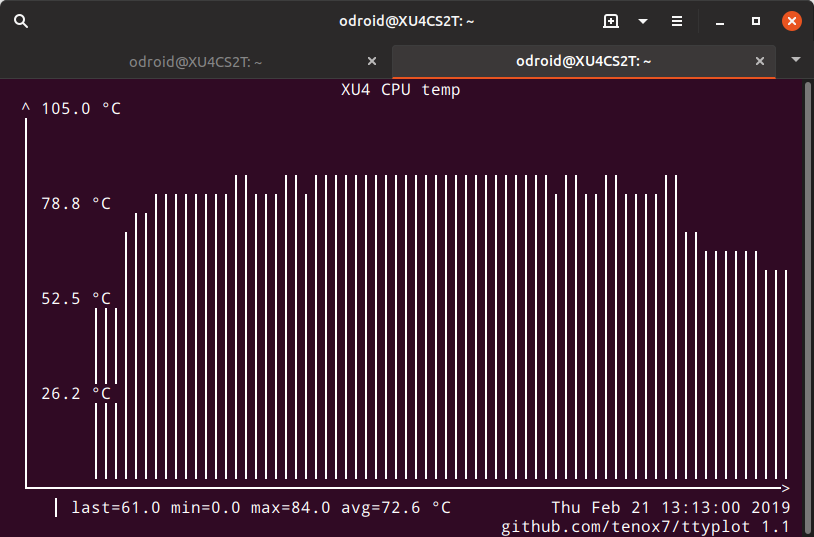
$ { while true; do echo `cat /sys/devices/virtual/thermal/thermal_zone0/temp`/1000 | \
bc; sleep 1; done } | ttyplot -t "XU4 CPU temp" -u "°C" -s 105
For testing your system, you can use stress-ng from the normal distribution. The matrix stressor with 0 as modifier is going to stress all 8 CPU cores with high load:
$ sleep 5; stress-ng --matrix 0 -t 1m --timesOn my system, the plot looks like this:
I also ran, as root, cpufreq can not be read otherwise!
$ { while true; do echo `cat /sys/devices/system/cpu/cpufreq/policy0/cpuinfo_cur_freq`/`cat \
/sys/devices/system/cpu/cpufreq/policy0/cpuinfo_max_freq`*100 | bc; sleep 1; done } | \
ttyplot -t "XU4 CPU freq [%max]" -u "%" -s 105
to make sure that the CPU freq doesn’t drop below 100% of the maximum frequency:
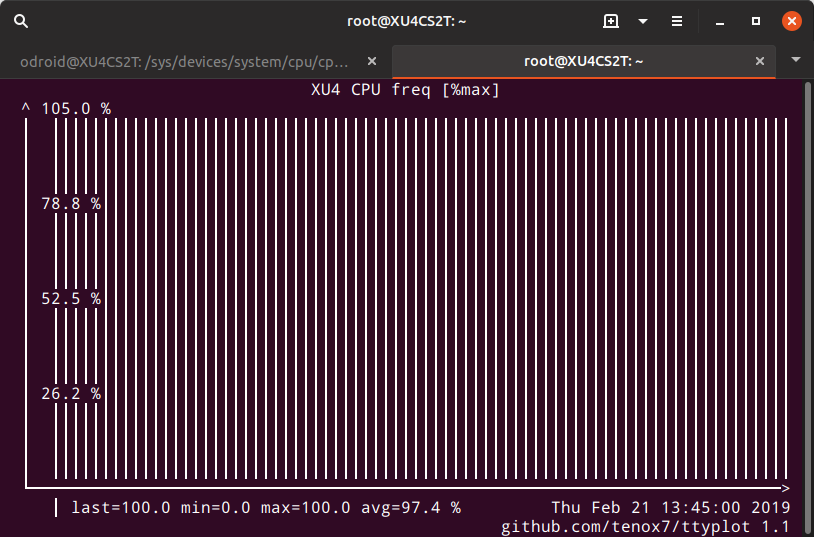
That’s a real-world example; it proves that my XU4 with Cloudshell and modified with a Noctua NF-A4x10 5V fan is sufficient to keep the system cool under load, even with the very small stock cooler.
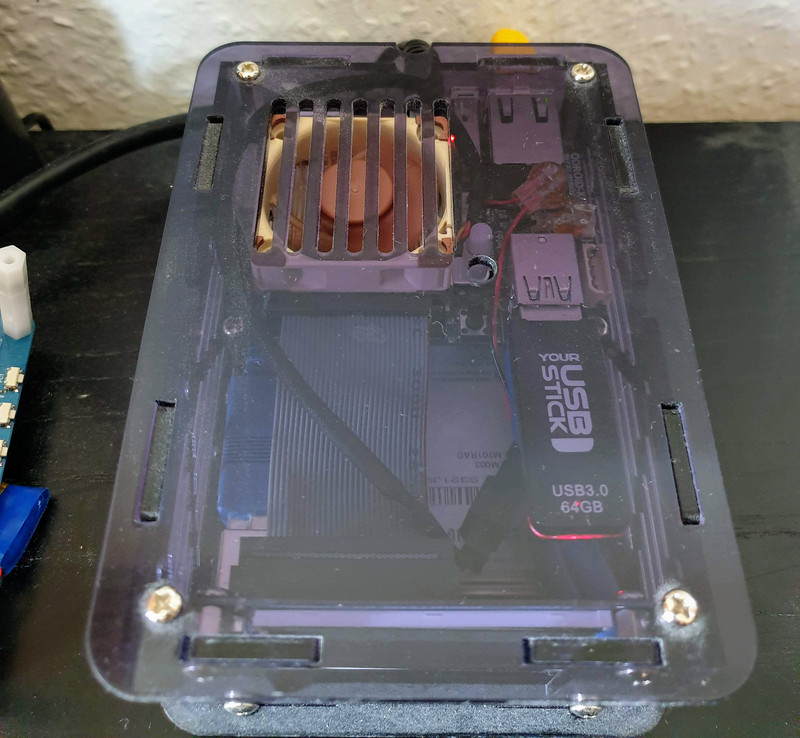
This is a modification I can recommend to all XU4 owners, since the stock fan sounds like an angry bee in a paper bag. Preview of the next part, the quest for productivity and useful one liners continues. Will there ever be an end to it? Let’s find out!
References https://github.com/tenox7/ttyplot https://forum.odroid.com/viewtopic.php?f=52&t=22930
Be the first to comment